1
D3000 SERIES USER MANUAL
D3000 Series
Intruder Alarm Systems
User Manual
Congratulations on purchasing your D3000 Intruder Alarm System. It is a very easy
system to use, all operations start by entering your User Code, then following the
instructions on the display or providing simple keystrokes to tell the system what to do
next.
The D3000 is a flexible, highly configurable piece of equipment, thus the precise operation
will depend on how your Alarm Installation Company has installed it. It is important that
your Installer explains how the system works and the level of access each user has to the
system.
If you have any queries on the configuration or the operation of this Intruder Alarm System,
ring your Alarm Company on the following telephone number:
Alarm Company:
___________________________________________
Telephone:
___________________________________________
Note: This manual covers 2 products, the D3001 and the D3020. Operation of either
system is the same unless otherwise specified in this manual.
Similarly, there are a choice of keypads, the D3201 Multimedia keypad, D3202
Multimedia keypad with proximity reader, D3211 Low cost keypad and D3212 Low
cost keypad with proximity reader.
D3000 Series User Manual
Page 1 of 16
AH 300001-D01 23/03/2005
D3000 SERIES USER MANUAL
CONTENTS
CONTENTS ...................................................................................................................................................2
UNDERSTANDING THE SYSTEM................................................................................................................3
UNDERSTANDING USERS ..........................................................................................................................5
BASIC OPERATIONS ...................................................................................................................................6
SILENCING THE SYSTEM .......................................................................................................................6
SETTING ALL OR PART OF THE SYSTEM .............................................................................................6
UNSETTING THE SYSTEM ......................................................................................................................6
UNSETTING THE SYSTEM AFTER AN ALARM CONDITION .................................................................6
RESETTING THE SYSTEM AFTER AN ALARM.......................................................................................7
SETTING THE SYSTEM WITH ZONES OMITTED ...................................................................................7
PERSONAL ATTACK (PA)........................................................................................................................7
FIRE ..........................................................................................................................................................7
ADVANCED OPERATIONS..........................................................................................................................8
TESTS.......................................................................................................................................................8
TEST BELL ...........................................................................................................................................8
TEST STROBE .....................................................................................................................................8
WALK TEST..........................................................................................................................................8
TEST RKP LEDs ...................................................................................................................................9
TEST RKP SOUND...............................................................................................................................9
TEST PANEL SOUND ..........................................................................................................................9
VIEW LOG.................................................................................................................................................9
VIEW FULL LOG...................................................................................................................................9
VIEW ALARM LOG ...............................................................................................................................9
VIEW USER LOG..................................................................................................................................9
CHANGE OWN CODE ..............................................................................................................................9
DELETE USER CODES ............................................................................................................................9
DELETE ALL USER CODES ................................................................................................................9
EDIT USERS........................................................................................................................................... 10
ACCESS CONTROL ........................................................................................................................... 10
SMOKE RESET .................................................................................................................................. 10
OMIT ZONES...................................................................................................................................... 10
ARM ONLY ......................................................................................................................................... 10
RESET SYSTEM................................................................................................................................. 10
SET DATE AND TIME ............................................................................................................................. 12
REMOTE ACCESS ................................................................................................................................. 12
APPENDIX A – ENTERING TEXT VIA THE KEYPAD................................................................................ 13
APPENDIX B - USER MENUS .................................................................................................................... 14
APPENDIX C - GLOSSARY........................................................................................................................ 15
D3000 Series User Manual
Page 2 of 16
AH 300001-D01 23/03/2005
D3000 SERIES USER MANUAL
UNDERSTANDING THE SYSTEM
Before using the system for the first time, please read the first few sections of this manual
as well as the Glossary at the back to make sure that you are happy with all the
terminology used.
Within this manual, keys which need to be pressed are show thus [OK]. Messages shown
on the display are shown in quote marks “like this”.
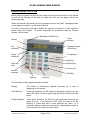
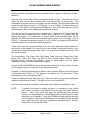
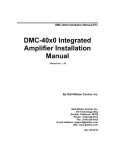
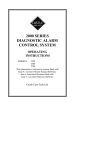
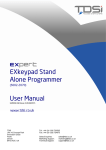
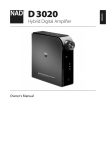
The main control panel (the brains behind the system) is housed in a plain metal box
hidden away from danger. All system operations are performed using the ‘Remote
Keypad’, shown below:
Microphone (D320x only)
Display
Power
Indicator
Set
Indicators
Proximity Reader
(D32x2only)
Ready
Indicators
Loudspeaker
[Up] Key
Quick Set
Keys
[Down] Key
[menu] Key
Numeric
keyboard
[OK] Key
[flip] Key
[esc] Key
The main parts of the keypad are used as follows:
Display:
This screen is continuously updated, informing you of what is
happening on the system.
Set Indicators:
These red indicators are ON when the appropriate Group(s) are set
and is OFF when it is safe to go into that part of the building. See Note
below.
Ready Indicators:
These green indicators are ON when the appropriate Group(s) are
ready to be set. If the indicator is OFF when you want to set the
Group(s), it means that one or more detectors are ‘active’ i.e. a
movement detector needs more time before it automatically resets, or
a door needs to be closed. See Note below.
D3000 Series User Manual
Page 3 of 16
AH 300001-D01 23/03/2005
D3000 SERIES USER MANUAL
Quick Set Keys:
These are used to Set and Unset Groups.
Numeric Keys:
Used to enter your User Code, or to enter other information when
requested by the system.
[flip] Key:
Used to show different parts of displayed information (i.e. ‘flip’
between multiple screens)
[esc] Key:
Used when you have made a mistake or when you need to move back
to a previous screen.
[OK] Key:
Used to enter information into the system, e.g. after entering your
User Code, press [OK] to accept it.
[menu] Key:
After entering your User Code, the [menu] key is used to start the
advanced options, such as system tests.
[Up] Key:
Used to move up through a series of options.
[Down] Key:
Used to move down through a series of options.
Loudspeaker:
Provides tones to indicate entry mode, exit mode etc.
Power LED:
Normally ON showing that power to the system is OK. This indicator
will flash if the Mains is off, or if there is a problem with the internal
battery. When this indicator is flashing, the display will show details of
the problem.
Microphone:
Used for the Intercom and the Helpline features. These features are
only available if the D320x keypad is used.
Proximity Reader:
This feature is useful if users find it difficult to remember codes when
setting and unsetting the system. By giving the user a tag which can
be clipped to a key ring, it is possible to set and unset the system
merely buy placing the tag against the keypad.
Note 1:
The system may be programmed to extinguish the Set and Ready
Indicators after 30 seconds. To make them operate for 3 minutes,
press the [esc] key.
Note 2:
The display of time is in 24 hour format (e.g. 16:55 for 4:55 pm).
If a “?” is displayed (e.g. 16?55) then the time may not be correct and
requires setting.
D3000 Series User Manual
Page 4 of 16
AH 300001-D01 23/03/2005
D3000 SERIES USER MANUAL
UNDERSTANDING USERS
The D3001 can identify up to 64 Users (20 users on the D3020), each having a unique
User Code. Each User can be allocated different levels of access to system functions.
This enables some Users to have a ‘Manager’ Code and to have access to the
management features. In this way, ‘Operator’ and ‘Cleaner’ Codes can also be
programmed.
When programming users to the system, the following information is required:
User Number:
A two digit reference number used internally to identify which User is
using the system.
User Name:
A text name to identify each User.
User Code:
The code that is used to confirm that the person at the keypad is an
authorised User
User Functions:
These define whether an individual User has access to specific
functions within the User’s menu.
Tag:
If the user is to be given a tag to set and unset the system, the tag
must be programmed against the appropriate user.
As an example, User 14 (the User Number) is called Sue (the User Name) with a code of
6210 (the User Code) and she can Set and Unset the system and change her own Code
(the User Functions)
User 1 is a special user that ALWAYS has access to ALL function. It is strongly
recommended that User 1 is not used for day to day functions (e.g. setting the
system), but is reserved for management functions (e.g. reviewing the log).
D3000 Series User Manual
Page 5 of 16
AH 300001-D01 23/03/2005
D3000 SERIES USER MANUAL
BASIC OPERATIONS
There are four green indicators above the ‘Quick Set’ Keys ([A], [B], [C] and [D]) to indicate
whether the system is ready to Set. Your Installer will explain which of these indicators are
applicable to your system.
SILENCING THE SYSTEM
If the system is emitting an alarm tone, it is possible to silence it by entering your User
Code followed by the [OK] key OR presenting your tag at a keypad. The display will show
the source of the alarm (e.g. which door has been opened). Rectify the problem, or
contact your Alarm Company for further advice.
SETTING ALL OR PART OF THE SYSTEM
Press the [Esc] key and confirm that the Green indicators for the Quick Set keys to be Set
are all on. If they are not, that part of the system is not ready to Set, so wait a few
seconds. If they don’t light, check that all doors are closed.
To Set all of the system, enter your User Code followed by the [OK] key or place the tag
against the keypad.
OR…
To Quick Set one or more Groups, enter your User Code followed by the appropriate
Quick Set Key.
OR…
To set one or more Groups individually, enter your User Code followed by the [Menu] key
then the [OK] key. The display will now show the status of Groups 1 to 10 (Groups 1 to 4
on the D3020). An ‘s’ under the Group number indicates that the Group is set, and a ‘u’
indicates that it is unset. Press the numeric key for the appropriate group to change the ‘u’
to ‘s’. To see the status of Groups 11 to 20 (D3001 only), press the [Down] key. When all
the desired groups show ‘s’, press [OK] to start the setting sequence. The continual tone
then indicates that the system is in Exit Mode.
Leave through the Exit Route and ensure that all doors are secured behind you. When
you hear the characteristic three beeps, the system is Set.
UNSETTING THE SYSTEM
Always enter the building via the correct Entry Route to avoid setting off the alarm. The
intermittent tone indicates that the system is in Entry Mode. Go straight to the Keypad and
enter your User Code followed by the [OK] key or place the tag against the keypad to
Unset all of the system. Alternatively, enter your User Code followed by a Quick Set Key
([A], [B], [C] or [D]) to Unset specific Group(s). The red indicators above these keys will go
out showing that the appropriate Group(s) have Unset.
• If you proceed into the building without Unsetting the correct Groups, you will set off
the alarm !
UNSETTING THE SYSTEM AFTER AN ALARM CONDITION
Always enter the building via the correct Entry Route to avoid setting off the alarm. Your
Alarm Company may have adjusted your system to start the internal sounders or to use
the intermittent tone to indicate that the system is in Entry Mode. The internal sounders will
alert you to an alarm occurring during the previous Set period.
D3000 Series User Manual
Page 6 of 16
AH 300001-D01 23/03/2005
D3000 SERIES USER MANUAL
Go straight to the Keypad and enter your User Code followed by the [OK] key or place the
tag against the keypad to Unset all of the system. Alternatively, enter your User Code
followed by the appropriate Quick Set Key ([A], [B], [C] or [D]) to Unset specific Group(s).
The red indicators above these keys go out showing that the appropriate Groups have
unset, but the green indicators will not light for the Group which caused the alarm
condition. The display will show details of where the alarm occurred.
• If you go into the main building without entering your User Code, you will set off the
alarm !
RESETTING THE SYSTEM AFTER AN ALARM
Enter your User Code followed by the [OK] key and follow the instructions shown on the
display. If the display returns to the normal Unset message, then no further action is
necessary.
The following features may not be enabled for your system.
Please consult your Alarm Company for further information.
SETTING THE SYSTEM WITH ZONES OMITTED
Enter your User Code followed by the [menu] key (it is not possible to use tags for this).
The display will now show “Set or Unset Groups”, press [OK] and the display will indicate
which Groups can be Set, select all or some of the Groups as required.
Note: “u” and “s” on the display shows that the Group is Unset or Set; “U” or “S” indicates
that you are about to change the Group to Unset or Set. Press [OK] to continue.
The display will now show the Zone reference for the first zone that can be omitted. Move
up and down through all the omitable Zones using the [UP] and [DOWN] keys, pressing
the [0] key to omit it or the [1] key to activate it. Press [OK] to start the setting mode.
PERSONAL ATTACK (PA)
Press a PA button to set off the alarm.
Enter your User Code followed by [OK] to silence the alarm. The display will show the
Zone that generated the alarm.
To reset the alarm condition, re-enter your User Code followed by [OK].
FIRE
If a smoke detector activates, the alarm will sound with a different tone to normal.
Enter your User Code followed by [OK] to silence the alarm. The display will show the
Zone that generated the alarm.
To reset the alarm condition, re-enter your User Code followed by [OK]
D3000 Series User Manual
Page 7 of 16
AH 300001-D01 23/03/2005
D3000 SERIES USER MANUAL
ADVANCED OPERATIONS
You may be authorised to perform certain advanced operations on your alarm system,
check with your Alarm Company for further details.
To start the advanced operations, enter your User Code followed by the [menu] key. The
display will then show the operations you have been given access to. To move through
the options, press the [UP] and [DOWN] keys until you see the option you want, then press
[OK]
SET OR UNSET GROUPS
This option is used to control individual groups. Press [OK] and the display will show the
status of Groups 1 to 10 (Groups 1 to 4 on the D3020). An ‘s’ under the Group number
indicates that the Group is set, and a ‘u’ indicates that it is unset. Press the numeric key
for the appropriate group to change the ‘u’ to ‘s’. To see the status of Groups 11 to 20
(D3001 only), press the [DOWN] key. When all the desired groups show ‘s’, press [OK] to
start the setting sequence. The continual tone then indicates that the system is in Exit
Mode
OMIT 24Hr ZONES
If the system has omittable 24 hour zones (usually fire doors), these can be controlled
using this option. Press [OK] and the display will indicate the first zone which could be
omitted. Press [0] to omit the zone, or [1] to reinstate it. Press the [DOWN] key to move to
the next zone. When finished, press [OK] to return to the user menu.
TESTS
Within this option, there are several sub-options as defined below. Press the [UP] and
[DOWN] keys to move between the options, then press [OK] to select the test. Pressing
the [UP] and [DOWN] keys will cycle around the options (i.e. pressing the [DOWN] key
after the last option will then show the first option again)
TEST BELL
Press [OK] to select. The display will read “Bell ON” and the outside sirens or bells
will begin. Press [OK] to end the test.
TEST STROBE
Press [OK] to select. The display will read “Strobe ON” and the flashing lights
outside will begin. Press [OK] to end the test.
WALK TEST
Press [OK] to select the Walk Test option. The display will now cycle through all the
Zones in your areas. As you move around the building, you will hear a tone each
time a detector is operated or a door is opened. If you do not hear this tone, make
a note of the faulty Zone and ring your alarm company for further advice.
When you have finished walking around the building, the display will read “Walk
Test Complete”. If it doesn’t, it means that some Zones did not operate correctly.
Make a note of the Zone names and call your Alarm Company for further advice.
Press the [OK] key to end the test.
D3000 Series User Manual
Page 8 of 16
AH 300001-D01 23/03/2005
D3000 SERIES USER MANUAL
TEST RKP LEDs
Press [OK] to start the test. The display will show which indicator is being tested
and each of the green and red indicators above the Group keys will flash for about 2
seconds. Press [OK] to end the test.
TEST RKP SOUND
Press [OK] to start the test. The display will read “KP Sounder ON” and the keypad
sounder will be heard. Press [OK] to end the test.
TEST PANEL SOUND
Press [OK] to start the test. The display will read “Panel Sounder ON” and the main
sounder inside the building will be heard. Press [OK] to end the test.
VIEW LOG
Press [OK] to view the log. You will then have 3 options as described below:
VIEW FULL LOG
This option allows you to see all entries in the event log.
VIEW ALARM LOG
This option allows you to see the alarm entries in the event log.
VIEW USER LOG
This option allows you to see the entries in the event log relating to user activity.
To view the selected log, press [OK]. You will then be asked to enter a Start Date (i.e. the
date of the oldest event to be viewed), change this if required then press [OK].
You will then be asked to enter an End Date (i.e. the date of the newest event to be
viewed), change this if required then press [OK].
The display will now show each event and the date and time it occurred, starting with the
most recent. Pressing the [flip] key may display additional information for the displayed
event. Use the [UP] and [DOWN] keys to move up and down through the event log.
When you have finished, press the [esc] key.
CHANGE OWN CODE
To change your User Code, press [OK]. The bottom line of the display will then show a
string of stars, showing the number of digits in your existing code (NOTE you are not able
to see what the code is). Enter your new User Code followed by [OK] to overwrite the old
code.
DELETE USER CODES
Before using this feature, ensure that you have a record of all the Users on the system.
Press [OK]:
DELETE ALL USER CODES
Pressing [OK] followed by the [D] key will erase ALL Users from the system, other
than User 1. It is not possible to delete User 1.
D3000 Series User Manual
Page 9 of 16
AH 300001-D01 23/03/2005
D3000 SERIES USER MANUAL
EDIT USERS
Before entering this option, ensure that you have a record of all the Users on the system.
To edit user details, press [OK] when this option is displayed.
-
Use the [UP] and [DOWN] keys to get to the User Number to be edited. Press [OK]
-
The User Code for that User can then be entered (new User) or changed if required
(existing User). If the display shows a string of “*” characters, then a code already
exists. Press [OK] to leave the code unchanged. Alternatively, enter the new User
Code followed by [OK]. {Note; to delete this user, press [C] to clear the code
followed by [OK].}
-
The User Name can then be changed (if required). Press [OK] to leave the User
Name unchanged, or enter a new name as required (use the [UP] and [DOWN]
keys to move around the name, or clear the display with [C]). Press [OK] to accept
the User Name. Refer to Appendix A for text entry using the Keypad.
-
User Attributes can then be changed for this User (if required) as follows: To select
or de-select the attribute, press the [flip] key. A “-” character on the display means
that the relevant attribute is de-selected. Pressing [A] will select all the attributes,
whereas pressing [C] will clear all the attributes. Note: User 1 always has all
attributes selected. This can not be changed.
ACCESS CONTROL
The first “A” on the display indicates that the User Code has no access to setting or
un-setting the system, or to the menus. Entry of a User Code with the Access
Control attribute activates an output, this is usually used for door entry.
SMOKE RESET
An “S” on the display indicates that the User is able to reset smoke detectors
following a fire alarm condition.
OMIT ZONES
An “O” on the display indicates that the User is able to omit some detectors from
being protected when the Group is Set. Zones should be omitted with care, and
only after consultation with your Installer.
•
ARM ONLY
The second “A” on the display indicates that the User is only allowed to Set the
appropriate Groups, this user will NOT be able to Unset Groups.
NOTE: Users with this attribute selected MUST be aware that they cannot unset
Groups otherwise they risk generating false alarms when they enter the building.
RESET SYSTEM
An “R” on the display indicates that the User is authorised to reset the system
following an alarm condition, providing that the system is configured for Customer
Reset. Please contact your Alarm Company for further advice.
D3000 Series User Manual
Page 10 of 16
AH 300001-D01 23/03/2005
D3000 SERIES USER MANUAL
When the top line of the display reads the desired function, press the [flip] key to enable /
disable it.
Next, the User can be given authority to operate specific Groups. These are the Groups
which the user will set when entering their code followed by the [menu] key. Any
combination of groups used on your system can be allocated. The first screen shows the
access the user has to Groups 1 to 10 (Groups 1 to 4 on D3020). To allocate access to
groups 11 to 20 (D3001 only) press the [DOWN] key. Press [OK] when the user has the
desired access. Note: User 1 always has access to all Groups.
The user can then be given access to “AutoGroups”. These are the Groups which the
user will set when entering their code followed by the [OK] key, or by placing their tag
against the keypad. Any combination of groups within those allocated above can be
selected. The first screen shows the Autogroups within Groups 1 to 10 (Groups 1 to 4 on
D3020). To allocate Autogroups to groups 11 to 20 (D3001 only) press the [DOWN] key.
Press [OK] when the user has the desired Autogroups.
Finally, each User can be given authority to use any of the advanced functions defined in
this section of the manual. You cannot give a User access to advanced functions if you
yourself do not have that access. Note: User 1 has access to all advanced functions. This
can not be changed.
The functions are: Set /Unset, Omit 24Hr Zones, Tests, View Log, Change Own Code,
Delete User Codes, Edit Users, Set Date & Time, Control Output, Remote Access,
Engineer Access, Intercom and Helpline. Some of these options may not appear
depending on how your system has been configured.
Using the [UP] and [DOWN] keys to select the desired function on the top line, and then
use the [flip] key to turn it on and off. Press [OK] when finished.
Example: To allow the selected User to perform tests, press the [flip] key when the top line
of the display reads “Tests”, a “T” will appear on the bottom line. To remove the “T” from
the bottom line, press the [flip] key again.
Finally, the display will read “Waiting for tag”. If the user requires a tag, it should be placed
against the keypad now to learn it. If a tag is not to be used, press [OK].
Once the above has been completed, edit another User’s details, or press [esc] to end.
NOTE:
To simplify the process of setting up users, it is possible to ‘copy’ details
(NOT name, usercode or tag details) from one user and ‘paste’ them to
another. Select “Edit Users” and press the [DOWN] key until the user
number to be copied appears. Press the [menu] key, followed by [1] to copy
the details into a ‘clipboard’. Press the [DOWN] key again until the new user
number appears. Press [menu] followed by [2], then press [OK] and enter the
User’s code and name (and tag if required) as described above. All other
details will be as per the initial user.
D3000 Series User Manual
Page 11 of 16
AH 300001-D01 23/03/2005
D3000 SERIES USER MANUAL
SET DATE AND TIME
Press [OK] to change the date and time. The top line of the display will then read
“dd mm yyyy” and the bottom line will show the current date setting. Enter 2 digits for the
day, followed by 2 digits for the month and 4 digits for the year (e.g. 1st October 2001 =
01102001). Press [OK] to accept this.
The top line of the display will then read “hh:mm” and the bottom line will show the current
time setting. Enter 2 digits for the hour using the 24 hour clock format followed by 2 digits
for the minutes (e.g. 3:25 in the afternoon = 1525). Press [OK].
NOTE: If the keypad shows a “?” in the time (e.g. 12?34), then it means that the time has
to be set correctly.
REMOTE ACCESS
This option authorises modem access into the system from software called a Downloader
at a remote location (usually your Alarm Company). Three options exist, namely “CALL
DOWNLOADER”, “ANSWER CALL” and “START REMOTE SERVICING”. You will be
instructed by your Alarm Company when to use these options.
INTERCOM
Press [OK] to contact another keypad on the system. If there are more than 2 keypads
you will be asked which one you want to contact. Enter the keypad number and press
[OK].
NOTE: When using the Intercom, it is important to remember that only one person can
speak at a time, this is under the control of the ‘calling’ person. When you have finished
talking you must press [1] to listen to the other user. When you want to talk, press [2].
Press [esc] to end the intercom facility.
HELPLINE
Press [OK] and you will hear the system dialling the Helpline. When the Helpline operator
answers, you can then tell him what your problem is. Press [esc] when the conversation is
over.
NOTE: When using the Helpline, it is important to remember that only one person can
speak at a time. When the operator has finished talking you will hear a beep to indicate
that you can talk. When you hear another beep, it means that the operator has taken
control so he can talk to you, he cannot hear you when he has done this.
D3000 Series User Manual
Page 12 of 16
AH 300001-D01 23/03/2005
D3000 SERIES USER MANUAL
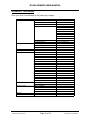
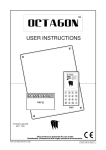
APPENDIX A – ENTERING TEXT VIA THE KEYPAD
Text is entered using a similar convention to that used on most mobile telephones, i.e.
multiple presses of the numeric keys enters text.
Multiple presses of each of the keys enters text as defined below:
Press
1
2
3
4
5
6
7
8
9
0
1
a
d
g
j
m
p
t
w
space
.
b
e
h
k
n
q
u
x
0
c
f
i
l
o
r
v
y
‘
,
2
3
4
5
6
s
8
z
“
Displayed
@
A
D
G
J
M
7
T
9
/
!
B
E
H
K
N
P
U
W
*
(
C
F
I
L
O
Q
V
X
#
)
?
R
S
Y
%
Z
The cursor will automatically move right, one second after the last keypress. Alternatively,
the cursor can be moved right manually with the [UP] key or left with the [DOWN] key.
D3000 Series User Manual
Page 13 of 16
AH 300001-D01 23/03/2005
D3000 SERIES USER MANUAL
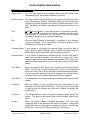
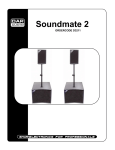
APPENDIX B - USER MENUS
Enter your User Code followed by the [menu] key to begin.
Set / Unset Menu
Tests
View Log
Change Own Code
Delete Operator Codes
Edit Operators
Set Date & Time
Remote Access
Test Bell
Test Strobe
Walk Test
Test RKP LEDs
Test RKP Sound
Test Panel Sound
View Full Log
View Alarm Log
View Operator Log
Change Operator Code ****
Delete All Operator Codes
Select Operator
Access Code
Operator Name
Access Control Attribute
Smoke Reset Attribute
Omit Zones Attribute
Arm Only Attribute
Reset System Attribute
Operator Groups
Autoset Groups
Tests Allocation
View Log Allocation
Change Own Code Allocation
Delete Operator Codes Allocation
Edit Operator's Allocation
Set Date & Time Allocation
Remote Access Allocation
dd mm yyyy
hh:mm
Call Downloader
Allow Downloader Access
Answer Call
Attribute
Bell ON
Strobe ON
Walk Test Complete
Green LED A Test
Red LED A Test
Green LED B Test
Red LED B Test
Green LED C Test
Red LED C Test
Green LED D Test
Red LED D Test
KP Sounder ON
Panel Sounder ON
Groups 1-10 and 11-20
Groups 1-10 and 11-20
Intercom
Helpline
D3000 Series User Manual
Page 14 of 16
AH 300001-D01 23/03/2005
D3000 SERIES USER MANUAL
APPENDIX C - GLOSSARY
Access Code:
This is a code (between 4 and 8 digits), which must be entered at the
Keypad before you are allowed to perform any actions.
Alarm Condition: An alarm condition is generated when the system is Set and movement
within the building is detected. Depending on how the system has been
configured, an alarm condition can result in a signal being sent to your
ARC, the Bell(s) and Strobe may activate and internal sounders may
begin.
ARC:
Alarm Receiving Centre. If your alarm system is connected to an ARC,
they will be aware of each time the alarm is triggered and can process
this information to Keyholders or to the Police. They will also inform
your Alarm Company that your alarm has activated.
Bell:
When an alarm condition is generated, it is common to ring sounders
outside the building. These can be Bells or Electronic Sirens, but are
referred to in this document as Bells.
Customer Reset: If your system is configured for Customer Reset, you will be able to
clear down any alarm conditions. After an alarm the system must be
Reset before it can be Set again. (Also see Engineer Reset)
Engineer Reset:
If your system is configured for Engineer Reset, you will not be able to
clear down any alarm conditions, you will have to contact your alarm
company each time an alarm condition is generated. After an alarm the
system must be Reset before it can be Set again. (Also see Customer
Reset)
Entry Mode:
When the system is Set, opening the relevant door will start the Entry
Mode. You will then be given enough time to walk to the Keypad and
enter your User Code to Unset the system without generating an alarm.
It is very important, however, that you go straight to the Keypad and do
not wander through the building else the alarm will be triggered.
Entry Route:
The designated route used for entering the building when Unsetting the
system.
Exit Mode:
When the system is Unset, entering your User Code followed by the
command to Set will start the Exit Mode. This will give you enough time
to walk through the relevant door and lock it behind you before the
system Sets.
Exit Route:
The designated route used for leaving the building when Setting the
system. This may be (but doesn’t have to be) the same as the Entry
Route.
Groups:
When your Alarm Company installed the system, they may have
configured each of the detectors and doors into Groups. Using these
groups will allow you to Set parts the system (e.g. Group 1 could be the
ground floor, Group 2 the first floor and Group 3 an annexe)
D3000 Series User Manual
Page 15 of 16
AH 300001-D01 23/03/2005
D3000 SERIES USER MANUAL
Keyholder:
A nominated person who has a key for the protected building as well as
an User Code. The Keyholder will be the person who responds to any
alarm conditions in conjunction with the Police.
User Code:
This is a code (usually 4 digits), which must be entered at the Keypad
before you are allowed to perform any actions.
User 1
User 1 is a special user that ALWAYS has access to ALL function. It is
strongly recommended that User 1 is not used for day to day functions
(e.g. setting the system), but is reserved for management functions (e.g.
reviewing the log).
PA:
See Personal Attack
Personal Attack: A method of initiating an instant, deliberate alarm when the system is
Unset. This can be useful if you find yourself in a threatening situation,
to trigger the alarm and summon help.
Set:
When the system is Set, the building is protected and any movement
inside the building will trigger an alarm condition.
Strobe:
When an alarm condition is generated, it is common to trigger flashing
lights outside the building. These lights are referred to as Strobes.
Unset:
When the system is Unset, the building is not protected and it is safe to
walk around without triggering the alarm.
Walk Test:
This feature provides the User with a facility to periodically test that all
the detectors on the system are working correctly.
CS3000 Series Feature Comparison
Feature
D3001
D3020
Number of Users
64
20
Number of Groups
20
4
Audio
D3201 or D3202 keypad
D3201 or D3202 keypad
Tag
D3202 or D3212 keypad
D3202 or D3212 keypad
D3000 Series User Manual
Page 16 of 16
AH 300001-D01 23/03/2005