1
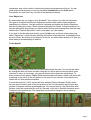
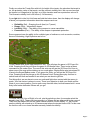
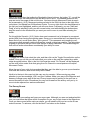
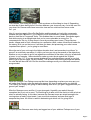
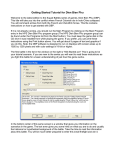
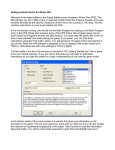
Learning how to Fight – The Eagles Strike Tutorial By James "Digger" Rapkins Welcome to Western Europe, Squad Battles style. Here the 82nd and 101st Airborne Divisions, the Rangers and various other American forces – the Eagles – made their mark on history. You are about to join them. Want to learn how to play? Read on… This is the place where you’ll learn how to get started with Squad Battles: Eagles Strike. If it is not already running, you should run the Main Program by clicking on the Main Program entry in the HPS Eagles Strike program group (The HPS Eagles Strike program group can be found under the Programs list from the Start button). If you prefer, you can print these instructions using the Print button above. You will get about 10 pages of text and graphics if you do this. You can get more detailed information in the instructions below by clicking on the links displayed in the text. Doing so will display the associated help file for this topic. We strongly recommend that you do this. Once printed, you can start the game and keep the notes beside you as you play. You can return to this help information by clicking on the Back button above. Note: the HPS Eagles Strike software is designed to run on displays with screen areas up to 1280 by 1024 pixels and with color settings of 16-bit or higher. ***Please note that this file is in no way a substitute for the documents and Help files provided with the game. There are two important manuals: 1) Main Program Help which contains a description of each Menu and Dialog among other things; and 2) A Users Manual that explains all the game rules. This documentation is available from the HELP Menu, or a printable DOC format is available from the START Button | Program Files | HPS Eagles Strike | Printable Documentation. Going to War By default, after the introduction the Main Program begins by prompting you for the name of the file to open using the File Selection Dialog. We’ll start with the battle called "A Ranger Challenge - Easy." In the list of files displayed by the File Selection Dialog, you will see that Page 1 A Ranger Challenge-Easy is selected. Notice that a short description of the battle appears at the bottom of the dialog along with historical and designer notes. Sometimes it’s good to read the historical notes, as it lets you know what to expect. Likewise, not knowing can be half the fun. Now click on the OK button. Next, the A/I Selection Dialog will appear. Since we are going to play as the Americans, select Automatic with FOW (which means "Fog of War") in the German A/I group on the right hand side of the dialog. This will cause the computer to play as the German side. The "fog of war" option makes the fighting for the Americans a little more difficult, but is much more realistic. Later on, you can also use this dialog to experiment with Optional Rules by clicking on the Rules button. For now, click on the OK button. The battlefield will be drawn on the screen and in the middle of the screen the Turn Dialog box will appear. This box will appear at the start of every turn and help you keep track of the turn and duration of the battle. Click anywhere on this box to close. After you close the Turn Dialog, Some scenarios will also have a Command Report. This tells you how much Smoke your side has, whether or not there will be Unit Withdrawals. Withdrawals are set by the scenario designer to represent retreats or units being tasked elsewhere, Your Forces Now we find ourselves in battle. You are in command of 2 platoons of infantry from C Company, 2nd Ranger Battalion, led by Captain Ralph Goranson. They are just reaching Vierville after scaling the cliffs to get over the beach. We see we have eight stacks of units on the map. If you click on each one, you’ll notice the bar at the bottom of the map change to list the various units in that hex. This is known as the Unit List Area. It displays the units in that hex, as well as information regarding what weapons they have, the status of the troops, and so on. It also tells you what type of terrain the unit is in, and other general information regarding the hex itself. The thin bar below this shows information such as the Date, Time, and Turn Number. Your Battleground Take just a moment to look at your surroundings. As we click around the map, we notice that the pair of numbers in the lower right corner change. These numbers are the hex Page 2 coordinates, and can be useful in determining where reinforcements will arrive. You can check what reinforcements you have by selecting Scheduled from the Units Menu. Sometimes you won’t have any, just like in this particular scenario. Your Objectives So what exactly are you trying to do in this battle? Your mission is to take the objectives. Your goal is to capture the German Objectives and hold them while keeping American casualties to a minimum. You gain points for capturing and holding the enemy Objectives and also by killing the enemy. Some scenarios will have Exit Hexes. In these scenarios you can also gain points by moving your units into the Exit Hex and removing them from the map. Others have "Capture Objectives," which once taken, can’t be retaken. If you wish to find the objectives quickly, go to the Info menu at the top of the screen and select "Objectives." A box will open showing the location of all objectives. In this battle there are two of them. By clicking on an objective in the list, you will be taken directly to it. Now you know what you are attempting to achieve. To the Attack! To actually do something, we must first select which troops we want. You can do this either by clicking the stack you want and then using the Unit List to pick and choose which units you want to move, or conversely, you can just double click to select the whole stack. To make it easier for the player, Eagles Strike denotes stacks that have a leader with them with a gold star in the corner of the unit picture on the map. As you can see, every stack has a leader with it in this particular scenario. If we double click hex (18,5), we find we have selected Platoon Sergeant Geldon and a six-man squad. Next to each of the Unit pictures in the Unit List area we see the type and number of weapons that that squad/leader has. We can see that Pn. Sgt Geldon has a M1 Carbine, while the squad with him as 3 M1 Garands, a M1 with a Grenade Launcher and a Thompson sub-machine gun. The squad also has a satchel charge to use for clearing bunkers and the like. Page 3 Finally we notice the Terrain Box with info for height of the terrain, the elevation the terrain is on, the protection value of the terrain, and the scenario visibility limit. We can see here that the terrain is a Village that is 3m high, on a 30m elevation and has a protection value of 6. The Scenario visibility limit is 30 hexes (1.2 Kilometres) If you right click in the Unit List Area and hold the button down, then the display will change to show you important information about the weapons such as: Reliability (Rel) – Ranging from A (best) to F (worst). Range (Rng) – Measured in hexes. Lethality (Leth) – The ability of the weapon to cause causalities. Penetration (Pen) – The ability of the weapon to penetrate protection. Some weapons have the ability to fire multiple types of ordinance, such as smoke, canister, Armour Penetrating, High Explosive and so on. To get a better look at the map press the 1 Key. This will place the game in 2D Zoom-Out View. Pressing the 2 Key will return the game to 2D Normal View. There is also a Menu command for this under View. The rest of this write-up will use the 2D Zoom-Out View to show more of the map without taking up too much space. Eagles Strike also introduces 3D Views to the Squad Battles series. If you press the 3 Key you will get the 3D Zoom-Out View. Pressing the 4 Key brings up the 3D Normal View. During game play feel free to switch back and forth as needed to see what you are about to get into. First things first, we now have to move our units and fight when contact with the enemy is made. Your first choice is where to move. There is an objective to both your North and the West of your current position. One is worth more than the other, but that means hat it’s more likely to be better defended. Where will you go? To check the LOS (Line of Sight) of a unit, start by selecting a hex, for example select the squad in hex (18,5). These men are currently in a Village and are adjacent to higher ground. Then from the toolbar click on the Visible Hexes button or use the hotkey "S". As you can see the visibility will extend up to 30 hexes except where the terrain blocks LOS. In this case the fact the unit is on a lower elevation severely curtails its visibility. Page 4 Now if you select from the toolbar the Reachable Hexes button or the hotkey "C", you will be shown the hexes this selected unit will be able to move up to. The shaded portions of the map are out of the range of this unit this turn. You have enough Movement Points to reach the crossroads in (16,3). Movement points are listed in the Unit List Area to the right of the unit picture. 2nd Squad has 24 Movement Points. To move, right click in the hex adjacent to the unit you have highlighted, and the unit will move there. Conversely, you can "Hold and Drag" a unit by selecting it with your left mouse button, and while holding the button down, drag the cursor to the location that you want your unit to move to, and then releasing the button. Do this with the Squad in (16,3). Notice how road movement is a lot cheaper in movement points (MPs) than moving through the grass. Once you’ve moved that unit, and hopefully not been shot at yet, we will make them "go to ground". This represents units seeking cover, laying prone and generally making themselves a small a target as possible. The advantage of going to ground is that you are in less danger of taking casualties. The disadvantage is that such an action slows down considerably your ability to move. To toggle this mode, first select the units, and then click on the Toggle Ground button on the toolbar. Once you do this you will notice that your units on the map are marked by a white stripe along the bottom. Also in the Unit List Area the words "On Ground" will be displayed on the units in this mode. Note that going from On Ground to normal posture will require Movement Points. Move the rest of your units, but remember that they won’t be able to go over up an elevation level until the next turn, due to how many MPs it takes. North is to the top in this map, but this may vary by scenario. When moving pay close attention to your surroundings, LOS, and your Leaders. Make your way to the Objective and beware of danger every step of the way. Enemy troops may be waiting in the next hex or around the patch of trees. Sometimes you may not be aware of the enemy until you try to move into an adjacent hex and are ambushed. The Enemy Reacts Use care when proceeding and keep your eyes open. Although you were not ambushed this turn you must know that there will be a reception for you, as you get closer to the Objectives. Once you have moved all the units you desire, you will need to end your turn so the AI can make its moves. To advance, click on the Next Turn button on the toolbar. Page 5 The German Turn Dialog will popup. Click anywhere on this dialog to close it. Depending on what the AI does during its turn, the time between your turns may vary. As in this case it is very short. No German units have come into view and our units have not come under fire…yet. Now it’s your turn again. Move Pn Sgt Geldon and the squad you had at the crossroads towards the 20pt Objective in (15,0). Before you do this however, remember to put them back on their feet or "unground" them. This enables them to move faster. Remember again that while moving in an upright state that you’re more vulnerable to enemy fire. To compensate for this, try to keep them in cover by avoiding open hexes. Things like tree hexes, villages and so forth, where there is a protection value, makes it that much harder for the enemy to hit you on the move. It will slow you down, but preserving your units is more important than speed – you’re going to need them. Move the rest of your units up to the higher elevation level, and remember to put them "to ground" to avoid early casualties. It’s up to you how you set up the assault on the objectives, whether or not you want to go full out against one and then hit the other, or the try to take both at once. In my example, I have decided to make my main thrust against the 30-point Objective in hex 11,7. If you are unsure whether all your units have been moved, or you just want to go to the next stack, hit the N hotkey. This is easier than hunting amongst the stacks for units that still have MP left. End the turn after making sure all your units have moved and are grounded. When the German Turn Dialog comes up this time, depending on where your men are, you will notice that German units are starting to appear. It’s time to realize once you click the Turn Dialog, the enemy are going to start shooting. Now aren’t you glad I suggested that you ground your troops? After the Germans move and fire, it’s your turn again. Hopefully you made it through unscathed, but if not, not to worry. The first thing to do after a turn like that is to have a look at what I’m actually facing. In this case, because the German troops are stupid enough to be running down a road in clear terrain, I can count their numbers, and see what type of weapons they have. All of this is useful in determining at which unit I’m going to fire. But perhaps the Germans were lucky and tagged one of your soldiers. Perhaps one of your Page 6 squads was even "Pinned." Now your leaders come into play. Select a leader in the same hex with the Pinned unit and then try to "Rally" them. You can do this either by hitting the Rally icon or selecting Rally Units from the Leaders menu. The Moment of Truth You will want to move your other units toward the objectives. Before you do, however, select the hex in which the enemy soldiers are in and then select the Visible Hexes button. This shows you what the enemy can actually see. Use this knowledge to plot a course where you outflank and surround the enemy units, while staying out of their sight. But they shot at ME! I want revenge! Well, first of all, make sure that you don’t move your units too far; otherwise they won’t have enough Movement Points (MPs) to fire. Generally a unit needs 1/3 of its Total MPs to fire. The Move/Fire Mode button on the toolbar toggles between Move and Fire Modes. When in Move mode the cursor will be a cross and when in Fire mode it will be aiming circle . Most veterans of the series leave it in Move Mode and switch to Fire Mode by simply holding down the Ctrl Key. Letting up the Ctrl Key returns it to Move Mode. With a little practice, you’ll become proficient at this. Select the unit with which you are going to fire upon the enemy with. I’ve chosen Pn Sgt Kennedy and his squad. But I want to make sure I’m using the right ammunition for the job. Hitting the Select Load button, or by selecting Select Weapon Load from the Command menu, brings up the Weapon Load Dialog. From this I can see that my primary load is M17 Frag, which is capable of indirect fire. My targets are standing upright on the middle of a road, so I’m happy with this. Now, I hold down Ctrl to activate Fire mode and set the crosshairs on the German unit, which I wish to target. Once I’ve got the general area, I right click to fire. Since FOW is on, the enemy casualties are not readily apparent. I can check to see if I caused any casualties by selecting the enemy unit, but only if it is in open terrain. Once done, I hit N again to find any unit that haven’t moved, and then hit Next Turn. What happens though when those pesky Germans just won’t die? Well, it’s time for an assault. An assault occurs when you attempt to move into a hex containing German troops. It ’s resolved automatically and winning it depends on a few things like the Morale of your units, the types of weapons you have and so forth. Basically you don’t want to be assaulting with a mortar and it’s crew – but a hint would be to assault those German Machine Gun nests – MG’s are not that great in close combat, and your Garands and Thompsons are very good for a bit of "up close" action. Now you have the basics of the game. As you play, you will find many other features such as off-map artillery, air support and a ton of other features that have been included to make your wargaming experience more realistic and challenging. Page 7 Remember that you learn by doing, not so much by reading, when it comes to playing the game. The more you play, the more adept you become as a commander. Many of the things we have mentioned here will become second nature to you. They better – your men depend on you! When the scenario is over the Command Report will pop up with a message that the time limit is up. Clicking OK will then bring up the Victory Dialog. This box will show you the losses for both sides, the points awarded for Objectives captured, the Victory Values, Total Points scored and the Outcome. In this example the Americans scored 69 Total Points. This is a pretty good result as it’s nearly thirty points over the Major Victory mark. Although you may not score a victory your first try, you are sure to improve with time. You can display the Victory Dialog at any time during the scenario from the Info/Victory menu item. This will allow you to follow your progress, but do not be alarmed to see that your side is losing, particularly in the early part of a scenario. Often the winning side is not determined until the last couple of turns and you have plenty of time to accomplish your mission. Feel free to save this battle and come back to it later if you want to do more exploring at this point. Whatever battle file you save can be displayed by selecting the "Old (by name)" or "Old (by date)" button in the top left corner of the File Selection Dialog. Good Hunting! To get more information, see the following help files: User Manual Main Program Help File Scenario Editor Help File Order of Battle Editor Help File Good Luck with it, and we of the Eagles Strike development team hope you have as much fun playing the game as we did in making it. Well, don’t just sit here gawking! Get to it Soldier! Page 8