1
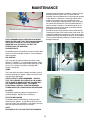
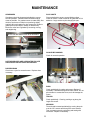
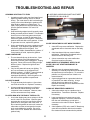
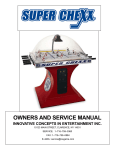
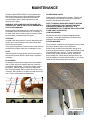
MAINTENANCE
SCOREBOARD LIGHTS
All parts in the SUPER CHEXX™ Hockey Game have
been manufactured to the highest standards possible.
The following maintenance should be performed as
recommended to assure optimal performance and
longevity of the game.
Replacement is advised when necessary. Remove the
four screws on the light diffuser and pull out the bulb.
Insert the new bulb and reassemble.
NOTE: TIE WRAPS HAVE BEEN USED TO SECURE
THE FLOURESCENT LIGHT AGAINST SHIPPING
DAMAGE AND ABUSE ON LOCATION. IT IS
RECOMMENDED THAT THESE BE REPLACED AFTER
A NEW LIGHT IS INSTALLED.
WARNING: THIS GAME DOES NOT REQUIRE ANY
LUBRICATION. USE OF ANY OILS OR GREASE MAY
VOID YOUR WARRANTY.
Most mechanical maintenance jobs, when required, will
necessitate removal of the dome and / or ice surface. In
all cases, when the ice surface must be removed, follow
the ice surface removal procedure as given.
COIN MECHANISMS
Mechanisms should be cleaned and adjusted when
necessary. Follow the manufacturer’s instructions on
adjustment and maintenance.
PARTS KIT
Included in the spare parts kit, is a wire cable with loop &
hooks. This is used to hold the dome open when tilted
back to service the game.
PLAYER WASHERS
These washers, located over each gearbox, serve to keep
the players shafts in place in their gearboxes.
In the event the goalies are removed, extra cotter pins are
provided if the original cotter pins are damaged or lost.
Extreme care should be exercised when pulling out or
pushing in players because a washer that falls into a track
can be bothersome to remove. To help eliminate this
problem, push all the rods all the way in, and pull the
player straight out. When pushing a player back in, be
sure the gearbox is lined up with the shafts. If not, slowly
rotate the rod while pushing down on the player.
PUCK
Inspect the puck for large gashes, which may impede a
smooth rolling action down the puck ramps. Replace if
necessary.
PUCK RAMPS
Periodically check the puck ramps for dirt accumulation
and / or other objects or materials that may cause the
puck action to slow down. To clean the ramps, remove
the goalies. Slide all players to center ice (this saves
time, as all the players and ice surface do not have to be
removed). Bend up the ice on either end and remove the
nets. Clean out the tracks and reassemble.
PLAYER WASHER
11
MAINTENANCE
Start the game and observe operation. Check for foreign
particles under the ejector arm. The entire bracket
assembly can be repositioned to correct improper ejection
in any direction. Loosen the 2 mounting screws and reposition as necessary. Be sure all parts work freely.
Check by pushing the solenoid plunger only, to see that
the ejector lifts up about 3/8” from the cabinet bottom. If
less movement is noted, be sure that the ejector is not
hitting any of the side chute areas or has become bent
through failure of another part.
Excessive random angle ejections can be eliminated by
centering the ejector in the vertical area of the chute. (An
improperly positioned ice surface may also cause angled
ejections) An ejector that sticks in the up or down position
is due to either improper positioning, a broken spring or a
damaged solenoid.
VIEW OF PLAYER AFTER INSTALLATION
NOTE: WASHERS SHOULD BE REPLACED WHEN
WORN TO THE POINT THAT THEY CAN NO LONGER
HOLD THE PLAYERS IN. AFTER PLAYERS ARE
INSERTED, PULL UP GENTLY TO TEST THE
STRENGTH OF THE WASHERS.
SOUND EFFECTS
Periodically test the sound effects, sensors, and the “Boo”
button to ensure the proper functions. Test for National
Anthem bypass.
ICE SURFACE
The ice surface should be cleaned as needed, using
Windex™, Fantastic™, or a comparable product. Apply
liberally to a lint-free cloth, wipe surface thoroughly, and
let dry. For a “faster” ice surface, dust lightly with
Pledge™ and let dry.
DOME
The Lexan dome should be cleaned as needed, using a
furniture polish type of cleaner. Apply to a lint-free cloth
and wipe dome thoroughly.
NOTE: PLEDGE™ IS RECOMMENDED. ALWAYS
TEST THE CLEANER YOU INTEND TO USE ALONG
THE FLANGE TO MAKE SURE THE CLEANER WILL
NOT HARM THE DOME FINISH. TO REMOVE
SCRATCHES, A SPECIAL SCRATCH REMOVER
FORMULATED FOR LEXAN SHOULD BE OBTAINED.
PLAYERS
Periodically inspect the players for appearance or
possible damage. Replace when necessary.
EJECTOR MECHANISM
Periodically test the mechanism by scoring goal and
observing puck ejection. If puck fails to eject, does not
clear ice surface, the mechanism is not working correctly.
Open the dome and remove the ice surface.
NOTE:
BE CAREFUL NOT TO LOSE THE FLAT WASHERS.
12
MAINTENANCE
GEARBOXES
PUCK CHUTE
Gearboxes should be inspected periodically to ensure
smooth operation. Gearbox tracks should be kept as
clean as possible. If a gearbox seems to rotate stiffly, first
check to see that a rod collar is not pushed up tightly
against it (this can happen if a grip comes off a rod and a
gearbox hits a solid object, usually on defensemen).
Back off a collar from a gearbox by loosening, moving,
and retightening.
Clean periodically to ensure a good sliding surface.
Check for cracks. Small cracks can be glued with a C/A
adhesive. Large cracks require changing the part.
NOTE GAP BETWEEN COLLAR & GEARBOX
GOALIE MECHANISMS
Check for smooth operation.
NOTE GEARBOXES ARE LUBRICATED FOR LIFE
AND SHOULD NOT BE OILED OR GREASED.
ROD BEARINGS
Check once a year for excessive wear. Replace when
necessary.
RODS
Check periodically for cracks and gouges. Replace if
necessary. Clean Mineral Spirits or Paint Thinner. Do not
allow cleaner to contact the Dome, as it will damage the
Dome.
TRACKS
Check periodically. Clean by pushing a rag along the
length of the track.
SENSORS
These should be tested periodically by moving the puck
over the “Oh” sensors and through the score sensors.
Test a suspect sensor by unplugging and testing with
ohmmeter. Replace if necessary.
13
TROUBLESHOOTING AND REPAIR
PUCK WILL NOT EJECT
PUCK TAKES TWO OR THREE TIMES TO EJECT
For some ejection problems the ice surface may have to
be removed.
1. A puck hitting the ice surface can be corrected by
first making sure the ice surface is in place. If it is
in place, observe which way the playfield is
positioned. The opening can be centered by
either bending the pins that locate the nets and
ice surface from goal to goal, or bending the puck
return chutes underneath for side-to-side
adjustment.
1. Opening the dome and sliding all of the players to
the center ice can correct dirt in the puck ramps.
Next, remove the goalies one at a time, bend up
the ice surface and clean the ramps. Assemble
in the reverse order.
2. It is possible that the software (option #9) has
been set up with the solenoid strength set too
low. Enter the programming mode, go to option
#9 and check the setting. The higher the value,
the higher the puck will eject. Adjust the eject
strength as necessary.
2.
2. To determine if the ejector is misaligned, first
remove the ice surface and then start the game.
Look straight down the ejector chute and observe
how the puck ejects. If the puck consistently hits
one side of the chute, the ejector should be
adjusted. Loosen the 2 screws that mount the
solenoid assembly to the cabinet. Re-position the
assembly so that the cup where the puck sits is
centered into the vertical area of the chute.
PUCK
RAMP
EJECTOR CHUTE
3. A puck ramp may become pushed up during
shipping or moving. Just push it back down in the
retainer/chute with a pencil or screwdriver.
4. A unique electronic circuit incorporated on the
main PC Board prevents the eject solenoid from
burning out. If a solenoid problem is suspected,
check for a pulse of about 12 volts at the
solenoid. Then remove the wires to the solenoid
and check that the coil is not open or shorted. A
good solenoid will read between 3-4 ohms.
NOTE: REPLACE THE SOLENOID ONLY AFTER
DETERMINING WITH AN OHM/VOLT METER THAT
THE SOLENOID WAS RECEIVING POWER.
14
PUCK
EJECTOR
SOLENOID
TROUBLESHOOTING AND REPAIR
GEARBOX IS DIFFICULT TO TURN
PLAYER ROD & GEAR BOX SHAFT MUST MEET
IN CENTER OF COLLAR SLOT
1. A gearbox-coupling collar may have been forced
against a gearbox causing uneven or difficult
turning. The usual cause for this is a handle grip
coming off a rod and allowing the gearbox to hit
either another gearbox or a cabinet end. To
repair, simply loosen the collar and back it away
from the gearbox between 1/32” and 1/16”.
Retighten.
2. Gear teeth being stripped out will generally cause
binding at certain points of rotation. This situation
should not occur until many games have been
played. However, to check for bad gears, first
remove the gearbox from the game. Loosen the
gearbox collar and slide out the gearbox. If teeth
on gears are worn out, replace the gearbox.
SCORE INDICATORS DO NOT WORK PROPERLY
3. A worn gear bearing can cause a gearbox to work
improperly. If you suspect a gear problem, first
remove the gearbox from the game. If no
problems are visible, disassemble the gearbox. If
a worn bearing is found, replace the gearbox.
1. A bad LED may cause malfunction. Replace the
scoreboard and run electronic tests on the faulty
unit.
2. A bad scoreboard chip may cause indicator
malfunction. Replace the scoreboard and run
electronic tests on the faulty unit.
GAME LIGHTING DIM
1. The scoreboard bulb may be burned out. Open
the dome and see if the bulb appears to be
burned out while the game is plugged in. Unplug
the game. Remove the screws holding the right
diffuser in place. Replace the light bulb and
reassemble.
3. A loose connection may cause malfunction.
Check and repair as necessary.
GAME LOSES PLAY SEQUENCE. GIVES FALSE
SCORE, WILL NOT START WHEN MONEY IS
INSERTED
2. Very low AC power will cause poor lighting. To
test, use a voltmeter on the suspect line to
determine voltage. A CHEXX™ game hooked up
to a line with too many other games may
experience this difficulty. Move the game to its
own AC line if this problem is experienced.
1. Although game is protected against static
electricity, an unusually large shock will cause the
microprocessor to lose sequence. To correct the
problem, turn off power and turn it back on to
reset electronics.
2. A game plugged into an ungrounded outlet has
no protection from static electricity. A large
enough shock may destroy the IC chips.
Electronic tests may be run to determine the fault.
Repair as necessary.
NO LIGHT IN GAME
1. The light bulb may be burned out. Open dome
see if bulb is burned out. Replace if necessary.
2. A loose scoreboard connector is not likely to
affect the bulb without affecting some other
component in the scoreboard. However, make
sure the connectors are firmly seated.
COINS NOT REGISTERED CORRECTLY
1. A bad micro-switch may be a problem due to
internal failure. Test with an ohmmeter. Replace
if necessary.
PLAYERS RUN INTO THE END OF THEIR SLOTS
2. Loose connections may cause money to be
registered improperly. Check the connectors
from the coin mechanisms, as well as the
connectors on the main PC Board. Repair if
necessary.
1. A rod collar slipping may cause a player to hit the
end of a slot in an ice surface. Open the game
and rotate the rod until you can see the rod and
gearbox touch, through the slot in the collar. If
the rod and the gearbox do not touch, loosen the
collar make sure the rod and gear box coupler
touch, and retighten the gearbox. Be sure to
leave 1/32” to 1/16” between the collar and the
gearbox body.
3. A bad capacitor (CZ5) on the main PC Board may
cause bounce problems with the micro-switch.
Run electronics tests to determine the problem.
15
TROUBLESHOOTING AND REPAIR
NO “OH” SOUNDS OR REPEATED “OH” SOUNDS
PLAYERS RUB ON THE SIDES OF THEIR SLOTS
1. Short or open circuits in the harness or one of the
reed switches on the “Oh” sensors are the most
common problems. Repair as necessary.
1. On rare occasions a track may become bent,
forcing the player to work improperly. If, when
the ice surface is properly located, you can see
the top of an aluminum track, the track must be
bent. Use a large screwdriver or other suitable
object, and gently pry in the desired direction to
obtain clearance. Check for smooth operation.
2. A bad IC chip on the main PC Board may cause
problems. Run electronics tests. Repair
defective components.
SCORE IS NOT REGISTERED-NO CHEER
NOTE: BE SURE NOT TO GOUGE THE SIDE OF THE
CHANNEL WHEN PRYING. A RAG SHOULD BE
WRAPPED AROUND YOUR SCREWDRIVER.
1. A bad Reed Switch may cause a goal not to
register. Disconnect and test with an ohmmeter.
Replace if defective.
2. A bad connection could be a problem. Check
associated harnessing and connectors with an
ohmmeter.
SCORE IS NOT REGISTERED-GAME CHEERS
1. A scoreboard connector may be loose or bad.
Repair or correct as necessary.
2. A bad scoreboard IC chip may be a problem.
Replace the scoreboard and run electronics tests
to determine the problem.
SCORE AND CHEERING KEEPS REPEATING FOR
ONE TEAM WITH NO GOALS ACTUALLY BEING
SCORED
1. A Reed Switch shorted to the cabinet will cause
this problem. Usually an exposed wire touching
the cabinet will be the cause of the problems.
2. A Reed Switch, always closed, can be tested by
first disconnecting it from the board. Use an
ohmmeter to see if the switch is always closed. If
it is, replace the score Reed Switch.
SOUND GOES LOW OR GOES ON AND OFF
1. Check the audio IC chips on the main PC Board.
Replace any defective parts.
NOTE: ALUMINUM TRACK IS NOT VISIBLE IN PHOTO.
2. A faulty volume control is a possible cause for
intermittent sound. Rotating the volume control
will usually show a problem. Many times, the
problem can be corrected by cleaning with a
commercially available switch cleaner.
3. A bad speaker connection to the main PC Board
may be the problem. Check and repair as
necessary.
16
TROUBLESHOOTING AND REPAIR
TOP CABINET ASSEMBLY
WITH ICE SURFACE & PLAYERS INSTALLED
PLAYER WITH LONG STICK
PLAYER WITH LONG STICK
PLAYER NUMBERING AND LAYOUT
30 Goalie
18 Long
12 Short
6 Short
4 Short
14 Short
14 Short
4 Short
6 Short
12 Short
18 Long
17
30 Goalie
TROUBLESHOOTING AND REPAIR
TOP CABINET ASSEMBLY
WITH ICE SURFACE & PLAYERS REMOVED
HINGE
SCOREBOARD CABLE
“BOO”
BUTTON
RIGHT CHANNEL
LEFT CHANNEL
GRIP
LONG COLLAR (Not Shown)
GRIP
BUMPER
DEFENSE CHANNEL
CENTER CHANNEL
SOLENOID
ASSEMBLY
COLLAR WASHER
EJECTOR CHUTE
GOALIE
KNOB
COLLAR RUBBER
CENTER CHANNEL
DEFENSE CHANNEL
CABINET STIFFENER
SHORT COLLAR
RIGHT CHANNEL
“BOO”
BUTTON
CABINET
GASKET
LEFT CHANNEL
ROD BEARING
(Not Shown)
18