1
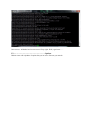
User Manual
V1.2
9 August 2011
Compiled by radix
Table of Contents
i. Legal stuff
ii. About
1
Hashcat
1.1
1.2
1.3
1.4
2
oclHashcat (cudaHashcat)
2.1
2.2
2.3
2.4
3
Overview
Options
Attack Vectors
oclHashcat Specifics
oclHashcat-lite (cudaHashcat-lite)
4.1
4.2
4.3
4.4
5
Overview
Options
Attack Vectors
oclHashcat Specifics
oclHashcat-plus (cudaHashcat-plus)
3.1
3.2
3.3
3.4
4
Overview
Options
Attack Vectors
Hashcat Specifics
Overview
Options
Attack Vector
oclHashcat-lite Specifics
hashcat-utils
Troubleshooting
References
ToDo
Legal and Licensing
1. All copyrights to this program are exclusively owned by the author, atom.
2. This program is only to be used for personal, non-commercial and legal purposes in a non-business or noncommercial environment. Use of this software in a corporate, governmental or business environment is
strictly forbidden without expressed written consent of the copyright holder.
3. You will only use this software with hashes created on your own.
4. THIS PROGRAM IS DISTRIBUTED "AS IS". NO WARRANTY OF ANY KIND IS EXPRESSED OR
IMPLIED. USE THIS SOFTWARE AT YOUR OWN RISK. THE AUTHOR WILL NOT BE LIABLE FOR
DATA LOSS, DAMAGES, LOSS OF PROFITS OR ANY OTHER KIND OF LOSS WHILE USING OR
MISUSING THIS SOFTWARE.
5. If your country’s law(s) do not allow restrictions as in (4.) you need to get an additional, written and
individual license by the copyright holder to use this software. If you do not possess such a license, you are
not authorized to use the software.
6. You are not allowed to distribute this program.
7. You may not use, copy, emulate, clone, rent, lease, sell, modify, decompile, disassemble, or otherwise
reverse engineer this program or any subset of this program, except as provided for in this license agreement.
Any such unauthorized use shall result in immediate and automatic termination of this license and may result
in criminal and/or civil prosecution.
About
The hashcat family of software is a set of professional tools provided at no charge to the community. Hashcat
is intended to be used LEGALLY as a tool to recover plain text strings for a variety of hashing methods
including:
• MD5 (and variations)
• SHA1 (and variations)
• MySQL
• SSHA-1
• MD4
• NTLM
• Domain Cached Credentials (DCC)
• MSSQL
• SHA256
• SHA-512
• Oracle 11G
• DES(Unix)
As the Hashcat suite is constantly under development, more algorithms may be added in the future.
Additional information can be found at:
http://hashcat.net
or on IRC at
irc.rizon.net #hashcat
Hashcat
1.1……………………………………Overview
The latest version of hashcat can be obtained from the hashcat website at http://www.hashcat.net/hashcat.
You will need 7zip to decompress the downloaded archive.
Hashcat is the world’s fastest CPU based password recovery tool. While not as fast as its GPU counterparts:
oclHashcat, oclHashcat-plus, and oclHashcat-lite, large lists can be easily sliced in half with a good dictionary
and a bit of familiarity with the switches. The goal of this section is to present you with everything you will
need to get up and running with hashcat.
Once decompressed, there will be a folder called hashcat-X.XX where X represents the version downloaded.
There is also a GUI for hashcat but as I am not a windows user, I will not be providing documentation for it.
Inside the hashcat folder (in this case hashcat-0.37\) you will see a list of files and a couple directories. Their
purposes are as follows:
Hashcat-cli(32/64).(bin/exe) – the main program. For 32 bit operating systems select 32, and for 64 bit, select
64. Linux users will run .bin, while windows users will run the .exe. Operands must be supplied or hashcat
will do nothing. On windows simply double clicking the executable will quickly open and command prompt
and close it. Windows users must run this from a command prompt, or through a .bat/.cmd.
Rules/ - This directory contains a few pre-generated rules for you to use with hashcat. These will be
discussed later.
Examples/ - This directory has many files to be used with different hash modes. These are a good way to
practice with hashcat and understand what hash types look like. IE: A0.M0.hash has a list of plain MD5
hashes, while A0.M0.word has the plain text version.
Salts/ - Contains a list of 3 byte salts incremented from a to ~~~. These can be useful, but generally you will
not need them. These lists can be expanded upon, or new salt lists can be added. This is for advanced hashcat
usage.
Tables/ - The tables directory contains files to be used with the –-table-min/max and file switches. These can
be useful when you know the requirements of a password.
Using the tools provided in the hashcat package, let’s do a quick test run.
Here we have told hashcat to load the hashlist examples/A0.M0.hash and to use the dictionary
examples/A0.M0.word. This should give us 100% success rate since the MD5’s were hashed from the strings
in this file. If you are using windows, be sure to run hashcat-cli(32/64).exe and omit the ./.
Great success. All hashes have been recovered. Easy right? Well, it gets better……
1.2………………………………………………Options
Hashcat comes with a plethora of options that you can use to fine tune your attacks.
The number of options may seem intimidating at first, but once you get used to them, they are easy to
remember. Most are self-explanatory so take the time to read each one.
I’m going to skip the first 3 options since they explain themselves fairly well. However the remainder I will
explain in further detail.
--remove : Adding this will delete the hash from your list when it is cracked. It requires no further input.
This will prevent you from having to attack the same hash twice, since it will be removed when cracked.
Default: not used
--quiet : Supresses all output except for errors, and recovered hashes. Default: not used
--stdout : Rather than try to recover passwords, hashcat simply outputs to the terminal window.
--disable-potfile : Prevents Hashcat from writing recovered hashes to hashcat.pot. Default: not used
--rules-file=FILE or –r : Adding this will allow hashcat to use the rule file specified. Hashcat will then run
the specified rules against the current attempt. Default: not used
--rules-file=rules/best64.rule or -r rules/best64.rule
--output-file=FILE or –o : Specifies where cracked hashes should be written to. This should be used if you
plan to keep the hashes, or do not want to copy/paste them from a terminal or command prompt. Work
smarter not harder. Default: not used
--output-file=cracked.out or –o cracked.out
--output-format=NUM : NUM can be 0, 1, or 2. Generally not needed, but if a plain text contains hex
characters this will need to be specified to prevent bad plain texts. Default: Mode 0
--output-format=0
--salt-file=FILE or –e : Specifies a list of pre-generated salts to be used in a session. This is used when a
salted hash is missing the salt. Default: not used
--debug-file=FILE : Specify the file that debug information should be written to. Default: not used
–-debug-file=debug.txt
--debug-mode=NUM : Writes either the finding rule, original word, or the mutated word that was successful
against the provided hash(s) to –debug-file=. Default: not used
--seperator-char=CHAR or –p : Used to specify a separator in a hash list. IE hash:username:guid –p : would
tell hashcat how to read where a field ends. Default: ‘:’
-p :
--threads or –n : For use on multi-threaded processors. Almost all processors contain multiple cores, set this
accordingly. If you have a quad core processor, set –n 4, or –n 6 for hexacore. If you run a multi-processor
system, set –n to the number of cores * number of physical processors. IE dual hexacore would be 6 (cores) *
2 (processors) = 12 (total threads). Default: 8
–n 12
--segment-size=NUM or –c : Specifies the amount of memory in MB that should be allowed for caching of
wordlists. If you are working with a limited amount of memory, this could be set so as not to interfere with
other services. The following switch would allow 10MB of words from your list to be cached. Default: 32
–c 10
--words-skip=NUM or –s : Skips the provided number of words when resuming a stopped session. This
prevents running words against your hash list again which would increase the amount of time that an instance
would take. The following switch would skip the first 100000 words. Default: not used
–s 100000
--words-limit=NUM or –l : Specifies the number of words that should be processed. This is useful when
recovering the same list of hashes across multiple computers so the same computer never runs words that are
being processed by another. The following switch would only use the first 20000 words. Default: not used
–l 20000
--generate-rules=NUM or –g : Tells hashcat to generate NUM rules to be applied to each attempt. The
following switch would have hashcat to randomly generate 512 rules on the fly to be used for that session.
This can eliminate the need for large rule files, though targeted rule files can increase your chance of
recovering a plain text password. Default: not used
–g 512
--generate-rules-func-min/max=NUM : Specifies the number of functions that should be used. This number
can be unlimited but large numbers are not recommended. When used in conjunction with –g, any rule
outside of this setting will be ignored. IE: -g 512 generates l r, l ^f, and sa@, these are all valid rules to be
used, however, l ^f sa@ r $3 would be ignored as it contains 5 functions. Default: min=1 max=4
--attack-mode=NUM or –a : Specifies the type of attack that should be performed against a hash. Using
different attack vectors will improve your chances of recovering a hash. The modes are as follows:
0 = Straight – Simply runs all words in a dictionary against your hashlist. Having a good dictionary here will
improve your chances of successfully recovering a hash.
1 = Combination – Combines words from the given dictionary.
Modes 0 and 1 are also the only modes to accept the switches –r or –g.
2 = Toggle-Case – Flips all capitals to lowercase, and all lowercase to uppercase. Digits and special
characters are ignored as they do not have a case.
3 = Brute-Force – BF should be used as a last resort as it is not effective against long passwords, and can be
quite time consuming.
4 = Permutation – Takes letters from a word, and re-arranges them. Example: abc becomes abc, acb,bca, bac,
cba, cab.
5 = Table-Lookup – Breaks a string into individual characters and applies a rule to each one matching a table
entry.
Default: Mode 0
--hash-mode=NUM or –m : This tells hashcat what type of hash specifically you are working with.
Remember, hashcat will assume –m 0 if no –m is set, and will throw errors for any hash over 32 bytes. The
list is too long and self-explanatory for me to go into. Default: Mode 0
–m 100
--toggle-min/max=NUM : Setting this will tell hashcat to expect a minimum/maximum of X and Y in the
plain. Can shorten run time by disregarding values that fall outside of password requirements. Default:
min=1 max=16
--toggle-min=3 --toggle-max=5
--bf-pw-min/max=NUM : This will specify the minimum and maximum number of character spaces to try
when brute forcing. The following command will attempt all character combinations from four(4) – eight(8)
spaces. Only lengths starting from min, or ending at max will be attempted. Default: min=1 max=16
--bf-pw-min=4 --bf-pw-max=8
--bf-cs-buf=CHARS : Tells hashcat what characters to use when brute forcing. The following command will
only use characters a to g, and numbers 1 to 5. This can accept full keyboard space of 96 characters. Default:
abcdefghijklmnopqrstuvwxyz
--bf-cs-buf=abcdefg12345
--perm-min/max=NUM : Any word outside of the defined length will be ignored. Default: 2
--table-min/max=NUM : Any word outside of the defined length will be ignored. Default: 10
--table-file=FILE : Specifies which table to use with –a 5. Tables can be found in the tables directory, or may
be created on your own. Default: not used
--table-file=tables/toggle_case_and_leet.table
1.3…………………………………Attack Vectors
Straight. This attack simply runs down a wordlist and tries all strings against each hash. This is an extremely
effective vector for a first run, assuming you have a good dictionary like rockyou (hint hint).
Combination. Adds 2 words from the given dictionary together and tries them. Can be useful against long
passwords as people will try to meet complexity requirement by typing the same string twice, or persons
using their first and last name. IE atom uses his last name of derp to make a password, as long as atom and
derp exist in the wordlist, atomderp will be found, but derpatom will also be tried.
Toggle-case. Simply flips each lowercase to upper case, and each uppercase to lower case. So PaSSwoRd
becomes pAssWOrD.
Brute-force. While extremely useful on GPU, CPU bruteforcing can take forever. This vector will try every
combination of character defined in –bf-cs-buf, and that meets the min/max declaration. Essentially trying
incrementing combinations until the correct plain text is supplied. Highly unintelligent and generally used as
a last resort, except on machines with lots of GPGPU computing power.
Permutation. This vector rearranges words supplied by a wordlist and that meet the min/max. For instance,
min of 1 and max of 3 would take all words of 1 to 3 lengths and arrange them in every possible combination.
Can be effective against random password generators.
Table-lookup. This is a highly advanced attack vector that breaks a string into individual characters and
applies a rule as defined in --table-file to each. For instance, password is broken into each character: p a s s
w o r d. Hashcat then looks at the table file for rules that should be applied to each letter (in this case). Our
table for this example contains:
a=aA
p=pP
o=oO0 (last character is a zero)
Now each character that matches will be changed and tried. So for every a, a and A will be tried, for every p,
p and P will be tried, and for every o, o, O, and 0 (zero) will be tried. For those familiar with masking, it
would look something like this: -1 pP -2 aA -3 oO0 ?1?2ssw?3rd. If this looks completely foreign to you,
don’t worry, it will be explained later in the oclHashcat section where it is highly used.
1.4…………………………………Hashcat Specifics
Hashcat is especially good for removing a large number of hashes using quick methods like single dictionary
attacks (-a 0), toggle case (-a 2), etc. Though it is the world’s fastest CPU recovery tool, hashcat would still
take years to brute force a hash with a long plain text. This is where oclHashcat comes into play. Users
without a GPGPU capable graphics card can also use hashcat in place of the other hashcat tools albeit slower.
oclHashcat (cudaHashcat)
2.1………………………………………Overview
The latest version of oclHashcat is available for download from the Hashcat website here:
http://www.hashcat.net/oclhashcat . 7zip is still required to decompress the archive.
oclHashcat is the world’s fastest GPU based password recovery program, coded by atom for both GNU/Linux
and MS Windows, 32, and 64bit architectures. This is a big step up from CPU based solutions due to the
amount of data that GPU’s of today can process via the CUDA (NVIDIA), Stream (AMD), and OpenCL
(OSS) platforms. What would take hours on CPU can now take minutes on GPU, and heres how to do it.
Since the install procedure is the same as Hashcat, I will forego the explanation. If you are unsure, please
head back up to 1.1 and read the instructions there.
Once decompressed we see quite a few files and folders. First a brief explanation of each will be given, then
we will dive into oclHashcat itself.
Another quick note, atom has split oclHashcat into two main executables. The first, oclHashcat is for AMD
(ATI) users only. It will require the Stream SDK to be installed, see http://ati.amd.com for information on
how
to do this on your distribution/version of windows. ADDITIONALLY Windows AMD users will need either
a monitor or dummy plug connected to each card. The other main executable is cudaHashcat, which is for
NVIDIA users. For NVIDIA we only need the latest Forceware driver. No extra libs are required as CUDA
support is built into the driver. For the sake of simplicity, I will refer to both hashcats as oclHashcat, but
NVIDIA users remember, you should run cudaHashcat or it will return an error.
oclHashcat(32/64).(bin/exe) - is the main executable.
oclExample.(sh/cmd) - is an example file to act as a quickstart for oclHashcat. It will be used as an example,
but after reading this, should not be needed.
example.dict – is the plain text version of example.hash
example.hash – is the MD5 encoded strings from example.dict
docs/ - are the documents pertaining to oclHashcat
kernels/ - is the directory where hardware kernels are stored. This should not be touched unless directed by a
senior member of the hashcat community, this can break oclHashcat.
Using the provided examples, let’s do a quick demo run of oclHashcat.
Here we see a bunch of output that may not make much sense, but look, we have recovered some passwords!
Let’s delve into the options………
2.2………………………………………Options
Like hashcat oclHashcat comes with many options. Let’s take a look at what we have:
From the top we can see oclHashcat's usage. oclHashcat works a bit different from hashcat since it uses a left
and right mask. An easier way to think of this is each attempt is broken into two pieces. You can specify a
dictionary, or a charset for either side. For example:
./oclHashcat64.bin hashlist dict1 ?d?d?d?d
This would take each entry in dict1 and try all numbers from 0-9 in each of the ?d spots. You must specify a
left and right mask in oclHashcat. If you are still confused by this, don’t worry. It will be explained further in
Attack Vectors.
Now we will jump into the options that are available to us.
Again, the first 3 are self-explanatory so I will skip them.
--quiet : Suppresses output to STDOUT so your terminal/command prompt is not flooded with text.
Recovered hashes and program errors will still be displayed. No further input is required. Default: not used
--remove : Again, like hashcat as each hash is cracked, it is removed from the hashlist preventing oclHashcat
from attempting to crack it again. No further input is required. Default: not used
--output-file=FILE or –o : Specifies where cracked hashes should be written to. This should be used if you
plan to keep the hashes, or do not want to copy/paste them from a terminal or command prompt. Default: not
used
--output-file=cracked.out or –o cracked.out
--output-format=NUM : NUM can be 0, 1, or 2. Generally not needed, but if a plain text contains hex
characters this will need to be specified to prevent bad plain texts. Default: Mode 0
--output-format=0
--salt-file=FILE or –e : Provides salts for hashes missing their salt. Useful for vbull or xtcommerce hashes.
Default: not used
--gpu-devices=STR or –d : This is used to specify a number of GPUs (in order) to use if you have a multiGPU setup, or dual-GPU card. This is useful if you are running a window manager such as Gnome, KDE, or
Windows. Due to the sheer volume of data being processed, the desktop will be laggy or jerky; you can skip
your first GPU in this instance to ensure smooth operation of your desktop while attempting recovery.
Default: All cards will be used
-d 2,3,4
--gpu-accel=NUM or –n : gpu-accel defines the workload tuning. The higher this value is set, the harder your
cards will work. Higher values can be more efficient on brute force attempts while lower values tend to be
better for wordlist attacks. This has to do with the way that oclHashcat stores and retrieves data from the
cards GDDR. Be mindful of your power draw, the higher the number, the more power required. There is no
set best value. Try different values to find what’s right for you. Default: 80
-n 400
--gpu-loops=NUM : This is used for further workload tuning. More specifically, the number of words per
unit of work. Essentially provides more work to the left mask. Default: 128
--gpu-loops=1024
Charsets. Unlike Hashcat where your charsets have to be defined, oclHashcat has them built in. They are
broken into 5 groups:
?l is all lower case letters from a to z
?u is all upper case letters from a to z
?d is all digits from 0-9
?s is all special characters on a standard keyboard
?h is all ISO-8859 characters or “HEX” characters
These are used by themselves, or combined to form a mask. This will be discussed shortly in Attack Vectors.
Custom charsets can also be defined if you have an idea of what you are looking for. Briefly its usage would
be something like:
-1 abcdefg012345
Which would create a new charset for the session containing ONLY abcdefg012345 and utilized by
specifying ?1 in the mask. Again, we will look at this in Attack Vectors.
--increment : increments the right side mask by +1 for each position. Example, dict1 ?d?d?d?d --increment
would first run dict1 ?d, then dict1 ?d?d, and so on until all four(4) places are processed on the right side.
Needs no further input. Default: not used
--rule-left=RULE or –j and –rule-right=RULE or –k : Default: not used
There is already an amazing write up by d3ad0ne on this which can be found at http://ob-security.info/?p=31 .
Perhaps in a later revision he could add that information to this document.
--hash-mode=NUM or –m : again self-explanatory. Default Mode 0
-m 1000
2.3…………………………………………Attack Vectors
As stated before, oclHashcat uses a left and right mask with all its attacks. Either mask can be set to a
charset, or dictionary.
Combination attack : using a dictionary on both left and right masks.
./oclHashcat hashlist dict1 dict1
Bruteforce attack : exhausting single or multiple charsets on the left and right mask until the plain is found.
The example shows brute force of an eight char plain text using full alphanumeric + specials
./oclHashcat64.bin hashlist -1 ?l?u?d?s ?1?1?1?1 ?1?1?1?1
This can also be done by specifying which characters you want to attempt in a mask. This example shows a
brute force of an eight char plain text using only an upper character in position one, lower character in
positions two through six and digits in seven and eight.
./oclHashcat64.bin hashlist ?u?l?l?l ?l?l?d?d
These masks can be modified to suit your needs. You can also create more advanced masks. Here we will
tell oclHashcat to create the custom charset 1, 2, and 3. Again, attacking a hash we believe to be eight
characters, we will specify to try upper and lower case in position one, lower case and digits in positions two
through four, and finally lower case, digits, and special characters in positions five through eight.
./oclHashcat64.bin -1 ?u?l -2 ?l?d -3 ?l?d?s ?1?2?2?2 ?3?3?3?3
Hybrid attack : This is done by using a dictionary in one mask, and exhausting a specified charset in the other.
For this example, we will use a dictionary in the left mask, then append ?d?d?d?d via the right mask to use
0000-9999 at the end of each dictionary word.
./oclHashcat64.bin hashlist dict1 ?d?d?d?d
This can also be reversed. Using ?l?l?l?l in the left mask and a dictionary in the right.
./oclHashcat64.bin hashlist ?l?l?l?l dict1
We can also apply an advanced mask
./oclHashcat64.bin hashlist dict1 -1 ?l?d -2 ?d?s ?1?1?2?2
With both combination and hybrid attacks, we can add rules to the left and/or right side. Here we will
truncate, or delete, four spaces from the end of the left mask which will be a dictionary, and brute force four
spaces using the right mask. To better clarify, pass1234 is a word in our dictionary, one of our hashes plain
text is pass1122. When running the following command this is what will happen.
./oclHashcat64.bin hashlist –j ]]]] dict1 -1 ?l?u?d ?1?1?1?1
oclHashcat will delete 1234 from pass1234 and brute force those 4 spaces with full alpha numeric + digit. So
an attempt would look something like this:
passaaaa
passaaab
etc until:
pass1122 is reached and the hash has been recovered.
For the right side, you would replace –j with –k and adjust your command accordingly. For example:
./oclHashcat64.bin hashlist –k [[[[ ?d?d?d?d dict1
Would delete the first four(4) characters from dict1 and replace them with a brute force attempt of four(4)
digits.
While this may seem like a lot, we have hardly scratched the surface of what can be done with rules in
oclHashcat. It is recommended that you read http://ob-security.info/?=31 to get a better understanding of
what rules can be used and what they do.
2.4…………………………………oclHashcat Specifics
oclHashcat is only available on supported NVIDIA and AMD graphics cards. If your model of video card is
not available through either CUDA, Stream, or OpenCL you will not be able to run the ocl suite. Adequate
cooling and power MUST be provided as GPU processing is intensive and can cause hardware damage if
precautions are not taken. As agreed to before running oclHashcat, atom, nor any other member can be held
accountable for any damages as a result of running this software!
oclHashcat-plus (cudaHashcat-plus)
3.1……………………………………Overview
oclHashcat-plus specializes in wordlist attacks utilizing rules. As with the other hashcat’s, it can be found on
the hashcat website at http://www.hashcat.net/oclhashcat-plus/, and requires 7zip to decompress. Be aware
that as with all GPU cracking, you should be mindful of your hardware. Adequate cooling and power is
required or serious damage may occur. CUDA or Stream must have support or it will not run. Please check
the vendor websites (http://nvidia.com and http://amd.com respectively) to see if your card is supported.
Again we will start from within the decompressed oclHashcat-plus folder.
As before, a quick rundown of the applications and directories:
oclHashcat-plus(32/64).(bin/exe) – The main executable.
oclExample.(sh/cmd) - is an example file to act as a quick start for oclHashcat. It will be used as an example,
but after reading this, should not be needed.
example.dict – is the plain text version of example.hash
example.hash – is the MD5 encoded strings from example.dict
docs/ - are the documents pertaining to oclHashcat
kernels/ - is the directory where hardware kernels are stored. This should not be touched unless directed by a
senior member of the hashcat community, this can break oclHashcat.
Again, using the provided examples, we will do a demo run.
3.2………………………………Options
Jumping into the options now:
As before, I will skip the first three as they are self-explanatory.
--quiet : Suppresses output to STDOUT so your terminal/command prompt is not flooded with text.
Recovered hashes and program errors will still be displayed. No further input is required. Default: not used
--remove : Again, like hashcat as each hash is cracked, it is removed from the hashlist preventing oclHashcat
from attempting to crack it again. No further input is required. Default: not used
--output-file=FILE or –o : Specifies where cracked hashes should be written to. This should be used if you
plan to keep the hashes, or do not want to copy/paste them from a terminal or command prompt. Default: not
used
--output-file=cracked.out or –o cracked.out
--output-format=NUM : NUM can be 0, 1, or 2. Generally not needed, but if a plain text contains hex
characters this will need to be specified to prevent bad plain texts. Default: Mode 0
--output-format=0
--runtime=NUM : NUM can be any number from 0 on and specifies how many seconds oclHashcat-plus
should run. If you want a 2 minute run you would do: Default: not used
--runtime=120
--segment-size=NUM or –c : Specifies the amount of memory in MB that should be allowed for caching of
wordlists. If you are working with a limited amount of memory, this could be set so as not to interfere with
other services. The following switch would allow 10MB of words from your list to be cached. Default: 32
–c 10
--gpu-async : This is used for older NVIDA cards like the GTS 8800. It may increase performance by calling
a CPU loop to process while waiting for the GPU’s to stop processing. Does not require any further input.
Default: not used
--gpu-async
--gpu-devices=STR or –d : This is used to specify a number of GPUs (in order) to use if you have a multiGPU setup, or dual-GPU card. This is useful if you are running a window manager such as Gnome, KDE, or
Windows. Due to the sheer volume of data being processed, the desktop will be laggy or jerky; you can skip
your first GPU in this instance to ensure smooth operation of your desktop while attempting recovery.
Default: All cards will be used
-d 2,3,4
--gpu-accel=NUM or –n : gpu-accel defines the workload tuning. The higher this value is set, the harder your
cards will work. Higher values can be more efficient on brute force attempts while lower values tend to be
better for wordlist attacks. This has to do with the way that oclHashcat stores and retrieves data from the
cards GDDR. Be mindful of your power draw, the higher the number, the more power required. There is no
set best value. Try different values to find what’s right for you. Default: not used
-n 400
--gpu-loops=NUM : This is used for further workload tuning. More specifically, the number of words per
unit of work. Essentially provides more work to the left mask. Default: 128
--gpu-loops=512
--gpu-watchdog=NUM : Setting this will allow you to override the built in safety measure. Setting this higher
may cause permanent damage to your video cards, take care if raising this limit. For those who want to play
it safe, you can set this lower. Remember, oclHashcat-plus uses Celsius, not Fahrenheit. Default: 90
--gpu-watchdog=85
--generate-rules=NUM or –g : Tells hashcat to generate NUM rules to be applied to each attempt. The
following switch would have hashcat to randomly generate 512 rules on the fly to be used for that session.
Since oclHashcat-plus is built around rule based attacks, using a large number is a better choice here. All rule
generation is done on GPU so no CPU cycles are taken. This also makes it very efficient with a setting like:
Default: not used
–g 512000
--generate-rules-func-min/max=NUM : Specifies the number of functions that should be used. This number
can be unlimited but large numbers are not recommended. When used in conjunction with –g, any rule
outside of this setting will be ignored. IE: -g 512 generates l r, l ^f, and sa@, these are all valid rules to be
used, however, l ^f sa@ r $3 would be ignored as it contains 5 functions. Default: min=1 max=4
--hash-type=NUM or –m : again self-explanatory. Default: Mode 0
-m 1000
3.3………………………………..Attack Vectors
oclHashcat-plus can be used in two ways: with, or without rules. For heavily iterated hash types, it is
recommended to use oclHashcat-plus to do dictionary attacks. You may also use rules to increase the chance
to recover the password.
As stated before, oclHashcat-plus works extremely well with large rule files. You can choose rules in one of
two ways:
Pre-generated rule list using –r
./oclHashcat-plus64.bin hashlist dict1 –r rules/best64.rule
Or generated on the fly using –g
./oclHashcat-plus64.bin hashlist dict1 –g 512000
We can also omit past a certain length by using:
./oclHashcat64.bin hashlist dict1 –g 512000 --generate-rules-func-min=3 --generate-rules-func-max=7
As the options section states, this will ignore any rules with two or less functions, and any rule with eight or
more functions.
Generating large random rules can be very effective getting those last hashes recovered, while using targeted
rules will generally shoot more for patterns that are seen in everyday password. Experiment with both of
these to find what works best for you.
To use oclHashcat-plus in straight mode, or dictionary only you would do something along the lines of:
./oclHashcat64.bin hashlist dict1 –o recovered.out
This will do the same as hashcat’s –a 0.
3.4………………………….oclHashcat-plus Specifics
oclHashcat-lite, as with all GPU based hashcat programs, is an extremely efficient rule based recovery tool.
For best results, you should write rule files based on the password requirements from where the list was
obtained. And again, properly monitor your hardware so as not to cause damage by improper cooling.
oclHashcat-lite (cudaHashcat-lite)
4.1……………………………Overview
oclHashcat-lite is a simple GPU based brute forcer that has been optimized for single hash recovery. It can be
obtained from the hashcat website here: http://hashcat.net/oclhashcat-lite, and requires 7zip to decompress.
In many ways oclHashcat-lite acts like oclHashcat but with far better speed (ON SINGLE HASH ONLY). If
you are looking to recover a hash from an SL3 locked phone, or only need to recover the hash belonging to
Admin on a Windows machine that has thus far eluded you oclHashcat-lite is what you want.
Here we see the directory structure of oclHashcat-lite. Pretty simple.
oclHashcat-lite(32/64).(bin/exe) - the main executable
oclExample.(sh/cmd) - is an example file to act as a quick start for oclHashcat-lite. It will be used as an
example, but after reading this, should not be needed.
docs/ - are the documents pertaining to oclHashcat
kernels/ - is the directory where hardware kernels are stored. This should not be touched unless directed by a
senior member of the hashcat community, this can break oclHashcat-lite.
Jumping straight into it, here we have run ./oclExample.sh. The program was run and was aborted to keep
within image constraints for this document. What we can see however, is that the speed far surpasses
oclHashcat.
4.2………………….Options
Like the other hashcat’s, oclHashcat-lite shares my features. By now you should be fairly familiar with them,
but we will cover them once more.
The first three options are again skipped. We begin with:
--quiet : Suppresses output to STDOUT so your terminal/command prompt is not flooded with text.
Recovered hashes and program errors will still be displayed. No further input is required. Default: not used
--remove : Again, like hashcat as each hash is cracked, it is removed from the hashlist preventing oclHashcat
from attempting to crack it again. No further input is required. Default: not used
--output-file=FILE or –o : Specifies where cracked hashes should be written to. This should be used if you
plan to keep the hashes, or do not want to copy/paste them from a terminal or command prompt. Default: not
used
--output-file=cracked.out or --o cracked.out
--output-format=NUM : NUM can be 0, 1, or 2. Generally not needed, but if a plain text contains hex
characters this will need to be specified to prevent bad plain texts. Default: Mode 0
--output-format=0
--session=STR : Allows you to name a session to be restored at a later date. If you would like stop a run
before it completes and start it again, this should be set. You may name multiple sessions, but when restoring
using --restore below, the name should be identified. Default: not used
--session=md5
--restore : Restores a previous session. Must be used in conjunction with –session=STR. Default: not used
--session=md5 --restore
--restore-timer=NUM : Saves your current restore file every NUM seconds. If you lose power to the box,
your restore file will contain the progress it was last saved at. While writing a file every second is not
recommended, writing one every 30 seconds could be beneficial. Default: 60
--restore-timer=30
--gpu-async : This is used for older NVIDA cards like the GTS 8800. It may increase performance by calling
a CPU loop to process while waiting for the GPU’s to stop processing. Does not require any further input.
Default: not used
--gpu-async
--gpu-devices=STR or –d : This is used to specify a number of GPUs (in order) to use if you have a multiGPU setup, or dual-GPU card. This is useful if you are running a window manager such as Gnome, KDE, or
Windows. Due to the sheer volume of data being processed, the desktop will be laggy or jerky; you can skip
your first GPU in this instance to ensure smooth operation of your desktop while attempting recovery.
Default: All cards will be used
-d 2,3,4
--gpu-accel=NUM or –n : gpu-accel defines the workload tuning. The higher this value is set, the harder your
cards will work. Higher values can be more efficient on brute force attempts while lower values tend to be
better for wordlist attacks. This has to do with the way that oclHashcat stores and retrieves data from the
cards GDDR. Be mindful of your power draw, the higher the number, the more power required. There is no
set best value. Try different values to find what’s right for you. Default: not used
-n 400
--gpu-loops=NUM : This is used for further workload tuning. More specifically, the number of words per
unit of work. Essentially provides more work to the left mask. Default: 1024
--gpu-loops=1024
--gpu-watchdog=NUM : Setting this will allow you to override the built in safety measure. By default
oclHashcat-plus will automatically end processing when one card reaches 90c. Setting this higher may cause
permanent damage to your video cards, take care if raising this limit. For those who want to play it safe, you
can set this lower. Remember, oclHashcat-plus uses Celsius, not Fahrenheit. Default: 90
--gpu-watchdog=85
Charsets. Again, where your charsets will be defined, oclHashcat-lite has some built-in. This time, they are
broken into 8 groups:
?l is all lower case letters from a to z
?u is all upper case letters from a to z
?d is all digits from 0-9
?s is all special characters on a standard keyboard
?h is all ISO-8859 characters or “HEX” characters
?D is all 8-bit characters from the German alphabet
?F is all 8-bit characters from the French alphabet
?R is all 8-bit characters from the Russian alphabet
Please note that ?D, ?F, and ?R must be capitalized to function properly.
These again, are used by themselves, or combined to form a mask. This will be discussed shortly in Attack
Vectors.
Custom charsets can also be defined if you have an idea of what you are looking for. Briefly its usage would
be something like:
-1 abcdefg012345
Which would create a new charset for the session containing ONLY abcdefg012345 and utilized by
specifying ?1 in the mask. Again, we will look at this in Attack Vectors.
--pw-min/max=NUM : This will specify the minimum and maximum number of character spaces to try when
brute forcing. The following command will attempt all character combinations from four to eight spaces.
Only lengths starting from min, or ending at max will be attempted. Default: min=4 max =15
--pw-min=4 --pw-max=8
--hash-type=NUM or –m : If you haven’t gotten this by now, I don’t know what to tell you. Default: Mode 0
--pw-skip=NUM : Skip to the specified number of passwords. Useful for distributed recovery. Allows you to
skip attempts that are being tried on another box, so work is not duplicated. Should be used in conjunction
with --pw-limit.
--pw-skip=10000 on box one
--pw-skip-20000 on box two
--pw-limit=NUM : Aborts the attempt when NUM passwords have been tried. Use in conjunction with –pwskip on all but your first box.
--pw-limit=10000
4.3………………………….Attack Vector
oclHashcat-lite allows you to brute force at pretty amazing speeds. Since we only have a single attack vector
available to us, we will cover how to apply this to some common hashes. Using what we know about masks
from section 2, we will use here.
With the addition of SL3, there has been a lot of talk about it, and how to recover the mastercode embedded in
each SL3 encoded phone. Using atom’s forum post, we will cover this quickly then move on to a couple
other hash types.
SL3 is a bit odd as it uses a hex encoded SHA-1 hash that has been salted with the IMEI that every cellular
phone is required to have. The IMEI is also hex encoded. Your hex encoded IMEI must have a 00 appended,
and prepended to it. So if your IMEI is 35152304783734 you would add 00 to the beginning and end to get
003515230478373400. Some IMEI may contain 15 or more digits, if this is the case, remove the last digits
until you get 14. We will specify that our mask (-1) should try 00, 01, 02, and on, in each ?1 field. An
example of this is as follows:
./oclHashcat-lite –m 1900 –n 160 -1 00010203040506070809 --outfile=recovered.txt
21B1E417AF2DE6496772BCC2FE33D2593A9BB7A0:003515230478373400 ?1?1?1?1?1?1?1?1?1?1?1?1?
1?1?1
For MD5 we could use something like this:
./oclHashcat-lite64.bin 9b957cc6ab97cbf88c4f6f0f146adafe –o recovered.out
And finally, we will add some specifics in. Here oclHashcat-lite has been told to attempt from four to 10
characters, using ?l?u?d?s?F since we believe the password may belong to someone French.
./oclHashcat-lite64.bin c39e614e6b3f35a70541a41bcd65ab97 --bf-pw-min=4 --bf-pw-max=10
-1 ?l?u?d?s?F ?1?1?1?1?1?1?1?1?1?1 --o recovered.txt
4.4…………………….oclHashcat-lite Specifics
oclHashcat-lite is designed to offer better single hash performance. It utilizes many of the oclHashcat
features, and adds a couple new ones. oclHashcat-lite is only as powerful as you make it. Simply giving it a
hash and letting it run its course will work, but may take days or weeks. You should use the masking options
available to you in conjunction with the password requirements. This can mean the difference between a
week, and 10 minutes.
As with all GPU applications, appropriate precautions must be taken or serious damage may occur.
Hashcat-utils
Hashcat-utils is a set of tools designed to help you work with lists, create lists, modify lists, etc. Here I will
give you a quick run-down on what each of these do, and how to use them.
Combinator – This will join two files into a single file. For example, if you have two dictionaries, you can
use combinator to join them together to make one file. This can be useful for long passwords as people often
choose phrases to meet complexity requirements. Usage would be something like:
./combinator.bin dict1.txt dict2.txt > dict3.txt
Expander – Expander works by taking a string of characters, or wordlist, and rearranging it into every
possible combination. This should be used carefully as running expander on a large list could take 12+ hours,
and make a wordlist that would be too big to be of benefit. Usage would be:
./expander.bin < dict1.txt > dict1.expanded
If dict1.txt contained abcd123!@# we could see all combinations of this in dict1.expanded.
Gate – Allows you to split work by creating multiple instances of a program based on a percentage of the
wordlist. Hard to explain so I’ll just give you the example. Here we assume a quad core processor:
./gate.bin 4 0 < dict | ./john --format=md5 --stdin hash.list
./gate.bin 4 1 < dict | ./john --format=md5 --stdin hash.list
./gate.bin 4 2 < dict | ./john --format=md5 --stdin hash.list
./gate.bin 4 3 < dict | ./john --format=md5 --stdin hash.list
Len – Len takes a dictionary as an input and extracts words of a specified lenth. Useful for removing
passwords that may exceed what is supported by the algo.
./len.bin 1 8 < dict1.dict > dict1.1-8
Permute – Running permute on a dict will arrange each string in every possible combination. As perviously
explained, permuting abc would give you, abc, bac, cba, cab. Do not use this on large dicts.
./permute.bin < dict > dict.permute
Req – Using req.bin on a file will allows you to extract words that contain characters specified. Options are
as follows:
1 – all words that contain at least one lower case character
2 – all words that contain at least one upper case character
4 – all words that contain at least one digit
8 – all words that contain at least one special, or hex character
These can also be added so that multiple character types can be requisitioned. For example:
./req.bin 12 < dict > dict.req
Would take each word with at least one special/hex char, and at least one digit. Create opts by adding the
desired numbers together.
Splitlen – Splitlen cuts words to a length supported by hashcat. Words from 1 – 15 characters will be output
to /path. This number can be increased by editing the splitlen.c file and changing the value from 15 to the
desired number. You can also change 1 to a high number if you wish to extract word of say 8 – 20 length.
This will require the file be recomplied afterwards.
./splitlen.bin /path/ < dict
Troubleshooting
Firstly, ensure that your system is setup properly. This means the latest drivers installed, applicable version of
Stream, and latest version of hashcat/oclHashcat. If using AMD graphics cards, monitors and/or dummy
plugs are required to be connected and screens available on the desktop.
Since this section has tons of information that will need to be read through, and not everyone’s problems will
be known until they happen, it will be added to the todo list. Please use the hashcat forums until then.
http://hashcat.net/forum
References
Hashcat suite.
http://hashcat.net/forums
Rule-Fu: The art of word mangling. http://ob-security.info/?p=31
Rockyou dictionary
http://www.skullsecurity.org/wiki/index.php/Passwords
Password exploitation class
http://www.irongeek.com/i.php?page=videos/passwordexploitation-class
Backtrack Linux
http://backtrack-linux.org
ToDo
Expand upon the rule section
Changelog
19 May 2011 - 1.0a Fixed typo and corrected formatting.
20 May 2011 - 1.0b Fixed ob-security links.
6 June 2011 - 1.1 Added new hashcat options.
9 August 2011 - 1.2 Added hashcat-utils


![Anwenderhandbuch für xt:Commerce 3.0.4 [SP2.1]](http://vs1.manualzilla.com/store/data/006783642_1-08d60571a7e2d062868696d30c15140a-150x150.png)