1
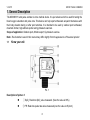
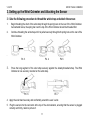
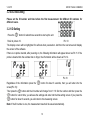
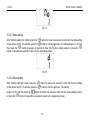
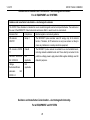
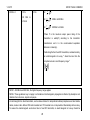
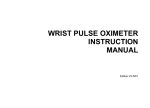
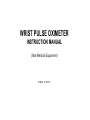
WRIST PULSE OXIMETER INSTRUCTION MANUAL (Non-Medical Equipment) Edition: V1.0W11 V1.0W11 WRIST PULSE OXIMETER Copyright Our company owns all rights to this unpublished work and intends to maintain this work as confidential. Our company may also seek to maintain this work as an unpublished copyright. This publication is to be used solely for the purpose of reference, operation, maintenance or repair of our equipment. No part of this can be disseminated for other purposes. In the event of inadvertent or deliberate publication, our company intends to enforce its rights to this work under copyright laws as a published work. Those having access to this manual may not copy, use, or disclose the information in this work unless expressly authorized by our company to do so. All information contained in this manual is believed to be correct. Our company shall not be liable for errors contained herein nor for incidental or consequential damages in connection with the furnishing, performance, or use of this material. This publication may refer to information and protected by copyrights or patents and does not convey any license under the patent rights of our company, nor the rights of others. Our company does not assume any liability arising out of any infringements of patents or other rights of third parties. Content of the manual is subject to changes without prior notice. ALL RIGHTS RESERVED Issue date: NOV 12, 2009 2 V1.0W11 WRIST PULSE OXIMETER Caution! Read this entire manual carefully before using the wrist oximeter. The information in this manual has been checked carefully and is believed to be accurate. In the interest of continued product development, our company reserves the rights to make changes and improvements to this manual and the products it describes at any time, without notice or obligation. Precautions for use Read and follow all safety instructions before using the Wrist Oximeter. Contraindications DO NOT use the Wrist Oximeter in a magnetic resonance imaging (MRI) environment. Explosion Hazard: Do not use the Wrist Oximeter in an explosive atmosphere or in the presence of flammable anesthetics or gas. General operation of the Wrist Oximeter might be affected by the presence of an electrosurgical unit (ESU). The wrist oximeter has no alarms. It will not sound if the amount of oximeter in your body is low or if your pulse rate is too high or too low. Do not use the wrist oximeter when the alarms are required! Do not place the wrist oximeter in liquid or clean it with agents containing ammonium chloride, isopropyl alcohol,or products that are not listed in this instructions manual. The wrist oximeter must be able to measure your pulse properly to give you an accurate reading. Do not put the device on the same arm when using a blood pressure cuff or monitor. Warnings! Discontinue use of adhesive tape strips if the user exhibits an allergic reaction to the adhesive material. 3 V1.0W11 WRIST PULSE OXIMETER Do not stretch the adhesive tape while applying the pulse oximeter sensor. Use in emergency vehicles with communication systems may affect accuracy. The use of accessories, sensors, and cables other than those listed in this manual may result in increased emission and /or decreased immunity of this device. Ensure that the wrist band fits comfortably on the user’s arm. Do not over-tighten the wrist band. Pulse oximeter readings might be affected while users are being defibrillated. Radios and cell phones or similar devices may affect the wrist oximeter and should be kept at least 7 feet away from the device. SpO2 measurements may be adversely affected in the presence of high ambient light. The device should not be used adjacent to or stacked with other equipment. If adjacent or stacked use is necessary, the device should be observed carefully to verify normal operation. DO NOT use the oximeter for diagnosing or treating any illnesses. Cautions! Before using any sensor, carefully read the direction for use. Do not, under any circumstance, perform any testing or maintenance on the wrist oximeter before and after it is being used. Verify that all visible indicators appear during the start-up (initialization) sequence. If any indicator does not appear, do not use wrist oximeter. Contact Choice Customer support for assistance. Field strengths from fixed transmitters,such as base stations for radio (cellular/cordless) telephones and land mobile radios,amateur radio,AM and FM radio broadcast towers and TV broadcast towers may affect accuracy. 4 V1.0W11 WRIST PULSE OXIMETER If the wrist oximeter fails to respond as described, refer to “Error code” or discontinue until the situation has been corrected by qualified personal. Do not remove any covers other than the battery cover when replacing battery. There are no userserviceable parts inside. Battery might leak or explode if used or disposed of improperly. Remove the battery if the oximeter will be stored for more than 1 months. Follow local governing ordinances and recycling instructions for disposal or recycling of the device and device components including batteries. The wrist oximeter is a precision electronic instrument and must be repaired by trained personnel only. The wrist oximeter measures arterial oxygen saturation of functional hemoglobin. Significant levels of dysfunctional hemoglobin(caused by sickle cell anemia, carbon monoxide,etc.) could affect the accuracy of the measurement. Check the pulse oximeter sensor application site frequently to determine the positioning of the sensor and the circulation and skin sensitivity of the user. If there is any discomfort on your measured application,relocate the sensor to another finger. Do not tamper with, or hang lanyard from the flexible circuit. Warning! DO NOT use the wrist oximeter when the alarms are required! Unpacking and inspecting the wrist oximeter Contact the carrier immediately if the shipping carton for the wrist oximeter is damaged. Confirm that the items listed below are packed with the wrist oximeter: 5 V1.0W11 WRIST PULSE OXIMETER Contents of package: One 1.5V AAA alkaline Battery. An instruction manual Finger-clip sensor One reusable wristband MedView software CD Data cable (model: M-50G07CSO) 6 V1.0W11 WRIST PULSE OXIMETER CONTENT 1. General Description............................................................................................................................. 8 2. Inserting and Replacing the Batteries......................................................................................... 10 3. Setting up the Wrist Oximeter and Attaching the Sensor .................................................... 11 4. Measurement ....................................................................................................................................... 17 5. Specifications ...................................................................................................................................... 18 6. Error code ............................................................................................................................................. 21 7. Key symbols ........................................................................................................................................ 21 8. Maintenance and storage ................................................................................................................ 22 9. Warranty and Repair.......................................................................................................................... 22 APPENDIX A Declaration of manufacturer .................................................................................. 25 7 V1.0W11 WRIST PULSE OXIMETER 1. General Description The MD300W11 wrist pulse oximeter is not a medical device. It is just a device which is used for testing the blood oxygen saturation and pulse rate. This device can help sport enthusiasts acquaint themselves with their body situation during or after sport activities. It is intended to be used by outdoor sport enthusiast, mountain climber, high-altitude sporter and gymnasium exerciser. Scope of application: Outdoor sport; Athletics sport; Gymnasium exercise. Note: The illustrations used in this manual may differ slightly from the appearance of the actual product. 1.1 Know your unit Pic. 1 Description of picture 1: ① SpO2: Real-time SpO2 value measured. (Now the value is 98%) ② PR: Real-time pulse rate value measured.(now the value is 65 pbm) 8 V1.0W11 1.2 WRIST PULSE OXIMETER ③ : Pulse Strength bar graph, the height of the pulse bar graph is proportional to the pulse amplitude. ④: Battery box cover. ⑤: Reusable Wristband ⑥ ⑦ : Power / data setting button, press this button for a long time, you can turn on or turn off the unit; under setting menu, press this button for a short time, you can set the data. ⑧ ⑨: Sensor : OK button / parameter selection button : Low battery voltage Product Features Exquisite, compact & light design. Displaying & recording SpO2 &PR rate. Wearing around wrist, very compact design, easy-to-carry on hand, a weight of only 26g. A safe and convenient design of keeping sweat outside the product. One AAA battery, easy to replace Low power consumption. 9 V1.0W11 WRIST PULSE OXIMETER 2. Inserting and Replacing the Batteries (1). Pull the battery cover indicated by the arrow, and lift the end of the cover upwards. Note: Do not pull too hard on the cover. (2). Insert one battery as indicated in Picture 2. Note: Make sure that install the battery with correct battery polarity. (3). Remove the old battery and discard or recycle them according to local applicable regulations. Pic. 2 (4). Carefully re-position the battery cover. Do not force the cover into place; it fits only when positioned properly. (5). If the wrist oximeter does not turn on when you press the power on button, reinsert the battery. Note: The battery indicator will appear when the voltage is too low, please replace the battery in time. The Wrist Oximeter contains non-volatile memory, so removing or replacing batteries will not affect the data saved in memory. Stored data will remain in memory until overwritten by newer data or cleared fro m memory with MedView software. 10 V1.0W11 WRIST PULSE OXIMETER 3. Setting up the Wrist Oximeter and Attaching the Sensor 3.1 Use the following procedure to thread the wrist strap and attach the sensor. 1. Begin threading the short of the wrist strap through the spring bars on the rear of the Wrist Oximeter. As illustrated below, the spring bar near the top of the Wrist Oximeter should be threaded first. 2. Continue threading the wrist strap until it is pulled securely through both spring bars on the rear of the Wrist Oximeter. . Pic. 3 3. Pic. 4 Pic.5 Press the long segment of the wrist strap securely against the already-threaded strap. The Wrist Oximeter is now securely mounted on the wrist strap. Pic. 6 Pic. 7 4. Apply the wrist band securely and comfortably around the user’s wrist. 5. Plug the sensor into the connector at the top of the wrist oximeter, ensuring that the sensor is plugged correctly and firmly, refers to picture 8. 11 V1.0W11 WRIST PULSE OXIMETER Pic.8 NOTE: DO NOT insert the sensor incorrectly; otherwise there is no Oxygen Saturation signal. 1. Place the user’s finger inside the sensor. Refer to the respective sensor instructions for specific information about placement and user safety, shown as picture 9. 2. Place the user’s finger inside the sensor. Refer to the respective sensor instructions for specific information about placement and user safety, shown as picture 9. Pic.9 12 V1.0W11 WRIST PULSE OXIMETER 3.2 ID &Time setting Please set the ID number and time before the first measurement. Set different ID numbers for different users. 3.2.1 ID Setting Press the “ ” button for about three seconds to start up the unit. Refer to picture 10. Pic.10 The display screen will be highlighted for self-test when powered on. And then the next screen will display the version of the software. If there is no probe inserted, after powering on, the following information will appear shown as Pic.11. If the probe is inserted into the oximeter but no finger, the information will be shown as Pic.12. Pic.11 Regardless of the information press the “ screen(Pic.13): Pic.12 Pic.13 ” button for about 3 seconds, then you will enter into the Then press the “ ” button and the Id number will change from 1~10. Set the number and then press the “ ” button for a short time, you will save the settings and enter into the time setting screen. If you press the “ ” button for about 3 seconds, you will return to the measuring screen. Note: If the ID number is one, the measurement result will be saved automatically. 13 V1.0W11 WRIST PULSE OXIMETER 3.2.2 Time setting Press the “ ” button for about three seconds to enter into the parameter setting screen. And then press the “ ” button for one second repeatedly, the parameter will display as following order: ID, Y (year), No (month), d (date), H (hour), N1 (minute), S (seconds). Press the “ ” to set the correct number. 3.2.2.1 Year setting Press the “ ” button for about three seconds to enter into the parameter setting screen. And then press the “ ” button for one second repeatedly, to enter into the year setting picture shown as picture 14. Press “ ” button to set the right year. The setting range is 0~20, it means that the year is from 2000 to 2020. After finishing setting the year, press the “ ” button for about one second to enter into other parameter setting screen or press the “ ” button for about three seconds to return to the measuring screen. Pic.14 3.2.2.2 Month setting After finishing setting the year, press the “ ” button for about one second to enter into the month setting screen shown as Pic.15, And then press the “ ” button to set the right month. The setting range is 1~12. And then press the “ ” button for about one second to enter into the date setting screen or press the “ ” button for about three seconds to return to the measuring screen. 14 V1.0W11 WRIST PULSE OXIMETER Pic.15 3.2.2.3 Date setting After finishing setting the month, press the “ ” button for about one second to enter into the date setting screen shown as Pic.16, and then press the “ ” button to set the right date. The setting range is 1~31. And then press the “ ” button for about one second to enter into the hour setting screen or press the “ ” button for about three seconds to return to the measuring screen. Pic.16 3.2.2.4 Hour setting After finishing setting the date, press the “ ” button for about one second to enter into the hour setting screen shown as Pic.17, and then press the “ ” button to set the right hour. The setting range is 0~23. And then press the “ ” button for about one second to enter into the minute setting screen or press the “ ” button for about three seconds to return to the measuring screen. 15 V1.0W11 WRIST PULSE OXIMETER Pic.17 3.2.2.5 Minute setting After finishing setting the hour, press the “ ” button for about one second to enter into the minute setting screen shown as Pic.18, and then press the “ ” button to set the right minute. The setting range is 0~59. And then press the “ ” button for about one second to enter into the minute setting screen or press the “ ” button for about three seconds to return to the measuring screen. Pic.18 3.2.2.6 Second setting After finishing setting the minute, press the “ ” button for about one second to enter into the second setting screen shown as Pic.19, and then press the “ ” button to set the right minute. The setting range is 0~59. And then press the “ ” button for about one second to enter into the minute setting screen or press the “ ” button for about three seconds to return to the measuring screen. After setting parameter, you can measure the SpO2 & PR. 16 V1.0W11 WRIST PULSE OXIMETER Pic.19 4. Measurement (1). After parameter setting, you can press the “ ” button for about three seconds to return to the measuring screen. Place the user’s finger inside the sensor shown as the picture 20. Refer to the respective sensor instructions for specific information about placement and user safety. The signal searching picture is shown as Pic.21. Pic.20 Pic.21 Pic.22 (2). The measuring result shown as Pic.22. Description of picture 22: The SpO2 value is 89% and the PR value is 68bpm. Important:Any of the following conditions may reduce the performance of the wrist oximter: -----Flickering or very bright light; -----Weak pulse quality; 17 V1.0W11 WRIST PULSE OXIMETER -----Arterial catheters; -----Nail polish,and/or artificial nails; -----Any tests recently performed on you that required an injection of intravascular dyes. NOTE: Inaccurate measurement can be caused by: Incorrect application of the sensor. Placement of the sensor on an extremity with a blood pressure cuff, arterial catheter, or intravascular line. User’s moving. 5. Specifications 5.1 Parameters SpO2: Display range: 0%~100% Measuring range: 70%~100% Measuring accurate: 80%~100% ±2% ; 70%~79% ±3% ; <70% unspecified. PR Displaying range: 0~254bpm Measuring range: 30~235bpm Measuring accurate: 30~100bpm ±2bpm ; 101~235bpm 5.2 Operating conditions Temperature: 5℃~40℃ 18 ±2%. V1.0W11 WRIST PULSE OXIMETER Relative humidity: ≤80%, no condensation Atmosphere pressure: 86kPa~106kPa Power supply: DC 1.5V Battery: One AAA alkaline battery. Continuous measurement time: Twelve hours 5.3 Package & Storage conditions Temperature: -20℃~55℃ Relative humidity: ≤93%, no condensation 5.4 weight & Dimensions Weight: 26g Dimension: 60mmX50mmX20mm (length×width×height) 5.5 Automatic storage Total storage time: 30 h Frequency: the interval between two records is 1s. Note: Data is saved automatically, when the oximeter is started. If the register of the oximeter is full, the newest data will replace the oldest data. 5.6 Data transmission Transmission method: Cable transmission Data Cable Interface: USB Note: Connect the oximeter with the computer by the data cable, then you can transmit data saved in the oximeter to the computer through the transmission software, refers to the transmission software’s manual. 19 V1.0W11 WRIST PULSE OXIMETER 5.7 Indication function Battery power indication: When the battery voltage is less than 1.2V, the low power indication light will be lighted; when the battery voltage is less than 1.1V, the unit will power off automatically. Probe off indication: when the probe is not connected to the unit, the following indication picture will appear. Refer to Pic.11. No finger indication: when the probe is connected to the unit but the finger is out, the following indication picture will appear. Refer to Pic.12. Error 1 indication, refer to picture 23; Error 2 indication, refer to picture 24; Error 13 indication, refer to picture 25. Pic.23 Pic.24 20 Pic.25 V1.0W11 WRIST PULSE OXIMETER 6. Error code In measuring mode, press the right button, the error code will be displayed if there is. Refer to the following table. Error code Malfunction phenomenon E1 Fail to measure normally as the inner SpO2 module is broken-down. E2 Fail to store and read data, but can enter into normal state. E13 Low battery voltage Note: Please DO NOT repair or disassemble the unit, when the error code appears. Please contact to our service department in time. 7. Key symbols Symbol Meaning Symbol Meaning OK button / Parameter selection Type BF applied part button Attention, consult Accompanying documents PR Power / Data setting button SpO2 Pulse rate Low battery voltage Hemoglobin saturation Protected against dripping water 21 V1.0W11 WRIST PULSE OXIMETER 8. Maintenance and storage 1. Remove the battery if you not to use it for long time. 2. Clean the wrist oximeter separately from its associated sensors. 3. Clean the wrist oximeter with a soft cloth dampened with isopropyl alcohol. Do not pour or spray any liquids onto the wrist oximeter, and do not allow any liquid to enter any openings in the device. Allow the wrist oximeter to dry thoroughly before reusing. 4. Store the wrist oximeter within the stated environmental specifications. See “Specifications” for additional information. 9. Warranty and Repair 9.1 Service Method 1) Service respond time: 9:00am~17:30pm, Monday to Friday 2) Service support: Our company will offer user telephone and e-mail technology support and parts change. Parts change: 1) Our company will change parts if it is necessary free of charge in the warranty period. Because parts are the sources of maintenance, user should send them back to our company if not specified. 2) Update the system software free of charge. 22 V1.0W11 WRIST PULSE OXIMETER 9.2 Exempt and limitation 1) Our company isn’t responsible for such damages caused by force majeure. For example: fire, thunder flash, flood, cyclone, hail, earthquake, house collapse, commotion, plane failing and traffic accident, deliberate damage, lack of fuel or water, labor and capital bother, strike and stop-working etc. 2) No-service offer The corresponding charge and insurance charge of disassembling, refurbishing, repackaging and moving the oximeter or the part of it. The damage caused by the third company not commended by our company to adjust, install replace the parts of the oximeter. The damage and failure caused by user or its representative doesn’t comply with the operator’s manual. 3) The oximeter is installed or connected with such external device without our company permission a s printer, computer, data cable and lead to oximeter failure. Our company will charge for the maintenance. 4) Responsibility limitation During the period of maintenance contract validity, if user changes the parts manufactured by other manufacturers without our company permission, our company is entitled to terminate contract. 9.3 User Guarantee 1) Please read user manual carefully before operation. 2) Please operate and make daily maintenance as request of manual and guarantee. 3) Power supply and environment. 9.4 No-guarantee principle 23 V1.0W11 WRIST PULSE OXIMETER There is no-dispelled smut and not-original mark in the crust. There is physical damage on oximeter and its accessory. There are liquid leftover and eyewinker on oximeter and lead to short circuit and plug board failure. All the probe and accessories belong to consumption and beyond free change range. Such damage of probe caused by mechanical force doesn’t belong to free change range. Due to the measurement, it is difficult to measure or the measurement results are inaccurate. Not-original package leaded to oximeter during transportation Not our company professionals or authorized personnel disassemble oximeter and lead to oximeter failure Not carefully read manual and so wrong operation leads to oximeter damages and failures. Any product of any other manufacturer. 9.5 User’s Special Request for Guarantee Time Our guarantee constitution for oximeter complies with electronic product after-sale service standard regulated by national laws. We regulate the guarantee time of host board is one year and all the accessories are six months. If users request the guarantee time beyond our regulated guarantee time, we should take it into consideration. Return Policy: For any material to be serviced or returned to our company, the following procedures should be followed: -------Obtain return authorization: -------Contact the Technical Support Department and obtain a RMA (Return Materials Authorization) number. -------The RMA number must appear on the outside of the shipping container. -------Return shipments will not be accepted if the RMA number is not clearly visible. -------Please provide the model number, serial number (SN), and a brief description of the reason for return. Freight policy: 24 V1.0W11 WRIST PULSE OXIMETER ------Within Warranty: The customer is responsible for freight & insurance charges when the equipment is shipped to our company for service (this includes custom charges). Our company is responsible for the freight & insurance charges from us to the customer. ------After Warranty: The customer is responsible for any freight & insurance charges for returned product. 9.6 Repackage Take all the accessories and put them into plastic cover Try to use original package and packing material: User will be responsible for such damage caused by bad package during transportation. Please offer guarantee list and copy of invoice to standby with the period of guarantee. Please describe failure phenomenon in detail and altogether offer oximeter. APPENDIX A Declaration of manufacturer 25 V1.0W11 WRIST PULSE OXIMETER Guidance and manufacture's declaration - electromagnetic emission For all EQUIPMENT and SYSTEMS Guidance and manufacture's declaration - electromagnetic e mission The 300W11 Pulse Oximeter is intended for use in an electromagnetic environment specified below. The customer or the user of the MD300W11 Pulse Oximeter should assure that it is used in such an environment. Emission Test Compliance Electromagnetic environment-guidance RF emission CISPR11 Group 1 The MD300W11 pulse oximeter uses RF energy only for its internal function. Therefore, its PR emissions are very low and are not likely to RF emission CISPR 11 Class B The MD300W11 pulse oximeter is suitable for use in all establishments, including domestic establishments and Those directly connected to the Harmonic emissions IEC 61000-3-2 Not applicable public low-voltage power supply network that supplies buildings used for domestic purposes. Voltage fluctuations/flicker emissions IEC 61000-3-3 Not applicable cause any interference in nearby electronic equipment, Guidance and manufacture’s declaration – electromagnetic immunityFor all EQUIPMENT and SYSTEM 26 V1.0W11 WRIST PULSE OXIMETER Guidance and manufacture's declaration - electromagnetic immunity The 300W11 Pulse Oximeter is intended for use in an electromagnetic environment specified below. The customer or the user of the MD300W11 Pulse Oximeter should assure that it is used in such an environment. Immunity Test IEC 60601 Test level Compliance Level Electromagnetic environment guidance Electrostatic Discharge (ESD) ±6kV contact ±8kV air ±6kV contact ±8kV air Floors should be wood, concrete or ceramic tile. If floor are converted with Synthetic material, the relative humidity should 3A/m 3A/m IEC610004-2 be at least 30% Power frequency(50HZ) magnetic field IEC 61000-4-8 Guidance and manufacture’s declaration-electromagnetic immunityFor EQUIPMENT and SYSTEMS that are not LIFE-SUPPORTING Guidance and manufacture's declaration - electromagnetic immunity The 300W11 Pulse Oximeter is intended for use in an electromagnetic environme nt specified below. The customer or the user of the MD300W11 Pulse Oximeter should assure that it is used in such an environment. Immunity Test Conducted RF IEC 61000-4-6 IEC 60601 Test level Compliance Level Electromagnetic environment guidance 3Vrms 3V Portable and mobile communications equipment should be used no closer to any part of the MD300W11 pulse oximeter, including cables, than the recommended separation distance calculated from the equation applicable to the frequency of the transmitter. 150 KHz to 80MHz Radiated RF IEC Recommended separation distance 27 V1.0W11 61000-4-3 WRIST PULSE OXIMETER 3V/m 80 MHz d= 3.5 3V/m V1 to 2.5GHz P d= 3.5 E1 P 80MHz to 800MHz d= 7 E1 P 800MHz to 2.5GHz Where P is the maximum output power rating of the transmitter is watts(W) according to the transmitter manufacturer and d is the recommended separation distance in meters(m). Field strengths from fixed RF transmitters, as determined by an electromagnetic sit survey, a should be less than the compliance level in each frequency range.b NOTE 1 At 80 MHz and 800 MHz, the higher frequency range applies. NOTE 2 These guidelines may not apply in all situations. Electromagnetic propagation is affected by absorption and reflection from structures, objects and people. a Field strengths from fixed transmitters, such as base stations for radio(cellular/cordless) telephones and land mobile radios, amateur radio. AM and FM radio broadcast and TV broadcast can not be predicted theoretically with accuracy. To assess the electromagnetic environment due to fixed RF transmitter, an e lectromagnetic sit survey should be 28 V1.0W11 WRIST PULSE OXIMETER considered. If the measured field strength in the location in which the ,MD300W11 pulse oximeter is used exceeds the applicable RF compliance level above, the MD300W11 pulse oximeter should be observed to verify norm al operation. If abnormal performance is observed, additional measures may be necessary, such as reorienting or relocating the MD300W11 pulse oximeter. b Over the frequency range 150KHz to 80 MHz, field strength should be less than 3V/m. Recommended separation distance between portable and mobile RF communication equipment and the EQUIPMENT OR SYSTEM that are not LIFE-SUPPORTING Recommended separation distance between portable and mobile RF communication equipme nt and the MD300W11 pulse oximeter The MD300W11 pulse oximeter is intended for use in an electromagnetic environment in which radiated RF disturbances are controlled. The customer or the user of the MD300W11 pulse oximeter can help prevent electromagnetic interference by maintaining a minimum distance between portable and mobile RF communications equipment(transmitters) and the MD300w11 pulse oximeter as recommended below, according to the maximum output 29 V1.0W11 power of the communications equipment. Rated maximum transmitter(W) output Power of WRIST PULSE OXIMETER Separation distance according to frequency of transmitter 150kHz to 80MHz d= 3 .5 V1 P 80MHz to 800MHz d= 3 .5 E1 P 800MHz to 2.5GHz d= 7 E1 P 0.01 0.12 0.12 0.23 0.1 0.37 0.37 0.74 1 1.17 1.17 2.33 10 3.69 3.69 7.38 100 11.67 11.67 23.33 For transmitters rated at a maximum output power not listed above, the recommended separation distance d in metres(m) can be estimated using the equation applicable to the frequency of the transmitter, where P is the maxim um output power rating of the transmitter in watts(W) according to the transmitter manufacturer. NOTE1 At 80 MHz and 800 MHz, the separation distance for the higher frequency range applies. NOTE 2 These guidelines may not apply in all situations. Electrom agnetic propagation is affected by absorption and reflection from structures, objects and people. 30 V1.0W11 WRIST PULSE OXIMETER Pic.4 Pic.5 31