1
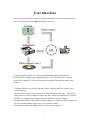
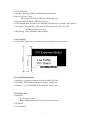
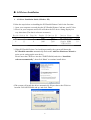
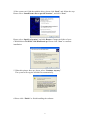
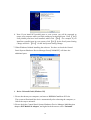
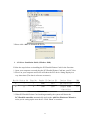
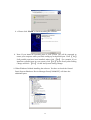
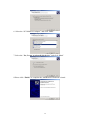
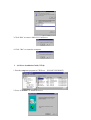
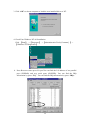
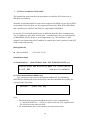
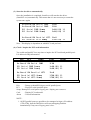
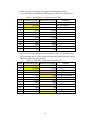
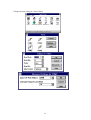
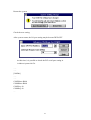
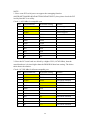
INDEX WHQL Certification Approval………………………………………...2 User Interface……………………………………….…………………..3 128K software FIFO……………………………………………………4 1.0 Introduction…………………………………………………………5 2.0 Specification…………………………………………………………5 ¾ 2.1 Features ¾ 2.2 Universal Serial PCI Card ¾ 2.3 Low Profile ¾ 2.4 System Requirement ¾ 2.5 Package List ¾ 2.6 Pin Assignments 3.0 Operation Environment............................................………………7 4.0 Driver Install/Uninstall......................................................................8 ¾ 4.1 Windows XP………………………...………………….….....8 ¾ 4.2 Windows 2000…………………………...………………......11 ¾ 4.3 Windows 95/98SE/ME………………...………………...…..16 ¾ 4.4 Windows NT4.0………………………………………....…...19 ¾ 4.5 DOS.........................................................................................22 ¾ 4.6 Windows 3.1............................................................................25 ¾ 4.7 Linux........................................................................................29 5.0 Configure COM port.......................................................................29 ¾ 5.1 How to configure COM port (Windows 95/98/98SE/ME)......29 ¾ 5.2 How to configure COM port (Windows 2000/XP)..................31 ¾ 5.3 How to configure COM port (NT4.0)......................................32 6.0 Trouble shooting......…………………………………………….…34 1 WHQL Certification Approval The Designed for Microsoft Windows XP logo identifies products that meet Microsoft’s quality standards, our I/O products carry with this logo and listed on Windows Catalog. 2 User Interface We provides User Interface software application program, user can use this software driver to control Serial cards RS-232 hardware directly. As the flowchart, plug the PCI card on the Motherboard, then install the User Interface software application program under O.S. (e.g. Windows XP ). User can control and configure PCI Serial card hardware parameter through this application program.. * Configure the bits per second, Data bits, Parity, Stop bits and Flow control if you want to change. *There are three kinds of flow control: Xon/Xoff, Hardware and None. Xon/Xoff is using software protocol. Hardware means the flow control is using RTS/CTS, but the RTS/CTS is controlled by software. None means there is no flow control. *Configure the Enable Auto CTS/RTS Flow Control, 16/32/64 bytes FIFO length, and Receive/Transmit Buffer trigger level if you want to change. *The detail of setting and configuring steps, please skip to page 30. 3 128K software FIFO FIFO ( First-in-First-out ) memories size decide computer interrupter frequency. The size of FIFO length is bigger, the data flow is more, the system will work constantly at anytime, and the resource of CPU will be saved, the system performance can be increased. The detail of FIFO adjust please skip to the page 30. Testing Environment : CPU: Celeron 1 G M/B : MSI MS-6547 (P4) Memory : 128MB OS : Microsoft Windows XP Testing Device : I/O Card : 4 port RS-232 PCI interface Card Test Driver : V5.560 Test program: Windows XP HyperTerminal Increased FIFO butter for better performance 445 128 Kbyte FIFO 363 128 byte FIFO 0 100 200 300 400 Max average speed (K/bps) 4 500 1.0 Introduction Thank you for purchasing the PCI Serial Card. This unique PCI I/O card allows you to attach your computer to support DB-9M / 25M Serial port, and reach fast result. The PCI I/O card function of PCI Bus is for Plug and Play. Users do not need a jumper to set I/O address and IRQ location, the system will search the device automatically. There is no conflict with other interface cards or devices. 2.0 Specification ¾ 2.1 Features: 1. Provides FIFO maximize size 128K memories, it is 1024 times faster than existing PCI-bus serial ports. Reduces CPU loading and improves system performance dramatically. 2. High speed serial ports support baud rates up to 921Kbps. 3. Plug and Play and Re-Map to ISA address 3F8, 3E8, 2F8, 2E8 4. Improves I/O access speed up to 8 times faster than existing ISA-bus serial ports. Reduces CPU load and improves system performance dramatically. 5. IRQ sharing feature eliminates IRQ conflicts 6. Works with various type of parallel DB25F & serial DB9M devices. ¾ 2.2 Universal Parallel PCI Card: 1. Bus type: Supports both 64-bit & 32-bit PCI Bus 3.3V & 5V connector keys 5 2. Chip: SUN1889 3. Interface: High-Speed RS-232 Standard Serial-Interface 4. Speed: Up to 921 Kbps Full support for DOS and Windows based software 5. Port type: RS232 DB9M / DB25M serial port 6. FIFO Length: Built in high-speed with128K transmit/receive software FIFO buffers 7. I/O Address: Plug and Play or Re-Map to ISA address 3F8, 3E8, 2F8, 2E8 (Re-Map function card only) 8. IRQ sharing feature eliminates IRQ conflicts. 2.3 Low Profile: Low Profile PCI card size is so small that can easily fit into almost system. 2.4 System Requirements 1. Pentium or equivalent computer with an available PCI slot. 2. CD-ROM / DVD-ROM required for software installation. 3. Windows 3.1x/ 95/98SE/ME/NT4.0/2000/XP, DOS, Linux. 2.5 Package list: 1. Hardware: PCI Serial IO Card × 1 DB9 or DB25 Male cable (only for 4 & 8 ports card) 2. CD Driver 3. User's Manual 6 ¾ 2.6 Pin Assignments: 3.0 Operation Environment 1. Operation temperature: 0℃ ~ 57℃ 2. Operation humidity: 5 to 95% RH 3. Storage temperature:-20℃ ~ 85℃ 7 4.0 Driver Installation ¾ 4.1 Driver Installation Guide (Windows XP) Follow the steps below on installing the PCI Parallel Printer Card for the first time: 1. Open your computer case and plug the PCI Parallel Printer Card into your PCI slot. 2. Power on your computer and screen will show the PCI device listing display in a very short time (The data is reference resources). Bus No Device No Func No Vendor ID Device ID Device Class IRQ 0 7 1 8086 7010 IDE Controller 14 0 13 0 1409 7268 Simple COMM. 10 Controller 3. When PCI Parallel Printer Card working normally, the system will detect the PCI Parallel controller automatically and run the Add New Hardware Wizard to assist you in setting up the new device. Please insert the CD Driver into the CD/DVD-ROM, and select “Install the software automatically”, then click “Next” to continue install driver. 4.The system will search the driver automatically. Please choose the CD driver location: D:\IO\PCI\Win2k and xp, and click “Next” 8 *If the system can’t find the suitable driver, please click “Back” and follow the step: Please select “Install from a list or specific location”, and click “Next” Please select “Specify a location” and click Browse. Change the folder of your CD-ROM drive D:\IO\PCI IO\Win2k and xp. Please click “Next” to continue installation. 5. When this picture show up, please select “Continue Anyway”. The system will copy the needed files automatically. 6.Please click “Finish” to finish installing the software. 9 ¾ Note: If you install PCI parallel ports to your system, you will be requested to restart your computer when you finish setting up each parallel port. Click 【Yes】 if all parallel ports have been installed, others click 【No】. For example, if you install two parallel ports in your system, click 【No】 for the first System Setting Change and click 【Yes】 for the last System Setting Change. 7. When Windows finished installing the software. You have to check the Control Panel-System-Hardware-Device Manager-Ports[COM&LPT] will show the additional ports. ¾ Driver Uninstall Guide (Windows XP) 1. Please shot down your computer, and remove PCI I/O Card from PCI slot. The system will uninstall the device automatically after rebooting the computer, or follow the step to uninstall: 2. Please check the Control Panel-System-Hardware-Device Manager-Multifunction adapters-PCI Multi-I/O Adapter, and right check the mouse select “Uninstall”. 10 3.Please click “OK” to uninstall the device. ¾ 4.2 Driver Installation Guide (Windows 2000) Follow the steps below on installing the PCI Parallel Printer Card for the first time: 1. Open your computer case and plug the PCI Parallel Printer Card into your PCI slot. 2. Power on your computer and screen will show the PCI device listing display in a very short time (The data is reference resources). Bus No Device No Func No Vendor ID Device ID Device Class IRQ 0 7 1 8086 7010 IDE Controller 14 0 13 0 1409 7268 Simple COMM. 10 Controller 3. When PCI Parallel Printer Card working normally, the system will detect the PCI Parallel controller automatically and run the Add New Hardware Wizard to assist you in setting up the new device. Click “Next” to continue. 11 4.Please insert the CD Driver into the CD/DVD-ROM, and select “Search for a suitable driver for my devices”, then click “Next” to continue install driver. 5. Please select “specific location”, and click “Next”. 6. Click “Browser” to install driver from CD-ROM “D:\IO\PCI IO\Win2k and xp”. Please click “Next” to continue installation. 7. Windows will detect the driver (snxpci.inf) and shows the device: PCI Multi IO Adapter. Click “Next” to copy the needed files to your computer . 12 8. e Please click “Finish” to finish installing the software. ¾ Note: If you install PCI parallel ports to your system, you will be requested to restart your computer when you finish setting up each parallel port. Click 【Yes】 if all parallel ports have been installed, others click 【No】. For example, if you install two parallel ports in your system, click 【No】 for the first System Setting Change and click 【Yes】 for the last System Setting Change. 9. When Windows finished installing the software. You have to check the Control Panel-System-Hardware-Device Manager-Ports[COM&LPT] will show the additional ports. 13 ¾ Driver Uninstall Guide (Windows 2000) 1. Please shot down your computer, and remove PCI I/O Card from PCI slot. The system will uninstall the device automatically after rebooting the computer, or follow the step to uninstall: 2. Click the “Hardware Wizard” in “Hardware” of System Properties. 3.Please “Next” to continue. 4. Select “Uninstall/Unplug a device” and click “Next”. 5. Select “Uninstall a device and click “Next”. 14 6. Select the “PCI Multi I/O Adapter” and click “Next”. 7. Select the “Yes, I want to uninstall this device” and click “Next” 8.Please click “Finish” to complete the Add/Remove Hardware wizard. 15 ¾ 4.3 Driver Installation Guide (Windows 95/98SE/ME) Follow the steps below on installing the PCI Parallel Printer Card for the first time: 1. Open your computer case and plug the PCI Parallel Printer Card into your PCI slot. 2. Power on your computer and screen will show the PCI device listing display in a very short time (The data is reference resources). Bus No Device No Func No Vendor ID Device ID Device Class IRQ 0 7 1 8086 7010 IDE Controller 14 0 13 0 1409 7268 Simple COMM. 10 Controller 3. When PCI Parallel Printer Card working normally, the system will detect the PCI Parallel controller automatically and run the Add New Hardware Wizard to assist you in setting up the new device. Click “Next” to continue. 4.Please insert the CD-Driver into your CD/DVD-ROM. Please select “Search for the best driver for your device” and click “Next”. ※ Windows ME will search the drive automatically. Please select the driver: “Multi IO Controller” “E:\IO\PCI IO\Win9x\SPCIMIO.INF and click “OK” (Please skip to the step7) 16 5. Please select “Specify a location” and click Browse. Change the folder of your CD-ROM drive D:\IO\PCI IO\Win9x. Please click “Next” to continue installation. 6. Windows will detect the driver (SPCIMIO.INF) and shows the device: Multi IO Controller. Click “Next” to copy the needed files to your hard disk . 7.The system will show that Multi IO Controller software had been installed successfully, and please click “Finish”. ¾ Note: If you install PCI parallel ports to your system, you will be requested to restart your computer when you finish setting up each parallel port. Click 【Yes】 if all parallel ports have been installed, others click 【No】. For example, if you install two parallel ports in your system, click 【No】 for the first System Setting Change and click 【Yes】 for the last System Setting Change. 17 7. When Windows finished installing the software. You have to check the Control Panel-System-Hardware-Device Manager-Ports[COM&LPT] will show the additional ports. ¾ Driver Uninstall Guide (Windows 95/98SE/ME) 1. Double click Add/Remove Programs in Control Panel. 2. Choose “PCI Multi-I/O Card”, and click “Add/Remove”, and click “OK” 18 3.Click “Yes” to remove Multi-I/O Card driver 4. Click “Yes” to restart the computer. ¾ 4.4 Driver installation Guide (NT4.0) 1. Run the setup.exe program in CD Driver 2. Press “Continue” to install the driver. 19 (D:IO\PCI IO\WinNT) 3. Click “OK” to reboot computer to load the new installed driver to NT. 4. Check Your Windows NT 4.0 Installation Click 【Start】 →【Programs】 →【Administrative Tools [Common] 】→ 【Windows NT Diagnostics】 ¾ Press Resources then press I/O port.You can find the I/O address of one parallel port (SNXPAR) and two serial ports (SNXSER). You can find the IRQ information by press “IRQ”. You can find the IRQ information by press “IRQ“. 20 ¾ Windows NT 4.0 Uninstall Guide 1. Double click Add/Remove Programs in Control Panel. 2. Select Multi-I/O Card Uninstall, press “Add/Remove”. 3. Press “OK” to remove Multi-I/O Card driver. 4. Click “OK” to reboot the computer. 21 ¾ 4.5 Driver installation Guide (DOS) This installation guide describes the procedures to install the PCI serial ports in MS-DOS environment. Normally serial and parallel I/O ports can be supported by BIOS call services in DOS environment. However there are only support 4 serial ports (3F8h,2F8h,3E8h,2E8h) and 3 parallel ports (3BCh/378h/278h) are supported by BIOS/DOS. In case the PCI serial and parallel ports are different from the above configurations (e.g. I/O address or more than 4 serial ports / 3 parallel ports), they are not supported by BIOS/DOS directly. However some applications (e.g. "PComm Plus" could support 8 serial ports and each I/O address is settable) have their own driver, thus PCI cards could work correctly. [DOS platform] z Microsoft DOS : V5.0/V6.0/ V6.22 [Installation Steps] (1) Run Install.exe (from CD Drive disk : \PCI IO\DOS\INSTALL.exe) Please enter the directory path for installation C:\PCI_DOS (return for default) (2) Enter the destination subdirectory You could enter your preferred destination subdirectory for installation, RETURN for default path. Once the dos driver has been installed successfully, the response looks like below. succeed ...Press Any Key Note: 1. The installation program will add the dos driver (one command line) "C:\Sunix\SunixPCI.exe AUTO" to autoexec.bat file. The original batch file will be saved to autoexec.SNX. 2. For uninstallation, just restore autoexec.snx into autoexec.bat. 22 (3) Start the dos driver automatically Once the installation is completed, Install.exe will start the dos driver (SunixPCI.exe) automatically. This means that it is not necessary to restart the system once again. On-Board/ISA Serial COM1 On-Board/ISA Serial COM2 PCI Serial COM3 Remap PCI Serial COM4 Remap 3f8H 2f8H 3e8H,IRQ 11 2e8H,IRQ 11 On-Board/ISA Parallel LPT1 3bcH PCI Parallel LPT2 Remap 378H IRQ 11 Note : This display is dependent on which PCI card you have. (4) Check / inquire the PCI card information You could run SunixPCI.exe any time to inquire the PCI serial and parallel port's I/O address & IRQ information. ISA PCI Setup Card About On-Board/ISA Serial COM1 On-Board/ISA Serial COM2 PCI Serial COM3 Remap PCI Serial COM4 Remap 3f8H 2f8H 3e8H,IRQ 11 2e8H,IRQ 11 On-Board/ISA Parallel LPT1 PCI Parallel LPT2 Remap PCI Parallel LPT3 Remap 3bcH 378H,IRQ 11 278H,IRQ 10 ESC: Exit ISA : Detect on-board/ISA legacy serial /parallel ports. PCI : Find PCI serial /parallels ports. Setup : Remap PCI serial port to legacy port / display port resources. Card : Display PCI card model. About : Version Information. NOTE : 1. All PCI parallel ports are possible to be remapped to legacy I/O address (378h,278h), thus the DOS driver will start remapping function automatically if any one of legacy ports is free. 23 2. Since some PCI serial ports can support the remapping function (e.g. /4027D/4037D/4056D/4079D).Thus please check it by PCIDOS.exe Clock= 1.8432 Mhz for remapable port in DOS Item 1 2 3 4 5 6 7 8 9 10 11 12 Actual Baudrate BIOS/DOS setting Remark 921600 Do not support 460800 Do not support 230400 Do not support 115200 115200 57600 57600 38400 38400 19200 19200 9600 9600 4800 4800 2400 2400 1200 1200 300 300 3. Since the PCI serial card are drived by a higher CLK (14.7456 Mhz), thus the actual baud rate is 8 times higher than the BIOS/DOS baud rate setting. The below table shows the relation. Clock=14.7456 Mhz for all non-remapable port Item Actual Baud rate BIOS/DOS setting Remark 1 921600 115200 2 460800 57600 3 230400 28800 Non BIOS standard 4 115200 14400 Non BIOS standard 5 57600 7200 Non BIOS standard 6 38400 4800 7 19200 2400 8 9600 1200 9 4800 600 Non BIOS standard 10 2400 300 11 1200 150 12 300 37.5 Non BIOS standard 24 ¾ 4.6 Driver installation Guide (Windows3.1) This installation guide describes the procedures to install the PCI serial / parallel ports in MS WINDOWS 3.1 environment. Normally serial and parallel I/O ports can be supported by WINDOWS 3.1 default device driver. However there are only 4 serial ports (3F8h,2F8h, 3E8h,2E8h) and 3 parallel ports (3BCh/378h/278h) are supported by default. Most likely the PCI serial ports are different from the above configuration (eg. I/O address or IRQ), these ports setting need to changed / modified in WINDOWS 3.1 manually. However it is necessary to inquire these PCI serial and parallel ports's resources in advance. [OS platform] Microsoft WINDOWS : V3.1/V3.11 [Installation Steps] Run PCIDOS.exe (from CD Drive disk : \PCI IO\DOS\ PCIDOS.exe) On-Board/ISA Serial COM1 On-Board/ISA Serial COM2 PCI Serial COM3 PCI Serial COM4 3f8H 2f8H b800H,IRQ 10 b808H,IRQ 10 On-Board/ISA Parallel LPT1 3bcH Start the WINDOWS 3.1 25 Change the port setting in Control Panel 26 Restart the system Check the new setting After system restart, the I/O port setting maybe become DEFAULT. At this time, it is possible to check the PCI serial port setting in \windows\system.ini file. ….. ….. [386Enh] ….. ….. COM3Base=B800 COM4Base=B808 COM3Irq=10 COM4Irq=10 … 27 NOTE : 1. Since some PCI serial ports can support the remapping function (4025D/4027D/4028D/4036D/4037D/4038D/4079D/E/F), thus please check the PCI card by SunixPCI.exe utility. Clock= 1.8432 Mhz for remapable port Item Actual Baudrate BIOS/DOS setting Remark 1 921600 Do not support 2 460800 Do not support 3 230400 Do not support 4 115200 115200 5 57600 57600 6 38400 38400 7 19200 19200 8 9600 9600 9 4800 4800 10 2400 2400 11 1200 1200 12 300 300 2. Since the PCI serial card are drived by a higher CLK (14.7456 Mhz), thus the actual baud rate is 8 times higher than the BIOS/DOS baud rate setting. The below table shows the relation. Clock= 14.7456 Mhz for all non-remapable port Item Actual Baud rate BIOS/DOS setting Remark 1 921600 115200 2 460800 57600 3 230400 28800 Non BIOS standard 4 115200 14400 Non BIOS standard 5 57600 7200 Non BIOS standard 6 38400 4800 7 19200 2400 8 9600 1200 9 4800 600 10 2400 300 11 1200 150 12 300 37.5 Non BIOS standard Non BIOS standard 28 ¾ 4.7 Driver installation Guide (Linux) Please read the detail files about the Linux OS system installation step from CD ROM: \ IO\ PCI IO\Linux\Red Hat V8.0.pdf CD ROM: \ IO\ PCI IO\Linux\Red Hat V6.0.pdf 5.0 Configure COM port ¾ 5.1 How to configure COM port (Windows 95/98/98SE/ME) 1. Select the PCI Serial Port you want to configure for example COM3. Right check the mouse, and select the “Properties”. 2. Click the “Port Settings”. Configure the Bits per second, Data bits, Parity, Stop bits and Flow control if you want to change. 29 There are three kinds of flow control: Xon/Xoff, Hardware and None. The Xon/Xoff is using software protocol. The Hardware means the flow control is using RTS/CTS, but the RTS/CTS is controlled by software. The None means there is no flow control. Click the “Advanced” if you want to set more advanced features. 3. Configure the “Enable Auto CTS/RTS Flow Control”, “16/32/64 bytes FIFO length”, and Receive/Transmit Buffer trigger level if you want to change. Enable Auto CTS/RTS Flow Control means the CTS/RTS flow control is controlled by hardware automatically. System will be more stable if the function is enabled. If your card can support 32 bytes FIFO, you can use 16 or 32 bytes FIFO. The default value is Use 16 Byte FIFO buffers. If your card cannot support 32 bytes FIFO, the Enable 32 Byte FIFO buffers will be shadowed. Set the Receive/Transmit Buffer to higher value will get faster performance because the interrupts will be reduced, but the time for interrupt service routine will become shorter. The receive buffer overflow will be easily happened if the CPU speed is not enough to handle. If the system is not stable, select the lower value to correct problems. 30 ¾ 5.2 How to configure COM port (Windows 2000/XP) 1. Select the PCI Serial Port you want to configure for example COM3. Press the right button and select “Properties”. 2. Click the “Port Settings”. Configure the Bits per second, Data bits, Parity, Stop bits and Flow control if you want to change. There are three kinds of flow control: Xon/Xoff, Hardware and None. The Xon/Xoff is using software protocol. The Hardware means the flow control is using RTS/CTS, but the RTS/CTS is controlled by software. The None means there is no flow control. 3. Click the “Advanced” if you want to set more advanced features. FIFO ( First-in-First-out ) memory size decision Computer interrupter frequency, When FIFO memory size more big, they can process more data flow, so don’t need anytime use interrupter, CPU resource save, and system performance going up. 31 4. At Market, The Biggest FIFO size only 128 byte, we provider 128K byte memory size to customer, it is market’s 1024 times. ¾ 5.3 How to configure COM port (NT4.0) 1. Double click Multi-I/O Card Configuration icon. 32 2. Press “PCI/ISA Serial Ports” and select the serial port you want to configure. Press “Setup” to configure the serial port . 3. Set the 32 byte FIFO or Auto Flow Control or Receive Trigger Level, click “Ok”. If your card can support 32 (64) bytes FIFO, you can use 16 or 32 (or 64) bytes FIFO. The default value is Use 16 Byte FIFO buffers. If your card cannot support 32 (64) bytes FIFO, the Use 32 (32 and 64) Bytes FIFO will be shadowed. Auto Flow Control Enable means the CTS/RTS flow control is controlled by hardware automatically. System will be more stable if the function is enabled. Set the Receive Trigger Level to higher value will get faster performance because the interrupts will be reduced, but the time for interrupt service routine will become shorter. The receive buffer overflow will be easily happened if the CPU speed is not enough to handle. If the system is not stable, select the lower value to correct problems. Note: If you stall the modem that is using auto detect by windows NT, the Auto Flow Control Enable shall be disabled. 33 6.0 Trouble Shooting 1. Why does the PCI serial port not behind the on board Communication Port? Ans: Sometimes you may find the PCI serial port does not locate just behind the on board Communication Port. It may happen as following. The COM3 and COM4 are not used. This problem is caused from the following reasons. 1. When you plug the installed PCI card to another PCI slot without uninstalling and reinstalling the driver. 2. When you remove the installed PCI card and installed a different PCI card without uninstalling and re-installing the driver. There are three methods to solve this problem. 1. When you want to remove or change the PCI card, please uninstall the driver first. 2. Change the individual COM port number in Advanced Setting for COM port. For example, change the COM5 to the actually unused COM3 port. 34 3. Delete the hidden and unused COM port from uninstalling a device. Click the “Show hidden devices”, You will find all COM ports. Please remove the driver and all COM ports and reinstall the driver. You will find the continuous COM port index for the COM ports. 35 2. When Display Vendor ID, Device Id, Device Class or IRQ aren’t DISPLAY or ERROR value. Ans: Because motherboard ignore the screen or show that immediately, you can press “Pause” key on the keyboard to see the message when PCI device listing display. If the Device Class or IRQ value error, please change other slot, clean your slot, or clean PCI card golden finger. The problem still can’t be solve, and please return PCI I/O card to manufacture. 36