1
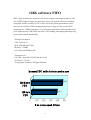
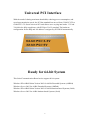
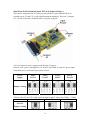
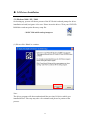
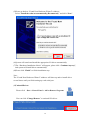
0 INDEX WHQL Certification Approval………………………………………...2 User Interface……………………………………….…………………..3 128K software FIFO……………………………………………………4 Universal PCI Interface...........................................................................5 Ready for 64-bit System...........................................................................5 1.0 Introduction…………………………………………………………6 2.0 Features…………………………………………………………….. 6 3.0 Hardware Guide…………………………........................................ 7 ¾ 3.1 System Requirement ¾ 3.2 Hardware Installation ¾ 3.3 Jumper Setting 4.0 Specification……………………………………………………..…14 ¾ 4.1 Function ¾ 4.2 Hardware ¾ 4.3 Communication ¾ 4.4 Protection ¾ 4.5 Driver Supported ¾ 4.6 Dimensions ¾ 4.7 Regulatory Approvals ¾ 4.8 Low Profile ¾ 4.9 Packing List ¾ 4.10 Operation Environment 5.0 Driver Install/Uninstall……………………………………………17 ¾ 6.1 Windows 2000/XP/2003 ¾ 6.2 Windows 2000/XP/2003 on 64-bit system ¾ 6.3 Windows NT4.0 ¾ 6.4 Linux ¾ 6.5 DOS ¾ 6.6 Windows 95/98SE/ME ¾ 6.7 Verifying Serial PCI card 6.0 Configure COM port………………………………………………25 1 WHQL Certification Approval The Designed for Microsoft Windows XP logo identifies products that meet Microsoft’s quality standards, our I/O products carry with this logo and listed on Windows Catalog. 2 User Interface We provides User Interface (U.I.) software application program, user can use this software driver to control Serial cards RS-232 hardware directly. As the flowchart, plug Sunix PCI card on the Motherboard, then install the User Interface software application program under O.S. (e.g. Windows XP ). User can control and configure PCI Serial card hardware parameter through this application program. * Configure the bits per second, Data bits, Parity, Stop bits and Flow control if you want to change. *There are three kinds of flow control: Xon/Xoff, Hardware and None. Xon/Xoff is using software protocol. Hardware means the flow control is using RTS/CTS, but the RTS/CTS is controlled by software. None means there is no flow control. *Configure the Enable Auto CTS/RTS Flow Control, 16/32/64 bytes FIFO length, and Receive/Transmit Buffer trigger level if you want to change. *For setting and configuring steps, please check page 25~26. 3 128K software FIFO FIFO ( First-in-First-out ) memories size decide computer interrupter frequency. The size of FIFO length is bigger, the data flow is more, the system will work constantly at anytime, and the resource of CPU will be saved, the system performance can be increased. For detail of FIFO configuration please see page 25. We provide FIFO maximum size 128Kbyte memories, it is 1024 times faster than existing market serial ports. High capacity 128K FIFO can reduce CPU loading, interrupting and improving system performance dramatically. Testing Environment : CPU: Celeron 1 G M/B : MSI MS-6547 (P4) Memory : 128MB OS : Microsoft Windows XP Testing Device : I/O Card : 4 port RS-232 PCI interface Card Test Driver : V5.560 Test program: Windows XP HyperTerminal Increased FIFO buffer for better performance 445 128 Kbyte FIFO 363 128 byte FIFO 0 100 200 300 400 Max average speed (K/bps) 4 500 Universal PCI Interface With the trend of sharing maximum bandwidth, reducing power consumption, and speed up transmission speed, the PCI bus standard has moved from 32-bit PCI/5V to 64-bit PCI/3.3V. Sunix universal PCI card allows users to plug into both a 3.3V and 32/64-bit slot fully compliance with PCI Spec.Ver2.2 standard. The hardware configuration for the IRQ and I/O address is assigned by PCI BIOS automatically. Ready for 64-bit System This Serial Communication Board series support 64-bit system: Windows XP 64-Bit Edition Version 2003 for 64-Bit Extended Systems (AMD64) Windows Server 2003 for 64-Bit Extended Systems (AMD64) Windows XP 64-Bit Edition Version 2003 for 64-Bit Itanium-based Systems (IA64) Windows Server 2003 for 64-Bit Itanium-based Systems (IA64) 5 1.0 Introduction Thank you for purchasing PCI Serial Communication Card Power version. This unique universal PCI Multi-port serial card attaches DB-9 or 25 Male RS-232 Serial ports on your system for POS, ATM and industrial automation applications. It works with both 3.3 or 5 voltage and 32 or 64 bit PCI bus, allowing this multi-port serial card to be installed in virtually any available PC system and compatible with all major operating systems. Users do not need any jumper to set I/O address and IRQ location. There is no conflict with other interface cards or devices because of PCI plug-n-play function. This PCI card provide options to select internal (BUS) or external power 5V and 12V, or RI signal through the ninth pin. It also supports circuit protection prevent damage from excessive current and short circuit of device. This PCI serial multi ports Communication Card is the best design for user convenient and easily connecting device without power adapter, such as barcode scanner and printer. 2.0 Features 1. 2. 3. Fully compliance with PCI Spec. Ver2.2 standard. Supports both 64-bit & 32-bit PCI , PCI-X Bus and 3.3V & 5V connector keys. High speed serial port support baud rates up to 921.6Kbps. 4. High capacity 128K FIFO can reduce CPU loading, interrupting and improving system performance dramatically. 5. Plug and Play, I/O address and IRQ assigned by BIOS. 6. 7. 8. 9. Works with various types of DB9M / DB25M serial devices. Optional internal (BUS) or external power 5V and 12V, or RI signal selecting. PCI serial communication cards are certified by WHQL, CE, FCC approval. Ready for the Intel® Itanium® and AMD® Athlon 64® 64-bit CPU on the Microsoft Windows® XP 64-bit Edition Version 2003 and Windows® Sever 2003 for 64-bit Itanium-based or Extended Systems. 10. Ideal for 56K V.90 external modems and ISDN terminal adapters, PDA, UPS, barcode scanner and other high-speed serial port devices. 11. Support Microsoft Windows 3.x, 9x, NT, 2000, XP, 2003, DOS, and Linux. 6 3.0 Hardware Guide 3.1 System Requirements: 1. Pentium or equivalent computer with an available PCI slot. 2. CD-ROM / DVD-ROM required for software installation. 3. Windows 3.1x/95/98SE/ME/NT4.0/2000/XP/2003, DOS, Linux. 3.2 Hardware Installation Follow the instruction given below to install the Serial PCI Card: 1. Make sure the jumper setting as page 8 indication to prevent any damages!! 2. Turn your computer off 3. Remove the power plug from the plug socket. 4. Remove the cover from the computer case. 5. If fitted. Remove the metal cover plate on the rear of a free PCI slot (White). 6. Insert Serial PCI card into the free PCI slot and screw it firmly on the bracket side. 7. Place the cover back onto the computer. 8. Insert the plug into the plug socket. CAUTION: Before plugging this PCI card into your system, please carefully check the jumper setting and hardware installation steps to prevent any damages. 3.3 Jumper Setting: This serial Communication PCI card provide options to select internal (BUS) or external power 5V and 12V, or RI signal through the ninth pin. Please follow the jumper setting before using for each port. Internal Power: Power provided from PCI BUS. (P) External Power: Power provided from added 4 pin power circuit. (A) RI: RI Signal 7 One Port Serial Communication PCI card Jumper Setting: This serial Communication PCI card provide options to select internal (BUS) or external power 5V and 12V, or RI signal through the ninth pin. There are 3 jumpers (J1, J2, J3) must be modified before using: Internal Power External Power 5V 12 V RI 8 CAUTION: It will cause damage both on your device and PCI card, if you sets jumpers as below: Do NOT select power supply both from Internal & External at the same time. Make sure the direction of jumper setting must be horizontal. 9 Dual Ports Serial Communication PCI card Jumper Setting: This serial Communication PCI card provide options to select internal (BUS) or external power 5V and 12V, or RI signal through the ninth pin. There are 3 jumpers (J2 , J4, and J5) must be modified before using for each port. *You can select the power supply mode through J2 jumper. Because of IC power consumption, you need to select both 5V and 12V power input from BUS power or External 4 pin power circuit. Power Supply Int5V Int12V Int5V Ext12V Ext5V Int12V Ext 5V Ext 12V Jumper Setting *Please select 5V and 12V or RI signal through J4 and J5 jumper for COM1 ~ COM2. 5V 12V J4 & J5 Jumper Setting 10 RI CAUTION: It will cause damage both on your device and PCI card, if you sets jumpers as below: Do NOT select J4 & J5 power supply both from 5V & 12V at the same time. Make sure the direction of jumper setting must be vertical. 11 Four Ports Serial Communication PCI card Jumper Setting: This serial Communication PCI card provide options to select internal (BUS) or external power 5V and 12V, or RI signal through the ninth pin. There are 5 jumpers (J2 ~ J6) must be modified before using for each port. *You can select the power supply mode through J6 jumper. Because of IC power consumption, you need to select both 5V and 12V power input from BUS power or External 4 pin power circuit. Power Supply Int5V Int12V Int5V Ext12V Ext5V Int12V Ext 5V Ext 12V Jumper Setting *Please select 5V and 12V or RI signal through J2 ~ J5 jumper for COM1 ~ COM4. 5V 12V J2 ~ J5 Jumper Setting 12 RI CAUTION: It will cause damage both on your device and PCI card, if you sets jumpers as below: Do NOT select J2~J5 power supply both from 5V & 12V at the same time. Make sure the direction of jumper setting must be vertical. 13 4.0 Specification 4.1 Function Type Serial Communication Host Controller Mode of Operation Hand-Shaking Mode Bus Transceivers RS-232 Full-Duplex Drivers per Line RS-232 1 Driver Receivers per Line RS-232 1 Receiver 4.2 Hardware IC SUN1889 Controller UART (16C650 compatible) Bus Interface 64-bit & 32-bit PCI Bus 3.3V & 5V connector keys Connector 1 serial port: 1 ports DB9 Male 2 serial port: 1 port DB44 Female to 2 ports DB9/25Male 4 serial port: 1 port DB44 Female to 4 ports DB9/25Male Multi-IO port: 1 port DB44 Female to 2 ports DB9/25Male & to 1 port DB25 Female Parallel port 4.3 Communication: IRQ & I/O address Assigned by BIOS FIFO 32 byte hardware FIFO 128Kbyte DMA mode FIFO Baud rate 75bps ~ 921.6 Kbps Data bit 4,5,6,7,8 Stop bit 1,1.5,2 Parity even, odd, none, mark, space Flow Control None, Xon/Xoff, Hardware Signal DCD, RxD, TxD, DTR, GND, DSR, RTS, CTS, RI/5V/12V 4.4 Protection: Circuit Protection 1A excessive current protection on both 5V and 12V 14 4.5 Driver support : Driver Supported 64-bit System Intel Itanium and AMD Athlon64 CPU Microsoft Windows 3.x/9x/Me/NT/2000/XP/2003 Linux 2.0.x / 2.2.x / 2.4.18 / 2.4.20 / 2.6.x DOS DOS 4.6 Regulatory Approvals: Regulatory Approvals Hardware CE, FCC Software WHQL 4.7 Low Profile: Low Profile PCI card size is so small that can easily fit into almost system. (Low profile PCI card only) 4.8 Package list: 1. Hardware: PCI serial multi ports Communication Card × 1 DB9 or DB25 Male cable (only for 2 & 4 ports card) × 1 2. CD Driver × 1 3. User's Manual × 1 15 4.9 Pin Assignments: 4.10 Operation Environment: 1. Operation temperature: 0℃ ~ 57℃ 2. Operation humidity: 5 to 95% RH 3. Storage temperature:-20℃ ~ 85℃ 16 5.0 Driver Installation 5.1 Windows 2000 / XP / 2003: On booting up, system will detect present of the PCI Serial card and prompt for driver installation wizard, but ignore it for now. Please insert the driver CD in your CD/DVD ROM drive and run point directory setup file : : \IO\PCI IO\win2k and xp\setup.exe (1) Please click “Next” to continue. Note: The driver program will detect and uninstall the previous I/O driver which you installed before. This step may take a few minutes and please be patient of the process. 17 (2) You can select the folder location to install the driver. Click “Next” to continue. (3)The Software Installation Notice will appear, please click “Continue Anyway”, and system will install driver automatically. (4)Please click “Finish” to finish the driver installation step. 18 (5)Please go back to “Found New Hardware Wizard” windows. Select “Install the software automatically (Recommend) ” and click “Next”. (6)System will search and install the appropriate I/O driver automatically. (7)The “Hardware Installation Notice” will appear, please click “Continue Anyway”, and system will install driver automatically. (8)Please click “Finish” to finish installation step. Note: The “Found New Hardware Wizard” windows will show up and re-install driver several times until you finish setting up each serial port. (9)Uninstall Driver: Please click Start > Control Panel > Add or Remove Programs You can click “Change/Remove” to uninstall I/O driver. 19 5.2Windows 2000 / XP / 2003 on 64-bit system: On booting up, Windows 2000 / XP / 2003 will detect present of the PCI Serial card and will prompt for driver installation. Insert the driver CD in your CD/DVD ROM drive and point directory: : \IO\PCI IO\win2k and xp_64bit\ (You can refer to 6.1 Windows 2000 / XP / 2003 for detail installation step) 5.3 Windows NT4.0: On booting up, Windows NT4.0 will detect present of the PCI Serial card and will prompt for driver installation. Insert the driver CD in your CD/DVD ROM drive and run point directory setup file : : \IO\PCI IO\winNT\setup.exe (You can refer to the installation step from CD ROM: \ IO\ PCI IO\serial.pdf) 5.4 Linux: Please read detail files about the Linux OS RedHat system installation step from CD ROM : Kernal: 2.2.x Kernal: 2.4.18 Kernal: 2.4.20 :\ IO\ PCI IO\Linux\RedHat V6.0.pdf :\ IO\ PCI IO\Linux\RedHat V8.0.pdf :\ IO\ PCI IO\Linux\RedHat V9.0.pdf 5.5 Dos: Please install the driver from CD ROM: \ IO\ PCI IO\DOS\install.exe, and follow the installation step from CD ROM: \ IO\ PCI IO\serial.pdf 20 5.6 Windows 95 / 98SE / ME: On booting up, Windows 95 / 98SE / ME will detect present of the PCI Serial card and will prompt for driver installation. Insert the driver CD in your CD/DVD ROM drive and point directory: : \IO\PCI IO\win9x\ (1)System will detect the new hardware device “PCI Serial Controller” and “Found New Hardware Wizard” windows will show up. Pleas click “Next” to continue. (2) Select “Search for the best driver for your device (Recommend) ” and click “Next” to continue. 21 (3)Please select “Specify a location” and point to the CD Driver directory to install driver. CD ROM: \IO\PCI IO\win9x\ (4)System will search and install the appropriate IO driver automatically. Pleas click “Next” to continue. 22 (5)Please click “Finish” to finish installation step. Note: 1.The “Add New Hardware Wizard” windows will show up and re-install driver several times until you finish setting up each serial port. 23 5.7 Verifying Serial PCI card: When Windows finished installing the driver. You have to check the Control PanelSystem-Hardware-Device Manager-Ports[COM&LPT], it will show the additional ports. Note: 1. If you have installed PCI Serial ports to your system, you will be requested to restart your computer, when you finished setting up each serial port. Click “Yes” if all serial ports have been installed, otherwise click “No”. 2. The item number you see during the installation may be different from the item you have installed. 24 6.0 Configure COM port 1. Select the PCI Serial Port you want to configure for example COM3. Right check the mouse, and select the “Properties”. 2. Click the “Port Settings”. Configure the Bits per second, Data bits, Parity, Stop bits and Flow control if you want to change. There are three kinds of flow control: Xon/Xoff, Hardware and None. The Xon/Xoff is using software protocol. The Hardware means the flow control is using RTS/CTS, but the RTS/CTS is controlled by software. The None means there is no flow control. Click the “Advanced” if you want to set more advanced features. 3. Configure the “Enable Auto CTS/RTS Flow Control”, “16/32/64 bytes FIFO length”, and Receive/Transmit Buffer trigger level if you want to change. (The 128K software FIFO adjusting only supports Microsoft Windows 2000 / XP / 2003 OS. You can change the FIFO size and COM port Number as you need.) 25 The below picture would be shown on OS Windows 2000/XP/2003. The below picture would be shown on OS Windows 95/98SE/ME. *Enable Auto CTS/RTS Flow Control means the CTS/RTS flow control is controlled by hardware automatically. System will be more stable if the function is enabled. *Set the Receive/Transmit Buffer to higher value will get faster performance because the interrupts will be reduced, but the time for interrupt service routine will become shorter. The receive buffer overflow will be easily happened if the CPU speed is not enough to handle. If the system is not stable, select the lower value to correct problems. 26