1
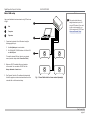
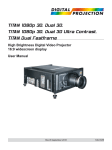
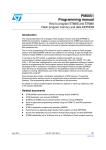
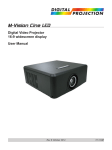
PROJECTOR CONTROLLER
Version 4.0
4USER MANUAL
Rev F July 2015
114-487F
Digital Projection Projector Controller
CONTENTS
CONTENTS
Overview............................................................................................................. 3
Gamut.................................................................................................................. 20
Product revision............................................................................................. 3
Gamut Tool.................................................................................................... 20
Applying edited TCGD data................................................................. 21
Legal notices.................................................................................................. 3
Quick-Start Guide......................................................................................... 4
Projector Controller software installation................................................... 4
Basic LAN setup............................................................................................. 5
Working With Individual Projectors.................................................. 6
Gamut Editor................................................................................................. 22
Export edited gamut data..................................................................... 23
Download edited gamut data to the projector...................................... 23
Warp..................................................................................................................... 24
Adding and removing projectors.................................................................. 7
Viewing Logs.................................................................................................. 29
Quick projector controls............................................................................... 8
ON/OFF button...................................................................................... 8
Shutter ON/OFF button.......................................................................... 8
Lamp status........................................................................................... 8
Application Settings.................................................................................. 30
Editing projector settings.............................................................................. 9
Locking projector settings.......................................................................... 10
Backing up projector settings.................................................................... 11
Restoring backed up projector settings.................................................... 13
Identifying a projector.................................................................................. 15
Using Groups.................................................................................................. 16
Creating groups............................................................................................ 17
Deleting groups............................................................................................ 17
Renaming groups......................................................................................... 17
Adding a projector to a group..................................................................... 18
Removing a projector from a group........................................................... 18
Bypassing the projector ON / OFF confirmation dialog........................... 30
Applying themes.......................................................................................... 31
Email alerts................................................................................................... 33
Configuring lens movement and calibration options............................... 35
Advanced Network Setup..................................................................... 36
Setting up LAN connections....................................................................... 36
Setting up serial connections..................................................................... 37
Adding a virtual projector............................................................................ 38
Recognizing virtual projectors in the workspace.................................. 38
Changing the IP address of a projector..................................................... 39
Workspace Reference.............................................................................. 40
Saving and opening workspaces............................................................... 42
Arranging projectors in the workspace..................................................... 43
Adding and removing multiple projectors................................................. 18
Editing group settings................................................................................. 19

Rev F July 2015
Digital Projection Projector Controller
OVERVIEW
Overview
Projector Controller enables you to monitor and control all projectors connected to your computer via LAN or Serial Port.
From a single screen layout you can view all projectors and access settings for an individual projector or for a group of projectors.
The software allows you to:
•
•
•
•
•
•
•
Notes
To check the latest version of this
software, visit
www.digitalprojection.com.
Create groups of projectors which can be controlled simultaneously
View essential information, such as model, name, ON/OFF status and lamp status, about all projectors on the network at a glance
View logs containing all interaction between the software and the projectors on the network
View network information such as IP and MAC address
Switch power on and off, open and close the shutter
Add and remove projectors within the network
Edit and control an array of settings, including:
•
•
•
•
Inputs and test patterns
Lens, image, color and geometry
Edge Blend and PIP settings
Plus many more
The software allows rapid network setup and discovery of projectors when using UDP mode.
Product revision
Because we at Digital Projection continually strive to improve our products, we may change specifications and designs, and add new features
without prior notice.
Legal notices
The software is provided as is. No warranty is implied. Digital Projection Ltd accepts no liability for loss or damage incurred as a result of its use.
Trademarks and trade names mentioned in this document remain the property of their respective owners.
Digital Projection disclaims any proprietary interest in trademarks and trade names other than its own.
Copyright © 2015 Digital Projection Ltd. All rights reserved.

Rev F July 2015
page 3
Digital Projection Projector Controller
QUICK-START GUIDE
Quick-Start Guide
Projector Controller software installation
The software can be installed within an existing network or you can build the network after the installation. Provided the network setup is
correct, Projector Controller will automatically detect available projectors as soon as you start the application.
Notes
This section details the most
straightforward setup via LAN
using a UDP network. If you wish
to use a serial connection or a
LAN connection with TCP/IP, see
Advanced Network Setup.
1. Ensure you have Microsoft .NET 2.0 framework installed on your computer.
2. Start the installer, DPProjectorControllerSetup.exe, and follow the instructions of the wizard.
The setup creates a Start menu shortcut at the following location:
•
All Programs > Digital Projection > Projector Controller > Projector Controller X.X.X.X (Windows Vista and above).
•
Programs > Digital Projection > Projector Controller > Projector Controller X.X.X.X (Windows XP).

Rev F July 2015
page 4
Digital Projection Projector Controller
QUICK-START GUIDE
Basic LAN setup
Use a small dedicated local area network using UDP as shown
in Fig. 1.
1
Hub
2
Computer
3
Projectors
Notes
This section details the most
straightforward setup via LAN
using a UDP network. If you wish
to use a serial connection or a
LAN connection with TCP/IP, see
Advanced Network Setup.
1
2
1. Connect each projector to the LAN network using the
following projector port:
•
•
Use the Update port on most models.
On HIGHlite 660 3D, HIGHlite Laser or M-Vision 930,
use the LAN port.
3
To locate the relevant LAN port, refer to your projector
manual (see the chapter called Connection Guide).
2. Make sure DHCP is switched off on each projector
in the network. You can switch off DHCP from the
Setup > Network > Control menu.
3. Run Projector Controller. The software will automatically
find all the projectors on the network and allow them to be
controlled with no further network setup.

Fig. 1: A small dedicated local area network (example)
Rev F July 2015
page 5
Digital Projection Projector Controller
WORKING WITH INDIVIDUAL PROJECTORS
Working With Individual Projectors
1
2
Currently selected projector
The currently selected item has a different
background. Click on a projector to select it.
3
Projector model and serial number
4
Projector name
When a projector is added to the network, the
software assigns a default name. You can edit this
text and assign a name of your choice by rightclicking it.
5

Tabs
The Projectors tab shows all projectors in the
workspace. You can edit settings of one projector at
a time.
The Groups tab allows you to work with several
projectors simultaneously.
The Warp Config tab is used for creating and
editing warp maps for projection onto uneven
surface
Quick controls
The ribbon at the top of each item allows you to:
• switch the projector on and off;
• open and close the shutter;
• view lamp status.
6
Disconnected projector
A disconnected projector will remain visible until
removed.
7
Information bar
This area provides information about the currently
selected projector: name, serial number, IP and
MAC address.
Notes
1
You can select multiple projectors in
order to copy them into a group. To
do so, hold the SHIFT key down and
click on each projector you wish to
copy.
To work with multiple projectors, see
Using Groups further in this guide.
2
3
4
5
6
7
Rev F July 2015
page 6
Digital Projection Projector Controller
WORKING WITH INDIVIDUAL PROJECTORS
Adding and removing projectors
Notes
To add a projector,
•
Simply connect the projector to the network. The software
will detect the new projector and add it to the view
automatically.
2
To remove a projector:
You can only remove a projector if it
is disconnected from the network.
1. Disconnect the projector from the network.
1. Select the disconnected projector
1
If you need to edit network settings
manually, see Advanced Network
Setup further in this guide.
.
2. On the Connections menu, click Remove
2
.
1

Rev F July 2015
page 7
Digital Projection Projector Controller
WORKING WITH INDIVIDUAL PROJECTORS
Quick projector controls
The Quick Controls ribbon
at the top of each projector allows you to switch a projector on and off,
open and close the shutter, and monitor lamp status.
Notes
1
1
ON/OFF button
ColorMeaning
Red
The projector is switched off.
Green
The projector is switched on.
Click this button to switch the projector on and off.
Shutter ON/OFF button
Image
A two-lamp projector
1
Meaning
The shutter is closed.
The shutter is open.
Click this button to open and close the shutter.
Lamp status
Each lamp is represented by a lightbulb symbol. Lamp status is indicated by the color of the lightbulb, as
follows:
ColorMeaning
Gray
The lamp is switched off.
Green
The lamp is switched on and working at 100% power.
Green (flashing)
The lamp is switched on and warming up.
Amber (flashing)
The lamp is cooling down.
Amber
The lamp is switched on at less than 100% power.
Red
An error.

A quad-lamp projector
Lamp status icons are not buttons.
To change a lamp status, open
Menu > Tasks > Lamps.
Rev F July 2015
page 8
Digital Projection Projector Controller
WORKING WITH INDIVIDUAL PROJECTORS
Editing projector settings
Notes
Projector settings are accessible from the following locations:
•
Select an item to edit from Menu > Tasks
1
.
For further information about
projector settings, refer to the
Operating Guide section of the
projector manual.
or
•
Select an item from the Task pane
2
.
Depending on the projector model and existing configuration, some settings may be unavailable.
1
2

Rev F July 2015
page 9
Digital Projection Projector Controller
WORKING WITH INDIVIDUAL PROJECTORS
Locking projector settings
Notes
Lock a projector to ensure that the settings cannot be changed locally. This is useful once a projector has
been set up to prevent accidental changes.
Settings can be changed via the
projector’s OSD even when locked.
To lock one or more projectors:
1
1. Select the projectors you wish to lock in the Projectors tab or from within a group.
To select multiple projectors, hold down SHIFT as you click on the projectors.
2. From the Projector menu, click Lock
.
Locked projectors appear with a padlock symbol
1
in the corner.
To unlock a projector,
•

From the Projector menu, click Unlock
.
Rev F July 2015
page 10
Digital Projection Projector Controller
WORKING WITH INDIVIDUAL PROJECTORS
Backing up projector settings
Notes
For each individual projector, you can back up settings and restore backed up settings.
1
Only global settings can be backed
up.
To back up settings:
1. In the Backup menu, click Backup
1
.
Some projectors cannot be backed
up:
•
•
2. In the Backup Projectors window, select which projector to back
up. You can select multiple projectors 2 .
3. If necessary, change the backup location
4. Click Start

4
.
3
.
HIGHlite Laser
M-Vision 930
2
3
4
Rev F July 2015
page 11
Digital Projection Projector Controller
WORKING WITH INDIVIDUAL PROJECTORS
Backing up projector settings (continued)
Notes
Only global settings can be backed
up.
Some projectors cannot be backed
up:
•
•
5. You can monitor the backup progress
1
.
6. When the backup is over, a message appears. Click OK 2 to
close the message and return to the Backup Projectors window.
7. Click Exit
3
HIGHlite Laser
M-Vision 930
1
2
to return to the main Projector Controller window.
3

Rev F July 2015
page 12
Digital Projection Projector Controller
WORKING WITH INDIVIDUAL PROJECTORS
Restoring backed up projector settings
Notes
To restore backed up settings:
1. In the Backup menu, click
Restore 1
1
.
Only global settings can be backed
up.
If a backed up projector is not in
the workspace, its backup will be
unavailable.
2. In the Restore Projectors window, select which projector to
restore. You can select multiple projectors 2 .
3. If necessary, navigate to a different backup location
3
2
.
3
4. Click Start
4
.
4

Rev F July 2015
page 13
Digital Projection Projector Controller
WORKING WITH INDIVIDUAL PROJECTORS
Restoring backed up projector settings (continued)
Notes
Only global settings can be backed
up.
If a backed up projector is not in
the workspace, its backup will be
unavailable.
5. You can monitor the restore progress
1
.
6. When the restore is complete, a message appears. Click
OK 2 to close the message and return to the Restore
Projectors window.
7. Click Exit
window.

3
to return to the main Projector Controller
1
2
3
Rev F July 2015
page 14
Digital Projection Projector Controller
WORKING WITH INDIVIDUAL PROJECTORS
Identifying a projector
To identify a projector in the array, select the projector in the Projectors pane and click Home menu tab > Projector > Identify
Notes
.
The following will then occur to allow identification:
•
•

The keypad lights on the selected projector will flash for 10 seconds.
The image projected by the selected projector will be replaced by a test pattern for 10 seconds.
Rev F July 2015
page 15
Digital Projection Projector Controller
USING GROUPS
Using Groups
Notes
Groups enable you to edit settings for several projectors simultaneously, without the need to open each projector.
You can have a number of groups and each projector can be added to any group.
A projector can be added to more than one group.
You can delete and rename groups as needed.
To use groups, open the Groups tab
Individual groups appear as tabs
3
1
. The Groups menu
2
is now enabled.
. The first group, Default, is automatically added by the application. You cannot delete or rename it.
Within a group you can still change settings for individual projectors as normal, or you can work with the whole group. To do so,enable group
settings by doing the following:
•
On the Tasks menu, click Group
1

4
Group names cannot contain spaces
or special characters.
.
2
3
4
Rev F July 2015
page 16
Digital Projection Projector Controller
USING GROUPS
Creating groups
Notes
To create a group, click the New Group command
1
in the Groups menu.
1
Deleting groups
To delete a group, click Delete
2
2
.
Renaming groups
2
Groups are assigned a name automatically when created.
To change the default name of the selected group:
1. Click Rename
3
in the Groups menu.
2. Type the new name in the Edit Group Name box
4
and then click OK.
4
Group names cannot contain spaces
or special characters.

Rev F July 2015
page 17
Digital Projection Projector Controller
USING GROUPS
Adding a projector to a group
Notes
1. Select the projector in the Projectors tab or in another group and copy it using Copy from the Clipboard menu, or Ctrl+C.
Cut works in groups only.
2. Paste the projector into the destination group using Paste from the Clipboard menu, or Ctrl+V.
To move a projector from one group to another, use Cut (Ctrl+X) instead of Copy.
Removing a projector from a group
1. Select the projector within the group.
2. On the Arrange toolbar, click Delete
.
The projector disappears from the group but remains in the workspace. You can access it from the Projectors tab, or from any other groups it
has been added to.
Adding and removing multiple projectors
To add or remove several projectors at the same time, hold down the SHIFT key while selecting the projectors.

Rev F July 2015
page 18
Digital Projection Projector Controller
USING GROUPS
Editing group settings
Notes
1
1. Open the group you wish to edit.
2. If group settings are not displayed, click Group
the Tasks menu.
1
Only a subset of settings are
available in Group Mode.
in
3. Edit the settings as required.
4. To exit group settings, select an individual projector.

Initially all group settings appear
blank. When you edit a setting, the
Group Tasks pane shows the new
group value.
Rev F July 2015
page 19
Digital Projection Projector Controller
GAMUT
Gamut
Notes
1
Gamut Tool
Gamut Tool allows editing TCGD
data which can be applied to any
number of projectors. In comparison,
Gamut Editor manipulates TCGD
and MCGD data for a single
projector.
The Gamut Tool (Fig. 1) allows you to edit target
gamut coordinates and load the edited gamut into
one of two target gamut tables supported by the
projectors.
See Gamut Editor further in this
section.
To open Gamut Tool,
•
On the Gamut menu, click Gamut Tool 1
Some projectors, for example
HIGHlite Laser, only support one
user-defined gamut table.
.
Gamut Tool works with all
projectors. A projector needs to be
disconnected from the network in
order to be excluded from the gamut
matching process.
The Gamut tool uses predefined
measured data. To edit that data,
and to edit individual numeric values
within the user tables, do either of
the following:
•
click ColorMax on the Task
Pane. When you have finished
editing a table, click Send to
load the data into the projector.
•
use Gamut Editor. See Gamut
Editor further in this section.
Fig. 1: Gamut Tool

Rev F July 2015
page 20
Digital Projection Projector Controller
GAMUT
Gamut Tool (continued)
The yellow triangle represents the current red, green and blue gamut coordinates that will be sent to the user table of choice. The white
triangles visualize the measured data for each projector on the network.
Edit the yellow triangle by dragging its corners within the grid. Make sure the yellow triangle occupies as much space as possible while at the
same time being completely within each and every one of the white triangles. Use the zoom buttons to pinpoint the exact position of the red,
green and blue coordinates. Use Reset to zoom out.
Applying edited TCGD data
Notes
Gamut Tool allows editing TCGD
data which can be applied to any
number of projectors. In comparison,
Gamut Editor manipulates TCGD
and MCGD data for a single
projector.
See Gamut Editor further in this
section.
Click Download to send gamut coordinates to the projectors. From the dropdown, select TCGD Table 1 or TCGD Table 2.
Some projectors, for example
HIGHlite Laser, only support one
user-defined gamut table.
Gamut Tool works with all
projectors. A projector needs to be
disconnected from the network in
order to be excluded from the gamut
matching process.
The Gamut tool uses predefined
measured data. To edit that data,
and to edit individual numeric values
within the user tables, do either of
the following:

•
click ColorMax on the Task
Pane. When you have finished
editing a table, click Send to
load the data into the projector.
•
use Gamut Editor. See Gamut
Editor further in this section.
Rev F July 2015
page 21
Digital Projection Projector Controller
GAMUT
Gamut Editor
Notes
1
Gamut Editor (Fig. 1) allows visual editing of both
MCGD and TCGD data for the selected projector.
Gamut Editor manipulates TCGD
and MCGD data for a single
projector. In comparison, Gamut
Tool allows editing TCGD data
which can be applied to any number
of projectors.
To open Gamut Editor,
•
On the Gamut menu, click Gamut Editor 1
.
The yellow triangle represents the MCGD table. The
two white triangles represent the TCGD tables.
See Gamut Tool earlier in this
section.
Some projectors, for example
HIGHlite Laser, only support one
user-defined gamut table.
Edit any triangle by dragging its corners within the
grid. Make sure the yellow triangle occupies as much
space as possible while at the same time being
completely within at least one of the white triangles.
Use the zoom buttons to pinpoint the exact position
of the red, green and blue coordinates. Use Reset to
zoom out.
Fig. 1: Gamut Editor

Rev F July 2015
page 22
Digital Projection Projector Controller
GAMUT
Import gamut data
Notes
1. Select the table where you wish to import new
coordinates.
Gamut Editor manipulates TCGD
and MCGD data for a single
projector. In comparison, Gamut
Tool allows editing TCGD data
which can be applied to any number
of projectors.
2. Click Import MCGD/TCGD - the name of the button
will vary depending on the selected table.
3. Navigate to the location where the data is stored,
select the data file and click Open.
Export edited gamut data
1. Select the table you wish to export.
See Gamut Tool earlier in this
section.
Some projectors, for example
HIGHlite Laser, only support one
user-defined gamut table.
2. Click Export MCGD/TCGD - the name of the button
will vary depending on the selected table.
3. Navigate to the location where you wish to store the
data, enter a file name and click Save.
Download edited gamut data to the projector
1. Click Download to send the gamut coordinates to
the projector.
2. From the dropdown, select TCGD Table 1 or TCGD
Table 2.

Rev F July 2015
page 23
Digital Projection Projector Controller
WARP
Warp
Notes
Not all projector models support
Warp. Refer to the projector manual
for details.
The Warp Config tab is used for creating and editing warp maps
for projection onto uneven surfaces.
To create and edit warp maps:
1
1. Copy one or more projectors from the Projectors tab or from
within a group.
2. Open the Warp Config
1
tab.
Each cell within the grid is a placeholder for a projector. The
default grid contains three cells in a single row. You can edit
the grid at this stage or later by adding or removing rows or
columns. Use the Grid Height 2 and Grid Width 3 dropdown lists.
3. Paste the copied projectors in the grid. You can arrange the
projectors within the grid using the arrows 4 .

2
3
4
Rev F July 2015
page 24
Digital Projection Projector Controller
WARP
Notes
4. If your computer is connected to more than one monitor, you can select which monitor will show the warp map editor. Select a monitor
from the Grid Monitor 1 drop-down list.
1
5. To enable warp map editing, select a projector and click Apply Warp
2
Not all projector models support
Warp. Refer to the projector manual
for details.
.
2
6. Edit the warp map - click Edit Grid
3
. The warp map editor opens on the monitor specified at step 4.
3

Rev F July 2015
page 25
Digital Projection Projector Controller
WARP
Notes
1
7. In the warp map editor for the selected
projector, use the controls under Evaluator
Controls 1 and Grid Designer 2 to edit
the warp map.
Not all projector models support
Warp. Refer to the projector manual
for details.
2

Rev F July 2015
page 26
Digital Projection Projector Controller
WARP
Notes
8. To send the warp map to the projector, select
a slot in the projector memory from Save
Warp to Slot 3 , and then click Send 4 .
9. To exit the warp map editor, click Close
Grid Designer.
1
This will close the map editor and allow you
to access the main Projector Controller
window again.
1
2
Not all projector models support
Warp. Refer to the projector manual
for details.
in
3
Changes to your map will be lost unless you
send the map to the projector beforehand.

Rev F July 2015
page 27
Digital Projection Projector Controller
WARP
Notes
10. Back in the main Projector Controller window, to disable warp grid editing, click Reset Warp
1
.
1

Not all projector models support
Warp. Refer to the projector manual
for details.
Rev F July 2015
page 28
Digital Projection Projector Controller
VIEWING LOGS
Viewing Logs
Notes
The Logging menu tab consists of the following commands:
View Log shows a record of interaction between the software
and the available projectors logged within the current session.
The Log View
1
appears underneath the main workspace.
Choose from the following views:
•
•
•
•
•
•
Click Comms to view all communication between Projector
Controller and the projectors. Log entries are grouped by
projector.
Click Errors to view communication errors within the
network.
Click Diagnostics to see low level diagnostic messages,
including errors, sent by the projectors.
Use the Filter drop-down list to view only log entries for a
particular projector.
Click Reset to remove the applied filter.
Click Clear to clear the log.
1
Clear Log deletes the current record.
Comms Log opens a text file containing all communications for
the current session.
This log is identical in content to the Communications tab.
Error Log opens a text file containing all error messages logged
during the current session.
This log is identical in content to the Errors tab.
Status Log opens a text file containing all status messages
logged during the current session.
This log is identical in content to the Diagnostics tab.
Log Folders opens the location on your computer where log
files COMMS.LOG, STATUS.LOG and ERROR.LOG reside. In
addition, you can view past logs automatically archived by the
application in subfolders by date.

You can set up Projector Controller
to send the status log periodically to
an email address of your choosing.
For further information, see Email
Alerts further in this guide.
Rev F July 2015
page 29
Digital Projection Projector Controller
APPLICATION SETTINGS
Application Settings
Notes
Bypassing the projector ON / OFF confirmation dialog
Projector Controller asks for confirmation when you switch a projector on or off.
To bypass the confirmation dialog:
1. Open the Application Settings dialog: click the DP icon 1 at the top
left corner of the window Projector Controller window, then click
Options 2 .
1
2
2. On the General tab, deselect
Warn user before powering on/off projectors 3 .
3. Click OK
4
3
to close the Application Settings dialog.
4

Rev F July 2015
page 30
Digital Projection Projector Controller
APPLICATION SETTINGS
Applying themes
Notes
You can customize the software by applying different themes.
1
To apply a theme:
1. Click the DP icon
Controller window.
2. Click Options
2
1
at the top left corner of the Projector
.
3. On the General tab 3 , select a theme from the drop-down list
under Application UI theme 4 , then click OK 5 .
2
3
4
5

Rev F July 2015
page 31
Digital Projection Projector Controller
APPLICATION SETTINGS
Applying themes (continued)
Notes
Select from the following themes:

Office Blue
Office Black
Office Silver
Professional Black (default theme)
Professional White
Microsoft Zune
Rev F July 2015
page 32
Digital Projection Projector Controller
APPLICATION SETTINGS
Email alerts
Notes
The Email Alerts feature, when enabled, periodically emails the status log to
an email address of your choice.
For information about accessing the
status log, see Viewing logs earlier
in this guide.
The status log contains low level diagnostic and error messages that the
projectors emit, for example :
23:46:35 : ERROR: Verify Lamp Timer ROM 1 failed
1
To set up email alerts:
1. Make sure the computer is connected to the internet.
2. Open the Application Settings dialog: click the DP icon 1 at the top left
corner of the window Projector Controller window, then click Options 2 .

2
Rev F July 2015
page 33
Digital Projection Projector Controller
APPLICATION SETTINGS
Notes
3. On the Email Alerts tab
•
•
•
1
:
1
select Enable Email Alerts
2
.
2
enter up to three recipient email addresses under Email alerts to these
recipients 3 .
3
specify how often you wish to receive the emails: in the Email alerts out
every ... Minutes field 4 , enter a value between 1 and 1440.
4
4. On the SMTP Server tab
5
:
•
enter the recipient SMTP server Host Name
Enable SSL 7 .
•
enter the SMTP account name and password
5. Click OK
dialog.
9
6
and select
8
.
to save the settings and close the Application Settings
For information about accessing the
status log, see Viewing logs earlier
in this guide.
The email addresses and domain
names shown in these illustrations
are dummies. You should change
them to your own email addresses
and server name.
5
6
SMTP port is always 25.
7
8
9

Rev F July 2015
page 34
Digital Projection Projector Controller
APPLICATION SETTINGS
Configuring lens movement and calibration options
Notes
Projector Controller allows you to control lens movement speed as well as step
size when executing a Nudge command.
To configure lens movement speed and nudge step size:
Lens movement and calibration
options are applied to all projectors.
1
1. Open the Application Settings dialog: click the DP icon 1 at the top left
corner of the window Projector Controller window, then click
Options 2 .
2
2. On the Lens tab:
•
•
Under Lens Calibration 3 , select which actions should be
performed by the Tasks > Lens > Calibrate command (where
applicable): Calibrate focus, Calibrate zoom and Centre lens.
Under Lens Movement 4 , select lens movement speed (Slow,
Medium, Fast and Very Fast) and nudge step size (Tiny, Small,
Medium and Large)
3. Click OK

5
to close the Application Settings dialog.
3
4
5
Rev F July 2015
page 35
Digital Projection Projector Controller
ADVANCED NETWORK SETUP
Advanced Network Setup
Notes
Projector Controller supports the following types of network connection:
•
•
•
LAN using UDP (recommended)
LAN using TCP/IP
Serial
You can also add virtual projectors to your network, for testing purposes.
Connection types can be combined. For example, you can control projectors via LAN and
RS232 at the same time.
Typically, Projector Controller will automatically detect all connected projectors. If necessary,
you can set up a network connection manually using the Connections menu.
Setting up LAN connections
You can choose between UDP and TCP/IP:
1. On the Connections menu, click Network.
2. Select UDP or TCP/IP.
Using UDP is straightforward and requires no further setup.
If using TCP/IP, you may need to edit IP addresses manually to ensure the correct IP is
assigned to each projector in the network.

See Changing the IP address of a
projector further in this section for
more information.
Rev F July 2015
page 36
Digital Projection Projector Controller
ADVANCED NETWORK SETUP
Setting up serial connections
Notes
You can connect one or more projectors using RS232, depending
on your available ports.
Use a null-modem cable to connect a projector directly to your
computer, or a straight cable to use a modem.
1. On the Connections menu, click Serial (Fig. 1).
2. Select the COM port used by the projector (Fig. 2).
Fig. 1: Serial connections
1
1
Computer with four USB ports
Projector Controller will run on this computer.
2
USB to Serial adaptor cables
These transform the USB ports into Serial ports.
3
Serial connections
The Connections menu will list them as COM ports.
4
Connected projectors
When setting up the serial connections, make sure you
assign the correct COM port to each projector.
2
COM1
3
COM2
COM3
COM4
4
Fig. 2: An example network using four COM ports

Rev F July 2015
page 37
Digital Projection Projector Controller
ADVANCED NETWORK SETUP
Adding a virtual projector
Notes
Virtual projectors can be added to any network.
1. On the Connections menu, click Virtual.
2. Select a projector series and model from the list.
Recognizing virtual projectors in the workspace
Virtual projectors are denoted by a green lens
preceding the serial number.
1
and by a hash symbol # In the illustration, the projector on the left is a virtual projector.
2
1
2

Rev F July 2015
page 38
Digital Projection Projector Controller
ADVANCED NETWORK SETUP
Changing the IP address of a projector
Notes
To change an IP address:
1. On the Projector menu, click Change IP
The Change IP window opens
2
1
.
.
1
2
All IP addresses in your network
must be identical up to the third
octet; each IP address must have a
unique last octet.
All IP addresses within a network
share the same subnet mask. You
cannot edit the subnet.
Each MAC address is unique.
MAC addresses are assigned
automatically and cannot be edited.
3
2. Type the new IP address in the New IP field 3 and
then click OK 4 to close the Change IP window and
return to Projector Controller.
4

Rev F July 2015
page 39
Digital Projection Projector Controller
WORKSPACE REFERENCE
Workspace Reference
1
Menus
Sets of menus in two menu tabs, Home and Logging.
2
Notes
Main workspace split in tabs
Monitor the projectors in your network and change settings. Switch between the following tabs:
•
•
•
Projectors - view all projectors at once and work with one projector at a time.
Groups - view and work with groups of projectors.
Warp Config - create, edit and apply warp maps.
Use the Arrange buttons to change the order of the projectors.
3
Individual projector
View model, name, lamp status and configuration, and whether the projector is powered on. The currently selected projector has a
darker background. Click a projector to select it. On the Projectors tab all commands work only on the currently selected projector.
4
Task pane
All settings for the currently selected projector can be controlled from this area.
1
2
3

4
Rev F July 2015
page 40
Digital Projection Projector Controller
WORKSPACE REFERENCE
Notes
5
Log View
Quick access to the Comms log, Errors log and Diagnostics log, allowing you to filter entries so you can view messages for an
individual projector.
6
Information bar
This area provides information about the currently selected projector: model, serial number, IP, MAC address and network type.
5
6

Rev F July 2015
page 41
Digital Projection Projector Controller
WORKSPACE REFERENCE
Saving and opening workspaces
You can save your workspace for future use. Projector Controller
records the current projectors, their order in the workspace, as well as
any groups and the projectors they contain.
Notes
1
When you open a saved workspace, it replaces your current
workspace.
Unavailable projectors are also added to the workspace.
Workspaces are saved with the .workspace extension. The default
location for your saved workspaces is
My Documents\Digital Projection\Projector Controller\Workspaces.
You can save your workspaces to any location of your choice.
To save a workspace or open a saved workspace:
2
3
1. Click the DP icon
Controller window.
1
at the top left corner of the Projector
4
5
2. Choose from the following actions:

•
Open a previously saved workspace
•
Open a recent workspace
•
Save the current workspace
•
Exit Projector Controller
5
2
3
4
.
Rev F July 2015
page 42
Digital Projection Projector Controller
WORKSPACE REFERENCE
Arranging projectors in the workspace
Notes
To change a projector’s position within the workspace,
1
1. Select the projector.
2
3
4
2. Use the Arrange toolbar:

•
Move to the beginning
•
Move toward the beginning, one step at a time
•
•
Move toward the end, one step at a time
Move to the end
1
2
3
4
Rev F July 2015
page 43
Contact Information:
Digital Projection Limited
Digital Projection Inc.
Digital Projection China
Digital Projection Asia
Greenside Way, Middleton
Manchester M24 1XX, UK
55 Chastain Road, Suite 115
Kennesaw, GA 30144, USA
中国 北京市 朝阳区 芍药居北里101号
世奥国际中心A座2006室(100029)
Registered in England No. 2207264
Registered Office: as above
Tel
Fax
Tel
Fax
[email protected]
www.digitalprojection.com
Rm A2006
ShaoYaoJu 101 North Lane
Shi Ao International Center
Chaoyang District
Beijing 100029, PR CHINA
16 New Industrial Road
#02-10 Hudson Technocentre
Singapore 536204
(+44) 161 947 3300
(+44) 161 684 7674
(+1) 770 420 1350
(+1) 770 420 1360
[email protected]
[email protected]
www.digitalprojection.co.uk
114-487F Projector Controller User Manual
Tel
Fax
(+86) 10 84888566
(+86) 10 84888566-805
[email protected]
www.dp-china.com.cn
Tel
Fax
(+65) 6284-1138
(+65) 6284-1238
www.digitalprojectionasia.com