1
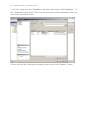
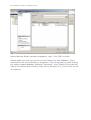
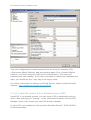
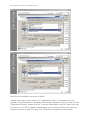
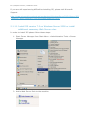
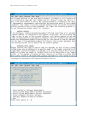
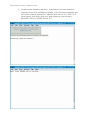
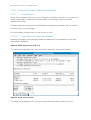
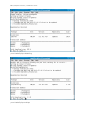
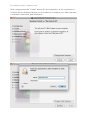
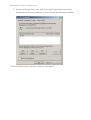
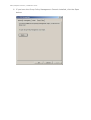
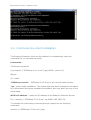
Version 3.0.5.3
Installation Guide
I | Endpoint Protector | Installation Guide
Table of Contents
1. System Requirements..............................1
1.1. Server System Requirements .............................................1
1.2. Client System Requirements...............................................3
2. Server Installation Routines......................4
2.1. Windows OS Server Installation ..........................................4
2.1.1.
Download locations of required applications: ...................... 4
2.1.2.
Server Installation Prerequisites........................................ 5
2.1.3.
Install .NET Framework 2.0 .............................................. 5
2.1.4. Install MS SQL or MS SQL 2005 Express Server and Server
Management Studio .................................................................... 5
2.1.5.
Install MS SQL Server Management Studio (Express) .......... 7
2.1.6.
Modify the settings for MS SQL connections........................ 7
2.1.7.
Launch the SQL Server Management Studio ....................... 8
2.1.8.
Create a new database user ............................................. 9
2.1.9.
Create a new database. ..................................................10
2.1.10. Install IIS version 6.0 on Windows Server 2003 .................14
2.1.11. Install IIS version 7.0 on Windows Server 2008 or install
additional necessary Web Server roles..........................................17
2.1.12. Install PHP ....................................................................20
2.1.13. Using a database from another location ............................21
2.1.14. Endpoint Protector Server installation ...............................22
2.1.15. Endpoint Protector Server Configurator .............................24
2.1.16. Final Steps ....................................................................26
2.2. Login Credentials to Endpoint Protector Server ................... 29
2.3. Linux Server Installation – Debian (Ubuntu) ....................... 30
2.3.1.
Installation of required software ......................................33
2.3.2.
Installation of Zend Optimizer 3.3.0 .................................35
2.3.3.
Installation of Endpoint Protector files...............................43
2.3.4.
Configuration of the Endpoint Protector system..................44
2.4. Linux Server Installation – Red Hat (Fedora) ...................... 46
2.4.1.
Endpoint Protector Automated Installation.........................47
2.4.1.1. Preparations ..................................................................47
2.4.1.2. Installation....................................................................47
2.4.2.
Endpoint Protector Manual Installation ..............................54
II | Endpoint Protector | Installation Guide
2.4.2.1. Preparations ..................................................................54
2.4.2.2. Installation of required software ......................................54
2.4.2.3. Installation of Endpoint Protector files...............................66
2.4.2.4. Configuration of Endpoint Protector ..................................69
3. Client Installation .................................. 71
3.1. Client Installation on Windows .......................................... 71
3.2. Client Installation on Mac OS............................................ 73
3.3.
Remote Deployment of Endpoint Protector Client ................ 80
3.4. Command-line client installation ....................................... 90
4. Installing Root Certificate to your Internet
Browser ............................................. 91
4.1. For Microsoft Internet Explorer ......................................... 91
4.2. For Mozilla Firefox ........................................................... 97
5. Support ............................................... 99
6. Important Notice / Disclaimer ............... 100
1 | Endpoint Protector | Installation Guide
1. System Requirements
1.1. Server System Requirements
Operating system (x86):
Windows 2003 Server SP1 (or other Windows with IIS version 6.0
or higher)
Windows 2008 and Windows Small Business Edition 2008
Linux based (Debian or Ubuntu) are recommended, since
installation routines are optimized for this particular OS. Other
compatible Linux based systems are: Red Hat (Fedora) and other
distributions
Unix based (FreeBSD etc)
Administrative rights on the Server
Apache web server (with PHP version 5.2.3 or higher) or IIS version
6.0 or higher (PHP as ISAPI module)
PHP-CLI
MySQL database or MSSQL database (MSSQL 2005 Express)
OpenSSL
.Net Framework 2.0
2 GHz processor or faster recommended
Minimum of 512 MB RAM
2 | Endpoint Protector | Installation Guide
Total of 50 MB of available memory on the Hard Drive for the
application files
Additional space required by the MySQL or MSSQL database,
depending on the number of clients and the activity on the network
Sufficient Hard Drive space available for file tracing/shadowing
module option (10GB up to 500GB). This space is related to the
number of client computers and their activity. We recommend using
a separate storage HDD for shadow storage
Attention!
In case you are using an internal or external firewall, please assure that the port
you assign to the server is open. By default this is port 443.
3 | Endpoint Protector | Installation Guide
1.2. Client System Requirements
Operating system:
Windows 7 (all versions) 32bit/64bit
Windows Vista (all versions) 32bit/64bit
Windows XP Home or Professional
(Service Pack 2 is recommended)
Windows Server 2003
Mac OS X 10.4 and 10.5+
Administrative rights on the PC to install the MSI package
Microsoft .NET Framework 2.0 needs to be preinstalled on the PC
Fully functional internet / network connection
1 GHz processor (or faster recommended)
Minimum of 256 MB RAM
32 MB of available memory on the hard drive (plus additional space for
optional offline file tracing and file shadowing)
Attention!
In case you are using an internal or external firewall, please assure that the
computer you are installing the client on has the server-specified port open. By
default this is port 443. In case you are behind a router, consult the device’s
user manual or contact the manufacturer of your device about setting up portforwarding.
4 | Endpoint Protector | Installation Guide
2. Server Installation
Routines
2.1. Windows OS Server Installation
2.1.1. Download locations of required applications:
All 3rd party software that is required for the installation can be downloaded for
free from the following locations:
MSSQL
http://www.microsoft.com/sql/downloads/trial-software.mspx
MSSQL 2005 Express
and Microsoft SQL Server Management Studio Express
http://www.microsoft.com/express/2005/sql/register/
http://www.microsoft.com/downloads/details.aspx?FamilyID=c243a5ae-4bd14e3d-94b8-5a0f62bf7796&displaylang=en
.NET Framework 2.0
x86 version:
http://www.microsoft.com/downloads/details.aspx?FamilyID=0856EACB-43624B0D-8EDD-AAB15C5E04F5&displaylang=en
x64 version:
http://www.microsoft.com/downloads/details.aspx?familyid=b44a0000-acf84fa1-affb-40e78d788b00&displaylang=en
Additional information regarding the installation of these applications can be
found on their respective websites.
5 | Endpoint Protector | Installation Guide
Adobe® Flash® Player
http://get.adobe.com/flashplayer/?promoid=DXLUJ
This is required to display the Graphical reports in Endpoint Protector
2.1.2. Server Installation Prerequisites
These components MUST be installed before you can proceed with the installation
of the Endpoint Protector Server.
Please follow these detailed next steps for a successful installation:
2.1.3. Install .NET Framework 2.0
After you have downloaded the package, run the “dotnetfx.exe” and follow the
instructions.
2.1.4. Install MS SQL or MS SQL 2005 Express Server and Server
Management Studio
Run the installer and complete installation process with default settings.
When asked, choose “Mixed Mode (Windows Authentication and SQL Server
Authentication)” and set up your password. On the following screen check
“Enable User Instances” and click Next.
6 | Endpoint Protector | Installation Guide
Click “Next”.
7 | Endpoint Protector | Installation Guide
Click “Next” and proceed with the installation.
2.1.5. Install MS SQL Server Management Studio (Express)
Leave default settings. When the installation is completed, click “Finish”.
2.1.6. Modify the settings for MS SQL connections
Attention!
Please assure TCP/IP and Named Pipes are enabled in the SQL Configuration
tool. To do this, go to Start->Programs->Microsoft SQL Server 2005>Configuration Tools->SQL Server Configuration Manager.
From the list on the left side select “Protocols for SQLEXPRESS”, then set Named
Pipes and TCP/IP to enabled.
8 | Endpoint Protector | Installation Guide
Create a new user: EPP and a database: EPP by following these steps:
2.1.7. Launch the SQL Server Management Studio
Start->Programs->Microsoft SQL Server 2005->SQL Server Management Studio
Express. Connect to the Database Engine using Windows Authentication (default
settings).
9 | Endpoint Protector | Installation Guide
2.1.8. Create a new database user
To create a new database user, follow these steps:
From the SQL Server Management Studio Express access the “Security” folder,
then right-click “Logins” folder and select “New Login…”
From the “New Login” window, choose “SQL Server authentication” and type in
the login name “epp” for this new user and the correspondent password for this
database user. Uncheck all options (Enforce password expiration, User must
change password at next login, etc).
10 | Endpoint Protector | Installation Guide
Click “OK” to finish. Now you should see a new user called EPP.
2.1.9. Create a new database.
After you have created a new user, you need to create a new database.
11 | Endpoint Protector | Installation Guide
To do this, right-click the “Databases” directory and select “New Database…” In
the “Database name” enter “EPP” and set the owner of the database to be your
previously created EPP user.
You can do this by clicking the browsing mark next to the “default” owner.
12 | Endpoint Protector | Installation Guide
In the new window click on “Browse”. A list of available users will appear.
Check the box next to the user “epp” and click “OK”
13 | Endpoint Protector | Installation Guide
Notice that the Owner has been changed to “epp”. Click “OK” to finish.
Please make sure that you set the correct Collation for this database. This is
essential for the correct display of characters. This can be done by right-clicking
the newly created database, selecting “Properties”, then “Options” from the left
side of the window and choosing “SQL_Latin1_General_CP1_CI_AS” from the list
of collations.
14 | Endpoint Protector | Installation Guide
Test your configuration by disconnecting from the current connection (File>Disconnect Object Explorer) and reconnecting again (File->Connect Object
Explorer), this time using the “SQL Server Authentication” (the user and
password you just created). If you have successfully created your database and
login, you should see the “-epp” tag in the server name.
For further information on setting up MS SQL Server, please consult Microsoft
Support. http://support.microsoft.com/ph/2855
2.1.10. Install IIS version 6.0 on Windows Server 2003
Install IIS, if not already present. You can check if IIS is installed by going to
Start->Run and typing in “inetmgr”. If the Internet Information Services (IIS)
Manager opens, than means you have IIS already installed)
In case IIS is not installed you will need the Windows Server™ 2003 CD/DVD.
Follow these steps:
15 | Endpoint Protector | Installation Guide
Go to Start->Settings->Control Panel->Add or Remove Programs->Add/Remove
Windows Components.
From the Windows Components Wizard, select “Application Server” and click on
“Details…”
In the new window, check the box next to “Internet Information Services (IIS)
and click “OK”.
16 | Endpoint Protector | Installation Guide
Wait for the installation process to finish.
Please note that in some cases, the “Application Server” component will not
appear in the Add/Remove Windows Components Wizard. In case you do not see
“Application Server” please look for “Internet Information Service” and check the
box next to it. If IIS is already installed but is not working, follow the previous
steps to remove it, and then use your CD/DVD to reinstall the component.
17 | Endpoint Protector | Installation Guide
If you are still experiencing difficulties installing IIS, please visit Microsoft
Support.
http://www.microsoft.com/technet/prodtechnol/WindowsServer2003/Library/IIS/
750d3137-462c-491d-b6c7-5f370d7f26cd.mspx?mfr=true
2.1.11. Install IIS version 7.0 on Windows Server 2008 or install
additional necessary Web Server roles
In order to install IIS please follow these steps:
1. Start Server Manager from Start Menu ->Administrative Tools->Server
Manager
2. Add a Web Server Role to the machine
18 | Endpoint Protector | Installation Guide
3. Select a Web Server and click the „Next“ button.
4. Select the Role Services(Static Content, Default Document, Directory
Browsing, HTTP Errors, CGI, HTTP Logging, Request Monitor, Windows
Authentication, Client Certificate Mapping Authentication, IIS Client
Certificate Mapping Authentication, Request Filtering, Static Content
Compression, IIS Management Console, IIS Management Scripts and Tools
and all files from IIS 6 Management Compatibility) as presented below:
19 | Endpoint Protector | Installation Guide
5. Install the Role with the required services and restart the server.
20 | Endpoint Protector | Installation Guide
2.1.12. Install PHP
PHP is installed automatically during the setup process of Endpoint Protector
Server.
If you would like to install PHP manually, we recommend using the following
command
msiexec.exe /i php-5.2.6-win32-installer.msi INSTALLDIR="c:/php"
ADDLOCAL=MainExecutable,iis4ISAPI,ext_php_mssql,ext_php_mbstring,ext_php
_openssl,ext_php_soap,ext_php_xmlrpc,ext_php_xsl,ext_php_ldap,ext_php_curl
,ext_php_gd2,ext_php_smtp,ext_php_sockets,ext_php_zip -qn
(You can install PHP version 5.2.3 as a minimum requirement, but we
recommend version 5.2.6. Additionally, you can remove the –qn parameter in
order to add more extensions to php, depending on other sites you have running
on the same web server)
This command will assure that all the correct extensions for PHP are installed
automatically.
The PHP configuration itself will be done automatically by the Endpoint Protector
Configurator.
21 | Endpoint Protector | Installation Guide
2.1.13. Using a database from another location
You can configure Endpoint Protector Server to use a database which is on a
different computer, thus reducing the load on the server.
In order to make Endpoint Protector run on one server and the database on
another, please follow the steps:
1. Follow the instructions from the page bellow in order to be sure that
the remote connections are enabled in your SQL Server.
http://support.microsoft.com/default.aspx?scid=kb;EN-US;914277
2. In the last part of the installation (Endpoint Protector Configurator), use one
of the following as instance name:
ComputerName\SQLInstanceName (ex. Steve_PC\SQLExpress)
IP\ SQLInstanceName (ex. 89.65.215.39\SQLExpress)
Depending on your network configuration.
22 | Endpoint Protector | Installation Guide
2.1.14. Endpoint Protector Server installation
You will have received the .ZIP file containing the Endpoint Protector Setup files.
The server installation contains the installation files for OpenSSL, PHP 5.2.6 for
Windows and also configures the IIS and PHP settings for you.
Please extract them to a temporary folder and launch
“EndpointProtectorServerInstaller.exe”.
This Wizard allows you to install all necessary components simply and easily.
In case you are not sure that you have all necessary requirements, you can
consult the Install Sheet by clicking on the “Get Install Sheet” button.
Please note that this is a .PDF document and you require a PDF reader to open it.
Click “Start” to proceed.
Simply follow the on-screen instructions for each setup wizard and install all
components with default settings.
Please note that after the Prerequisite Software and Endpoint Protector
Installation you will need to click on “Continue” to proceed with the installation.
When the installation finishes with the Prerequisite Software and Endpoint
Protector Server setup, a configuration wizard will open and ask for some
parameters. These parameters are required for the creation of a Certificate
Authority, Server Certificate and database access.
23 | Endpoint Protector | Installation Guide
Note!
ALL FIELDS ARE REQUIRED!
Enter the required information into the configuration window. You can find what
information you need to enter in the paragraph called “Endpoint Protector
Configurator”. If you do not know what information you need to enter
here, please go to the paragraph called “Endpoint Protector
Configurator” now.
Note!
Endpoint Protector uses by default the 443 port. If this port is occupied by
another Website, the "Endpoint Protector Configurator" will prompt you to
introduce a different port. This port is also necessary when installing the
Endpoint Protector Client.
24 | Endpoint Protector | Installation Guide
Click the “OK” button and exit the Endpoint Protector Configuration.
After clicking “OK” you can exit the Configurator and continue with the “Final
steps”.
2.1.15. Endpoint Protector Server Configurator
The Endpoint Protector Server Configurator allows you to configure the
parameters of the server.
25 | Endpoint Protector | Installation Guide
All fields are necessary.
Certificate Authority Password – You must define a password for certificate
authorizations in your system. You use this password when importing a
certificate into IIS.
Server Certificate Password – You must define a password for server certificate
authorizations. This enables server authentication on the client side. The client
verifies the server's identity using ssl mechanism. The server sends the public
key of the server certificate as part of SSL key handshake.
Database Host – This is the address to the database itself. If the database is on
the same computer where you installed Endpoint Protector Server than the
correct format is “.\SQLExpress” – without quotes. If the database is on a
different computer, please see the “Using a database from another location”
paragraph. Please pay close attention to capital letters; SQLExpress and
computer names must be written as such.
Database Name – The name of the database which you created earlier; in this
case “EPP”.
Database User – The login that you created for your database (epp).
Database Password – The password you created for the database user.
26 | Endpoint Protector | Installation Guide
2.1.16. Final Steps
1. Restart IIS Admin service.
To do this, go to Start->Run and type in “services.msc” without quote
marks. Look for the IIS Admin Service, select it and click restart.
2. Open a browser and go to https://127.0.0.1/index.php
We recommend that you add this page to Internet Explorer’s trusted sites.
The steps for adding this a described in detail in the Endpoint Protector User
Manual in the paragraph “Installing Root Certificate to your Internet Browser”.
27 | Endpoint Protector | Installation Guide
1. Once the final step is complete, you will be able to see the Endpoint
Protector Login window.
2. Access the “Tools” option from Internet Explorer’s menu bar and select
“Internet Options”.
28 | Endpoint Protector | Installation Guide
3. From “Internet Options” click the “Security” tab, select “Trusted sites” and
click on “Sites...”
29 | Endpoint Protector | Installation Guide
4. If the current site (https://127.0.0.1) does not appear in the text-box,
then type it in manually, click “Add” and finally “Close”.
Attention!
If you installed a client after setting up the server but no connected devices are
reported, even though you have already connected devices to the client, then
please check you firewall settings. (See System Requirements for the Client).
2.2. Login Credentials to Endpoint Protector Server
The default username and password for the Endpoint Protector Server 2009 are:
USERNAME:
root
PASSWORD:
epp2009
To change the user name and password and to create additional administrators
please see paragraph “Error! Reference source not found.” in the Endpoint
Protector User Manual.
30 | Endpoint Protector | Installation Guide
2.3. Linux Server Installation – Debian (Ubuntu)
In order to install Endpoint Protector 2009 under Linux, you will need an Internet
connection. The reason for this is that the installer downloads all needed
components (MySQL, PHP, OpenSSL, etc.) directly from the Internet and also
configures them automatically. This saves space and time. If you have already
installed some components, such as PHP, then the installer will simply update
your existing settings and register the required extensions needed for Endpoint
Protector.
Please follow these detailed next steps for a successful install:
After you have received the .ZIP file from your Endpoint Protector Customer
representative:
Create a folder and name it “eppInstaller” and save the zip file inside.
Unzip the archive into the same folder
unzip EndpointProtectoDebianServerSetup.zip
Run the shell script install.sh located in that folder
sudo ./install.sh, depending on your operating system
31 | Endpoint Protector | Installation Guide
32 | Endpoint Protector | Installation Guide
Follow the steps from the wizard.
33 | Endpoint Protector | Installation Guide
2.3.1. Installation of required software
34 | Endpoint Protector | Installation Guide
35 | Endpoint Protector | Installation Guide
2.3.2. Installation of Zend Optimizer 3.3.0
36 | Endpoint Protector | Installation Guide
37 | Endpoint Protector | Installation Guide
38 | Endpoint Protector | Installation Guide
39 | Endpoint Protector | Installation Guide
40 | Endpoint Protector | Installation Guide
41 | Endpoint Protector | Installation Guide
42 | Endpoint Protector | Installation Guide
43 | Endpoint Protector | Installation Guide
2.3.3. Installation of Endpoint Protector files
44 | Endpoint Protector | Installation Guide
2.3.4. Configuration of the Endpoint Protector system
When configuring Endpoint Protector (paragraph 2.4.2.4), you will be asked to
enter certain information. In order to configure Endpoint Protector correctly,
please see below what information is required:
45 | Endpoint Protector | Installation Guide
Host: localhost
User : user from SQL database
Password: password for the username from SQL database
Port: leave it default
Click "Y" when asked "Do you want to create a new database and load...."
Enter any password to "Enter PEM pass phrase"
Your will now be asked to enter your credentials: country name, location
etc.
Enter the password you have set above when you are asked the following
"Enter pass phrase for..."
Click "Y" when asked "Sign the certificate?"
Click "Y" when asked "1 out of 1 certificate request certified, commit?"
Enter once again the password set above when you are prompt for "Please
input..."
After configuring Endpoint Protector, please choose “Cancel” from the Installation
Menu in order to Exit the Installation.
After finishing the installation, please follow also these two steps:
Add the following line to the file /etc/hosts file
127.0.0.1
endpointprotector
Access https://endpointprotector/index.php from the web browser.
46 | Endpoint Protector | Installation Guide
2.4. Linux Server Installation – Red Hat (Fedora)
In order to install Endpoint Protector 2009 under Linux, you will need an Internet
connection. The reason for this is that the installer downloads all needed
components (MySQL, PHP, OpenSSL, etc.) directly from the Internet and also
configures them automatically. This saves space and time. If you have already
installed some components, such as PHP, then the installer will simply update
your existing settings and register the required extensions needed for Endpoint
Protector.
The Red Hat installation of Endpoint Protector has the following requirements:
“Yum” utility installed and correctly configured.
Default port 443 open and not used by another application.
Internal firewall either disabled, or configured to allow traffic through 443.
The installation for Red Hat (Fedora) can be done automatically using the
installation scripts provided or it can be done manually.
The automated installation is recommended on systems recently installed or
where the update of the following software will not inflict with existing
applications installed:
Apache Web Server
PHP
PHP extensions
OpenSSL
MySQL Server
The manual installation will require the user installing the Endpoint Protector
software to install and update if required the software pre -requisitions.
47 | Endpoint Protector | Installation Guide
2.4.1. Endpoint Protector Automated Installation
2.4.1.1.
Preparations
Unzip the received archive from your Endpoint Protector provider to a temporary
folder. After that, change the current folder to the folder where you have
extracted the files.
All the following commands and installation of Endpoint Protector Server need to
be done using root privileges.
For that please change user to root using: su root
Verify what version of Fedora you are running (32bit or 64bit); the installation
package contains both versions.
Command: uname –a
2.4.1.2.
Installation
Depending on your Red Hat version please run the installation script.
Command: ./install-x32.sh or ./install-x64.sh
Please note that you must accept the EULA in order to continue with the
installation.
48 | Endpoint Protector | Installation Guide
The steps of installation of Endpoint Protector Server:
49 | Endpoint Protector | Installation Guide
1. Testing your system configuration for required software
50 | Endpoint Protector | Installation Guide
2. Installing the software required - Automated (recommended on
systems where the installation/update of the following software will
not inflict existing application: Apache Web Server 2.x, PHP 5.2.3
(php-mysql, php-soap, php-xml, php-mbstring, php-xmlrpc),
OpenSSL 0.9.8.g, MySQL Server 5.x.
51 | Endpoint Protector | Installation Guide
3. Installing the software required - Advanced (recommended for users
with advanced knowledge about Linux Administration)
52 | Endpoint Protector | Installation Guide
4. Installation of Endpoint Protector Server files
The Endpoint Protector Server files will be installed in /var/www/EPPServer/
5. Configuration of Endpoint Protector files
53 | Endpoint Protector | Installation Guide
e.g:
Host: localhost
User: root
Password: administrator
Port (3306 default) : 3306
After this point, you will be asked to introduce company-related data such as
company name, address, country, e-mail contact etc.
After you have verified this information you entered, sing the certificate created
by Endpoint Protector.
Note!
The Security Enhanced Linux (SELinux) feature will prevent the loading of Zend
Optimizer components. Please follow these commands to remedy the situation:
chcon –t texrel_shlib_t /usr/local/Zend/lib/Optimizer-3.3.3/php5.2.x/ZendOptimizer.so
chcon –t texrel_shlib_t /usr/local/Zend/lib/ZendExtensionManager.so
execstack –c /usr/local/Zend/lib/Optimizer-3.3.3/php5.2.x/ZendOptimizer.so
execstack –c /usr/local/Zend/lib/ZendExtensionManager.so
After executing the commands, please restart the httpd service using the
following command:
/etc/init.d/httpd restart
Note!
The MySQL and httpd components are not installed as a service and therefore
they will not start automatically after reboot. Please follow these commands to
remedy the situation:
/sbin/chkconfig mysql on
/sbin/chkconfig httpd on
These commands will force the two components to start automatically with the
system.
54 | Endpoint Protector | Installation Guide
2.4.2. Endpoint Protector Manual Installation
2.4.2.1.
Preparations
Unzip the received archive from your Endpoint Protector provider to a temporary
folder. After that, change the current folder to the folder where you have
extracted the files.
All the following commands and installation of Endpoint Protector Server need to
be done using root privileges.
For that please change user to root using: su root
2.4.2.2.
Installation of required software
Endpoint Protector requires the following software to be installed on your Red
Hat system installed:
Apache Web Server version 2.X
To install this manually your can issue the command: yum install httpd
Apache mod_ssl module
To install this manually your can issue the command: yum install mod_ssl
55 | Endpoint Protector | Installation Guide
MySQL Database Server
To install this manually use the command: yum install mysql-server
Start mysql service: /etc/init.d/mysqld start
Define a password for root user of the MySQL Database Server:
56 | Endpoint Protector | Installation Guide
/usr/bin/mysqladmin –u root password “pass”
PHP version 5.2.3 or higher
To install this manually, you can issue the command: yum install php
Several extension for PHP 5.2.3 or higher
These extensions are: php-mysql, php-soap, php-xml, php-mbstring, php-xmlrpc
To install these extensions manually, you can issue the commands:
yum install php-mysql
57 | Endpoint Protector | Installation Guide
yum install php-soap
yum install php-xml
58 | Endpoint Protector | Installation Guide
yum install php-mbstring
yum install php-xmlrpc
59 | Endpoint Protector | Installation Guide
OpenSSL version 0.9.8g
To install this manually, you can issue the command: yum install openssl
60 | Endpoint Protector | Installation Guide
Zend Optimizer 3.3.0
This utility software can be downloaded from the Zend website www.zend.com,
or you can use the version bundled with our Endpoint Protector package.
To install Zend Optimizer 3.3.0 run the command ./install.sh and follow the
installation wizard.
61 | Endpoint Protector | Installation Guide
62 | Endpoint Protector | Installation Guide
63 | Endpoint Protector | Installation Guide
64 | Endpoint Protector | Installation Guide
65 | Endpoint Protector | Installation Guide
66 | Endpoint Protector | Installation Guide
Note! The Security Enhanced Linux (SELinux) feature will prevent the loading of
Zend Optimizer components. Please follow these commands to remedy the
situation:
chcon –t texrel_shlib_t /usr/local/Zend/lib/Optimizer-3.3.3/php5.2.x/ZendOptimizer.so
chcon –t texrel_shlib_t /usr/local/Zend/lib/ZendExtensionManager.so
execstack –c /usr/local/Zend/lib/Optimizer-3.3.3/php5.2.x/ZendOptimizer.so
execstack –c /usr/local/Zend/lib/ZendExtensionManager.so
After executing the commands, please restart the httpd service using the
following command:
/etc/init.d/httpd restart
Note! The MySQL and httpd components are not installed as a service and
therefore they will not start automatically after reboot. Please follow these
commands to remedy the situation:
/sbin/chkconfig mysql on
/sbin/chkconfig httpd on
These commands will force the two components to start automatically with the
system.
2.4.2.3.
Installation of Endpoint Protector files
First step from installation of Endpoint Protector Server files should be the
creation of a new folder which will host the application files.
Command: mkdir /var/www/EPPServer
67 | Endpoint Protector | Installation Guide
The location /var/www/ is a good choice because the Endpoint Protector is
actually a web application.
The archive EndpointProtector.zip should be extracted in the folder created
above.
Command: unzip –qo EndpointProtector.zip –d /var/www/EPPServer
68 | Endpoint Protector | Installation Guide
Please change the owner of the new created folder to the user apache or the
user which is set to run Apache Web Server.
Command: chown –R apache:apache /var/www/EPPServer
69 | Endpoint Protector | Installation Guide
2.4.2.4.
Configuration of Endpoint Protector
Configuration of Endpoint Protector Server is a complex part of the installation
process. We recommend you to use the provided script for configuration.
Command: ./configureRedHat.sh
Following there are the manual configuration steps:
Create and populate the database with default data
Create a new Certificate Authority and a new Server Certificate
Create the Endpoint Protector configuration files
-
/var/www/eppserver/sieratool/config/databases.yml
-
/var/www/eppserver/sieratool/config/_autoload_classes.php
-
/var/www/eppserver/sieratool/config.php
-
/var/www/eppserver/sieratool/settings.php
-
/var/www/eppserver/sieratool.apps/rattol/config/configws.php
-
/var/www/eppserver/sieratool.apps/rattol/config/config.php
-
/var/www/eppserver/sieratool/config/propel.ini
•
Creating the Apache configuration file.
•
Change the permissions for cache, logs and uploads folder so they can
be accessible also for writing.
Commands:
chmod –R 777 /var/www/eppserver/sieratool/cache
chmod –R 777 /var/www/eppserver/sieratool/logs
chmod –R 777 /var/www/eppserver/sieratool/web/uploads
70 | Endpoint Protector | Installation Guide
Access from web browser https://127.0.0.1
71 | Endpoint Protector | Installation Guide
3. Client Installation
3.1. Client Installation on Windows
Please make sure that the .NET Framework 2.0 is installed on your client PC
before installing the ‘Endpoint Protector Setup.msi’.
In case you see the following message, you do not have installed .NET
Framework 2.0 or there was an error during the install process.
If this is the case, please install .NET Framework or repair the already existing
installation.
Please assure that your client PC has full internet access / network connectivity
without any interference from firewalls, etc.
72 | Endpoint Protector | Installation Guide
You will have received an MSI for your installation (EPPClientSetup.msi).
The MSI requires you to include the correct Server Settings to connect to the
Endpoint Protector Server.
Launch the MSI and follow the steps through the installation process.
Server IP:
Server Port:
[XXX.XXX.XXX.XXX]
default 443
73 | Endpoint Protector | Installation Guide
Attention!
If your Endpoint Protector is not using the default 443 port, please introduce the
correct port.
You should not be required to add additional information in the installation
process.
3.2. Client Installation on Mac OS
To install Endpoint Protector Client on a Mac PC, you must first unzip the archive
with the Endpoint Protector Mac Client application and double-click on the
‘EndpointProtectorClient.pkg'. Next, in the Endpoint Protector Client Installer
window, please press the “Continue” button from the right down corner, which
will initiate the installation process.
74 | Endpoint Protector | Installation Guide
As a first step, please read carefully the Software License Agreement and press
“Agree” and then “Continue” if you accept the terms of the agreement.
75 | Endpoint Protector | Installation Guide
Next, inside the Server Configuration window, please enter the IP Address of
your Endpoint Protector Server and continue with the next step.
76 | Endpoint Protector | Installation Guide
At the Destination Select step, please select the disk where you want to install
Endpoint Protector Client and click “Continue”.
77 | Endpoint Protector | Installation Guide
Now, please press the “Install” button for the installation to be completed. A
window will be displayed where you are asked to introduce your Administrator
credentials (username and password).
78 | Endpoint Protector | Installation Guide
If the installation is completed successfully, please press the “Close” button to
exit setup.
79 | Endpoint Protector | Installation Guide
Next, please press the F4 key for the Dashboard to be displayed and browse for
the Endpoint Protector icon. After finding the corresponding icon and clicking on
it, a similar screen with the one below will be displayed:
For Offline Device Authorization, please enter the ID provided by your
Administrator. Based on this ID, a temporary password will be generated inside
the Endpoint Protector Server, which will be sent to you by your Administrator.
This password must be entered in the Device Authorization window, as shown in
the screenshot below, for being able to access offline the devices connected to
your MAC.
80 | Endpoint Protector | Installation Guide
3.3. Remote Deployment of Endpoint Protector Client
Info!
The following deployment of clients can be also done over the Endpoint Protector
– Reporting and Administration Tool web interface. Please follow the user manual
and the wizard instructions for this enhanced deployment feature.
You can automatically install Endpoint Protector Client for all your network
computers through Active Directory and Group Policy Objects. This can be done
by following the next steps:
1. Copy the files ‘EPPClientSetup_x86_32.msi’ and
‘EPPClientSetup_x86_64.msi’ to a shared network folder. Be sure to
set the sharing and security permissions for the folder to Everyone – Read
Only.
2. Copy the supplied “Install_EPP_Client” Visual Basic script file (found in
\Tools folder of Endpoint Protector Installation kit) into the same shared
folder. This script queries the registry to see if Endpoint Protector Client is
installed on the computer and also for the version of operating system
targeted: 32 or 64 bit Windows. If it’s not, it will run the proper installer,
and if it is installed, it will check if the installed version is older than the
version of the installer itself. msiexec command runs with the /i option for
installation and the /qn option for silent installation meaning that the user
will not be prompt for any information during install time.
You will need to edit the script prior to using it in the deployment of clients. To
do this, simply right-click the script file and select “Edit”. This will open your text
editor, by default Notepad, and will allow you to make changes to the file.
81 | Endpoint Protector | Installation Guide
There are only two values which need to be edited in this script file:
“shared location” = “” – here you need to enter the path to the shared folder
which contains both 32 and 64 bit Endpoint Protector client”.
Example: “\\server\Shared Folder\EPPClient\”
“Endpoint Protector Server IP Address” =”” – here you need to enter the IP of
the Endpoint Protector Server
Example: “192.168.0.35” or “35.74.254.98”
Save the changes after finishing editing this file.
82 | Endpoint Protector | Installation Guide
3. Choose “Start> Programs> Administrative Tools”, and click “Active
Directory Users and Computers”. You should see the following window:
4. Right-click the Organizational Unit you want to assign the policy to, and
select Properties.
83 | Endpoint Protector | Installation Guide
5. Select the Group Policy tab, and if you don’t have the Group Policy
Management Console installed, you should see the following window:
Click the New button, and then continue with step 7.
84 | Endpoint Protector | Installation Guide
6. If you have the Group Policy Management Console installed, click the Open
button:
85 | Endpoint Protector | Installation Guide
7. In the Organizational Unit tree view on the left, select the desired OU
(Organizational Unit), right-click it and choose Create and Link a GPO here
8. Name your Group Policy Object accordingly, right-click it and then select
Edit. The Group Policy Object Editor console is started.
86 | Endpoint Protector | Installation Guide
9. Go to “Computer Configuration” / “Windows Settings” / “Scripts”
(Startup/Shutdown). Right click on “Startup” and choose “Properties”.
87 | Endpoint Protector | Installation Guide
10.From the Startup Properties window select Add. A new window will be
displayed. Select Browse to search for the script you want to use.
88 | Endpoint Protector | Installation Guide
11.Do not use the Look in browser to search for the file, but write the full
UNC path of the script:
Note!
The client computers are required to have Windows Installer 2.0 installed.
89 | Endpoint Protector | Installation Guide
12.If your client computers are running Windows XP then in the same Group
Policy Object go under Computer Configuration > Administrative
Templates > System > Logon and enable the Always wait for computer
network to startup at logon GPO. This is required for the client computers
to have access to the shared network folder at reboot.
Next time each computer from this OU reboots, the startup script will run and it
will install Endpoint Protector Client.
Note!
It may take some time for your policy to apply, depending on the Domain
configuration. If you want to apply the policy immediately, run gpupdate from
your command prompt.
90 | Endpoint Protector | Installation Guide
3.4. Command-line client installation
The Endpoint Protector client can be installed or uninstalled by using the
command line (or command prompt).
Commands:
The format should be:
:\> msiexec /i “EPPSetup.x.x.x.x.msi” [/qn] WSIP= (server IP)
Where:
/i - install
“EPPSetup.version” – EPPSetup.2.3.2.8.msi is the current latest version
/qn – silent mode installation. This means that you won’t be asked to introduce
any information during the installation procedure. Also you won’t see any of the
setup steps.
WSIP=IP address – insert the IP address of the Endpoint Protector Server
E.g.: msiexec /i "EPPSetup.2.3.2.8.msi" /qn WSIP=192.168.0.35
To uninstall the client using command prompt, please run the following
command:
msiexec /x "EPPSetup.2.3.2.8.msi" [/qn] .
91 | Endpoint Protector | Installation Guide
4. Installing Root Certificate
to your Internet Browser
4.1. For Microsoft Internet Explorer
Open Endpoint Protector Administration and Reporting Tool IP address
https://127.0.0.1.
If there is no certificate in your browser, you will be prompted with Certificate
Error page like the screenshot below.
Continue your navigation by clicking
recommended)”.
“Continue to this website (not
Now, go to the Certificate file you downloaded and install the Certificate.
92 | Endpoint Protector | Installation Guide
Click the Certificate Error button just next to the IE address bar as shown.
By clicking the “Certificate Error” button, a pop-up window appears. Just click the
“View certificates” in that pop-up window.
Another pop-up Certificate window will appear with three tabs namely “General”,
“Details” and “Certification Path”.
Select the “General” tab and then click “Install Certificate...” button as shown
above.
93 | Endpoint Protector | Installation Guide
Another Welcome to the Certificate Import Wizard pops up. Just click the Next
button.
94 | Endpoint Protector | Installation Guide
In Certificate Import Wizard window, select “Place all certificates in the following
store” radio button.
Click “Browse” button.
From the browser list, select “Trusted Root Certification Authorities”.
Then click the “Next” button.
95 | Endpoint Protector | Installation Guide
Another “Completing the Certificate Import Wizard” pops up. Just click the
“Finish” button.
96 | Endpoint Protector | Installation Guide
Security Warning window pops up. Just click “Yes”.
You have now successfully installed the Certificate.
Close the Internet Explorer browser and try to access the Endpoint Protector
Administration and Reporting Tool IP address again.
97 | Endpoint Protector | Installation Guide
4.2. For Mozilla Firefox
Open the Browser.
Open Endpoint Protector Administration and Reporting Tool IP address.
https://127.0.0.1.
From the above screenshot This Connection is Untrusted, choose I Understand
the Risks. Click Add Exception.
Security Warning window pops up.
98 | Endpoint Protector | Installation Guide
Just click Get Certificate button and then the Confirm Security Exception button.
Close the browser and start it again.
99 | Endpoint Protector | Installation Guide
5. Support
In case additional help, such as the FAQs or e-mail support is required, please
visit our support website directly at http://www.cososys.com/help.html.
One of our team members will contact you in the shortest time possible.
Even if you do not have a problem but miss some feature or just want to leave
us general comment we would love to hear from you. Your input is much
appreciated and we welcome any input to make computing with portable devices
safe and convenient.
100 | Endpoint Protector | Installation Guide
6. Important Notice /
Disclaimer
Security safeguards, by their nature, are capable of circumvention. CoSoSys
cannot, and does not, guarantee that data or devices will not be accessed by
unauthorized persons, and CoSoSys disclaims any warranties to that effect to the
fullest extent permitted by law.
© 2004 – 2010 CoSoSys Ltd.; Endpoint Protector Basic, EPPBasic, Endpoint Protector, My
Endpoint Protector are trademarks of CoSoSys Ltd. All rights reserved. Windows is
registered trademark of Microsoft Corporation. Macintosh, Mac OS X are trademarks of
Apple Corporation. All other names and trademarks are property of their respective
owners.