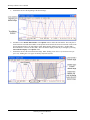
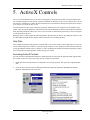
1
DATAQ
R
INSTRUMENTS
Note to Users
This pdf file contains links to Multimedia files (.swf) denoted by the Flash icon (shown below).
Click on the icon anywhere in this file to view the demonstration videos.
The way PC-based instrumentation should be
WINDAQ Acquisition
Waveform Recording Software
WINDAQ Waveform Browser
Playback and Analysis Software
ActiveX Controls and XControls
Software Modules
User's Manual
Manual
Revision F
Copyright © 2006 by DATAQ Instruments, Inc. The Information contained herein is the exclusive property of
DATAQ Instruments, Inc., except as otherwise indicated and shall not be reproduced, transmitted, transcribed, stored
in a retrieval system, or translated into any human or computer language, in any form or by any means, electronic,
mechanical, magnetic, optical, chemical, manual, or otherwise without expressed written authorization from the company. The distribution of this material outside the company may occur only as authorized by the company in writing.
DATAQ Instruments' hardware and software products are not designed to be used in the diagnosis and treatment of
humans, nor are they to be used as critical components in any life-support systems whose failure to perform can reasonably be expected to cause significant injury to humans.
DATAQ, the DATAQ logo, and WINDAQ are registered trademarks of DATAQ Instruments, Inc. All rights reserved.
Designed and manufactured in the
United States of America
Software License Agreement
NOTE
Dataq Instruments' hardware and software products are not designed to be used in the diagnosis and treatment of humans, nor are they to be used as critical components in any life-support systems whose failure to
perform can reasonably be expected to cause significant injury to humans.
LICENSE AGREEMENT
(SINGLE-USER PRODUCTS)
THIS IS A LICENSE AGREEMENT AND NOT AN AGREEMENT FOR SALE. A LICENSE AGREEMENT IS A
LEGAL AGREEMENT BETWEEN YOU, THE END USER, AND DATAQ INSTRUMENTS, INC. PLEASE
READ THIS LICENSE AGREEMENT CAREFULLY BEFORE OPENING THIS SEALED PACKAGE. IF YOU
DO NOT AGREE WITH THE TERMS AND CONDITIONS OF THIS LICENSE AGREEMENT, PROMPTLY
RETURN THE PACKAGE UNOPENED AND YOUR MONEY WILL BE REFUNDED.
1. This software package is protected by federal copyright law and international treaty.
2. By law, you, the end user, may do the following: a) make a copy of the software solely for backup or archival purposes; or b) transfer the software to a single hard disk, provided you keep the original solely for backup or archival
purposes.
3. Federal copyright law prohibits you from making any other copy of the software for any other reason without our
permission. Federal copyright law also prohibits you from copying the written materials accompanying the software
without first obtaining our permission.
4. You may install our software on multiple computers, provided that one software license has been purchased (or
granted) for each DATAQ Instruments hardware unit that is to be used with the software. For example, the purchase
of one hardware unit and one software unit allows you to install the software on as many computers as desired. But if
a second unit is purchased, that unit cannot be used with the original license installed on any computer unless a second license is also purchased. To do otherwise is a violation of this License Agreement. Licenses for WinDaq Waveform Browser (playback) software are free.
5. If the software is a library product, then you have a royalty-free right to reproduce executable files created using
the software.
6. If this software package contains any combination of CDs, 3 1/2 disks, and 5 1/4 disks, you may only use the disks
appropriate to your computer. You may not use the remaining disks on another computer (or computer network), nor
may you loan, rent, lease, or transfer them to another user. If the entire software package is transferred to another user
on a permanent basis, then both sets of disks must be transferred to that user. If you transfer the software, you may not
retain any of the disks or copies thereof for your own use.
7. You may not rent, lend, lease, or assign this software. You may, however, transfer the software and the accompanying written materials on a permanent basis. When you transfer the software on a permanent basis, you may not keep
any copies, and you must remove the software from your hard disk. Also, the person to whom you transfer the software must agree to the terms of this License.
8. You may not alter, modify or adapt the software or accompanying materials. In addition, you may not translate, de
compile, disassemble or reverse engineer the software. You also may not create any derivative works based on this
software. A derivative work is defined as a translation or other form in which the software may be recast, transformed
or adapted.
LIMITED WARRANTY
Dataq Instruments, Inc. warrants that this program will perform in substantial compliance with the published specifications and documentation supplied in this package, provided it is used on the computer hardware and with the oper-
ating system for which it was designed. This warranty is limited to a period of 90 days from the date of the original
purchase.
If you report a significant defect in performance, in writing within 90 days of purchase, Dataq Instruments will
attempt to correct it or, at its option, authorize a refund of your license fee.
Dataq Instruments warrants that the original disks and documentation are free from defects in material and workmanship, assuming normal use, for a period of 90 days from the date of purchase. If a defect occurs during this period,
you may return the faulty disk or documentation, along with a dated proof of purchase, and Dataq Instruments will
replace it free of charge.
Except as specifically provided above, Dataq Instruments makes no other warranty or representation, either
express or implied, with respect to this software, the disks or documentation, including their quality, merchantability, or fitness for a particular purpose. In no event will Dataq Instruments be liable for direct, indirect, special, incidental, or consequential damages arising out of the use or inability to use the software or
documentation, even if Dataq Instruments has been advised of the possibility of such damages. The warranties
and remedies set forth above are exclusive and in lieu of all others, oral or written, express or implied.
Dataq Instruments is not responsible for any costs including, but not limited to, those incurred as a result of lost profits or revenue, loss of time or use of the software, loss of data, the costs of recovering such software or data, the cost
of substitute software, claims by third parties, of other similar costs. In no case will Dataq Instruments' liability
exceed the amount of the license fee. The warranties provided give you specific legal rights. You may have other
rights which vary from state to state. Some states do not allow the exclusion of incidental or consequential damages,
or the limitation of how long an implied warranty lasts, so some of the above may not apply to you.
Dataq Instruments retains title to and ownership of the software. Dataq Instruments retains all rights not expressly
granted. Nothing in this License Agreement constitutes a waiver of Dataq Instruments' rights under the U.S. copyright laws or any other Federal or State law. Dataq Instruments or its designee has the right to audit your computer
and software usage to determine whether any unauthorized copies of this program have been made. Any authorized
copy of the software covered by this Agreement, including authorized backup copies if any, must include Dataq
Instruments' copyright and trademark notices.
U.S. GOVERNMENT RESTRICTED RIGHTS
The software covered by this Agreement and documentation thereto are provided with RESTRICTED RIGHTS. Use,
duplication or disclosure by the Government is subject to restrictions as set forth in subparagraph (c)(l)(ii) of the
Rights in Technical Data and Computer Software clause at 52.227-7013. The manufacturer of this software and documentation thereto is Dataq Instruments, Inc.; 241 Springside Drive; Suite 200; Akron, Ohio 44333; (330) 668-1444.
This Agreement is governed by the State of Ohio.
If you have any questions about this License Agreement, write to: Dataq Instruments, Inc.; 241 Springside Drive;
Suite 200; Akron, Ohio 44333.
WINDAQ Software User’s Manual
Table of Contents
Software License Agreement .................................................................................................................
1. Introduction .......................................................................................................................................
WinDaq Software ..............................................................................................................................
Help Files ....................................................................................................................................
Multimedia Demonstration Videos .............................................................................................
Conventions Used in the Documentation ..........................................................................................
General Conventions ...................................................................................................................
Mouse Conventions .....................................................................................................................
WinDaq Operating Modes .................................................................................................................
2. Getting Started ..................................................................................................................................
Step One: Installing the Hardware .....................................................................................................
Step Two: Installing WinDaq Software .............................................................................................
Step Three: Connecting Input Signals to the Instrument ...................................................................
3. WinDaq Data Acquisition .................................................................................................................
Help Files ...........................................................................................................................................
Fast Start ............................................................................................................................................
Step 1 Enabling Channels for Acquisition ..................................................................................
Serial Port Products (DI-154RS and DI-194RS models) ....................................................
All Other Products ..............................................................................................................
Enabling/disabling a channel .........................................................................................
Enabling/disabling a differential channel ......................................................................
Enabling a digital input channel ....................................................................................
Channel Selection Notes .......................................................................................................
Step 2 Viewing Enabled Channels ............................................................................................
Step 3 Specifying a Sample Rate ..............................................................................................
Step 4 Specifying Gain and Measurement Range .....................................................................
Step 5 Calibrating Input Signals ...............................................................................................
Step 6 Recording Waveforms to Disk .......................................................................................
Additional Data Acquisition Features ...............................................................................................
Event Markers .............................................................................................................................
Triggered Sweep Display ............................................................................................................
Triggered Mode (as supported by your hardware) ......................................................................
Reference Files ............................................................................................................................
User Annotation ..........................................................................................................................
4. WinDaq Waveform Browser ............................................................................................................
Help Files ...........................................................................................................................................
Fast Start ............................................................................................................................................
Step 1 Moving Around in the Data File ....................................................................................
Moving Coarsely Through the Data File with the Scroll Bar ..............................................
Moving to a Single Point Using the Cursor ..........................................................................
Step 2 Time and Date Display ....................................................................................................
Start Time .............................................................................................................................
End Time ..............................................................................................................................
Cursor Time ..........................................................................................................................
Time/Division .......................................................................................................................
Step 3 Making Waveform Measurements with the Cursor .......................................................
Selecting a Channel ..............................................................................................................
The Data Cursor ...................................................................................................................
Moving the Cursor to the highest peak .................................................................................
Moving the Cursor to the lowest valley ...............................................................................
Moving the Cursor to the Center of the Screen ....................................................................
Step 4 Getting a Bird’s Eye View of All the Data or a Portion of the Data ..............................
Compressing all Data ...........................................................................................................
Table of Contents
v
iii
1
1
1
2
3
3
3
3
5
5
5
5
7
7
7
7
7
8
9
9
9
10
10
12
13
15
17
20
20
20
20
20
20
21
21
21
21
21
22
22
22
23
23
23
23
23
23
24
24
25
25
25
WINDAQ Software User’s Manual
Compressing to a Ratio .........................................................................................................
Cursor Mode Control (Mid/Min/Max/MxMn) for compressed displays .............................
Step 5 Making Statistics Measurements ...................................................................................
Step 6 Exporting to Excel .........................................................................................................
Additional Playback Features ............................................................................................................
X-Y plotting ................................................................................................................................
FFT and DFT utilities ..................................................................................................................
Event Markers .............................................................................................................................
5. ActiveX Controls ...............................................................................................................................
Help Files ...........................................................................................................................................
Accessing ActiveX Controls ..............................................................................................................
DataqFile ............................................................................................................................................
WriteDataqFile ............................................................................................................................
ReadDataqFile .............................................................................................................................
DataqSDK ..........................................................................................................................................
DataqSerial (Obsolete) .......................................................................................................................
DQChart .............................................................................................................................................
WinDaq ..............................................................................................................................................
6. XControls Software Option ..............................................................................................................
Installing XControl Software .............................................................................................................
Using XControls with WinDaq/XL ...................................................................................................
Step One ......................................................................................................................................
Step Two .....................................................................................................................................
Step Three ...................................................................................................................................
Step Four .....................................................................................................................................
XControls Documentation .................................................................................................................
Index ........................................................................................................................................................
Table of Contents
vi
25
25
25
27
32
32
32
32
33
33
33
34
34
35
35
35
36
36
37
37
37
38
39
39
41
41
43
WINDAQ Software User’s Manual
1. Introduction
This manual contains information designed to familiarize you with and provide a “Fast Start” for WINDAQ waveform
recording software, WINDAQ Waveform Browser playback and analysis software, ActiveX Controls, and XControls
Software Option. For a complete and detailed description of each function contained in WINDAQ software please use
the Help Files.
WINDAQ Software
Use WINDAQ software with any DATAQ Instruments hardware product. The WINDAQ software package contains
both recording and playback software. The recording software allows you to record waveforms directly and continuously to disk while monitoring a real time display of the waveforms on your computer screen.
WINDAQ/Lite Recording Software limits maximum throughput to 240 Hz when in RECORD mode. WINDAQ/Pro
Recording Software features a sample rate limited only by the maximum sample rate of the hardware. In addition to
WINDAQ/Pro's features, WINDAQ/Pro+ Recording Software allows you to tailor sample different channels at different rates by entering a sample rate divisor value (1 to 255) for each channel.
WINDAQ Waveform Browser playback software allows you to review, measure, analyze, compress, cut-and-paste,
export/import, and otherwise manipulate the recorded waveform information.
Help Files
Click an item in the Help menu or use the context-sensitive help feature encoded into the software to access the Help
Files. The Help menu provides links to specific Help Topics. For example, clicking on Mouse in the Help menu will
take you to the portion of the help file regarding Mouse operations. Highlight a menu item and press F1 to utilize the
context-sensitive help feature. The Help File will open to the page most relevant to that menu item, its functionality,
and activating procedure.
Introduction
1
WINDAQ Software User’s Manual
Help Files contain 3 basic window panes. The Options pane gives printing options, browser functionality, and some
helpful links to our web site. The Contents pane has three tabs - the Contents, Index, and Search Tabs. These tabs
provide an easy way to find exactly the help information you need. The Main pane shows the main text and also provides browsing functionality to the help file. Click on the Next and Previous links to browse through the Help File
comparable to paging through a book.
Multimedia Demonstration Videos
The Flash icon shown below indicates the availability of a Multimedia Demonstration Video on the internet, in the
help files and on The WINDAQ Resource CD for that particular subject. Click on the icon to view the Demo or open
the Help Files to view any of the WINDAQ Software Demonstration Videos. Macromedia Flash Required.
Flash Icon
Click to view Demo
Introduction
2
WINDAQ Software User’s Manual
Conventions Used in the Documentation
Before using WINDAQ software, please read this section to understand some of the terms and notational conventions
used here and in the Help Files.
General Conventions
Commands you choose are given with the menu name preceding the command name. For example, the phrase
“Choose File Open” tells you to choose the Open command from the File menu. This naming convention describes
the sequence you follow in choosing a command - first you select the menu, then you choose the command.
Mouse Conventions
In general, most mouse actions require only the left mouse button. For example, carrying out a menu command or
working in a dialog box requires only the left mouse button. Since the majority of mouse procedures are done with
the left mouse button, we will not specify which mouse button to click, drag, or double-click in the procedure unless
the action uses the RIGHT mouse button. For example, “Double-click the right mouse button anywhere in the bottom
annotation line to move the cursor to the lowest displayed waveform valley.”
•
“Point” means to position the mouse pointer until the tip of the pointer rests on what you want to point to on
the screen. For example, “Point to the View menu.”
•
“Click” means to press and immediately release the mouse button without moving the mouse. For example,
“To display the menu that contains the command you want, click the menu name in the menu bar.”
•
“Double-click” means to click the mouse button twice in rapid succession. For example, “Double-click the
icon to start the program.”
•
“Drag” means to press the mouse button and hold it down while you move the mouse; then release the button. For example, “Drag down to Data Cursor to enabled the cursor for on-screen display.”
WINDAQ Operating Modes
WINDAQ waveform recording software has three operating modes: Setup, Record, and Standby. Each operating mode
shares many features with the other two, but specific modes may restrict features or disable some functions altogether.
WINDAQ Recording Software starts in the SET UP operating mode. In SET UP mode you can configure data acquisition parameters—such as the number of acquired channels, channel gain, and channel offset—and customize the real
time display. SET UP operating mode provides access to most data acquisition functions and adjustments including
control of the real time display screen's scaling and offset functions. The SET UP mode displays data in real time but
does not store data to disk. This mode limits sample rate only by the capabilities of the hardware. In other words, you
can sample as fast as your instrument will allow. When in this mode, the Status: area of the bottom annotation line
displays SET-UP.
The RECORD operating mode stores, or streams, data to disk. Activate the RECORD mode by selecting Record from
the File menu. You can use all waveform recording features and functions (with some restrictions) while in the
RECORD mode except the following: Channel-specific operations (i.e., channel number, gain, offset) and sample
rate adjustments. Waveform information continuously streams to disk while the real time display remains active.
RECORD mode limits sample rate to 240 Hz maximum throughput when using WINDAQ/Lite but does not limit the
sample rate when using WINDAQ/Pro or Pro+ (limit determined by hardware). When in RECORD mode, the Status:
area of the bottom annotation line displays RECORD.
Use the STANDBY operating mode to temporarily suspend (pause) waveform recording to disk. Select Stop in the
File menu to enter STANDBY mode. You can use all waveform recording features and functions except channel-specific operations (i.e., channel number, offset, etc.) and sample rate adjustments. The STANDBY mode displays data
in real time while waveform recording to disk has been stopped. When in this mode, the Status: area of the bottom
annotation line displays STBY. Start and stop as many times as desired during a data acquisition session.
Introduction
3
WINDAQ Software User’s Manual
2. Getting Started
The following items are included with each instrument purchase. Verify that you have the following:
•
Your DATAQ Instruments, Inc. hardware device.
•
Appropriate communications cables (this will vary according to the instrument you purchased).
•
The WINDAQ Resource CD-ROM.
•
This user's manual, which documents WINDAQ Software.
Call DATAQ Instruments at 330-668-1444 to report missing or damaged items—we will guide you through the
appropriate steps for replacing them. Save the original packing material in the unlikely event that your unit must, for
any reason, be sent back to DATAQ Instruments, Inc..
Step One: Installing the Hardware
Before installing WINDAQ software, you should already have the hardware installed and connected to your PC. If you
have not done so already, follow the instructions included in your hardware manual to install and connect your
device.
Step Two: Installing WINDAQ Software
1.
Insert the WINDAQ Resource CD into your CD drive and close the drive tray. For most users, the Windows autorun feature will automatically run the installation software. If you do not see a list of options after a reasonable
period of time, double-click the My Computer icon on your desktop and then double-click your CD-ROM icon to
manually start the installation process.
2.
In the “What do you want to do?” dialog box select the “Install Software” option and click OK.
3.
Choose the install you would like to run based on the model number of your device. If your device is not listed in
any of the options choose “Install Software for all other products” and click OK.
4.
The remaining installation steps vary by instrument and on-screen prompts should provide enough information
to successfully get you through the installation. Installation instructions are included in your hardware manual. If
you need additional information contact DATAQ Instruments Technical Support at 330-668-1444.
Step Three: Connecting Input Signals to the Instrument
Proceed with the input signal connection instructions contained in your hardware manual.
Getting Started
5
WINDAQ Software User’s Manual
3. WINDAQ Data Acquisition
WINDAQ Data Acquisition Software acquires, displays, and records waveform data. Before running the software, you
must correctly install all hardware and software components and connect your signals. Follow the basic steps presented in this chapter for a fast start to your first data acquisition session. These fast start steps outline the condensed
procedure for recording waveforms to disk. You will perform most of these functions every time you record with
WINDAQ Acquisition.
Help Files
For a complete description of all software functions, see the context-sensitive Help Files. To access the context sensitive help either highlight a menu item and press F1 (this will take you directly to help regarding that menu item) or go
to the Help menu and click on Contents. The Help Files elaborate and detail the functions in this Chapter and contain
detailed descriptions of each additional function available in WINDAQ Acquisition Software. After you have become
familiar with the functions described here, take some time to look over the rest of the functions detailed in the Help
Files.
Fast Start
Step 1 Enabling Channels for Acquisition (DI-154RS and DI-194RS models)
Serial Port Products
(i.e., all data acquisition hardware products that connect to a COM Port)
1.
In the Edit menu click on Channels....
The Ch: block cursor will blink in the Channels field on the status bar. The currently active list of enabled channels
are displayed in this field, immediately to the left of the cursor (blinking prompt).
2.
Enter the desired channel number and press the ENTER key. Repeat for each desired channel. Each activated
channel will have its corresponding channel number displayed in the currently active channels list.
3.
When all desired channels have been enabled, exit the channel configuration routine by pressing any key other
than the “D” or “I” key.
Type the channel number preceded by a minus (“-”) sign to disable channels. For example, typing “-3” disables channel 3 and removes it from the list of currently active channels.
Note: You may not enable channels in RECORD mode.
WINDAQ Acquisition
7
WINDAQ Software User’s Manual
All Other Products
You may enable or configure channels for acquisition only in SET-UP mode—you cannot add,
delete, or configure channels in RECORD mode. To activate ADC channel configuration click on
Channels... in the Edit Menu or double-click on the Channels: field in the status bar. This displays
the Channel Selection grid.
The channel selection grid displays the current status of all channels and allows you to enable and disable channels.
In the illustration above, the boxes formed by the top row of the grid represent the internal channels available on the
hardware device (the numbers above the top row of boxes refer to the channel numbers). The above example shows a
DI-720 with channels 1-4 configured for single-ended inputs and channel 7 configured for differential input. The subsequent rows underneath the top row of the grid (labeled A, B, C, etc.) represent each group of 32 external analog
input channels activated through use of an analog channel expander (like a DI-725).
The next graphic displays a single DI-725 32-channel analog expander added to the original DI-720. Enable and disable channels for an analog channel expander in Row A. At the end of the row labeled DI-720, you’ll notice a pair of
“A”s in the 31 and 32 positions. This indicates active status for the DI-725 and successful communication with the
DI-720. WINDAQ Acquisition reserves channels 31 and 32 of the DI-720 to multiplex with the DI-725 (these channels
cannot receive direct input when multiplexed). Channel 31 multiplexes the first 16 channels on the attached channel
expander and channel 32 multiplexes the next 16 channels. Adding a second expander displays a “B” at channels 29
and 30 indicating use by the second expander. Each expander added continually increments channels in this manner.
WINDAQ Acquisition
8
WINDAQ Software User’s Manual
Use the instructions below to enable a channel for single-ended, differential, or digital input.
Enabling/disabling a channel
A check mark in the channel box indicates an enabled channel. Click on a channel box to enable/disable a channel
and place/remove a check mark in/from its channel box.
Enabling/disabling a differential channel
Note: If your instrument has fixed differential channels (like models DI-722-16, DI-722-32, DI-730) enable the channels as noted above—place a check mark in the desired channel box. If your instrument does not have fixed differential channels, follow these procedures to designate channels as differential. See your hardware manual to determine if
your instrument has fixed differential channels or not.
Point to the box in the grid representing the desired channel and double-click the left mouse button. This will display
a plus sign (+) in the desired channel box. Double-clicking a second time removes the plus sign and disables the channel.
Note: You cannot enable a differential channel numbered higher than one half the total number of channels provided
by the device (assuming the device supports differential inputs).
A differential channel requires two input terminals (positive and negative). For example, in order to designate channel 1 as differential requires both the channel 1 input terminal (positive input) and the channel 9 input terminal (negative input). Enabling a differential channel automatically enables its corresponding input (the negative terminal) and
places a minus sign (-) in the Channel Selection grid, designating it as the low input of the differential pair.
Enabling a digital input channel
An “I” in the channel box indicates a digital channel. Right-click on a channel box to enable/disable a channel and
place/remove an “I” in/from its channel box.
WINDAQ Acquisition
9
WINDAQ Software User’s Manual
WINDAQ Acquisition acquires the eight digital input bits (accessible as defined by the hardware) on a digital input
channel and scales the acquired data between +128 and -128, with 0 in the center.
Selecting Digital Plot in the Scaling menu will also display digital data. This feature horizontally splits the waveform
strip configured for digital input into eight equal parts. WINDAQ assigns the top-most waveform as digital input 0, the
bottom-most digital input 7, with the remaining 6 digital inputs allocated in logical order within the strip. This feature
provides quick-look capability to determine the state of a digital input line.
Channel Selection Notes
Single-ended, differential, and digital channels may coexist in any combination that the hardware allows.
WINDAQ Acquisition always sequentially samples from the lowest channel number specified to the highest.
You may enable any number and any combination of channels that the hardware will allow.
The RECORD mode does not allow configuration of the number or type of channels enabled.
Step 2 Viewing Enabled Channels
The default number of channels displayed varies by instrument. Click on Format Screen in the
View menu to change the current display. In the format box, click the desired display format. Format Screen allows for overlapped and non-overlapped waveform displays.
WINDAQ Acquisition
10
WINDAQ Software User’s Manual
WINDAQ Acquisition
11
WINDAQ Software User’s Manual
An overlapped format allows you to closely examine the relationship between two waveforms. A non-overlapped format allows you to isolate each waveform’s transition to within a defined area. Whatever the timing relationship of
your input signals, use any display format at any time without affecting the waveform information stored to disk. Display format changes only affect the way you view waveforms on your computer’s monitor.
Note: To display eleven channels (or some other number not listed in Format Screen) select the User-specified
option and enter 11 in the Number of Channels dialog box.
Step 3 Specifying a Sample Rate
The total sample throughput rate is the rate that the instrument acquires samples for all channels
combined. For example, to acquire two channels of data at 100Hz each requires a sample throughput rate (total scanning rate) of 200Hz (2 channels × 100Hz = 200Hz). Exception: The DI-1000TC
interprets the Sample Rate as a Sample Rate per Channel. Specify a Sample Rate before recording; default varies by
instrument.
Because WINDAQ/Pro+ recording software has the ability to sample different channels at different rates, it calculates
the sample throughput rate differently than WINDAQ/Lite or WINDAQ/Pro recording software. To calculate a total
sample throughput rate for WINDAQ/Pro+ software, multiply the number of channels to record by the rate of the fastest channel. For example, suppose you want to record four channels of data, one at 2kHz and the other three at 20Hz.
The sample throughput rate in this case would be 8kHz (4 channels × 2kHz = 8kHz).
To specify a sample rate:
1.
Select the Sample Rate command by clicking on Sample Rate... in the Edit menu. This displays the sample rate
dialog box.
2.
Enter the desired data throughput rate (or total scanning rate) in samples per second in the Sample Rate dialog
box.
3.
Click OK or press the ENTER key.
WINDAQ Acquisition automatically allocates the correct amount of buffer space needed for the sample rate specified.
The Input Buffer Size and Disk Buffer Size values display for informational purposes only.
WINDAQ Acquisition
12
WINDAQ Software User’s Manual
Keep in mind that sample rate equals throughput rate. The current sample rate per channel (obtained by dividing the
selected sample throughput rate by the number of channels enabled) displays in the lower left corner of the window as
S/s/CHAN: (samples per second per channel).
You may specify/configure any sample rate that the hardware/software allows but you might not achieve the specific
rate desired. For example (due to the inability to divide the master clock in a manner that results in an even-numbered
quotient), you may see a sample rate of 2999.63 when you entered 3000.
Step 4 Specifying Gain and Measurement Range
Note: Some Products do not support this feature.
Choose a gain factor (varies by instrument) to get the best possible measurement resolution for your
signals. A gain of 1 (unity) provides the widest measurement range possible on any given instrument (default). For example, if using a DI-720—this instrument features a maximum analog measurement range of
±10 volts and programmable gain factors of 1, 2, 4, and 8—a gain of 1 (gain factor = 1) makes the full scale measurement range equal to ±10 volts. However, at a gain of 2, the full scale measurement range equals ±5 volts. The full
scale measurement range gets even smaller for gain factors of 4 (range = ±2.5 volts) and 8 (range = ±1.25 volts).
If the signals you plan to record need the wide measurement range that a gain of 1 provides, then skip this step. Otherwise, continue with this step to select a higher gain factor (thus narrower measurement range) for the best possible
measurement resolution.
1.
Click the left mouse button in the unselected channel’s annotation margin to select an analog channel for gain
adjustment. A box will surround the Variable Waveform Assignment Indicator of the channel selected. The Variable Waveform Assignment Indicator displays the window number and the channel assigned to that window
(X=Y: X=window number; Y=channel number).
WINDAQ Acquisition
13
WINDAQ Software User’s Manual
2.
Click on Channel Settings… in the Edit menu. This displays the Channel Settings dialog box:
The Channel Settings dialog box displays the hardware-dependent gain factors and equivalent plus and minus full
scale voltages that result from selecting that gain factor—voltages vary by hardware device.
WINDAQ Acquisition
14
WINDAQ Software User’s Manual
3.
Click on the desired gain factor.
4.
Click OK or press the ENTER key.
Plus/Minus full-scale annotation adjusts to reflect the application of various gain factors. You cannot adjust gain factor while in RECORD mode. See the Channel Settings Function in the Help File for complete details regarding channel settings.
Step 5 Calibrating Input Signals
Calibration allows you to view and record waveform data in significant engineering units—converting measurements from volts to a more meaningful unit of measure. Once calibrated, WINDAQ
scales, annotates, and displays data in PSI, RPM, lbs, ft/s, or whatever engineering unit you calibrate.
For example, suppose you were acquiring pressure data with a transducer that had a known output of -1 volt at 0 PSI
and 4.5 volts at 100 PSI. Whether these output levels were read from the manufacturers specifications or verified
through use, they can be used as calibration values. You can even calibrate the data without knowing the transducer
output relationship. WINDAQ Acquisition will establish these output voltage values for you. For example, suppose
you were acquiring pressure data and you had no idea what kind of output voltages to expect from the transducer
you’re using. You could vent the pressure apparatus to quiescence or atmospheric pressure and observe what voltage
the transducer is outputting at quiescence from the Input Level text box in the Low Calibration dialog box (select
Low Calibration… from the Edit menu). In this same dialog box, enter what you would like this quiescent state to
be, such as “0” in the Low Cal Value text box, and enter “PSI” in the Engr. Units text box. Click on the OK command
button to close the dialog box and increase the pressure until a gauge reads a convenient value, say 100 PSI. In a similar manner, observe what voltage the transducer is outputting at 100 PSI from the Input Level text box in the High
Calibration dialog box (select High Calibration… from the Edit menu). Enter “100” in the High Cal Value text box,
enter “PSI” in the Engr. Units text box, click on the OK command button, and you’re done.
To calibrate a waveform using the high/low calibration method:
1.
Select the channel to calibrate by clicking the left mouse button in the unselected window’s annotation margin.
2.
If not enabled already, enable the Current Data and Data Display options (in the Options menu).
3.
Apply the Low Calibration Value to the instrument. That value in Volts displays in the Input Level text box in the
Low Calibration dialog box (shown below).
4.
Click on Low Calibration... in the Edit menu. This displays the Low Calibration dialog box.
If desired, enter the low calibration data value you would like assigned to the input voltage level. For instance, referring to the example above:
WINDAQ Acquisition
15
WINDAQ Software User’s Manual
a.
For the case where you know the transducer output, enter “0” in the Low Cal Value text box, “-1” in the
Input Level text box, and “PSI” in the Engr. Units text box.
b. For the case where you do not know the transducer output, enter “0” in the Low Cal Value text box (with the
test apparatus vented to atmospheric pressure), ignore the Input Level text box (WINDAQ Acquisition has
established the input voltage level for you), and enter “PSI” in the Engr. Units text box.
Use the mouse or press the TAB key to position the insertion point in the other text boxes. You may type up to a fourcharacter optional engineering unit tag (i.e., PSI, f/s, rpm, etc.).
5.
Click OK to complete the low calibration entry. If you have not completed the high calibration, WINDAQ applies
an offset to the waveform to achieve the entered value.
Note: When re-entering the calibration dialog box, the Input Level will change. The Input Level box displays the voltage value applied to the channel at the time the dialog box was enabled as an aid to calibration.
Enter the High Calibration value:
6.
Apply the High Calibration Value to the instrument. That value in Volts displays in the Input Level text box in the
High Calibration dialog box (shown below).
7.
Click on High Calibration… in the Edit menu. This displays the High Calibration dialog box:
If desired, enter the high calibration data value you would like assigned to the input voltage level here. For instance
(referring to the example above):
a.
b.
8.
For the case where you know the transducer output, enter “100” in the High Cal Value text box, “4.5” in the
Input Level text box, and “PSI” in the Engr. Units text box.
For the case where you do not know the transducer output, enter “100” in the High Cal Value text box (with
100 PSI applied), ignore the Input Level text box (WINDAQ Acquisition has established the input voltage
level for you), and enter “PSI” in the Engr. Units text box.
Click OK to complete the high calibration entry. The High Calibration dialog box disappears and the waveform
channel displays all waveform data values calibrated in the chosen engineering units.
If desired, specify upper and lower grid limit values (the waveform automatically scales to fit). This feature displays
the channel’s full scale span in whole numbers rather than obscure fractional values (which sometimes results from
calibrating). For example, a waveform scaled in mmHg can expand or contract to fit within grid limits of 0 to 100
mmHg, or -200 mmHg to +200 mmHg, or any other limits desired. Setting a channel to span 0 - 200 mmHg is much
easier to read and interpret on a per division basis than one that spans 10.372 - 189.628 mmHg.
Specify convenient upper and lower chart edge values:
WINDAQ Acquisition
16
WINDAQ Software User’s Manual
1.
Click on Limits… in the Scaling menu. This displays the Display Limits dialog box:
2.
Type convenient top and bottom chart-edge values in their respective text boxes.
3.
Click OK to complete the chart-edge value entry. The specified values display in the upper and lower chart edges
and the waveform automatically scales to fit in the chart.
Step 6 Recording Waveforms to Disk
The Record function on the File menu initiates recording to disk. To begin waveform recording:
1.
Click on Record in the File menu or press F4. This displays the Open File dialog box. Specify
a file name to create a new file or open an existing file to append to it. To create a new file you must specify a
maximum file size. To append an existing file you must specify how much additional data to add to it. In either
case, you can specify file size in kilobytes or recording time (where sample rate determines the file size). Experiment with different file sizes, sample rates, and recording time to get the desired result. Entering information
into the File Size box and pressing the TAB key will display the corresponding Recording Time in the Recording
Time box and vice versa.
2.
Enter the desired file size or accept the default.
3.
Click OK or press the Enter key to close the dialog box and begin recording to disk. WINDAQ enters RECORD
mode and simultaneously digitizes, displays on your monitor, and streams analog channel data to disk. The Status: field in the bottom annotation line indicates RECORD.
WINDAQ Acquisition
17
WINDAQ Software User’s Manual
Click on Stop in the File menu or press Control + F4 to pause recording. This suspends data storage to disk, but the
real time display remains active. The Status: field in the bottom annotation line indicates STBY.
WINDAQ Acquisition
18
WINDAQ Software User’s Manual
The “Storage:” field of the status bar displays the amount of file space consumed as a percentage of total file space
consumed.
You may start and stop recording as many times as desired. When the target data file has filled, data acquisition to
disk will cease, the “Storage:” field of the status bar will display “100% used” and the Status: field of the status bar
will display FILE FULL.
Each time recording is activated, WINDAQ inserts an event marker into the data stream. This creates acquisition break
points viewable in WINDAQ Waveform Browser Playback Software and also functions as a time and date stamp.
WINDAQ Acquisition
19
WINDAQ Software User’s Manual
Additional Data Acquisition Features
Some products do not support these features—see the help files for complete details. WINDAQ Data Acquisition Software offers these functions and much, much more.
Event Markers
Event Markers with comments allow you to add time and date stamped comments to the file while recording. Use
event markers to mark an event or flag an uncommon occurrence in the data stream going to disk—providing a complete record of what happened and why. You automatically insert event markers in the data stream each time you activate the RECORD operating mode. These event markers get tagged with a time and date stamp that allows
correlation with any point in a recorded waveform file and a precise date and time of occurrence (to the nearest second). After the data acquisition session, WINDAQ Waveform Browser Playback Software allows you to automatically
search and move to the point in the data file where the event markers were placed during data acquisition (refer to the
Search-For-Event function of the WINDAQ Waveform Browser Help File for more details). Refer to the Event Marker
Function in the Acquisition Help Files for more information.
Triggered Sweep Display
Triggered Sweep Display allows you to trigger the real time display so that periodic waveforms appear stationary. Set
trigger conditions (such as channel, level, and slope) that define the starting point for displaying the waveform onscreen. WINDAQ displays the waveform only when data meets the trigger conditions, producing a stable display easily measured or compared to other waveforms since it starts at the same point on the screen with every sweep. The
single sweep remains on the screen until waveform data again meets trigger conditions. See Display Mode Selection
in the Help Files for more information.
Triggered Mode (as supported by your hardware)
Set trigger conditions for recording data to disk. The number of pre and post trigger data points allows the user to
frame an event to determine cause and effect. Set hysteresis for more reliable triggering on noisy signals. The trigger
point can also be “stamped” with a vertical line in the data file. See Acquisition Triggering in the Help Files for more
information.
Reference Files
Reference Files allow you to define an unlimited number of default states. Specify any data acquisition file as the “set
up” for a new file. All data acquisition parameters (including number of channels, channel type, scaling constants,
engineering units, display format, compression, display mode, gain, etc.) from the previously recorded file become
the parameters for the new data file. See Open Reference File in the Help Files for more information.
User Annotation
User Annotation allows you to display a label (up to 30 characters) for each displayed channel. The label “rides” with
the channel data and WINDAQ writes the annotation to the data file along with the acquired waveform. See User
Channel Annotation in the Help Files for more information.
WINDAQ Acquisition
20
WINDAQ Software User’s Manual
4. WINDAQ Waveform Browser
WINDAQ Waveform Browser (WWB) interprets and analyzes data during or after acquisition to disk. Make timing
and amplitude measurements, review event markers, overlap waveforms to examine interdependencies, cut and paste
portions of the waveform for export, and do all forms of interpretive analysis.
Follow the basic steps presented in this Chapter for a fast start to your first waveform playback and analysis session.
These fast start steps outline the condensed procedure for reviewing waveforms. You will perform most of these functions every time you review data with WINDAQ Waveform Browser.
To run WINDAQ Waveform Browser software, click or double-click the WWB icon or select “Browse” in the File
menu of the Acquisition software. Data acquisition does not need to be stopped to open and view the contents of a
WINDAQ file. This allows interpretive analysis and measurement calculations while simultaneously recording data.
Help Files
For a complete description of all software functions, see the context-sensitive Help Files. To access the context sensitive help either highlight a menu item and press F1 (this will take you directly to help regarding that menu item) or go
to the Help menu and click on Contents. The Help Files elaborate and detail the functions in this Chapter and contain
detailed descriptions of each additional function available in the WINDAQ Waveform Browser software. After you
have become familiar with the functions described here, take some time to look over the rest of the functions detailed
in the Help Files.
Fast Start
Step 1 Moving Around in the Data File
Moving Coarsely Through the Data File with the Scroll Bar
WINDAQ Waveform Browser software allows for smooth scrolling (panning) or paging of waveforms in either a right-to-left (positive time) or left-to-right (negative time) direction. The horizontal scroll bar at the
bottom of the WINDAQ window controls waveform scrolling. With it, you can move from one part of the waveform
file to another. For optimum scrolling speed, position the WINDAQ Waveform Browser window entirely on the
screen.
Click this area to scroll one screen width at a time.
Drag slider box to scroll long distances.
Click scroll arrows to scroll 16 pixels at a time.
The horizontal scroll bar has the following functions:
•
Click the left or right scroll arrow to scroll through the waveform 16 pixels at a time. Click and hold either
scroll arrow to continue scrolling to the beginning or end of the file.
•
Click anywhere in the horizontal scroll bar on either side of the slider box to scroll the waveform one screenwidth toward the beginning or end of the data file. Hold down the left mouse button to scroll rapidly until the
slider box reaches the mouse pointer.
WINDAQ Waveform Browser
21
WINDAQ Software User’s Manual
Moving to a Single Point Using the Cursor
Click in the bottom annotation line to move the cursor directly above the point clicked. Click and drag in the bottom
annotation line to allow the user to move the cursor to any single point on the screen.
You may also navigate using left and right arrow keys (if using the number key pad be sure num lock is off).
Note: Using a floppy disk based data file as opposed to a hard disk based file will adversely affect the maximum
speed of waveform travel in either direction. To achieve maximum waveform scroll speed for your particular computer, copy the file to your hard drive.
Step 2 Time and Date Display
View the Time and Date Display on the right-hand side of the bottom annotation line.
Toggle the display between Start Time, End Time, Cursor Time, and Time/Division in the Options menu.
Start Time
The Start Time displays the date and time the file was opened for acquisition. Click on Start Time in the Options
menu. An “S” displays prior to the Start Time.
WINDAQ Waveform Browser
22
WINDAQ Software User’s Manual
End Time
The End Time displays the date and time the file was closed for acquisition. Click on End Time in the Options
menu. An “E” displays prior to the End Time.
Cursor Time
The Cursor Time displays the date and time at the current cursor position. Click on Cursor Time in the Options
menu. A “C” displays prior to the Cursor Time.
Time/Division
The Time/Division displays the time per screen grid division. Click on Time/Division in the Options menu. A “T”
displays prior to the Time/Division.
Step 3 Making Waveform Measurements with the Cursor
Selecting a Channel
Select a channel in WINDAQ Waveform Browser just as you would in the WINDAQ Acquisition
Software i.e, click in the desired channel’s left/right annotation margin. A box will surround the Variable Waveform
Assignment Indicator of the selected channel. The Variable Waveform Assignment Indicator displays the window
number and the channel assigned to that window (X=Y: X=window number; Y=channel number).
The Data Cursor
The Data Cursor allows annotation of waveform values at the point of waveform/cursor, or waveform/base line intersection. These values appear in the left/right annotation margin next to the Variable Waveform Assignment indicator.
Enable the data display waveform annotation option before toggling waveform/cursor or waveform/base line values.
With the data display option enabled, click on Data Cursor in the Options menu. A check mark next to Data Cursor
indicates enabled status. Click anywhere in the bottom annotation line to activate the data cursor. Click directly under
the data cursor in the bottom annotation line to disable it and enable waveform/base line intersection point values. As
WINDAQ Waveform Browser
23
WINDAQ Software User’s Manual
the following illustration shows, when cursor oriented waveform data is enabled, the cursor mode designator at the
bottom of the screen indicates DATA. When base line oriented waveform data is enabled, the cursor mode designator
indicates BASE.
The annotated waveform value outputs either the raw waveform voltage or the waveform voltage converted into engineering units (if calibrated).
When in BASE mode use the Page Up and Page Down keys to change the baseline value of a selected channel. This
shifts the waveform up or down on the screen. The upper and lower chart edge values change to center the baseline
value.
The baseline value outputs either the raw waveform voltage or the waveform voltage converted into engineering units
if calibrated.
Moving the Cursor to the highest peak
Select a channel in which to find the highest point. Click on Peak on Screen in the Search menu or double click the
left mouse button anywhere in the bottom annotation line. This moves the cursor to the highest waveform peak displayed on the screen for the selected channel.
Moving the Cursor to the lowest valley
Select a channel in which to find the lowest point. Click on Valley on Screen in the Search menu or double click the
right mouse button anywhere in the bottom annotation line. This moves the cursor to the lowest waveform valley displayed on the screen for the selected channel.
WINDAQ Waveform Browser
24
WINDAQ Software User’s Manual
Moving the Cursor to the Center of the Screen
Click on Center Cursor in the Search menu or click the right mouse button in the bottom annotation line. This
moves the cursor to the enter of the screen. If your computer’s Scroll Lock function is enabled, the waveform will
move to the center of the screen along with the cursor.
Step 4 Getting a Bird’s Eye View of All the Data or a Portion of the Data
WINDAQ allows compression of data to display a whole file on-screen or display portions of data in
one screen-width. Click on Compression... in the Edit menu to access waveform compression
options. This displays the waveform compression dialog box.
Compressing all Data
To compress an entire file into one window-width click on the Maximum button in the compression dialog box. To
fully uncompress the file click on the 1 button in the compression dialog box. The cursor position in maximum compressed mode will become the center of the screen whenever lowering compression.
Compressing to a Ratio
The selected waveform compression ratio outputs in the Compression= text box. The Compression ratio equals the
number of data points evaluated for a min/max value for each enabled channel. For example, if the compression ratio
equals twenty, then twenty data points are evaluated to plot a min/max point. This ratio can range from -10 to whatever value required to compress the entire file on the screen (Maximum). Entering negative values in the Compression text box will expand the waveform. To find the maximum possible compression value: Fully compress the
waveform (Maximum); then re-access the compression dialog box (Edit > Compression...)—the Compression= text
box displays the maximum possible compression value. To increase or decrease the compression ratio enter the
desired number. If you choose a compression value that is too large, an “Invalid Compression” message box will
appear. Click OK or press ENTER to clear the message box and try a smaller compression value.
Cursor Mode Control (Mid/Min/Max/MxMn) for compressed displays
The waveform compression function operates by accumulating x number of waveform samples (where x equals the
compression ratio). WINDAQ calculates these values and displays a min/max line where the end points of the line
equal the absolute minimum and maximum values detected for the sample group. The cursor mode control allows
you to specify the desired value to report as either the minimum (MIN), maximum (MAX), mid point (MID), or maximum and minimum values (MxMn). To select the desired line segment reporting method click the desired option
button and click OK.
The currently active cursor mode displays at the bottom of the screen where the DATA annotation is replaced by
MIN, MAX, MID, or MxMn (default = MID). Both maximum and minimum values (separated by a slash, in the left/
right annotation margin) are displayed in MxMn mode.
Step 5 Making Statistics Measurements
Extract and save statistics in text format for a specified section of any single waveform or for all
waveforms in a file. This is a quick and easy way to get just the data desired rather than looking at
all the numbers from a complete file.
WINDAQ Waveform Browser
25
WINDAQ Software User’s Manual
1.
Select a channel by clicking in the desired channel’s left/right annotation margin. If you did not select a channel,
the Open Statistics File dialog box will open allowing you to save the statistics for all channels in a spreadsheet
or text format.
2.
Position the cursor at the beginning of the desired range.
3.
Press F4 or select Enable Time Marker in the Options menu to enable the time marker. This will place a check
mark next to Enable Time Marker in the Options menu and will also show an increment of time in the bottom
annotation line by the Time Marker (TM). When initially enabled it will show “.00 SEC(TM).” When disabled it
will read “off SEC(TM).” The Time marker display format may be changed by selecting Select Marker Display
in the Options menu.
WINDAQ Waveform Browser
26
WINDAQ Software User’s Manual
4.
Position the cursor at the end of the desired range. Click on Statistics in the View menu. If a channel has not been
selected, the Open Statistics File dialog box will open allowing you to save all statistics for all channels to a text
or spreadsheet file. If a channel has been selected, the Statistics window opens.
The Statistics window will display the statistics for the currently selected channel including significant engineering
units, channel number, the number of samples the statistics are derived from, and the file name, as well as the mean,
deviation, minimum, slope, area, and position in the file. Use the Next and Previous buttons to view other channels in
the file. Statistics will work with any level of compression—even fully compressed.
The To Clipboard button allows the user to save the current statistics window to the Windows clipboard. This data
can then be “pasted” (CTRL + v) into a file. The Open New File... button will save data to file (if you select a channel
it will save only that channel—if you do not select a channel it will save ALL channels’ data). Save data in spreadsheet format (with comma delimiters) or text format. The Write to File... button allows you append an existing file.
Step 6 Exporting to Excel
Use the Save As... command in the File menu to export a user-specified range of data from an existing data file to an Excel file.
1.
Select the copy range (all data for each channel lying between the time marker and the cursor):
WINDAQ Waveform Browser
27
WINDAQ Software User’s Manual
a.
Position the cursor at the beginning of the desired range.
b.
Press F4 or select Enable Time Marker in the Options menu to enable the time marker. This will place a
check mark next to Enable Time Marker in the Options menu and will also show an increment of time in the
bottom annotation line by the Time Marker (TM). When initially enabled it will show “.00 SEC(TM).”
When disabled it will read “off SEC(TM).” The Time marker display format may be changed by selecting
Select Marker Display in the Options menu.
Position the cursor at the end of the desired range. Note: Shading shown below is for demonstration purposes only. Shading does not appear in WINDAQ Playback Software.
c.
WINDAQ Waveform Browser
28
WINDAQ Software User’s Manual
2.
Click on Save As… in the File menu. This displays the Save As dialog box.
3.
Select the file storage format option 5) Spreadsheet print (CSV). The file storage format selections appear on the
right side of the dialog box. A description of each data storage format is included in the Help Files for the
WINDAQ Waveform Browser software.
Enter a file name in the File name dialog box. Include “.csv” as the file extension in the file name. For example,
enter “test.csv” into the file name dialog box. Click on Save to export the data—this copies the data within your
selected range and from every channel in the file to the specified data file. To save only the channels displayed
on-screen select the Visible channels only box in the top right hand portion of the Save As dialog box. To export
specific channels, see the Extract Channels function in the Help Files.
The Spreadsheet Comments dialog box allows you to export annotations from the WWB file and allows you to
add new comments. Click in the appropriate check box to transfer Sample Rate, Comments, User Annotation,
Engineering Units, Relative Time, or Event Marks. After selecting the desired options and adding comments,
click the OK button to close the dialog box and save the file.
4.
5.
WINDAQ Waveform Browser
29
WINDAQ Software User’s Manual
6.
The file will have an Excel icon—double-click on the file to open it in Excel.
7.
Convert data from scientific notation by changing the format of the cells to “Number” format. Highlight the data,
in the Format menu click on Cells... then choose the desired format.
WINDAQ Waveform Browser
30
WINDAQ Software User’s Manual
8.
Manipulate your data using any Excel function. Click on Chart... in the Insert menu to create a graphical representation of your data.
9.
Choosing a Line chart will output a chart identical to the waveform exported from WINDAQ Waveform Browser.
WINDAQ Waveform Browser
31
WINDAQ Software User’s Manual
Additional Playback Features
X-Y plotting
Plot one channel versus another. Plot any two amplitude/time (Y-T) oriented waveforms versus each other - one channel designated as the X-axis and one as the Y-axis. Make analytical measurements on the X-Y plot including measure
excursion, slope, and area. Static and Dynamic generation of X-Y plots are possible. See X-Y Plotting Operations in
the Help Files for more information.
FFT and DFT utilities
Perform waveform frequency analysis functions using Fourier Transform Operations. The Fast Fourier Transform
(FFT) method is ideally suited for waveforms having a similar cyclic repetition. Use the Discrete Fourier Transform
operation to select a portion of the waveform more accurately than the FFT. See Fourier Transform Operations in the
Help Files for more information.
Event Markers
Display the list of event markers and comments enabled during acquisition. Automatically locate event markers
enabled during acquisition, display the date and time at the cursor position, quickly vector to any part of the data file,
and enable or disable event marker display. Edit, delete, and add Event Markers in the data file. See Event Mark Editing and Search-For-Event in the Help Files for more information.
WINDAQ Waveform Browser offers these features and much, much more.
WINDAQ Waveform Browser
32
WINDAQ Software User’s Manual
5. ActiveX Controls
Active X Controls eliminate lines of code from your program by having an already-made, tested, and defined function. Combine multiple ActiveX controls to perform a multitude of functions. In fact, you can combine Active X controls from any combination of vendors. Refer to numerous lines of code that have already been tested and are ready to
go to work for you in just one line of code.
ActiveX controls have three types of functions: properties, methods and events. Properties are the attributes of the
control. They describe the appearance and operation of the control. Methods are function calls inside the control that
allow information about the control to be sent or received. Events are notifications generated by a control in response
to some particular occurrence.
DATAQ ActiveX Controls support the following products: DI-148U, DI-150, DI-151, DI-154RS, DI-158 Series, DI190, DI-194RS, DI-195B, DI-4xx products, DI-5xx products, DI-7xx products, DI-5001.
Help Files
For a complete description of all properties, methods, and events, see the context-sensitive Help Files. To access the
context sensitive help select a control or a specific property, method, or event, and press F1 (this will take you directly
to help regarding that control, property, method, or event). The Help Files elaborate and detail each property, method,
and event and provide sample program coding to help get you started.
Accessing ActiveX Controls
ActiveX controls are installed when WINDAQ is installed and can be accessed in any application that supports them.
For example, it takes two steps to start using ActiveX controls in Visual Basic:
1.
Right click on the tool bar and select “Components” from the pop-up menu. This opens the Components Window.
2.
Check the boxes in front of the five DATAQ Instruments components (DataqFile, DataqSdk, DataqSerial,
DQChart, and WinDaq). Then click “OK.”
Active X Controls
33
WINDAQ Software User’s Manual
You will see the ActiveX control symbols on your tool bar.
Double-click on the symbol to apply one to your form. To access the help files, select the control or select a specific
property, method or event and press the F1 key.
DataqFile
DataqFile is comprised of two components: WriteDataqFile and ReadDataqFile.
WriteDataqFile
Use WriteDataqFile to create WINDAQ-compatible files. This control ensures that the files created by your program
may be used with WINDAQ Waveform Browser software.
Features of WriteDataqFile include:
•
File manipulation utilities that allow controlled access to data.
•
+/- Full-scale definitions per channel in engineering units.
•
Sample rate throughput definition that is used by WINDAQ browser software for timing measurements.
WriteDataqFile has the following limitations:
•
Supports only regular WINDAQ files (i.e., no support for different channels sampled at different rates).
•
No commented-event marker support.
•
No user annotation support.
Active X Controls
34
WINDAQ Software User’s Manual
ReadDataqFile
Use ReadDataqFile to read WINDAQ-compatible files. In many instances, you may wish access to data acquired by
WINDAQ data acquisition software. Examples include custom analysis and export requirements. This control provides
a convenient way to perform these special operations.
Features of ReadDataqFile include:
•
Open and close file manipulation capability.
•
File navigation utilities.
It also has the following limitations:
•
Supports only regular WINDAQ files (i.e. no support for different channels sampled at different rates).
•
No commented-event marker support.
•
No user annotation support.
DataqSDK
DataqSdk provides access to the most basic elements of data acquisition hardware. Use DataqSDK with all DATAQ
Instruments’ hardware, including the DI-148U, DI-150, DI-151, DI-154RS, DI-158 Series, DI-190, DI-194RS, DI195B, DI-4xx products, DI-5xx products, DI-7xx products, DI-5001.
Features of DataqSDK include:
•
Data acquisition mode definitions for continuous and triggered data acquisition.
•
Sample rate, channel, single-ended and differential definitions and various other scan list items.
•
Immediate mode access to digital I/O and analog outputs.
•
Access to acquired data using either burst or streaming methods.
•
And more.
Limitations include:
•
DataqSDK does not currently offer streaming DAC output.
DataqSerial (Obsolete)
Note: The DataqSerial control is now obsolete and will no longer be supported. The DataqSDK control should now
be used with serial devices. Some serial port devices may not work with DataqSerial.
Use DataqSerial with all DATAQ Instruments’ hardware that supports a serial (COM port) interface, including the
DI-150/151/190/194/195 series devices. Use the DataqSDK control to access and manipulate all other DATAQ
Instruments’ hardware products like the DI-22x/4xx/5xx/7xx series devices.
DataqSerial features include:
•
Continuous access to acquire data.
•
Sample rate, COM port and acquired channel definitions.
•
Access to acquired data using streaming methods.
Active X Controls
35
WINDAQ Software User’s Manual
DQChart
DQChart provides basic charting capabilities (as demonstrated in the Visual Basic samples included in the ActiveX
installation).
DQChart features include:
•
Plots up to 16 channels on the same chart.
•
Allows analog or digital plotting.
•
Displays color legends at the upper left corner of the chart.
•
Supports scaling and offsetting via mouse control.
•
Supports WINDAQ compatible event marker.
•
Plots a specified channel from a data stream.
WinDaq
Use the WinDaq control to eavesdrop on the data stream being acquired by WINDAQ Data Acquisition software. Use
this control to return a single value or the latest frame of data (using the data frame methods) or monitor the whole
data stream (using the data stream methods).
The primary advantage of this control is to relieve you of the tasks associated with initializing data acquisition. These
include, but are not limited to, scan list initialization and management, sample rate definitions, engineering unit scaling and many others. These tasks are performed by WINDAQ turnkey data acquisition software at a very high level.
However, the data acquired by the application can be made available in real time by this control. In this manner, the
control allows you to concentrate on specific requirements of the task at hand without regard to mundane and obscure
data acquisition details.
WinDaq offers the following features:
•
Derives the number of channels, sample rate, engineering units scaling, m and b scaling constants and fullscale ranges in engineering units as defined by Windaq software for each channel.
•
Provides access to acquired channel data using one of three options: immediate mode by defined channel,
immediate mode by all enabled channels and a stream approach that guarantees waveform continuity.
•
Allows asynchronous access to the hardware’s digital input and output ports and analog output ports.
Active X Controls
36
WINDAQ Software User’s Manual
6. XControls Software Option
DATAQ Instruments and Iocomp Software have collaborated to create XControls, a collection of software modules
that allow programmers and non-programmers alike to produce stunning graphical user interfaces (GUIs) for their
data acquisition applications. Designed specifically for DATAQ Instruments customers, the XControls work seamlessly with WINDAQ software. The “Linked Cell” property of each control provides exceptional power when coupled
with WINDAQ/XL software. WINDAQ/XL allows WINDAQ-acquired data to be ported to definable Excel cells both in
real time and after acquisition from the WINDAQ Waveform Browser (available on the DATAQ Instruments web site).
When those cells are linked to any given XControl using its LinkedCell property, the control has real-time access to
data: Thermometer columns rise and fall, panel meter displays update, angular display needles rotate to values, and
LED bar graphs change color and size. This is just one example of the many features included in the XControls.
Installing XControl Software
1.
Insert the Iocomp CD-ROM into your CD-ROM drive. The installation should start automatically if you have the
AutoRun option turned ON. If it does not, open “My Computer” and then double-click on your CD-ROM drive.
2.
Click on “Install Iocomp Components Version 2.0.”
3.
Choose the folder where you want the files saved. Click Next.
4.
When the “Welcome” window opens, click Next again.
5.
Read the Terms of License Agreement. If you accept these terms, click Next.
6.
Enter your user name and company name. Press Next.
7.
Reconfirm the destination folder you selected in step 3. If correct, click Next. If incorrect, press “Browse” and
locate the correct folder.
8.
Select “Typical Setup” to install all appropriate files required for your product and for the development environments automatically detected on your computer system.
9.
In the Keycode Manager Window, enter your keycode in the “New Keycode” text box on the right. Your keycode
can be found on the label on the outside of the CD case. Please keep this number in a safe place as you will need
it for future installations and updates. Once you have entered your keycode, press the “Add Keycode” button
below the text box and then press Next.
10. In the next window, select the Development Environments that you wish to support. Auto-detected Development
Environments have already been selected. Add any others you wish to support and press Next.
11. In the OPC Options and Settings Window, choose whether or not you want to install support for OPC features.
Then press Next.
12. The Install Shield Wizard Complete Window will come up next. Choose if you would like to register your product (Internet access is required) or display the Instrumentation Components Directory. Then click Finish.
Using XControls with WINDAQ/XL
This tutorial will show you how to use XControls in Excel with WINDAQ/XL. WINDAQ/XL is DATAQ's software
add-on to WINDAQ Software that allows data acquired by these packages to be ported to a Microsoft Excel spreadXControls
37
WINDAQ Software User’s Manual
sheet. Let's say you need to measure the power and endurance of a motorcycle engine. You may want to test the
engine to see how long it can run at its maximum level without overheating. This would involve a control to measure
RPM, a control to measure the temperature, an odometer control, and an LED control that will let you know immediately when the engine has overheated. When you place all of these controls on a panel and label them, it might look
something like this:
Create and link controls in Excel in four simple steps:
Step One:
Go to View > Toolbars > Control Toolbox. This will display the Control Toolbox. Click on the “More Controls” button
in the lower right corner to reveal additional controls.
XControls
38
WINDAQ Software User’s Manual
Step Two:
XControls have an “i” in front of them. When you find the one you want, click on it once. Your cursor will become a
cross hair. Click and drag to size the control or just click where you want it to be placed on the screen and it will
appear at its default size. In the example below, the iThermometer control was placed at its default size.
Step Three:
When the control is placed, you will automatically enter “Design Mode.” Right click on the control and select “Properties” or just press the Properties button
in the Control Toolbox. Here, you can change the properties of your
control, such as size, style, font, etc., but, most importantly, you can link the control to your application. Next to
“LinkedCell,” type in the Column and Row of the cell to which you would like the control linked. For example, to
specify a cell in Column “C,” Row 5, you would just type “C5.”
XControls
39
WINDAQ Software User’s Manual
You can change other properties by right clicking on the control and selecting “(the name of your control) Control
Object” and then click on “Properties” (for our example, you would select “iThermometerX Control Object” > “Properties”).
XControls
40
WINDAQ Software User’s Manual
This displays another window specific to the control (shown below for the “iThermometer” control).
Step Four:
To exit Design Mode and apply any property changes you have made to the control, click the “Exit Design Mode”
button
on the upper left-hand side of your Control Tool bar. This is also the button you need to press if you
want to enter Design Mode at any point to make changes to the control.
Your control is now linked!
XControls Documentation
The documentation for the XControls is on the CD as a pdf. To view the documentation, you must have Adobe Acrobat Reader. If you do not have Adobe Acrobat Reader, download it for free off the Internet at www.adobe.com. To
access the documentation, insert the CD. Close the Installation window. Double click on “My Computer” and then
right click on the CD-ROM drive. Choose the “Explore” option. This opens a window containing all of the folders on
the CD. Open the “DOC” folder and then, inside that folder, open the “General” folder. Inside this folder is the “Getting Started Guide” pdf you need to use XControls.
The Getting Started Guide includes everything you need to operate XControls, except for the instructions for use with
WINDAQ/XL, which is included in this manual.
Chapter One covers which component architecture you should use. ActiveX, VCL and CLX component architectures
are included with your XControls. This chapter also gives an overview of XControls' key features and system requirements and tells you where you can locate help.
Chapter Two describes installation procedures, including custom setup, repair, service packs, and uninstall instructions as well as other procedures.
Chapter Three describes how to get started using the ActiveX component architecture. It covers setting up component
projects within Visual Basic and Microsoft Visual C++, including modifying control properties, generating even
code, basic programming usage and accessing help files. Chapter 3 also provides directions on distributing ActiveX
Component Files.
XControls
41
WINDAQ Software User’s Manual
Chapter Four covers how to get started using the VCL component architecture. It describes the process of compiling
and installing VCL components, accessing help files, distributing components, setting an environment library path,
modifying control properties, generating event code, and basic programming usage.
Chapter Five describes how to get started using the CLX component architecture. It covers setting up component
projects in Borland Delphi, C++ Builder, and Kylix, including compiling and installing CLX components, accessing
help files, distributing CLX components, modifying control properties, generating event code, and basic programming usage.
Chapter Six details support options for XControls.
Appendix A contains a chart detailing each component library and what components they include.
Appendix B contains a table listing commonly used colors, their hexadecimal values and selected constants from
popular development environments.
Appendix C details the Transparency Feature, including how and when it can be used.
Appendix D details the Themes Feature, including how to use existing themes, how to create your own, how to use
themes in a compiled application using Run-Time Property Editors and more.
Appendix E contains the Software License Agreement.
XControls
42
WINDAQ Software User’s Manual
Index
A
accessing ActiveX Controls 33–34
acquisition software 7–20
ActiveX Controls 33–36
DataqFile 34–35
DataqSDK 35
DataqSerial 35
DQChart 36
WinDaq 36
analysis software 21–32
annotation 20
annotation margin 13, 23
B
BASE 23
baseline oriented waveform data 24
baseline value, upper chart edge value 24
bottom annotation line 23
Browse 21
browsing a data file 21–22
C
calibrating input signals 15–17
Center Cursor 25
channel expander 8
Channel Selection grid 8
channel settings dialog box 14
Channel Settings... 14
channels
differential 9
digital input 9
fixed differential 9
Channels field 7, 8
Channels... 7, 8
chart edge values 16
compressing data to a ratio 25
compressing waveform data 25
compression ratio 25
Compression... 25
context-sensitive help 1
acquisition software 7
ActiveX Controls 33
playback software 21
conventions 3
general 3
mouse 3
copy range 27
CSV 29
Current Data 15
cursor 22
cursor mode designator 24
Cursor Time 23
D
DATA 23
Data Cursor 23
Data Display 15
DataqFile 34–35
ReadDataqFile 35
WriteDataqFile 34
DataqSDK 35
DataqSerial 35
date stamp 19, 20, 32
default states 20
Demonstration Video 2
DFT 32
differences between WinDaq/Lite/Pro/Pro+ Recording
software 1
differential channels 9
digital input channels 9
Digital Plot 10
disabling channels
other products 9
serial port products 7
display format 10
displaying channels 10–12
displaying compressed waveforms 25
DQChart 36
E
Enable Time Marker 26, 28
enabling channels 7–10
other products 8
analog 9
differential 9
digital 9
fixed differential 9
serial port products 7
special considerations 10
End Time 23
engineering units 15
event marker 19, 20, 32
Index
43
WINDAQ Software User’s Manual
Excel 27, 37
Cells... 30
Chart... 31
Excel icon 30
exporting waveform data to Excel 27–31
extracting statistics 25–27
F
F4 28
FFT 32
FILE FULL 19
file size 17
file space consumed 19
file storage format 29
fixed differential channels 9
flag 20
Flash icon 2
Format Screen 10
formatting numbers 30
fourier transform operations 32
frequency analysis 32
full scale annotation 15
full scale measurement range 13
G
gain 13–15
gain configuration 13
gain factor 14
H
help files 1–??
acquisition software 7
ActiveX Controls 33
playback software 21
help topics 1
high calibration dialog box 16
High Calibration… 16
horizontal scroll bar 21
I
Input Level 15, 16
installing 5
installing XControls 37
L
label 20
left/right annotation margin 23
Limits... 17
line segment reporting 25
linking XControls to WinDaq/XL 37–41
low calibration dialog box 15
Low Calibration... 15
lower chart edge value 16, 24
M
making statistics measurements 25–27
making waveform measurements with the cursor 23–25
MAX 25
maximum compression 25
measurement range 13–15
measurement resolution 13
MID 25
MIN 25
moving around in the data file 21–22
moving the cursor
to the center of the screen 25
to the highest peak 24
to the lowest valley 24
Multimedia Demonstration Videos 2
multiplexer 8
MxMn 25
N
negative input terminal 9
non-overlapped waveform display 11
O
100% used 19
open file dialog box 17
opening ActiveX Controls 33–34
operating mode 3
RECORD 3
SETUP 3
STBY 3
overlapped waveform display 11
P
paging through waveforms 21
pause 18
Peak on Screen 24
playback software 21–32
plotting digital data 9
positive input terminal 9
R
ratio, compressing data to 25
ReadDataqFile 35
RECORD 3, 17–19
Index
44
WINDAQ Software User’s Manual
Record 17–19
recording software 7–20
recording time 17
recording waveforms to disk 17–19
reference files 20
right mouse button 3
running WinDaq Waveform Browser software 21
S
S/s/CHAN 13
sample rate 12
sample rate per channel 13
Sample Rate... 12
save as dialog box 29
Save As... 27–31
saving data to Excel 27–31
saving waveform data 17–19
scientific notation 30
scroll bar 21
selecting a channel
acquisition software 13–14
playback software 23
setting analog channels as differential 9
SETUP 3
significant engineering units 15
software license agreement iii
specifying a sample rate 12–13
specifying gain and measurement range 13–15
specifying upper and lower chart edge values 16
spreadsheet comments 29
spreadsheet options 29
spreadsheet print 29
STANDBY 3
Start Time 22
statistics 25–27
statistics window 27
STBY 3, 18
Stop 18
Storage field 19
U
upper chart edge value 16
user annotation 20
using the cursor 22
using XControls with WinDaq/XL 37–41
V
Valley on Screen 24
variable waveform assignment indicator 13, 23
Video 2
viewing enabled channels 10–12
Visual Basic 33
W
waveform assignment indicator 13
waveform display 11
waveform frequency analysis 32
waveform measurements 23–25
waveform value at point of intersection 24
WinDaq 36
WinDaq Software Demonstration Videos 2
WinDaq Waveform Browser 21–32
WinDaq/Lite/Pro/Pro+ differences 1
WinDaq/XL 37
WriteDataqFile 34
WWB 21–32
X
XControls documentation 41
XControls software option 37–42
X-Y plotting 32
Y
Y-T 32
T
throughput rate 12
time and date display 22–23
time and date stamp 19, 20, 32
Time Marker 26
Time/Division 23
TM 26
To Clipboard 27
toggling the data cursor on/off 23
total sample throughput rate 12
triggered sweep display 20
Index
45
DATAQ Instruments, Inc.
241 Springside Drive
Akron, Ohio 44333
Telephone: 330-668-1444
Fax: 330-666-5434
E-mail: [email protected]
Vertrieb: / Distributed by:
ALTHEN GmbH Mess- und Sensortechnik
Frankfurter Str. 150-152 Tel.: +49 (0)6195 7006-0 http://www.althen.de
65779 Kelkheim / Deutschland Fax: +49 (0)6195 700666 E-Mail: [email protected]