1
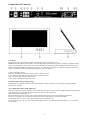
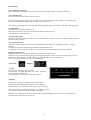
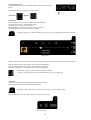
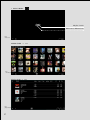
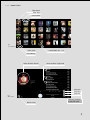
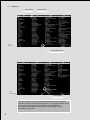
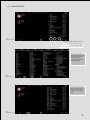
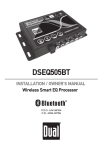
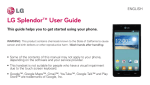
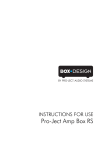
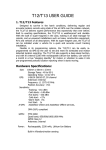
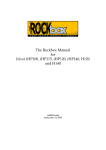
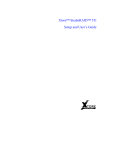
1
Congratulations
Congratulations on your purchase of the Pathos MUSITECA
Musiteca is Pathos’ ultimate source of music that puts together massive storage, uncompromised audio quality and userfriendly operation.
Its hard disk is capable of storing up to 25,000 tracks, approximately 2,500 CDs, with uncompressed quality. Digital
music can be captured and stored either by ripping CDs via the built-in transport, or by copying files from any digital
storage device—computer hard drive, USB drive, digital music player... Metafiles such as cover arts and detailed
information are automatically acquired from the web and associated to the respective tracks.
Playing Musiteca is a multi-sensorial pleasure: its wide touch screen, combined with Pathos’ proprietary intuitive
interface, allow easy operation even by users with no familiarity with computers at all.
Musiteca’s built-in 192KHz 24bit D/A converter makes analog signal available through a pair of XLR balanced outputs
and a pair of RCA unbalanced connectors. The signal processing includes a FET high precision amplification stage and
a buffer stage with ECC88 6922 tubes.
Musiteca can be remotely operated via any smartphone or tablet by means of specific free apps.
Don’t skip the BS*, please
Sure, you know how to connect and operate an amplifier.
You are clearly an audio expert or you won’t have this manual in your hands!
Nevertheless, there are precautions and safety instructions that you should be aware of.
Before connecting, operating or adjusting this product, please read the instruction booklet carefully and completely.
Retain it for future reference.
* Boring Stuff
Serial number is indicated on the box and on the rear panel. Record the serial number in the space provided below.
Refer it whenever you call upon your Pathos dealer regarding this product.
SERIAL No. _________________________
2
Important Safety Instructions
Any changes or modifications not expressly approved in this manual void
the warranty and your authority to operate this equipment. Always
disconnect the unit from the AC outlet before connecting or disconnecting
any cables, or when cleaning any component. This unit contains voltages
that can cause serious injury or death. Never operate unit with its cover removed. No user-serviceable parts are inside.
Service should only be performed by authorized Pathos personnel.
Users are not allowed to perform any service to this appliance.
Do not modifify safety device and do not remove ground of power plug.
Make sure that power cord is protected from being bent, or stepped, especially close to the wall plug and on the rear
panel inlet.
AC extension cords are not recommended for use with this product.
Do not place the unit in a confined space, such as a bookcase or built-in cabinet. Do not place the unit on a rug or other
soft surface. Always make sure the ventilation of the apparatus is not covered at any time.
Do not expose the unit to rain, moisture, extremely high or low temperatures.
Also avoid locations subject to vibration and excessive dust.
Avoid placing it in direct sunlight or close to a source of heat.
Do not place bottles, vases, or other objects containing liquids, open flame sources such as lighted candles on the unit.
Should any solid object or liquid fall into the cabinet, unplug the unit and have it checked by qualified personnel before
operating it any further.
Always keep any electrical equipment out of the reach of children.
Always unplug this unit during lightning storms or when unused for long periods of time.
Never bypass the fuses. In case of fuse replacement, please refer to your Pathos authorized dealer or to your nearest
service centre. Authorized personnel should follow these instructions:
1. Before replacing fuses, disconnect the AC power cord.
2. For continued protection against hazard, replace fuses only with the same type and rating.
The unit retains AC power as long as is connected to the wall outlet, even when the unit is turned off.
This symbol is intended to alert the user to the presence of uninsulated “dangerous voltage” within the
product’s enclosure that may be of sufficient magnitude to constitute a risk of electric shock to persons.
This symbol is intended to alert the user of the presence of important operating and maintenance (servicing)
instructions, in the literature accompanying the appliance.
Do not throw away the battery with general house waste, dispose of it correctly as chemical waste.
Marking by “CE” symbol indicates compliance of this device with the EMC (Electromagnetic
Compatibility) and LVD (Low Voltage Directive) standards of the European Comunity.
Limited Warranty
The reference for the guarantee is always national distributor where the machine was sold for the first time.
Pathos warrants this product to be free from defects in materials and workmanship (subject to the terms set forth
below). Pathos will repair or replace (at Pathos’s option) this product or any defective parts in this product. Warranty
periods may vary from country to country. If in doubt consult your dealer and ensure that you retain proof of purchase.
To obtain warranty service, please contact the Pathos authorized dealer from which you purchased this product. If your
dealer is not equipped to perform the repair of your Pathos product, it can be returned by your dealer to Pathos or an
authorized Pathos service agent. You will need to ship this product in either its original packaging or packaging
affording an equal degree of protection.
This warranty is void if:
- the factory-applied serial number has been altered or removed from this product; or
- this product was not purchased from a Pathos authorized dealer.
You may call Pathos or your local Pathos distributor to confirm that you have an unaltered serial number and/or you
made a purchase from Pathos authorized dealer.
This warranty does not cover cosmetics damage or damage due to acts of God, accident, misuse, abuse, negligence,
commercial use, or modification of, or to any part of, product.
This warranty does not cover damage due to improper operation, maintenance or installation, or attempted repair by
anyone other than Pathos or Pathos dealer, or authorized service agent which is authorized to do Pathos work.
Any unauthorized repais will void this warranty.
This warranty does not cover products sold AS IS or WITH ALL FAULTS.
REPAIR OR REPLACEMENTS AS PROVIDED UNDER THIS WARRANTY ARE THE EXCLUSIVE REMEDY
OF THE CONSUMER. PATHOS SHALL NOT BE LIABLE FOR ANY INCIDENTAL OR CONSEQUENTIAL
DAMAGES FOR BREACH OF ANY EXPRESS OR IMPLIED WARRANTY IN THIS PRODUCT. EXCEPT TO
THE EXTENT PROHIBITED BY LAW, THIS WARRANTY EXCLUSIVE AND IN LIEU OF ALL OTHER
EXPRESS AND IMPLIED WARRANTIES WHATSOEVER INCLUDING, BUT NOT LIMITED TO, THE
WARRANTY OF MERCHANTABILITY AND FITNESS FOR A PARTICULAR PURPOSE.
Some countries and US states do not allow the exclusion or limitation of incidental or consequential damages or implied
warranties so the above exclusions may have other statutory rights, which vary from state to state or country to country.
For any service, in or out of warranty, please contact your dealer.
3
About your unit
Content
Package includes following articles:
Musiteca, power cord, user manual.
In case any of the above items is not included, please contact shop or authorized Pathos dealer.
Packaging
When unpacking your Musiteca, always handle it with care. Store all packaging materials in a dry place for future
shipments. In case of transport or shipment, the original packaging will properly prevent transit damages.
Placement
Choose the installation location carefully.
Musiteca should generally be placed close to your amplifier, thus keeping interconnecting cables short.
Do not place in a sealed area such as a bookcase or in a cabinet.
Do not place the unit on an unstable surface or shelf. The unit may fall, causing serious injury to a child or adults as
well as serious damage to the product.
Heat buildup
Do not place anything on top of the cabinet that might block the ventilation holes and cause malfunctions. Your
Musiteca heats up during operation, this is not a malfunction. A suggested distance of at least 10cm on each side and
10cm from the top will ensure a sufficient air flow to cool down the unit.
Vacuum Tubes
Your Musiteca is provided with a pair of ECC88 / 6922 tubes. In case you need to replace vacuum tubes, always use
same type.
In quality of manufacturer, Pathos choose the brands according to their sound quality performance and availability.
In the market you may find many others brands that can replace pretty well the supplied tubes; NOS, for military use,
with gold pins and so on may improve sonic quality of the amplifier as long as they are equivalent to the ECC88.
NOTE: is not recommended to leave your Musiteca switched on 24 hours a day. This habit for some audiophiles does
not induce benefits in Musiteca’s musical performances and will shorten tubes’ life.
Warm-up
For superior sonic performances, a warm-up period of approximately twenty minutes is recommended before the
Musiteca is used.
Cleaning
Before cleaning, be sure to turn off and unplug the unit.
Clean the cabinet, panel, and controls with a soft cloth slightly moistened with clean water. Do not use any type of
detergent, abrasive pad, scouring powder, thinner, or solvent such as alcohol or benzine.
Service
In the unlikely event your Musiteca should require service, always refer to your Authorized Pathos Dealer or to the
Authorized Pathos Distributor of your country.
Before you get started
Turn off the power to all components before making any connections.
Do not connect the AC power cord until all of the connections are completed.
Be sure to make firm connections.
4
Dimensions
5
Connections & Controls
CAUTION:
When connecting your Musiteca to other components, make sure all units are off.
NOTE: Pathos Acoustics recommends to use only high quality interconnecting cables. Not using appropriate cables
prevents your amplifier, your sources, and your loudspeakers from delivering their full potential. The wiring to and
from the amplifier should be arranged in a neat way. It is advisable to separate AC cords from signal and speakers
cables, to avoid hums and noise from being introduced into your system.
1) Select operating voltage:
Before to use Musiteca check the voltage selector. (230V or 115V).
if you change it, you need to change also the fuse with this values:
90V – 125V 50/60Hz the right value is F2A
210V – 240V 50/60Hz the right value is F1A
2) Serial number and operating voltage:
Serial number is indicated on the box and on the rear panel. Refer it whenever you call upon your Pathos dealer
regarding this product.
3) AC Main Inlet, Main switch, Main fuse:
This IEC-standard AC mains receptacle is used with the removable AC power cord to supply the Musiteca with power.
Connect the power cord to this receptacle and the AC mains outlet in the wall.
Main switch turns the machine on.
The unit remains powered as long as it is connected to the wall outlet, even if the unit itself is turned off.
If you are not going to use your unit for a long time, be sure to disconnect it from the wall outlet.
To disconnect the AC power cord, grasp the plug itself; never pull the cord.
Never bypass any fuse. In case of fuse replacement, please refer to your Pathos authorized dealer or to your nearest
service centre.
6
4) Led to signal Musiteca is switch on:
this led indicates that Musiteca is turn on or switching on.
5) Remote ON/OFF
Musiteca is provided with one connector for switching on/off via remote.
Remote ON/OFF OUT: when unit is on, 12VDC are on the connector to turn on other
machines provided with compatible remote.
6) USB “A”:
USB connector for external HARD DISK to backup and restore.
7) ETHERNET RJ45:
Internet connection.
This connection is needed to download CD information for ripping.
8) Interruttore DAC interno:
Through this switch is possible to turn off internal DAC to use one external.
NOTE: if you switch on when Musiteca is already active, this take about 30 second for tubes warm up. After this period
you can hear a click who signal that analog outputs are active.
Digital output is always active.
9-10) Uscita bilanciata:
Connect a pair of audio XLR-type connecting cords (not supplied) from the outputs of your Musiteca to corresponding
inputs of your pre-amplifier, integrated amplifier or receiver. As to get correct stereo imaging, double-check Right
output is connected to Right input and Left output is connected to Left input.
Whenever available in your amplifier, balanced connection is highly recommended not only in order to minimize noise,
but
also to take advantage for the superior signal management of this technology.
Associated with the Musiteca, Pathos high end amplifiers are real balanced designs that allow you to build an entirely
balanced system, from the source to the speakers.
11) Uscita sbilanciata:
Connect a pair of audio RCA-type connecting cords (not supplied) from the outputs of your Musiteca to corresponding
inputs of your pre-amplifier, integrated amplifier or receiver.
As to get correct stereo imaging, make sure to match the colour code: Red (right) to Red and White (left) to White.
12-13) uscita digitale
Two digital outputs are provided to allow you to connect your Musiteca to an audio component equipped with digital
inputs, such as a D/A converter. By providing this kind of connection, the Musiteca’s built-in D/A converter is
bypassed. Being the quality of the Musiteca internal D/A converter unparalleled, we do not recommend to operate this
kind of connection.
Nevertheless, we provide this option so that in the future, would a better D/A conversion technology become available,
you will be able to take advantage of it and your Musiteca will not become obsolete.
Digital connections are also suitable to connecting your Musiteca to digital recorders such as DAT, MD or others.
Connect a digital coaxial cable (not supplied) from the output of your Musiteca (13) to corresponding input of your
component.
Connect a digital XLR cable (not supplied) from the output of your Musiteca (12) to corresponding input of your
component.
14) Button switch ON from stand by.
The letters “Pathos” is the button to switch ON Musiteca from standby.
15) Slot for CD
Slot for playing CD or ripping
16) Monitor
21’’ monitor touch screen to control the unit
7
MAIN SPECIFICATION
Converter
D/A Conversion:
Differential 24bit 192KHz delta sigma DAC
Analog stage:
Fully balanced, class A, tubes , zero feedback
Conversion rate:
up to 192KHz
Dynamic range:
120dB
THD+N:
-110dB
Analog output:
one Balanced XLR, one Unbalanced RCA line
Max output level:
unbalanced RCA 3V RMS
Balanced XLR 1,5V + 1,5V RMS
Music server
Internal storage:
1Terabyte (about 600 album)
Touch screen:
21’’
Connectivity:
and backup
USB type “A” for storage music
Ethernet RJ45 for internet
connection
Generali
Main voltage:
90-250V 50/60Hz
Size (WxDxH):
600x330x425mm
Weight:
28Kg
8
Get started
Turn machine ON and OFF
Before operating your Musiteca, make sure the power cord and signal cables are properly connected.
- Turn machine ON:
Press the switch on the rear panel to turn the unit on.
the power LED (4) will be light for one second then it's switch off. This mean that Musiteca is in standby mode.
To Switch on MUSITECA push lightly the Pathos's logo on the front.
The preheating tubes take about 30 second, after this time Musiteca shows the “home” menù and it will be working.
- Standby mode:
On Home menu, touch the switch off icon.
After some second the power led is off and also the monitor will be turn off.
Now Musiteca is on standby mode.
- Turn machine OFF:
We highly recommend to set the standby mode and then press the on/off switch on the rear panel of machine. Do not
skip the standby procedure.
Network configuration:
After right connect Musiteca to the local net through RJ45 cable, check your configuration. Home > setting >
network.
The Musiteca's network configuration is DHCM mode (automatic mode).
To change the values, skip on "manual mode" and through numpad set IP,Net Mask,Gateway and DNS.
Ripping and listen CD:
Insert an original audio CD into the apposite slot on Musiteca's left side.(15)
After few second on home menu the CD's icon will appear selectable, touch it to show the Ripping/play Cd page.
If Musiteca is right connect to internet automaticaly download the CD's data information.
now you can choose between “Listen CD” and “Ripping”.
“Listen CD”
“Ripping”
- Ascolto:
Touch "Listen CD" icon to listen the CD.
The controller will appear below the cover, here is possible to
control the track inside the disk.
when is playing a CD the play list ON-AIR is paused.
- Ripping:
Select track to ripping (by default all tracks are selected).
touching the track change the track status (select or deselect).
touching album cover change all tracks status (select or deselect).
After choose tracks by touching the ripping's icon ripping will start.
This function automaticaly disable the listen Cd function.
IMPORTANT. Ripping take about 15 minutes, when is finished Musiteca ejects the CD, to avoid damage on
mechanics allow the correct eject of the CD.
9
Listen music stored.:
To listen music previously stored inside Musiteca touch the icon “music
library”.
It will appear two icon, “music list” and “playlist”
“music list”
“playlist”
- Music list
Touch "music list" icon to view all music stored on Musiteca.
Touch an alum cover to view the album dettail.
The white circle indicate "selected track".
Touch single track to invert select mode (select / deselect).
Touch the album cover to invert all tracks selection
Touch the play label on the lower part of the screen to see the widget Play, the music controller.
Widget Play
After the selection of all tracks, three mode of playning are available by three icon on the right side, respectively:
insert the selected music into playlist onair and listen immediately
insert the selected music into playlist onair after the current track
insert the selected music into playlist onair in the end of playlist
A rapid link to playlist onair is on widget play on top left.
To remove all track to playlist onair touch the stop icon on the widget play.
- Play list.
Touch "music list" icon to view the playlist temporary ON-AIR.
By touching one of the track change the playing order.
Touch the setting label on the lower part of the screen to see the widget setting.
touch the keyboard icon on widget setting and insert the new name.
Widget Setting
10
MUSITECA
USER INTERFACE
MAIN MENU’
1
1-MUSIC LIBRARY
2
1.1.1
alnum cover
3
1.1.2
album list
4
1.2.1
Play list detail
5
1.2.2
Playlist summary
8
2-READ CD AND RIPPING
2.1
Listen cd
10
2.2
Ripping
10
3-SETTING
11
3.1
Network
11
3.2
About
12
13
14
-!).-%.5
-USICLIBRARY
2EAD#$
3ETTING
3WITCHOFF-USITECA
FIG
MAINMENá
MOVEUPANDDOWNCONTROLVOLUM
MOVEUPANDDOWNCONTROLPLAYER
GOTOPLAYLISTONAIR
CLEARALLPLAYLISTONAIR
FIG
WIDGETPLAY
MUSICCONTROL
POSITIONTRACKCONTROL
SONGONAIR
ARTISTONAIR
COVERALBUMONAIR
FIG
WIDGETVOLUM
-53)#,)"2!29
0LAYLIST/N!IR
-USICSTORE!LBUM#OVER
FIG
MENáSTORE
!,"5-#/6%2
FIG
COVERALBUM
0LAYLIST/N!IR
FIG
PLAYLISTDETTAIL
!,"5-#/6%2
&ILTER'ENRE
&ILTER!RTIST
REMOVEFILTER
FIG
COVERALBUMICON
MAINMENá
SWITCHALBUMLIST
MUSICLIBRARY
SELECTDESELECTALLTRACK
SELECTDESELECTSINGLETRACK
PLAYNOW
PLAYAFTER
PLAYEND
FIG
!LBUMDETTAIL
!LBUM#OVER
ADDSONGSELECTED
TOPLAYLIST/N!IR
!,"5-,)34
ACTIVEFILTER
REMOVEFILTER
FIG
ALBUMLIST
SWITCHALBUMCOVER
FIG
ALBUMLISTSELECT
SELECTALBUM
WHENWESELECTEDANITEMAUTOMATICALYITFILTERTHECOLUMNONTHERIGHT
)FONEFILTERISACTIVEALLTRACKIN3ONGSCOLUMNCANTOBEADDTOPLAYLIST/N!IR
)NOTHERWAYYOUCANSELECTONEBYONETHESONGANDADDTHEM
4HISACTIONCANTOBEREPEATINANYMOMENTSOISPOSSIBLETOCREATE
THEPLAYLISTgSSONGSORDER
0,!9,)34$%44!),
FIG
PLAYISTWIDGETEDIT
CHAGENAMEPLAYLISTONAITTOSAVEFIG
REMOVETRACKFROMPLAYLISTFIG
ADDTRACKTOPLAYLISTFIG
CHOSEYOURSONGANDPRESS
ADDBOTTON4HISACTIONCAN
TOBEREPEATMORETIMETO
DEFINETHETRACKSORT
4OCOMPLETETHEFUNCTION
PRESSFINISCHBOTTON
FIG
PLAYLISTADDSONG
CHOSEYOURSONGANDPRESS
DELETEBOTTON4HISACTION
REMOVEONLYTHELINKTO
PLAYLISTNOTREMOVEFROM
STORE
FIG
PLAYLISTREMOVESONG
0,!9,)34$%44!),
CHAGENAMEPLAYLISTONAITTOSAVEFIG
FIG
0LAYLISTDETTAIL
CURRENTSONG
CHANGINGTHENAMETO
PLAYLISTONAIRISEQUALTO
SAVEITWHITNEWNAME
FIG
FIG
0LAYLISTRENAME
FIG
0LAYLISTRENAME
0,!9,)34$%44!),
2%,!8
SELECTSTARTERTRACKTOADD
FIG
ADDLAYLIST
2%,!8
4OADDONPLAYLISTONAIR
SELCTPLAYLISTFROMPLAYLIST
SUMMARYSELECTTHEFIRST
TRACKTOPLAY
FIG
ADDLAYLIST
2%,!8
4HROUGHWIDGETPLAYSELECT
THEINSERTMODEMODEFIG
PLAYNOW
PLAYAFTER
FIG
ADDPLAYLIST
PLAYEND
0,!9,)3435--!29
SELECTTOOPEN
PLAYLISTSDETTAIL
FIG
PLAYLISTSUMMARY
FIG
PLAYLISTSUMMARY
WIDGETEDIT
CHAGENAMEPLAYLISTFIG
REMOVEPLAYLISTFIG
ADDNEWPLAYLISTFIG
FIG
PLAYLISTSUMMARY
CHANGENAME
0,!9,)3435--!29
THISACTIONREMOVEONLYTHE
PLAYLISTNOTREMOVETHE
RELATIVESONGTOMUSICSTORE
FIG
PLAYLISTSUMMARY
DELETE
.%70,!9,)34
FIG
NEWPLAYLIST
POP
%NTERINNEWPLAYLISTAND
ADDTRACKFIG
VIAGGIO
ARTIST
NIGTH
FIG
NEWPLAYLIST
#$
AFTERINSERTCDINTOMUSITECA
APPEAREJECTBOTTONAND
2EAD#$BOTTONCHANGE
VISIBILITYWHENTHECDIS
READY
FIG
RIPPING
PRESSTOVIEWCDPLAYERCONTROLL
,)34%.#$
PRESSTORIPPINGCD
)SPOSSIBLEPLAY#$OR
2IPPING-ETADATEWILLBE
AUTOMATICDOWNLOADFROM
INTERNETONLYIF-USITECAIS
CONNECTIONTOINTERNET
)FCDISINPLAYINGTHEONAIR
CHANGESTATUSTOh0AUSEv
FIG
PLAYCD
2)00).'#$
2IPPING3ATUS
FIG
RIPPING
!"/54
-USITECASOFTWEARVERSION
4OUCHTOSENDFEEDBACKABOUT
YOURSYSTEM
)FHANN
FIG
!BOUT
FIG
3ENDFEEDBACK
02%&%2%.#%-53)4%#!
FIG
PREFERENCE
.%47/2+
FIG
NETWORKING
INDEX
Congratulation
2
Important safety instruction
3
About your unit
4
Dimension
5
Connection & control
6
Main specification
8
Get started
10
User Interface
11
11
Pathos Acoustics srl
Via Palù 50/52
36040 Grumolo delle Abbadesse
Vicenza
ITALIA
www.pathosacoustics.com
12