1
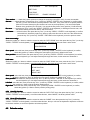
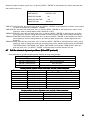
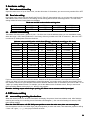
1
Catalogue
Production
Production-------------------------------------------------------------------------------------------------------------------------------------3
Note / Warning / Friendly suggestion
Installation and connection
connection--------------------------------------------------------------------------------------------------------------4
Indoor & Outdoor IR High Speed Dome Camera
Camera----------------------------------------------------------------------------------5
1. Features
2. Mounting size drawing
2.1 Wall mount
2.2 Hoisting mount----------------------------------------------------------------------------------------------------------------------------6
3. Hardware setting
3.1 Dial codes switch setting
3.2 Baud rate setting
3.3 Address codes setting
4. OSD menu setting
setting------------------------------------------------------------------------------------------------------------------------7
4.1 Menu setting operating introductions
4.2 Basic introduction
4.2.1 Select item
4.2.2 Parameters setting operation
4.3 System setting of the dome camera
4.3.1 Info display setting-----------------------------------------------------------------------------------------------------------------8
4.3.2 System act setting
4.4 Camera setup------------------------------------------------------------------------------------------------------------------------------9
4.5 PAN setup-------------------------------------------------------------------------------------------------------------------------------- 10
4.5.1 Scan setup / Pattern scan setting / Tour scan setting / Auto scan setting
4.5.2 Auto flip function------------------------------------------------------------------------------------------------------------------11
4.5.3 Home (Fixed) position
4.6 Calendar setup
4.7 Call the shortcut of preset positions (Pelco-D/P protocol)--------------------------------------------------------------------12
Indoor & Outdoor Normal High Speed Dome Camera (W/O IR) ------------------------------------------------------------13
1. Features
2. Mounting size drawing
2.1 Wall mount
2.2 hoisting mount
3. hardware setting ------------------------------------------------------------------------------------------------------------------------14
3.1 Dial codes switch setting
3.2 Baud rate setting
3.3 Address codes setting
4. OSD menu setting
4.1 menu setting operating introductions
4.2 Basic introduction ----------------------------------------------------------------------------------------------------------------------15
4.2.1 Select item
4.2.2 Parameters setting operation
4.3 System setting of the dome camera
4.3.1 Info display setting
4.3.2 System act setting---------------------------------------------------------------------------------------------------------------16
4.4 Camera setup
4.5 PAN setup -------------------------------------------------------------------------------------------------------------------------------18
4.5.1 Scan setup
4.5.2 Auto flip function-----------------------------------------------------------------------------------------------------------------19
4.5.3 Home (Fixed) position
4.6 Calendar setup
4.7 Call the shortcut of preset positions (Pelco-D/P protocol)-------------------------------------------------------------------20
Clean the dome cover
Notes for maintain / Lightning protection / Simple sheet for check faults
faults---------------------------------------------21
SONY zoom module menu for reference ------------------------------------------------------------------------------------------23
LG zoom module menu for reference
reference-----------------------------------------------------------------------------------------------24
CNB zoom module menu for reference
reference---------------------------------------------------------------------------------------------25
SAMSUNG zoom module menu for reference
2
Products introduction
Thank you for using our INTELLIGENT SPEED DOME CAMERA
Our products use perfect function design of high performance digital DSP, stable performance. The key parts, we use
world famous bands, like electrical motor, zoom module, electrical ring, IR lights components. With the perfect electrical
circuit design and convenient installation method, make it can tracing objectives fast and correctly. It can monitor all
locations in 24 hours. The skillful design of hardware reducing failure rate as its possible. The human design of software
make the operation become simple and convenient. These advantages make the system become convenient for
installation, using, maintaining, and working stably. We believe our products have excellent performance, so it can be
the best in the industry! These products can be applicable to intelligent building, bank security protection, city roads,
airport, quay, station, residential district, industrial factory and mine and so on. It can meet various demands, in
anywhere, and various moving targets.
Notes
A. Please read the installation instructions before you operate it;
B. Please comply with safe operating instructions when you operate it;
C. Only professional and experienced worker can operate the installation and maintain works of it;
D. Please use reliable tools, those tools which of poor quality maybe causing dangerous situation;
E. Please ensure the installation and using environment is in line with our products demands;
F. Please check the space for install the supporter, including strength and toughness, the weight support capacity of
substrate at least up to 5 multiples of both products and parts;
G. Please save the packaging of product, in order to package and transport it in the future.
Warning
A. Don't put it near to inflammable and explosive things, please keep it far away dangerous areas;
B. Don't put it on the unstable or supporter;
C. Don't let any foreign material and liquid into the machine, that will damage it;
D. Don't try to use wrong power or adaptor to supply electricity, it's power voltage is DC 12V;
E. Please recognize the RS-485 control wire;
F. Don't try to supply power for it before you have not finish the installation;
G. Don't try to take it apart to repair;
H. Don't use corrosive cleaner to clean it;
I. Please don't let the camera face to strong light directly, like strong lamp light, strong sunlight, etc. Otherwise its
CCD maybe damaged forever;
J. Please do not let it bear weight pressure or strong hit, and strong shake;
K. Please read the introductions carefully before you operate it.
Friendly suggestions
1. Please use high quality and safe power supply, our standard power adaptor should be near to the camera, the best
distance is within 3m, to avoid too much attenuation, please make sure your power supply is enough.
2. We suggest you to use high quality wires for both power and transmission, and avoid to tie a knot wires, please try
your best to wiring smoothly, sometimes you have to connect many wires together, please be careful to make the
connection point be perfect, don't think one core is not important, don't just tie them together, please make all cores
one-to-one. Please consider to add electronic resistance and UPS when you find the power supply is not normal.
3. Please never carry the wire which is outside the dome, and don't let that wire to bear the camera weight.
4. We suggest you’d better to do some grounding and lightning protection measures, because speed dome camera
have control cable, it is easier to be hit by thunder and lightning than other normal camera.
3
Installation and connection
Notes before installation
1.Installation must by the professional technicians or someone which have qualification.
2.Detailed wiring method please reference the installation sketch map and the install introductions.
3.When you installing camera, please use clean gloves, and avoid to use metal/strong objects/hands to touch the
dome or its cover, in order to avoid damage the cover and affect image quality.
4.After you finish the installation, please use soft and clean cloth or towel to clean the transparent cover carefully,
unclean fingers will make smudges on the cover, then will affect the image to be unclear.
Installation requirements
�
Please check the accessories are complete before installation;
�
Before installation, please make sure the camera's using place and installation method are meet the requirement of
the machine.
�
Installation must operated by professional worker, and should comply with related rules, in order to avoid faults.
�
You must to use right installation tools, like screwdriver etc, please check the dial code switch is right or not.
Installation method
The installation place or wall must be strong and no constructing problems, the weight support capacity of installing
place at least up to 4 multiples of both products and parts, including the supporter, in order to avoid camera fall down
due to it's unstable.
Installation steps
a.
Take out the supporter from box, draw a central position of the drilling hole on the wall;
b.
Use M8 electrical hammer to dill 4 holes on the position that out of the central position, then fix M6 screws in it;
c.
Insert the wires from supporter top into the supporter inside, leave enough length for the connecting wire;
d.
Put 4 holes of the supporter on those 4 screws, fix gaskets, screw those 4 screws, then fix the supporter and
camera on the wall;
e.
Clean the cover after installation.
External wiring connection
�
Put the BNC video interface connecting to the fixed video wire;
�
Put the power wire connecting to the fixed power wire (DC12V/5A);
�
Put the RS 485 control wire connecting to the fixed control RS 485wire,.please check the positive and negative of
RS 485wire, make its in accordance with the remarking connection method on the wire head, if you make its
converse, it can't get communication. A is positive of RS485 wire ( generally be orange ), B is negative of RS485
wire ( generally be yellow ).
�
Please check the whole routes after you connect every wires, including: The polarity and connecting method of
power and control wires. If you are sure they all are right, you can turn on the power. The camera will checking
itself after turn on power. It will rotating 360° in horizontal firstly, then rotating 90° in vertical. At the same time,
every checking informations will display on the screen, like the address, communicating speed rate, camera. After
finish all checking, it will stop, this means it's finished checking and waiting for your controlling.
4
Indoor & Outdoor IR High Speed Dome Camera
1. Features
�
128 accurate preset positions, 2 pattern scan routes, 4 tour routes, 1 fixed monitoring position
�
Display PTZ direction and zoom number, and temperature
�
English OSD menu for operation.
�
RS-485 communication, auto identify protocol of Pelco D / Pelco P
�
Address codes range: 1~255
�
Baud rate: 2400/4800/9600/19200, set by dial codes
�
Horizontal rotating range: 0° –360° continuously
�
Horizontal rotating speed: 0° –220° /sec
�
Vertical rotating speed: 0° ~100° /sec, auto flip
�
Working temperature: -20° C--+75° C
�
Working humidity: less than 95%
�
Waterproof cover level: IP65
�
Built-in constant temperature control system
�
Installation methods: Hoisting installation, wall mounted installation
�
Power: DC12V/ 5A power supply.
2. Mounting size drawing
2.1 Wall mount
5
2.2 Hoisting mount
3. hardware setting
3.1 Dial codes switch setting
Open the codes cover on top of dome cover, see the dial codes of 10 numbers, you can turn every number ON or OFF
3.2 Baud rate setting
High speed dome camera can auto identify the Pelco-D / Pelco-P, then starting work, so you just need to set baud rate
and address codes of the camera, it can starting normal working. Baud rate can set through the 9th ~10th dial codes,
setting method as below: factory default as 2400bps.
Baud rate and dial codes switch matching sheet
Dial codes
No. 9
No. 10
2400 bps
OFF
OFF
4800 bps
ON
OFF
9600 bps
OFF
ON
19200 bps
ON
ON
3.3 Address codes setting
10numbers dial codes switch, (picture 01) No.1~ No.8 are use to set the address codes, you can set address codes
within the range 1~256, factory default as 1. Use binary, dial every number to be "ON" is means as 1, dial to be "OFF"
is means as 0, details please reference the sheet.
Address codes and dial codes switch sheet (Binary
Binary)), calculate it according to this sheet
Binary
Add
Binary
Add
Binary
Add
Binary
Add
0000000
0
11110000
15
01111000
30
10110100
45
10000000
1
00001000
16
11111000
31
01110100
46
01000000
2
10001000
17
00000100
32
11110100
47
11000000
3
01001000
18
10000100
33
00001100
48
00100000
4
11001000
19
01000100
34
10001100
49
10100000
5
00101000
20
11000100
35
01001100
50
01100000
6
10101000
21
00100100
36
11001100
51
11100000
7
01101000
22
10100100
37
00101100
52
00010000
8
11101000
23
01100100
38
10101100
53
10010000
9
00011000
24
11100100
39
01101100
54
01010000
10
10011000
25
00010100
40
11101100
55
11010000
11
01011000
26
10010100
41
00011100
56
00110000
12
11011000
27
01010100
42
10011100
57
10110000
13
00111000
28
11010100
43
01011100
58
01110000
14
10111000
29
00110100
44
11011100
59
6
If you use other equipments to control the camera, because of the protocol limitation, some special function maybe
cannot use. When you use other equipments to control the camera, you need to set the protocol (auto identify), baud
rate, address codes to be right. Different factories have different address codes, so sometimes you need to add 1 or cut
1 when you setting address codes. For example, you set the address code of camera to be 2, then you need to set
DVR controlling address code to be 3 or 1, then you can control it.
Remarks: alarming output switch always opening, K1~K8 are use to connect outside input signal
4. OSD menu setting
4.1 menu setting operating introductions
When the camera power on, its basic informations will display, like protocol, baud rate, address code. After finish the
checking and accept your controlling, these informations will disappear. ( user can see all setting info at here ) OSD
menu setting method:
Enter the main OSD menu: call #59 / #95 preset position to enter the main menu, then can set every item.
Use the keyboard: call 59 / 95 number keys (call preset position) to enter main menu, then shake the joystick to shift up
/ down / left / right ( ←↑→↓ ), every keys functions as below:
No.
menu setting functional keys
Original functions of the keyboard
Functions after enter the OSD menu
1
2
3
4
5
6
joystick: up
joystick: down
joystick: left
joystick: right
Iris close/ Iris (Iris - )
Iris open/ Iris (Iris + )
Menu cursor: up
Menu cursor: down
Menu cursor: left
Menu cursor: right
Menu: back
Menu: enter
4.2 Basic introduction
4.2.1 Select item
Use the keyboard: call 59# / 95 # preset position to enter main menu, then see a sheet as below:
Use the joystick up / down to select item, then press the key "Iris+" (or the key "OPEN" / "ENTER" on the keyboard ) to
confirm select this item, or enter the next sub menu:
Change the language to be English: move the joystick down to the bottom, press the key "Iris+" (or the key "OPEN"
on the keyboard ) to confirm select the item of "LANGUAGE", shake the joystick to change language to be "ENGLISH".
SYSTEM
SETUP
CAMERA
SETUP
PAN
SETUP
CALENDAR
LANGUAGE
ENGLISH
4.2.2 Parameters setting operation
Shake the joystick up / down to change number of every item, press the key "Iris+" (or the key "OPEN" / "ENTER" on
the keyboard ) to confirm select this item and save this setting.
Press the key "Iris-" (or key "CLOSE" / "RETURN" on the keyboard ) to exit this menu, or back to the previous menu.
4.3 System setting of the dome camera
Shake the joystick up / down to make the cursor be under the "SYSTEM SETUP" item, then press the key "Iris+" (or the
key "OPEN" / "ENTER" on the keyboard ) to confirm select this item, or enter the next sub menu: as the sheet:
INFO DISPLAY
SYSTEM ACT
SET DOME TITLE
7
4.3.1 Info display setting
Shake the joystick up / down to make the cursor be under the "INFO DISPLAY" item, then press the key "Iris+" (or the
key "OPEN" / "ENTER" on the keyboard ) to confirm select this item, or enter the next sub menu: as the sheet:
TITLE INFO
OFF
COORDINATE
OFF
TEMPERATURE
OFF
Shake the joystick up / down to select, then press the key "Iris+" (or the key "OPEN" / "ENTER" on the keyboard ) to
confirm select this item.
CAMERA
TITLE
ON / OFF
COORDINATE
ON / OFF
TEMPERATURE
ZOOM
ON / OFF
OFF
Press the key "Iris+" (or the key "OPEN" / "ENTER" on the keyboard ) to confirm select this item, then shake the
joystick up / down, you can select "DISPLAY" or "OFF". Finish the setting select, press the key "Iris+" (or the key
"OPEN" / "ENTER" on the keyboard ) to confirm and save your set value. You can press the key "Iris-" (or the key
"CLOSE" / "RETURN" on the keyboard ) to exit this menu , and back to the previous menu.
4.3.2 System act setting
Shake the joystick up / down to make the cursor be under the "SYSTEM ACT" item, then press the key "Iris+" (or the
key "OPEN" / "ENTER" on the keyboard ) to confirm select this item, or enter the next sub menu: (as the sheet:)
POWER UP ACT
NOTHING
LEISURE ACT
NOTHING
LEISURE TIME
003~240
(SECONDS)
RESET
Power up act
act:: means after camera power on and finish checking, the action that users want it to do, the factory default
is "nothing (no any action)":
Shake the joystick up / down to make the cursor under the "POWER UP ACT" item, press the key "Iris+" (or the key
"OPEN" / "ENTER" on the keyboard ) to confirm select this item, then shake joystick up / down to select what action you
want, there are 10 options can be selected: nothing / pattern scan route / cruise route scan / limiting position scan/ auto
scan/ fixed position scan (home). Select one, then press the key "Iris+" (or the key "OPEN" / "ENTER" on the keyboard )
to confirm and save your set value. You can press the key "Iris-" (or the key "CLOSE" / "RETURN" on the keyboard ) to
exit this menu, and back to the previous menu.
Leisure act
act:: means the camera haven't any actions after a period of time which you set, if you don't control it beyond
this time, it will auto working a action you set before. The factory default is "nothing":
Shake the joystick up / down to make the cursor be under the "LEISURE ACT" item, then press the key "Iris+" (or the
key "OPEN" / "ENTER" on the keyboard ) to confirm select this item, then shake joystick up / down to select what action
you want, there are 10options can be selected: nothing / pattern scan route / cruise route scan / limiting position scan /
auto scan / fixed position scan. Select one, then press the key "Iris+" (or the key "OPEN" / "ENTER" on the keyboard )
to confirm and save your set value. You can press the key "Iris-" (or the key "CLOSE" / "RETURN" on the keyboard ) to
exit this menu , and back to the previous menu.
Leisure time: (factory default is "30 seconds")
Shake the joystick up / down to make the cursor be under the "LEISURE TIME" item, then press the key "Iris+" (or the
key "OPEN" / "ENTER" on the keyboard ) to confirm select this item, then shake joystick up / down to select time
(3~240 seconds). Finish the setting select, press the key "Iris+" (or the key "OPEN" / "ENTER" on the keyboard ) to
confirm and save your set value. You can press the key "Iris-" (or the key "CLOSE" / "RETURN" on the keyboard ) to
exit this menu, and back to the previous menu.
Reset:
Shake the joystick up / down to make the cursor be under the "SYSTEM RESET" item, then press the key "Iris+" (or the
key "OPEN" / "ENTER" on the keyboard ) to confirm select this item, then screen appears "?", you need to enter the
8
camera secret codes, then press the key "Iris+" (or the key "OPEN" / "ENTER" on the keyboard ) to confirm, 2 seconds
later, the camera will restore to factory defaults.
Set camera title:
Shake the joystick up / down to make the cursor be under the "SET DOME TITLE" item, then press the key "Iris+" (or
the key "OPEN" / "ENTER" on the keyboard ) to confirm select this item, then screen appears "?", shake the joystick up
/ down to select the letters (a~z, A~Z) and numbers (0~9) you want, move the joystick left or right will move the cursor
location, then press the key "Iris+" (or the key "OPEN" / "ENTER" on the keyboard ) to confirm.
4.4 Camera setup
Shake the joystick up / down to make the cursor be under the "camera setup" item, different camera have different
parameters for selection, different modules have different menu. Our standard module menu generally as below:
MENU
TIR16
F RANGE: 5M / 3M / 1M
CAMERA ID: 000 (optional)
ID DISPLAY: OFF / ON
FOCUS: AUTO / MANUAL
ZOOM START: 01 (changeable)
ZOOM END: 23 (changeable)
BLC: ON/OFF
ID:
FOCUS:
WHITE BALANCE:
AGC:
MODE:
MENU MODE:
IR LIGHT:
INITIALIZE: OFF
EXIT
1
After enter the main menu, you can choose these menu items as below by the key "zoom" (the key "zoom" original
function is for change the image zoom definition ), or use the joystick, use "focus" to change value.
F RANGE: 5M /3M /1M--------the range of the FOCUS
CAMERA ID: 000:--------000-255(selectable by useing the key "zoom")
ID DISPLAY: ON/OFF:--------"ON" means display, "OFF" means no display(selectable by useing the key "zoom")
FOCUS: MANUAL/AUTO: --------manual zoom (defaults)/ auto zoom(selectable by useing the key "zoom")
ZOOM START: 01:--------default is 01X,(selectable by useing the key "zoom")
ZOOM END: 23:--------default is 23X,(selectable by useing the key "zoom")
BLC: ON/OFF:--------back light compensation is selectable,ON/OFF(selectable by useing the key "zoom")
RESET:--------restore factory settings
EXIT:--------return
ID: --------ID of every camera, in order to control all cameras more conveniently, from 1~255
FOCUS:
FOCUS MODE----AUTO: real time, default; MANU: manual focus; PUSH: find image clear point when the zoom
stopping, then focus, will not focus again. (MANUAL MODE, if change zoom, focus mode will auto change to AUTO
FOCUS MODE; AUTO MODE, if change zoom, focus mode will auto change to MANUAL FOCUS MODE)
FOCUS DISTANCE----5 / 20 CM / 1M
INITIALIZE----5K / 15K / 25K / 35K / EXEC / OFF (in order to solve lens lose steps, when it focus certain times, the
module will auto check itself again, EXEC means REBOOT AND SELFCHECK)
ZOOM START----1, means the zoom starting time of the zoom module
ZOOM END----30, mean the biggest zoom times of the zoom module (initialization can clear this set)
EXIT
WHITE BALANCE:
MODE----AUTO / SPECIAL / WAWB / OUTDOOR / INDOOR
R----1~255
B----1~255
EXIT
AGC:
AGC----AUTO / MANU
LEVEL----1~16
BEIGHTNESS----AUTO / 1~15
SHUTTER----AUTO / 1/50~10K
EXIT
MODE:
9
BLC----ON / OFF
D/N----AUTO / DAY / NIGHT
MIRROR----ON / OFF
Don't change this protocol, otherwise you can not control the PTZ anymore
PROTOCOL----VISTA / PELCO D (Don't
anymore)
EXIT
MENU MODE:
LANGUAGE----CHS/ENG
MODE----PUSH / OFF / ON
ID----OFF / ON
FOCUS----OFF / ON
EXIT
IR LIGHT:
FUNCTION (MODE)----OFF / ON
IR LIGHT (LEVEL)----1 / 2 / 3 (IR light turn on set)
SWITCH----OFF / ON
ZOOM STAR----1 (changeable)
ZOOM END----30 (changeable)
EXIT
INITIALIZE: ON / OFF
EXIT
4.5 PAN setup
Shake the joystick up / down to make the cursor be under the "PAN SETUP" item, then press the key "Iris+" (or the key
"OPEN" / "ENTER" on the keyboard ) to confirm select this item, and enter the next sub menu: as the sheet:
SCAN SETUP
AUTO FLIP
HOME PLACE
4.5.1 Scan setup
setup::
Shake the joystick up / down to make the cursor be under the "SCAN SETUP" item, then press the key "Iris+" (or the
key "OPEN" / "ENTER" on the keyboard ) to confirm select this item, and enter the next sub menu: as the sheet:
PATTERN SCAN
TOUR SCAN
AUTO SCAN
LIMIT SCAN
Pattern scan setting:
Shake the joystick up / down to make the cursor be under the "PATTERN SCAN" item, then press the key "Iris+" (or the
key "OPEN" / "ENTER" on the keyboard ) to confirm select this item, and enter the next sub menu: (as the sheet:)
PATTERN NUMBER
001 / 002
SET PATTERN
RUN PATTERN
USED STATE
ENABLE / DISABLE
Pattern number
number--------shake the joystick up/down to change the scanning routes,(001—002), 2 routes are settable.
Set pattern
pattern--------select this item, then press the key "Iris+" (or the key "OPEN" / "ENTER" on the keyboard ) to confirm
select this item, start to set route.(can remember route within 15 minutes, pattern your scan route)
Run pattern
pattern--------select this item, then press the key "Iris+" (or the key "OPEN" / "ENTER" on the keyboard ) to
confirm select this item, now the camera starting pattern scan action, and exit all menu.
Used state
state--------select this item, then press the key "Iris+" (or the key "OPEN" / "ENTER" on the keyboard ) to confirm
select this item, shake the joystick up / down to select use this route or don't use. After finish the set, press the key "Iris" (or the key "CLOSE" / "RETURN" on the keyboard ) to exit this menu , and back to the previous menu.
Tour scan setting:
Shake the joystick up / down to make the cursor be under the "TOUR SCAN" item, then press the key "Iris+" (or the key
"OPEN" / "ENTER" on the keyboard ) to confirm select this item, and enter the next sub menu: as the sheet:
10
TOUR NUMBER
001 ~ 004 optional
SET TOUR
RUN TOUR
USED STATE
ENABLE / DISABLE
Tour number
number--------shake the joystick up/down to change the scanning routes,(001—004), 4 routes are settable.
Set tour
tour--------select this item, press the key "Iris+" (or the key "OPEN" / "ENTER" on the keyboard ) to confirm select
this item, you can set continuous preset positions in this route, every route can set 16 preset positions
(Note: this function shortcut key and number can't use as preset positions ). You can set the speed
between every positions (50~128 level). You can set the stay time of every position (1~240 seconds).
Run tour
tour--------press the key "Iris+" (or the key "OPEN" / "ENTER" on the keyboard ) to working this cruise scan, now
the camera starting cruise scan action, and exit all menu.
Used state
state--------select this item, then press the key "Iris+" (or the key "OPEN" / "ENTER" on the keyboard ) to confirm
select this item, shake the joystick up / down to select use this route or don't use. After finish the set,
press the key "Iris" (or the key "CLOSE" / "RETURN" on the keyboard ) to back to previous menu.
Auto scan setting:
Shake the joystick up / down to make the cursor be under the "AUTO SCAN" item, then press the key "Iris+" (or the key
"OPEN" / "ENTER" on the keyboard ) to confirm select this item, and enter the next sub menu: as the sheet:
SCAN SPEED
060
SCAN POSITION
Scan speed
speed: select this item, then press the key "Iris+" (or the key "OPEN" / "ENTER" on the keyboard ) to confirm,
shake the joystick up / down to change the scan speed (10~80 level), default is 60th level.
Scan position
position: select this item, then press the key "Iris+" (or the key "OPEN" / "ENTER" on the keyboard ) to confirm,
use the keyboard, you can adjust camera pitch angle and zoom, let the camera to remember it.
Limit scan:
Shake the joystick up / down to make the cursor be under the "LIMIT SCAN" item, then press the key "Iris+" (or the key
"OPEN" / "ENTER" on the keyboard ) to confirm select this item, and enter the next sub menu: as the sheet
SCAN SPEED
060
SCAN POSITION
LEFT LIMIT
RIGHT LIMIT
Scan speed
speed: select this item, then press the key "Iris+" (or the key "OPEN" / "ENTER" on the keyboard ) to confirm,
shake the joystick up / down to change the scan speed (10-80 level), default is 60th level.
Scan position
position: elect this item, then press the key "Iris+" (or the key "OPEN" / "ENTER" on the keyboard ) to confirm,
use the keyboard, you can adjust camera pitch angle and zoom, let the camera to remember it.
Left limit
limit: select this item, then press the key "Iris+" (or the key "OPEN" / "ENTER" on the keyboard ) to confirm, shake
the joystick up / down to set the position (starting point).
Right limit
limit: select this item, then press the key "Iris+" (or the key "OPEN" / "ENTER" on the keyboard ) to confirm,
shake the joystick up / down to set the position (ending point).
4.5.2 Auto flip function
Shake the joystick up / down to make the cursor be under the "AUTO FLIP" item, then press the key "Iris+" (or the key
"OPEN" / "ENTER" on the keyboard ) to confirm select this item, select ON/OFF, the factory default is ON.
4.5.3 Home (Fixed) position
Shake the joystick up / down to make the cursor be under the "HOME " item, then press the key "Iris+" (or the key
"OPEN" / "ENTER" on the keyboard ) to confirm select this item, then you can use the keyboard to adjust the camera to
be the best condition, to set a fixed position as its home position.
4.6 Calendar setup
11
Shake the joystick to operate, press "Iris+" (or the key "OPEN" / "ENTER" on the keyboard ) to confirm select this item,
and enter the sub menu.
TIME SET
TIME DISPLAY
DISPLAY / OFF
TIMING ACTION NO.
001
TIMING ACTION TIME
010
TIMING ACTION
NOTHING
TIME SET: select this item, then press "Iris+" (or the key "OPEN" / "ENTER" on the keyboard ) to confirm, move joystick
up / down to change time (YY/MM/DD HH:MM)
TIME DISPLAY: select this item, then press "Iris+" (or the key "OPEN" / "ENTER" on the keyboard ) to confirm, move
joystick up / down to change display mode, default set is "OFF".
TIMING ACTION NO.: select this item, then press "Iris+" (or the key "OPEN" / "ENTER" on the keyboard ) to confirm,
move joystick up / down to change action number for certain time (001~008), camera support 8 timing set.
TIMING ACTION TIME: select this item, then press "Iris+" (or the key "OPEN" / "ENTER" on the keyboard ) to confirm,
move joystick up / down to change the time you when you want certain action, camera support 24 hours
timing set.
TIMING ACTION: select this item, then press "Iris+" (or the key "OPEN" / "ENTER" on the keyboard ) to confirm, move
joystick up / down to change the action you want at the time you set. Camera support actions as: NOTHING
/ PATTERN SCAN / TOUR SCAN / LEF, RIGHT LIMIT SCAN / AUTO SCAN / HOME PLACE. When you
finish set, press "Iris+" (or "OPEN" / "ENTER" on the keyboard) to confirm and save your set.
4.7 Call the shortcut of preset positions (Pelco-D/P protocol)
Some shortcuts can realized by calling preset positions to using some functions:
Preset position
Function
Call 59# or 95# preset position
Enter main menu
Call 34# preset position
Back to initial position
Call 38# preset position
360° auto scan
Set 40# preset position
Delete all preset positions
Preset position number of tour scan route, and call / delete command
Tour scan route
Call command
Corresponding number of preset position
No.01
Call 41# preset position
No. 1—16# preset position
No.02
Call 42# preset position
No. 17—32# preset position
No. 03
Call 43# preset position
No. 65—80# preset position
No. 04
Call 44# preset position
No. 113—128# preset position
No. 05
Call 45# preset position
No. 129—144# preset position
No. 06
Call 46# preset position
No. 145—160# preset position
No. 07
Call 47# preset position
No. 161—176# preset position
No. 08
Call 48# preset position
No. 177—192# preset position
Preset position number of pattern scan, and call / delete command
Pattern scan route
Call command
No.01
Call 51# preset position
No.02
Call 52# preset position
Starting limit scan
Call 53# preset position
12
Indoor & Outdoor Normal High Speed Dome Camera (W/O IR)
1. Features
�
Rotating speed: horizontal 0.1°~220°/sec, vertical 0.1°~160°/sec
�
128 preset positions, some models can set camera title
�
2 scan modes, 4 cruise routes, 2 pattern scan routes
�
2 alarm input,2 alarm auxiliary switch output (need to choose when you order the product)
�
RS485 communication, auto identify protocol as Pelco D / P
�
Chinese / English OSD menu
�
�
Built-in the setting function of idle action
Display the camera location coordinates and zoom multiples
�
Waterproof cover level: IP66
�
Built-in constant temperature control system
�
2 installation methods: Drop ceiling installation, wall mounted installation
�
Working temperature: -20° C--+65° C
�
Working humidity: less than 95%
�
Power: DC12V/5A
2. Mounting size drawing
2.1 Wall mount
2.2 hoisting mount
13
3. hardware setting
3.1 Dial codes switch setting
Open the codes cover on top of dome cover, see the dial codes of 10 numbers, you can turn every number ON or OFF
3.2 Baud rate setting
High speed dome camera can auto identify the Pelco-D / Pelco-P, then starting work, so you just need to set baud rate
and address codes of the camera, it can starting normal working. Baud rate can set through the 9th ~10th dial codes,
setting method as below: factory default as 2400bps.
Baud rate and dial codes switch matching sheet
Dial codes
No. 9
No. 10
2400 bps
OFF
OFF
4800 bps
ON
OFF
9600 bps
OFF
ON
19200 bps
ON
ON
3.3 Address codes setting
10numbers dial codes switch, (picture 01) No.1~ No.8 are use to set the address codes, you can set address codes
within the range 1~256, factory default as 1. Use binary, dial every number to be "ON" is means as 1, dial to be "OFF"
is means as 0, details please reference the sheet.
Address codes and dial codes switch sheet (Binary
Binary)), calculate it according to this sheet
Binary
Add
Binary
Add
Binary
Add
Binary
Add
0000000
0
11110000
15
01111000
30
10110100
45
10000000
1
00001000
16
11111000
31
01110100
46
01000000
2
10001000
17
00000100
32
11110100
47
11000000
3
01001000
18
10000100
33
00001100
48
00100000
4
11001000
19
01000100
34
10001100
49
10100000
5
00101000
20
11000100
35
01001100
50
01100000
6
10101000
21
00100100
36
11001100
51
11100000
7
01101000
22
10100100
37
00101100
52
00010000
8
11101000
23
01100100
38
10101100
53
10010000
9
00011000
24
11100100
39
01101100
54
01010000
10
10011000
25
00010100
40
11101100
55
11010000
11
01011000
26
10010100
41
00011100
56
00110000
12
11011000
27
01010100
42
10011100
57
10110000
13
00111000
28
11010100
43
01011100
58
01110000
14
10111000
29
00110100
44
11011100
59
If you use other equipments to control the camera, because of the protocol limitation, some special function maybe
cannot use. When you use other equipments to control the camera, you need to set the protocol (auto identify), baud
rate, address codes to be right. Different factories have different address codes, so sometimes you need to add 1 or cut
1 when you setting address codes. For example, you set the address code of camera to be 2, then you need to set
DVR controlling address code to be 3 or 1, then you can control it.
Remarks: alarming output switch always opening, K1~K8 are use to connect outside input signal
4. OSD menu setting
4.1 menu setting operating introductions
When the camera power on, its basic informations will display, like protocol, baud rate, address code. After finish the
checking and accept your controlling, these informations will disappear. ( user can see all setting info at here ) OSD
menu setting method:
Enter the main OSD menu: call #59 / #95 preset position to enter the main menu, then can set every item.
Use the keyboard: call 59 / 95 number keys (call preset position) to enter main menu, then shake the joystick to shift up
/ down / left / right ( ←↑→↓ ), every keys functions as below:
14
No.
1
2
3
4
5
6
menu setting functional keys
Original functions of the keyboard
Functions after enter the OSD menu
joystick: up
Menu cursor: up
joystick: down
Menu cursor: down
joystick: left
Menu cursor: left
joystick: right
Menu cursor: right
Iris close/ Iris (Iris - )
Menu: back
Iris open/ Iris (Iris + )
Menu: enter
4.2 Basic introduction
4.2.1 Select item
Use the keyboard: call 59# / 95 # preset position to enter main menu, then see a sheet as below:
Use the joystick up / down to select item, then press the key "Iris+" (or the key "OPEN" / "ENTER" on the keyboard ) to
confirm select this item, or enter the next sub menu:
Change the language to be English: move the joystick down to the bottom, press the key "Iris+" (or the key "OPEN"
on the keyboard ) to confirm select the item of "LANGUAGE", shake the joystick to change language to be "ENGLISH".
SYSTEM
SETUP
CAMERA
SETUP
PAN
SETUP
CALENDAR
LANGUAGE
ENGLISH
4.2.2 Parameters setting operation
Shake the joystick up / down to change number of every item, press the key "Iris+" (or the key "OPEN" / "ENTER" on
the keyboard ) to confirm select this item and save this setting.
Press the key "Iris-" (or key "CLOSE" / "RETURN" on the keyboard ) to exit this menu, or back to the previous menu.
4.3 System setting of the dome camera
Shake the joystick up / down to make the cursor be under the "SYSTEM SETUP" item, then press the key "Iris+" (or the
key "OPEN" / "ENTER" on the keyboard ) to confirm select this item, or enter the next sub menu: as the sheet:
INFO DISPLAY
SYSTEM ACT
SET DOME TITLE
4.3.1 Info display setting
Shake the joystick up / down to make the cursor be under the "INFO DISPLAY" item, then press the key "Iris+" (or the
key "OPEN" / "ENTER" on the keyboard ) to confirm select this item, or enter the next sub menu: as the sheet:
TITLE INFO
OFF
COORDINATE
OFF
TEMPERATURE
OFF
Shake the joystick up / down to select, then press the key "Iris+" (or the key "OPEN" / "ENTER" on the keyboard ) to
confirm select this item.
CAMERA
TITLE
ON / OFF
COORDINATE
ON / OFF
TEMPERATURE
ZOOM
ON / OFF
OFF
Press the key "Iris+" (or the key "OPEN" / "ENTER" on the keyboard ) to confirm select this item, then shake the
joystick up / down, you can select "DISPLAY" or "OFF". Finish the setting select, press the key "Iris+" (or the key
15
"OPEN" / "ENTER" on the keyboard ) to confirm and save your set value. You can press the key "Iris-" (or the key
"CLOSE" / "RETURN" on the keyboard ) to exit this menu , and back to the previous menu.
4.3.2 System act setting
Shake the joystick up / down to make the cursor be under the "SYSTEM ACT" item, then press the key "Iris+" (or the
key "OPEN" / "ENTER" on the keyboard ) to confirm select this item, or enter the next sub menu: (as the sheet:)
POWER UP ACT
NOTHING
LEISURE ACT
NOTHING
LEISURE TIME
003~240
(SECONDS)
RESET
Power up act
act:: means after camera power on and finish checking, the action that users want it to do, the factory default
is "nothing (no any action)":
Shake the joystick up / down to make the cursor under the "POWER UP ACT" item, press the key "Iris+" (or the key
"OPEN" / "ENTER" on the keyboard ) to confirm select this item, then shake joystick up / down to select what action you
want, there are 10 options can be selected: nothing / pattern scan route / cruise route scan / limiting position scan/ auto
scan/ fixed position scan (home). Select one, then press the key "Iris+" (or the key "OPEN" / "ENTER" on the keyboard )
to confirm and save your set value. You can press the key "Iris-" (or the key "CLOSE" / "RETURN" on the keyboard ) to
exit this menu, and back to the previous menu.
Leisure act
act:: means the camera haven't any actions after a period of time which you set, if you don't control it beyond
this time, it will auto working a action you set before. The factory default is "nothing":
Shake the joystick up / down to make the cursor be under the "LEISURE ACT" item, then press the key "Iris+" (or the
key "OPEN" / "ENTER" on the keyboard ) to confirm select this item, then shake joystick up / down to select what action
you want, there are 10options can be selected: nothing / pattern scan route / cruise route scan / limiting position scan /
auto scan / fixed position scan. Select one, then press the key "Iris+" (or the key "OPEN" / "ENTER" on the keyboard )
to confirm and save your set value. You can press the key "Iris-" (or the key "CLOSE" / "RETURN" on the keyboard ) to
exit this menu , and back to the previous menu.
Leisure time: (factory default is "30 seconds")
Shake the joystick up / down to make the cursor be under the "LEISURE TIME" item, then press the key "Iris+" (or the
key "OPEN" / "ENTER" on the keyboard ) to confirm select this item, then shake joystick up / down to select time
(3~240 seconds). Finish the setting select, press the key "Iris+" (or the key "OPEN" / "ENTER" on the keyboard ) to
confirm and save your set value. You can press the key "Iris-" (or the key "CLOSE" / "RETURN" on the keyboard ) to
exit this menu, and back to the previous menu.
Reset:
Shake the joystick up / down to make the cursor be under the "SYSTEM RESET" item, then press the key "Iris+" (or the
key "OPEN" / "ENTER" on the keyboard ) to confirm select this item, then screen appears "?", you need to enter the
camera secret codes, then press the key "Iris+" (or the key "OPEN" / "ENTER" on the keyboard ) to confirm, 2 seconds
later, the camera will restore to factory defaults.
Set camera title:
Shake the joystick up / down to make the cursor be under the "SET DOME TITLE" item, then press the key "Iris+" (or
the key "OPEN" / "ENTER" on the keyboard ) to confirm select this item, then screen appears "?", shake the joystick up
/ down to select the letters (a~z, A~Z) and numbers (0~9) you want, move the joystick left or right will move the cursor
location, then press the key "Iris+" (or the key "OPEN" / "ENTER" on the keyboard ) to confirm.
4.4 Camera setup
Shake the joystick up / down to make the cursor be under the "camera setup" item, different camera have different
parameters for selection, different modules have different menu. Our standard module menu generally as below:
After enter the main menu, you can choose these menu items as below by the key "zoom" (the key "zoom" original
function is for change the image zoom definition ), or use the joystick, use "focus" to change value.
16
MENU
TIR16
F RANGE: 5M / 3M / 1M
CAMERA ID: 000 (optional)
ID DISPLAY: OFF / ON
FOCUS: AUTO / MANUAL
ZOOM START: 01 (changeable)
ZOOM END: 23 (changeable)
BLC: ON/OFF
RESET
ID:
FOCUS:
WHITE BALANCE:
AGC:
MODE:
MENU MODE:
IR LIGHT:
INITIALIZE: OFF
EXIT
1
F RANGE: 5M /3M /1M--------the range of the FOCUS
CAMERA ID: 000:--------000-255(selectable by useing the key "zoom")
ID DISPLAY: ON/OFF:--------"ON" means display, "OFF" means no display(selectable by useing the key "zoom")
FOCUS: MANUAL/AUTO: --------manual zoom (defaults)/ auto zoom(selectable by useing the key "zoom")
ZOOM START: 01:--------default is 01X,(selectable by useing the key "zoom")
ZOOM END: 23:--------default is 23X,(selectable by useing the key "zoom")
BLC: ON/OFF:--------back light compensation is selectable,ON/OFF(selectable by useing the key "zoom")
RESET:--------restore factory settings
EXIT:--------return
ID: --------ID of every camera, in order to control all cameras more conveniently, from 1~255
FOCUS: FOCUS MODE----AUTO: real time, default; MANU: manual focus; PUSH: find image clear point when the
zoom stopping, then focus, will not focus again. (MANUAL MODE, if change zoom, focus mode will auto change to
AUTO FOCUS MODE; AUTO MODE, if change zoom, focus mode will auto change to MANUAL FOCUS MODE)
FOCUS DISTANCE----5 / 20 CM / 1M
INITIALIZE----5K / 15K / 25K / 35K / EXEC / OFF (in order to solve lens lose steps, when it focus certain times, the
module will auto check itself again, EXEC means REBOOT AND SELFCHECK)
ZOOM START----1, means the zoom starting time of the zoom module
ZOOM END----30, mean the biggest zoom times of the zoom module (initialization can clear this set)
EXIT
WHITE BALANCE: MODE----AUTO / SPECIAL / WAWB / OUTDOOR / INDOOR
R----1~255
B----1~255
EXIT
AGC: AGC----AUTO / MANU
LEVEL----1~16
BEIGHTNESS----AUTO / 1~15
SHUTTER----AUTO / 1/50~10K
EXIT
MODE: BLC----ON / OFF
D/N----AUTO / DAY / NIGHT
MIRROR----ON / OFF
Don't change this protocol, otherwise you can not control the PTZ anymore
PROTOCOL----VISTA / PELCO D (Don't
anymore)
EXIT
MENU MODE: LANGUAGE----CHS/ENG
MODE----PUSH / OFF / ON
ID----OFF / ON
FOCUS----OFF / ON
EXIT
IR LIGHT: FUNCTION (MODE)----OFF / ON
IR LIGHT (LEVEL)----1 / 2 / 3 (IR light turn on set)
SWITCH----OFF / ON
ZOOM STAR----1 (changeable)
ZOOM END----30 (changeable)
EXIT
INITIALIZE: ON / OFF
EXIT
17
4.5 PAN setup
Shake the joystick up / down to make the cursor be under the "PAN SETUP" item, then press the key "Iris+" (or the key
"OPEN" / "ENTER" on the keyboard ) to confirm select this item, and enter the next sub menu: as the sheet:
SCAN SETUP
AUTO FLIP
HOME PLACE
4.5.1 Scan setup
setup::
Shake the joystick up / down to make the cursor be under the "SCAN SETUP" item, then press the key "Iris+" (or the
key "OPEN" / "ENTER" on the keyboard ) to confirm select this item, and enter the next sub menu: as the sheet:
PATTERN SCAN
TOUR SCAN
AUTO SCAN
LIMIT SCAN
Pattern scan setting:
Shake the joystick up / down to make the cursor be under the "PATTERN SCAN" item, then press the key "Iris+" (or the
key "OPEN" / "ENTER" on the keyboard ) to confirm select this item, and enter the next sub menu: (as the sheet:)
PATTERN NUMBER
001 / 002
SET PATTERN
RUN PATTERN
USED STATE
ENABLE / DISABLE
Pattern number
number--------shake the joystick up/down to change the scanning routes,(001—002), 2 routes are settable.
Set pattern
pattern--------select this item, then press the key "Iris+" (or the key "OPEN" / "ENTER" on the keyboard ) to confirm
select this item, start to set route.(can remember route within 15 minutes, pattern your scan route)
Run pattern
pattern--------select this item, then press the key "Iris+" (or the key "OPEN" / "ENTER" on the keyboard ) to
confirm select this item, now the camera starting pattern scan action, and exit all menu.
Used state
state--------select this item, then press the key "Iris+" (or the key "OPEN" / "ENTER" on the keyboard ) to confirm
select this item, shake the joystick up / down to select use this route or don't use. After finish the set, press the key "Iris" (or the key "CLOSE" / "RETURN" on the keyboard ) to exit this menu , and back to the previous menu.
Tour scan setting:
Shake the joystick up / down to make the cursor be under the "TOUR SCAN" item, then press the key "Iris+" (or the key
"OPEN" / "ENTER" on the keyboard ) to confirm select this item, and enter the next sub menu: as the sheet:
TOUR NUMBER
001 ~ 004 optional
SET TOUR
RUN TOUR
USED STATE
ENABLE / DISABLE
Tour number
number--------shake the joystick up/down to change the scanning routes,(001—004), 4 routes are settable.
Set tour
tour--------select this item, press the key "Iris+" (or the key "OPEN" / "ENTER" on the keyboard ) to confirm select
this item, you can set continuous preset positions in this route, every route can set 16 preset positions
(Note: this function shortcut key and number can't use as preset positions ). You can set the speed
between every positions (50~128 level). You can set the stay time of every position (1~240 seconds).
Run tour
tour--------press the key "Iris+" (or the key "OPEN" / "ENTER" on the keyboard ) to working this cruise scan, now
the camera starting cruise scan action, and exit all menu.
Used state
state--------select this item, then press the key "Iris+" (or the key "OPEN" / "ENTER" on the keyboard ) to confirm
select this item, shake the joystick up / down to select use this route or don't use. After finish the set,
press the key "Iris" (or the key "CLOSE" / "RETURN" on the keyboard ) to back to previous menu.
Auto scan setting:
Shake the joystick up / down to make the cursor be under the "AUTO SCAN" item, then press the key "Iris+" (or the key
"OPEN" / "ENTER" on the keyboard ) to confirm select this item, and enter the next sub menu: as the sheet:
18
SCAN SPEED
060
SCAN POSITION
Scan speed
speed: select this item, then press the key "Iris+" (or the key "OPEN" / "ENTER" on the keyboard ) to confirm,
shake the joystick up / down to change the scan speed (10~80 level), default is 60th level.
Scan position
position: select this item, then press the key "Iris+" (or the key "OPEN" / "ENTER" on the keyboard ) to confirm,
use the keyboard, you can adjust camera pitch angle and zoom, let the camera to remember it.
Limit scan:
Shake the joystick up / down to make the cursor be under the "LIMIT SCAN" item, then press the key "Iris+" (or the key
"OPEN" / "ENTER" on the keyboard ) to confirm select this item, and enter the next sub menu: as the sheet
SCAN SPEED
060
SCAN POSITION
LEFT LIMIT
RIGHT LIMIT
Scan speed
speed: select this item, then press the key "Iris+" (or the key "OPEN" / "ENTER" on the keyboard ) to confirm,
shake the joystick up / down to change the scan speed (10-80 level), default is 60th level.
Scan position
position: elect this item, then press the key "Iris+" (or the key "OPEN" / "ENTER" on the keyboard ) to confirm,
use the keyboard, you can adjust camera pitch angle and zoom, let the camera to remember it.
Left limit
limit: select this item, then press the key "Iris+" (or the key "OPEN" / "ENTER" on the keyboard ) to confirm, shake
the joystick up / down to set the position (starting point).
Right limit
limit: select this item, then press the key "Iris+" (or the key "OPEN" / "ENTER" on the keyboard ) to confirm,
shake the joystick up / down to set the position (ending point).
4.5.2 Auto flip function
Shake the joystick up / down to make the cursor be under the "AUTO FLIP" item, then press the key "Iris+" (or the key
"OPEN" / "ENTER" on the keyboard ) to confirm select this item, select ON/OFF, the factory default is ON.
4.5.3 Home (Fixed) position
Shake the joystick up / down to make the cursor be under the "HOME " item, then press the key "Iris+" (or the key
"OPEN" / "ENTER" on the keyboard ) to confirm select this item, then you can use the keyboard to adjust the camera to
be the best condition, to set a fixed position as its home position.
4.6 Calendar setup
Shake the joystick to operate, press "Iris+" (or the key "OPEN" / "ENTER" on the keyboard ) to confirm select this item,
and enter the sub menu.
TIME SET
TIME DISPLAY
DISPLAY / OFF
TIMING ACTION NO.
001
TIMING ACTION TIME
010
TIMING ACTION
NOTHING
TIME SET: select this item, then press "Iris+" (or the key "OPEN" / "ENTER" on the keyboard ) to confirm, move joystick
up / down to change time (YY/MM/DD HH:MM)
TIME DISPLAY: select this item, then press "Iris+" (or the key "OPEN" / "ENTER" on the keyboard ) to confirm, move
joystick up / down to change display mode, default set is "OFF".
TIMING ACTION NO.: select this item, then press "Iris+" (or the key "OPEN" / "ENTER" on the keyboard ) to confirm,
move joystick up / down to change action number for certain time (001~008), camera support 8 timing set.
TIMING ACTION TIME: select this item, then press "Iris+" (or the key "OPEN" / "ENTER" on the keyboard ) to confirm,
move joystick up / down to change the time you when you want certain action, camera support 24 hours
timing set.
TIMING ACTION: select this item, then press "Iris+" (or the key "OPEN" / "ENTER" on the keyboard ) to confirm, move
joystick up / down to change the action you want at the time you set. Camera support actions as: NOTHING
19
/ PATTERN SCAN / TOUR SCAN / LEF, RIGHT LIMIT SCAN / AUTO SCAN / HOME PLACE. When you
finish set, press "Iris+" (or "OPEN" / "ENTER" on the keyboard) to confirm and save your set.
4.7 Call the shortcut of preset positions (Pelco-D/P protocol)
Some shortcuts can realized by calling preset positions to using some functions:
Preset position
Function
Call 59# or 95# preset position
Enter main menu
Call 34# preset position
Back to initial position
Call 38# preset position
360° auto scan
Set 40# preset position
Delete all preset positions
Preset position number of tour scan route, and call / delete command
Tour scan route
Call command
Corresponding number of preset position
No.01
Call 41# preset position
No. 1—16# preset position
No.02
Call 42# preset position
No. 17—32# preset position
No. 03
Call 43# preset position
No. 65—80# preset position
No. 04
Call 44# preset position
No. 113—128# preset position
No. 05
Call 45# preset position
No. 129—144# preset position
No. 06
Call 46# preset position
No. 145—160# preset position
No. 07
Call 47# preset position
No. 161—176# preset position
No. 08
Call 48# preset position
No. 177—192# preset position
Preset position number of pattern scan, and call / delete command
Pattern scan route
Call command
No.01
Call 51# preset position
No.02
Call 52# preset position
Starting limit scan
Call 53# preset position
Clean the dome cover
A, In order to get image with high definition, please clean the dome cover with gloves regularly. Please dismount the
cover carefully, don't be hurt, and keep your hands be dry, the sweat maybe will erode the cover.
B, Please use dry cloth.
C, Please use neutral cleaner.
Notes for maintain
1、Check every power sockets about every camera regularly.
2、Ensure every power voltage is stable.
3、Set obvious mark for camera which installed in a low position, remind else people who isn't monitor worker don
not to touch or move it.
4、Arrange a special person to manage the monitoring equipments, forbid other person to use it.
5、Should shut off the power of monitoring equipments, when the monitoring center have no person every evening.
6、Maintain the machine regularly.
20
Lightning protection
This products use TVS lightning protecting technology, it can protect the equipment in these situations: momentary
lightning striking power voltage below 1.5W, electrical surge and other pulse signal. But, if you installed the machine
outdoor, should consider practical situations, should ensure the electrical security, and do necessary protecting
measures. Like this picture:
�
Signal transfer wires should stay away from high voltage equipment or wires at least 50m distance ;
�
Wiring outdoor should choose to along under house eaves;
�
In the open zoom, please use sealed steel tube to cover land and wiring, and use the steel tube to touch the land,
forbid to wiring in the air;
�
In strong thunderstorm area, or high voltage area (like high voltage substation), must install special powerful
lightning protecting equipment, and lightning rod, and all these equipments must be installed by professional
worker;
�
The system must be electrical bonding, the earthing device must meet all professional demands both of system
and electricity, and don't connect to strong electrical net wires. When the system earthing alone, the impedance
of earthing device should be less than 4Ω, cross sectional area of earthing conducting wires must be smaller than
25mm.
21
22
Simple sheet for check faults
Faults
Possible reasons
Solution
Power wires connected wrong
Correct
Power damaged
Change
Power is not right
Change
Power wires are poor connection
Rule out
Power on, camera can
check itself and display
the image, but you
can't control it
Address codes, baud rate are wrong
Reset the address codes and baud rate
Wrong protocol
Correct
RS485 wires connected wrong or damaged
Check RS485wires connection
Self-check is abnormal,
have image but with
electrical motor
working voice
Machine faults
Repair
Camera is crooked
Move and adjust its position
Power is not enough
Change the power
Video wires are poor connection
Rule out
Power is not enough
Change the power
Video route is bearing interruption
Rule out
Camera is manual zoom mode
Change to auto zoom mode
The dome cover is dirty
Clean the dome cover
Power is not enough
Change power, you'd better put the power
near to the camera
Power on, but no
action, no image,
indicating lights off.
Image is unstable
image is unclear
Bad controlling
Check the farthest camera's controlling
resistance, see if it added into
The distance is too long, 485 signal are cut
down
Wrong operating method lead to out of the
control
Add the resistance
Use the twisted pair or add the diameter of
the wire
Power off and reboot
SONY zoom module menu for reference:
M.FOCUS (OFF / ON)----manual focus;
M.SHUTTER (OFF / ON)---- manual shutter
M.IRIS (OFF / ON)---- manual iris;
NIGHT (OFF / ON)----auto night vision mode
A.SBLC (OFF / ON)----super back light compensation;
BRIGHT (ADJ)---- brightness adjustable
WBMODE----white balance mode (6 optional);
R.GAIN (OFF / ON. ADJ)----red gain adjustable
B.GAIN (OFF / ON.ADJ)----blue gain adjustable;
SHARP (ADJ)---- sharp adjustable
ALARM----alarm (13 modes optional);
P.ZONE 1 (ON - POS - SIZE - OFF)----privacy zones
P.ZONE 2 (ON - POS - SIZE - OFF)----privacy zones;
Z.OSD (OFF / ON)----zoom displayed on the screen
D.ZOOM (OFF / ON)----digital zoom;
H.INVERT (OFF / ON)----horizontal invert
V.INVERT (OFF / ON)----vertical invert;
P.EFFECT----picture effect (negative / B&W / OFF)
F.LIMIT (00~12)----focus limit;
2P.ZOOM (OFF / ON)----2 points zoom;
.SPEED (00~07)----zoom speed
L.INIT (SET)----lens initialization
23
FREEZE (OFF / ON);
FACTORY.SET (SET)
RS 485 COMMUNICATION INTERFACE (OFF / ON)
LG zoom module menu for reference:
FOCUS SET
FOCUS MODE:AUTO / KEY / TRIGGER / MANUAL;
ZOOM START: X1 ~X22;
ZOOM SPEED: SLOW / MID / HIGH;
INITIAL SET;
FOCUS RANGE: 50CM / 1M / 3M / 5M
ZOOM STP: X2~X276 / X324 / X396 / X444
ZOOM MODE: AUTO / MANUAL / FIXED AUTO
BACK / EXIT: PREVIOUS MENU / MAIN OPTION / END
EXPOSURE SET
IRIS: AUTO / MANUAL;
AGC: OFF / LOW / MID / HIGH
WDR / BLC: OFF / WDR / BLC / STRONG LIGHT RESTRAINT;
BRIGHTNESS: 0~100;
SHUTTER: X512 / X2 / AUTO / OFF / ANTI-FLICKER / 1/160 / 1/90000
SENS-UP: OFF / AUTP / X2~ / AUTO / X128
INITIAL SET: EXIT / BACK TO PREVIOUS MENU / BACK TO MAIN OPTIONS / END
AWB SET----AUTO WHITE BALANCE
AWB: AUTO / KEY CONTROL AUTO / MANUAL----COLOR (IN / OUTDOOR) / RED (-100~100) / BLUE (-100~100) /
INITIAL SET / EXIT / BACK TO PREVIOUS MENU / BACK TO MAIN OPTIONS / END
D / N----DAY / NIGHT SWITCH
AUTO / LEVEL LOW, MID, HIGH / WAIT TIME 5, 10, 15, 30, 60 SECONDS / INITIAL SET / EXIT / BACK TO
PREVIOUS MENU / BACK TO MAIN OPTIONS / END / DAY / NIGHT / EXTERNAL CONTROL
DYNAMIC SENSE SET
OFF / ON / AREA 1~4 / STATUS: OFF, ON / WIDTH / HEIGHT / HORIZONTAL MOVE / VERTICAL MOVE /
SENSITIVITY / DYNAMIC ZOOM: OFF, X1~X23, X27, X33, X37 / INITIAL SET / EXIT / BACK TO PREVIOUS MENU /
BACK TO MAIN OPTIONS / END / DAY / NIGHT / EXTERNAL CONTROL
PRIVACY MASK ZONE SET
OFF / ON / ZONE: 1~8 / DISPLAY: OFF, ON / COLOR: BLACK, GRAY, WHITE / WIDTH / HEIGHT / HORIZONTAL
MOVE / VERTICAL MOVE / PRIVACY MASK RESTORE / INITIAL SET / EXIT / BACK TO PREVIOUS MENU / BACK
TO MAIN OPTIONS / END / DAY / NIGHT / EXTERNAL CONTROL
3D DIGITAL NOISE REDUCTION
OFF / LOW / MID / HIGH
SPECIAL SET
CAMERA ID: 0~255;
DIGITAL EFFECT: OFF / VERTICAL INVERSE / MIRROR / ROTATE
COLOR: OFF / ON;
FREEZE: OFF / ON
SHART: 0~68;
DISPLAY ON SCREEN: OFF / ON: USER NAME / ZOOM STATUS DISPLAY / FUNCTION DISPLAY / CAMERA ID
LANGUAGE: ENG / CHN;
INITIAL SET / EXIT / BACK TO PREVIOUS MENU / BACK TO MAIN OPTIONS / END
RESET
FACTORY SET;
SOFTWARE VERSION;
REBOOT;
PROTOCOL: PELCO-D / PELCO-P;
INITIAL SET / EXIT / BACK TO PREVIOUS MENU / BACK TO MAIN OPTIONS / END
EXIT
Note: If built in LG module to our speed dome, when you enter MENU, "FOCUS+ / -" at keyboard can used to change
value, "ZOOM + / -" can used to choose options.
24
CNB zoom module menu for reference:
GENERAL
CAMERA ID;
PROTOCOL;
LANGUAGE;
INITIAL;
ZONE LABEL;
EXIT
FOCUS
FOCUS MODE;
FOCUS DIST;
ZOOM START;
ZOOM END;
BLUE CONT;
PUSH AUTO;
AWB----AUTO WHITE BALANCE
AWB MODE;
RED CONT;
AE----AUTO EXPOSURE
AE MODE;
BRIGHTNESS;
FLICKERNESS;
AGC ADJUST;
AGC MAS SET;
INITIAL;
D&N----DAY & NIGHT
D & N MODE;
D & N DELAY;
INITIAL;
BACK LIGHT;
SHARPNESS;
ZOOM SPEED;
INITIAL;
SHUTTER SPD;
EXIT
MIRROR;
INITIAL;
EXIT
EXIT
IRIS ADJUST;
EXIT
SLOW_SHT----SLOW SHUTTER
SHT_FLD;
INITIAL;
EXIT
MOTION
DETECT MODE;
DISPLAY
WHOLE OSD;
VERSION;
INITIAL
OFF STATE;
DETECT AREA;
SENSITIVITY;
FUNC OSD;
MOTICM DET;
INITIAL;
EXIT
INITIAL;
CAMERA ID;
EXIT
ZOOM MAG;
ZONE LABEL;
ON STATE
EXIT
SAMSUNG zoom module menu for reference: Main menu on screen,
DARK ZONE COMPENSATION 』
WHITE BALANCE 』
BACK LIGHT COMPENSATION
MOTION DETECTION
FOCUS 』
EXPOSURE 』
ADDITIONAL MENU 』
RESET
EXIT
�
(e.g. Our control keyboard, if for mid / low speed dome camera, press IRIS + for about 15 seconds , you
wills see the zoom module menu. zoom+ / zoom - can be used to choose option, focus + / focus - can be
used to change the options value)
� Use UP / DOWN button to choose the option, when you choose options, the arrow on screen will follow your
choice to move, use LEF / RIGHT button to change the mode of your chose option, when you finish all set, move
the arrow to "EXIT" to quit and save the set.
� Some options with "』" mark, means this option have sub options, you can enter its sub options.
25
DARK ZONE COMPENSATION
COMPENSATION----this function means you can adjust the image brightness and saturation.
1. Press "SET" button to enter the sub menu, 0~15 adjustable, default set is 8.
2. Enter "LEVEL" of this function, can change to be LOW / MID / HIGH.
3. Move the arrow to EXIT to quit.
WHITE BALANCE----AUTO TRACK / AUTO / MANUAL
BLC--BLC----when the camera focused object have strong light to shine it from its back, the image will be dark, you ca use
this function to adjust the image. The sensitivity of BLC can be HIGH / MID / LOW / OFF
MOTION DETECTION---DETECTION----this module have 8 motion detection zones, camera can detect the object by its color,
brightness, when the screen show "moving object", you need to pay attention on it.
1. Choose the area you want to detect under option "SELECT AREA".
2. Change the MOTION DETECTION function to be "ON", then set the area you want to detect.
3. Finish set, exit and save the set.
FOCUS
FOCUS----enter its sub menu,
AUTO: when camera doing optical zoom, it will auto turn on DIGITAL ZOOM, it will auto focus when it zooming.
ONE TIME FOCUS: when zoom stop, it will focus one time, and it will auto focus one time when zoom stop.
MANUAL: use controller to change zoom, and confirm the screen change, now it without auto focus function.
ZOOM TRACKING MODE: use controller to choose OFF / ON.
ZOOM TRACKING SPEED: use this to choose the digital zoom times, 1x ~ 16x.
INITIALIZE ZOOM POSITION.
USER DEFAULT SET.
LENS INITIALIZATION.
EXIT.
EXPOSURE
EXPOSURE----enter the sub menu,
BRIGHTNESS;
IRIS: AUTO / MANUAL;
AGC: HIGH / MID / LOW;
SHUTTER: ANTI-FLICKER / MANUAL / AUTO (best mode);
DIGITAL NOISE REDUCTION;
SENSE LIGHT: help camera to get better image at dark environment.
26
ADDITIONAL MENUMENU----enter the sub menu
DAY / NIGHT: DAY (COLOR) / NIGHT (B&W) / AUTO;
DIGITAL IMAGE STABLIZATION;
SYNCHRONOUS MODE: INTERNAL SYNC / EXTERNAL SYCN;
COMMUNICATION;
BAUD RATE: 2400 / 9600 / 19200
ASYNCHRONOUS MODE: set parity as NO PARITY / ODD PARITY / EVEN PARITY;
EXIT;
IMAGE ADJUST: HORIZONTAL INVERSE / VERTICAL INVERSE / SHARPNESS (this can make object edge to be
clear, but if value is too high, will interrupt the image) / EXIT;
IMAGE: use can choose suitable monitor. CRT / LCD / USER DEFAULT
DISPLAY: set the information will be displayed on screen when the camera is working.
CAMERA ID: 1~255;
POWER DISPLAY;
LANGUAGE: 16 kinds can be chose;
MOTION DETECTION;
ZOOM;
WORD COLOR;
BACK.
BACK MAIN MENU
RESTORE
EXIT
27