1
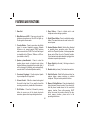
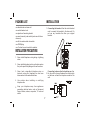
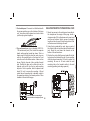
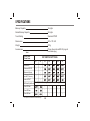
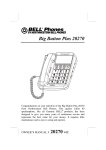
PHOTO
5
Instruction Manual
IMPORTANT SAFETY INSTRUCTIONS
When using your telephone equipment, basic safety precautions should always be followed to
reduce the risk of fire, electric shock and injury to persons, including the following:
Slots and openings in the cabinet and the back or
bottom are provided for ventilation, to protect it
from overheating. These openings must not be
blocked or covered. The openings should never
be blocked by placing the product on a bed, sofa,
rug, or other similar surface. This product should
never be placed near or over a radiator or heat
register. This product should not be placed in a
built-in installation unless proper ventilation is
provided.
Read and understand all instructions.
Follow all warnings and instructions marked on
the product.
Unplug this product from the wall outlet before
cleaning. Do not use liquid cleaners or aerosol
cleaners. Use a soft, damp cloth for cleaning.
Do not use this product near water, for example,
near a bath tub, wash bowl, kitchen sink, or
laundry tub, in a wet basement, or near a
swimming pool.
To reduce this risk of electric shock, do not
disassemble this product, but take it to a qualified
serviceman when some service or repair work is
required. Opening or removing covers may
expose you to dangerous voltage or other risks.
Incorrect assembly can cause electric shock
when the appliance is subsequently used.
Do not place this product on an unstable stand,
or table. The product may fall, causing serious
damage to the product.
Do not allow anything to rest on the power or line
cord. Do not locate this product where the cord
will be abused by persons walking on it.
Do not use the telephone to report a gas leak in
the vicinity of the leak.
During thunderstorms, avoid using telephone
except cordless models. There may be a remote
risk of electric shock from lightning.
Never push objects of any kind into ventilation
slots. Risk of fire or electric shock may result if
dangerous voltage points are touched. Never
spill liquid of any kind on the product.
1
IMPORTANT SAFETY INSTRUCTIONS CONTINUED...
Unplug this product from the wall outlet and refer:
Explanation of Symbols
Indicates dangerous voltage
inside the enclosure, possible
electric shock of fire hazard.
A. When the line cord is damaged or modular
plug is damaged or frayed.
B. If liquid has been spilled into the product.
Indicates important notice of
operating or servicing
instructions.
C. If the product has been exposed to rain or
water.
D. If the product does not operate normally by
following the operating instructions. Adjust
only those controls, that are covered by the
operating instructions because improper
adjustment of other controls may result in
damage and will often require extensive work
by a qualified technician to restore the product
to normal operation.
Caution: To reduce the risk of
electric shock, do not remove cover.
No user-serviceable parts inside.
Refer servicing to qualified service
personnel.
Warning: To prevent fire or shock
hazard do not expose this appliance to
rain or moisture.
E. If the product has been dropped or the cabinet
has been damaged.
F. If the product exhibits a distinct change in
performance.
SAVE THESE INSTRUCTIONS
2
FEATURES AND FUNCTIONS
CLOCK/TIMER
SET
REDIAL/PAUSE STORE
SHIFT
1
2ABC
3DEF
4GHI
5JKL
6MNO
7PQRS
8TUV
9WXYZ
*
0
MUTE
#
HEADSET
TRANSFER SPEAKER
TOP VIEW
BOTTOM VIEW
3
FEATURES AND FUNCTIONS
1. Base Unit
8. Store Button - Press to initiate and to end
telephone number storing operation.
2. Mute Button and LED - Press once to mute the
telephone microphone and the LED will light up.
Press again to release mute.
9. Redial/Pause Button - Press to redial last number
dialled. The same button can be used to store a 3.5
second pause.
3. Transfer Button - Press to generate a hook flash
signal, to access telephone company Network
Services or to access special PABX functions
when connected to a PABX. The hook flash signal
is selectable to be 100msec, 300msec or 600 ms.
(see details on item 32)
10. Headset/Speaker Switch - Select either Headset
or speaker phone operation mode. When the
switch is in "Speaker" position, it is always speaker
phone mode. When it is put in "Headset" position,
it is in headset mode when headset is plugged in or
otherwise in speaker phone mode.
4. Speaker phone/Headset - Press to enter the
speaker phone mode or headset mode (when
headset had been plugged into the modular jack, it
will be changed to headset mode automatically,
see also item 10 on Headset/Speaker switch).
11. Ringer Switch (on the side) - Set ringer volume to
Hi, Lo or Off.
12. Modular Jack (on base) - For headset connection.
13. Data Port Socket - Data Port Socket used for a fax,
modem, laptop, answer machine or cordless
telephone. This port acts in parallel to the line.
5. Over-sized Keyboard - Double injected plastic
keys are shaped to fit finger touch.
6. Volume Control - Slide the volume knob against
the mark for best level. If you want to boost the
receiving sound level, please slide it to maximum.
7. Shift Button - Press first, followed by memory
button to access one of the twelve two-touch
memories, please refer to operating instructions.
4
14. Memory Dialling Buttons - Press to automatically
dial a previously stored number. Press directly to
dial the phone number stored in the one-touch
memory location. Press after pressing SHIFT
button to access the number stored in the twotouch memory location, please refer to the
operating instructions.
FEATURES AND FUNCTIONS
15. Ringing Lamp - Flashes when there is an
incoming call. It will also flash on some special
message waiting signals.
22. Wall Mounting Tab (under handset) - Lift and
rotate to the wall mounting position, if desired. See
installation for wall mount use (page 8)
16. Message Wait Lamp - Message wait lamp will
illuminate when a message is left in the voicemail
facility of the PABX. The user can call the PABX
operator/receptionist or call the voicemail system
for any messages. This illumination function will
only operate if the PABX has been fitted with this
capacbility. In order to use this feature correctly,
the message waiting setting must be first set. See
item 32 for details.
23. Electronic Tone Ringer - Ringing on incoming
calls when ringer switch is set to Hi or Lo.
24. Modular Jack (on base) - For coiled handset cord
connection.
25. Modular Jack (on handset) - For telephone line
cord connection.
17. In-use Led - Lights up when telephone is in use.
26. Ringer Pitch Control - Adjust the Ringer Pitch by
using a screwdriver.
18. Telephone Directory - Records the names and
phone number stores in memory. Shaded area can
be used for two-touch memories and white area for
one-touch memories.
27. Reset Button - System reset button. If the
telephone does not work under some adnormal
conditions, push this button once under off hook
condition by a small pin.
19. Handset Cradle
28. Modular Jack (on base) - for telephone line cord
connection.
20. Telephone Handset
29. Telephone Line Cord Channel - Route the
telephone line cord in the channel when the phone
is wall-mounted.
21. Hook Switch (under handset inside the cradle)
5
FEATURES AND FUNCTIONS
38. Clock/Timer - Use to toggle real time and calling
timer.
30. Wall Mounting Keyholes
31. Bracket - With locking hooks, it can be pressed to
lock either in up or low position on the bottom of
the Base.
39. Battery compartment - Remove the screw to open
the door for installing two 1.5V "AA" size batteries
to back up the real time clock on the LCD. This is
useful if there is often power interruption on your
PABX.
32. Dip Switch Door - Access to select the setting of
message waiting services on various PABX and
setting of hook flash timings. See table 1 for
details on p.13.
33. Type1/Type2 Switch - This switch will select the
type of connection on the headset to be used.
34. Mic Gain Switch - This switch will increase or
reduce the microphone output of the headset.
35. Holes for Wall Mounting Bracket - Snap in the
separate plastic Wall Mounting Bracket here, if
required.
36. LCD Panel - 16 digits LCD to display real time
clock, dialling digits and dialling time.
37. LCD Set Button - Use to set time and reset timer.
6
PACKING LIST
INSTALLATION
one handset and one base unit
one coiled handset cord
one plastic wall mounting bracket
one user's manual (read carefully and save for future
reference)
one 3m line cord modular to modular
one P608M plug
one 7 inches line cord modular to modular
1. Connecting the handset: Use the coiled handset
cord to connect the handset to the base unit. Do
not use any handset other than your original
handset.
INSTALLATION PRECAUTIONS
1. Never install telephone wiring during a lightning
storm.
2ABC
3DEF
4GHI
5JKL
6MNO
7PQRS
8TUV
9WXYZ
*
0
#
1
2. Never install telephone jack in wet location unless
the jack is specifically designed for wet locations.
3. Never touch uninsulated telephone wires or
terminals unless the telephone line has been
disconnected at the network interface.
Connecting to phone line for desk top use: Use
2. the line cord to connect between the modular jack
on the base unit and the telephone socket on the
wall.
4. U s e c a u t i o n w h e n i n s t a l l i n g o r m o d i f y i n g
telephone line.
5. Keep your telephone away from appliances
generating electrical noise, such as fluorescent
lamps, heaters, motors, computers, TV sets and
radios.
7
1. Mount two screws in the wall spaced according to
the template on the margin of this page. Leave a
clearance about 1/4 inch between each screw head
and the wall surface. Select screws of adequate
length and size for good fit into the keyholes of the
unit and secured mounting in the wall.
2. Using the long modular line cord, plug one end of
the cord into the unit and the other end into the wall
jack. Route the cord down the channel on the
bottom of the unit as shown.
3. Position the unit so that the screw heads fit into the
keyholes on the bottom of the unit. Once in position,
slide the phone down about 1/4 inch to secure the
mounting. Be sure to lift and rotate the wall
mounting tab on the handset cradle to the wall
mounting position (protruding upwards).
4. For wall-mount use (over standard USOC RJ11W modular wall jack): First, install the separate
plastic wall mounting bracket as shown. This is a
simple snap fit. Using the short line cord, plug one
end into the modular jack on the base unit, and
route the cord to the bottom centre of base unit as
shown. Plug the free end of line cord into the wall
jack. Position the base unit so that studs on the
modular wall jack fit into the two wall mounting
keyholes. Once in position, slide the phone down
about 1/4 inch to secure the mounting. Lift and
rotate the wall mounting tab in handset cradle to
the upward protruding wall-mount position. Place
handset in the cradle to hang up.
CAUTION: Make sure mounting is
secured before releasing the phone.
8
100 mm
WALL MOUNTING WITHOUT STANDARD WALL PLATE
3. For desktop use: Press and lock the Bracket with
the arrows pointing up on the bottom of the base
unit. Your phone can be placed on a desk or table
just like any regular telephone.
OPERATING INTRUCTIONS
1. On first installing, it is advised that to go through
one system reset by pushing the reset switch once
by a small pin during off hook. See item 27 on the
feature list.
Note: you may adjust the microphone output of the
headset by turning the mic gain switch on the back
of the unit. (see item 34 on the feature list)
4. Receiving a Call. When the phone rings, simply lift
handset or press Speaker/Headset button, and
answer the call. Be sure ringer switch is set to Hi or
Lo if you wish to hear incoming calls ringing.
2. Using the Handsfree Dialling. Press Speaker/
Headset button to initiate handsfree dialling(In-use
indicator will light up). You will hear dial tone on the
speaker and can dial out without lifting the handset.
Adjust the speaker volume control for optimum
loudness. When the call is connected, simply talk
to the speaker phone microphone or pick up the
handset and talk to the other party. Otherwise,
press Speaker/ Headset button to end handsfree
dialling (In-use indicator will turn off).
5. Redialling the Last Number. If the number you try
to reach is busy, hang up or press the hook switch
for at least 2 seconds. To call the busy number
automatically again, pick up handset and press
REDIAL. (REDIAL can contain up to 32 digits)
6. Setting Ringer Volume. Set ringer switch to OFF if
you don't want to be disturbed by phone ringing.
Set ringer switch to Hi or Lo (as desired) if you wish
to hear incoming calls ringing.
Note: To have speaker phone mode working
properly, either the headset must not be plugged in
OR the headset/speaker switch must be in speaker
position.
7. Setting Ringer Pitch. You may use a screwdriver
to turn the ringer pitch control clockwise or
anticlockwise for best ringer pitch.
3. Using the Headset. Plug in the headset to the
headset socket. Switch the Headset/Speaker
switch to " headset " position and select type 1 or
type 2 connection on the type1/type2 switch. Press
the Speaker/Headset button to initiate Headset
mode (In-use indication will light up). Adjust the
volume for best loudness. Press the
Speaker/Headset button again to release line.
8. Using Transfer Button. Please refer to item 3 on
the feature list.
9
9. Store a Number in Memory. Up to 24 phone
numbers (each up to 16 digits including pause/flash)
can be stored in memory. These memories are
separated into two groups of twelve, called the onetouch memory group and the two-touch memory
group. Each of twelve-touch memories is accessed
by pressing each of the twelve memory buttons
directly. Each of the twelve two-touch memories is
accessed by pressing SHIFT first and then followed
by each of the memory buttons. The memories are
backed-up by internal Lithium battery.
To store a number, lift handset off hook or press
speaker key and press STORE to begin storing
operation, followed by pressing the phone number
desired (this number won't be dialled). End storing
sequence by pressing STORE again, following by
the memory location you wish to store the number.
Example 1: To store phone number 96349811 in
the no. 3 one-touch memory, lift handset and press
the following buttons.
STORE
96349811
STORE
No.3 memory button
Example 2: To store phone number 02-96349811 in
the no.2 two-touch memory, lift handset
STORE
0296349811
STORE
10. Example 3: If your phone is connected to a PABX
in the office which requires dialling 0 to access
outside line, you can store a phone number 028446111 in the no.3 one-touch memory. Press the
following buttons:
REDIAL/PAUSE
STORE
0
STORE
No.3 memory button
028446111
Example 4: If your phone is connected to a PABX
in your office which requires dialling 0 to access
outside line, you can store a phone number 028446123 in the no.2 two-touch memory. Press the
following buttons.
STORE 0 REDIAL/PAUSE 028446123
SHIFT No.2 memory button
STORE
11. Dial a Stored Number. First identify which
memory location (one-touch or two-touch) has the
number you wish to call. Pick up handset (or press
Speaker/Headset button) and listen for dial tone.
To dial from a one-touch memory, press the
memory button directly. To dial from a two-touch
memory, press SHIFT first, and then press the
memory button. Stored number is then
automatically dialled.
Example 5: To dial the stored number 96349811
from Example 1 above, pick up handset, listen for
dial tone, and then press no.3 memory button.
SHIFT
No.2 memory button
10
Example 6: To dial the stored number 02-96349811
in Example 2 above, lift handset and listen for dial
tone, and then press SHIFT, followed by pressing
the no.2 memory button.
- Press Set button will reset the timer and start
counting.
- Press Clock/Time button will toggle display
between real time clock and timer.
12. Muting The Microphone. Press MUTE button once,
MUTE indicator will light up and the microphone
(both on handset mode and handsfree mode) will
be muted. To release the mute, press MUTE button
again. The microphone is enable and the light of the
mute indicator will go out. The mute will be reset
when goes to on hook.
(c) Setting the Clock time.
- Place telephone in off line mode.
- Press Clock/Timer button for 3 seconds, the
hour digit will flash, press Set button to advance
the hour digit.
13..Use of Data Port. Plug into the data port socket the
equipment to be used. Operate the equipment you
connect as normal and independently of the
telephone. Do not try to use the telephone whilst
the data port socket is in use as this is a parallel
connection, unless modification is made.
- Press Clock/Timer button, the minute digit will
flash. Press Set button to advance the minute digit.
- Press Clock/Time button to start the second
counting.
14. Use of LCD.
(a) During off line - press Clock/Timer button will
toggle between the real time clock and the calling
time of the previous call.
15. Battery back-up for LCD. If there is frequent
power interruption on your telephone line, you
could back up the real time clock by inserting two
"AA" size battery on the battery compartment. See
item 39 on the feature list. Replace the battery
every year.
(b) During on line - Immediately after going on line,
the display will be blanked for 2 seconds and then
changed to timer mode and start counting.
- Dial digits or press memory button will cause
display to show numbers to be dialled.
11
IF YOU HAVE PROBLEMS
If your telephone does not work properly, go through
the following check list before you spend
unnecessary time and money for repairs.
3. Have you reset the telephone by pushing the
reset button once?
Pick-up handset to go off hook, press the reset
button once (see item 27 on the feature list) to
reset the system.
1. Is your telephone connected properly?
Make sure all plugs are connected properly.
Inspect the line cord connections at the wall jack
and the telephone. Also inspect the coiled handset
cord connections at both ends.
4. If the telephone's volume level drops, or it begins
to make strange sounds, or does not dial out even
though a dial tone is heard, check to see if other
phones have been picked up on the same line.
Your telephone may not operate properly when
other phones are active on the same line
(especially in areas with low telephone voltage).
Hang up the other phones to correct the problem.
Try unplugging the telephone and connecting to
another Telephone wall socket. If it still does not
work, try another telephone. If both telephones
don't work, the problem is not in your telephone.
The problem may be caused by the telephone
network or the wiring in your home.
If you still have problems: Disconnect the phone
immediately. If other phones on the same line
function properly, the problem is in the phone or its
installation.
2. Is the ringer switch set properly?
Ringer switch must be set to HI or LO position in
order to hear ringing of incoming calls.
If there are several other telephones on the same
phone line, try disconnecting some of the other
telephones. Having too many telephones
connected can cause problems such as low ringing
volume, or impaired sound quality during calls.
12
SPECIFICATIONS
Memory Capacity
16 digits
Redial Memory Capacity
32 digits
Tone Dialling
Standard DTMF
Dimensions
223 x 172 x 90
Weight
810g
Accessories
Phone line cords with RJ12 plugs &
Australian plug
Table 1
Type of PABX
& Hook Flash
DIP SWITCH SETTINGS
S1
S2
Panasonic
*
*
Ericsson MD110
*
*
Siemens Hicom
*
*
Ericsson 150/250
and GPT Plessey
*
*
Lucent/AT & T
*
*
NEC/Alcatel/Fujitsu/Nortel
S3
S4
S5
S6
S7
No Dip Switches settings are required for these systems
Flash 100ms
*
*
*
*
*
Flash 300ms
*
*
*
*
*
Flash 600ms
*
*
*
*
*
* This phone is to be used on the PABX only.
13
For service and warranty support
please contact
Australian Business Telephone Company
1300361112
506-09000063(AUST)
RECYCLED PAPER