1
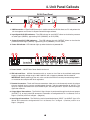
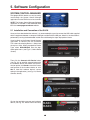
Digital Loudspeaker Controller/
System Control Manager Software
User Instruction Manual
© 2015 Bogen Communications, Inc.
Specifications are subject to change without notice.
54-2230-01A 1508
Digital Loudspeaker Controller
Before using the Apogee DLX24 Digital Loudspeaker Controller, please view the product’s documentation to familiarize
yourself with the product’s features and operation. Visit http://www.apogeesound.com and navigate to the product’s
dedicated page. Or enter the appropriate URL listed below:
• Software, Firmware (http://www.apogeesound.com/software/ )
• Technical Specifications (http://www.apogeesound.com/literature/pdfs/DLX24s.pdf )
NOTICE FOR DIGITAL EQUIPMENT
In order to obtain the full performance of Apogee digital devices, always
download and install the latest drivers, firmware and/or software versions
available online at http://www.apogeesound.com/software/.
IMPORTANT SAFETY INSTRUCTIONS
• Unit is not to be exposed to splashing water or objects filled with liquid.
• Unit must be plugged only into outlets which are protectively earthed.
Always follow these basic safety precautions when installing
and using the DLX24 Digital Loudspeaker Controller unit:
1.
Read these instructions.
2.
Keep these instructions.
3.
Heed all warnings.
4.
Follow all instructions.
5.
Do not use this apparatus near water.
6.
Clean unit with dry cloth.
7.
Do not block any ventilation openings. Install in accordance with
the manufacturer's instructions.
8.
Do not install near any heat sources such as radiators, heat
registers, stoves, or other apparatus (including amplifiers) that
produce heat.
9.
Do not defeat the safety purpose of the polarized or groundingtype plug. A polarized plug has two blades with one wider than
the other. A grounding-type plug has two blades and a third
grounding prong. The wide blade, or the third prong, are provided
for your safety. If the provided plug does not fit into your outlet,
consult an electrician for replacement of the obsolete outlet.
10. Protect the power cord from being walked on or pinched particularly at plugs, convenience receptacles, and the point where
they exit from the apparatus.
11. Only use attachments/accessories which have been specified
by the manufacturer.
12. Unplug this apparatus during lightning storms or when not used
for long periods of time.
13. Refer all servicing to qualified service personnel. Servicing is
required when the apparatus has been damaged in any way,
such as power-supply cord or plug is damaged, liquid has been
spilled or objects have fallen into the apparatus, the apparatus
has been exposed to rain or moisture, does not operate
normally, or has been dropped.
Compliance with International Standards
The DLX24 processor complies with the following
international standards:
UL 60065 Issued: 2003/06/30 Ed: 7 Rev: 2013/07/24
Audio, Video and Similar Electronic Apparatus - Safety
Requirements
CSA C22.2#60065 Issued: 2003/04/01 Ed: 1 (R2012)
Audio, Video and Similar Electronic Apparatus – Safety
Requirements; Amd. 1: 2006, Amd. 2: 2012
EC 60065 Issued: 2011/02/15 Ed:7.2 Audio, Video &
Similar Electronic Apparatus # Safety Requirements;
Consolidated Edition. Ed. 7 2001/12/11 with Amd 1
2005, Amd 2 2010, Consolidated Ed. 7.1 2005
FCC Rules and Regulations 47 CFR Chapter I Part 15
Subpart B (10-01-13 Edition); ICES-003 ISSUE 5
(2012) & ANSI C63.10-2009: American National standard for Testing Unlicensed Wireless Devices.
EN55103-1 Electromagnetic Compatibility.
Product family standard for audio, video, audio-visual
and entertainment lighting control apparatus for professional use
Part 1: Emission
EN55103-2 Electromagnetic Compatibility.
Product family standard for audio, video, audio-visual
and entertainment lighting control apparatus for professional use
Part 2: Immunity
TABLE
OF
CONTENTS
1. Introduction..................................................................................................1
2. Installation....................................................................................................2
3. Maintenance ................................................................................................2
4. Unit Front Panel / Rear Panel Callouts ......................................................3
5. Configuration: System Control Manager Software ............................4-12
5.1
5.2
5.3
5.4
5.5
5.6
5.7
5.8
Installation and Connection with DLX24 ................................................4
Menus ....................................................................................................5
Signal Generator and Remote Ports ......................................................6
Input Processing ................................................................................7-8
Output Processing ............................................................................9-10
Graphical Window ................................................................................11
Report Log............................................................................................12
Password Protection ............................................................................12
6. Diagrams ....................................................................................................13
6.1. Function List ........................................................................................13
6.2. Function Diagram ................................................................................13
7. Technical Characteristics ........................................................................14
8. Block Diagram ..........................................................................................15
9. Warranty ....................................................................................................16
This Page Intentionally Left Blank
1. Introduction
DLX24 Digital Processor for Speaker Systems
The Apogee DLX24 is a Digital Signal Processor featuring 2 Audio Inputs and 4 Audio Outputs,
USB connectivity, and two ports for Volume Remote Control.
Main Features:
• 2 Audio Inputs and 4 Audio Outputs, with XLR Connectors
• DSP with 24-bit quantization and 48 kHz sampling frequency
• LED Indicators for Signal Presence/CLIP, on each input and output
• 2 REMOTE ports to control the volume of the inputs or outputs
• USB interface and compatibility with System Control Manager software
• Processing:
- Controls for Level, Polarity, MUTE per input and output
- 8 PEQ (Parametric Filters) per input and per output
- Butterworth, Linkwitz-Riley or Bessel crossovers on the inputs and outputs (up to 48 dB/oct)
- Delays on the inputs and outputs
- Peak/Compressor Limiter on the inputs and outputs
- RMS/Compressor Limiter on the outputs
- 2 LINK groups available to link output channels
- 1 LINK group available to link input channels
• 4 System templates for the creation of user configurations:
- T1: 2 x 1 Stereo way
- T2: 2 Stereo ways
- T3: 4 Mono ways
- T4: 4 Mono outputs
• Editing names (labels) of inputs, outputs,
presets, and device
• Locking with password protection
• 20 User presets for loudspeaker preset
files or custom configured presets
1
2. Installation
The Apogee DLX24 can be mounted in a standard 19” rack (482.6 mm) taking up one rack unit height
(44 mm). For professional use it is recommended to place the processor in the same rack as the power
amplifiers. Given the small power consumption of the unit, no ventilation is required. Nevertheless, it is advisable
not to expose the unit to extreme temperatures, and to ensure a dry and dust-free operating environment.
It is important not to place the processor next to electrical noise sources such as transformers, voltage
dimmers, motors, etc., or their mains supply cables. The metal cover of the device should never be removed
under any circumstance.
The unit operates with AC MAINS between 100–240V at 50 to 60 Hz. The device features a power supply
which adapts itself to any mains voltage around the world, without needing any manual adjustment.
Even though the noise produced by powering up is minimal, it is always advisable to follow this power up
sequence: signal sources, mixing unit, processor, and lastly, power amplifiers. The power-down sequence
must follow a reverse order exactly. By closely following these sequences, all peaks or transients produced
by switching devices on and off do not affect the next devices in the chain and never reach the loudspeakers,
which are extremely sensitive to this.
3. Maintenance
Cleaning the Unit
Do not clean the DLX24 control panel with any solvent, abrasive, or petroleum-based substance; doing
so can damage the unit’s finish and silk-screen printing. When cleaning is necessary, use a damp soft
cloth with plain liquid soap. Be careful not to get any liquid in any of the unit’s openings. Never use sharp
or erosive objects on the unit’s control panel.
2
4. Unit Panel Callouts
DLX24 Front Panel
1. USB Connection - A Type-B USB Connector is used to connect the DLX24 direct to a PC and perform the
unit management and control via System Control Manager software.
2. Input Signal/CLIP LED Indicators - The LED indicator for each INPUT allows to visualize the presence
of audio signal (GREEN), approaching CLIP (ORANGE), or CLIP (RED).
3. Output Signal/CLIP LED Indicators - The LED indicator for each OUTPUT allows to visualize the
presence of audio signal (GREEN), approaching CLIP (ORANGE), or CLIP (RED).
4. Power ON Indicator - LED Indicator lights up when the device is powered ON.
DLX24 Rear Panel
5. Power Switch - ON/OFF Main Power Switch for the unit.
6. IEC Inlet and Fuse - AC/Main Connection with an access to fuse. Due to the switched mode power
supply, the operating voltage range is 100V–240V AC, with a frequency between 50 Hz and 60 Hz.
IMPORTANT: Before powering up the unit, make sure that the DLX24 is correctly connected to ground in
an installation that complies with local regulations.
7. Remote Connectors - The A and B remote connectors allow you to simultaneously control the volume
of one or multiple inputs, or one or multiple outputs through a 10k-ohm potentiometer (0-10V DC). The
Inputs or Outputs controlled from each REMOTE port are configured with System Control Manager
application software
8. Output Signal Connections - The DLX24’s Signal Output is performed through four balanced outputs
(OUTPUT 1-4), on 3-pin male XLR connectors. Connectors are configured with Pin 1 to Ground, Pin 2 to
Signal + (Positive) and Pin 3 to Signal – (Negative).
9. Input Signal Connections - The DLX24 has two balanced Audio Inputs (INPUT 1 and INPUT 2) on 3-Pin
female XLR connectors configured with Pin 1 to Ground, Pin 2 to Signal + (Positive) and Pin 3 to
Signal – (Negative).
3
5. Software Configuration
SYSTEM CONTROL MANAGER
The Apogee DLX24 device can only be configured through the System Control Manager
application since the DLX24 has no local controls.
NOTE: The System Control Manager Software
application is available via free download direct
from the www.apogeesound.com website.
5.1 Installation and Connection of the DLX24
Once you have downloaded the software, it is recommended that you first connect the USB cable supplied
with the equipment between a computer's USB port and the DLX24’s USB port. After this, the installation is
performed by running the downloaded installer file and following the steps displayed on screen.
Once installed, run the System Control Manager
application to connect with the hardware.
This is done by selecting Device -> Select from
the top bar menu. When prompted for Device
Type, select DLX24/DLX24i from the dropdown option menu. (see Fig. 5-1, Select Device
Screen)
Fig. 5-1
Then click the Connect with Device button
(see Fig. 5-2) to establish communication with
the hardware device and choose the synchronization option (click Send to send the current
configuration to the hardware device or click
Get to load the hardware device's current
setting in the application). (see Fig. 5-3, Device
Connect Screen)
Fig. 5-2
Fig. 5-3
Click on the text field to rename your hardware
device. (see Fig. 5-4, Device Name Text Field)
Fig. 5-4
4
5. Software Configuration
5.2 Menus
File Drop-Down Menu (see Fig. 5-5)
Options include:
• New- Start a new file
• Open- Locate the existing file you want to open
• Save- Will save the current open file
• Save As- Option to save the current open file as new name
• Recent Files- View the names of recently opened files
• Exit- Closes the application.
Fig. 5-5
NOTE: A configuration file contains the configuration that was active in the device at the time of saving, but
will not include data for its 20 presets. When you retrieve a saved configuration file, connect the
equipment and transfer this configuration to the hardware (SEND option), that configuration is not
stored in any preset, unless it is saved as a preset file (see Fig. 5-6, Device Drop-Down Menu).
In addition to the 20 user-writable presets, there are 4 common predefined templates (not rewritable) that
can be used to start a user configuration. These are:
• T01: 2 x 1 Stereo Way
• T02: 2 Stereo Ways
• T03: 4 Mono Ways
• T04: 4 Mono Outputs
Device Drop-Down Menu (see Fig. 5-6)
Options include:
• Select: Choose the device you want to connect to
• Recall Preset: Recall/Activate one of the 20 presets
• Store Preset: Save the current configuration into a
user preset
• Upgrade Firmware: Update Device Firmware using
compatible file
Fig. 5-6
NOTE: The latest versions of compatible firmware for Apogee Digital Devices are available for download
via the www.apogeesound.com website.
You can also recall and store presets using the control
panel (see Fig. 5-7, Control Panel Presets Screen))
Fig. 5-7
Help Drop-Down Menu (see Fig. 5-8)
Options include:
• User Manual: View the DLX24 User Manual
• Visit the Apogee Website: Connects you directly to
the Apogee website: www.apogeesound.com
• About: Displays information about the version of the
application
Fig. 5-8
5
5. Software Configuration
5.3 Signal Generator and Remote Ports
The built-in signal generator can feed an output its signal to the DSP processing chain in order to perform
a spectral analysis and/or adjustment of parameters depending on the acoustic characteristics of the room
and equipment.
The parameters are:
• SIGNAL: Select type of signal desired (see Fig. 5-9)
- SINEWAVE (sinewave with a variable frequency)
- POLARITY (specific waveform to determine correct
polarity of the speakers, with variable frequency)
- WHITE NOISE
- PINK NOISE
• LEVEL: Set level for the signal.
• FREQUENCY: Set frequency of the sinewave or
polarity signal.
Fig. 5-9
The REMOTE A and REMOTE B connectors allow you to simultaneously control the volume of one or
multiple inputs, or one or multiple outputs through a 10k-ohm potentiometer (0-10V DC). (see Fig. 5-10)
Remotes Screen (see Fig. 5-10)
Each preset saves the function assigned to REMOTE A and
REMOTE B at the time the configuration is is saved (so that
different presets can contain different functions for either
REMOTE port).
6
Fig. 5-10
5. Software Configuration
5.4 Input Processing
The processing available for each audio input channel are shown on the Input Processing Screen.
2
4
5
1
3
6
Fig. 5-11
1) The controls in this section include:
• MUTE- Mute signal by pressing the
button.
• POLARITY- Press
to select polarity
• LEVEL- Select level by entering dB number or using the gain fader.
• DELAY- Choose amount of delay (up to 1 second, displayed in units of time or distance)
2) CROSSOVER- The Low-Pass and High-Pass filters define a frequency bandwidth.
Available filter types that can be selected from the TYPE drop-down menu are:
• Bypass (filter not activated)
• Bessel (12, 18, 24 or 48 dB/oct)
• Butterworth (6, 12, 18, 24 or 48 dB/oct)
• Linkwitz-Riley (12, 24 or 48 dB/oct)
3) PARAMETRIC EQ- These filters enhance or attenuate different frequency ranges of the signal. Eight
filters are available for each input, and each one of them can have the following settings (selected from
the TYPE drop-down menu):
• Bypass (filter not activated)
• Parametric EQ (controls for frequency, Q [bandwidth] and gain of the affected band)
• High Shelf (6 or 12 dB/oct)
• Low Shelf (6 or 12 dB/oct)
• High Pass (6 or 12 dB/oct)
• Low Pass (6 or 12 dB/oct)
• All Pass (1st or 2nd order)
7
5. Software Configuration
5.4 Input Processing (cont’d)
4) COMP/LIMIT (Compressor/Limiter)- This is the dynamics processor of the input channel with signalpeak detection. It has the following controls:
• THRESHOLD- Adjusts the threshold of the COMP/LIMITER (dB).
• RATIO- Gain reduction of the processed (compressed) signal compared to the incoming signal.
• ATTACK- The time it takes the compressor to start compressing after the threshold has been reached.
• RELEASE- The time the compressor takes to stop compressing after the input signal has fallen below
the threshold.
• MAKE-UP- Gain applied to the signal after compression, to globally increase its level once dynamically
modified.
• KNEE- The type of curve (transition zone around the threshold) that determines whether the bend in the
response curve around threshold is abrupt (HARD) or gradual (SOFT).
• GR (Gain Reduction)- This real-time meter (dB) indicating COMP/LIMIT attenuation, including
MAKE-UP GAIN
5) COPY/PASTE- These icons “copy” the settings from one channel and "paste" them in another,
cloning the settings. (All settings, except the label or channel name, can be copied and pasted.)
6) LINK GROUPS- The two inputs can be part of the
same LINK GROUP. In this mode, all the settings of an
input (for example, the left channel) will be automatically applied to the other input (right channel), and vice
versa. (see Fig. 5-12)
Fig. 5-12
Pressing the F2 key, allows you to rename an input or
output channel. (see Fig. 5-13)
Fig. 5-13
8
5. Software Configuration
5.5 Output Processing
The processing available for each audio output channel are shown on the Output Processing Screen.
2
1
7
6
4
5
3
8
Fig. 5-14
1) The controls in this section include:
• MUTE- Mute signal by pressing the
button.
• POLARITY- Press
to select polarity
• LEVEL- Select level by entering dB number or using the gain fader.
• DELAY- Choose amount of delay (up to 1 second, displayed in units of time or distance)
• SELECT- Use the SELECT drop-down menu to choose the signal source for each output channel:
None, IN1, IN2, IN1+, IN2 (mono mix from a stereo source), or GEN (internal signal generator).
• AMP GAIN- Calibrates the COMP/LIMIT voltage threshold to the gain of the amplifier that will be
used with the DLX24 device. This parameter is critical for the COMP/LIMIT in order not to exceed a
certain level and/or to protect speaker systems.
2) CROSSOVER- The Low-Pass and High-Pass filters define a frequency bandwidth.
Available filter types that can be selected from the TYPE drop-down menu are:
• Bypass (filter not activated)
• Bessel (12, 18, 24 or 48 dB/oct)
• Butterworth (6, 12, 18, 24 or 48 dB/oct)
• Linkwitz-Riley (12, 24 or 48 dB/oct)
3) PARAMETRIC EQ- These filters enhance or attenuate different frequency ranges of the signal. Eight
filters are available for each input, and each one of them can have the following settings (selected from
the TYPE drop-down menu):
• Bypass (filter not activated)
• Parametric EQ (controls for frequency, Q [bandwidth] and gain of the affected band)
• High Shelf (6 or 12 dB/oct)
• Low Shelf (6 or 12 dB/oct)
• High Pass (6 or 12 dB/oct)
• Low Pass (6 or 12 dB/oct)
• All Pass (1st or 2nd order)
9
5. Software Configuration
5.5 Output Processing (cont’d)
4) COMP/LIMIT (Compressor/Limiter)- This is the dynamics processor of the input channel with signalpeak detection. It has the following controls:
• THRESHOLD- Adjusts the threshold of the COMP/LIMITER (Volts).
• RATIO- Gain reduction of the processed (compressed) signal compared to the incoming signal.
• ATTACK- The time it takes the compressor to start compressing after the threshold has been reached.
• RELEASE- The time the compressor takes to stop compressing after the input signal has fallen below
the threshold.
• MAKE-UP- Gain applied to the signal after compression, to globally increase its level once dynamically
modified.
• KNEE- The type of curve (transition zone around the threshold) that determines whether the bend in the
response curve around threshold is abrupt (HARD) or gradual (SOFT).
• GR (Gain Reduction)- This real-time meter (dB) indicating COMP/LIMIT attenuation, including
MAKE-UP GAIN
5) COMP/LIMIT 2 (Compressor/Limiter)- Dynamics processor of the output channel with signal RMS-level
(Root Mean Square) detection. It has the same controls and indicators as the PEAK Compressor/Limiter.
6) LOUDSPEAKER PRESET- Allows you to load or save a loudspeaker preset for an output channel, on
your computer or on a storage device, which will be directly associated with the characteristics
of a specific speaker system model (crossover frequencies, delay, EQ, compression and limiting, etc.).
This preset can be loaded subsequently in DLX24 devices requiring an
exact copy of the settings it contains. A PROTECTED preset will be
loaded as an uneditable preset. Uneditable setting parameter controls will
be disabled. This will insure that the PROTECTED preset is not edited.
(see Fig. 5-15)
Fig. 5-15
IMPORTANT: When loading a PROTECTED Loudspeaker Preset file, the “AMP GAIN” field must
also be appropriately set. This will ensure proper calibration of the Loudspeaker Preset Limiters.
7) COPY/PASTE- These icons “copy” the settings from one channel and "paste" them in another, cloning
the settings. (All settings, except the label or channel name, can be copied and pasted.)
8) LINK GROUPS- The two inputs can be part of the same LINK GROUP.
In this mode, all the settings of an input (for example, the left channel)
will be automatically applied to the other input (right channel), and viceversa. (see Fig. 5-16)
Fig. 5-16
The F2 key gives you access to the Change Channel Name
Screen which allows you to rename an input or output channel.
(see Fig. 5-17)
Fig. 5-17
10
5. Software Configuration
5.6 Graphical Window
The icon located in the top right corner of the application allows you to view the Graphical Window.
Fig. 5-18
This window will display a graphical representation of volume, crossovers processing and parametric
equalization of each of the inputs and outputs, and even allows filter parameters to be adjusted in
real-time on the screen. (see Fig. 5-18) You just have to click and drag one of the circular icons available
for each filter. (Protected Loudspeaker Preset graphicals will not be viewable.)
11
5. Software Configuration
5.7 Report Log
The icon located in the lower right corner of the application allows you to view the Report Log, which
contains a list of events recorded by the application since the start of the session. (see Fig. 5-19)
Fig. 5-19
5.8 Password Protection
The device can be password protected so that each time you try to access the System Control Manager
application, this password is required, protecting settings against tampering. (see Fig. 5-19)
To create or change a password, click on the Lock
icon. On the Enter Password screen, enter the
desired password in both the New Password and
Confirm New Password fields.
If no password is desired, or if removing a password,
do no enter anything in the New Password and
Confirm New Password fields. Then click OK.
Fig. 5-20
12
6. Unit Diagrams
6.1 Function Diagram
6.2 Function List
1. USB port
2. SIGNAL/CLIP indicator light, INPUT 1
3. SIGNAL/CLIP indicator light, INPUT 2
4. SIGNAL/CLIP indicator light, OUTPUT 1
5. SIGNAL/CLIP indicator light, OUTPUT 2
6. SIGNAL/CLIP indicator light, OUTPUT 3
7. SIGNAL/CLIP indicator light, OUTPUT 4
8. POWER ON indicator light
9. Power switch
10. Fuse holder
11. Mains socket
13
12. Pluggable terminal for remote control,
REMOTE B
13. Pluggable terminal for remote control,
REMOTE A
14. XLR output connector, OUTPUT 4
15. XLR output connector, OUTPUT 3
16. XLR output connector, OUTPUT 2
17. XLR output connector, OUTPUT 1
18. XLR input connector, INPUT 2
19. XLR input connector, INPUT 1
7. Technical Specifications
Analog Inputs
Number of Inputs: ....................................(2)
Connectors: ..............................................3-pin Female XLR
Type:..........................................................Electronically balanced
Impedance: ..............................................20k
CMRR: ......................................................> 55 dB
Analog Outputs
Number of Outputs: ..................................(4)
Connectors: ..............................................3-pin Male XLR
Type: ........................................................Electronically balanced
Impedance: ..............................................300
Digital Interface
USB: ........................................................Standard A/B, front panel
System Performance
Frequency Response: ..............................20 Hz – 20 kHz, +/- 0.5 dB
Crosstalk: ..................................................> 95 dB, 20 Hz – 20 kHz
Noise Floor: ..............................................< -115 dB, 20 Hz – 20 kHz
THD+N: ....................................................< 0.0028%, 20 Hz – 20 kHz
System Features
Max. Delay: ..............................................1s input, 1s output
(adjustable in 20.8µs steps)
Crossover Filters: ......................................Linkwitz-Riley (12, 24, 48 dB/oct)
......................................Butterworth (6, 12,18, 24 dB/oct)
......................................Bessel (12, 18, 24, 48 dB/oct)
EQ Filters: ................................................8 bands per input and output channel
................................................Parametric (adjustable Q, Gain, and Frequency)
................................................Low & High Shelf (6,12dB/oct)
................................................Low & High Pass (6,12dB/oct)
................................................All Pass (1st and 2nd order)
Limiters: ....................................................Peak & RMS
....................................................Threshold: -36 to +12 db (Input)
15V to 150V (Output Peak)
10V to 100V (Output RMS)
....................................................Attack Time: 0.1-500ms
....................................................Release Time: 1.0-5000ms
....................................................Ratio: 1:1 - ∞:1 (Hard & Soft Knee)
Power
Input AC:....................................................100-240V AC, 1.1A, 50/60 Hz
Power Consumption: ................................16VA
Connector: ................................................3-pin IEC
Physical
Product Weight: ........................................3.86 lb. (1.73 kg)
Dimensions: ..............................................19" W x 1-3/4" H x 4-3/4" D
(482.6mm x 44.5mm x 121mm)
14
8. Block Diagram
15
9. Warranty; Exclusion of Certain Damages
The Apogee DLX24 is warranted to be free from defects in material and workmanship for 3 (three) years from the date of sale to the
original purchaser. Any part of the product covered by this warranty that, with normal installation and use, becomes defective (as confirmed
by Bogen upon inspection) during the applicable warranty period, will be repaired or replaced by Apogee, at Apogee’s option, provided the
product is shipped insured and prepaid to the Apogee Factory Service Department. Repaired or replacement product will be returned to
you freight prepaid. This warranty does not extend to any of our products that have been subjected to abuse, misuse, improper storage,
neglect, accident, improper installation or have been modified or repaired or altered in any manner whatsoever, or where the serial number
or date code has been removed or defaced.
THE FOREGOING LIMITED WARRANTY IS BOGEN’S SOLE AND EXCLUSIVE WARRANTY AND THE PURCHASER’S SOLE AND
EXCLUSIVE REMEDY. BOGEN MAKES NO OTHER WARRANTIES OF ANY KIND, EITHER EXPRESS OR IMPLIED, AND ALL
IMPLIED WARRANTIES OF MERCHANTABILITY OR FITNESS FOR A PARTICULAR PURPOSE ARE HEREBY DISCLAIMED AND
EXCLUDED TO THE MAXIMUM EXTENT ALLOWABLE BY LAW. Apogee's liability arising out of the manufacture, sale or supplying of
products or their use or disposition, whether based upon warranty, contract, tort or otherwise, shall be limited to the price of the product. IN
NO EVENT SHALL BOGEN BE LIABLE FOR SPECIAL, INCIDENTAL OR CONSEQUENTIAL DAMAGES (INCLUDING, BUT NOT LIMITED TO, LOSS OF PROFITS, LOSS OF DATA OR LOSS OF USE DAMAGES) ARISING OUT OF THE MANUFACTURE, SALE OR
SUPPLYING OF PRODUCTS, EVEN IF BOGEN HAS BEEN ADVISED OF THE POSSIBILITY OF SUCH DAMAGES OR LOSSES. Some
States do not allow the exclusion or limitation of incidental or consequential damages, so the above limitation or exclusion may not apply
to you. This warranty gives you specific legal rights, and you may also have other rights which vary from State to State.
Products that are out of warranty will also be repaired by the Apogee Factory Service Department. The parts and labor involved in these
repairs are warranted for 90 days when repaired by the Apogee Factory Service Department. All shipping charges in addition to parts and
labor charges will be at the owner's expense. All returns require a Return Authorization number. For most efficient warranty or repair service,
please include a description of the failure.
11/2014-APG
www.apogee-sound.com
16