1
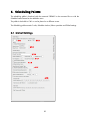
AddoSoft ADDOBAR USER MANUAL October 2015 Revision 1.0 – 10 October 2015 Synopsys This document sets out to describe the reinforcement detailing CAD add-on application by AddoSoft, AddoBar. The software tool, its operation and associated settings is outlined in this document, meant to serve as a user, reference and/or training guide. Chapters are logically divided to guide the user through the uses of the tool and to bring hidden and unknown features to the fore. Disclaimer This report has been prepared for the use and reference of AddoBar users, and is subject to and issued in accordance with the agreement between AddoSoft its Users. AddoSoft accepts no responsibility whatsoever for the use of the software and its consequences. Using this application is at the user’s own risk. AddoBar does NOT substitute engineering design, any detailing code or rational, logical detailing. All tools, scripts, wizards, blocks and examples should be subject to technical review from an engineering design perspective. Bending schedule lists produced by this application are without any warranties and may be subject to errors from time to time. Users should confirm computational output from this application with relevant codes and standards. It is the sole responsibility of the user to keep the application up to date with the latest releases, report any errors and/or crashes to the developers and use the tool responsively in reinforcement production. AddoSoft is NOT the developer of Autodesk AutoCAD nor BricSYS BricsCAD, and cannot be held responsible for application defects relating to either softwares. Published by: AddoSoft Pty Ltd 166 John Adamson Drive Roosevelt Park Gauteng 2195 South Africa Contact: Wolter Bijker +27 83 408 1891 Contact: JP Rousseau +27 72 433 7350 2 Table of Contents Synopsys ........................................................................................................................... 2 Disclaimer ......................................................................................................................... 2 1. 2. 3. 4. 5. Setup.......................................................................................................................... 5 1.1 Downloading AddoBar.......................................................................................... 5 1.2 Installing AddoBar for the first time ......................................................................... 5 1.3 Re-Installing AddoBar............................................................................................ 6 1.4 Manual Setup ....................................................................................................... 7 1.5 Updating AddoBar with AddoBar Updater .............................................................. 8 1.6 Activating AddoBar............................................................................................... 9 Quick Start................................................................................................................ 10 2.1 Rebar Template .................................................................................................. 10 2.2 Adding a bar ..................................................................................................... 11 2.3 Adding a member block ...................................................................................... 12 2.4 Producing a bending schedule.............................................................................. 13 Rebar Object............................................................................................................. 15 3.1 Visual Bar Object................................................................................................ 15 3.2 Bar object properties ........................................................................................... 16 3.3 Add Bar dialog................................................................................................... 17 3.4 Bar-list XML ........................................................................................................ 19 Bar style object .......................................................................................................... 23 4.1 Bar style object manager ..................................................................................... 23 4.2 Bar style object attributes ..................................................................................... 24 4.2.1 Leader ........................................................................................................ 25 4.2.2 Cover ......................................................................................................... 26 4.2.3 Bar and Range ............................................................................................ 26 Referenced Dim style .................................................................................................. 28 5.1 Scale settings ...................................................................................................... 28 5.2 Arrow settings .................................................................................................... 28 5.3 Leader settings .................................................................................................... 29 3 5.4 6. Scheduling Palette...................................................................................................... 30 6.1 Global Settings ................................................................................................... 30 6.1.1 Round cut length .......................................................................................... 31 6.1.2 Verbose Logging .......................................................................................... 31 6.1.3 Default Country/Code .................................................................................. 31 6.1.4 Table Style................................................................................................... 31 6.1.5 Row heights and scale .................................................................................. 31 6.1.6 Schedule table variables ............................................................................... 31 6.1.7 Schedule table block and layout .................................................................... 31 6.1.8 Schedule/Weight table column widths............................................................ 32 6.2 Schedule Window ............................................................................................... 32 6.2.1 Top Buttons.................................................................................................. 32 6.2.2 List members box ......................................................................................... 33 6.2.3 Highlight bar tick box ................................................................................... 33 6.2.4 Schedule table ............................................................................................. 33 6.2.5 Bottom Button .............................................................................................. 34 6.3 7. Line Settings ....................................................................................................... 29 Rebar Quantities ................................................................................................. 36 Final Remarks............................................................................................................ 37 4 1. Setup 1.1 Downloading AddoBar AddoBar can be downloaded at http://addosoft.co.za/downloads/AddoBar.exe or by scanning the QR code on the last page of this manual. Since the application is specialist engineering software, the installer is not downloaded thousands of times. Furthermore, the installer file is built by AddoSoft for every new and updated release. This may cause windows to block the file depending on the user’s security settings. To unblock the file, follow these steps: - Once downloaded, the file needs to be unblocked by windows by right clicking on the file and choosing properties. - In the General tab, tick the Unblock box, and click Apply & OK. 1.2 Installing AddoBar for the first time Once unblocked, run the installation file. Windows will prompt for elevated user account control (UAC) rights. The Welcome screen will appear showing the release number. Click Next. The “Select Components” screen will show a bullet list of CAD platforms installed on the system. 5 Only one CAD platform can be selected at a time. If the user wants to install AddoBar on more than one CAD platform, the installer needs to be executed for each CAD platform installation. On completion, the installer will prompt to run the installed CAD system and view the changelog. Each tick-box will be ticked by default. The selected CAD system must be run once in elevated user account control (UAC) rights for the relevant COM interaction CUID code to be installed in the system’s registry. 1.3 Re-Installing AddoBar The installer file may also be used to update AddoBar or to install AddoBar on another supported CAD platform on the system. Should AddoBar be already installed, the installer will prompt the user with the following message boxes. When CAD is running, the AddoBar application files are in use by the CAD system and would therefore be not-replaceable. It is therefore important to make sure all CAD systems are closed. Since windows keeps track of an installer’s status, the existing installer must be uninstalled before it can run again and make further changes to the system. AddoBar will not uninstall itself in this case, only the installer program is being uninstalled. All registry entries, files, directories and customizations will remain intact. Therefore, the user must select NO at the next dialog prompt: 6 Although the windows installer system will prompt that AddoBar was successfully removed from the computer, this message only applies to the installer program, not the application. The rest of the installation procedure is the same as before. 1.4 Manual Setup This section describes how to install AddoBar manually by means of the registry entry scripts found in the bin directory under AddoBar and adding the path to trusted locations in AutoCAD. The program library files for each compiled CAD version of AddoBar is stored in the C:\AddoSoft\AddoBar\Bin\ directory. “V” followed by a number refers to BricsCAD whereas “Acad” followed by a number refers to AutoCAD. 64-bit builds are appended with the suffix “x64”. Registry Each directory contains arx, dbx and dll files required for AddoBar to run on the CAD platform. Also contained in each folder is a reg script file containing registry entries to link the system files to their particular CAD platform. These scripts may be used to add the required registry entries to the register in cases where the installer was unsecessfull or cannot be used. The reg script file may also be edited to suite special releases of CAD platforms not supported by the installer by default. In this example for AutoCAD 2015, the AutoCAD release is referenced in the first 3 entries, linking the arx, dbx and dll files, as “AutoCAD\R20.0\ACAD-E001:409”. If the packaging of AutoCAD 2015 is in a suite, the last number might be different, although still build R20.0. For example, AutoCAD 2015 in the Ifrastructure design suite references “AutoCAD\R20.0\ACAD-E030:409” 7 The last two registry entries adds AddoBar specific information to the Current User section of the registry. These entries are required for AddoBar to know its own location, the location of the setting files and the user information. AutoCAD Trusted Location BricsCAD users can ignore this sections since this is only applicable to AutoCAD users. Since AutoCAD 2014, Autodesk introduced a Trusted Locations variable to try and avoid spamware from damaging the AutoCAD setup. If AddoBar is not added to the Trusted Locations list, AutoCAD will warn the user at startup before loading any programmatic add-on files such as arx, dbx or dll programs. In AutoCAD, type options in the command line. The above dialog box appears. Choose the Files tab and expand Trusted Locations (3rd in the the tree-view). Choose the Add button and browse to the relevant version directory under C:\AddoSoft\AddoBar\Bin\... and add the location. 1.5 Updating AddoBar with AddoBar Updater Addobar will automatically check for newer versions. If a new version is available a button will appear in the schedule window as seen below. 8 Pressing this button will open the AddoUpdater. The Updater will automatically detect the version(s) installed. Updating AddoBar will fetch and replace the old files with the new build. The updater can be run as a standalone by running the AddoUpdater.exe file in "C:\Addosoft\AddoBar\AddoUpdater.exe" 1.6 Activating AddoBar AddoSoft use an online activation system, the system will verify your license and activate AddoBar. The software may be use on multiple workstations, effectively making it a network license. To make use of this feature you will have to be connected to the internet. A license can only be used on one (1) workstation at a time. To transfer the license to a different workstation, you will have to de-activate AddoBar first, and then activate AddoBar on a different workstation. To de-activate AddoBar, simply press the License command on the ribbon. The “Activate license” button will change to “Deactivate” Note to IT admin: Activation server is located on http://www.addosoft.co.za, please do not block access to this site via proxy server(s) or router. 9 2. Quick Start This section guides the user through adding a bar in the CAD model space in a few easy steps. It also illustrates the use of a template file and producing a rebar schedule with the scheduler. Bricscad Menu AutoCad Menu 2.1 Rebar Template The easiest way to start a rebar drawings is to open a template file with pre-defined styles, layers and settings. AddoBar provides a basic rebar template setup in the following location: "C:\Addosoft\AddoBar\Block\ADDO_REBAR_TEMPLATE.dwt" The file may be opened by double clicking on it or opening it in CAD. The file is customized to provide the following pre-set abstract objects: Layers: Relevant layers have been set up such as Concrete, Rebar, Dimension, Grid & Text. TextStyle: The default text style, on which all other styles are based, is Arial. DimStyle: Four custom dimstyles are provided, of which DIM ANNO & DIM REBAR should be used. Multileader Style: One custom style has been setup, DIM ANNO, matching the equivalent DimStyle. TableStyle: One custom style for schedules named Schedule table style. Barstyle: Four visual barstyles have been created, with standard as the current. The relevant styles above has been set as the default values in the template. 10 2.2 Adding a bar To add a bar, envoke the ab_addbar command on the command line, or switch to the AddoSoft ribbon and click on the AddBar icon. The following dialog box will appear: Since the template setup has the correct settings as default, the correct layer, Barstyle, Dimstyle and Scale should already be chosen correctly. Click the Add button to add the bar to model space. Back in model-space, the default bar shape will be displayed on the cursor whilst the command prompt will guide the user through the insertion process: Click the insertion point Rotate the bar, if desired, whilst clicking the second insertion point Choose the remaining dimension by clicking the stretch points into place 11 Click a insertion point for the leader Press the Escape key to exit out of the bar insertion procedure. 2.3 Adding a member block The quickest way to generate a bending schedule of a component is to make use of member blocks. The easiest example can be opened from the following location: "C:\Addosoft\AddoBar\Block\Rebar Blocks\AB-BASE-RC.dwg" This file contains a dynamic block definition which is editable in the properties palette. Its dynamic attributes allows the user the change basic geometry such as width, breadth and height. Once the desired dimensions has been set, the block can be exploded by using the BURST command. This explodes the block into its sub components with the changed block settings intact. Rebar object parameters are now accessible via the property palette and readable by the scheduler. 12 NOTE: Member blocks can be assembled in separate files or in a single file, which in turn can be added to the Tool Palette by creating a new tab from a file: Open the desired block containing dwg file. Use Ctrl 2 to open the Design Center. Right Click on the block containing file under the Open Drawings tab Click Create Tool Palette On opening the tool palette, a new tab would have been added with all the blocks in the drawing as icons on the palette. Remove the undesired blocks by Right clicking on the icons and selecting Delete. These member blocks can now be added to any drawing by simply dragging the icon from the palette into model space. 2.4 Producing a bending schedule Now that there is a member with bar objects in model space, a bending schedule may be produced by means of the scheduler. First make sure that all the bars belonging to the member to be scheduled, has the same member Name: Make sure the CAD properties palette are open, visible or docked. If not, load it by typing PROPERTIES in the command line. Select all the entities in the member with a fence select, clicking top right first and then bottom right. At the top of the properties palette, click the dropdown containing All(#) (where the # is a number) to display all the objects in the selection. Choose by clicking on Reinforcement Now the common properties of all the bar objects are being displayed. Where properties differ, the term *VARIES* will be displayed. Under the General grouping, the Name property should be a term common to all the selected bars. If not, *VARIES* will be displayed. In this case, type the desired member name in the field, press Enter. Press Esc to unselect the objects in model space. 13 Now that all the bars in the member belong to the same group, a bending schedule can be produced: Select the AddoSoft ribbon tab and click the first icon, Schedule, or type REBAR in the command line. The Rebar Palette will load and dock on the left side of the CAD screen. In the top left list, the member name given to the selection of bars in the previous step will appear in the list. Click on the name The Schedule Table will now be populated with the schedule information of the bar objects belonging to this group. Click the Schedule button top right, click in Model space and select the insertion point for the table. 14 3. Rebar Object This chapter sets out to explain all associated properties and settings relating to the Rebar object. 3.1 Visual Bar Object AddoBar’s approach to reinforcement detailing is object orientated. That means that reinforcement is represented by a dwg database visual object which can be viewed and manipulated in model space, viewed in paper space, and configured with grip-points and the standard CAD com-based property palette. In most instances the object can be accessed by selecting its visual representation in model or paper space. Like any other dwg entity, multiple instances of the object can be selected at a time with any of the standard CAD selection mechanisms. Once selected, the bar object displays its associated grip stretch points, its dimensional annotations as well as its properties via the property palette (which is described below). The following standard CAD commands may be used with the rebar object: Move Copy Array Mirror Stretch Layer selection Line-type selection Colour Selection Hot-grip manipulation Selection filtering All of the above functions are native standard CAD functions which the bar object is able to understand and manipulate its own variables and state accordingly. 15 3.2 Bar object properties The bar object exposes most of its data, visual and dimensional properties to the standard CAD properties palette. This section briefly highlights each property setting and how to edit it. General - - TrueColor: Sets the color of the bar object Layer: Sets the layer in which the bar object resides Linetype: Sets the linestyle of the bar lines LinetypeScale: Sets the scale of the selected linetype. Angle: Sets the bar angle; the text angle; text-on-bar (ToB) angle relative to the current UCS x-axis positive vector o To set the bar angle type an angle in degrees o To set the text angle, type ’;’ + angle in degrees o To set ToB angle, type ‘;;’ + angle in degrees View: Sets the view direction of the bar ShowRangeLine: Displays the range line for ranged groups ShowDims: Displays the dimension lines on bar variables Barstyle: Sets the associated bar style object Dimstyle: Sets the associated dimension style object Scale: Sets the annotation scale. Type only the 2nd value Member Info - - Mark: Sets the bar mark, a unique identifier per group Size: Selects the bar material designator and diameter Density: Sets the bar count and/or spacing o To set the count type the number as a real number o To add a multiplier, type a number + ‘x’ before count o To set the spacing, type ‘@’ + real number as spacing Shape: Sets the shape code identifier (text value) Postscript: Sets the label’s post-script tag (text value) Label: Selects the label order (as defined in the barstyle) Cover: Sets Top;Bottom;Side covers separated by ‘;’ Step: Sets the stepping criteria for stepped groups Schedule: Sets whether or not to include in the schedule Listening: Should the bar respond to equivalent bar actions Definition / General - Adim – Edim: Sets the dimensional variables as defined by the shape code Name: Member group name as bars will be grouped in the schedule Count: Multiplier for the associated member group (unique per group) Volume: Placeholder for member concrete volume to be recorded (unique per group) 16 3.3 Add Bar dialog The add bar dialog assists the user in adding bar objects to model space by providing an interface to set important properties before the object is being clicked into place. The dialog can be loaded with the command-line command ab_addbar, or by clicking the bar icon in the toolbar or AddoSoft ribbon. The add-bar dialog consists of three parts: Properties, range options and a preview. The preview pain displays a sample of the selected bar shape on a virtual viewport of model space drawn with dimensions in the selected styles. Properties - - Bar Color: Sets the color of the bar object Layer: Sets the layer of the bar Barstyle: Choose the associated style Dimstyle: Choose the dimension style Name: Sets the member name Count: Sets the no off member Volume: Sets the associated member volume Mark: Sets the bar mark. Will increment from last used mark in the associated member group Type: Sets the bar material type Diameter: Selects the bar diameter Spacing: Sets the spacing from bar to bar Shape: Selects the bar shape to be inserted Postscript: Selects or sets the post script string used in the bar tag Label: Selects the format of the bar tag (as defined in the selected bar style) Schedule: Selects whether or not the bar should be listed by the scheduling palette. Range options - Single Bar: Add a single bar to the drawing. The clicking sequence is as follows: 1. Choose the insertion point. 2. Click the first dimension grip-point while rotating the bar to the desired rotation. 3. Click the remaining dimensions into place. 4. After the last dimension the first point of the leader may be clicked. 17 5. Thereafter multiple leader points may be inserted. 6. To terminate and exit the command, press the Esc key. - Ranged Bar: Add a ranged bar to the drawing. The clicking sequence is as follows: 1. Same as steps 1-3 above. 4. After the last dimension, the first and last points of the range line should be chosen. 5. After the last range line point, the first point of the leader may be clicked. 6. Thereafter multiple leader points may be inserted. 7. To terminate and exit the command, press the Esc key. - Ranged Bar: Add a stepped group to the drawing. The clicking sequence is as follows: 1. Same as steps 1-3 above. 4. After the last dimension, click the insertion point of the bar to be ranged to. 5. Repeat step 3. 6. After the last dimension, the first and last points of the range line should be chosen. 7. After the last range line point, the first point of the leader may be clicked. 8. Thereafter multiple leader points may be inserted. 9. To terminate and exit the command, press the Esc key. - Fan Range: Add a fan group to the drawing. The clicking sequence is as follows: 1. Same as steps 1-3 above. 4. After the last dimension, pick the arc centre point. 5. Select a position where the arc should cross the bar (advisable to click on the bar). 6. Click the first and last points of the range line. 7. After the last range line point, the first point of the leader may be clicked. 8. Thereafter multiple leader points may be inserted. 9. To terminate and exit the command, press the Esc key. - Alternate Bar reversed: Adds an alternate-bar-reversed group to the drawing. The clicking sequence is as follows: (Tip: test function with SC 34) 1. Same as steps 1-3 above. 4. After the last dimension, pick the insertion point of the alternating bar. 5. Click the first and last points of the range line. 6. After the last range line point, the first point of the leader may be clicked. 7. Thereafter multiple leader points may be inserted. 8. To terminate and exit the command, press the Esc key. - Alternate Bar Offset: Adds an alternate-bar-offset group to the drawing. The clicking sequence is the same as above for Alternate bar reversed: - Alternating Bars range: Adds two different bars in an alternating configuration to the drawing. The clicking sequence is as follows: 18 1. 4. 5. 6. 7. 8. 9. - Same as steps 1-3 above. Click the first and last points of the range line. After the last range line point, the first point of the leader may be clicked. Thereafter multiple leader points may be inserted. To terminate and exit the command, press the Esc key. Select the position of the alternating bar. Select the position of the alternating bar’s text label. Multiple Ranged Bars: Add a ranged bar with multiple range lines to the drawing. The clicking sequence is as follows: 1. Same as steps 1-3 above. 4. Click the first and last points of the range line. 5. Repeat step 4 for all desired ranges and then press the Esc key. 6. Thereafter multiple leader points may be inserted. 7. To terminate and exit the command, press the Esc key. 3.4 Bar-list XML The bar shape definitions are stored in an xml formatted file for easy customization. This sections sets out to unpack the xml tree hierarchy and explain the rationale behind shape-code definitions. The default shape list file is named barlist.xml and can be found in c:\Addosoft\AddoBar\ It is recommended to edit the file with an xml format enabled viewer such as NotePad++ which can be downloaded at https://notepad-plus-plus.org/download/ (To view In NotePadd++, open the barlist.xml file, click on the Language menu and select XML) Codes: The highest level in the structure lists international reinforcement codes based on code name and country. The default list contains the South African SANS 282:2011 code and the UK BS 8666:2005. Variables: Each Code node contains a list of variables associated with a customizable name. The following list of variable may be used: strhook: standard straight hook length radius: applicable bending radius dia: applicable bar diameter bnthook: standard bent hook length 19 PI: the irrational number Pi. dim1-dim5: the 5 useable variable dimensions of a shape-code definition The above variable may be combined in a number of symbol names which may be referenced in the shape-code definition. Sizes: Each Code node contains a list of type ranges (which is given a unique identifier usually associated with the material designator such as “R”) referred to as a symbol, which in turn contains a list of standard sizes. Each size entry contains unique data for the variables dia, radius, bnthook and strhook. Shapes: The third section of the code node contains a list of shape-codes. The first entry in this list defines the default bar to be shown in AddoBar when the detailing code is set. It defines the default shapecode, diameter, symbol and undefined shape-code. Thereafter the list of shape-codes follow. Each shape-code contains sub-fields, defining the form, grips, min-max values and shape-code specific parameters. The following is an extract of a 72: The first entry is the <def> container containing a text list defining the linear propagation of the rod. It consists of an arbitrary list of vectors separated with the symbol ’|’. Each vector is defined by 5 comma separated values: - delta x: moving in the local x-direction. This value may be written as a mathematical function of variables (polish math notation applies) or a constant. delta y: moving in the local y-direction delta z: moving in the local z-direction (not yet implemented, use ‘0’) bulge factor: 0 for straight, 0.5 for 90° bulge and 1 for 180° degrees. Can be negative. Vector code: Alpha codes to manipulate behaviour in the vector (see below): 20 The second container, <seq>, defines grip sequencing of the shape. It is important to note when nodes and when vectors are referenced. The node list is 0-based and is always the vector list count plus 1. Vector 0 is defined as node 0 to node 1. The list consists of 4 text values: - - ip: insertion point number (0-based) as measured from the first vector. vl: vector list, separated with ’|’, indicating vectors which should be assigned stretch grips. ol: offset list, separated with ’|’, defining the offset line. Can be ‘0’, ‘-‘, ‘S’ (side), ‘T’ (top) or ‘B’ (bottom). The first and last value defines the side offset the start and end nodes, the rest applies to the corresponding vector. The list length must be equal to the vector count plus 2. rv: rotation vector, defines the vector which will contain the rotation grip based on two node numbers (0-based list). The third container, <var>, defines the 5 variable dimensions of the shape-code. It consists of 5 text values: - def: comma separated list (max length of 5) of the default values for the used dimensions. May be a function of variables as defined earlier. 21 - max: comma seperated list (max length of 5) of the maximum allowable length for each dimension (mandatory for bar flipping operation). min: comma seperated list (max length of 5) of the minimum allowable length for each dimension (mandatory for bar flipping operation). len: mathematical formula (polish notation) of the cut-length. If set to 0, AddoBar will use the geometric centreline of the bar to calculate the cutting length. Shape-code designators may be alpha-numerical. Shape-code designators pre-pended with a ‘0’ will be regarded as unique by the object, but not by the schedules. ie, SC 038 and 38 may have different bar definitions which will result in 2 unique bar objects, but the scheduler will read both as 38. 22 4. Bar style object The bar style object is an abstract custom object which is designed to store certain variables associated to the Bar object. Although these objects are stored in the dwg database, they cannot be viewed in model or paper space. In order to access them, the user must load the Bar style object manager by clicking on the BarStyle icon on the ribbon or typing ab_bstyle in the command line. 4.1 Bar style object manager The Bar style object manager has been designed to have the same look and feel as the standard AutoCAD dimstyle manager dialog. The Current style in use is shown top left and can be changed by selecting a style in the list and clicking on the Set Current button. The New… button opens the Create New Bar Style dialog box where the user can create a new style based on an existing style. By default, the standard style will always be present and cannot be deleted. Type a new name and click OK to add the new style to the style list. Any style, except the standard style, can be deleted at any time, provided that it is not selected as the CURRENT STYLE. Click on the style name in the list and click the Delete button. To modify a style, highlight it in the list and click the Modify… button. This will load the Bar Style Settings dialog box explained below. To exit the dialog click OK to save changes or Cancel to exit without storing changes. 23 4.2 Bar style object attributes To modify a bar style’s settings, click on the BarStyle icon on the ribbon or type ab_bstyle in the command line. In the Bar Style Object manager, click on the Modify… button. This will load the Bar Style Settings dialog box. The window is divided in four quadrants: Leader: This deals with all aspects of the leader and its contents. Cover: These settings adjust cover on the bar and set some visual options associated with cover. Preview: Displays a preview of a typical bar object with the style settings applied. Bar and Range: Sets visual display settings which is beyond the scope of dim style settings. 24 Above the Leader container, a Dimension Style may be chosen to be associated with the bar style. NOTE: This setting does not fix a dim style to a bar, it only sets the default associated dim style with the bar style. 4.2.1 Leader The first group of controls is geared to assist the user to build a list of options for the contents of the Leader tag. The top most textbox can be filled in with standard text, or variable codes, or a combination of both. The leader option can be build up by selecting available codes from the right drop-down and adding it into the textbox by clicking the <- button. The following codes may be referenced: - [Cnt]: Placeholder for the member count variable. [Mlt]: Placeholder for the multiplier, if specified. [Nof]: Placeholder for the number of bars represented by the object. [Dia]: Placeholder for the diameter. [Mrk]: Placeholder for the bar mark [Spc]: Placeholder for the bar spacing [Psc]: Placeholder for the bar post script, also known as the tag. Once the label has been assembled as required, it can be added to the list with the Add button. To remove an entry in the list, select it and click Remove. To copy an entry to the textbox in order to edit it, highlight the entry in the list and click Copy. Click in the top text box, right click and select paste, or type Ctrl – V. The order of the entries in the list can be manipulated by selecting the desired entry and using the up and down buttons ( v ^ ). The next line of controls deal with multiplier codes which may be used in the post script field. The first control is an editable dropdown textbox where a multiplier abbreviation can be entered or chosen from a list of existing abbreviations. When a new abbreviation is typed into the box, the multiplier needs to be typed into the multiply by text box. The default value is 1. Click the Add button to add the new abbreviation and its associated multiplier to the list. 25 When the user chooses an existing abbreviation from the list, the associated multiplier will be displayed in the multiply by text box. To remove the selected abbreviation from the list, click the Remove button. The remaining five settings relates to display parameters associated with how the leader is drawn: - Mark Factor: Factors the bar mark text size up or down in relation to the defined text size. Mark Color: Sets the bar mark colour in the label. ByBlock yields the label’s text colour. Kink Leader on insert: When a bar is inserted graphically with the add-bar dialog. Landing factor: times the text height equals the leader landing distance. Centre floating tag: Sets centre text adjustment when the label has no leader line. 4.2.2 Cover Cover is perceived from the bar’s definition axis, or as seen when the bar is at a 0 angle of rotation. Top cover is usually applied on the northern x-direction vectors, Side to the eastern and western y-direction vectors and Bottom to the southern xdirection vectors. Top, Side and Bottom adheres to the T, B & S codes in the bar definition xml list. The following settings can be adjusted relating to the bar cover: Offset grips: places bar grips on cover line. Show cover border: draws the cover line. Cover Border Color: Sets the colour of the cover line. Snap to cover border: makes the cover border snap-able. Top: perpendicular distance from bar lines to top cover. Bottom: perpendicular distance from outside bar lines to bottom cover. Side: perpendicular distance from outside bar lines to side cover. Side cover on range-line: Applies side cover offsets on the range line grip points. Exact Rangeline spacing: Keeps the spacing of bars exact and applies half the residual on each side of the range-line. 4.2.3 Bar and Range The following settings can be adjusted relating to the bar and range-line: 26 Bar Line Style: Sets the line style in which the bar should be drawn (see above). Non-Schedule Bar: Sets the “Schedule = No” bar line colour. Showdims display symbols: Displays the vector symbols when “showdims = True”. Space bars to range-line: Calculate the spacing in the direction of the rangeline instead of perpendicular to the bar rotation. NOT recommended as stated in note! Rebar Dot Scale: Scales the size of the diameter when the bar is seen in section or as dots. Range to Bar Dot: The next two settings refers to the dot where the range-line and bar cross. Open Dot: Sets whether the bar to range-line dot is open or hatched. Scale: Sets the crossing bar dot scale relative to the dimension or annotation scale. Range Dot Color: Sets the colour of the abovementioned bar to range-line dot. Slide Leader on Rangeline: Slides the leader on the range-line when the first leader grip is moved. Else the leader snaps to the start, end or bar-to-range-line intersection. Show singe stepped-group bar: Display only one bar in a stepped group instead of two. 27 5. Referenced Dim style Each bar object references a standard CAD dim-style from which it applies certain settings in determining its own visual display. This section outlines the different applicable dim-style settings and explains how it effects the bar object. To edit a dimstyle, type DIMSTYLE in the command line, or use the relevant user interface button. Once the Dimension Style Manager is loaded, choose the dimstyle referenced by the relevant bar and click the Modify… button. Note: In BricsCAD the dim-style settings are displayed as a hierarchical list, but the variables available to set is the same as in AutoCAD. 5.1 Scale settings The scale at which annotative markings and text is drawn for a bar object is a function of the property Scale, multiplied with the associated dim-style scale. The dim-style scale is set in the Fit tab in the Scale for dimensions features container frame. Three options are available. - The scale can be set to Annotative, which implies the bar will adapt the current annotation scale set in model space. User overall scale of: hard set the scale to a specified value. Scale dimensions to layout: currently not supported. 5.2 Arrow settings The symbols of the range-line and leader-line of a bar is set in the dim-style under the Symbols and Arrows tab. The first and second Arrowhead symbols 28 corresponds to the first and second points of the range-line of the bar, and the Leader symbol to the leader of the bar. As with dimension objects, the arrow symbols may be customized to a user created block definition. 5.3 Leader settings Most of the leader settings, apart from the leader arrow, is influenced by settings in the dim-style Text tab. The first container frame sets the label’s text style, colour and background fill colour. The background fill colour presents the opportunity to mask the text of the leader as well as the text of the variable dimensions, should they be displayed by the bar object. The text height may also be set, but, as with dimension objects, will be subjected to the scale setting of the dim-style. The only variable used in the Text placement container frame is the Vertical setting: Centered: Places the text centre in relation to the leader line. Above: Places the text above the leader line, where the leader line extends below the text. Below: Places the text below the leader line, where the leader line extends above the text. 5.4 Line Settings The Lines tab sets the colour, linetype & lineweight of the range-line as well as the variable dimension lines if they are displayed by the bar object. The extension lines on the edges of the arrows for both the range-line and variable dimensions are set according to the Extension lines settings. 29 6. Scheduling Palette The scheduling pallet is launched with the command "REBAR" in the command line or with the Schedule button located on the AddoBar menu. The pallet is dock able in CAD or can be placed on a different screen. The Scheduling pallet contains 3 tabs, Schedule window, Rebar quantities and Global settings. 6.1 Global Settings 6.1.2 6.1.1 6.1.3 6.1.4 6.1.5 6.1.6 6.1.7 6.1.8 30 6.1.1 Round cut length This will round the cut length to the value selected, Shape Code 20 is excluded from this calculation and will always be rounded to the closest 5mm. 6.1.2 Verbose Logging This will turn on/off the addosoft logs. We tried to keep it to a minumun, selecting this option would not affect performance! 6.1.3 Default Country/Code Select default country and code currently South Africa and UK included. Optional Shape Codes may be added to the barlist discussed earlier in this document 6.1.4 Table Style This defines the table style used for writing the schedules to Model Space. To edit tablestyles in AutoCad or Bricscad use the “Tablestyle” command. If the tablestyle doesn’t exist a default will be allocated to the style. 6.1.5 Row heights and scale This is split up into: Header height: The header height used for the schedule table in mm Row height: The height of the schedule rows in mm Default Scale: This will write the table in to a specific scale (useful where drawing and schedules are integrated) 6.1.6 Schedule table variables This is split up into: Insert schedule headings: This will insert the descriptions as seen on the schedule window. Remove column description: This is useful if users define their own column descriptions. The custom descriptions will form part of the schedule table block discussed in the next section Merge member column: Tis is normally done if the member name is very long. 6.1.7 Schedule table block and layout Predefined blocks is located in “C:\Addosoft\AddoBar\Block\” 31 6.1.8 Schedule/Weight table column widths Schedule and weight table column widths can be adjusted to the customers need. Table widths are in millimetres. Schedule table column widths from left to right (13+1) Weight table widths also from Left to right (11 off) Total widths are calculated and shown below the input. 6.2 Schedule Window 6.2.1 Top Buttons 6.2.1.1 Schedule 6.2.1 6.2.2 6.2.3 This will prompt for a table position and will write the schedules to Model Space. Schedule and mass table will be written for the current member(s) selected. A summary of steel weights is added to the bottom of every page. NB: If schedules already exist in model space the schedules will be overwritten. 6.2.1.2 Mass Table Write a Mass table to Model Space in kg, this is the combined masses for all the members selected. 6.2.1.3 Length Table 6.2.4 Write a length table to Model space in meters [m], this is the combined length of the members selected 6.2.1.4 Hide columns 6.2.5 Will hide columns A-E in the schedule table 6.2.1.5 Update button Update button updates the member list and display all the member found in the current drawing. 32 6.2.2 List members box List the member(s) in the current drawing. 6.2.2.1 Selecting Selecting a member will display the schedule for the current member. Multiple selections can be made with holding down “CTRL” and selecting members. Multiple selections can also be done with the “SHIFT” key. 6.2.2.2 Moving member(s) Members can be moved up or down in list box by using the up/down buttons located next to the list box. Select member (s) and move up or down as required. 6.2.2.3 Right Mouse options NB: members will appear in schedule according to the list box order. 6.2.3 Highlight bar tick box If selected, this will highlight the bar(s) in the drawing with user defined color. This color setting is located in the Global settings section. 6.2.4 Schedule table Shows the schedule table for the current selected member(s). Column Description Can EDIT Member Display member name YES Number off Total number of MEMBERS YES Bars per member Total number of BARS in drawing YES Type and Diameter Y/R and diameter YES Bar Mark Mark alpha-numeric / numeric-alpha YES Total number Total = (Number off x Bars per member) NO Length Calculated cut length NO Shape Code Display the Shape Code YES A-E Display A-E dimensions YES 33 All columns can be edited except total number and length. Columns may be dragged and dropped to suit client’s specifications. The order in which the columns are displayed in the schedule window will define how the schedules are written to Model Space. Modifications made in the schedule will appear in drawing. 6.2.4.1 Right mouse click functions A menu will become visible in the schedule window if the right mouse button is clicked. These options are the same as the bottom buttons and will be discussed in the next section. The “Copy Schedule Table to clipboard” will copy the schedule table including headers to be used in excel of similar program. 6.2.4.2 Middle mouse click This will zoom to the bar highlighted in the schedule table 6.2.5 Bottom Button 6.2.5.1 Clear This will clear the current schedule table 6.2.5.2 Delete This will delete the selected bar(s) in the drawing. 6.2.5.3 Zoom to Will zoom to model space to the selected bar. 6.2.5.4 Re-Number Will re-number the selected bar(s). 34 Bars will be re-numbered alpha-numerical or numeric alpha. See table for examples Start number Following number A B a b aa ab az aaa 100 101 101a 101b A100 A101 HA01 HA02 If bars are selected by using the “SHIFT” key, the bars will be re-numbered in order to how they appear in the schedule table. NB: If bars is selected using the “CTRL” key, they will be re-numbered in the selection order. (First selected bar will be re-numbered first) 6.2.5.5 Re-Member Change the member name of the selected bar(s). 6.2.5.6 Update This button only appears if the is a newer version of AddoBar available. (Internet connection required). This will download and install the new AddoBar version. This feature can be manually triggered by running the following file: "C:\Addosoft\AddoBar\AddoUpdater.exe" 35 6.3 Rebar Quantities Rebar weight can be calculated and viewed without writing tables to Model space. The rebar quantities pallet will display weights of all the members selected in the Member box. NB: Density calculation will be added in the next major version, [kg/m3] 36 7. Final Remarks We trust that this manual provided you, the user, with valuable and insightful new knowledge of the workings of AddoBar. The software is not static as we are developing and improving it continuously. Please feel free to send us your criticism, comments, suggestions and complements to [email protected] as we will be updating and improving this manual on a continuous basis as well. See the back leaf of this booklet for links to the program download and to this manual. Happy detailing, Jean-Pierre Rousseau & Wolter Bijker 37 Notes: __________________________________________________________________________________ __________________________________________________________________________________ __________________________________________________________________________________ __________________________________________________________________________________ __________________________________________________________________________________ __________________________________________________________________________________ __________________________________________________________________________________ __________________________________________________________________________________ __________________________________________________________________________________ __________________________________________________________________________________ __________________________________________________________________________________ __________________________________________________________________________________ __________________________________________________________________________________ __________________________________________________________________________________ __________________________________________________________________________________ __________________________________________________________________________________ __________________________________________________________________________________ __________________________________________________________________________________ __________________________________________________________________________________ __________________________________________________________________________________ __________________________________________________________________________________ __________________________________________________________________________________ 38 Notes: __________________________________________________________________________________ __________________________________________________________________________________ __________________________________________________________________________________ __________________________________________________________________________________ __________________________________________________________________________________ __________________________________________________________________________________ __________________________________________________________________________________ __________________________________________________________________________________ __________________________________________________________________________________ __________________________________________________________________________________ __________________________________________________________________________________ __________________________________________________________________________________ __________________________________________________________________________________ __________________________________________________________________________________ __________________________________________________________________________________ __________________________________________________________________________________ __________________________________________________________________________________ __________________________________________________________________________________ __________________________________________________________________________________ __________________________________________________________________________________ __________________________________________________________________________________ __________________________________________________________________________________ 39 http://addosoft.co.za/downloads/AddoBar.exe http://addosoft.co.za/downloads/AddoBarManual.pdf 40