1
AVG LinkScanner for Mac
User Manual
Document revision 90.6 (14.4. 2011)
C opyright AVG Technologies C Z, s.r.o. All rights reserved.
All other trademarks are the property of their respective owners.
This product uses RSA Data Security, Inc. MD5 Message-Digest Algorithm, C opyright (C ) 1991-2, RSA Data
Security, Inc. C reated 1991.
This product uses compression library zlib, C opyright (c) 1995-2005 Jean-loup Gailly and Mark Adler.
This product uses compression library libbzip2, C opyright (c) 1996-2010 Julian R. Seward.
This product uses OpenSSL, C opyright (c) 1999-2009 The OpenSSL Project.
This product uses C rypto++ Library, C opyright (c) 1995-2009 by Wei Dai.
This product uses cURL, C opyright (c) 1996 - 2010, Daniel Stenberg.
This product uses Assistant-Kit, C opyright (c) 2003 Stephane Sudre.
This product uses bsdiff, C opyright (c) 2003-2005 C olin Percival.
This product uses deflate64, C opyright (c) 1990-2007 Info-ZIP.
A V G L inkSc anner © 2 0 1 1 C opyright A V G T ec hnologies C Z, s .r.o. A ll rights res erved.
1
Contents
........................................................................................................................ 4
1. Introduction
..........................................................................................................
4
1.1 What is the
AVG LinkScanner®?
........................................................................................................................
5
2. Installation
Requirements
5
2.1 Operation..........................................................................................................
Systems Supported
..........................................................................................................
5
2.2 Web Browsers
Supported
........................................................................................................................
6
3. Installation
Process
.......................................................................................................... 6
3.1 Introduction
7
3.2 Important..........................................................................................................
Information
.......................................................................................................... 8
3.3 License Agreement
..........................................................................................................
9
3.4 Installation
Type
..........................................................................................................
10
3.5 Installing
AVG LinkScanner®
..........................................................................................................
10
3.6 Installation
Summary
.......................................................................................................... 11
3.7 After Installation
........................................................................................................................
12
4. Finding
your way around the AVG LinkScanner®
..........................................................................................................
12
4.1 Main User
Interface
13
4.2 Icon in ..........................................................................................................
the Menu Bar
14
4.3 Menu in..........................................................................................................
the Menu Bar
..........................................................................................................
14
4.4 AVG Protection
Status
........................................................................................................................
16
5. AVG
LinkScanner® in your web browser
.......................................................................................................... 16
5.1 Search-Shield
.......................................................................................................... 17
5.2 Surf-Shield
........................................................................................................................
19
6. AVG
LinkScanner® Settings
20
6.1 General ..........................................................................................................
tab
..........................................................................................................
22
6.2 Search-Shield
tab
..........................................................................................................
23
6.3 Surf-Shield
tab
24
6.4 Update ..........................................................................................................
tab
........................................................................................................................ 26
7. Updates
26
7.1 Update ..........................................................................................................
Types
26
7.2 Update ..........................................................................................................
Process
........................................................................................................................
28
8. Uninstallation
of AVG LinkScanner®
..........................................................................................................
28
8.1 Automatic
uninstallation
A V G L inkSc anner © 2 0 1 1 C opyright A V G T ec hnologies C Z, s .r.o. A ll rights res erved.
2
28
8.2 Manual ..........................................................................................................
uninstallation
........................................................................................................................
31
9. Contact
& Support
A V G L inkSc anner © 2 0 1 1 C opyright A V G T ec hnologies C Z, s .r.o. A ll rights res erved.
3
1. Introduction
This user manual offers a general overview of the tasks and detection technologies
provided by AVG LinkScanner®. We will briefly talk about the program installation,
initial startup, configuration and use.
AVG LinkScanner® is provided free-of-charge. It is up and running immediately from
the moment of installation. All basic settings have been pre-set by the manufacturer,
so most of the time you will not have to worry about anything – just let AVG
LinkScanner® work in the background and protect you without any effort on your
part. However, there might be situations where you need to adjust the program
settings, or decide what to do with a virus infected file; this manual is here to provide
detailed information and assist you with any task.
1.1. What is the AVG LinkScanner®?
In the last couple of years the number of malicious programs has increased
dramatically. New dangerous applications are being created every day. The majority of
today's viruses, that is spreading via Internet, is designed for financial/commercial
gain. Moreover, there are far more threats out there than plain viruses. You have
probably come across the term spyware as well, however, authors of malicious codes
and dangerous websites are very innovative, and new kinds of threats emerge quite
often. Here are some of the most common:
E xplo it is a malicious code that takes advantage of a flaw or vulnerability in an
operating system, Internet browser, or other essential program.
So cia l e ngine e ring is a common term for various techniques used to trick people
into giving away their personal information (passwords, bank account details,
credit card numbers etc.). A typical example of social engineering is phis hing –
an attempt to acquire sensitive personal data by shamming a trustworthy and
well-known organization. Usually, the potential victims are contacted by a bulk
e-mail asking them to e.g. update their bank account details. In order to do that,
they are invited to follow the link provided which then leads to a fake website of
the bank.
Sca m can be also considered a kind of social engineering; it includes false job
offers, or ones that will abuse the workers for illegal activities, summons to
withdraw a large sum of money, fraudulent lotteries and the like.
H o a x is a bulk e-mail containing dangerous, alarming or just bothering and
useless information. Many of the above threats use hoax e-mail messages to
spread.
M a licio us we bs ite s are ones that deliberately install malicious software on your
computer, and hacked sites do just the same, only these are legitimate websites
that have been compromised into infecting visitors.
The AVG LinkScanner® is here to protect you from all these online threats.
A V G L inkSc anner © 2 0 1 1 C opyright A V G T ec hnologies C Z, s .r.o. A ll rights res erved.
4
2. Installation Requirements
2.1. Operation Systems Supported
The AVG LinkScanner® will only run on computer with Mac OS X 10.5.6 or higher.
Please note that only the Intel platform is supported!
2.2. Web Browsers Supported
AVG LinkScanner® is fully compatible with the following Internet browsers:
Apple Safari 3.2.x - 5.0.x,
Mozilla Firefox 3.0.0 - 3.6.x,
Mozilla Firefox 4.0 and higher
A V G L inkSc anner © 2 0 1 1 C opyright A V G T ec hnologies C Z, s .r.o. A ll rights res erved.
5
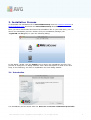
3. Installation Process
To download the installation file of AVG LinkScanner® visit the AVG Free website at
http://free.avg.com/ and follow the AVG LinkScanner® download link.
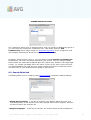
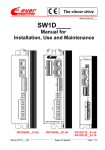
Once you have downloaded and saved the installation file on your hard drive, you can
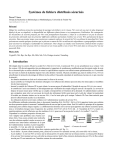
launch the installation process. Double-click your installation package (the
a v g90LSM - ???.dm g file) to open the following dialog:
In this dialog, double-click the Install icon to launch the installation process. This
process is a sequence of dialog windows with a brief description of what do at each
step. In the following, we offer an explanation for each dialog window.
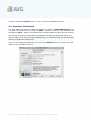
3.1. Introduction
The installation process starts with the W e lco m e to the AVG LinkSca nne r® Ins ta lle r
A V G L inkSc anner © 2 0 1 1 C opyright A V G T ec hnologies C Z, s .r.o. A ll rights res erved.
6
window. Click the Continue button to go on with the installation process.
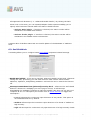
3.2. Important Information
The next dialog provides some basic information on usage of AVG LinkScanner®. You
can print the whole text by clicking the Print... button or save it to your hard drive by
clicking the Save... button and selecting the resulting PDF file's name and its location.
Please keep in mind that information provided by this dialog is really brief and if you
want to learn more about the AVG LinkScanner®, you should always consult this User
manual or application-based help.
After you are finished reading this text, click the Continue button to trigger the next
dialog of the installation process.
A V G L inkSc anner © 2 0 1 1 C opyright A V G T ec hnologies C Z, s .r.o. A ll rights res erved.
7
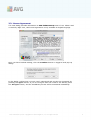
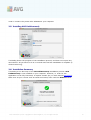
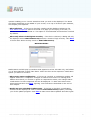
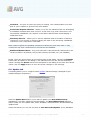
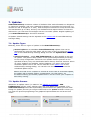
3.3. License Agreement
The next dialog provides information on AVG LinkScanner® terms of use. Please read
it carefully. Right now, this license agreement is only available in English language.
Once you have finished reading, click the Continue button to trigger a little pop-up
dialog:
In this dialog confirm that you have read, understood and accept the agreement by
pressing the Agre e button. If you do not agree with the terms of use stated, press
the D is a gre e button, and the installation process will be terminated immediately.
A V G L inkSc anner © 2 0 1 1 C opyright A V G T ec hnologies C Z, s .r.o. A ll rights res erved.
8
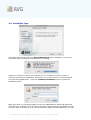
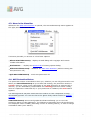
3.4. Installation Type
This dialog informs you that your AVG LinkScanner® will be installed on your local
hard drive. After clicking the Install button, this dialog
appears to inform you about the necessity of your computer restart in order to
successfully finish the installation. This allows you to save all your current work and
quit all running applications. Click the Continue Installation button to start the
installation itself.
Right after that you will be prompted to type an administrator's name and password
(otherwise the Installer won't be allowed to make changes and the installation process
won't be able to continue). If you do not know the login name and password, you will
A V G L inkSc anner © 2 0 1 1 C opyright A V G T ec hnologies C Z, s .r.o. A ll rights res erved.
9
need to contact the person who administers your computer.
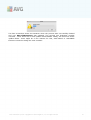
3.5. Installing AVG LinkScanner®
This dialog shows the progress of the installation process, and does not require any
intervention. All you have to do is to sit and wait until the installation is complete (it
doesn't take long).
3.6. Installation Summary
This dialog is the last step of the AVG LinkScanner® installation process. AVG
LinkScanner® is now installed on your computer. However, in order for the
application to be fully functional, it requires restart (as you were warned previously).
Make sure all your current work is saved and closed, then click the Restart button.
A V G L inkSc anner © 2 0 1 1 C opyright A V G T ec hnologies C Z, s .r.o. A ll rights res erved.
10
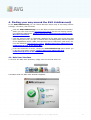
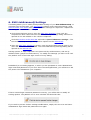
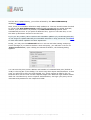
3.7. After Installation
The first thing you should see after your Mac OS reboots is this dialog:
It serves to inform you about a special AVG feature called Automatic reporting of
threats that you encounter while surfing the web. Details about the detected
threat are sent automatically to AVG Technologies CZ, which happens without any
inconvenience or need of any action on your part, and of course without any
reference to you or your personal data. The received data is then thoroughly analysed
by our malware specialists, which enables us to continuously improve the AVG
protection for all its users. For this reason, we kindly ask you to keep this feature
activated.
However, if you don't want to enable the reporting, you can do it immediately. Clicking
the Open Preferences button takes you directly to your AVG LinkScanner® settings
(more precisely the General Settings section of the General tab). All you have to do
here is to unmark the Reporting threats to AVG checkbox.
Otherwise click the OK button to finally finish the installation process.
A V G L inkSc anner © 2 0 1 1 C opyright A V G T ec hnologies C Z, s .r.o. A ll rights res erved.
11
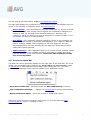
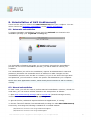
4. Finding your way around the AVG LinkScanner®
In the AVG LinkScanner® you can choose between three ways of accessing various
settings, overviews, and functions:
click the AVG LinkScanner® icon in the Dock to open the Main User Interface,
where you can view current AVG protection status and access setting options
for individual components. Click to learn more about the AVG LinkScanner®
Main User Interface.
click the AVG icon that is (optionally) displayed in the right part of the menu bar.
Upon clicking the icon, you get a context menu resuming neatly relevant options
of the application menus. Apart from quick access to frequently used items, the
icon also indicates AVG protection status. Click to learn more about the AVG
LinkScanner® icon in the Menu Bar.
if the User Interface is active, clicking the AVG LinkScanner® menu allows you
to access some basic options. Click to learn more about the AVG
LinkScanner® menu in the Menu Bar.
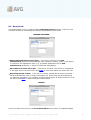
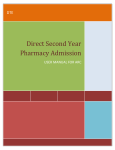
4.1. Main User Interface
To access the Main User Interface, simply click the docked AVG icon.
Thereafter that the Main User Interface appears:
A V G L inkSc anner © 2 0 1 1 C opyright A V G T ec hnologies C Z, s .r.o. A ll rights res erved.
12
The left part of the main window displays AVG protection status.
The right part displays the components of your AVG protection and whether they are
active or not. Clicking a component opens its setting options:
Search-Shield - when searching the web with component on, all search results
returned from the most popular search engines are evaluated for dangerous or
suspicious links. By checking these links and marking the bad links, this
component warns you before you click on dangerous or suspicious links, so you
can ensure you only go to safe websites.
Surf-Shield - this component will block malicious content of any webpage you
try to open, and prevent it from being downloaded to your computer. With this
feature enabled, clicking a link or typing in a URL to a dangerous site will
automatically block you from opening the web page thus protecting you from
inadvertently being infected.
Update Manager - this component helps you to control regular updating. Within
this component you can schedule automatic downloads of update files either
from the Internet, or the local network. Learn more about updates and why
they are so important.
4.2. Icon in the Menu Bar
The AVG icon can be optionally displayed in the right part of the menu bar. If it is not
visible, you can display it by turning on the Sho w AVG ico n in the m e nu ba r option
in General tab of AVG LinkScanner® Settings. Upon clicking the icon, you get a
context menu resuming neatly relevant options of the application menus:
Stop/Start LinkScanner - pauses/resumes the AVG LinkScanner® protection.
Open LinkScanner Settings... - displays the General tab of setting options dialog.
About LinkScanner Agent - shows the version of LinkScanner Agent.
Apart from quick access to frequently used items, the icon also indicates AVG
protection status (correct / warning or error).
A V G L inkSc anner © 2 0 1 1 C opyright A V G T ec hnologies C Z, s .r.o. A ll rights res erved.
13
4.3. Menu in the Menu Bar
Whenever the Main User Interface is opened, the AVG LinkScanner® menu appears in
the right part of the menu bar:
This menu provides you access to a few basic options:
About AVG LinkScanner® - displays a small dialog with copyright and version
number information.
Preferences... - displays the General tab of setting options dialog.
Hide AVG LinkScanner® - minimizes the Main User Interface (without turning the
AVG protection off).
Quit AVG LinkScanner® - turns AVG protection off.
4.4. AVG Protection Status
The protection status is intended to show you, whether you are fully protected or not.
When your AVG LinkScanner® is up-to-date and working, the protection status is
correct. However, when a non-critical part of the AVG protection is switched off or
inactive, you are immediately warned about the warning protection status. Finally,
when a component is switched off, or your protection is outdated, the error status
appears.
The warning status may also mean that error status of some component is being
intentionally ignored. You can set this in the Ignore faulty states section in General
settings.
AVG LinkScanner® uses several graphical indicators allowing you to view the
protection status of this application. The following screenshots show the docked AVG
icon displayed either normally (indicating correct or warning status), or with an orange
exclamation mark (error status):
A V G L inkSc anner © 2 0 1 1 C opyright A V G T ec hnologies C Z, s .r.o. A ll rights res erved.
14
You can also recognize the status by looking at the icon in the menu bar, when
means correct or warning status and
means error. If the AVG icon in the menu bar
is not visible, you can display it by turning on the Sho w AVG ico n in the m e nu ba r
option in General settings.
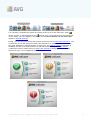
Finally, you can see your protection status in the left part of Main User Interface. The
screenshot on the left shows the Main User Interface in correct status, the one on
the right illustrates a warning status (in this case, the Search-Shield component is
disabled) and the one below shows the warning status with the Search-Shield
component inactive. Note that your Main User Interface always gives you details
about the error, even suggesting how to fix it.
A V G L inkSc anner © 2 0 1 1 C opyright A V G T ec hnologies C Z, s .r.o. A ll rights res erved.
15
5. AVG LinkScanner® in your web browser
Your AVG LinkScanner® functions within your web browser without affecting its
performance. It uses a set of informative icons to either show you the threat level of
every search result in most commonly used web search engines (the Search-Shield
component), or to warn you in case a webpage you try to access appears to
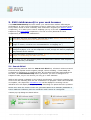
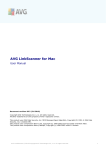
suspicious (the Surf-Shield component). The set of icons (identical for both
components) is listed in the table below:
The page has been successfully scanned and is safe. Please note that this
icon is not displayed on the Yahoo! server!
The page does not contain threats but is somewhat suspicious (questionable in
origin or motive, therefore not recommended for e-shopping etc.).
The page can be either safe itself, but containing further links to positively
dangerous pages; or it can be suspicious in code, though not directly employing
any threats at the moment.
The linked page contains active threats. We do not recommend visiting this
page, or forwarding the URL via e-mail!
The page can not be scanned (which can mean that is doesn't exist anymore, or
it is temporarily unavailable.
5.1. Search-Shield
When searching Internet with the AVG Se a rch- Shie ld on, all search results returned
from the most popular search engines (Google, Yahoo and Bing - former MSN) are
evaluated for dangerous or suspicious links. By checking these links and marking the
bad links, the AVG LinkScanner® warns you before you click on dangerous or
suspicious links, so you can ensure you only go to safe websites.
While a link is being evaluated on the search results page, you will see a graphic sign
next to the link informing that the link verification is in progress. When the evaluation
is complete, the respective informative icon will be displayed. Hovering over an
individual icon will display brief pop-up dialog describing the particular link in question.
Please note that the search results are generated based on a blacklist (database of
known malicious websites) and the evaluation itself cannot be configured!
Various pop-up dialogs are listed below:
A V G L inkSc anner © 2 0 1 1 C opyright A V G T ec hnologies C Z, s .r.o. A ll rights res erved.
16
There are a few settings for this component that you can adjust. The easiest way to
access the Search-Shield settings dialog is by clicking the component's name in Main
User Interface.
5.2. Surf-Shield
Present-day internet is quite a dangerous place to surf - exploited web pages might
infect your computer simply by visiting the affected site. The Surf-Shield aims to
prevent that. This powerful feature provides you a real-time protection from the most
serious online threats: malicious, exploitive, and phishing websites. If enabled, it
automatically scans the source code of any website you try to access (either by
clicking a link or typing in a URL) and verifies the webpage origin. If it discovers
anything suspicious, it will interrupt loading the website, and display a notification with
more details.
The notification dialogs (listed above) use the same set of informative icons as the
Search-Shield and are informative only. They serve just to notify you that the threat
has been found and blocked, so the loading of the page has been interrupted. Access
to a potentially dangerous website itself is not blocked; the decision whether to visit
the page is completely up to you. However, the page shown in the browser after
closing the notification dialog will be just a fragment of the original one - it will be
displayed only from the start to the point where the threat was discovered and
blocked.
There is no simple way to access the original infected page. However, if you have any
reason to visit the untouched original page (possibly containing an infection), you can
A V G L inkSc anner © 2 0 1 1 C opyright A V G T ec hnologies C Z, s .r.o. A ll rights res erved.
17
disable the Surf-Shield component in the Surf-Shield tab of AVG LinkScanner®
Settings (which requires administrator password since it disables the protection of the
machine) and then reload the page (a cache cleaning might be needed depending on
application requesting the page because of application internal caching).
A V G L inkSc anner © 2 0 1 1 C opyright A V G T ec hnologies C Z, s .r.o. A ll rights res erved.
18
6. AVG LinkScanner® Settings
This dialog allows you to modify all adjustable settings of your AVG LinkScanner®. It
is divided into several tabs - the General tab contains some universal settings, while
Search-Shield, Surf-Shield and Update tabs offer settings for respective components.
The dialog is accessible in three ways:
click the docked AVG icon to open the Main User Interface, then click any
component's name. Note that the AVG LinkScanner® Settings dialog will then be
opened on the tab related to the chosen component.
click the AVG icon in the menu bar and select O pe n LinkSca nne r Se ttings ... The
AVG LinkScanner® Settings dialog will be opened on the General tab.
when the Main User Interface is active, open the AVG LinkScanner® menu in the
menu bar and select Pre fe re nce s . The AVG LinkScanner® Settings dialog will be
opened on the General tab.
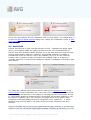
Setting options of major importance are protected by authentication, and are by
default locked (grayed out and inactive). To modify the settings you have to be click
the padlock icon in the lower right corner of every dialog:
Immediately a new dialog appears, in which you are prompted to enter administrator
login name and password. If you don't know the name/password, you will have to ask
the person who administers your computer:
If have entered login name and password correctly, you will be able to modify all
setting options. The padlock icon is now unlocked and looks like this:
If you wish to prevent further settings modifications, simply click the icon and enter
administrator login name and password once again.
A V G L inkSc anner © 2 0 1 1 C opyright A V G T ec hnologies C Z, s .r.o. A ll rights res erved.
19
6.1. General tab
This dialog allows you to configure basic AVG LinkScanner® settings. There are four
sections sections in this dialog with specific adjustable items in them:
GENERAL SETTINGS:
Start AVG LinkScanner® upon login - if the box is checked, the AVG
LinkScanner® will launch automatically after computer startup, when a user logs in,
or whenever the application quits (e.g. if another application forces AVG
LinkScanner® shutdown, it will be re-launched immediately).
Show AVG icon in the menu bar - if the box is checked, the AVG icon is displayed
in the right end of the menu bar. Click here to learn more about the menu bar icon.
Reporting threats to AVG - if the box is checked, details about detected threats
will be automatically sent to AVG Technologies CZ, where they will be analysed by
our malware specialists. This enables continual improvement of AVG protection for all
its users. Click here to learn more about this feature.
ALERTS:
There is a little arrow next to the Surf-Shield alerts item. Click it to expand/collapse
A V G L inkSc anner © 2 0 1 1 C opyright A V G T ec hnologies C Z, s .r.o. A ll rights res erved.
20
options enabling you to choose AVG alerts that you wish to be displayed. The alerts
are always displayed in the middle of your screen, on a top of all other open windows,
and require your response.
Show all alerts - if the box is checked, a dialog will be displayed whenever the
Surf-Shield component detects a threat on a page you are trying to access, no
matter how severe the threat is. This option is recommended and therefore checked
by default.
Show only alerts of the highest severity - if the box is checked, a dialog will only
be displayed when AVG LinkScanner® detects a threat of high severity. Click here
to learn more about severity levels in AVG LinkScanner®.
NOTIFICATIONS:
Notifications are little pop-up windows that appear for a few seconds only, and inform
you of less important events than alerts. Check the box at the respective notification
option you want to activate:
Show error status notifications - if the box is checked, a notification window will
appear whenever a component changes its status from correct to warning/error.
Please note that if you choose to ignore a component's status, the change status
notifications for that component will not be displayed. To learn more about AVG
protection statuses click here. Ignoring error statuses is described in the end of
this chapter.
Notify me upon scheduled update start - if the box is checked, a notification
window will be displayed at each scheduled AVG LinkScanner® update, informing
you of the update progress. Click here to learn more about updates and their types.
A V G L inkSc anner © 2 0 1 1 C opyright A V G T ec hnologies C Z, s .r.o. A ll rights res erved.
21
IGNORE ERROR STATUSES:
If a component shows error or warning status, and you decide to deliberately ignore it,
you can check the respective component here. This means that the AVG
LinkScanner® will no longer report the error/warning status of the component, and
won't display notifications about the component status change.
No matter which section you're in, you can always change Position of LinkScanner
notifications. The white rectangle represents your screen. The tiny orange triangle
shows where the notifications appear right now (which is by default in the upper right
corner). To change this simply move the mouse cursor to any other corner and click.
You will immediately see that the tiny orange triangle has moved to selected corner and from now on, the notifications are going to pop up here.
6.2. Search-Shield tab
This dialog allows you to configure some Search-Shield component related settings.
Enable Search-Shield - if the box is checked, AVG Search-Shield is active and
evaluating safety of the results of the most popular online search engines. Uncheck
the box to switch the function off.
Supported plugins - if this box is checked, the search results will be evaluated in
A V G L inkSc anner © 2 0 1 1 C opyright A V G T ec hnologies C Z, s .r.o. A ll rights res erved.
22
all supported web browsers (i. e. Safari and Mozilla Firefox). By clicking the little
arrow next to this item, you can expand/collapse further options enabling you to
specify which browsers should utilize the Search-Shield function:
o Activ a te Sa fa ri plugin - if this box is checked, the search results will be
evaluated in the Safari web browser.
o Activ a te Fire fo x plugin - if this box is checked, the search results will be
evaluated in the Mozilla Firefox web browser.
Creation date of DB files states last successful update of the database of malicious
sites.
6.3. Surf-Shield tab
This dialog allows you to configure some Surf-Shield component related settings.
Enable Surf-Shield - if the box is checked, AVG Surf-Shield is active and, whenever
surfing the web, protecting you real-time from the most serious online threats:
malicious, exploitive, and phishing websites. Uncheck the box to switch the function
off.
Interrupt connections from [selected] severity level - whenever the Surf-Shield
detects a threat on a webpage you are trying to access, it will interrupt
downloading the webpage contents so that the harmful code does not get into your
computer at all. You can specify the lowest level of threat severity to trigger the
interruption:
o Lo w will interrupt the connection upon detection of any threat. This option is
recommended and set by default.
o M e dium will interrupt the connection upon detection of a threat of medium to
high severity.
o H igh will interrupt the connection only upon detection of a high severity threat
A V G L inkSc anner © 2 0 1 1 C opyright A V G T ec hnologies C Z, s .r.o. A ll rights res erved.
23
.
Local Port - the port on which the proxy is running. The communication over this
port of your computer is protected by Surf-Shield.
Connection Request Timeout - allows you to set the maximum time for attempting
to establish communication with a server. If the time is up, and connection is not
successfully established, the request is cancelled. Web browser should display a
notification then.
Inactivity Timeout - allows you to set the maximum time for duration of inactive
connection. If no activity is detected during the time in the previously established
connection, the connection is cancelled.
Both Timeout options are primarily intended for advanced users who want to fully
control the way how connections to web servers are handled.
Additional Redirect Ports - any ports entered in this field will be redirected to the
Local Port above. By default, the port 80 is always included, too (not editable).
Finally, there are three button in the bottom part of this dialog. Clicking the Defaults
button sets all options in the dialog to the manufacturer pre-set and recommended
values. Clicking the Revert button sets all options in the dialog to the last user-saved
values. Use the Apply button to save all current changes to the settings.
6.4. Update tab
This dialog allows you to configure some Update related settings (managed by the
Update Manager component).
Click the Update Now button if you wish to update your AVG LinkScanner®
immediately. This also called the manual update. The AVG LinkScanner® will then
search online for new update files, and if available, download these and automatically
update itself.
Under this button you can see the time of Last Successful Update. If the database
A V G L inkSc anner © 2 0 1 1 C opyright A V G T ec hnologies C Z, s .r.o. A ll rights res erved.
24
had not been updated lately, you will be informed by the AVG LinkScanner®
displaying error status.
Next, there is a checkbox called Run Daily Updates at. This box should remain checked
to ensure that AVG LinkScanner® updates itself automatically at regular intervals,
without your intervention. By default, the AVG LinkScanner® updates itself
automatically at noon. If you prefer a different hour, type it in the time box, or use
the little up and down arrows to set the hour.
If you (for any reason) have switched off automatic updates (by unchecking this box).
do not forget to update manually at reasonable intervals to stay protected. Click here
to learn more about updates and their importance.
Finally, you may use the Advanced button to access and edit existing web proxy
server settings (if you want to define a new web proxy, you will have to do so via
Sy s te m Pre fe re nce s ). Upon clicking the Advanced button, the following dialog
appears:
You can see the proxy server address and number of communication port (default is
3128) in the top part of the dialog. The server may also require authentication. In this
case you will need to fill in the login details, too. These cannot be filled in for you,
because each user account on the computer might have different login details. Please
mark the checkbox Proxy server requires authentication, and type your proxy server
username and password in the respective fields.
A V G L inkSc anner © 2 0 1 1 C opyright A V G T ec hnologies C Z, s .r.o. A ll rights res erved.
25
7. Updates
AVG LinkScanner® contains a number of definition files with information on dangerous
or suspicious websites, and uses combined techniques to generate the final result (i.e.
whether an URL is dangerous or safe). AVG developers work hard to keep all these files
and mechanisms up-to-date, and any new definitions and improvements of these are
delivered to you from AVG Technologies servers via online update. Regular updating of
your AVG LinkScanner® is therefore essential.
All update related settings can be adjusted in the Update tab of AVG LinkScanner®
Settings dialog.
7.1. Update Types
Basically, there are two types of update in the AVG LinkScanner®:
M a nua l upda te is an immediate AVG LinkScanner® update that can be
performed any time the need arises. All you have to do is to open the Update
tab of AVG LinkScanner® Settings dialog and click the Update Now button.
Sche dule d upda te - within AVG LinkScanner® it is also possible to pre-set
an update. The planned daily update is then performed periodically according
to the setup configuration. Whenever new update files are present on the
specified location, they are downloaded either directly from the Internet. When
no newer updates are available, nothing happens. The exact time of this
automatic update can be set via the time box in the Update tab of AVG
LinkScanner® Settings dialog. You can also use the checkbox to turn the
scheduled update off/on.
Please note that if the computer is turned off at the time of scheduled update,
the update will be missed without compensation. For this reason, we
recommend setting up the daily update time to an hour when your computer is
most likely running.
7.2. Update Process
Whenever an update starts (no matter if it's manual or scheduled), AVG
LinkScanner® will first verify whether there are new update files available. If so,
AVG LinkScanner® starts their downloading and launches the update process itself.
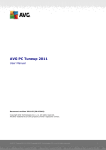
During the update process you will get redirected to the Upda te interface where you
can view the process progressing in its graphical representation as well as its final
result:
A V G L inkSc anner © 2 0 1 1 C opyright A V G T ec hnologies C Z, s .r.o. A ll rights res erved.
26
The first screenshot shows the situation when the process was successfully finished
and your AVG LinkScanner® was updated. The second one illustrates another
outcome - when there are no new update files available. Finally, the third one shows
update failure. There might be a few reasons for this, with limited or unavailable
Internet connection being the most common.
A V G L inkSc anner © 2 0 1 1 C opyright A V G T ec hnologies C Z, s .r.o. A ll rights res erved.
27
8. Uninstallation of AVG LinkScanner®
There are two ways to remove the AVG LinkScanner® from your computer. You can
either choose the automatic uninstallation, or the manual uninstallation.
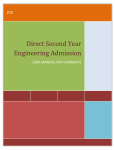
8.1. Automatic uninstallation
To trigger automatic uninstallation, please click the Uninstall icon located in the
installation package (the a v g90LSM - ???.dm g file):
The Uninstaller will appear and guide you conveniently through the uninstallation
process. At the end of uninstallation process, you will be asked to reboot your
computer.
The uninstallation (as well as the installation) requires an administrator's name and
password (otherwise the Uninstaller won't be allowed to make changes and the
uninstallation process won't be able to continue). If you do not know the login name
and password, you will need to contact the person who administers your computer.
Please note that applications Firefox, Safari and System Preferences will be closed if
running.
8.2. Manual uninstallation
In most cases, you will not need to perform manual uninstallation. However, should the
need arise, you can remove all files related to the AVG product as follows:
1. Open AVG LinkScanner® Settings and in General tab (General Settings section)
uncheck the Start AVG LinkScanner® upon login item.
2. Quit the Firefox, Safari and System Preferences applications, if running.
3. Prevent "launchd" daemon from automatically invoking the main AVG LinkScanner®
services by executing the following commands in a terminal window:
/bin/la unc hc t l re m ov e c om .a v g.LinkSc a nne rAge nt
/bin/la unc hc t l re m ov e c om .a v g.Loa de rAge nt
A V G L inkSc anner © 2 0 1 1 C opyright A V G T ec hnologies C Z, s .r.o. A ll rights res erved.
28
sudo
sudo
sudo
sudo
/bin/la unc hc t l
/bin/la unc hc t l
/bin/la unc hc t l
/bin/la unc hc t l
re m ov e
re m ov e
re m ov e
re m ov e
c om .a v g.a piSe rv ic e s
c om .a v g.a v gc onfigd
c om .a v g.a v gnot ify d
c om .a v g.a v gpriv d
4. Unload the network kernel extension by executing the following commands as a root
in a terminal window:
/sbin/Sy st e m St a rt e r st op "AV G Ne t shie ld support "
If an error occurs, it means that the kernel extension is currently busy and can't be
unloaded. You can still proceed to the next step.
5. Execute the following commands as a root in a terminal window:
rm -rf Applic a t ions/AV G\ LinkSc a nne r.a pp
rm -rf /Libra ry /Pre fe re nc e Pa ne s/LinkSc a nne rSe t t ings.pre fPa ne
rm -rf /opt /a v g/a v g9
rm -f /Libra ry /La unc hDa e m ons/c om .a v g.a piSe rv ic e s.plist
rm -f /Libra ry /La unc hDa e m ons/c om .a v g.c onfigura t ionT ool.plist
rm -f /Libra ry /La unc hDa e m ons/c om .a v g.not ific a t ionT ool.plist
rm -f /Libra ry /La unc hDa e m ons/c om .a v g.priv ile ge dT ool.plist
rm -f /Libra ry /La unc hAge nt s/c om .a v g.Loa de rAge nt .plist
rm -f /Libra ry /La unc hAge nt s/c om .a v g.LinkSc a nne rAge nt .plist
rm -f ~/Libra ry /Pre fe re nc e s/c om .a v g.LinkSc a nne rSe t t ings.plist
rm -f /Use rs/Sha re d/AV G/c om .a v g.LinkSc a nne rSe t t ings.plist
rm -f /usr/sbin/a v gc t l
rm -f /usr/sbin/a v gc fgc t l
rm -f /usr/sbin/a v gupda t e
rm -f /usr/sbin/a v gurlsc a n
rm -f /usr/sha re /m a n/m a n1/a v gc t l.1.gz
rm -f /usr/sha re /m a n/m a n1/a v gc fgc t l.1.gz
rm -f /usr/sha re /m a n/m a n1/a v gd.1.gz
rm -f /usr/sha re /m a n/m a n1/a v gdum p.1.gz
rm -f /usr/sha re /m a n/m a n1/a v glnsd.1.gz
rm -f /usr/sha re /m a n/m a n1/a v gnsd.1.gz
rm -f /usr/sha re /m a n/m a n1/a v gsc he d.1.gz
rm -f /usr/sha re /m a n/m a n1/a v gupd.1.gz
rm -f /usr/sha re /m a n/m a n1/a v gupda t e .1.gz
rm -f /usr/sha re /m a n/m a n1/a v gurlsc a n.1.gz
rm -rf /Libra ry /Sc ript ingAddit ions/AV GSc ript ingAddit ions.osa x
rm -rf /Libra ry /Applic a t ion\ Support /AV G/Plugins/AV GSa fa riPlugin.bundle
rm -rf /Libra ry /Applic a t ion Support /M ozilla /Ext e nsions/{e c 8030f7-c 20a -464f9b0e -13a 3a 9e 97384}/linksc a nne r@a v g.c om
rm -rf /Libra ry /Priv a t e F ra m e w orks/AV GLnsc Se rv ic e s.fra m e w rok
rm -rf /Libra ry /St a rt upIt e m s/AV GNe t Shie ldLoa de r
6. To unregister all packages related to the installation (i.e. to remove all related
receipts), do the following as a root in a terminal window:
To find out what packages have been registered, please execute:
A V G L inkSc anner © 2 0 1 1 C opyright A V G T ec hnologies C Z, s .r.o. A ll rights res erved.
29
pkgut il --pkgs=.*LinkSc a nne r.*
For each package in the list, please execute:
pkgut il --forge t =<pa c ka ge na m e >
7. If you have encountered any error in step 4, please reboot your computer.
After performing these steps, the AVG LinkScanner® product should be completely
removed from your computer.
A V G L inkSc anner © 2 0 1 1 C opyright A V G T ec hnologies C Z, s .r.o. A ll rights res erved.
30
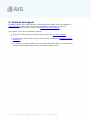
9. Contact & Support
All AVG products are created by AVG Technologies CZ. Please visit our webpage at
www.avg.com to learn more, or for more information specifically on the AVG
LinkScanner for Mac product, please visit linkscanner.avg.com/mac.
For support, there are the following options:
browse the FAQ section of the AVG free website at: free.avg.com/faq.
use the online AVG forums, section AVG For Mac, available at forums.avg.com/
betaforum.
to contact us directly, please use the forums mentioned above; our developers
and technical support follow these, and will be ready to help.
A V G L inkSc anner © 2 0 1 1 C opyright A V G T ec hnologies C Z, s .r.o. A ll rights res erved.
31