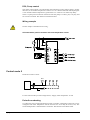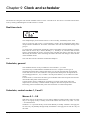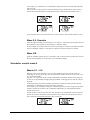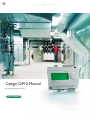
1
O P T I G O
–
Optigo OP10 Manual
©Copyright AB Regin, Sweden, 2007
R E A D Y - S T E A D Y - G O
DISCLAIMER
The information in this manual has been carefully checked and is believed to be correct. Regin however, makes no
warranties as regards the contents of this manual and users are requested to report errors, discrepancies or ambiguities to
Regin, so that corrections may be made in future editions. The information in this document is subject to change
without prior notification.
The software described in this document is supplied under license by Regin and may be used or copied only in
accordance with the terms of the license. No part of this document may be reproduced or transmitted in any form, in any
fashion, electronically or mechanically, without the express, written permission of Regin.
COPYRIGHT
© AB Regin. All rights reserved.
TRADEMARKS
Optigo is a registered trademark of AB Regin.
Some product names mentioned in this document are used for identification purposes only and may be the registered
trademarks of their respective companies.
March 2007
Document Revision: 2007-1-00
Table of contents
Chapter 1 About this manual
5
Mer information
5
Chapter 2 Introduction to Optigo
Optigo controllers
Chapter 3 Technical data
Chapter 4 Installation and wiring
6
6
8
10
Installation
10
Wiring
Supply voltage
Inputs and outputs
11
11
11
Chapter 5 Control modes
Control modes 1, 2 and 3
Control mode 4, Radiator circuit control with
outdoor curve
Control mode 5
14
14
19
20
Chapter 6 Display and encoder
22
The Basic level
The 3 second level
The 10-second level
Display symbols
22
23
23
23
Chapter 7 Setpoint
24
Chapter 8 Alarm handling
25
Chapter 9 Clock and scheduler
26
Real time clock
Scheduler, general
Scheduler, control modes 1, 2 and 3
Menus 0.1 – 0.8
Menu 0.9, Override
Menu OK
Scheduler, control mode 4
Menus 0.1 – 0.8
Menu 0.9, Setback
Menu OK
Chapter 10 Configuration
Menus 1.0 – 5.0
Menus X.1 Output type (control modes 1, 2, 3 and 4)
(where X depends on your choice of alternative above)
Menus X.2 Output signals (control modes 1, 2, 3)
Menus X.3 Neutral zone (Control modes 1, 2 and 3)
Menus X.4 P-band
Menus X.5 I-time
26
26
26
26
27
27
27
27
28
28
29
29
29
29
30
31
31
Menus X.6 Damper minimum position (Control modes 1,
2 and 3) Cascade factor (control mode 3) 0°C temperature
boost (Control mode 4) D-factor (control mode 5)
Menus X.7 Universal input UI1 (Control modes 1, 2, 3)
Pump exercise (Control mode 4) Periodic overheating
(Control mode 5)
Menus X.8 Startpoint for outdoor compensation, S.P
(Control mode 2) Supply air min limit (Control mode 3)
Low temperature setpoint (Control mode 4)
Menus X.9 Maximum compensation, CMP (Control
mode 2) Supply air max limit (Control mode 3) High
temperature setpoint (Control mode 4)
Menu I/O
Menu OK
Storage of settings
Reset to factory setting
Chapter 11 Index
31
32
33
34
34
34
35
35
36
Chapter 1 About this manual
This manual describes the controller Optigo OP10 and OP10-230. It covers program
revisions from R 1.0.
Make sure that you always follow the safety regulations in the documentation to prevent risk
of fire, electric shock and personal injury.
Mer information
More information on OP10 can be found in:
•
Optigo controllers – Sales brochure for Optigo controllers
•
Optigo product instruction
The information can be downloaded from the Regin website, www.regin.se.
Optigo OP10 user manual
Chapter 1 About this manual
5
Chapter 2 Introduction to Optigo
Optigo controllers
Optigo is a new series pre-programmed, configurable controllers that can be set to handle
everything from temperature control or humidity control to CO2 control or pressure control.
OP5 and OP10
The Optigo series comprises two different types, OP5 and OP10.
OP5 has 5 inputs/outputs and can be configured to control Temperature, CO2, Humidity or
Pressure
OP10 has 10 inputs/outputs and can be configured to control Temperature (ventilation
control with heating and cooling), Water-heated radiator heating with outdoor temperature
dependent control-curve or Domestic hot-water control. OP 10 is available in two versions,
OP10 with 24 V AC supply voltage and OP 10-230 with 230 V AC supply voltage.
Mounting
Optigo OP10 user manual
Optigo is designed primarily for DIN-rail mounting but can also be screw-mounted to any
suitable surface.
Chapter 2 Introduction to Optigo
6
Optigo OP10
Optigo OP10 is a new pre-programmed, configurable controller. It has been designed with
the main intention of replacing a number of Regin’s Aqualine controllers.
All configuration and normal handling is done using the display and the knob on the front.
In- and Outputs
Control modes
Internal clock
Optigo OP10 user manual
Optigo OP10 has
•
2 analogue inputs, PT1000
•
1 universal input, PT1000 or digital
•
2 digital inputs
•
3 digital outputs
•
2 analogue outputs, 0…10 V DC
Optigo OP10 is pre-programmed with a choice of 5 different control modes:
•
Supply air temperature control
•
Supply air temperature control with outdoor compensation
•
Cascade connected room / extract air temperature control
•
Radiator circuit control
•
Domestic hot water control
Optigo OP10 has a built-in week-base real time clock with a number of different scheduler
alternatives.
Chapter 2 Introduction to Optigo
7
Chapter 3 Technical data
Supply voltage ............. OP10-230: 230 V AC; +10 / -15%; OP10: 24 V AC; ±15%. 50/60 Hz
Internal consumption .........................................................................................................6 VA
Operation
Climatic conditions according to IEC 721-3-3 ........................................................ Class 3k5
Ambient temperature ................................................................................................. 0...50°C
Ambient humidity..............................................................................................Max 95% RH
Mechanical requirements according to IEC721-3-3 ..............................................Class 3M3
Vibration.......................................................... IEC60068-2-6, Test FC, vibration Sinusoidal
Shock ................................................................................................IEC60068-2-27, Test Ea
Transport
Climatic conditions according to IEC 721-3-2 ........................................................ Class 2k3
Ambient temperature .............................................................................................. -20...70°C
Air humidity ......................................................................................................Max 95% RH
Mechanical requirements according to IEC721-3-2 ..............................................Class 2M2
Vibration.......................................................... IEC60068-2-6, Test FC, vibration Sinusoidal
Shock ................................................................................................IEC60068-2-27, Test Ea
Free fall............................................................................................ IEC60068-2-27, Test Ed
Storage
Climatic conditions according to IEC 721-3-1 ........................................................ Class 1k3
Ambient temperature .............................................................................................. -20...70°C
Air humidity ......................................................................................................Max 95% RH
Terminals......................... Disconnectable, so-called lift type for cable cross-section 2.5 mm2
Protection class................................................................................................................... IP00
Material casing ............................................................................................. Polycarbonate, PC
Colour
Cover ............................................................................................................................. Silver
Bottom part..............................................................................................................Dark gray
Weight ................................................................ OP10-230: 370g; OP10:215 g incl. terminals
Dimensions.....................................122 (7 modules) x 120 x 64 mm (WxHxD incl. terminals)
LVD, Low Voltage Directive
This product conforms with the requirements of European LVD standard EN61010-1.
EMC emissions an immunity standard
This product conforms with the requirements of European EMC standards CENELEC EN
61000-6-1 and EN 61000-6-3 and carries the CE mark
Inputs
AI........................................................................................................... Resolution: 10 bit A/D
AI1...................................................................................... PT1000-sensor, range 5…+80°C
AI2................................................................................... PT1000-sensor, range -30…+50°C
UI
AI....................................................................................................PT1000, range 0…+80°C
or DI ........................................................................................ Closing potential-free contact
AGND ................................................................................................................Reference for AI
UI+ ..................................................................................................................Reference for UI
DI................................................................................................ Closing potential-free contact
DI+ ..................................................................................................................Reference for DI
Optigo OP10 user manual
Chapter 3 Technical data
8
Outputs
AO.................................................................... 0…10 V DC; 8 bit D/A short-circuit protected
DO1 and DO2 (OP10)........... Triac controlled, 24 V AC, 0.5 A continuous (connected to G0)
DO1 and DO2 (OP10-230).. Triac controlled, 24 V AC, 0.16 A continuous with internal trafo
............................................... (connected to G0)
DO3............................................................... Change-over (SPDT) relay 230 V AC, 1000 VA
GDO ....................................................................Reference for DO1 and DO2. 24 V AC output
Other data
Display ............................................................... Numeric / graphic. Background illumination
Setpoints
Range
Factory setting
Temperature
supply air
room
tap hot water
10...80°C
10...50°C
10…80°C
21°C
21°C
55°C
P-band
0…99°C
15°C
I-time
0…990 s
60 s
D-factor
0…99
0
Cascade factor
0…99
2
Minimum at cascade
0…99°C
15
Maximum at cascade
0…99°C
25
Damper minimum limit
0…99
10
Start of outdoor compensation
-30…50°C
10°C
Outdoor compensation at -20°C outdoor temp
-10…10°C
5°C
Supply temperature (water-heated radiator heating)
at -20°C outdoor temperature
at 20°C outdoor temperature
0…99°C
0…99°C
60°C
20°C
Frost protection
7°C (fixed)
Shutdown mode
25°C (fixed)
Accessories
Temperature sensors...............PT1000 sensors, for example:TG-R5/PT1000, TG-KH/PT1000
Casing..............................................................................................................................EK216
The accessories are available from Regin. For more detailed information, see product sheets
and instructions which are available at www.regin.se.
Optigo OP10 user manual
Chapter 3 Technical data
9
Chapter 4 Installation and wiring
Installation
Optigo is intended to be installed and handled by professional personnel.
The installation should conform to the requirements of installation category 3 and pollution
degree 2.
There are a number of mounting alternatives:
-
DIN-standard casing (minimum 7 modules)
-
Cabinet, either on a DIN-rail or, using the two screw-pockets provided, by being
screwed to any suitable flat surface in the cabinet
-
The controller can also be mounted in a cabinet door or other control panel, using a
suitable front-mounting kit
For installations which are connected to 230 V AC:
Optigo OP10 user manual
-
Observe that there is a risk of electric shock on contact with terminals 1-3 and 10-12.
-
Mount Optigo in a DIN-casing or similar where it can be used without risk of electric
shock. The casing should provide at least 6 mm insulation from connected cables and
terminals 1-3 and 10-12.
-
Optigo should be protected against overload by a fuse in the installation. Since the
maximum load is 1000 VA, a fuse of 6 A is suitable.
-
Circuit breaker and fuse: The controller should be connected to a circuit breaker so the
power supply to the controller can be cut. Place this breaker close to the controller where
it is easy for the operator to reach. It should be clearly marked as a circuit breaker for the
controller.
Chapter 4 Installation and wiring
10
Wiring
This section only describes general rules and technical limitations concerning the wiring.
In chapter 5 there are specific wiring diagrams for the different control modes. Choose the
one suitable for the application on hand.
It is important to make sure that the wiring is correctly done, in accordance with the
instructions given in this manual and in accordance with local legislation for this type of
installation.
Supply voltage
OP10-230: 230 V AC +10%, -15%, 50/60 Hz. 6 VA
OP10: 24 V AC ±15%, 50/60 Hz. 6 VA
If the Optigo OP10 (24V supply model only) and actuators connected to it share transformer,
it is essential that the same transformer-pole is used as reference for all the equipment.
Failure to do so will prevent the equipment from functioning as intended and may also lead to
damages.
Inputs and outputs
AGND
All AGND terminals are interconnected and also connected to G0.
Optigo OP10 user manual
Chapter 4 Installation and wiring
11
Analogue inputs AI
The analogue inputs must refer to an AGND terminal. The analogue inputs are for PT1000
temperature sensors only. AI1 has a range of 0…+84°C. AI2 has a range of
-30…+54°C
Digital inputs DI
The digital inputs must refer to DI+ on terminal 41.
The digital inputs may only be wired to voltage-free contacts. Any external voltage applied
to a digital input may seriously damage the unit.
Universal input UI
The universal input can, depending on the choice of application, be made to act as either an
analogue input or as a digital input.
When used as an analogue input it is for PT1000 temperature sensors. The input then has a
range of 0…+84°C
UI must refer to UI+ on terminal 43.
Analogue outputs
Analogue outputs must refer to a AGND terminal or directly to G0.
If the Optigo OP10 (24V supply model only) and actuators connected to it share transformer,
it is essential that the same transformer-pole is used as reference for all the equipment.
Failure to do so will prevent the equipment from functioning as intended and may also lead to
damages.
Digital outputs
The two digital outputs DO1 (terminal 14) and DO2 (terminal 15) are triac controlled. The
triacs are internally connected to G0. Each triac can handle 24 V AC, 500 mA. The outputs
cannot be used to drive DC relays.
When DO1 and DO2 are used for 3-point control DO1 will always be increase signal (open
valve) and DO2 always decrease signal (close valve)
The outputs should normally refer to GDO on terminal 13. GDO is internally connected to G
and supplies 24 V AC.
In OP10 GDO can deliver the necessary 2 x 500 mA.
13 GDO
G0
14
15
G0
In OP10-230 however, the internal transformer’s capacity restricts the current on GDO to
approx. 165 mA.
Optigo OP10 user manual
Chapter 4 Installation and wiring
12
For more power an external transformer must be used. Wire the transformer according to the
following figure. The two 500 mA fuses are important to prevent possible overloading of the
triacs.
500mA
13 GDO
G0
14
500mA
24 V AC
G0
15
20
Agnd
230 V AC
Optigo OP10 user manual
Chapter 4 Installation and wiring
13
Chapter 5 Control modes
Optigo can be configured to any one of the following control modes.
1. Supply air temperature control.
The supply air temperature is kept at the setpoint value by controlling the output signals on
AO1 and AO2. A single PI control loop is used.
2. Supply air temperature control with outdoor compensation.
The supply air temperature is kept at the setpoint value by controlling the output signals on
AO1 and AO2. A single PI control loop is used.
The setpoint is automatically adjusted according to the outdoor temperature.
3. Cascade connected room / extract air temperature control.
An offset in room temperature will adjust the supply air temperature setpoint so as to
eliminate the room temperature offset. One PI and one P control loop are used. The supply
air temperature can be minimum and maximum limited.
4. Radiator circuit control with outdoor curve.
The water temperature setpoint is changed according to the outdoor temperature. A single PI
control loop is used. A room temperature sensor can be added to give corrective action if the
room temperature differs from the setpoint
5. Domestic hot water control.
The water temperature is kept constant by controlling the output signal on AO1. A single
PID control loop is used.
Control modes 1, 2 and 3
These three modes have a lot in common and will therefore be treated in a single section.
For control mode 1, Supply air temperature control” you need only one sensor,”Supply air
sensor” on AI1.
Optigo OP10 user manual
Chapter 5 Control modes
14
For control mode 2, “Supply air temperature control with outdoor compensation” you need
two sensors, “Supply air sensor” on AI1 and “Outdoor sensor” on AI2.
For control mode 3, “Cascade connected room / extract air temperature control” you also
need 2 sensors, “Supply air sensor” on AI1 and either “Room sensor” or “Extract sensor” on
AI2.
The analogue outputs can be configured to the following combinations:
AO1
/ AO2
1. Heating
/ -
2. Cooling
/
-
3. Heating
/
Cooling
4. Heating
/
Heating
5. Cooling
/ Cooling
6. Heating
/ Damper
7. Cooling
/ Damper
In alternative 4, Heating-Heating AO2 will be activated first on increasing heat demand.
In alternative 5, Cooling-Cooling AO2 will be activated first on increasing cooling cemand.
In alternative 6, Heating-Damper, at temperatures above the setpoint the damper on AO2 will
be fully open. On increasing heating demand, the damper on AO2 will first close to the set
minimum value before the heating output on AO1 starts to increase.
In alternative 7, Cooling-Damper, at temperatures below the setpoint the damper on AO2
will be fully open. On increasing cooling demand, the damper on AO2 will first close to the
set minimum value before the cooling output on AO1 starts to increase.
Optigo OP10 user manual
Chapter 5 Control modes
15
3-Position control
Instead of an analogue output you can configure a single 3-position (increase / decrease)
output. You will then only have the following output choices:
Heating
Cooling
DO1 is used for increase signal and DO2 for decrease. This option cannot be combined with
alarm output.
A single P control loop is used.
Universal input UI1
Electric heating
If the Optigo is used to control electric heating UI1 is used for the high temperature limit
switch. Connect and configure as a digital input. The input is normally closed. Whenever the
running mode switches to “Off”, (normal shutdown) the heating output will be shut down
immediately but the fan will run on for a further 3 minutes to cool the heater. On activation
of the high temperature limit, the heating output will be shut down immediately and there
will be no cool-down period.
Relay
el. heating
Control voltage
43
44
High limit
thermostat
Wiring suggestion for
high temp limit when
using electric heating.
Drawn with high temp
limit activated.
Optigo
Contr. voltage
Auxilliary relay
N.B. It is important that the high temperature thermostat is hardwired to disconnect the
power to the heater to ensure that the heating is shut down when the thermostat is activated
even if the Optigo should be faulty.
Water heating
When controlling a water heater, UI1 can, when necessary, be used for a frost protection
sensor. Connect and configure as an analogue input. The frost protection function can be tied
to either of the analogue outputs.
The heater return water temperature is monitored by the frost protection sensor. Should the
temperature at the frost protection sensor fall below 12°C an internal, proportional signal is
generated that is used to force the heating valve open to try and prevent freeze-up of the
heater.
“Internal signal”
Prop.band
100 %
0%
7°C
Optigo OP10 user manual
12°C
Chapter 5 Control modes
16
The frost protection signal (“Internal signal”) will increase linearly to 100 % at 7°C at which
point the frost protection alarm is triggered. The fan will then be shut down and the
controller will go into shutdown mode.
Shutdown mode (Only if frost protection sensor has been configured)
Whenever the running mode switches to ”Off”, (normal shut-down or frost protection is
activated) the controller will go into ”Shutdown mode”. The shutdown controller will
control the output that is tied to the frost protection function to maintain a constant 25°C at
the frost protection sensor.
Outdoor compensation
In control mode 2, Supply air control with outdoor temperature compensation, the supply air
temperature setpoint can be displaced according to outdoor temperature. The displacement
starts from outdoor temperature S.P and reaches the setpoint value + the compensation
(CMP) at -20°C outdoor temperature. Example: Normal setpoint = 20, S.P=10 and CMP = 5
will give the following result:
Setpoint
Setpoint + CMP 25°C
Setpoint 20°C
-20°C
10°C
S.P.
Outdoor temp
Damper
It is possible to set a minimum limit value to the damper output signal. The damper-output
will then not go lower than the set value during normal operation. On shut-down however the
signal will go to zero.
In the output mode heating – damper the damper will be fully open for temperatures higher
than the setpoint. On increasing heat demand the damper will first close to the minimum
value before the heating output starts to increase.
In the output mode cooling – damper the damper will be fully open for temperatures lower
than the setpoint. On increasing cooling demand the damper will first close to the minimum
value before the cooling output starts to increase.
DI1, Fan indication
Unless the fan indication input is active (closed) indicating that the fan is running, the
controller will not start normal temperature control and an alarm will be generated. An alarm
will also be generated if the input is active (closed) when the fan control output is off.
DI2, Extended running
Activation of this input will force the controller to running mode even if internal scheduler is
in Off-mode. The unit will run as long as the input is activated.
Optigo OP10 user manual
Chapter 5 Control modes
17
Wiring examples
See also chapter 4 Installation and wiring.
A. OP10 with electric heating (for example via PULSER-X/D or TTC25X) and
damper. Cascade control
B. OP10-230 with water heating, 3-position output. Supply air control with
outdoor compensation
Optigo OP10 user manual
Chapter 5 Control modes
18
Control mode 4, Radiator circuit control with outdoor curve
GT2
GT1
For this control mode you need two sensors, GT1 “Supply temperature” on AI1 and GT2
“Outdoor sensor” on AI2.
You can also have a room temperature sensor on UI1 to let the room temperature offset give
correction to the supply temperature. Wire UI1 as an analogue input.
3-Position control
Instead of the analogue output you can configure a 3-position (increase / decrease) output
using DO1 and DO2. DO1 is used for increase signal and DO2 for decrease. This option
cannot be combined with alarm output.
A single P control loop is used.
Control curve
The supply temperature setpoint is determined by a outdoor temperature/supply temperature
curve. The basic control curve is a straight line between the two setpoints SPL and SPH where
SPL is the supply temperature to be held when the outdoor temperature is +20°C and SPH is
the temperature to be held at an outdoor temperature of -20°C. An extra temperature boost
can be added at 0°C outdoor temperature. The boost receeds from the set value to 0 over ±3
degrees. In the Setpoint menu a parallel displacement of the whole curve can be added.
Supply temp
SPH
SPL
-20
0
+20
Outdoor temp
Room sensor
An optional room sensor can be connected to UI1. If a room sensor is used, it must be
connected to the Optigo before control mode 4 is selected. Otherwise, the controller will not
detect the sensor. To activate/deactivate the room sensor it has to be connected/not connected
to the Optigo before control mode 4 is selected. The control program is automatically
adapted when a room sensor is connected. Any room temperature offset will displace the
supply setpoint as to eliminate the offset. The room controller is a P-controller with a fixed
P-band of 3K.
If room sensor is activated the Setpoint menu is used to set the room temperature instead of
adding a parallel displacement.
To indicate that room control is activated the display symbol showing a thermometer outside
the house is replaced by a thermometer inside the house.
Optigo OP10 user manual
Chapter 5 Control modes
19
DO3, Pump control
The pump control output is activated when the temperature control output signal is greater
than zero, or the outdoor temperature is below 15°C. It is deactivated when the output signal
is zero and the outdoor temperature is greater than 15°C. There is a 10 minute stop delay.
There is a pump exercise function which will start the pump at 15:00 (3 pm) every day and
let it run for 5 minutes. The function can be deactivated.
Wiring example
See also chapter 4 Installation and wiring.
OP10-230 with 3-position actuator and room temperature sensor
Control mode 5
Domestic hot water control
GT1
CW
For this control mode you need a single sensor, “Supply water temperature” on AI1
Periodic overheating
To reduce the risk of Legionella bacteria growth a periodic overheating of the water can be
configured. The water temperature will be raised to 65°C once daily at 03:00 (3 am). The
elevated temperature is maintained for 10 minutes. The function can be deactivated.
Optigo OP10 user manual
Chapter 5 Control modes
20
Wiring example
OP10 with 0...10V actuator
Y1
Optigo OP10 user manual
G0
G
Y
13
14
15
20
21
22
GDO
DO1
DO2
AGND
AO1
AO2
DO3
10 COM
11 NO
12 NC
G 1
G0 2
3
DI2
DI+
DI1
UI+
UI1
AGND
AI1
AGND
AI2
40
41
42
43
44
50
51
52
53
24 V AC
°C
Supply water temp
Chapter 5 Control modes
21
Chapter 6 Display and encoder
All setting and configuration is done using the display and encoder.
The menu information on the display is organised in a tree fashion. Using the encoder you
can move between menus, set values etc.
In any of the configuration menus, a click on the encoder will activate change mode. You
can then rotate the encoder button to move between choices or set values. A second click of
the button will accept the choice.
The menu system is divided into three levels: The Basic level, the 3-second level which
contains the clock and scheduler settings and the 10-second level which contains all the
configuration menus.
The Basic level
The Basic level comprises four sets of menu displays, the Base Display, the I/O Displays, the
alarm handling display and the Setpoint Display.
Base Display
This is an example of the Base Display, the display that is normally shown when there is no
operator activity.
This is an example of the Base display, the display that is normally shown when there is no
operator activity.
It shows the current time and the actual value of the main input parameter.
There are bar-graphs showing the current output levels together with symbols showing how
the outputs have been configured (Heating, Cooling or damper etc).
Also a symbol showing which of the five control modes is configured and an alarm symbol
that is displayed in the event of an alarm condition.
The fan symbol (control modes 1, 2 and 3 only) is lit as long as the fan indication input is
activated.
I/O
When the Base Display is shown, by twisting the knob counter clockwise until the text I/O is
displayed and then clicking on it, you can gain access to a menu where you can look at the
values and states of all inputs and outputs.
To exit this menu again, click on the knob and then twist the knob clockwise and you will be
returned to the Base display.
Optigo OP10 user manual
Chapter 6 Display and encoder
22
Setpoint
When in the Base Display, a click on the encoder button gives direct access to the Setpoint
menu. See chapter 7 Setpoint.
If there are any active alarms, clicking on the encoder button will instead give access to the
alarm handling menus. Here the alarms are displayed and can be acknowledged. There is one
menu display for each alarm with symbols showing which type of alarm it is. See chapter 8
Alarm handling.
The 3 second level
This level is reached from the Base display by clicking and holding the encoder button for 3
seconds. The 3-second level holds all menus for setting the clock and the scheduler program.
See chapter 9 Clock and Scheduler.
The 10-second level
This level is reached from the Base Display by clicking and holding the encoder button for
10 seconds. The 10-second level holds all the configuration menus. See chapter 10
Configuration.
Display symbols
Outdoor compensation
configured
Alarm indicator
Configuration level
Cascade control
Temperature control
Radiator circuit control
Menu number
AO1 Graphic output signal
Control mode 1 only
Bargraph AO1 output level
Domestic hot water control
Bargraph AO2 output level
Fan run indicator
Menu holds
Active 0...10V
changable values
input signal
or 3-position output
indicator
Optigo OP10 user manual
AO2 Graphic output signal
Control mode 1 only
Chapter 6 Display and encoder
23
Chapter 7 Setpoint
The setpoint menu is normally accessed from the Base Display by a clicking on the encoder
knob.
If you wish to change the displayed value, click on the knob again and the change indicators
will start to flash to show that you are now in change mode. Twist the knob, clockwise to
increase the value, anti-clockwise to decrease.
When the desired value is shown, click on the knob to acknowledge. To return to the Base
display, twist the knob.
For configurations involving a single output signal the setpoint is the starting point for the
output signal.
For configurations involving two diverging output signals with neutral zone (heating –
cooling) the setpoint is placed in the middle of the neutral zone.
For configurations involving two outputs without neutral zone (heating – heating, cooling –
cooling, heating – damper or cooling – damper) the setpoint value is the starting point for the
first sequence (AO2)
Control mode 4, Radiator circuit control
If no room sensor is configured the setpoint menu is used to add a parallel displacement to
the outdoor curve. The displacement can be either positive or negative. The setpoint is shown
as ΔSP.
If room sensor is activated the Setpoint menu is used to set the room temperature instead of
adding a parallel displacement.
An optional room sensor can be connected to UI1. If a room sensor is used, it must be
connected to the Optigo before control mode 4 is selected. Otherwise, the controller will not
detect the sensor. To activate/deactivate the room sensor it has to be connected/not connected
to the Optigo before control mode 4 is selected. The control program is automatically
adapted when a room sensor is connected. Any room temperature offset will displace the
supply setpoint as to eliminate the offset. The room controller is a P-controller with a fixed
P-band of 3K. The setpoint is shown as SP
To indicate that room control is activated the display symbol showing a thermometer outside
the house is replaced by a thermometer inside the house.
Optigo OP10 user manual
Chapter 7 Setpoint
24
Chapter 8 Alarm handling
If there are any active, unacknowledged alarms, the alarm indicator in the Base Display will
light up and start flashing. If DO1 is configured as alarm output, it will be activated.
The alarm handling menus are accessed from the Base Display by a click on the encoder
knob. The first alarm is displayed.
There are four different alarm types:
AL1
Frost protection alarm. The frost protection temperature has fallen below +7°C
AL2
High temperature limit switch activated.
AL3
Fan indication alarm. Either there is no fan indication input on DI1 when the fan
start output, DO3 is active or DI1 is active although there is no fan start signal on
DO3. The fan alarm has a 30 second delay.
AL4
Sensor error. A sensor input is open circuit.
A symbol shows which type of alarm it is. Snowflake for frost protection, sun for high
temperature limit switch, a fan for fan indicator and the input symbol for sensor error.
If there are multiple alarms, twist the knob to scroll through them. To acknowledge an alarm,
click the knob to enter change mode. Then twist it to change No to Yes and click to
acknowledge. An alarm will remain on the alarm list until it is both acknowledged and has
reset. The alarm indicator in the Base Display will remain lit until the alarm list is empty.
However, it will only continue to flash as long as there are unacknowledged alarms in the
list. Thereafter it will remain steadily lit until all alarms have reset. If DO1 is used as alarm
output it will remain activated as long as there are unacknowledged alarms in the alarm list.
DO1 cannot be used as an alarm output when 3-point control has been selected.
Optigo OP10 user manual
Chapter 8 Alarm handling
25
Chapter 9 Clock and scheduler
The menus for setting the clock and the scheduler times lie in the 3-seconds level. This level is accessed from the basic
level by clicking and holding the encoder knob for 3 seconds.
Real time clock
This sample display shows that the time is 13:48 on a Friday, the fifth day of the week.
The 0.0 in the top right corner is a menu display counter. Each configuration menu has a
unique number combination. All menus connected to the clock and scheduler belong to the
group 0.
To set the clock, click the knob and the day-of-the-week number will start flashing. Twist the
knob until the correct day is shown, Monday is 1, Tuesday 2 etc, and then click the knob
again to acknowledge the choice. Now the hours will flash. Set them in the same way and
then finally the minutes. After confirming the minutes the menu will change to show the first
of the scheduler menus.
Note
The clock does not have automatic summertime adaption.
Scheduler, general
The scheduler function is only available for control modes 1, 2, 3 and 4.
The easiest way to understand the scheduler function is to compare it to the type of
mechanical timer that has a rotating disk where you can pull out knobs that on passing the
switch kan turn it ON or OFF. There are 4 ON-points and 4 OFF-points. Each point has its
own menupage where 0.1, 0.3, 0.5 and 0.7 are ON-points and 0.2, 0.4, 0.6 and 0.8 are OFFpoints.
Control modes 1, 2 and 3 have the same type of scheduler where the ON-points will start the
unit and the OFF-points will shut it down.
Control mode 4 uses the scheduler for switching to economy mode (ECO) where the
temperature is lowered by a settable number of degrees. Here the ON-points will switch
ECOnomy period on and the OFF-points will switch back to comfort temperature.
Scheduler, control modes 1, 2 and 3
Menus 0.1 – 0.8
With the 4 pairs of on-off menus you can create 4 different running periods, either for single
days or for a group of days. The day of the week number can be set to any value 1 to 9 or
-- for unused menus.
Numbers 1 to 7 represent the days of the week Monday to Sunday. Number 8 will apply the
set time every day Monday through Friday and number 9 will apply the set time all 7 days of
the week.
Optigo OP10 user manual
Chapter 9 Clock and scheduler
26
For example, you wish the unit to run Monday to Friday between 07:30 and 18:00, Saturday
8:00 to 14:00.
Set first on-time to day 8 and 7:30, the first off-time to day 8 and 18:00. Set the second ontime to day 6 and 8:00 and the second off-time to day 6 and 14:00. Set all others to day --.
If you want the unit to run around the clock, set the on-time to 0:00 and the off-time to 0:00.
Menu 0.9, Override
After the eight switching point menus there is a ninth, 0.9. There the present output status of
the scheduler is shown and you can manually override the setting.
If, for example, the switch is shown as ON and you change it to OFF it will remain off either
until you manually change it to On again or until the next timer ON-point is reached.
Menu OK
After the scheduler menus there is a final menu, OK. A klick on the encoder knob will exit
the Clock and Scheduler level and return you to the Basic Display.
Scheduler, control mode 4
Menus 0.1 – 0.8
With the 4 pairs of on-off menus you can create 4 different economy periods, either for
single days or for a group of days. The day of the week number can be set to any value 1 to 9
or -- for unused menus.
Numbers 1 to 7 represent the days of the week Monday to Sunday. Number 8 will apply the
set time every day Monday through Friday and number 9 will apply the set time all 7 days of
the week.
In this application you need to remember that ON will switch ECOnomy period (lowered
temperature) on and OFF will switch ECOnomy period off.
For example, every weekday morning you want the temperature to start rising at 06:00 and to
remain at comfort level until 21:00. On Saturday and Sunday you want high temperature
from 07:00 to 23:30.
Set first on-time to day 8 and 21:00, the first off-time to day 8 and 06:00. Set the second ontime to day 6 and 23:30 and the second off-time to day 6 and 07:00. Set the third on-time to
day 7 and 23:30 and the third off-time to day 7 and 07:00.
Optigo OP10 user manual
Chapter 9 Clock and scheduler
27
Should you want the comfort period on Friday to run on until 23:30 you can set the fourth
on-time to day 5 and 23:30 and the fourth off-time to day 5 and 21:01. The 1 minute dip will
not be noticable.
Menu 0.9, Setback
After the eight switching point menus there is a ninth, 0.9. In this menu you set the number
of degrees you wish to lower the room temperature setpoint during the economy periods. If
no room sensor is connected the supply water setpoint will be lowered by 3 times the set
value.
Menu OK
After the scheduler menus there is a final menu, OK. A click on the encoder knob will exit
the Clock and Scheduler level and return you to the Basic Display.
Optigo OP10 user manual
Chapter 9 Clock and scheduler
28
Chapter 10 Configuration
All the configuration menus lie in the 10-seconds level. This level is accessed from the Base
Display by clicking and holding the encoder knob for 10 seconds.
There are numerous configuration menus covering all available options and combinations.
In some cases, making a certain choice in one menu will mean that you will only see certain
other menus. For example, the menu for setting the damper minimum limit is only shown if
you have configured AO2 to be a damper control output.
Menus 1.0 – 5.0
In the first set of configuration menus you choose which of the five control modes you wish
to run. The displayed symbol and the first digit in the menu-number show which control
mode is at hand
Menus X.1
Output type (control modes 1, 2, 3 and 4) (where X depends
on your choice of alternative above)
For control modes 1,2, 3 and 4 you can, instead of the 0 – 10 V analogue output, choose to
use two digital outputs to control a 3-point (increase/decrease) actuator. In this case DO1 will
always be increase (open valve) and DO2 decrease (close valve).
In controlmode 5 you can only have 0 – 10 V analogue output.
Menus X.2 Output signals (control modes 1, 2, 3)
Here you choose the combination of output signals.
If you in the preceding menu have chosen analogue 0…10 V outputs, they can be configured
to the following combinations:
Optigo OP10 user manual
Chapter 10 Configuration
29
AO1
1. Heating
2. Cooling
3. Heating
4. Heating
5. Cooling
6. Heating
7. Cooling
/
AO2
/
/
/
/
/
/
/
Cooling
Heating
Cooling
Damper
Damper
Output
symbol
\
/
\/
\\
//
\/
\/
Graphic
symbol
In alternative 4, Heating-Heating AO2 will be activated first on increasing heat demand.
In alternative 5, Cooling-Cooling AO2 will be activated first on increasing cooling cemand.
In alternative 6, Heating-Damper, at temperatures higher than the setpoint the damper on
AO2 will be fully open. On increasing heating demand, the damper on AO2 will first close to
the set minimum value before the heating output on AO1 starts to increase.
In alternative 7, Cooling-Damper, at temperatures lower than the setpoint the damper on
AO2 will be fully open. On increasing cooling demand, the damper on AO2 will first close
to the set minimum value before the cooling output on AO1 starts to increase.
If you have chosen 3-point output in the preceeding menu you will only be able to choose
alternatives 1 or 2 with a single output signal.
For each alternative the number representing it is shown along with a graphic symbolisation
of the output signal and also a symbol next to the bar-graph for each output.
Control mode:
Cascade control
Output signals, graphical
Control mode 3 menu 2
AO1 Heating
AO2 Cooling
Output alternative 3, Heating/Cooling
Example, Menu X.2
Room temperature control (Cascade control) with output alternative 3 Heating/Cooling.
Since control modes 4 and 5 are fixed to one step heating in their output function the menus
4.2 and 5.2 are not available.
Menus X.3
Neutral zone (Control modes 1, 2 and 3)
Here you set the neutral zone. This menu is only available for control modes 1, 2 and 3 and
only if you have chosen the output signal combination 3, heating – cooling. In this output
option you can set a neutral zone between the outputs. The setpoint will be placed at the
middle of the neutral zone.
Optigo OP10 user manual
Chapter 10 Configuration
30
Menus X.4
P-band
Here you set the P-band (Proportional band). The P-band is the control offset necessary to
drive an output signal from 0 to 100%. In configurations involving two outputs the same Pband applies to both outputs.
In controlmode 3, Cascade control this setting will set the P-band for the supply air
controller. The P-band for the room controller is set by the cascade factor, see menu X.6
below.
Menus X.5
I-time
Here you set the Integration time (Reset time). Menu X.5 is only shown if 3-point control has
not been selected in menu X.1.
Menus X.6
Damper minimum position (Control modes 1, 2 and 3)
Cascade factor (control mode 3)
0°C temperature boost (Control mode 4)
D-factor (control mode 5)
Damper minimum position
If you in menu X.2 have configured output AO2 to be a damper, alternative 6 or 7, you can
set a minimum value to the damper signal. The damper output will then not go lower than the
set value during normal operation. On shut-down however the signal will go to zero and fully
close the damper.
Cascade factor
For control mode 3 there is a second 3.6 menu page where you set the cascade factor, CF.
In cascade control an offset in room/extract air temperature will displace the supply air
controller’s setpoint so as to eliminate the offset. The cascade factor sets the amplification on
the corrective signal from the room controller. If for example you have set a cascade factor
of 5 and the room temperature falls 0.5 degrees below the room setpoint value the supply air
setpoint will be raised by 0.5 x 5 = 2.5 degrees.
Optigo OP10 user manual
Chapter 10 Configuration
31
0°C temperature boost
In control mode 4 an extra temperature boost can be added at 0°C outdoor temperature. The
boost recedes from the set value to 0 over ±3 degrees.
Supply temp
SPH
SPL
-20
0
+20
Outdoor temp
D-factor
Control mode 5, Domestic hot water temperature control is often a very difficult application
which calls for responsive control. Optigo therefore utilises PID-control for this control
mode. In this menu you set the D-factor.
Menus X.7
Universal input UI1 (Control modes 1, 2, 3)
Pump exercise (Control mode 4)
Periodic overheating (Control mode 5)
Input UI1
For control modes 1, 2 and 3 you can choose to configure the universal input UI1 as either an
analogue input for a frost protection sensor on either output (snowflake-symbol) in a waterheated system or as a digital input for a high temperature limiting switch (sun-symbol) in an
electric heater. It can also be set to --, not active.
If set to frost protection sensor Optigo will activate the frost protection function and also
shutdown mode, see chapter 5.
If set to high temperature limit switch, the fan will run for an extra 3 minutes after the
heating output has been turned off at shutdown.
Frost protection on AO1
Optigo OP10 user manual
Frost protection on AO2
Chapter 10 Configuration
32
High temp limit switch
Not used
Pump exercise
If the pump stands still for prolonged periods during the summer there is the risk of the pump
impeller seizing. To reduce this risk the Optigo has a pump exercise function which will start
and run the pump for 5 minutes at 15:00 each day. In this menu the exercise function can be
turned Off if not desired. Default is On.
Periodic overheating
To reduce the risk of Legionella bacteria growth a periodic overheating of the water can be
configured. The water temperature will be raised to 65°C once daily at 03:00 (3 am). The
elevated temperature is maintained for 10 minutes. In this menu the overheating function can
be turned Off if not desired. Default is On
Menus X.8
Startpoint for outdoor compensation, S.P (Control mode
2)
Supply air min limit (Control mode 3)
Low temperature setpoint (Control mode 4)
For control mode 2. S.P is the outdoor temperature at which the setpoint compensation starts.
At temperatures lower than S.P a compensation will be added to the setpoint value. The
maximum compensation is set in menu 2.9 and is achieved at -20°C
For control mode 3 the supply air temperature can be minimum and maximum limited. In
this menu you set the minimum supply air temperature.
For control mode 4 you need to establish a relationship between outdoor temperature and
supply water temperature. This is set by the two setpoints SPL and SPH where SPL is the
water temperature to be held at an outdoor temperature of +20°C and SPH is the water
temperature to be held at -20°C. Intermediate values are calculated with linear interpolation.
In this menu you set SPL.
Optigo OP10 user manual
Chapter 10 Configuration
33
Menus X.9
Maximum compensation, CMP (Control mode 2)
Supply air max limit (Control mode 3)
High temperature setpoint (Control mode 4)
For control mode 2. The maximum setpoint compensation value.
Compensation will start to be added to the setpoint value when the outdoor temperature falls
below the start point S.P entered in menu 2.8. The compensation will increase linearily up to
the maximum value CMP which is reached when the outdoor temperature has fallen to -20°C
For control mode 3 the supply air temperature can be minimum and maximum limited. In
this menu you set the maximum supply air temperature.
For control mode 4 you need to establish a relationship between outdoor temperature and
supply water temperature. This is set by the two setpoints SPL and SPH where SPL is the
water temperature to be held at an outdoor temperature of +20°C and SPH is the water
temperature to be held at -20°C. Intermediate values are calculated with linear interpolation.
In this menu you set SPH.
Menu I/O
After the last configuration menus there is a menu where you can look at the actual values of
all the inputs and outputs.
Menu OK
Last of the configuration level menus is the OK-menu. To leave the configuration level, go to
this menu and klick on the encoder knob.
Optigo OP10 user manual
Chapter 10 Configuration
34
On exit from the configuration level you will not be returned to the Basic level but to the
Time and Scheduler level.
There is also a time-out function that will automatically exit the configuration level after 5
minutes of inaction.
Storage of settings
All configuration settings become valid as soon as they are entered by clicking the encoder
knob. They are however not written to the flash memory until you exit the configuration
level either via the OK menu or via the time-out function.
To exit the configuration level without saving the changes to flash memory, cut the supply
voltage when still in the configuration level. All values will be kept as they were before you
entered the configuration level.
Reset to factory setting
The OP10 can be reset to factory settings by configuring Domestic hot water control (mode
5) and setting the D-factor to 99. Go to the Basic Display. Then cut the power supply. When
power is reapplied all configuration and scheduler settings will be reset to factory setting.
Optigo OP10 user manual
Chapter 10 Configuration
35
Chapter 11 Index
1
10-second level ..............................................................23, 29
3
3-second level ................................................................23, 26
A
Alarm...................................................................................25
Analogue inputs...................................................................12
Analogue outputs.................................................................12
B
Basic level ...........................................................................22
C
Clock ...................................................................................26
Configuration.......................................................................29
Configuration level ..............................................................23
Control modes........................................................................7
Domestic hot water control .............................................20
Radiator circuit control....................................................19
Temperature control ........................................................14
D
Damper ................................................................................17
Digital inputs .......................................................................12
Display and encoder ............................................................22
Domestic hot water overheating ..........................................33
E
EMC ......................................................................................8
Extended running.................................................................17
L
LVD ...................................................................................... 8
M
Menu
Configuration.................................................................. 29
I/O............................................................................. 22, 34
OK ...................................................................... 27, 28, 34
Setback ........................................................................... 28
Setpoint..................................................................... 23, 24
Mounting............................................................................... 6
O
Outdoor compensation ........................................................ 17
Overheating......................................................................... 33
Override .............................................................................. 27
P
Pump exercise ..................................................................... 33
S
Scheduler ............................................................................ 26
Scheduler override .............................................................. 27
Setback................................................................................ 28
Setpoint ............................................................................... 24
Shutdown mode................................................................... 17
Supply voltage .................................................................... 11
T
Technical data ....................................................................... 8
Inputs ................................................................................ 8
Outputs ............................................................................. 9
U
F
Factory settings, reset to ......................................................35
Fan indication ......................................................................17
I
Inputs and outputs............................................................7, 11
Analogue inputs ..............................................................12
Analogue outputs.............................................................12
Digital inputs...................................................................12
Universal inputs ..............................................................12
Installation ...........................................................................10
Optigo OP10 user manual
Universal inputs .................................................................. 12
V,W
Wiring ................................................................................. 11
Wiring diagram
Control mode 1, 2 and 3 ................................................. 18
Control mode 4 ............................................................... 20
Control mode 5 ............................................................... 21
general ............................................................................ 11
Chapter 11 Index
36
R E G I N
–
T H E
C H A L L E N G E R
I N
B U I L D I N G
A U T O M A T I O N
AB Regin
Main office, Marketing, Sales and Logistics
Box 116
Phone: + 46 (0)31-720 02 00
E-mail: S-428 22 Kållered, Sweden
Fax: + 46 (0)31-720 02 50
Website: www.regin.se
[email protected]
Sales office France
Sales office Singapore
Sales office Hong Kong
Regin Control SARL
Regin Controls Asia Pacific Pte Ltd
Regin Controls Hong Kong Limited
5 Rue Regnault
66 Tannery Lane, 2901 EW International Tower
FR-93500 Pantin, France
#03-04 Sindo Building, Singapore 347805
120 Texaco Road, Tseun Wan,
Phone: +33 (0)1 41710034
Phone: + 65 6747 8233
NT, Hong Kong
Fax: +33 (0)1 41714646
Fax: Phone: Website: www.regin.fr
+ 65 6747 9233
E-mail: [email protected]
Website: www.regin.com.sg
+ 852 2407 0281
Website: www.regin.com.hk