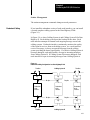
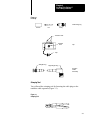
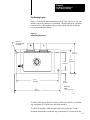
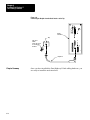
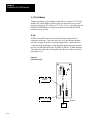
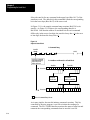
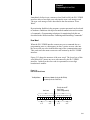
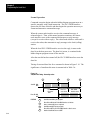
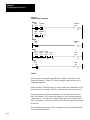
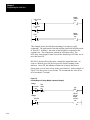
1
AllenBradley
Data Highway II
PLC-2 Family
Interface
(Cat. No. 1779-KP2,
KP2R)
User Manual
Table of Contents
Using This Manual . . . . . . . . . . . . . . . . . . . . . . . . . . . . . . .
11
Chapter Objectives . . . . . . . . . . . . . . . . . . . . . . . . . . . . . . . . . . .
Manual's Purpose . . . . . . . . . . . . . . . . . . . . . . . . . . . . . . . . . . .
Audience . . . . . . . . . . . . . . . . . . . . . . . . . . . . . . . . . . . . . . . . . .
Vocabulary . . . . . . . . . . . . . . . . . . . . . . . . . . . . . . . . . . . . . . . .
Manual Organization . . . . . . . . . . . . . . . . . . . . . . . . . . . . . . . . .
Chapter Summary . . . . . . . . . . . . . . . . . . . . . . . . . . . . . . . . . . .
11
11
11
11
12
12
Introducing the PLC2/DHII Interface . . . . . . . . . . . . . . . . .
21
Chapter Objectives . . . . . . . . . . . . . . . . . . . . . . . . . . . . . . . . . . .
What Is the PLC2/DHII Interface? . . . . . . . . . . . . . . . . . . . . . . . .
What Is Its Function? . . . . . . . . . . . . . . . . . . . . . . . . . . . . . . . . .
Compatible Processors . . . . . . . . . . . . . . . . . . . . . . . . . . . . . . .
Communication Connections . . . . . . . . . . . . . . . . . . . . . . . . . . . .
Node Interfaces . . . . . . . . . . . . . . . . . . . . . . . . . . . . . . . . . . . . .
Data Highway II Network . . . . . . . . . . . . . . . . . . . . . . . . . . . . . . .
Media Access Method . . . . . . . . . . . . . . . . . . . . . . . . . . . . . . . .
Bridges to Other Data Highway II Links . . . . . . . . . . . . . . . . . . . .
Command/Reply . . . . . . . . . . . . . . . . . . . . . . . . . . . . . . . . . . . .
Message Priority . . . . . . . . . . . . . . . . . . . . . . . . . . . . . . . . . . . .
Redundant Cabling . . . . . . . . . . . . . . . . . . . . . . . . . . . . . . . . . .
A Second Link . . . . . . . . . . . . . . . . . . . . . . . . . . . . . . . . . . . . . .
Chapter Summary . . . . . . . . . . . . . . . . . . . . . . . . . . . . . . . . . . .
21
21
23
24
24
25
25
29
210
210
214
217
218
218
Installing Data Highway II Link Cabling Hardware . . . . . . .
31
Chapter Objectives . . . . . . . . . . . . . . . . . . . . . . . . . . . . . . . . . . .
Identifying Hardware . . . . . . . . . . . . . . . . . . . . . . . . . . . . . . . . .
Planning Cabling Configuration . . . . . . . . . . . . . . . . . . . . . . . . . .
Taps and Length of Trunkline . . . . . . . . . . . . . . . . . . . . . . . . . . .
Installing Taps . . . . . . . . . . . . . . . . . . . . . . . . . . . . . . . . . . . . . .
Installing the Trunkline . . . . . . . . . . . . . . . . . . . . . . . . . . . . . . . .
Plugging into the Tap . . . . . . . . . . . . . . . . . . . . . . . . . . . . . . . . .
Installing Droplines . . . . . . . . . . . . . . . . . . . . . . . . . . . . . . . . . . .
Chapter Summary . . . . . . . . . . . . . . . . . . . . . . . . . . . . . . . . . . .
31
31
34
34
310
311
314
315
316
ii
Table of Contents
Installing the PLC2/DHII Interface . . . . . . . . . . . . . . . . . . .
41
Chapter Objectives . . . . . . . . . . . . . . . . . . . . . . . . . . . . . . . . . . .
Planning the Layout . . . . . . . . . . . . . . . . . . . . . . . . . . . . . . . . . .
Mounting the PLC2/DHII Interface . . . . . . . . . . . . . . . . . . . . . . .
Setting Link Address . . . . . . . . . . . . . . . . . . . . . . . . . . . . . . . . .
Setting HostBoard Switches . . . . . . . . . . . . . . . . . . . . . . . . . . . .
Setting MACBoard Switches . . . . . . . . . . . . . . . . . . . . . . . . . . .
Connecting Communication Cables . . . . . . . . . . . . . . . . . . . . . . .
Connecting Power and Ground . . . . . . . . . . . . . . . . . . . . . . . . . .
Power Distribution . . . . . . . . . . . . . . . . . . . . . . . . . . . . . . . . . . .
Chapter Summary . . . . . . . . . . . . . . . . . . . . . . . . . . . . . . . . . . .
41
41
44
45
45
48
49
415
417
418
Programming the Local Host . . . . . . . . . . . . . . . . . . . . . . .
51
Chapter Objectives . . . . . . . . . . . . . . . . . . . . . . . . . . . . . . . . . . .
Communication Zone . . . . . . . . . . . . . . . . . . . . . . . . . . . . . . . . .
Status Words . . . . . . . . . . . . . . . . . . . . . . . . . . . . . . . . . . . . . . .
Initiating and Monitoring Commands . . . . . . . . . . . . . . . . . . . . . .
Memory Access Limitations . . . . . . . . . . . . . . . . . . . . . . . . . . . . .
Chapter Summary . . . . . . . . . . . . . . . . . . . . . . . . . . . . . . . . . . .
51
51
516
523
540
542
Operation and Troubleshooting . . . . . . . . . . . . . . . . . . . . .
61
Chapter Objectives . . . . . . . . . . . . . . . . . . . . . . . . . . . . . . . . . . .
Indicators . . . . . . . . . . . . . . . . . . . . . . . . . . . . . . . . . . . . . . . . .
Operation Switches . . . . . . . . . . . . . . . . . . . . . . . . . . . . . . . . . .
Operating the KP2 Interface . . . . . . . . . . . . . . . . . . . . . . . . . . . .
Replacing Boards . . . . . . . . . . . . . . . . . . . . . . . . . . . . . . . . . . .
Troubleshooting the Interface . . . . . . . . . . . . . . . . . . . . . . . . . . .
Error Codes . . . . . . . . . . . . . . . . . . . . . . . . . . . . . . . . . . . . . . . .
Chapter Summary . . . . . . . . . . . . . . . . . . . . . . . . . . . . . . . . . . .
61
61
64
65
66
611
614
614
Specifications . . . . . . . . . . . . . . . . . . . . . . . . . . . . . . . . . .
A1
Error Codes . . . . . . . . . . . . . . . . . . . . . . . . . . . . . . . . . . . .
B1
Chapter Objectives . . . . . . . . . . . . . . . . . . . . . . . . . . . . . . . . . . .
Error Codes . . . . . . . . . . . . . . . . . . . . . . . . . . . . . . . . . . . . . . . .
B1
B1
Chapter
1
Using This Manual
Chapter Objectives
This chapter tells you about this manual. It explains this manual’s
purpose, audience, and content.
Manual's Purpose
In this manual you will read about the PLC-2/DHII Interface
(Cat. No. 1779-KP2) and the Redundant PLC-2/DHII Interface
(Cat. No. 1779-KP2R). You will see how to install and use a PLC-2/DHII
interface in a Data Highway II communication network.
Audience
Plant electricians who install Data Highway II hardware need to read
Chapters 1 through 4 of this manual.
People who program programmable controllers need to read all but
Chapter 3. To use the PLC-2/DHII interface, you must be able to program
and operate a PLC-2 family programmable controller. In this manual, we
assume that you know how to do this. If you don’t, refer to the
appropriate manual for the controller you are using. Consult our
Publication Index (Publication 499) for a list of our publications.
Vocabulary
The redundant PLC-2/DHII interface has all of the functions of the
PLC-2/DHII interface. Therefore, when we refer to the PLC-2/DHII
interface in this manual, it applies to both. We only mention the
redundant PLC-2/DHII interface in describing a difference.
When referring to an Allen-Bradley programmable controller in this
manual, we use the Allen-Bradley registered trademark PLC
programmable controllers.
Some node interfaces have the function of interfacing with an intelligent
foreign device, such as a computer. These foreign devices must have the
computer-like intelligence to communicate in the prescribed protocol.
Although some of these devices may not be thought of as computers, for
simplicity in this manual, we refer to them all as computers.
11
Chapter 1
Using This Manual
Manual Organization
This manual is organized into the following chapters:
Chapter
Chapter Summary
12
Title
What's Covered
1
Using This Manual
Purpose, audience, vocabulary, and
organization for manual.
2
Introducing the PLC2/DHII Interface
Overview of PLC2/DHII interface, its
function, application, and messages it
sends and receives.
3
Installing Data Highway II Link Cabling
Hardware
Installing taps, droplines, and
trunklines for Data Highway II link.
4
Installing PLC2/DHII Interface
Installing PLC2/DHII interface and
connecting it to a PLC2 family
processor.
5
Programming Local Host
Programming communication zone
rungs needed in PLC2 family
processor.
6
Operation and Troubleshooting
Operating and troubleshooting your
KP2 interface.
This chapter told you about this manual. In the next chapter we introduce
the Data Highway II PLC-2 Family Interface (Cat. No. 1779-KP2,
-KP2R).
Chapter
2
Introducing the PLC2/DHII Interface
Chapter Objectives
This chapter gives you an overview of the 1779-KP2 interface, its
function, its application in a communication network, and the types of
messages it sends and receives.
What Is the PLC2/DHII
Interface?
The PLC-2/DHII interface is a standalone unit consisting of:
One Stationary Frame
One Removable Frame
One Power-Supply Board (Cat. No. 1779-PH2)
One PLC-2 Host Board (Cat. No. 1779-JP2)
One Media Access Controller Board (Cat. No. 1779-JMA)
A redundant PLC-2/DHII interface has a redundant media access
controller board (Cat. No. 1779-JMAR) instead of a Media Access
Controller board.
The stationary frame mounts on the back panel of an enclosure
(Figure 2.1). The removable frame fastens to the stationary frame.
The removable frame contains the power-supply board, the PLC-2 host
board, and the media access controller (MAC) board. A shield separates
the power-supply board from the PLC-2 host board and the MAC
(Figure 2.2).
21
Chapter 2
Introducing the PLC2/DHII Interface
Figure 2.1
PLC2/DHII Interface with Removable Frame Separated from Stationary Frame
Stationary Frame
Removable Frame
22
Chapter 2
Introducing the PLC2/DHII Interface
Figure 2.2
Rear View of the Removable Frame Assembly
Power
Supply
Board
MAC
Board
3M NO. 3394
3M NO. 3394
Shield
Host
Board
12617
What Is Its Function?
The PLC-2/DHII interface functions as a communication interface
between a PLC-2 family processor (host processor) and other nodes of a
Data Highway II link (Figure 2.3).
The power-supply board converts AC power to DC power that the PLC-2
host board and MAC board use. The power-supply board accepts either
120V AC OR 220V AC, 60 Hz. The PLC-2 host board communicates
with the PLC-2 family processor. The MAC board communicates with
the other nodes of the Data Highway II link through the coaxial cable
medium.
23
Chapter 2
Introducing the PLC2/DHII Interface
Compatible Processors
The PLC-2/DHII interface is compatible with these PLC-2 family
processors:
Mini-PLC-2 Processor (Cat. No. 1772-LN1, -LN2, -LN3)
Mini-PLC-2/05 Processor (Cat. No. 1772-LS,-LSP)
Mini-PLC-2/15 Processor (Cat. No. 1772-LV)
PLC-2/20 Processor (Cat. No. 1772-LP1, -LP2)
PLC-2/30 Processor (Cat. No. 1772-LP3)
Figure 2.3
A PLC2Family Processor Communicating with Other Nodes through a PLC2/DHII Interface
PLC2/DHII Interface
PowerSupply
Board
Host Processor
PLC2 Family
Processor
Communication Connections
PLC2
Host
Board
Media
Access
Board
Other Nodes
of the
Data Highway II
Communication
Link
The PLC-2/DHII interface communicates through connectors on its front
surface (Figure 2.4).
The PROCESSOR connector provides cable connection to the PLC-2
family processor. At the PLC-2 family processor, the cable mates with
the connector provided for Industrial Terminal use.
The PROGRAM INTERFACE connector provides cable connection to an
Industrial Terminal for the PLC-2 family processor. When connected to
the PROGRAM INTERFACE connector, the Industrial Terminal behaves
as though it were connected directly to the PLC-2 family processor port.
The DATA HWY II jack provides dropline cable connection to a tap on a
Data Highway II link. A redundant PLC-2/DHII interface has a second
DATA HWY II jack for a redundant set of cabling for the link.
The DHII AUX ACCESS connector provides cable connection for future
communication requirements.
24
Chapter 2
Introducing the PLC2/DHII Interface
Node Interfaces
You can use these node interfaces on a Data Highway II link:
Asynchronous Foreign-Device/DHII Interface (Cat. No. 1779-KFL)
Redundant Asynchronous Foreign-Device/DHII Interface
(Cat. No. 1779-KFLR)
Synchronous Foreign-Device/DHII Interface (Cat. No. 1779-KFM)
Redundant Synchronous Foreign-Device/DHII Interface
(Cat. No. 1779-KFMR)
PLC-2/DHII Interface (Cat. No. 1779-KP2)
Redundant PLC-2/DHII Interface (Cat. No. 1779-KP2R)
PLC-3/DHII Interface (Cat. No. 1779-KP3)
Redundant PLC-3/DHII Interface (Cat. No. 1779-KP3R)
Figure 2.4
Communication Connections
Industrial
Terminal
PLC-2-Family
Processor
Tap
Data Highway II Network
The Data Highway II network is a local area network (LAN) for the
industrial environment that provides peer-to-peer communication between
nodes. A Data Highway II network is illustrated in Figure 2.5.
25
Chapter 2
Introducing the PLC2/DHII Interface
Stations/Nodes
At each node interface, you must assign a unique link address to each
node of the link. A host (computer or PLC processor, for example) and its
interface to the Data Highway II link make up a station. A station is an
input/output point in the communication system. A node is the point at
which each station accesses the medium. Because each station
communicates through a node on the Data Highway II link, it may appear
that we use the terms node and station interchangeably at times.
However, we will show later that there is not always a one-to-one
relationship between stations and nodes.
Within a station that contains a synchronous-device or
asynchronous-device interface, a local host/interface link is required for
access to the Data Highway II link. Two nodes for such stations are
shown in Figure 2.5.
One node comprises a 1779-KFM interface to a computer through an
RS-422/449 link limited to 4,000 cable-feet.
Another node comprises a 1779-KFL interface to two host devices.
Each 1779-KFL interface has two channels for connection to two
standard-link devices at the same time. Through either channel it can
interface either an RS-232-C compatible device or an RS-422
compatible device to the Data Highway II link.
Although the host/interface links are not Data Highway II links, they are a
part of the Data Highway II network.
In each case, the device is the host for the interface. A host device is a
node on one end of its host/interface link and its interface to the Data
Highway II link is a node on the other end of the host/interface link.
However, to the other nodes of the Data Highway II link, the host device
and its interface, combined, are accessed as a single node of the Data
Highway II link.
26
Chapter 2
Introducing the PLC2/DHII Interface
Programming
The program in a host device at one node can initiate a transfer of a
message to or from any other node in the network. We describe
programming a host device for communication through a 1779-KFL
interface in later chapters.
Figure 2.5
A Data Highway II Network with Two Data Highway II Links
8200
CNC
8200KDHW
Interface
Computer
Dumb
Terminal
RS422/449 Link
4,000 CableFeet Max.
RS232C Link
50 CableFeet Max.
RS422 Link
4,000 CableFeet Max.
1779KFM
Interface
1779KFL
Interface
Data Highway II Link
Data Highway II Link
Bridge
1779KP3
Interface
1779KP2
Interface
1779KP2
Interface
PLC3
Processor
PLC2/15
Processor
PLC2/30
Processor
13291
27
Chapter 2
Introducing the PLC2/DHII Interface
Host/Interface Links
In many applications, it is essential for nodes in a Data Highway II link to
communicate with devices such as:
Computers
Color-Graphic Terminals
Dumb Terminals
Robots
Computerized Numerical Controls (CNC)
These devices must communicate through a local host/interface link and a
node interface to the Data Highway II link to communicate with other
nodes on the Data Highway link (Figure 2.5).
Figure 2.5 shows three such devices, each communicating through a local
host/interface link and node interface to a Data Highway II link.
A computer is shown communicating with other nodes of the Data
Highway II link through an RS-422/449 link and a 1779-KFM
interface. A 1779-KFM interface has a single RS-422/449 channel that
links an RS-422/449 compatible device to the Data Highway II link.
An 8200 CNC is shown communicating with other nodes through its
Factory Communication Module (Cat. No. 8200-KDHW), an RS-422
link, and a 1779-KFL interface.
A dumb terminal is shown communicating with other nodes through an
RS-232-C link and a 1779-KFL interface. Each 1779-KFL interface
has two channels for connection to two host devices at the same time.
Through either channel it can interface either an RS-232-C compatible
device or an RS-422 compatible device to the Data Highway II link.
You can use a host device to communicate through either an RS-232-C or
RS-422 link to a 1779-KFL interface or an RS-422/449 link to a
1779-KFM interface in a packet assembler/disassembler (PAD) protocol.
The PAD protocol is useful for communicating with robots and dumb
terminals.
A dumb terminal can only communicate across a Data Highway II
network through the PAD protocol because the terminal does not have the
intelligence to assemble or disassemble message packets. When a
computer sends a message across the network to a terminal node, at the
receiving node the interface disassembles the packet and sends only the
data field to the terminal. Furthermore, by issuing a station-management
command from another station, you can establish a logical connection
from the terminal to the computer so that if the operator at the terminal
28
Chapter 2
Introducing the PLC2/DHII Interface
enters a data field, the interface assembles the data field into the proper
packet for the network to deliver the message to the computer.
The PAD protocol is also useful for devices, such as robots, which have a
fixed protocol. In sending a message to a robot, a computer could encode
the message data field with the protocol that the robot expects. At the
receiving node, the interface disassembles the packet and sends only the
data field to the robot. Since the computer had encoded the data field, the
robot sees the protocol that it expects.
Data Highway II Link
In a Data Highway II link, nodes communicate with one another through a
physical bus media of coaxial cable. The coaxial cable forms the bus
connection between the nodes in a trunkline/dropline configuration.
The maximum length permissible for the trunkline depends on the number
of nodes, the type of cable, and the type of tap (local tap or extended tap).
For example, with RG-11 type coaxial cable, local taps, and 52 nodes in a
link, the trunkline length can be up to 4,100 cable-feet. Refer to
Chapter 3 for detailed information on planning cable lengths.
The Data Highway II link provides carrier-band signaling through
frequency shift keying. The carrier frequency is 5 MHz. The carrier is
modulated to 6.25 MHz for a data-high signal and 3.75 MHz for a
data-low signal. Because it has a carrier-band medium, the Data
Highway II link provides high noise immunity at a high data transmission
rate (1 Mbit/s) over its long permissible cable lengths.
Media Access Method
Because the Data Highway II link has a carrier-band bus medium, only
one node can transmit at a time. However, each node in a Data
Highway II link has a regularly scheduled opportunity to access the
medium to transmit messages to other nodes.
This peer-to-peer communication between nodes is provided by the Data
Highway II link through token passing. The token passing is
self-initiating. The nodes form a logical ring. The token is passed around
the ring to each node on a regular schedule, thereby making throughput
and response time predictable. While a node possesses the token, it is the
master. Only the master can initiate communication. After a node has
had the opportunity to transmit messages for the prescribed period of
time, it passes the token on to the next node.
29
Chapter 2
Introducing the PLC2/DHII Interface
Bridges to Other Data Highway II At this time, the Data Highway II network does not have bridges to join
Links
Data Highway II links. However, we have designed the Data Highway II
network with the flexibility to accommodate bridges at a later date. Any
discussion of bridges in this manual is only in regard to future product
development.
You can join two Data Highway II links with a bridge. The bridge
becomes a node on each of the two links. The two Data Highway II links
and their host/interface links combine to form a single Data Highway II
network (Figure 2.5).
Actually, you can configure a Data Highway II network of many Data
Highway II links joined together with bridges. A node can address up to
254 links.
The advantage of configuring a network of several small links instead of
one large link is that separate message transmission can take place within
each of the links all at the same time. Each link has its own token which
it passes around to its nodes. For example, in Figure 2.5, the computer
could send a message to the PLC-3 processor at the same time that the
PLC-2/30 processor is sending a message to the PLC-2/15 processor.
However, a message from a node on one link to a node on another link
would use up message transmission time in both links. By configuring
links within a network so that most messages do not cross from one link
to another, you can improve the performance of the network.
Command/Reply
Communication is always initiated by a node transmitting a command
message. Only the node holding the token can initiate communication by
transmitting a command message. When a node transmits a command to
read an immediate-access block, the node receiving the command
immediately transmits a reply message while the initiating node still holds
the token. For any other command requiring a reply, the node receiving
the command must wait until it holds the token before it can transmit the
reply message.
Some commands call for the node receiving the command message to
transmit no reply message.
210
Chapter 2
Introducing the PLC2/DHII Interface
Reading a Block of Data
You can generate two types of commands to read a block of data:
Read Block
Read Immediate-Access Block
When a node interface receives a read block command from another node,
it reads the specified area of the host’s memory; then, when it receives the
token, it transmits the reply message containing the block of data
specified in the command.
For a node to reply to a command to read an immediate-access block, the
host must periodically write a specified block of data from the host’s
memory into a buffer in the node interface. When the node interface
receives a command from another node to read an immediate-access
block, it reads the specified block of data from its buffer and immediately
transmits the reply message without waiting to receive the token.
Writing a Block of Data
For write block commands, you specify a block of data from the local
host’s memory that you want to write into a specified block of memory in
the host at a remote node.
For a write block command, you can specify either:
Write with No Reply
Write with Reply
Write Verified
If the local node transmits a command to write with no reply, the remote
node never transmits a reply (Figure 2.6). If the local node transmits a
command to write with reply, when the remote node interface receives
the token, it transmits a reply message to indicate whether it was able to
successfully write into the host’s memory (Figure 2.7).
211
Chapter 2
Introducing the PLC2/DHII Interface
Figure 2.6
Write with No Reply Message Transfer
Command Message — Block of data
to write into host at Node 2
Node
1
Node
2
Figure 2.7
Write with Reply Message Transfer
Node
1
Command Message — Block of
data to write into host at Node 2
Node
2
Reply Message — Status of
whether the write was successful
If the local node host transmits a command to write verified, the local
node interface first transmits a command to write with reply. When the
remote node interface receives the token, it transmits a reply message to
indicate whether it was able to successfully write into the host’s memory.
When the local node interface receives the token again, it then
automatically transmits a command to read that same block of data. After
the remote node interface writes the data into its host’s memory, it reads
that data from the host’s memory. When the remote node receives the
token, the remote node interface then transmits this data back to the local
node. The local node interface then verifies that the data it received is
identical to what it had transmitted (Figure 2.8)
212
Chapter 2
Introducing the PLC2/DHII Interface
Figure 2.8
Write Verified Message Transfer
Node
1
Command Message — Block of
data to write into host at Node 2
Node
2
Reply Message — Status of whether
the write was successful
Command Message — Read
from host at Node 2
Reply Message — Block of data read
from host at Node 2
A write with no reply takes the least amount of time. A write verified
takes the most time.
All messages are transmitted across the Data Highway II link with
Manchester encoding and CRC-16 error checking to help ensure data
integrity before the interface writes data into its host’s memory. A write
verified command may provide added security in applications where the
level of electrical noise is very high. However, you should be aware that
the interface can report a false error in reply to a write verified command.
For example, after the data is written into the remote host’s memory, it
could be overwritten by the program in the host or by another Data
Highway II node before it could be sent back for verification. If you use a
write verified command, you must ensure that the data is not overwritten
before it can be sent back for verification.
213
Chapter 2
Introducing the PLC2/DHII Interface
Message Priority
The two categories of message priority are:
Supervisory
Time-Critical
You determine the priority of messages when you select the command you
want to send. Most of the commands available have supervisory priority.
(A write verified command always has supervisory priority.) However,
certain read and write commands have time-critical priority. (A command
to read an immediate-access block always has time-critical priority).
Every message (except an immediate-access block reply) has to wait until
the node gets the token before it can be transmitted. Furthermore, token
passing occurs on a regularly scheduled basis; it is not influenced by the
priority of the messages waiting to be transmitted. However, if two
messages are waiting to be transmitted when the node gets the token, a
time-critical message is given priority over supervisory messages at that
node. Although time-critical messages are given priority, a minimum
percentage of time is regularly set aside for supervisory messages so that
they get to their destination regardless of the number of time-critical
messages to be transmitted.
You can send time-critical messages to other nodes of the same Data
Highway II link only. However, supervisory messages can be sent to any
node in any link in a network (Figure 2.5).
In Figure 2.5, the PLC-3 processor and the computer are on a separate
link; also, the PLC-2/15 processor, the PLC-2/30 processor, the 8200
CNC, and the dumb terminal are on a second separate link. The PLC-3
processor and computer can send time-critical messages to each other but
can send only supervisory messages to other nodes on other links.
Similarly, the PLC-2/15 and PLC-2/30 processors can send time-critical
messages to each other but can send only supervisory messages to other
nodes on other links.
You are limited to transferring 21 words maximum using a read
immediate-access block command and limited to transferring less using
other time-critical commands. However, the size of a supervisory
message can be much greater, depending on the type of command. For
example, in Figure 2.5 the computer could upload the memory of any
PLC processor in blocks of 244 bytes.
214
Chapter 2
Introducing the PLC2/DHII Interface
Generated Commands
You can program the PLC-2/DHII interface to generate the following
types of commands:
Read Commands:
- Read Block
Write Bit Commands:
- Protected Write Bit with No Reply
- Protected Write Bit with Reply
- Unprotected Write Bit with Reply
- Protected and Verified Write Bit
Write Block Commands:
- Protected Write Block with No Reply
- Protected Write Block with Reply
- Unprotected Write Block with Reply
- Protected and Verified Write Block
Immediate-Access Commands:
- Read Immediate-Access Block
- Update Immediate-Access Block
Accepted Commands
The PLC-2/DHII interface can accept commands from remote nodes. The
interface will interpret the command, check switches and programming
rungs for restrictions, and execute the command without any extra
programming on the user’s part. The following is a list of command types
accepted:
Generated Commands
Other Data Transfer Commands
Upload/Download
Diagnostics
Remote Programming
Remote Command Control Commands (Third-Party)
Station Management
Generated Commands
Obviously, the PLC-2/DHII interface can accept all commands that it can
generate. All read, write bit, write block, and immediate-access
commands are accepted by the interface.
215
Chapter 2
Introducing the PLC2/DHII Interface
Other Data Transfer
There are more data transfer commands available on Data Highway II that
can be generated with the KP2. They increase in complexity with the
processor used. They still move data from one place to another, but they
have different formats. The KP2 can interpret some of these and execute
them successfully.
Upload/Download
A computer can download or upload user programs into the memory of a
PLC-2 via the node interface using upload/download commands.
Diagnostics
Likewise, a computer can check the current state of the interface as well
as that of the PLC via the diagnostic command set.
Remote Programming
The PLC-2/DHII interface assists remote programming devices in
allowing programmers to edit and monitor user programs from other Data
Highway II nodes.
Remote Command Control (Third-Party)
The PLC-2/DHII interface has a special facility to allow other nodes to
“program” them, just as if a command had been entered via the rungs in
the local PLC. This is called a third-party request. If you consider the
ladder rung in the local PLC that says, in effect, “read data from Node 5,”
to be the first party, and in this case Node 5 to be the second party, then
you will see that if some OTHER node, say Node 10, sends a message to
the local interface saying, “read data from Node 5,” Node 10 would be a
third-party. Node 10 sends a remote command block, and the KP2
generates a message and sends it out just as if it were a local command
coming from the local PLC’s ladder rung program. This is all happening
“in the background” while the KP2 is generating and accepting other
commands. Chapter 4 shows that if you do not want these remote
commands executed, you can disable it with a switch.
216
Chapter 2
Introducing the PLC2/DHII Interface
Station Management
The station-management commands change network parameters.
Redundant Cabling
If you install the redundant version of each node interface, you can install
a second complete cabling system for the Data Highway II link
(Figure 2.9).
In Figure 2.9 we show Cabling System A and Cabling System B for Data
Highway II. Each cabling system provides backup for the other. Each
node interface attempts to transmit each outgoing message across both
cabling systems. Each node interface continuously monitors the quality
of the signal it receives from each cabling system. As a node interface
receives a message, it always accepts the message from the cabling
system providing the better signal quality. If a cable in Cabling System A
becomes damaged, each node interface accepts its incoming messages
from Cabling System B. If Cabling System B becomes damaged, each
node interface accepts its incoming messages from Cabling System A.
Figure 2.9
Redundant Cabling Configuration for a Data Highway II Link
Trunkline
Cabling System A
Tap
Tap
Dropline
Redundant
Node
Interface
Trunkline
Tap
Dropline
Redundant
Node
Interface
Dropline
Tap
Trunkline
Redundant
Node
Interface
Dropline
Tap
Cabling System B
Tap
Trunkline
217
Chapter 2
Introducing the PLC2/DHII Interface
A Second Link
You can provide two separate communication links for a PLC-2 family
processor. For example, you can connect a 1771-KA2 module and a
1779-KP2 interface to provide both a Data Highway link and a Data
Highway II link respectively through which the PLC-2 family processor
can communicate (Figure 2.10).
Figure 2.10
Data Highway Link and a Data Highway II Link for a PLC2 Family Processor
Computer
RS422/449 Link
4,000 CableFeet Max.
PLC2/05
Processor
1771KA
Module
1771KFM
Interface
Data
Highway
Link
1771KA2
Module
PLC2/30
Processor
Chapter Summary
218
1779KP2
Interface
Data
Highway II
Link
1779KP2
Interface
PLC2/20
Processor
Now that you have been introduced to the PLC-2/DHII interface and
concepts of how it communicates across a Data Highway II network, you
are ready to read about how to install the Data Highway II link cabling
hardware.
Chapter
3
Installing Data Highway II Link Cabling Hardware
Chapter Objectives
In this chapter we explain how to install cabling hardware for a Data
Highway II link. We tell you how to:
Identify Hardware
Plan Your Cabling Configuration
Install
- Taps
- Trunkline
- Droplines
Identifying Hardware
To install a Data Highway II link, you need the following cabling
hardware items:
Part
RG11Type Coaxial Cable
AB Catalog Number
None
Manufacturer Information
Times Wire & Cable
AA5066
Astro Wire & Cable
20111A
Alpha 515780
Local Tap:
One Dropline Cable
Two Cable Plugs
1779XP
AMP 2258866
Crimping Tool
None
AMP 2200151
Terminator (2)
1779XT
None
Do not use an unauthorized part. An unauthorized part may greatly
reduce the reliability of the link.
31
Chapter 3
Installing Data Highway II
Link Cabling Hardware
Coaxial Cable
Use RG-11 type coaxial cable for the trunkline. The RG-11 type coaxial
cable has both a foil and a braided wire outer conductor (Figure 3.1).
Figure 3.1
Coaxial Cable
Braid
Foil
Inner Conductor
Insulating Jacket
Insulation
Local Tap
Each node of a Data Highway II link requires a local tap. Each local tap
has two trunkline jacks, a dropline jack, and a cap for covering the
dropline jack when you do not have a dropline connected. With each
local tap we also ship (Figure 3.2):
two cable plugs for connecting the trunkline cables to the trunkline jack
on the tap and
a dropline cable assembly (2 feet maximum) for connecting a node
interface to the dropline jack on the tap.
32
Chapter 3
Installing Data Highway II
Link Cabling Hardware
Figure 3.2
Local Tap
Cable Plugs (2)
Sleeve
Pin
Body
Trunkline Jack
Dropline
Jack
Tap
Cap
Straight Plug
Right-Angle Plug
Dropline
Cable
Assembly
Crimping Tool
You will need the crimping tool for fastening the cable plugs to the
trunkline cable segments (Figure 3.3).
Figure 3.3
Crimping Tool
33
Chapter 3
Installing Data Highway II
Link Cabling Hardware
Terminator
At each end of the trunkline, you will need a terminator to connect to a
trunkline jack of the tap (Figure 3.4).
Figure 3.4
Terminator
Planning Cabling Configuration
Before you install any hardware, carefully plan your cabling
configuration. The general cabling configuration of a Data Highway II
link is shown in Figure 3.5.
A dropline connects each node interface with its tap. Trunkline segments
connect between taps. A terminator connects to a tap at each end of the
link to provide the proper terminating impedance (75 ohms) at each end of
the link.
Taps and Length of Trunkline
You require a tap for each node of the link. Also, if you plan to add nodes
later, provide a tap for each future node during initial installation. This
will avoid the disruption of adding taps and rerouting the trunkline (see
Figure 3.5).
A trunkline segment between two taps must be a minimum of
30 cable-feet.
For example, if your link requires 24 taps, the trunkline length is limited
to 6,200 cable-feet. If your link requires only 5 taps, the trunkline length
can be up to 7,625 cable-feet. Figure 3.6 shows the relationship of
trunkline length to the number of nodes using local taps.
You can calculate the trunkline length limit for cable with the formula:
Trunkline Limit (Cable-Feet) = 8,000 - (No. of Local Taps x 75)
34
Chapter 3
Installing Data Highway II
Link Cabling Hardware
Figure 3.5
Cabling Configuration of a Data Highway II Link
Trunkline
Terminator
Terminator
Dropline
Tap
Node Interface
Figure 3.6
Relationship between Trunkline Length and Number of Nodes with Local Taps
10K
8K
6K
Length of
Trunkline
in Feet
4K
2K
20
40
60
80
Number of Nodes with Local Taps
100
120
35
Chapter 3
Installing Data Highway II
Link Cabling Hardware
Bend Radius of Cables
If you bend a coaxial cable sharper than the recommended minimum bend
radius, you may decrease the reliability of the link.
Plan your trunkline cable routing so that the cable will have no sharper
bend than a minimum 6-inch bend radius (Figure 3.7).
Figure 3.7
Trunkline Cable Showing Minimum Bend Radius
6 inch
Plan your dropline cable routing so that the cable will have no sharper
bend than a minimum 3-inch bend radius (Figure 3.8).
Figure 3.8
Dropline Cable Showing Minimum Bend Radius
3 inch
36
Chapter 3
Installing Data Highway II
Link Cabling Hardware
Tap Mounting Layout
Figure 3.9 shows the mounting dimensions of a tap. However, you can
mount a tap in any position or orientation. Mount each tap in a position
convenient for your trunkline cable routing which will not violate the
6-inch minimum bend radius.
Figure 3.9
Tap Mounting Dimensions
Use No. 5
mounting bolts.
(2 Places)
2.1 in.
(54 mm)
1.5 in.
(38 mm)
1.0 in.
(25 mm)
3.1 in.
(79 mm)
3.5 in.
(89 mm)
0.2 in.
(6 mm)
Clearance
Depth:
5 in. (77 mm)
12644
To allow sufficient air flow for cooling of the node interface, mount the
tap a minimum of 2 inches from the node interface.
To allow the dropline cable enough slack to not violate the 3-inch
minimum bend radius, mount the tap a maximum of 11 inches from the
37
Chapter 3
Installing Data Highway II
Link Cabling Hardware
bottom or left side of the node interface. Avoid routing the dropline cable
over AC power terminals on the node interface.
The PLC-3 interface module (1779-KP3) requires further restrictions
because it is inside of the PLC-3 processor chassis. Mount the tap a
maximum of 5 inches from the chassis. Furthermore, you can only mount
the tap on the side of the chassis if the PLC-3 interface module is at the
end of the chassis.
Figure 3.10 shows an example of a tap mounted below a node interface.
The trunkline runs straight out through the sidewall of the enclosure.
Figure 3.10
Local Tap Mounted between a Node Interface
Node
Interface
Trunkline
Use conduit for
the first 20 ft.
from enclosure.
Enclosure
Wall
Dropline
Tap
Figure 3.11 shows an example of taps mounted beside a node interface.
The trunkline cables run straight out through the top of the enclosure.
38
Chapter 3
Installing Data Highway II
Link Cabling Hardware
Figure 3.11
Local Taps Mounted Beside a Node Interface
Use conduit for
the first 20 ft.
from enclosure.
Trunkline
Top of Enclosure
Node
Interface
Tap
Tap
Droplines
Planning Cable Routing
Follow these cable routing recommendations for protecting the coaxial
cable from electrical interference:
If the cable must cross power feed lines, it should do so only at right
angles.
Keep the cable at least 1 foot from 120V AC power lines, 2 feet from
240V AC power lines, and 3 feet from power lines of 480V AC or
more.
Keep the cable at least 3 feet from any electric motors, transformers,
rectifiers, generators, arc welders, induction furnaces, or sources of
microwave radiation.
39
Chapter 3
Installing Data Highway II
Link Cabling Hardware
Conduits
Conduits provide protection from physical damage as well as an
additional layer of protection from electrical interference for a coaxial
cable. Route the trunkline cable through conduit for the first 20 feet
above the enclosure. Where you route the coaxial cable through conduits,
follow these additional recommendations:
Use ferromagnetic conduit near the greatest sources of electrical
interference. You can use aluminum conduit in non-critical areas.
Couple between aluminum and ferromagnetic conduits with plastic
connectors. Make an electrical connection around the plastic connector
to hold both sections of the conduit at the same potential.
The entire length of the conduit should be grounded. Ground the
conduit by attaching it to the steel structure of the building.
Do not let the conduit touch the tap or the plug on the cable.
Third conduit should only contain serial communication cables. Cables
within the conduit should be loosely arranged.
Installing Taps
The tap has a metal shell which electrically connects to the outer
conductor of the coaxial cable. Therefore, the mounting base of the tap is
made of plastic to insulate the metal shell from ground. However, the cap
for the dropline jack hangs down on a chain. Be sure to mount the tap so
that the cap and its chain hang freely without touching a conductive
surface. If the metal shell, cap, or chain touches a conductive surface, the
reliability of the link could be significantly reduced.
If you do not have a node interface to connect to the tap, place the cap
over the dropline jack on the front of the tap (Figure 3.12). In that case,
store the dropline so that it will be available later when you install a node
interface.
310
Chapter 3
Installing Data Highway II
Link Cabling Hardware
Figure 3.12
Cap on Dropline Jack of Tap without a Node Interface
Put cap on
dropline jack.
Installing the Trunkline
Because the trunkline can vary greatly from one Data Highway II
configuration to the next, you have to construct your own trunkline. The
trunkline actually consists of a number of cable segments. Each segment
connects between the taps of two neighboring nodes on the trunkline
(Figure 3.5).
Three major tasks are required in constructing the trunkline:
Cutting the cable into segments of appropriate length.
Attaching the plugs on the ends of the cable segments.
Plugging the trunkline segments into the taps.
Cutting Cable
Use RG-11 type coaxial cable for the trunkline. When cutting the cable
segments, make them long enough to route them from one tap to the next
with sufficient slack, according to the guidelines in the section entitled
“Planning Your Cabling Configuration.”
311
Chapter 3
Installing Data Highway II
Link Cabling Hardware
Attaching Plugs
After cutting the cable segments to the desired lengths, attach a plug to
each end of each segment. Figure 3.13 illustrates the steps given here for
attaching the plugs:
1.
Slide the plug sleeve over the end of the cable segment.
2.
Strip 0.7 inches of insulating jacket from the end of the cable
segment, exposing the braid.
3.
Strip 0.3 inches of braid and foil from the end of the cable segment,
exposing the insulation.
4.
Strip 0.2 inches of insulation from the end of the cable segment,
exposing the inner conductor.
5.
Push the plug pin as far as possible onto the center conductor of the
cable.
6.
Use the crimping tool to crimp the plug pin onto the center
conductor.
7.
Flare out the exposed end of the braid and tear off the exposed foil.
8.
Slide the plug body over the pin and cable end. Make sure the neck
of the plug body goes underneath the braid. Push the plug body as
far as possible onto the cable.
9.
Slide the plug sleeve down over the braid until it butts up against the
shoulder of the plug body.
10. Put the crimping tool over the plug sleeve and as close to the plug
body shoulder as possible. Crimp the sleeve onto the plug body.
312
Chapter 3
Installing Data Highway II
Link Cabling Hardware
Figure 3.13
Attaching the Cable Plugs
0.7 in.
Coaxial Cable
0.3 in.
0.2 in.
Steps 1 through 4
Plug Sleeve
Plug Pin
Steps 5 and 6
Braid
Steps 7 and 8
Plug Body
Steps 9 and 10
Crimped Sleeve
313
Chapter 3
Installing Data Highway II
Link Cabling Hardware
Plugging into the Tap
At the tap at each of the two physical ends of the link, plug the trunkline
segment into one trunkline jack of the tap. Plug a terminator into the
other trunkline jack of the tap (Figure 3.14).
Figure 3.14
Terminator and Trunkline Segment Connected to a Tap at One End of the Link
Trunkline
Segment
Terminator
Tap
Dropline
At each tap other than at the end of the link, plug the two trunkline
segments into the two trunkline jacks on the tap (Figure 3.15).
To guard against the minimum bend radius being violated or a cable being
pulled out of its plug, secure each cable in place with some form of
strain-relief device.
314
Chapter 3
Installing Data Highway II
Link Cabling Hardware
Figure 3.15
Trunkline Segments Connected to a Tap that Is Not at an End of the Link
Trunkline
Segment
Trunkline
Segment
Tap
Dropline
Installing Droplines
After mounting the node interface (Chapter 4), pull the node interface out
to the switch-setting position before connecting the tap to the node
interface. This is the only way to be sure that the dropline will have
enough slack in the switch-setting position. (Remember the 3-inch
minimum bend radius.) Plug the right-angle plug of the dropline into the
jack labeled DATA HWY II PORT on the node interface. Then, plug the
other end of the dropline into the jack on the front of the tap (Figure 3.16).
315
Chapter 3
Installing Data Highway II
Link Cabling Hardware
Figure 3.16
Connecting the Dropline from the Node Interface to the Tap
Node
Interface
Tap
Cap and
Chain
must not touch
a conductive
surface.
Dropline
Chapter Summary
316
Once you have installed the Data Highway II link cabling hardware, you
are ready to install the node interfaces.
Chapter
4
Installing the PLC2/DHII Interface
Chapter Objectives
This chapter presents procedures for:
Planning the Layout
Mounting the PLC-2/DHII Interface
Setting Switches
Connecting Communication Cables
Connecting Power
Read this chapter before you install the KP2 interface module. We
provide steps for you to follow for proper installation. Failure to follow
the steps provided may result in equipment damage.
Planning the Layout
The maximum distance between components is limited by cable length.
You must plan the layout so that the PLC-2/DHII interface is within
10 cable-feet of the PLC-2 family processor.
The minimum component spacing is limited by heat dissipation
considerations. The temperature of the air must not exceed 60oC (140oF)
at any point immediately below any chassis (PLC-2/DHII Interface,
processor chassis, I/O chassis, power supply). The failure rate of the
semiconductor devices may increase significantly if the temperature is
raised above 60oC. Furthermore, a significant decrease in the failure rate
of the semiconductor devices can be expected for every degree below
60oC that the ambient temperature can be kept.
The temperature will tend to be higher toward the top of the enclosure.
Factors that determine the level at which the temperature will be 60oC
include:
The Size of the Enclosure
The Power Dissipation within the Enclosure
The Temperature of the Air Surrounding the Enclosure
Power dissipation includes not only the power dissipated through the
power supplies for the PLC-2/DHII interface, the processor chassis, and
I/O chassis, but also the user-supplied power dissipated through the input
and output circuits.
41
Chapter 4
Installing the PLC2/DHII Interface
To allow necessary air flow for cooling of components, refer to Figure 4.1
and follow these rules:
Do not mount an I/O chassis above a processor chassis.
Provide 6 inches minimum vertical separation between chassis and to
top and bottom of the enclosure, with no chassis mounted above the
60oC air temperature level (Figure 4.1).
Provide minimum horizontal separation between chassis and to
enclosure sides.
Leave any excess space at the top of the enclosure where the
temperature is highest.
Mount wiring ducts, taps, and terminal strips no closer than two inches
from any chassis.
42
Chapter 4
Installing the PLC2/DHII Interface
Figure 4.1
Minimum Spacing for Necessary Air Flow for Cooling
4
6
4
4
6
A-B
4
PLC
2/30
G
Y
1
6
6
1
4
6
6
The temperature of the air must not excceed 60 0 C (1400 F) at any point immediately below any chassis. This may limit how high chassis can be mounted in an enclosure.
10913I
43
Chapter 4
Installing the PLC2/DHII Interface
Mounting the PLC2/DHII
Interface
Figure 4.2 shows the mounting dimensions for the PLC-2/DHII interface.
After drilling and tapping Interface the three holes in the enclosure
backpanel, start the mounting bolt into the bottom hole. You can then
hold the interface in place, resting it on the bottom bolt, while you start
the top mounting bolts.
Figure 4.2
Mounting Dimensions
3.8 in
(97 mm)
Use 0.25 in.
mounting bolts.
(3 Places)
1.9 in.
(48mm)
14.25 in.
(362 mm)
15.25 in.
(387 mm)
6.5 in.
(165 mm)
Clearance depth including cable connectors is 11 inches (280 mm).
44
Chapter 4
Installing the PLC2/DHII Interface
Setting Link Address
On the front of the PLC-2/DHII interface is a set of three link address
thumbwheel switches (Figure 4.3).
Set these switches to designate the link address of the node. The top
switch represents the most significant digit (MSD). The bottom two
switches do not go past the digit 7; this is because the link address must be
an octal number. The top switch does not go past the digit 3; this is
because the highest link address settable is 377. The values 000 and 377
are invalid link addresses. Also, the 1770-T3 Industrial Terminal cannot
address Words 000 through 007 or 100 through 107 in the processor work
areas in the PLC-2 programmable controllers. Select a number from 010
through 077 or 110 through 376.
Give each node of the link a unique link address. The token will pass
from node to node by order of link address.
Figure 4.3
Link Address
TEST
RUN
RESET
MSD
SAT
ACTIVITY
NORMAL
PROGRAM
INTERACE
ACTIVE
COMM. ERR
PROCESSOR
PROG. ERR
PROC. ERR
LINK
ADDRESS
EXIT
COMPLETE
EXIT
REQUEST
Setting HostBoard Switches
At each of the four latches on the front of the interface is a captive screw.
You can tighten or loosen these screws by hand with the knobs of the
screws. Loosen the screws; then grasp the knobs to pull the removable
frame out 3 inches to the switch-setting position.
With the removable frame pulled out, the host-board switches are exposed
on the left side of the removable frame assembly. On the left side of the
stationary frame is a label that indicates the function of each host-board
switch (Figure 4.4).
45
Chapter 4
Installing the PLC2/DHII Interface
Figure 4.4
HostBoard Switches
1779KP2/KP2R
LEGEND
ON
Option Enabled
ON
OFF
OFF
Option Disabled
ON
OFF
White Is Depressed
PROTECTION OPTIONS
2 3 4
F
F
O
2
F
F
O
F
F
1
N
O
O
F
F
1
2
1
O
N
S3
O
N
4
3
2
1
N
Reserved
Reserved
S2
OPEN (OFF)
Accepts Writes to Program Area
Accepts Writes to Data Table
Accepts Network Parameter Changes
Accepts ThirdParty Requests
S5
1
O
2
First Position from Processor
Reserved
4
3
2
1
2
1
1
COMMUNICATION PARAMETERS
S4
OPEN (OFF)
Reserved
Reserved
Reserved
Reserved
2 3 4
KP2SPECIFIC OPTIONS
O
The switches are in four switch assemblies. In this publication we show
and describe switches as being ON or OFF. Printed on the actual switch
assemblies are the words ON and OFF or the word OPEN. OPEN
corresponds to OFF.
These switch assemblies are identified by the nomenclature S2 through
S5. This designation is printed on the printed circuit board just above
each switch assembly.
Use a blunt-pointed instrument, such as a ball-point pen, to set these
switches. Never use a pencil; lead could jam the switch.
46
Chapter 4
Installing the PLC2/DHII Interface
Accept Writes to Program Area
The accept-writes-to-program-area switch selections are:
OFF — The interface rejects commands to write into the program area
of the host.
ON — The interface accepts commands to write into the program area
of the host.
Accept Writes to Data Table
The accept-writes-to-data-table switch selections are:
OFF — The interface rejects commands to write into the data table of
the host.
ON — The interface accepts commands to write into the data table of
the host.
Accept Network Parameter Changes
The accept-network-parameter-changes switch selections are:
OFF — The interface rejects commands to change network parameters
stored on the interface for this node.
ON — The interface accepts commands to change network parameters
stored on the interface for this node.
Accept ThirdParty Requests
The accept-third-party-requests switch selections are:
OFF — The interface rejects any command from another node for this
node to transmit a command to a third node.
ON — The interface accepts commands from another node for this
node to transmit commands to a third node.
First/Second Interface
The first/second-interface switch selections are:
OFF — First Interface: Use this selection if you connect this interface
directly to the PLC-2 family processor.
ON — Second Interface: Use this selection if you connect this
interface to the PROGRAM INTERFACE connector on another
PLC-2/DHII interface, or on a 1771-KG, 1771-KA2, or 1770-KG
module (discussed in the following paragraphs).
47
Chapter 4
Installing the PLC2/DHII Interface
Setting MACBoard Switches
The MAC board has two switches. Set Switch 1 to the UP position.
Switch 2 is not used and can be in either position. To set the switch,
follow these steps:
1.
With the removable frame in the switch-setting position, disconnect
the green equipment-grounding conductor from between the
stationary frame and the ground post on the removable frame
(Figure 4.5).
Figure 4.5
Green Conductor Connecting the Stationary Frame to the Ground Post on the Removable
Frame
115V AC/230V AC
INTERNALLY
SWITCH
SELECTABLE
L1
L2/N
GND
Green Grounding
Conductor
48
2.
While holding the removable frame at the top and bottom, lift in up
an inch and then out away from the stationary frame.
3.
Locate the switches at the rear edge of the MAC board (middle
board) between the bottom two ribbon cables (Figure 4.6).
4.
Set the switch with your finger.
5.
Slide the removable frame back onto the stationary frame.
6.
Push the removable frame back to the operating position.
7.
Reconnect the green conductor for grounding the stationary frame to
the ground post on the removable frame (Figure 4.5).
Chapter 4
Installing the PLC2/DHII Interface
Figure 4.6
MACBoard Switches
Shield
Down
Power
Supply
Board
Connecting Communication
Cables
MAC
Board
Up
Host
Board
After you have set the host-board switches to select the type of operation
you want, you can begin connecting the communication cables necessary
for your application. Cables that you might connect to the PLC-2/DHII
interface are listed in Table 4.A.
Table 4.A
Cables
Catalog
Number/Name
Length
Connects
1771CN
1.5 feet (0.46 m) PROCESSOR connector to a miniprocessor module.
PROGRAM INTERFACE connector to a second interface or communication module.
1771CO
3.4 feet (1 m)
PROCESSOR connector to a miniprocessor module
PROGRAM INTERFACE connector to a second interface or communication module.
1771CR
10 feet (3.1 m)
PROCESSOR connector to a PLC2/20 or PLC2/30 processor.
PROGRAM INTERFACE connector to a second interface or communication module.
1772TC
10 feet (3.1 m)
PROGRAM INTERFACE connector to a programming terminal.
2 feet (0.62 m)
DATA HWY II PORT jack to a tap.
LocalTap Dropline
Do not connect any cable to the DHII AUX ACCESS connector. This is reserved for future product enhancement.
49
Chapter 4
Installing the PLC2/DHII Interface
To PLC Processor
You must connect a cable from the PROCESSOR connector on the
interface to the PLC processor (Figure 4.7).
Use a 1771-CN or 1771-CO cable for connection to a Mini-PLC-2,
Mini-PLC-2/05, or Mini-PLC-2/15 processor. Use a 1771-CR cable for
connection to a PLC-2/20 or PLC-2/30 processor.
Figure 4.7
Connection to the PLC2 Family Processor
Industrial
Terminal
PLC Processor
INTERFACE or
PROGRAM PANEL
Connector
Interconnect Cable
cat. no. 1771-CN (1.5 ft.)
cat. no. 1771-CO (3.5 ft.)
cat. no. 1771-CR (10 ft.)
410
Tap
Chapter 4
Installing the PLC2/DHII Interface
To Programming Terminal
To use an Industrial Terminal with the PLC processor, connect a 1772-TC
cable from the PROGRAM INTERFACE connector on the interface to the
connector on the Industrial Terminal (Figure 4.8). With this connection
you cannot use tape cassette functions through the Industrial Terminal. If
you use two interfaces with the same processor (Figure 4.10) you must
use a 1770-T3 Industrial Terminal with Revision F or later firmware.
Figure 4.8
Connection to a Programming Terminal
Industrial
Terminal Compatible
with the PLC
Processor
1772-TC Cable
(10 ft.)
PLC Processor
Tap
411
Chapter 4
Installing the PLC2/DHII Interface
To 1770RG Module
To use a PLC-2 Family Report Generation Module (Cat. No. 1770-RG)
with the processor, connect a 1771-CN, -CO, or -CR cable from the
PROGRAM INTERFACE connector on the interface to the PROCESSOR
connector on the 1770-RG module (Figure 4.9).
Figure 4.9
Connection to a 1770RG Module
1770-RG Module
Interconnect Cable
cat. no. 1771-CN (1.5 ft.)
cat. no. 1771-CO (3.5 ft.)
cat. no. 1771-CR (10 ft.)
PLC Processor
Tap
412
Chapter 4
Installing the PLC2/DHII Interface
To Second PLC2/DHII Interface
To use two PLC-2/DHII interfaces (for a second Data Highway II link)
connect a 1771-CN, -CO, or -CR cable from the PROGRAM
INTERFACE connector on the first interface to the PROCESSOR
connector on the second interface (Figure 4.10).
Figure 4.10
Connection to a Second PLC2/DHII Interface
First Interface
Second Interface
Interconnect Cable
cat. no. 1771-CN (1.5 ft.)
cat. no. 1771-CO (3.5 ft.)
cat. no. 1771-CR (10 ft.)
1771-T3
(Series B, Rev. F)
Industrial
Terminal
PLC Processor
Tap
Tap
To 1771KG Module
Another possibility of providing a second link is to connect a 1771-KG
module (for an RS-232-C link) in place of either the first or second
interface in Figure 4.10. Connect a 1771-CN, - CO, or -CR cable from
the PROGRAM INTERFACE connector on the first to the PROCESSOR
connector on the second.
413
Chapter 4
Installing the PLC2/DHII Interface
To 1771KA2 Module
Another possibility of providing a second link is to connect a 1771-KA2
module (for a Data Highway link) in place of either the first or second
interface in Figure 4.10. Connect a 1771-CN, -CO, or -CR cable from the
PROGRAM INTERFACE connector on the first to the PROCESSOR
connector on the second.
To Tap
Pull the removable frame out to the switch-setting position before
connecting to the tap. This is the only way to be sure that the dropline
will have enough slack in the switch-setting position. (Remember the
3-inch minimum bend radius.) Plug the right-angle plug of the dropline
into the jack labeled DATA HWY II PORT on the PLC-2/DHII interface.
Then, plug the other end of the dropline into the jack on the front of the
tap (Figure 4.11).
Figure 4.11
Connection to a Tap
Industrial
Terminal
PLC Processor
Dropline
Tap
414
Chapter 4
Installing the PLC2/DHII Interface
Connecting Power and Ground
To connect the PLC-2/DHII interface to power and ground, follow these
steps:
1.
Pull the removable frame out to the switch-setting position. This
exposes the power-selection switch on the right side of the
removable frame assembly (Figure 4.12).
Figure 4.12
PowerSelectionSwitch
115V
If you connect ii5V AC
input power, slide
the switch up.
If you connect 230V AC
input power, slide
the switch down
10912I
2.
Set the power-selection switch to correspond to the level
(115V/230V) of the AC power source.
3.
Push the removable frame back to the operating position.
4.
Tighten the four thumbscrews on the front of the interface. The
thumbscrews must be tight to ensure that AC power is not
interrupted by the interlock switch on the power-supply board.
5.
Lock open the main disconnect switch to remove all power to the
enclosure.
WARNING: Do not attempt to connect power conductors to the
power terminals without first locking open the main disconnect
switch. Failure to heed this warning could cause you to receive
a dangerous electrical shock.
6.
Connect the GND post on the removable frame to the central ground
bus. The central ground bus must connect to the grounding electrode
415
Chapter 4
Installing the PLC2/DHII Interface
system through a grounding electrode conductor. The interface is
shipped to you with a wire connecting the post to the stationary
frame and another wire connecting the post to the GND terminal of
the terminal block. When you ground the post on the removable
frame, you thereby also ground the stationary frame and the
power-supply board. (Figure 4.13).
7.
Connect the L2/N terminal to the low side of the transformer
supplying the AC power (Figure 4.13).
8.
Connect the L1 terminal to the high side of the transformer supplying
the AC power (Figure 4.13).
9.
Install the supplied terminal cover over the terminal block.
WARNING: Do not leave these terminals exposed. Exposed
power terminals could cause you to receive a dangerous
electrical shock.
10. On the front of the interface, set the AC POWER switch to OFF
(Figure 4.13).
11. Close the main disconnect switch to allow AC power into the
enclosure.
12. On the front of the interface, set the AC POWER switch to ON
(Figure 4.13).
Figure 4.13
Power and Ground Connections
416
Chapter 4
Installing the PLC2/DHII Interface
ON
AC POWER
OFF
SLOW BLOW
2A, 250V
FUSE
115V AC/230V AC
INTERNALLY
SWITCH
SELECTABLE
L1
Connect L1 to high side
of transformer.
L2/N
GND
Connect L2/N to low side
of transformer.
Connect GND post to
central ground bus.
Power Distribution
Connect a separate transformer between the AC power source and the
interface power supply to provide DC isolation from other equipment.
Connect the transformer primary to the AC source; connect the high side
of the transformer secondary to the L1 terminal of the power supply;
connect the low side of the transformer secondary to the L2/N terminal of
the power supply.
The power consumed by the PLC-2/DHII interface is 50W. Multiply the
power requirements of the Allen-Bradley power supplies by 3, and add all
other power requirements (input circuits, output circuits) to determine the
required rating of the transformer. The power requirements must take into
consideration the surge currents of devices controlled by the controller.
The minimum transformer rating requirement for the PLC-2/DHII
interface is 125V AC.
DHII power supplies that are set up for 115V AC operation are designed
to generate a shutdown whenever the AC line voltage drops below
85 volts and to allow the interface to resume operation when the line
voltage reaches 85 volts again. For power supplies that are set up for
230V AC operation, the shutdown level is 170V AC.
417
Chapter 4
Installing the PLC2/DHII Interface
If the transformer is too small, it will clip the peak of the sine wave before
the voltage drops below 85 volts. The power supply will sense this as a
low voltage and shut down the interface prematurely.
Allen-Bradley power supplies have circuits which suppress
electromagnetic interference from other equipment. For installations near
particularly bad electrical noise generators, an isolation transformer can
provide further suppression of electromagnetic interference from other
equipment.
In applications where the AC power source is especially “soft” and
subject to unusual variations, a constant-voltage transformer can stabilize
the AC power source to the interface, thereby minimizing shutdowns.
Chapter Summary
418
Now that you have installed the PLC-2/DHII interface, connecting it
between a PLC-2 family processor and a Data Highway II link dropline,
you are ready to read about how to program the PLC-2 family processor
to communicate across the Data Highway II.
Chapter
5
Programming the Local Host
Chapter Objectives
In this chapter you will read about how to generate a ladder-diagram
program for a PLC-2 family processor (local host) to communicate
through the KP2 interface to the host of a remote node.
The generation of commands is discussed as if transmitted to the PLC-2
family processor at a remote node. If another type of PLC processor is at
the remote node, refer to the manual for the node interface of that PLC
processor for information on that processor’s addressing conventions. For
a computer (and some processors) at a remote node to accept commands
from this local node, it must have a file at the remote node host to
simulate a PLC-2 family data table.
Communication Zone
A Data Highway II network allows access to the memory of each remote
node. This means that data table information at any operating PLC
processor can be transmitted to another PLC processor, or to a computer,
and used by the other node to control its own part of an operation.
The communication zone is a set of rungs with a well-defined beginning
(header) rung and a well-defined ending (delimiter) rung that you enter
into your control program. The rungs between the header and delimiter
tell your highway interface what messages to generate and what messages
to accept while this process is running. Figure 5.1 shows a simple
communication zone including each function type. The following
sections explain the communication zone rungs in detail.
Actual communication zone rungs for any host processor may vary. If,
for instance, a PLC-2 will not generate any messages and will accept all
messages from other nodes, you need not enter a communication zone at
all. The length of this zone is a function of the number of remote nodes
with which the local host processor communicates and the number of
types of commands to be sent to these remote nodes.
51
Chapter 5
Programming the Local Host
Figure 5.1
Format of a Communication Zone
Header
Rung 1
Memory
Access
Rung
START
022
00
020
00
017
00
Immediate
Access
Update Rung
Read
Immediate
Read/Write
Block
Write Bit
024
10
032
12
032
030
G
012
G
070
G
076
G
017
063
G
065
G
010
200
G
217
G
022
/
00
027
022
/
17
040
G
047
G
027
020
016
G
022
G
120
120
10
032
027
L
07
077
G
XX
017
11
XX
00
120
04
120
/
10
00
00
022
G
022
G
07
060
G
062
G
07
07
024
G
027
07
01
120
02
120
/
05
120
120
135
/
11
11
06
120
03
52
027
07
120
07
126
00
Delimiter
Rung 1
1
027
Program the header and delimiter rungs for each host
processor. Program the other rungs as needed.
027
U
07
Chapter 5
Programming the Local Host
Here are the communication zone rungs that go in your ladder diagram
program:
Rung to designate communication zone header (if a communication
zone is needed).
Rungs to define memory access (as needed).
Rungs to update immediate-access blocks (as needed).
Rungs to read immediate-access blocks (as needed).
Rungs to read/write blocks (as needed).
Rungs to write bits (as needed).
Rung to delimit the end of the communication zone.
Figure 5.1 shows the addresses above most GET instructions, but not the
three-digit data value displayed below the GET element. This convention
is used for clarity, since only the GET address is significant when entering
your communication zone. In entering communication zone rungs, you
don’t need to enter values with the GET instructions.
Header/Delimiter Rungs
A minimum communication zone consists of a header rung and a
delimiter rung.
The delimiter rung defines the end of the communication zone. This rung
must be exactly as shown in Figure 5.1. The unlatch 02707 instruction is
interpreted as a special code. Word 027 is reserved for special functions
such as this and cannot be used for other data table use.
The header rung defines the start of the communication zone. It must
consist of an EXAMINE-ON element, two or three GET elements, and a
latch 02707 element (Figure 5.2).
The word address in the EXAMINE-ON instruction in the header rung
specifies the local node.
The local node designation must match the three-digit number you
selected with the link address thumbwheels on the PLC-2/DHII interface.
This number should be an octal number from 010 to 077 or from 110 to
376. Again, 0 to 7 and 100 to 107 cannot be entered by the Industrial
Terminal; and 377 is an invalid node designation.
53
Chapter 5
Programming the Local Host
Figure 5.2
Header Rung
Address of
Error Word
Supervisory
Timeout
Preset Code
Local
Node
022
00
077
G
030
G
TimeCritical
Timeout Preset
Code
011
G
027
L
07
Optionally a single GET will supply a single timeout
for both supervisory and timecritical.
The address in the three GET elements in the header rung specify (from
left to right):
The Address of The Error Word
The Supervisory Timeout Preset Code
The Time-Critical Timeout Preset Code
Select any available word in the data table as the error word. The
PLC-2/DHII interface will write error codes into the word you select
(refer to the “Error Word” discussion preceding Figure 5.12).
The timeout preset code gives a programmed timeout interval for
command completion. Based on the three-digit value entered for the
address in these GET instructions, the PLC-2/DHII interface monitors
command execution for all commands sent from the local node. The
significance of this preset code, its computation, and timeout
considerations are described in the discussion about “Timeout Preset
Value” (refer to Figure 5.23).
These are two timeouts. If you use two GET instructions, the first timeout
is for supervisory. The second GET is for time-critical. The timeout
preset for time-critical can be smaller, while the supervisory can be
generally larger. If you use only one timeout, it applies to both
supervisory and time-critical. Refer to the discussion “Programming
Preset Code” and Table 5.B which lists timeout preset codes.
54
Chapter 5
Programming the Local Host
Memory Access Rungs
Memory access rungs define blocks of data table words which can be
accessed with protected write commands from the remote node you
specify. Protected write commands received from the specified remote
node may access only those blocks of local data table words listed in
memory access rungs. However, with no memory access rungs, the local
node will accept protected write commands from any remote node to
access any part of the data table.
WARNING: Unprotected write commands override any
memory access rungs. Use them with discretion because writes
to unauthorized data table areas can result in damage to
equipment and personnel. Don’t forget that to allow access to
data table write commands from any remote node, you must set
the accept-writes-to-data-table switch to ON (Chapter 4).
A memory access rung is composed of one or more memory access
branches, as shown in Figure 5.3. In the memory access branch format, a
branch start precedes a group of elements. The EXAMINE-ON and GET
elements in the memory access branch specify the following:
The word address in the EXAMINE-ON element specifies the remote
node.
The word address in the first GET element specifies the starting address
of the memory access block.
The word address in the second GET element specifies the ending
address of the memory access block.
These elements must be followed by a branch end.
Figure 5.3.B shows the block of words in memory that is now open to
writes from Remote Node 010, due to the memory access branch of
Figure 5.3.A.
Memory access branches can be listed in a single memory access rung.
Note that each group of elements must be preceded by a branch start.
(This is true in all cases, even where only one memory access branch is
defined.) Branch end must be used to fit the memory access rung into the
ladder-diagram display format.
You must end each memory access rung with an Energize Output 02707
element.
55
Chapter 5
Programming the Local Host
Figure 5.3
Memory Access Example
(A) Memory Access Branch
Memory Access Block
Boundaries in Local
Host Data Table
Remote
Node
Starting
Address
010
Ending
Address
020
023
G
G
00
000
000
Branch Start
Instruction
(Required)
Branch End
Instruction
(Required)
(B) Local Host Data Table Showing
Block Accessible to Protected
Writes from Remote Node 010
ÉÉÉÉÉ
ÉÉÉÉÉ
ÉÉÉÉÉ
ÉÉÉÉÉ
ÉÉÉÉÉ
Block Accessible
to Write Commands
from Remote
Node 010
ÉÉÉÉÉÉÉÉÉ
ÉÉÉÉÉÉÉÉÉ
ÉÉÉÉÉÉÉÉÉ
ÉÉÉÉÉÉÉÉÉ
Words
020
023
Figure 5.4 shows a memory access rung with multiple branches. This
rung lists the remote nodes which have access to write into specific blocks
of data table, as follows:
Node 020 can access Words 070-076.
Node 017 can access Words 063-065 and Word 022.
Node 010 can access Words 060-064.
As shown in Figure 5.4, you can identify a particular remote node in more
than one memory access branch. Also, you can assign two or more nodes
to have access to the same block of words.
For practical reasons, do not exceed the display area of the programming
terminal when entering these rungs. More than one memory access rung
can be programmed if needed. Should you require multiple memory
access rungs, you can enter them in any order in the communication zone.
Grouping memory access rungs together promotes ease of programming.
56
Chapter 5
Programming the Local Host
Figure 5.4
Typical Memory Access Rung
020
00
017
00
070
G
076
G
017
063
G
065
G
010
00
00
022
G
022
G
027
07
060
G
064
G
Command Rungs
The command rungs direct the PLC-2/DHII interface to send command
messages to remote nodes. Each command rung lists the type of
command and the bits or block of words affected. You initiate a
command message through the ladder-diagram program.
A command rung to read or update an immediate-access block is
significantly different from all other (general) command rungs. However,
the first element on each command rung must be an EXAMINE-ON
instruction addressing a start bit. Also, you must end each command rung
with an Energize Output 02707 element.
Figure 5.5 shows the format of a general command rung. The second
element in this general command rung is an EXAMINE-ON. The word
address that you enter in this second EXAMINE-ON element is the
remote node designation.
General Command Code
The bit pointer that you enter into this second EXAMINE-ON element is
the command code (Figure 5.5). Through the command code you
identify:
Priority Status of the Command as Time-Critical or Supervisory
Type of Command
There are two general command rung formats which differ only in terms
of the unit of memory which they control. The general command rung
formats are:
Block Command Format
Bit Command Format
57
Chapter 5
Programming the Local Host
Figure 5.5
General Command Rung
Remote Station
Start Bit
AAA
XX
Refer to
Figure 5.6 & Figure 5.7
027
07
Command Code
0X
Supervisory
1X
TimeCritical
00
01
02
03
04
05
06
07
Protected Write Block with Reply
Read Block
Protected Write Bit with Reply
Unprotected Write Block w/Reply
Unprotected Write Bit with Reply
Protected Write Block VERIFIED
Protected Write Bit VERIFIED
Unused
10
11
12
13
14
15
16
17
Protected Write Block with Reply
Read Block
Protected Write Bit with Reply
Unprotected Write Block w/Reply
Unprotected Write Bit with Reply
Protected Write Bit NO REPLY
Protected Write Bit NO REPLY
Unused
Whereas:
Protected means that when a command with this quality is received, it is
checked against the memory access rungs.
Unprotected means that a command with this quality overrides any
memory access rungs put in to stop it. As in Data Highway, they should
be used with discretion.
Memory access does not apply to READ commands, so the READ
BLOCK is neither protected nor unprotected.
Note that Codes 05 and 06 are different from 15 and 16, while other
commands are symmetrical. They are “enhanced” WRITE commands. A
VERIFIED command is issued for supervisory while a NO REPLY
command is issued for time-critical. There is no supervisory NO REPLY,
nor is there a time-critical VERIFIED.
Should you receive Error Code E9, UNKNOWN COMMAND CODE,
(error codes are listed in both this chapter and Chapter 6), it means that
you may have used a command code that is not yet implemented. These
currently include: 03, 04, 05, 06, 13, 14 and unused Command Codes 07
and 17.
58
Chapter 5
Programming the Local Host
General Block Command Format
Use the format shown in Figure 5.6 when you enter a command code
specifying any of the following commands:
Read Block
Protected Write Block with No Reply
Protected Write Block with Reply
Protected Write Block Verified
Unprotected Write
This format uses three GET elements. Use the address in the first GET
element to specify a remote node data table word. The specified
command operation begins at this address. Use the address in the second
GET element to define the start and the address in the third GET element
to define the end of a block of data table words in the local node host
processor. This block contains words to be transferred in the write or read
operation. A time-critical message is limited to 18 words when writing to
an address less than 177. When you write data to an address greater than
177, you are limited to 17 words for a time-critical message. This is
because two additional bytes are used per addresses over 177 for sending
time-critical messages. However, the size of a supervisory message is
unlimited.
In the write block operation, a block of data from the local node data table
is written to data table words of a remote node. The first GET element in
the command rung specifies a beginning address at the remote node. Data
is to be written into this word, and succeeding words, from the local node
data table. The second and third GET elements in this type of rung list the
starting and ending boundary for the block of words to be sent from the
local node data table.
In the read block operation, a block of data is read from a remote node
into the local node data table. The first GET element in the read block
command rung lists the beginning address from which to read data.
Remote data table words are read in succession, beginning with this
address. This block of words is sent into the block of the local node data
table bounded by the second and third GET elements in the rung.
Only one set of GET elements, as shown in Figure 5.6, is allowed in a
single command rung.
59
Chapter 5
Programming the Local Host
Figure 5.6
General Block Command Format
Remote Station
Start Bit
BBB
G
Command
Code
Local Station
Data Table Boundaries
CCC
G
DDD
G
027
07
Remote Station Starting
Data Table Address
Legend
BBB
CCC
DDD
Beginning Word Address at REMOTE Station for WRITE/READ Operation
Beginning Word Address at LOCAL Station for WRITE/READ Operation
Ending Word Address at LOCAL Station for WRITE/READ Operation
Bit Command Format
Use the format shown in Figure 5.7 when you enter a command code
specifying any of the following commands:
Protected Write Bit with No Reply
Protected Write Bit with Reply
Unprotected Write Bit with Reply
Protected Write Bit Verified
This format uses examine elements which address bits in the remote node.
These elements control remote node data table bits as follows:
-] [- EXAMINE ON — This rung element instructs the remote node to
turn on the addressed bit.
-]/[- EXAMINE OFF — This rung element instructs the remote node
to turn off the addressed bit.
These elements are programmed immediately following the command
code. Any combination of these elements may make up this type of
command rung. Where necessary, branch start and a branch end may be
used to fit these elements into the display area of the programming
terminal. For practical reasons, do not exceed this display area. Multiple
rungs of this type can be used as necessary; but each rung needs its own
start bit.
510
Chapter 5
Programming the Local Host
Figure 5.7
Bit Command Format
Remote Station
Start Bit
Area may contain any legal
combination of these instructions.
EEE
EE
Command
Code
FFF
GGG
/
/
FF
GG
HHH
HH
Branch Start
(If Needed)
Legend
III
JJJ
II
027
07
Branch End
(If Needed)
JJ
-] [-
EEEEE
Turn ON the Addressed Bit at the Remote Station.
-] / [-
Turn OFF the Addressed Bit at the Remote Station.
Remote Station Addresses
In the preceding figures (Figure 5.1 and Figure 5.3 through Figure 5.7), to
specify the remote station, we showed you EXAMINE-ON elements
where the word address designated the node. However, in some cases,
you may need to specify not only the node, but the link as well. In other
cases you may need to specify the user also. A case in point is the
asynchronous-device/DHII interface that has two channels to support two
users of the highway.
The full remote station address is shown below. You can use it wherever
you use a station address in any of the rungs:
Remote Station Address
LLL
=
Link
NNN
Node
UUU
=
User
511
Chapter 5
Programming the Local Host
The link designation tells what link the remote node is on. It allows you
to send messages off the local link via bridges when you have bridging
capability.
The node designation is the address of the remote node within its local
link. The node designation must match the three-digit number you select
on the link address thumbwheel on the remote interface.
The user designation specifies the user of the node. There is only one
user of a PLC-2/DHII interface—the PLC-2 processor. On the 1779-KFL
foreign-device interface there are two users—the devices connected to
Channels 1 and 2.
The user designation can be set from 11-30 (octal) which selects
Users 1-16 (decimal). Pick a user number from 1-16, add 8 to it, then
convert to octal and enter it. When you are sending to the KFL, User
Designation 1 or 2 selects Channel 1 or 2. For example, if you want to
write to the second channel of a KFL, you’d put a:
012
=
Very often you will be sending messages to another PLC on your own
link. In this case the link designation is that of the local link and the user
designation is 1. To ease the coding of communication zone rungs, you
can leave the link and user portions off of the rung in this case. In fact,
whenever you send messages to a node on your own link, you may leave
the link portion off the rung. Likewise, whenever you send to a node with
only one possible user, as in the PLC-2 and PLC-3, you can leave the user
portion off the rung. Here then are examples for each case:
1. Specifies the link and node.
User is 1 by default.
2. Specifies the node and user.
Link is the local link by default.
3. Specifies the link address.
User is 1, and the link is the
local link by default.
512
...
=
=
...
...
Chapter 5
Programming the Local Host
For example, in Figure 5.3 we show a rung that designates only the
remote node on the local link:
010
00
020
G
023
G
If you were to designate a remote station that is on Channel 2 of a KFL
interface, you would have to add a user designation:
010
00
012
=
020
G
023
G
If you were to designate a remote station that is on another link (Link 3),
you would have to add a link designation:
003
=
010
00
012
=
020
G
023
G
You can designate link and user on memory access rungs and supervisory
general command rungs. You can designate user on time-critical general
command rungs. However, you cannot designate link on time-critical
command rungs because time-critical commands can only be sent to
nodes on the local link.
Commands to read immediate-access blocks can only designate node.
These commands cannot designate link or user.
ImmediateAccess Update Rung
The purpose of immediate-access rungs is explained in Chapter 2. Now it
is time to program one. Each immediate-access rung defines a block of
words in the local host data table that can be read by any remote node
through commands to read immediate-access blocks. An
immediate-access update rung consists of an EXAMINE-ON element,
two GET elements, an EXAMINE-OFF element and an Output Energize
Address 02707 element (Figure 5.8).
513
Chapter 5
Programming the Local Host
Figure 5.8
ImmediateAccess Update Rung
ImmediateAccess Block
Boundaries in Local Host
Data Table (21 Words Max.)
Starting Ending
Address Address
Start Bit
024
10
200
G
217
G
Local Node
052
/
00
027
07
ImmediateAccess
Block Number
The EXAMINE-ON, GET, and EXAMINE-OFF elements in the
immediate-access rung specify the following:
The bit address of the EXAMINE-ON instruction specifies the start bit
that controls when the PLC-2/DHII interface reads the
immediate-access block defined by the rung.
The word address in the first GET element specifies the starting address
of the immediate-access block.
The word address in the second GET element specifies the ending
address of the immediate block. The immediate-access block must not
exceed 21 words.
The word address in the EXAMINE-OFF element must specify the
local node (which must match the link address thumbwheel setting).
The bit pointer in the EXAMINE-OFF element specifies which one of
16 possible immediate-access blocks is defined by this rung.
The immediate-access update rung of Figure 5.8 is controlled by Start
Bit 02410 (High Byte 10-17) and defines the block of words from 200
through 217 which will be used as Immediate-Access Block 00 on this
node.
The PLC-2/DHII interface reads the start bit continually. Each time the
ladder-diagram program turns on the start bit, the PLC-2/DHII interface
updates this immediate-access block to hold that data in anticipation of
receiving a command from a remote node to read this immediate-access
block. When it receives a command from a remote node to read an
immediate-access block, it immediately replies with its latest copy of the
requested block.
514
Chapter 5
Programming the Local Host
Should you require multiple immediate-access rungs, enter them in
succession in the communication zone, immediately following any
memory-access rung and before any command rung.
Read ImmediateAccess Block
Use the format shown in Figure 5.9 when you enter a command rung to
specify a command to read an immediate-access block. This format uses
an EXAMINE-OFF and two GET elements. The word address in the
EXAMINE-OFF specifies the link address of the remote node. Use the
bit pointer in the EXAMINE-OFF to specify the number of the
immediate-access blocks to be read from the remote node. Use the
addresses in the GET elements to define the start and end of a block of
data table words to which the immediate-access block is sent in the local
node host processor. The length of this block in the local data table must
be the exact length of the block in the remote node.
Figure 5.9
Command Format for Read ImmediateAccess Block
Start Bit
Remote Station
AAA
/
BB
CCC
G
Local Host Data
Table Boundaries
DDD
G
027
07
ImmediateAccess
Block Number
Legend
AAA
BB
CCC
DDD
Link address of remote node.
Number of immediateaccess blocks at remote node.
Beginning local word address where block is placed after being read
from remote node.
Ending local word address where block is placed after being read
from remote node.
515
Chapter 5
Programming the Local Host
Notice the format used in the read and update immediate:
The format is:
Read
Update
/
G
G
G
G
/
get the data
and put it here.
/
G
G
G
G
/
Examine Start Bit
Assign a unique start bit to each command rung. The start bits are
examined by the PLC-2/DHII interface. When you turn on the start bit,
the PLC-2/DHII interface carries out the programmed command.
Assign a unique start bit to each immediate-access update rung and each
command rung. Use the ladder-diagram program to turn on the start bit
whenever and as often as your application requires.
Control the start bit through your ladder diagram program. Turn it on
when you want to send the command message to the remote node.
Programming methods for start-bit control are covered in the discussion
on “Controlling the Start Bit,” following Figure 5.15.
Status Words
The module controls certain data table words specified by the programmer
in the local station processor. These data table words indicate the status of
command execution and provide various types of diagnostic information
for start-up and troubleshooting. These words are:
One or more pairs of adjacent words for start/done and remote/local
fault storage.
An error word.
516
Chapter 5
Programming the Local Host
Refer to Figure 5.10. You specify the addresses of these status words
when entering the communication zone rungs. A pair of start/done and
remote/local fault words is defined by the selection of the start bit in a
command rung. You specify the error code storage word in the header
rung.
Figure 5.10
UserSelected Status Words
Local Station Data Table
Start/Done Word
Remote/Local Fault Word
Error Word
NOTE: Start/Done and Remote/Local Fault words must
be adjacent. Use one pair for each group of up
to 8 commands.
L1
L2/N
GND
CAT. NO. 1779-KP2 PLC-2/DHII INTERFACE
Any accessible data table words may be used as status words in the station
processor.
Start/Done Word
The start/done word is the first of a pair of adjacent status words for
module use. This word stores a start bit and corresponding done bit for
each of up to eight commands. If you program more than eight command
rungs at a station, you must provide for additional (preferably contiguous)
pairs of start/done and remote/local fault words.
517
Chapter 5
Programming the Local Host
Select the start bit for any command in the upper byte (Bits 10-17) of the
start/done word. The done bit for this command is then the corresponding
bit in the lower byte (Bits 00-07) of the same word.
In Figure 5.11.A, the sample command rung examines Bit 03210 as its
start bit. As Figure 5.11.B shows, the corresponding done bit is
Bit 03200. Note that the address of start/done bits for each command
differs only in the next to last digit; the start bit always has a 1 in the next
to last digit, the done bit always has a 0.
Figure 5.11
Adjacent Status Words
A. Command Rung
Start Bit
03210
G
Selection of Start Bit
Automatically Desig
nates Bits in Two
Adjacent Words
G
B. Start/Done and Remote/Local Fault Words
Start Bits
Word 032
Program
Controlled
Word 033
02707
G
Remote Fault Bits
ÉÉ
ÉÉ
Done Bits
ÉÉ
ÉÉ
PLC2/DHII
Interface Controlled
ÉÉ
ÉÉ
Local Fault Bits
ÉÉ
ÉÉ
ÉÉ
ÉÉ
Bits for Command Rung Shown
As it name implies, the start bit initiates command execution. This bit,
controlled by the user program, is set ON to initiate the sending of a
command. The PLC-2/DHII interface monitors the status of start bits and
transmits the corresponding command when its start bit is set ON.
518
Chapter 5
Programming the Local Host
As it name implies, the done bit indicates command completion. This bit,
controlled by the PLC-2/DHII interface, is set ON when the execution of
a command is completed successfully.
Each command rung must examine a unique start bit. Thus, a single pair
of start/done and remote/local fault words has enough bits for up to 8
command rungs. Should more command rungs be programmed, select
additional (preferably contiguous) word pairs as necessary.
To optimize memory use and minimize the time required by the
PLC-2/DHII interface to scan start bits, use all 8 start bits in one word
pair before using another start/done word. For the same reason,
sequentially group command rungs which use the same start/done word.
You cannot use Word 077 or the last data table word for start/done words
because the very next words are not part of the data table.
Remote/Local Fault Word
As Figure 5.11 shows, that selection of the start bit in the program not
only causes the PLC-2/DHII interface to control a corresponding done bit
in that same word, but also causes the PLC-2/DHII interface to control
remote and local fault bits in the next data table word. A remote fault bit
and local fault bit are controlled for each command. For a command, the
position of each of these fault bits within their respective bytes
corresponds directly to the position of start and done bits for that
command.
Remote and local fault bits are controlled by the PLC-2/DHII interface.
The PLC-2/DHII interface sets a fault bit ON when a command cannot be
executed due to a hardware-related fault either between nodes or between
the remote node interface and its host processor. Figure 5.12 summarizes
the significance of these bits.
A remote fault bit indicates that the remote node interface received a
message, but could not communicate with its host processor to execute
that command.
A local fault bit indicates that the local node has not received a response
from the remote node to acknowledge that it received a valid command.
519
Chapter 5
Programming the Local Host
Figure 5.12
Remote/Local Fault Bit Significance
Processor
PLC
2/30
Local Fault
Possible Sources:
• Power Off at Remote Node Interface
• Unused Remote Node Number Addressed
• Node Interface at Local or Remote Node Has
Disconnected Itself as a Result of Link
Monitoring
• Automatic Timeout at Local Node
Local Node
Processor
A-B
Remote Fault
Possible Sources:
• Remote Node Processor in Program Load
(or PROG) Mode
• Command Not Executed due to Switch
Setting at Remote Node
• Fault at Remote Node Processor
• Power Off at Remote Node Processor
• Error Detected in Communication Zone of
Program at Remote Node Processor
Remote
520
PLC
2/20
Chapter 5
Programming the Local Host
Immediately before it sets a remote or local fault bit ON, the PLC-2/DHII
interface enters a four-digit error code into the error code storage word.
The error code storage word is described in the discussion on “Error
Word.”
By monitoring fault bits in the program, operator personnel can be alerted
to hardware conditions which prevent normal transmission and execution
of commands. (Programming techniques for monitoring fault bits are
described in the discussion about “Initiating and Monitoring Commands.”
Error Word
When the PLC-2/DHII interface cannot carry out a command due to a
programming error or a discrepancy in data, it writes an error code into
the error word you select in the header rung of the communication zone.
This word stores the most recent error code written by the PLC-2/DHII
interface.
Figure 5.13 shows the structure of the error word. The lower byte of this
word (Bits 00-07) stores any error code entered by the PLC-2/DHII
interface. In this byte the error code is represented as a two-digit
hexadecimal number.
Figure 5.13
Error Code Word Format
TwoDigit Value:
Reference Number (for Codes D2E7 Hex)
Counter (for Codes 10CF Hex)
Error Codes 00FF
Hex Format
(Refer to Appendix B)
Hex Count
17 16 15 14 13 12 11 10 07 06 05 04 03 02 01 00
0F
0F
0F
0F
521
Chapter 5
Programming the Local Host
Appendix B lists status codes.
Error codes can be grouped as follows:
Codes D2 through E7 indicate that the PLC-2/DHII interface has
detected some programming error in the communication zone of the
program. The program status indicator (PROG ERR) will be ON if one
of these codes is displayed.
Codes 10 through CF generally indicate the PLC-2/DHII interface has
detected some programming or hardware-related fault during attempts
at communication between nodes. These codes are intended to serve as
diagnostic indicators after the initial power-up checks of program have
been completed.
The PLC-2/DHII interface writes a code in the 10 through CF group
whenever a remote or local fault bit is set ON.
The upper byte of the error code storage word (Bits 10-17) stores a 2-digit
HEX value. This value gives supplemental error or fault information,
depending on the type of error code displayed. This value may have one
of two meanings:
Reference Number
Counter
For Error Codes D2 through E7, the upper byte stores a 2-digit reference
number. This number points to the location of a programming error
within the communication zone of the program. This error may be an
incorrect instruction or an improper address entered within a rung of the
communication zone. In this numbering scheme, the header rung is
designated as “00”. Subsequent communication zone rungs are numbered
sequentially.
Note that Error Codes D2 through E7 are intended as aids in start-up
debugging of the communication zone. Thus, the reference number stored
in this word can be a valuable tool for debugging purposes.
Foe Error Codes 10 through CF, the upper byte stores a 2-digit counter.
This counter shows the number of Error Codes 10 through CF written into
the storage word by the PLC-2/DHII interface. The counter increments
each time the module enters a different error code.
522
Chapter 5
Programming the Local Host
Because Codes D2 through E7 are intended for start-up situations and
Codes 10 through CF are intended for situations subsequent to power-up,
there is no conflict in controlling this upper byte of the error code storage
word.
Error codes are generally used in the application program only for display.
They have special value in node start-up, when program errors are
detected in the communication zone. By viewing the header rung of the
communication zone, you can examine a displayed error code and the
least significant digit of the counter in this word. (The header rung is
described earlier in the discussion about “Header/Delimiter Rungs.”
In some instances, however, it may be preferable to display the 2-digit
error code using a 7-segment hexadecimal display controlled from output
modules of the controller. This 7-segment display, mounted at an
operator’s station, can be a useful troubleshooting aid for quickly locating
fault conditions.
Some hexadecimal codes will not display correctly on 7-segment BCD
displays.
Initiating and Monitoring
Commands
In this discussion you will read about the support programming for
commands at the host processor. This programming uses the start/done
and remote/local fault bits to initiate and monitor command execution.
Using these recommended techniques, you coordinate communication
zone programming with your application program.
Start/Done/Fault Bit Timing
The start bit that initiates a command is program controlled; the done bit,
which indicates command completion, is controlled by the KP2 interface.
The timing relationship of start and done bits is important when you
initiate and terminate commands. The following describes this
relationship in normal operation and the automatic responses which result
from faulted operation.
NOTE: The KP2 interface’s scan and its control of the fault and done bits
is asynchronous to the PLC processor’s scan and its control of the start
bits.
523
Chapter 5
Programming the Local Host
Normal Operation
Command execution begins when the ladder-diagram program turns on a
start bit, normally with a latch instruction. The PLC-2/DHII interface
detects the ON state of this bit and then begins the operation necessary to
format and transmit a command message.
When the remote node interface receives the command message, it
acknowledges it. Then, while normal operation continues, the remote
node interface reacts to the command and prepares a reply message
(except for a write with no reply). The remote node interface waits until it
receives the token, then transmits its reply message to the local (calling)
station.
When the local PLC-2/DHII interface receives the reply, it turns on the
done bit at the host processor. The done bit, in turn, is examined in the
ladder-diagram program to turn off the start bit.
After the start bit has been turned off, the PLC-2/DHII interface resets the
done bit.
Timing of start and done bits for a command is shown in Figure 5.14. The
significance of start/done bit status is summarized in Table 5.A.
Figure 5.14
Start/Done Bit Timing Normal Operation
A
Start Bit ON
OFF
B
LEGEND:
524
A
D
ÉÉÉÉÉÉÉÉÉÉÉÉÉ
ÉÉÉÉÉÉÉÉÉÉÉÉÉ
ÉÉÉÉÉÉÉÉÉÉÉÉÉ
ÉÉÉÉÉÉÉÉÉÉÉ
ÉÉÉÉÉÉÉÉÉÉÉ
Command/
Response
Time
Done Bit ON
OFF
C
Host Proc
essor Scan
PLC2/DHII
Interface Scan
Start Bit turned ON by the program.
B
Done Bit set ON by the PLC2/DHII interface to indicate
that a command has been completed.
C
Start Bit turned OFF by the program.
D
Done Bit set OFF by the PLC2/DHII interface after it senses
that the Start Bit has been set OFF.
Chapter 5
Programming the Local Host
Table 5.A
Start/Done Bit Status
Status Start Bit
Done Bit
Significance
0
0
Idle
1
0
Command initiated or in progress.
1
1
Command/reply operation complete.
0
1
The processor, based on the program, acknowledges
completion of the command/reply operation (transient
condition, since the KP2 interface turns the done bit OFF
in its next scan).
Faulted Operation
Certain fault conditions can prevent normal reception and execution of
commands by the remote nodes. To indicate the source of such fault
conditions, the PLC-2/DHII interface controls remote and local fault bits
at the host processor.
In general, the local fault bit indicates that the intended receiving station
is unable to receive (and acknowledge) a command message addressed to
it. The remote fault bit, on the other hand, indicates that the intended
remote node interface has received the command message, but is unable
to execute the command at the host processor of the remote node. (For a
summary of the distinction between these fault types, refer to
Figure 5.12).
The timing relationship of these fault bits in command execution is shown
in Figure 5.15. In this example, the command initiated at the setting of
the start bit cannot be executed due to some fault condition. The module,
detecting this fault condition, sets either a local or remote fault bit.
Recall that the start bit is program-controlled. The remote/local fault bits,
meanwhile, are controlled by the KP2 interface. You must keep this
relationship in mind when planning start bit control and fault bit
monitoring in the ladder-diagram program.
Note from Figure 5.15 that the fault bit, once on, remains on until your
program turns off the start bit. Only after it has detected that the
program-controlled start bit is off does the PLC-2/DHII interface then turn
off the fault bit. Note also that the done bit is not set on in the event of a
fault condition.
525
Chapter 5
Programming the Local Host
Figure 5.15
Start/Fault Bit Timing Faulted Operation
A
B
C
D
ÉÉÉÉÉÉÉÉÉÉ
ÉÉÉ
ÉÉÉÉÉÉÉÉÉÉ
ÉÉÉ
ÉÉÉÉÉÉÉÉÉÉ
ÉÉÉ
ÉÉÉÉÉÉÉÉÉÉÉ
ÉÉÉÉÉÉÉÉÉÉÉ
Start Bit ON
OFF
Command/
Response
Time
Remote
or Local ON
Fault Bit OFF
PLC2/DHII
Interface Scan
Done Bit ON
OFF
LEGEND:
A
Start Bit turned ON by the program.
B
Done Bit set ON by the PLC2/DHII interface to indicate
that a command has been completed.
C
Start Bit turned OFF by the program.
D
Done Bit set OFF by the PLC2/DHII interface after it senses
that the Start Bit has been set OFF.
Controlling the Start Bit
Your program controls the start bit: setting it on to initiate command
execution, turning it off after command completion or after a fault is
detected.
To turn on the start bit, the program examines application conditions.
These may include input/output device data, values, or other information
from the controlled process. For the most part, an application condition
used to initiate a command is one of these general types:
ON or OFF Status of a Bit
Transition of a Bit
Timed Condition
526
Chapter 5
Programming the Local Host
To turn off the start bit, the program examines the response from the
PLC-2/DHII interface. This response may be one of the following:
Done Bit
Remote Fault Bit
Local Fault Bit
Next we describe commonly used forms of start bit control. Each
discussion concerns a different method for initiating command execution.
All examples show how the program uses both done and fault bits to turn
off the start bit.
An important assumption underlies the examples outlined in the ensuing
discussions and shown in Figure 5.16 through Figure 5.19. The
assumption is that the program should automatically retry transmission of
a command in the event of a fault. Only the done bit terminates attempts
at command execution. A local or remote fault bit response causes the
program to re-initiate command execution. (Do not confuse this type of
programmed retry with the retry procedure of the PLC-2/DHII interface.
Transparent to your programming, the PLC-2/DHII interface
automatically attempts three retries of a message before it sets a fault bit.)
Programmed retry has distinct advantages. As the PLC-2/DHII interface
continuously tries to send the command message, any data content of the
message (for a write command) is continuously updated. As soon as the
fault condition is corrected, the message is sent, with the latest data. This
eliminates the need for a manual reset of the start bit when a fault
condition is corrected. Once the command is completed, the program
automatically unlatches the start bit.
527
Chapter 5
Programming the Local Host
ON/OFF Input Status
You can use the ON or OFF status of an input device to latch the start bit.
Figure 5.16 shows example rungs for this type of command initiation.
Figure 5.16
StatusInitiated Command
Input
111
Remote Local
Fault
Fault
033
033
/
/
11
12
02
Start
032
12
In this example, the rung is programmed to turn on the start bit when
Input Bit 11111 is ON, provided that both fault bits are OFF.
In normal operation, the start bit is turned on by Input 11111. The fault
bits initially are OFF. This causes the PLC-2/DHII interface to format
and send the command message. Then, when the command is completed,
the PLC-2/DHII interface turns on the done bit. However, unless a fault is
detected, Input Bit 11111 must go OFF to turn off the start bit in this
example. With this arrangement, the command message is sent only once;
Input 11111 must be turned off, then on again, to execute this command a
second time. In normal operation, the start bit, after successful command
completion, remains ON until Input 11111 goes OFF. Recall from
Figure 5.14 that the PLC-2/DHII interface holds the done bit ON until
after the start bit is turned off.
Should a fault condition prevent normal execution, the rung (Figure 5.16)
provides a programmed retry of the command as long as Bit 11111 is ON.
A remote or local fault turns off the start bit. The start bit is turned on
again after the PLC-2/DHII interface resets the fault bit. As Figure 5.15
shows, the PLC-2/DHII interface resets a fault bit only after the start bit
has been turned off.
Even though the fault bits are continually reset with this method, their
usefulness must not be overlooked. “Monitoring Remote/Local Fault Bit”
outlines a useful method you can use to monitor fault bits and control an
output indicator based on fault bit status.
528
Chapter 5
Programming the Local Host
In some applications, it may be useful to send a command continuously
between stations. You can accomplish this by adding an EXAMINE-OFF
instruction for the done bit as in Figure 5.17. This would cause the
command to be sent continuously as long as Input 11111 remains ON.
Figure 5.17
StatusInitiated Command Sent Continuously
Remote Local
Fault
Fault
033
033
/
/
11
12
02
Input
111
Done
032
/
02
Start
032
12
Transition
You can use the transition of an input device from ON to OFF and from
OFF to ON to latch the start bit. This allows you to send a command each
time a condition changes state. Figure 5.18 shows example rungs for this
type of command initiation.
In this example, a storage bit, called the transition bit, is manipulated to
control the sending of the command. This bit is latched whenever a
transition of Input 11111 is detected, unlatched only when the done bit is
set ON. A compare bit, 01111 in this example, is used to manipulate the
transition bit. In Rung 2, the compare bit is controlled to match the
ON/OFF status of the input. Because the input and the compare bits are
programmed to have matching states, both ON or both OFF, the
conditions of Rung 1 can be true only when the input has just changed
from ON to OFF or from OFF to ON. Thus, Rung 1 conditions set up a
one-shot, true only long enough to latch the transition bit. Note that these
rung conditions are false as soon as the processor scans Rung 2. The
order of these rungs is important for this reason.
With the transition bit latched, the start bit, in turn, is turned on in Rung 3.
This initiates the command. In normal operation, the done bit unlatches
the transition bit in Rung 4. In faulted operation, however, Rung 3
repeatedly retries the command in much the same manner as in the
example of Figure 5.16. The start bit and done bit handshaking is
accomplished by the EXAMINE-OFF done bit in Rung 3.
529
Chapter 5
Programming the Local Host
Figure 5.18
TransitionInitiated Command
Rung 1
Input
111
Compare
011
/
11
11
Input
Compare
011
111
/
11
11
Rung 2
Input
111
Transition
020
L
00
Compare
011
11
Rung 3
Transi
tion
020
Remote Local
Fault
Fault Done
033
033
032
/
/
/
00
12
02
02
Rung 4
Done
032
02
11
Start
032
L
Start
032
U
12
12
Timed
You can turn on the start bit periodically to send a command at a userdetermined interval. Figure 5.19 shows example rungs for this type of
command initiation.
In this example, Timed Bit 04615 is used to initiate the command at every
preset interval, 10 seconds. This bit is examined to turn on the start bit.
In normal operation, after the command is executed, the done bit is set
ON by the module. This causes the program to reset the timer and turn
off the start bit. The timer then begins timing again once the done bit is
OFF. (As Figure 5.14 shows, the done bit is reset only after the start bit is
turned off.)
Note that this programming causes continuous retry of a command in the
event of faulted operation.
530
Chapter 5
Programming the Local Host
Figure 5.19
TimerInitiated Command
Done
032
/
02
Timed
Bit
046
Remote Local
Fault
Fault
033
033
/
/
15
12
02
046
TON
1.0
PR 010
AC 000
Start
032
12
Retry Delay
In some cases, automatic retry, as implemented in Figure 5.16,
Figure 5.18, and Figure 5.19, can load down the network unnecessarily.
Message transfer attempts that result in local faults can take many times
as much time as the normal message transfer time. This could adversely
affect the performance of other nodes.
You can reduce the impact of automatic retries by providing a time delay
before each retry as shown in Figure 5.20. In this example, a .5 second
time delay was added to the example in Figure 5.18. When the local or
remote fault bit goes ON, the timer starts. Only after the .5 second time
delay is the start bit turned on again to initiate an automatic retry of the
command.
531
Chapter 5
Programming the Local Host
Figure 5.20
Retry Delay
Rung 1
Input
111
Compare
011
/
11
11
Input
Compare
011
111
/
11
11
Transition
020
L
00
Rung 2
Compare
011
Input
111
11
Rung 3
Transi
tion
020
Timeout Done
035
032
/
00
15
02
Rung 4
Local
Remote
Fault
Fault
033
033
/
/
02
12
Rung 5
Done
032
02
11
Start
032
12
035
TOF
0.1
PR 050
AC 000
Transition
020
U
00
Monitoring Remote/Local Fault Bit
When it cannot execute a command, the PLC-2/DHII interface sets a
remote or local fault bit ON. These bits, in the data table of the local host
processor, are located in the word immediately following the start/done
word. They indicate not only that a command was not executed, but also
point to the general type of fault condition which prevented command
completion.
532
Chapter 5
Programming the Local Host
The ladder-diagram program must monitor the remote and local fault bits
for each command. The recommendations that follow concern two
methods for monitoring fault bits and using these bits to signal a fault
condition.
Diagnostic Fault Rungs
The purpose of remote/local fault bit monitoring is to control one or more
output indicators to signal a fault condition. Fault indicators controlled
for this purpose may be as simple as an annunciator or as complex as a
printer or CRT terminal used to display a fault message. By controlling
the fault indicator device, the user program can alert personnel to the
nature and location of a fault condition.
To monitor the remote and local fault bits, the programmer must
understand their timing relationship to the corresponding start bit.
Figure 5.15 summarizes this relationship.
The discussion “Controlling the Start Bit” showed how you can program
the fault bits to unlatch the start bit in a fault situation and thus provide
automatic retries through the program. When used in this manner,
however, a fault bit will be rapidly cycled ON and OFF if a fault is
detected. Because the fault bit can be constantly changing state at a rapid
rate, the program must use some method of detecting this transient state of
any fault bit and controlling the output device based on this state.
Figure 5.21 shows a simple method for the control of a fault indicator.
Here, either the remote or local fault bit can turn on the output indicator.
The indicator remains ON until the done bit is energized. This then
unlatches the output indicator in the second rung. This example allows
for the transience of the fault bits, since the first rung need only be true
once for the output indicator to be latched.
The method of Figure 5.21 can be extended to monitor multiple
commands from a node, controlling multiple output indicators as
necessary. However, where more than one command is sent from a node,
the use of multiple output indicators may not be practical. In this
instance, a single output indicator can be used to signal all remote or local
fault conditions for commands from that node. Figure 5.22 shows a
method for fault indicator control assuming multiple commands.
Figure 5.21
Fault Bit Diagnostic Rungs (Single Command Example)
533
Chapter 5
Programming the Local Host
Remote Fault
033
10
Local Fault
033
00
Output
Indicator
010
L
00
Output
Indicator
010
U
00
Done
032
00
This example shows the fault bit monitoring for as many as eight
commands. The eight remote fault bits and the eight local fault bits reside
in Word 033. In Rung 1, the status of the fault bits is compared to the
constant zero. The comparison controls an OFF-delay timer. The
OFF-delay timer begins to time when all the fault bits go OFF after one or
more has been ON.
Bit 03015, the timed bit of the timer, controls the output indicator. As
soon as a fault bit goes ON, this bit goes ON, thereby turning on the
indicator. Once ON, the indicator remains on as long as the timer is
timing; that is, for at least as long as the preset interval. In the example of
Figure 5.22, this preset is two seconds. We recommend this value be set
at no less than 0.5 seconds.
Figure 5.22
Fault Bit Diagnostic Rungs (Multiple Commands Example)
Rung 1
Constant
040
G
000
Rung 2
Timed Bit
030
15
534
Fault
Status
033
<
000
030
TOF
0.1
PR 020
AC 000
Output
Indicator
010
00
Chapter 5
Programming the Local Host
The OFF-delay timer is useful in this application because it is continually
reset when its rung conditions go true. This means that the timed bit,
Bit 03015, remains on for a long as any fault bit is changing state during
programmed retries. This keeps the output indicator on until after the
done bit indicates command completion.
Of course, other methods can be used to monitor remote and local fault
bits. Such factors as availability of output terminals, memory space, and
type of application dictate the specifics of fault bit monitoring and
program response.
Synchronizing Fault Bits
As noted earlier, the PLC-2 DHII interface’s scan and its control of the
fault and done bits is asynchronous to the PLC processor’s scan and its
control of the start bits.
In the examples discussed so far, as in most applications, this lack of
synchronization does not present any problems. However, you may want
to use the program to count the number of times a fault bit turns on and/or
to store the error code each time a fault bit turns on. Because of the
asynchronous relationship, you may not be able to do these types of
functions accurately by examining fault bits directly.
Instead of examining the fault bits directly, use a GET/PUT rung at the
beginning of the program to copy the fault word into another word. You
can then examine the corresponding bits of the other word any time
during the program scan to determine the status of the fault bits as copied
at the beginning of the program scan. Even though the PLC-2/DHII
interface may change the state of fault bits in the middle of a program
scan, the status of the bits in the copy word will not change until the start
of the next program scan.
Timeout Preset Value
In addition to its remote/local fault bit control, you can have a timer for
both supervisory/time-critical, or a separate time for supervisory and
time-critical. The second timeout (time-critical) preset is entered after the
first (supervisory timer) by using another GET instruction in the header
rung. By this, the KP2 provides two automatic timers for monitoring
command completion. While they function automatically during
PLC-2/DHII interface operation, these timers use a preset value entered in
the ladder-diagram program. This feature enables the PLC-2/DHII
535
Chapter 5
Programming the Local Host
interface to monitor command execution time without using timer (TON)
instructions in the program.
Figure 5.23 shows the significance of the timeout preset interval. From
the time the start bit is set ON, the PLC-2/DHII interface must set either a
done bit or a remote or local fault bit within the timeout preset interval.
Should the PLC-2/DHII interface detect no done or fault bit response
within the preset interval, a fault is assumed. As a response to this type of
timeout situation, the PLC-2/DHII interface turns on the local fault bit and
enters the values B8 or 37 in the lower byte of the error word defined by
the header rung.
Figure 5.23
Timeout Preset Significance
Header Rung
(Representation)
G
XBF
Code BF" Entered
if Timeout Occurs
Start Bit ON
OFF
Done Bit ON
OFF
Code
QQQ
G
G
Optional GET
L
Time Preset Interval Within This Period
Done or Fault Bit Expected
ÉÉÉÉÉÉÉÉÉÉÉÉÉÉÉ
ÉÉÉÉÉÉÉÉÉÉÉÉÉÉÉ
ÉÉÉÉÉÉÉÉÉÉÉÉÉÉÉ
Remote ON
Fault Bit OFF
Local
ON
Fault Bit OFF
Local Fault Bit
Set if Timeout Occurs
ÉÉÉÉ
ÉÉÉÉ
Time
Timeout preset monitoring is intended as a backup for the other
communication monitoring functions of the PLC-2/DHII interface. It is
designed to signal any condition where the PLC-2/DHII interface has not
completed its communication with another node or detected some fault
condition within a short time. Because this timer is primarily intended as
a backup for some local fault type of situation, its preset value is not
critical.
536
Chapter 5
Programming the Local Host
Programming Preset Code
You enter the timeout preset code in the header rung of the
communication zone of program. The address field of the second GET
instruction (and the optional third GET for a time-critical timeout) in this
rung is used for the timeout preset code. Figure 5.23 shows the position
of this rung element.
The address in a GET instruction is an octal number. Because only octal
values can be entered for this address, the timeout preset value is a code
that you must compute as outlined in this section.
The timeout preset is not a critical value. For most applications, a
5-second preset is acceptable. The code for this timeout preset is 022.
This code is used in all header rungs shown in this publication. However,
there may be instances where another timeout preset interval is desired.
Table 5.B lists the 3-digit codes for intervals from .5 to 5 seconds. The
tolerance of this timer is plus 0 and minus 1/2 second.
A timeout preset code of 010 disables the timeout for those commands.
That means that in case of an error, the done and fault bits will never be
set. With any other code, the done or fault bit will be set within the
specified timeout.
Table 5.B
Timeout Preset Codes
Timeout Interval (Sec.)
Message won't timeout. It
waits indefinitely for a reply.
Code
010
.5
011
1.0
012
1.5
013
2.0
014
2.5
015
3.0
016
3.5
017
4.0
020
4.5
021
5.0
022
537
Chapter 5
Programming the Local Host
If it is necessary to use some value other than those provided in Table 5.B,
compute the 3-digit timeout preset code with the following steps:
1.
Select a timeout preset interval. This interval must be larger than
1/2 second at intervals of 1/2 second. For the purpose of computing
the code, label this number S.
Example:
2.
Desired Interval = 4.5 = S
Compute a decimal number using the desired interval of Step 1 in the
following formula:
(S * 2) + 8
Example:
3.
(4.5 * 2) + 8 = 9 + 8 = 17
Convert this value to an octal value.
Example:
1710 = 218
For a description of decimal-to-octal conversion, refer to the
Programming and Operation Manual of the controller being used.
User-Programmed Timeout
The automatic timeout of the PLC-2/DHII interface is a backup function.
This automatic monitoring routine continuously checks PLC-2/DHII
interface interaction with other nodes, timing the execution of commands.
This automatic timeout does not check PLC-2/DHII interface
communication with its host processor. For a backup check on
interface/host communication, you might use an optionally programmed
ON-delay timer instruction (TON).
With proper interface/host communication, the PLC-2/DHII interface sets
either a done bit or a remote or local fault bit as a response to a command.
However, in the event of faulted interface/host communication or faulted
PLC-2/DHII interface operation, a response bit might not be set. Instead,
the start bit would remain on in this instance until the fault situation was
corrected. You can use several programming methods to detect such a
condition; the simplest of these methods uses an ON-delay timer.
Figure 5.24 shows typical rungs that you can program for this purpose.
538
Chapter 5
Programming the Local Host
Figure 5.24
Typical UserProgrammed Timeout
Start
032
12
Timed Bit
060
15
Done
032
/
02
Remote Fault
032
/
12
Local Fault
033
/
02
060
TON
0.1
PR 100
AC 000
Output
Indicator
010
02
In the first rung of this figure, Timer 060 times the interval between the
setting of the start bit for a command and the done, local fault, or remote
fault response of the PLC-2/DHII interface. If no response is received
within the preset interval of this timer, here 10 seconds, a fault may be
indicated and Bit 06015 is set ON. The second rung examines this bit to
turn on an annunciator. Depending on the individual application, you
could also use this bit to enable or disable various parts of the program.
The preset value of this programmed TON instruction is not critical. For
this type of backup monitoring, the programmed preset must exceed the
timeout preset interval entered as a code in the header rung. (Remember
that the automatic timeout of the PLC-2/DHII interface gives a local fault
response to a command which would indicate normal interface/host
communication, but faulted communication with some other node.)
As with automatic timeout preset monitoring, a user-programmed timeout
is useful as a backup to the other monitoring functions of the PLC-2/DHII
interface. Remote and local fault bits at other nodes indicate the same
types of faults that can be detected using a user-programmed timeout. A
programmed timeout would not be necessary for each command from a
node. Instead, you can monitor a single command at each node in this
manner. For this type of monitoring, select a command that is sent
regularly.
539
Chapter 5
Programming the Local Host
There may be other instances where program monitoring of commands is
useful. In some cases, you might program a timeout to monitor the
execution time of critical commands. An application may require that a
time-critical message, such as a command to read an immediate-access
block, be sent within a certain limited amount of time. You can program a
TON instruction for this purpose; here, however, its preset interval will
generally be shorter than the interval entered as the timeout preset for the
module. You can also use the second timeout allowed in the header rung
with a smaller timeout preset to more closely control your time-critical
commands.
Memory Access Limitations
Before transmitting write commands to a remote node, you should
become aware of what areas of that node’s data table is accessible to you.
This information is available either in the programming manual for that
processor or the manual for its node interface. Further general memory
access limitations are discussed in the following sections.
Memory Access Rungs
A remote node may have memory access rungs, giving memory access of
parts of its data table to certain nodes. If your address is not specified in
the remote communication zone, your protected write commands will be
rejected.
Writes Switch Disabled
A node interface will not accept writes to its data table unless it has a
switch set to the proper position to accept writes to its data table.
Write Bit Access
You can use a write bit command to control any accessible data table bit.
However, do not use this to control:
Any bit whose status is controlled by an output instruction in the
ladder-diagram program.
Any bit in a byte which also contains program bits in the PLC-2 family
processor.
The first restriction simply states that you must not attempt to directly
control a bit by both an output instruction in the local ladder-diagram
program and a write bit command from a remote node. This rule applies
to all PLC processors.
540
Chapter 5
Programming the Local Host
Write bit commands are generally used to set storage bits in the data table
of a remote node. These storage bits can then be examined in the program
as conditions to energize an output bit. This indirect programming
technique not only allows control using write bit commands, but also
helps to prevent the confusion that can result if you attempt to control a
bit directly from both an output energize instruction and a write bit
command.
Figure 5.25 gives an example of an indirect programming technique used
to control Bit 01001. Here Storage Bit 12104 is controlled by a write bit
command. This bit is then examined by the program to control the status
of Bit 01001. Note that Output Bit 01001 cannot be directly addressed by
the write bit command. However, by controlling the storage bit and
examining that storage bit in the program, the desired effect is achieved.
Figure 5.25
Storage Bit Control Use (Example)
(A) Original Rung
Input
111
Control of this output desired.
However, bit already addressed by
output instruction.
13
Output
010
01
(B) Recommended Technique
Output
010
Input
111
13
Storage Bit
121
04
01
Control this bit through bit write
command to Control Output 01001.
The second restriction listed here applies to all PLC-2 family processors.
For these processors, when the node interface receives write bit
commands, it manipulates the 8-bit byte of the 16-bit memory word in
which the addressed bit is located. This may be the low byte (containing
Bits 00-07) or the high byte (containing Bits 10-17). Should program
instructions control other bits within the same byte, there is a remote
possibility that the PLC-2/DHII interface may write over programmed
status for those program-controlled bits. This would occur only if the
program altered the state of a bit while the PLC-2/DHII interface was
executing a received write bit command.
541
Chapter 5
Programming the Local Host
Therefore, when using the write bit command, address only bits within a
byte which are set aside exclusively for control by these commands.
Note that this byte restriction for write bit commands does not apply to
any but the PLC-2 family processors.
Chapter Summary
542
After you have generated a program at each host to communicate with the
other nodes, you can begin to start up and operate the Data Highway II
network.
Chapter
6
Operation and Troubleshooting
Chapter Objectives
This chapter provides the following:
A description of the function of each LED indicator and switch on the
front panel for operating the 1779-KP2 interface.
Procedures for operating the 1779-KP2 interface.
Procedures for narrowing down the source of the problem when a
problem occurs within the local node.
Procedures for replacing a faulty board in the 1779-KP2 interface.
Indicators
The 1779-KP2 interface has 21 LED indicators on its front panel. The
1779-KP2R interface has the same indicators plus the redundant-warning
indicator and the port-ready, signal-quality, and tap-fail indicators for the
redundant port. These indicators provide you with the following
diagnostic information (Figure 6.1).
61
Chapter 6
Operation and Troubleshooting
Figure 6.1
KP2 Front Panel
NODE PASS
HOST FAULT
NODE TEST
MAC FAULT
MAC TEST
TEST
RUN
RESET
MSD
SAT
ACTIVITY
NORM
PROGRAM
INTERFACE
ACTIVE
COMM ERR
LINK
ADDRESS
EXIT
COMPLETE
PROCESSOR PROG. ERR
PROC. ERR
EXIT
REQUEST
G IN RING
Y SEEKING MEM
DUP ADDR
REDUN WARN
PORT READY
SIG QUAL
TAP FAIL
DATA
HWY II
PORT
2
PORT READY
SIG QUAL
TAP FAIL
DC POWER ON
AC POWER ON
DH II
AUX
ACCESS
ON
AC POWER
OFF
PROGRAM
INTERFACE
EXTENDED
TAP
CONFIG
PROCESSOR
DATA
HWY II
PORT
SLOW BLOW
2A, 250V
FUSE
115V AC/230V AC
INTERNALLY
SWITCH
SELECTABLE
L1
L2/N
GND
DATA
HWY II
PORT
2
CAT. NO. 1779-KP2 DHII/PLC-2 INTERFACE
62
Chapter 6
Operation and Troubleshooting
When This Indicator:
Is:
Then:
NODE PASS
On Green
The host and MAC boards performed and passed selfdiagnostic tests.
HOST FAULT
On Red
The host board has either: (1) failed the selfdiagnostic test or (2) faulted while in
operation.
NODE TEST
On Yellow
The host and MAC boards are performing selfdiagnostic tests.
ACTIVITY SAT
On Yellow
The node has reached the peak of its ability to process messages.
ACTIVITY NORMAL
On Green
These three indicators show the relative amount of processing taking place at the
interface. If all three indicators are on, the amount of processing is high; if just one
indicator is on, the amount of processing is low.
ACTIVE
On Green
This program interface active light is green when communication path is OK, and sending
and receiving from Industrial Terminal programming device is normal.
COMM ERROR
On Red
A program interface communication error exists. The Industrial Terminal has broken
communication to resynchronize.
PROG ERR
On Red
There is a processor program errorno communication zone, or an error exists in the
communication rung.
PROC ERR
On Red
This indicates a processor error. The PLC2 has interrupted communication to
resynchronize.
MAC FAULT
On Yellow
The MAC board has: (1) failed the selfdiagnostic test, (2) faulted while in operation, or (3)
a duplicate address exists.
MAC TEST
On Yellow
The MAC board is performing a selfdiagnostic test.
EXIT COMPLETE
On Yellow
This node has left the logical ring of the Data Highway II link.
INRING
On Green
This node is a member of the logical ring on the Data Highway II link.
SEEKING MEM
On Yellow
This node is trying to become a member of the logical ring or trying to build a logical ring
in the case that a ring does not already exist.
OFF
This node is not a member of a logical ring and is not seeking membership.
DUP ADDR
On Red
Another node has the same address on the Data Highway II link. This condition also
places this node into the disconnect state and turns on the MAC FAULT indicator.
REDUN WARN
On Yellow
A valid signal is being received at only one of the two Data Highway II ports.
This indicator is only on the redundant interface.
PORT READY
On Green
The onboard relay connecting the MAC board to the dropline is closed.
SIG QUAL
On Green
A valid signal is being received at this Data Highway II port.
TAP FAIL
On Red
The extended tap has failed or its dropline connection to the port has opened.
This indicator can only go on if the switch on the MAC board is set for extended
tap.
EXTENDED TAP CONFIG
On Yellow
The switch on the MAC board is set for the interface to connect to an extended tap.
AC POWER ON
On Yellow
The interface is receiving AC power through the fuse and the AC power switch.
DC POWER ON
On Green
The powersupply board is generating DC power at an acceptable level.
63
Chapter 6
Operation and Troubleshooting
Operation Switches
The interface has three switches on its front panel for you to use in
operating the interface (Figure 6.1).
AC POWER Switch
EXIT REQUEST Switch
TEST/RUN/RESET Switch
AC Power Switch
The AC POWER switch is a toggle switch. In the on position, this switch
connects power from the input power terminals, through the fuse, to the
power-supply circuits. With the proper voltage level of AC power
connected to the power-supply circuits through the AC POWER switch,
the interface turns on the AC POWER ON indicator.
Exit Request Switch
The EXIT REQUEST switch is a push-button switch. When you press
this switch, the interface sends out a signal to the other nodes of the Data
Highway II link that it no longer wants to be included in the logical ring.
After accomplishing this exit, the interface turns on the EXIT
COMPLETE indicator. From then on until the interface is reset, the other
nodes will not attempt to pass on the token to this node. Press the EXIT
REQUEST switch before turning off interface power or switching out of
the RUN position. If you don’t press this switch before turning off
interface power or switching out of the RUN mode, the other nodes in the
ring will waste time trying to pass the token to this node for a while
before giving up.
TEST/RUN/RESETSwitch
The TEST/RUN/RESET switch is a three-position toggle switch that
controls the operation mode of the interface. TEST and RUN are
stationary contact positions. RESET is a momentary contact position.
To change switch position, you must first pull out on the switch handle.
This feature guards against switching out of the RUN position
inadvertently.
To switch to the TEST position, first switch to RESET momentarily. In
the TEST position, the interface continuously executes self-diagnostic
tests. Each test cycle lasts approximately 50 seconds. During these tests,
the NODE TEST and MAC TEST indicators turn on and the
IN-RING/SEEKING-MEM and DUP ADDR indicators flash rapidly.
64
Chapter 6
Operation and Troubleshooting
In the RUN position, the interface can communicate with other nodes of
the Data Highway II link. When you power up the interface in the RUN
position, it first goes through a reset cycle and a 15-second self-diagnostic
test cycle before seeking membership in a logical ring on the Data
Highway II link. Because each of the other switch positions causes the
interface to reset, the node seeks membership in a logical ring when you
switch into the RUN position.
In the momentary RESET position, the interface goes through a reset
cycle and a 15-second self-diagnostic test cycle. If this node is not in a
logical ring (because you pressed the EXIT REQUEST switch), resetting
the interface causes it to seek membership in the logical ring again.
Operating the KP2 Interface
After installing the 1779-KP2 interface as we described in Chapter 4,
switch to the TEST position before you power up the interface for the first
time. This provides the most extensive test cycle to ensure that the
interface is operating properly before you attempt to communicate
through it. Each test cycle takes approximately 50 seconds. If you leave
the switch in the TEST position, the interface will continuously execute
the test cycle. Leave the switch in the TEST position at least 15 seconds.
When you switch to the RUN position, the interface will continue through
the end of the current test cycle; if no faults are detected, the NODE PASS
indicator turns on green. At this point the interface is in the RUN
position. In the RUN position:
Initially, the PORT-READY indicator turns green and the
IN-RING/SEEKING-MEM indicator turns yellow to indicate that this
node is seeking membership.
If another node interface is connected in the Data Highway II link in
the RUN position, the SIG QUAL indicator turns green and then the
IN-RING/SEEKING-MEM indicator turns from yellow to green to
indicate that this node is now logically in a ring and receiving a token
periodically.
If there is a cabling problem or no other node interface is in the RUN
position, every ten seconds the MAC board goes through a one-second
self-diagnostic test. This is indicated by the MAC TEST indicator
turning yellow and the IN-RING/SEEKING-MEM and REDUN
WARN indicators flashing rapidly.
If another node on the link has the same address, the DUP ADDR
indicator on either this node, the other node, or both, will turn red.
Exactly which will occur cannot be determined because of the random
position of the token.
65
Chapter 6
Operation and Troubleshooting
Whenever you want to turn off interface power or switch out of the RUN
position, press the EXIT REQUEST switch first. This exit request saves
the other nodes time they would otherwise waste trying to pass the token
to a node that they can’t find.
Replacing Boards
If you determine through the troubleshooting procedure that one of the
interface boards has faulted, replace it with a spare.
Electrostatic discharge can damage integrated circuits or other
semiconductors in these boards if you touch connectors or pins. Avoid
electrostatic damage by observing the following precautions:
1.
Press the EXIT REQUEST switch.
2.
When the EXIT COMPLETE indicator goes on, turn off the AC
POWER switch.
3.
Disconnect the AC power at the source (disconnect switch or circuit
breaker).
WARNING: Always disconnect AC power at the source before
attempting to remove connections at the interface power
terminals. If you fail to heed this warning, you will receive an
electrical shock from touching the terminals.
66
4.
Remove the AC power connections from L1 and L2/N and the
ground connection from the GND post on the interface.
5.
Disconnect the green conductor that grounds the stationary frame to
the ground post on the removable frame (Figure 6.2).
Chapter 6
Operation and Troubleshooting
Figure 6.2
Green Conductor Connecting the Stationary Frame to the Ground Post on the Removable
Frame
115V AC/230V AC
INTERNALLY
SWITCH
SELECTABLE
L1
L2/N
GND
Green Grounding
Conductor
6.
Disconnect the cables from the front of the interface.
7.
Loosen the four thumbscrews on the front of interface.
8.
While holding the removable frame at the top and bottom, slide it out
to the switch-setting position, then lift it up an inch and then out
away from the stationary frame.
9.
Locate the ribbon cables that connect the boards at the back
(Figure 6.3).
67
Chapter 6
Operation and Troubleshooting
Figure 6.3
Rear View of the Removable Frame Assembly
3M NO. 3394
3M NO. 3394
Shield
Ribbon
Cables
Power
Supply
Board
MAC
Board
Host
Board
12617A
10. On the top two ribbon-cable connectors, locate the levers for locking
and ejecting the connectors (Figure 6.4).
68
Chapter 6
Operation and Troubleshooting
Figure 6.4
Locking/Ejecting Levers on Connectors
Levers
11. Push the lever apart with your thumbs to eject the cable from the
connector on the board.
12. Remove all three ribbon cables.
CAUTION: Electrostatic discharge can damage circuit board
components. To help prevent damage to circuit board
components, always transport circuit boards in anti-static
material. When installing or removing circuit boards, observe
all precautions to help prevent electrostatic damage.
69
Chapter 6
Operation and Troubleshooting
13. Remove five screws to remove the power-supply board.
14. Remove five screws to remove the host board.
15. Remove power-supply and host-board screws to remove the MAC
board.
16. With the screws removed, you can slide the faulted board straight out
the back of the removable frame.
17. Replace the faulted board with a spare.
18. Replace the mounting screws.
19. Reconnect the three ribbon cables to the back of the boards.
CAUTION: Do not misalign the pins when you connect the
bottom ribbon cable (Figure 6.5). Failure to heed this caution
could cause damage to the boards.
20. Slide the removable frame back onto the stationary frame.
21. Tighten the four thumbscrews on the front of the interface. The
thumbscrews must be tight to ensure that AC power is not
interrupted by the interlock switch on the power-supply board.
22. Reconnect the cables to the front of the interface.
23. Reconnect the green conductor for grounding the stationary frame to
the ground post on the removable frame (Figure 6.2).
24. With AC power disconnected at the source (disconnect switch or
circuit breaker). Reconnect the AC power connection to L1 and
L2/N, and the ground connection to the GND post on the interface.
25. Reconnect the AC power at the source.
610
Figure 6.5
Misalignment of Pins on Bottom RibbonCable Connector
Chapter 6
Operation and Troubleshooting
Troubleshooting the Interface
When you suspect that the interface is not functioning properly, follow
these steps (Figure 6.6).
1.
Check the AC POWER ON indicator.
OFF — If off, check the AC POWER switch setting, fuse, AC
source voltage, and interlock switch. If you still haven’t found the
source of the problem, try replacing the power-supply board.
ON — If on, proceed to Step 2.
2.
Check the DC POWER ON indicator.
611
Chapter 6
Operation and Troubleshooting
OFF — If off, turn the AC POWER switch off, wait 20 seconds and
turn the AC POWER switch on. If still off, try replacing each of the
three boards until you find the faulted one.
ON — If on, press EXIT REQUEST; switch to RESET
momentarily and then to run; then proceed to Step 3.
3.
Check the HOST FAULT indicator.
ON — If on, replace the host board.
OFF — If off, proceed to Step 4.
4.
Check the MAC FAULT indicator.
ON — If on, replace the MAC board.
OFF — If off, proceed to Step 5.
5.
Check the DUP ADDR indicator.
ON — If on, press EXIT REQUEST; set a unique link address for
the node; then switch to RESET momentarily and then to RUN.
OFF — If off, proceed to Step 6.
6.
Check the IN-RING/SEEKING-MEM indicator.
YEL — If yellow, check the cabling on the Data Highway II link.
GR — If green, check the cabling to the host device.
612
Chapter 6
Operation and Troubleshooting
Figure 6.6
Troubleshooting Flowchart
Problem
Suspected
Step 1
AC
POWER
ON
OFF
Check:
AC POWER Switch
Fuse
AC Power Source
Interlock Switch
Power-Supply Board
ON
Step 2
DC
POWER
ON
OFF
ON
Set the AC power switch to
OFF, wait 20 seconds, then
set the AC power switch to
ON. If the indicator is still OFF,
try replacing each of the three
boards until you find the
faulted one.
Press EXIT REQUEST.
Switch to RESET momentarily
and then to RUN.
Step 3
HOST
FAULT
ON
Replace host board.
OFF
Step 4
MAC
FAULT
ON
Replace MAC board.
OFF
Step 5
DUP
ADDR
ON
Press EXIT REQUEST.
Set unique link address.
Yellow
Check cabling on Data
Highway II link.
OFF
Step 6
IN-RING/
SEEKING
MEM
Green
Communication on Data
Highway II link OK. Check
cabling to the host device.
613
Chapter 6
Operation and Troubleshooting
Error Codes
You’ll find a complete list of error codes in Appendix B of this manual.
Chapter Summary
In this chapter, we gave you information about individual indicators and
switches, as well as procedures for using them to operate the interface.
We also provided procedures for troubleshooting and for replacing faulty
boards.
614
Appendix
A
Specifications
Specifications
Function
Interfaces a PLC-2 programmable controller with Data Highway II
Installation
Standalone Mounting with Independent Power Supply
Program Panel Interconnect Cable (Cat. No. 1772-TC)
Data Highway Processor Cable (Cat. No. 1771-CR)
Communication Rate
1 megabit per second over Data Highway II
Cabling
RG-11-Type Coaxial Cable for Data Highway II (See
Publication 1779-6.3.1)
Option for Data Highway II Cabling Redundancy
Power Requirements
1.5A @ 115V AC; 0.75A @ 230V AC; 47-63 Hz
Programming
Ladder Diagram Symbols
Ambient Temperature
Operation: 0oC to 60oC (32oF to 140oF)
Storage: -40oC to 85oC (-40oF to 185oF)
Humidity Rating
5% to 95% without Condensation
A1
Appendix
B
Error Codes
Chapter Objectives
This appendix lists error codes, grouped according to the error-code type:
Link-Layer Error Codes
Time-Critical Error Codes
Local Errors
Remote Errors
KP2 Prescan Error Codes
Error Codes
Link Layer
Code
Meaning
11
MAC board memory buffer is full at remote interface.
12
Remote interface is offline.
13
Remote interface cannot accept message (possibly wrong mode).
15
Memory buffer is full on host board at remote interface.
1A
Local interface not in logical ring.
1C
Two node interfaces identified by same node address.
1D
Ring has a second token.
1F
Destination node specified is not on the link.
22
Address for destination node is illegal.
26
Data path between MAC and host boards temporarily blocked at local interface.
2E
Message buffer is full in local interface.
2F
Too many messages being sent to the local interface.
FF
Reset of application layer.
FE
TNS value in reply does not match value in command.
FD
Reply came from wrong node.
FC
Remotereply timer or remoteTCreply timer in the local interface timed out.
FB
Link field value not legal.
FA
Link field value not legal.
F9
Illegal SEL field value.
F8
Remote interface set to wrong communication mode for this type of message.
F7
User field value not proper (1 or 2) for selecting a KFL channel.
B1
Appendix B
Error Codes
TimeCritical
Code
Meaning
B1
B2
B3
Host device at remote node has faulted.
Memory address specified doesn't exist in host device at remote node.
Data in write command is larger than area assigned or data in read command
is smaller than amount requested.
Data table in host device at remote node cannot be written to or read from.
Area of memory in host device at remote node cannot be written to or read from.
Memory address not specified or invalid.
Field is missing from message packet.
Timer timed out before message was executed.
Host device at remote node is in the wrong mode to receive commands.
Size parameter in timecritical command too large and exceeds maximum read.
Read/modify/write words command exceeds number of words you can
read/modify/write.
Read immediate mismtach.
B4
B5
B6
B7
B8
B9
BA
BB
BC
Local Errors
Code
32
33
34
35
36
37
Meaning
Cannot guarantee delivery of message. Link layer time out or received.
Duplicate token holder detected by link layer.
Local port is disconnected.
Attempt to send invalid command.
Bad source link address in response.
Message timeout execution time exceeds timeout preset value.
Remote Errors
Code
81
82
83
84
85
86
87
88
89
BB
92
B2
Meaning
Illegal command.
Station processor communication problem.
Remote station processor faulted or OFF.
I/O fault at remote station processor.
Command transmitted not allowed by switchsetting or memory access rung
programming at remote station.
Command transmitted not allowed by switch setting at remote station.
Remote station processor in program or program load mode.
Communication zone invalid at remote station processor.
Remote station communication adapter module unable to buffer received
command in memory.
Remote station is in download mode, or error in download command, or
operation not allowed in upload or download mode.
Destination station fails to respond.
Appendix B
Error Codes
KP2 Prescan Error Codes
Code
Meaning
00
Message transmission successful.
01
PC not responding.
D2
Switched back to program mode.
D4
Meaningless rung in communication zone.
D5
Program ends before a delimiter rung is found.
D6
Block number in update command missing.
D7
Too many rungs in communication zone (either highwater or number of rungs
exceeds 255).
D8
Own link address expected in update command.
D9
Too many read or write block rungs, over 200.
DA
Fault bits in nondata table region.
DB
Start bit not Bits 1017.
DC
Unrecognized instruction after start bit.
DD
GET (for remote address) expected.
DE
GET for start address expected.
DF
GET for end address expected.
E0
Start address > end address.
E1
No XIC or XIO instructions in bit write command.
E2
Too many bit addresses.
E3
Too many bit write rungs, over 50.
E4
Unexpected data after a valid command.
E5
Same start bit used twice.
E6
Too much for timecritical to send.
E7
Too big for supervisory.
E8
User dropped start bit before processing done.
E9
Tried to use reserved code.
EA
Link specified in a timecritical command.
EB
Too many timecritical rungs, maximum is 30.
EC
Invalid node number.
EE
Invalid link ID, either 0 or more than 255.
B3
AllenBradley, a Rockwell Automation Business, has been helping its customers improve pro
ductivity and quality for more than 90 years. We design, manufacture and support a broad range
of automation products worldwide. They include logic processors, power and motion control
devices, operator interfaces, sensors and a variety of software. Rockwell is one of the worlds
leading technology companies.
Worldwide representation.
Argentina • Australia • Austria • Bahrain • Belgium • Brazil • Bulgaria • Canada • Chile • China, PRC • Colombia • Costa Rica • Croatia • Cyprus • Czech Republic •
Denmark • Ecuador • Egypt • El Salvador • Finland • France • Germany • Greece • Guatemala • Honduras • Hong Kong • Hungary • Iceland • India • Indonesia •
Ireland • Israel • Italy • Jamaica • Japan • Jordan • Korea • Kuwait • Lebanon • Malaysia • Mexico • Netherlands • New Zealand • Norway • Pakistan • Peru •
Philippines • Poland • Portugal • Puerto Rico • Qatar • Romania • RussiaCIS • Saudi Arabia • Singapore • Slovakia • Slovenia • South Africa, Republic • Spain •
Sweden • Switzerland • Taiwan • Thailand • Turkey • United Arab Emirates • United Kingdom • United States • Uruguay • Venezuela • Yugoslavia
AllenBradley Headquarters, 1201 South Second Street, Milwaukee, WI 53204 USA, Tel: (1) 414 3822000 Fax: (1) 414 3824444
Publication 1779-6.5.3 - January, 1987
Publication 1779-6.5.3 - January, 1987
PN 955100-47
Copyright 1987 AllenBradley Company, Inc. Printed in USA