1
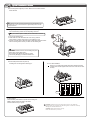
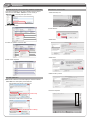
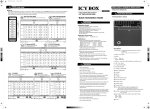
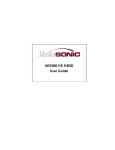
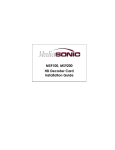
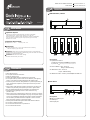
Please visit our website for manual
Online forum
STEP
2
http://www.mediasonic.ca
http://forum.mediasonic.ca/
Overview
LED Indication / Button
USB 3.0 Super Speed
e-SATA
Quick Installation Guide
STEP
1
2
Version 1.0
Brief Notes
1
Operation System
Windows XP / Windows Vista(32bit/64bit) / Windows 7(32bit/64bit)
(under MBR partition, supports single capacity up to 2TB only)
Windows XP (64bit) / Windows Vista (32bit/64bit) / Windows 7(32bit/64bit)
(with GPT partition enabled, supports single capacity higher than 2TB)
Macintosh 10.7 or later
Operation Environment
Temperature 0 ~ 40 °C
Humidity 5~95 % RH
References
1. Under Windows Vista / 7, users can enable GPT when initializing
HDD with capacity higher than 2TB.
WARNING: Please must turn off power before insert or eject HDD from
Docking station. Any movement on HDD during power on status can seriously
damage your HDD and all data on it.
WARNING: HDD will be hot after running.
Please be careful when you touch it.
3 4
4 3
3 4
4 3
Descriptions
1. System Power button
It needs to be pressed and held for 3 seconds
to power off. This design prevents accidental power off.
STEP
•
•
•
•
•
•
•
•
•
•
•
•
•
•
2
Reminders
Follow all instructions.
Do not place this device near water.
Clean only with dry cloth.
Install in accordance with the manufacturer’s instructions.
Do not place near any heat sources such as radiators, heat registers,
stoves, or the devices (including amplifiers) that produce heat.
Protect the power cord from being walked on or pinched particularly at
plugs, convenience receptacles, and the point where they exit from
the devices.
Power supply cords should be routed so that they are not likely to be
walked on or pinched by items placed upon them or against them.
Only use attachments/accessories specified by the manufacturer.
Unplug this during lightning storms or when unused for long
periods of time.
Refer all servicing to qualified service personnel. Servicing is required
when the devices has been damaged in any way, such as power-supply
cord or plug is damaged, liquid has been spilled or objects have fallen
into the devices, the devices has been exposed to rain or moisture,
does not operate normally, or has been dropped.
Carefully read and follow the Quick Install Guide and User Manual.
Do not drop or shake the device.
Do not move the device when it is powered on.
Do not overload wall outlets.
2. Power indicator : Blue : Power on
Orange : HDD Accessing
3. HDD Status : Blue : Power on
Purple : HDD Accessing
4. HDD Power button : Press to power ON/OFF the HDD slot.
Rear Panel
1
Descriptions
1. USB 3.0 / USB 2.0 port
2. eSATA port
3. DC Input port
2
3
STEP
3
Quick Installation Guide
1. Press Docking station against your desk. Make sure all 4 sucker feet have
fixed on the desk.
The tightness of sucker feet will be affected by the surface material of your
desktop. Place it on a smooth surface like a glass desktop shall receive the
best performance.
2. 1. Plug AC adapter cable into wall plug and device inlet. Plug DATA cable
into PC and Docking station with corresponding connector.
Only one interface (USB or eSATA) can be functioned at one time.
2. Turn on the system power.
3. Please make sure the HDD status LED is off. If not, press the
power bottom to power off the slot you are prepaning to use.
4. Position your HDD with its back side (motor side) faces toward the “back”
mark on Docking station. Insert your HDD into the loading slot.
PC
1
4
3
WARNING: Please must turn off the loading slot power
before insert or eject HDD from it.
Any movement on HDD during power on status
can seriously damage your HDD and all data on it.
2
3. Press the HDD power button to power up
the loading slot on Docking station and enjoy it.
For 2.5" HDD installation
1. Position your 2.5” HDD with its back side (motor side) faces toward
the “back” mark and lean against lower left corner of the slot to insert
it correctly.
HDD
BACK
For HDD ejection
1.Press the HDD power button to power off the loading slot.
2.Wait at least 5 seconds for HDD to spin down.
3.Pull the HDD from top to eject it.
WARNING: Please must turn off power before insert or eject HDD from
Docking station. Any movement on HDD during power on status can seriously
damage your HDD and all data on it.
WARNING: HDD will be hot after running.
Please be careful when you touch it.
STEP
4
Initialization
Windows XP (64 bit) / Vista (32/64 bit) / Windows 7 (32/64 bit)
If the HDD is uninitialized, you may have to initialize it by doing steps as
followed: At first click “Start” “Execute” at your PC and key in
“diskmgmt. msc”. After that please press “OK” key.
Macintosh O.S. 10.6.6 or later
1. Click Disk Utility icon.
1. Start disk initialization.
2. HDD initialize...
3. Click Erase
2. Create new partition and format disk.
4. Click Erase
3. HDD format completed
5. HDD format in process
Start disk initialization.
Note: Please enable GPT if the total capacity is more than 2TB and
enable MBR if the total capacity is less than 2TB.
Activate MBR if total volume is less than 2TB
6. Format completed
MBR (Master Boot Record)
Activate GPT if total volume is more than 2TB
GPT (GUID Partition Table)
Trouble Shooting
NTFS has volume size limit based on different cluster size setting.
We suggest user to set cluster size as 64K when formatting a disk volume over 2TB.
For more information, please check Microsoft Support (http://support.microsoft.com/kb/302873).