1
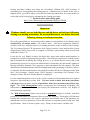
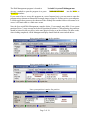
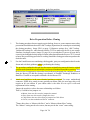
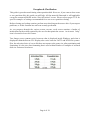
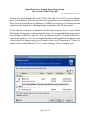
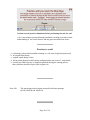
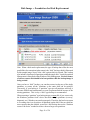
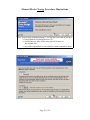
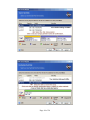
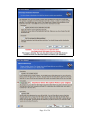
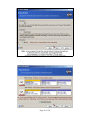
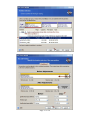
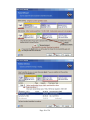
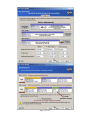
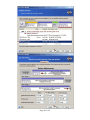
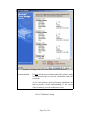
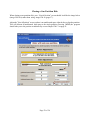
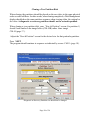
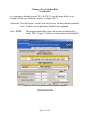
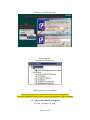
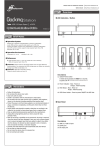
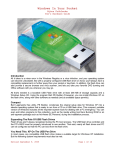
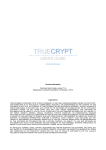
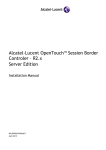
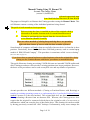
Manual Cloning Using TI Rescue CD
Acronis True Image Home
(version 10, build 4942)
with much appreciated input
from MudCrab (Paul Purviance) & from Brian K
The purpose of this pdf is to illustrate the Cloning procedure using the Manual Mode. This
will illustrate custom resizing of the individual partitions being cloned.
This guide is built around two basic premises:
1.
2.
Disk receiving the clone is installed in place of the original which is
relocated to an another location such as external/internal/network.
Cloning be performed when booted from the Acronis Rescue CD
or its substitute (BartPE/VistaPE).
There are other methods of cloning but practicing these two premises
offers the best chance of success with the least number of issues.
Some brands of computers will only clone successfully when new drive is cloned in its boot
position. Particularly, those drives which have 240 head geometry–such as certain laptop
models of IBM, HP and Compaq”. This procedure is sometimes called “reverse cloning”.
(See Note-240 on page 10.)
( If you do not have an external enclosure or other location to relocate the original drive during
cloning, use the “Partition Restore with Resize” procedures as mentioned below.)
This guide illustrates cloning an existing 120GB disk onto an intended 320GB unallocated
disk. Cloning procedures will resize the 3 existing partitions into larger partitions. However,
the basic resize procedures can be used on any disk size and any number of partitions.
Acronis provides two different methods (Cloning or Partition Restore with Resizing) to
transfer an existing operating system to a replacement drive. I prefer the Partition Restore
method* because it is the safer method. The original disk does not have to be connected
when performing a Restore from an alternate disk. Whereas, the Cloning process does
require that the original be connected which places the original at risk of a user error or
malfunction–which can cause the loss of data on the drive. This cloning risk can be avoided
by having previously created full “disk” backups. Unfortunately, many users attempt the
Page 1 of 26
cloning procedure without any safety net of backups. Without full “disk” backups, if
something goes wrong during the cloning process, a data disaster is at hand. If this were to
happen to you, you will be angry at yourself for not having taken those few extra minutes to
create that safety backup before attempting the cloning procedure.
* = Partition restore with resizing guide
http://www.wilderssecurity.com/showthread.php?t=203480
Important
Windows should not see both the new and old drives on first boot following
cloning or a backup restoration. Be sure and disconnect one before first boot
following cloning or backup restoration.
One safety precaution is to assign unique drive names to each partition so its identity can be
confirmed by its unique name-- not its drive letter. This name assignment should be
routinely used and completed prior to a cloning procedure or the creation of any backups.
The True Image Rescue CD determines drive letters based on Linux and the drive letters
displayed may differ from what is assigned by Windows–particularly when viewed from
within the Rescue CD.
It can also be very helpful to know the hard drive mfgr name and/or model number or
partition sizes prior to beginning this procedure. Since the user must select both the source
and destination drives during the cloning process, it is critical that the correct drive and
partitions be selected so as to prevent a data disaster. Sometimes, the disk model number is
the only identifier although drive capacity is often included in the this number. This disk
identification information can usually be found printed on the packaging or the drive. If drive
is mounted, the disk model number can usually be found in the Device Manager under “disk
drive” device listings. Sample image CM-03 on page 14 and image SA-8 on page 26 are
examples of how the drive model number is displayed.
It is also important that the user be aware of the existence of all partitions that exist on their
computer–especially their system disk. The user needs to know how many partitions,
what types (active-primary-logical) of partitions, what sizes and what order before they
begin. The Disk Management feature can provide this information. Hopefully, this
information would not be needed, but having the information could be very helpful if
troubleshooting a problem.
The Disk Management feature can provide a graphical display of all disks and their
partitions (both hidden or diagnostic) that exist on the computer. This display will illustrate
whether the computer has one or more partitions and whether any of the partitions are
manufacturer recovery partitions. Please take the time to acquaint yourself with your disk
specifications. Write it down or print a copy. What you don’t know can hurt you!
Page 2 of 26
The Disk Management program is located at
%windir%\system32\diskmgmt.msc
An easy method to open the program is to paste
DISKMGMT.MSC into the RUN or
SEARCH windows.
If you want to have a access this program on a more frequent basis, you may want to open the
program using a shortcut as illustrated via sample image on page 26. If others access your computer,
I would suggest that you move the shortcut off the desktop into another folder or sub-menu so its
access is less noticeable or a little more secure.
Note the four varied Disk Management examples below. Your example may differ. Your system
partition (Drive C) may or many not be the first partition (Partition 1). When cloning, the partitions
should be placed on the new drive in the same physical order as on the old drive. In other words,
when cloning completed, a Disk Management display should look the same on both drives.
Note system partition is not the first partition.
Note system partition is not the first partition.
Note system partition is not the first partition.
Page 3 of 26
Note system partition is the first partition.
Drive Preparation Before Cloning
1.
The cloning procedure does not require a prior backup; however, some common sense safety
precautions should dictate that a full “disk” backup (all partitions) be created prior to initiating
the cloning procedure. Image GD-1 on page 11 illustrates settings for a “disk” backup.
Validate the backup file when booted from the TI CD to make sure the file is not corrupt.
Simulate a backup & restore (image P1, page 10) to test whether TI can see all your drives
correctly (including the backup image location) when booted from the Rescue CD. You need
to know that your backup procedure is working should the cloning procedure not produce the
desired results.
2.
For dual / multi boot users considering a disk upgrade, post your configuration details on the
forum and seek their guidance prior to performing the cloning.
3.
The procedures outlined in this pdf has the master original being removed from its original
position and relocated into an external drive enclosure or another internal drive position. Once
the drives have been properly relocated as listed in the next paragraph, the computer is booted
from the Rescue CD and the cloning is performed. A bootable TrueImage flashdrive or
BartPE or VistaPE are acceptable substitutes for the Rescue CD.
4.
Attach new hard drive in the same identical position as original. Use same motherboard
connector. If IDE drive, attach in same position on ribbon cable; the new larger drive will
require an 80 wire ribbon. If your ribbon cable is the older 40 wire style it will need
replacement before starting.
Jumper the new drive to have the same relationship as old drive.
That is, if old drive has jumpers set
as Master, then new drive must be jumpered as master*
as Slave, then new drive must be jumpered as slave
as Cable Select, then new drive must be jumpered as Cable Select
as SATA, use same motherboard SATA connector
* Some drives have a “Master with Slave” and a “Master without Slave”setting.
The “Master” setting needs to be correct, but may not be the “exact” same setting.
Page 4 of 26
5.
Once you click on the Proceed button, True Image will write to the new drive. After the
operation has completed successfully, remove the CD.
The computer should be shutdown/turned off and power cord removed or power supply
switched off prior to removing power and disk connection.
Remove the power and remove the connection to the master disk. A duplicate drive needs to
be removed before rebooting. Reminder, two drives containing Windows should NOT be
attached on first boot following cloning.
6.
After disk removal/switching, power up and boot the system normally into Windows. It will
then report it has found new hardware (new hard drive) and needs to reboot. Let the system
reboot back into Windows until it does not detect new hardware. It is at this point or later that
the original disk can be (optionally) reconnected in a new position.
7.
Disk receiving the cloning: With TI it shouldn't matter if the new HD is partitioned or
unallocated space, the clone should work. However, if you want to play it safe, delete any preexisting partitions on the new hard drive. There has been reported instances of pre-used drives
still containing previous partition information causing cloning failures. Be safe. Delete the old
partitions so the disk space is unallocated before beginning the cloning function.
If using the TI “Add disk” function to delete the old partitions and create “unallocated space”,
when you reach the “New Partition” screen, be sure and remove the checkmark from the
“create new partition in unallocated space” option. You are not wanting to create a new
partition–you are wanting to delete those that already exist. Caution: Be careful. Don’t
choose the wrong disk for partition deletion.
Guide=How To Delete Disk Partitions Using TrueImage Home
http://www.wilderssecurity.com/showthread.php?t=213446
8.
The cloning procedures suggested by Acronis can be found in Chapter 13 of the TrueImage
10 user manual and Chapter 14 of the version 11 manual.
9.
If using the trial version of Acronis TrueImage, the clone function is non-functional when
using the trial version Rescue CD.
10.
If one of the partitions being cloned is a diagnostic or recovery partition, retain the same size
and physical position in the new drive as the old drive. Do not resize this type partition.
Page 5 of 26
Exception & Clarification
This guide is geared toward cloning a three partition disk. However, if you want to clone a one
or two partition disk, this guide can still help. All the material illustrated is still applicable
except the content will differ on the “Size & Position” screen. Please refer to pages 23-25 for
specific examples of settings recommended for a one or two partition cloning.
Before cloning or a backup creation, perform error checking on the source drive if you suspect
problems; or if this function has not been recently performed.
As you progress through the various restore screens, each screen contains a header of
instructions on the action required by the user for that particular screen. An Acronis “help”
icon is located in lower left corner.
True Image screen content varies between what is displayed inside Windows and what is
displayed within the Rescue CD. Display also varies between FAT32 and NTFS file systems.
Plus, the advertised size of a new disk does not equate to the same size after partitioning and
formatting. It is the size after formatting that is used within Windows. Examples of assorted
disk size variances listed next.
Page 6 of 26
Special notes for cloning drives that contain
the Acronis Secure Zone (SZ)
By MudCrab (Paul Purviance)
Various tests on cloning the SZ using TI 10 (4,942) and TI 11 (8,053) seem to indicate
that it is cloned intact. The SZ can be left at its original size or resized larger or smaller.
If the Acronis System Recovery Manager- (ASRM) is activated, it too seems to remain
enabled on the cloned drive. Backup images contained in the SZ also remain.
If your only drive backup is contained in the SZ and you want to have a “safe” Entire
Disk Image backup prior to performing the clone, it is recommended that you create a
new backup of the drive and save it to an alternate location (external USB drive,
another internal drive, etc.). It is recommended that you include the SZ partition as part
of the Entire Disk Image backup (you’ll need to check the SZ partition as TI leaves it
unchecked by default and click “Yes” on the warning). Three examples next.
Page 7 of 26
Page 8 of 26
Size & Position Screens
When referring to the Size & Position screens (illustrated below & by images CM10, CM13 and
CM16), remember that the objective is to allocate the space that is needed for the specific partition
being resized and to leave as much unallocated space after the newly resized partition as will be needed
by any remaining partitions. There are two ways of customizing a partition’s size and position:
With mouse: By dragging the partition or its borders with a mouse. If the cursor turns to two
vertical lines with left and right arrows, it is pointed at the partition border and
you can drag it to enlarge or reduce the partition size. If the cursor turns to four
arrows, it is pointed at the partition, so you can move it to the left or right (if
there is unallocated space near it).
Manually:
By entering corresponding values into the appropriate fields . (Unallocated
space before, Partition Size, unallocated space after)
You can play with the sizes of your new partitions as you do several practice clones/restores, but it will
probably be beneficial to have some idea of the sizes you want for your new partitions. One example
might be: Your old drive is 80GB and you have a new 500GB drive. Your first partition is a small
58MB FAT16 diagnostic partition (you want to keep diagnostic or recovery partitions the same size no resize). Your second partition is your Windows C: partition which is 44GB (you want the new C:
partition to be 100GB). Your third partition is your 30GB Data partition (you want it to use all the
remaining space on the new drive). Usually, the unallocated space is zero before each partition and
zero after the last partition. This is illustrated in the next sample image.
Page 9 of 26
Perform several practice simulations before performing the task for real.
A few extra minutes spent performing simulations can help to provide a better
understanding of the correct choices and may prevent troublesome errors.
Practices to avoid
a.
b.
c.
d.
e.
performing actions which prohibit returning to a safe state (original not protected)
no original disk backup
original wiped during a clone
having a dual-booting/ multi-booting configuration but not aware of setup details
resizing any OEM recovery or diagnostic partitions during the cloning process.
these partitions should be kept to their original size.
Note-240:
This much appreciated content extracted from forum postings
by k0lo, Brian K and MudCrab.
Page 10 of 26
Disk Image = Foundation for Disk Replacement
Note: When a disk needs replacement, the type of backup that offers the most
possibilities for restoration/replacement is the “disk” backup which is illustrated
by this sample image. Note it is the “disk’ option which is selected. This backup
type includes a backup of all partitions within the single disk. Your disk-partition
arrangement is illustrated within Windows Disk Management. For best chance
of success, source disk should be in boot position while the backup image is
being created.
Once you have a “disk” backup, you can then restore/overlay any of the single
partitions; or restore all the partitions so the entire disk can be replaced.
Conversely, if your backup is a “partition” type (not all partitions selected), it
becomes difficult and cumbersome to create a replacement disk because of the
missing partitions. This is why a “disk” type backup is recommended.
When restoring a “partition” type backup image to a new disk, if you restore only
the Windows partition from a drive that had multiple partitions (recovery,
diagnostic, etc), Windows may not boot properly. Therefore, the best bet to return
to a working state is to do restores all partitions on the disk. If the new disk has
more capacity than the old disk, restore the “disk”backup but use the “Partition
restore with resize” method to achieve the new larger size partitions.
Page 11 of 26
Special notice to owners of some Dell Computers!
(by) Brian K of NSW, AUSTRALIA
If you have a Dell laptop with MediaDirect then read this section.
Dell laptops with Vista OS have a different MediaDirect and aren't affected by the following
problem. The theory is here(1). Take special note of the first paragraph: "HPA Problems When
Upgrading Hard Disk"
Here are two simple ways to prevent the truncation problem based upon the above theory.
1.
If you plan to upgrade to a larger HD by restoring an image then
don't tick "Restore MBR and Track 0" during the restore process.
2.
If you plan on cloning your old HD to a new larger HD then the older HD needs some
preparation before the cloning process. Changing the Dell MBR to a generic MBR is
enough to prevent the truncation problem.....
Download this .ISO file from here(2) ....and burn it (as an image, not as data) to a CD.
I use ImgBurn but if you use Nero, it's Recorder, Burn image.
Boot to the CD. You will see "Press any key to rewrite MBR". Press a key and you will
be instructed to "Press ENTER to reboot" so press ENTER and remove the CD. Your
computer will still boot to WinXP as usual.
Now you can perform the clone using standard choices.
If you have already cloned (before reading this guide) and have a truncated new HD then visit the
forum for help.
People should generally know if they have MediaDirect as there is a special button to boot the
software. For those not sure if they do have a HPA (before using the above procedures) then download
dsrfix.zip from here(3)...
Unzip dsrfix.zip and burn dsrfixcd.iso to a CD (burn as an image, similar to mbrautowrite_en.iso).
Boot to the CD and at the A: prompt, type dsrfix and press ENTER. You will see a screen similar to
the graphic in the "Understanding the Dsrfix Report" section of the above web page.
Note in the graphic that "48-bit user secs" are NOT equal to "48-bit max secs". This means a HPA is
present. If your secs are equal you don't have a HPA and don't need to use the above two procedures.
Brian K
here(1)=
http://www.goodells.net/dellrestore/hpa-issues.htm
here(2)=
http://www.acronis.com/files/support/mbrautowrite_en.iso
here(3)=
http://www.goodells.net/dellrestore/fixes.htm
(Thanks to Brian K for this information about designated Dell computers.)
Page 12 of 26
Manual Mode Cloning Procedure Illustrations
Note: As previously indicated on page 3, you will get best results if you have
a. booted from the TrueImage Rescue CD
b. installed the new drive in the same physical location as
the original drive
c. moved the original drive to an external or another internal location
Page 13 of 26
Page 14 of 26
Page 15 of 26
Page 16 of 26
Page 17 of 26
Page 18 of 26
Page 19 of 26
Page 20 of 26
CM-17R
Page 21 of 26
Summary of changes that will occur when Proceed is checked.
Recommendation:
Do not click the proceed button until after you have made
several practice runs so you feel comfortable with your
selections.
A few extra minutes spent performing simulations can
help to provide a better understanding of the correct
choices and may prevent troublesome errors.
End of 3 Partition Cloning
Page 22 of 26
Cloning a One Partition Disk
When cloning a one partition disk, your “Size & Position” screen should look like the image below
(image CM-10A) rather than using image CM-10 (page 17 ).
Adjust the ”Size & Position” screen so there is no unallocated space either before or after the partition.
This will allocate all unallocated disk space to the single partition. Pressing NEXT, the program
should take you to the position as indicated by screen sample CM-17 on page 21.
Page 23 of 26
Cloning a Two Partition Disk
When cloning, the partitions should be placed on the new drive in the same physical
order as on the old drive. In other words, when cloning completed, a Disk Management
display should show the same partition sequence when viewing either the original or
the clone. A diagnostic or recovery partition should not be resized/expanded.
When cloning a two partition disk, your “Size & Position” screen (for partition 1)
should look similar to the image below (CM-10B) rather than image
CM-10 (page 17 ).
Adjust the ”Size & Position” screen for the desired size for that particular partition.
Press NEXT.
The program should continue in sequence as indicated by screen CM-11 (page 18).
Diagnostic or Recovery Partition size should not be changed.
Page 24 of 26
Cloning a Two Partition Disk
(Continued)
As you progress through screen CM-11 & CM-12, use the image below as an
example of what you should see in place of image CM-13.
Adjust the ”Size & Position” screen for the desired size for that particular partition.
Note: Vendor recovery partitions should not be expanded.
Press NEXT.
The program should take you to the position as indicated by
screen CM-17 (page 21) where you can continue until finished.
Diagnostic or Recovery partition size should not be changed.
Page 25 of 26
Shortcut to Disk Management
Device Manager
descriptions of hard drives
PDF prepared by Grover Hatcher
with much appreciated input from Brian K & MudCrab (Paul Purviance)
Their help substantially improved the content and appearance of this document
File= gh_acronis_manual_cloning.pdf
Revised: November 19, 2008
.
Page 26 of 26