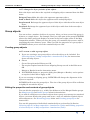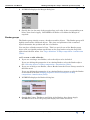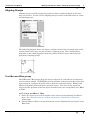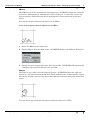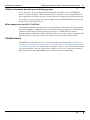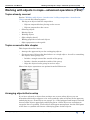
1
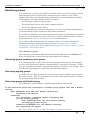
INTREPID User Manual
Library | Help | Top
Working with objects in maps—advanced operations (T45d)
1
| Back |
Working with objects in maps—advanced operations (T45d)Top
Topics already covered
Section "Working with objects—introduction" in Map composition—introduction
(T45a) covered the following topics
•
Placing new objects into the composition
•
Objects composed before placing on the screen
•
Objects composed on the screen
•
Selecting objects
•
Moving objects
•
Deleting objects
•
Object display detail
•
Editing properties of selected objects
•
Object properties section guide
Topics covered in this chapter
This chapter describes how to
•
Arrange the apparent layers for overlapping objects.
•
Create groups of objects that then behave as a single object. As well as containing
the objects, these groups can
•
Include a margin around the outside of the group,
•
Include a border around the outside of the group,
•
Align the objects in the group in various ways.
Most of the object operations use options from the Edit menu.
Arranging objects that overlap
If you have selected an object that overlaps one or more other objects you can
determine which object appears to be on top and the order of objects in the apparent
underlying layers. Some objects are opaque (i.e., filled polygons and images) and will
obscure other objects apparently underlying them. Other objects are transparent
except for lines or symbols. These objects will appear transparent, but the solid parts
of the lines or symbols will obscure underlying parts of other objects.
Library | Help | Top
© 2012 Intrepid Geophysics
| Back |
INTREPID User Manual
Library | Help | Top
Working with objects in maps—advanced operations (T45d)
2
| Back |
>> To change the layer position of an object:
Select the object and choose the required overlapping object command from the Edit
menu.
Bring to Front Make this object the apparent uppermost object
Send to Back Make this object the apparent most underlying object
Step forward Exchange the apparent layer of this object with that of the next object
above.
Step back Exchange the apparent layer of this object with that of the next object
underneath.
Group objects
You can enclose a number of objects in a group. After you have created the group, it
behaves as a single object. For example, when you click part of the group INTREPID
selects the whole group and displays its name in the lower right corner of the Map
Composition window. When you move the group, all contained objects move with it,
remaining the same distance apart. When you edit the properties of a group object
INTREPID allows you to select the contained object to edit.
Creating group objects
>> To create or edit a group object
1
If you are creating a new group object, select the objects to be included. See
"Selecting objects" in Map composition—introduction (T45a) for instructions
about selecting objects.
2
Choose
•
Create Group from the Edit menu OR
•
The required option from the Create Aligning Group cascade in the Edit menu
OR
•
Margin or Border from the Annotation menu.
3
If INTREPID displays a properties dialog box (Margin or Border), set its options
as required, then choose Apply or OK.
If you are creating an aligning group, INTREPID will change the alignment of the
objects as required.
INTREPID will create the group object. The size of the group object will be sufficient
to tightly fit around the objects.
Editing the properties and contents of group objects
You can edit the properties (e.g., width, line thickness) of the Margin/ Border groups.
See Margin groups and Border groups below for instructions.
If you wish to add objects to or remove objects from a group or rearrange its contained
objects, you must dissolve the group and create a new one with the required objects
and arrangement. See Dissolving groups below and Creating group objects for
instructions.
You can edit properties of individual contained objects as described in Section
"Selecting objects" in Map composition—introduction (T45a) and "Editing properties
of selected objects" in Map composition—introduction (T45a).
Library | Help | Top
© 2012 Intrepid Geophysics
| Back |
INTREPID User Manual
Library | Help | Top
Working with objects in maps—advanced operations (T45d)
3
| Back |
The order of objects in a group
The order of objects in a group is sometimes important.
If you select a number of objects to include in a group using the SHIFT+click method,
the order in which you select the objects becomes the order of the objects in the group.
If you select the objects by dragging a rectangular area in the Map Composition
window to enclose them, Map Composition determines their order by their position
from left to right and from bottom to top in the area that you defined.
Non-Aligning groups
A Non-Aligning group does not affect the position of its contained objects at the time
you create it. Use Create Group in the Edit menu or Margin or Border from the
Annotation menu to create a Non-Aligning group.
Box groups
The Box group is the simplest type of group. It groups its objects without changing
their position or creating margins or borders around them. A Box will tightly
surround its contained objects. The sizes and positions of the contained objects
determine the size and position of a Box.
>> To create a Box
Select the objects to be included and choose Create Group from the Edit menu.
Margin groups
The Margin group simply creates a margin around its objects. The margin effectively
increases the apparent size of the group of objects. If you include a Margin group
object in an HBox or VBox INTREPID will allow for the Margin when positioning the
object. The inside edge of a Margin group will tightly surround its contained objects.
The sizes and positions of the contained objects determine the position and inside size
of a Margin.
You can place a Margin around a Page. This is a special case of the Margin group
object, and you should perform operations on the page margin using the Page Size
option from the File menu. See "Page definition" in Map composition—introduction
(T45a).
>> To create or edit a Margin,
1
If you are creating a new Margin, select the objects to be included.
If you are editing the properties of an existing Margin, select the Margin object.
See "Selecting objects" in Map composition—introduction (T45a).
2
If creating a new Margin, choose Margin from the Annotation menu.
If you are editing the properties of an existing Margin, prepare to edit the Margin
as described in Section "Editing properties of selected objects" in Map
composition—introduction (T45a).
Library | Help | Top
© 2012 Intrepid Geophysics
| Back |
INTREPID User Manual
Library | Help | Top
Working with objects in maps—advanced operations (T45d)
4
| Back |
3
INTREPID displays the Margin dialog box.
4
Specify the size (in mm) of the margin along each edge in the corresponding text
boxes, then choose Apply. INTREPID will define or redefine the Margin as
required.
Border groups
The Border group simply creates a border around its objects. The Border group will
tightly surround its contained objects. The sizes and positions of the contained
objects determine the position and size of a Border.
You can place a Border around a Page. This is a special case of the Border group
object, and you should perform operations on the page border using the Page Size
option from the File menu. See "Page definition" in Map composition—introduction
(T45a).
>> To create or edit a Border,
1
If you are creating a new Border, select the objects to be included.
If you are editing the properties of an existing Border, select the Border object.
See "Selecting objects" in Map composition—introduction (T45a).
2
If you are creating a new Border, choose Border from the Create Group cascade in
the Edit menu.
If you are editing the properties of an existing Border, prepare to edit the Border
as described in Section "Editing properties of selected objects" in Map
composition—introduction (T45a).
Library | Help | Top
3
INTREPID displays the Border dialog box.
4
Specify the Colour, Thickness and Style of the Border, then choose Apply.
INTREPID will create the group and display the border around it.
© 2012 Intrepid Geophysics
| Back |
INTREPID User Manual
Library | Help | Top
Working with objects in maps—advanced operations (T45d)
5
| Back |
Aligning Groups
Aligning groups usually change the position of their contained objects at the time
they are created. Use the Create Aligning Group cascade in the Edit menu to create
an Aligning group.
The following diagram shows two objects and the extent of the rectangle that would
contain them before they are placed into an aligning group. The corresponding
diagrams on the following pages show the position of these objects after they are
placed into aligning groups.
1
2
The HBox and VBox groups
The HBox and VBox groups align the objects adjacent to each other in a horizontal
row or vertical column. INTREPID bases the position of the group on that of the first
object selected. It aligns the other objects adjacent to the first object. HBoxes and
VBoxes will tightly surround their contained objects. The sizes of the contained
objects and the position of the first object determine the size and position of an HBox
or VBox.
>> To create an HBox or VBox
Library | Help | Top
1
Select the objects you wish to include in the order required (bottom or leftmost
first). See "Selecting objects" in Map composition—introduction (T45a) for
instructions.
2
Choose HBox or VBox as required from the Create Aligning Group cascade of the
Edit menu.
© 2012 Intrepid Geophysics
| Back |
INTREPID User Manual
Library | Help | Top
Working with objects in maps—advanced operations (T45d)
6
| Back |
HBoxes
The HBox is one of the horizontally aligning groups. INTREPID aligns the adjacent
objects in a horizontal row with the first object on the left. It vertically centres the
objects around a horizontal line drawn through the vertical mid point of the first
object.
You can insert space between the objects in an HBox.
>> To insert space between objects in an HBox
1
2
1
Select the HBox for the operation.
2
Choose HSpace from the Edit menu. INTREPID displays the HSpace dialog box
3
Specify the space required (in mm), then choose OK. INTREPID will separate the
contained objects by the distance you specified.
Vboxes
The VBox is one of the vertically aligning groups. INTREPID aligns the adjacent
objects in a vertical column with the first object at the bottom. It horizontally centres
the objects around a vertical line drawn through the horizontal mid point of the first
object.
2
1
You can insert space between the pairs of adjacent objects in a VBox.
Library | Help | Top
© 2012 Intrepid Geophysics
| Back |
INTREPID User Manual
Library | Help | Top
Working with objects in maps—advanced operations (T45d)
7
| Back |
>> To insert space between objects in an VBox
1
Select the VBox for the operation
2
Choose VSpace from the Edit menu. INTREPID displays the VSpace dialog box
3
Specify the space required (in mm), then choose OK. INTREPID will separate the
contained objects by the distance you specified.
Reordering objects in an HBox or VBox
>> To reorder the objects in an HBox or VBox
1
Dissolve the group. See Dissolving groups for instructions.
2
Select the objects in the new order you require (top or leftmost first). See
"Selecting objects" in Map composition—introduction (T45a) for instructions.
3
Create the box again.
The Top, VCentre and Bottom groups
The Top, VCentre and Bottom groups are horizontally aligning groups. They align
their objects in a horizontal row but do not change their horizontal position (i.e., when
you create the group the objects may move up or down but they will not move
sideways).
INTREPID positions objects as follows.
•
Objects in a Top group have their top edges in line with the top edge of the top
object.
•
Objects in a Bottom group have their bottom edges in line with the bottom edge
the bottom object.
•
Objects in a VCentre group are centred vertically along a horizontal centre line
through a rectangular region enclosing all of the objects.
1
2
1
2
1
2
>> To create a Top, VCentre or Bottom group
Select the objects you wish to include, using one of the methods described in section
"Selecting objects" in Map composition—introduction (T45a), then choose Top,
VCentre or Bottom as required from the Create Aligning Group cascade of the Edit
menu.
Library | Help | Top
© 2012 Intrepid Geophysics
| Back |
INTREPID User Manual
Library | Help | Top
Working with objects in maps—advanced operations (T45d)
8
| Back |
The Left, HCentre and Right groups
The Left, HCentre and Right groups are vertically aligning groups. They align their
objects in a vertical column but do not change their vertical position (i.e., when you
create the group the objects may move sideways but they will not move up or down).
INTREPID positions objects as follows.
•
Objects in a Left group have their left edges in line with the left edge of the leftmost object.
•
Objects in a Right group have their right edges in line with the right edge of the
right-most object.
•
Objects in a HCentre group are centred horizontally along a vertical centre line
through a rectangular region enclosing all of the objects.
1
1
1
2
2
2
>> To create a Left, HCentre or Right group
Select the objects you wish to include, using one of the methods described in section
"Selecting objects" in Map composition—introduction (T45a), then choose Left,
HCentre or Right as required from the Create Aligning Group cascade of the Edit
menu.
The Centre group
Centre groups normally contain only one object. If there are several objects in a
Centre box, they will all coincide in the centre of the box. In a Centre group,
INTREPID aligns the objects in the centre of a rectangular region enclosing all of the
objects.
1
2
>> To create a Centre group
Select the objects you wish to include, using one of the methods described in section
"Selecting objects" in Map composition—introduction (T45a), then choose Centre from
the Create Aligning Group cascade of the Edit menu.
Library | Help | Top
© 2012 Intrepid Geophysics
| Back |
INTREPID User Manual
Library | Help | Top
Working with objects in maps—advanced operations (T45d)
9
| Back |
Dissolving groups
You can dissolve a group, releasing its contained objects to exist as separate objects.
Dissolving the group is equivalent to deleting the group object, so any visible
attribute that it has (for example if the group object you are dissolving is a border)
will disappear. You may wish to dissolve a group if:
•
You no longer require the group object;
•
You wish to move one or more of the contained objects;
•
You wish to add or remove objects.
If you are adjusting the contents of the group, you can recreate the group whenever
you wish with the required objects in their desired positions.
If you wish to add objects to or remove objects from a group or rearrange its contained
objects, you must dissolve the group and create a new one with the required objects
and arrangement. See Creating group objects for instructions.
If you wish to edit the properties of a contained object, you can do this directly
without dissolving or opening the group. Seesee "Selecting objects" in Map
composition—introduction (T45a) and "Editing properties of selected objects" in Map
composition—introduction (T45a).
>> To dissolve a group
Select the group and choose Dissolve Group from the Edit menu. INTREPID will
delete the group object and release the objects that were within it.
Dissolving groups containing other groups
It is common practice to have several levels of groups within groups. For example,
you may have some objects within a margin which is contained in a border. In this
case, if you dissolve the border, you will still only have one object—the margin. If you
then dissolve the margin you will release the individual objects.
Dissolving aligning groups
If you dissolve an aligning group, the objects remain in the position they had when
the group existed. They do not return to the position they had before the creation of
the group changed their position.
Dissolving groups with Detail setting
If you dissolve a group that has a Detail setting (Outline, Draft, Full):
If the dissolved group was contained in another group object that had a Detail
setting:
Then INTREPID will use this detail setting for
displaying the objects
Otherwise
If a previously contained object originally had
its own Detail setting:
Then INTREPID will use this detail setting
for displaying the object,
Otherwise INTREPID will use default settings
for displaying the object.
See "Object display detail" in Map composition—introduction (T45a).
Library | Help | Top
© 2012 Intrepid Geophysics
| Back |
INTREPID User Manual
Library | Help | Top
Working with objects in maps—advanced operations (T45d)
10
| Back |
Difference between dissolving and deleting groups
If you dissolve a group (using Dissolve Group from the Edit menu), INTREPID
removes the group object. The contained objects continue to exist independently in
the composition or within any outer group object that contained the dissolved group.
If you delete a group (using Cut from the Edit menu), INTREPID deletes the group
and all of the contained objects.
What happens in the MAPCOMP file
In the MAPCOMP file that describes your composition, dissolving the group deletes
the group's Begin – End block from around the objects in the group, including any
attribute information included for the group object. INTREPID also inserts
appropriate X= and Y= lines within all objects that were in the group to describe their
position relative to the lower left corner of the object that now contains them.
Flexible boxes
INTREPID uses flexible boxes to contain rectangles and images (See "Polygons" in
Including and editing map annotations (T45c) and "Images" in Including and editing
map annotations (T45c) for information about these objects). The size of a flexible box
can be controlled by the size of the object within it. If you are using the interactive
Map Composition tool INTREPID processes these boxes automatically.
Library | Help | Top
© 2012 Intrepid Geophysics
| Back |