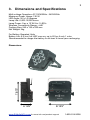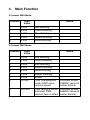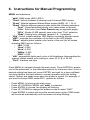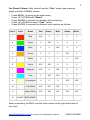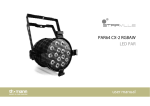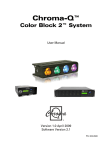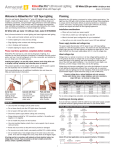
1
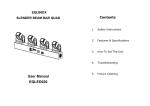
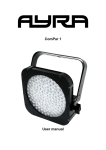
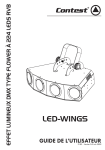
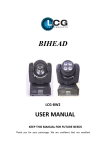
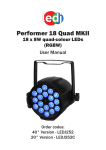
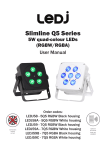
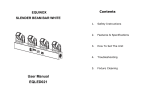
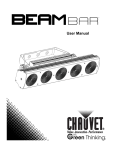
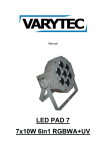
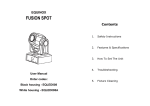
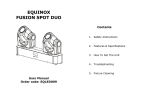
5-in-1 Wireless LED Light
Standard & Battery Operated Models
EDD-GL-BFLAT9 & EDD-GL-FLAT9
USER MANUAL
1. Introduction
Thank you for purchasing our 5-in-1 Wireless LED light. Please read these
instructions carefully before operating to avoid any possible damage and
accidents caused by misuse.
The 5-in-1 Wireless LED light has a durable steel enclosure. Five colors of
high-brightness LED lights (red, blue, green, amber and white) are used to
create a wide spectrum of colors. Each color can be independently
dimmed and controlled. The unit contains a switch for power, and another
switch to turn on/off the wireless receiver. The built-in programs include
dimming, fade, strobe, gradual change and more (see programming
section). The unit is compatible with the standard DMX 512 signal for
external DMX control, and wireless signals transmitted from DMX 512
sources. Practical uses of the product include dance halls, stage
backgrounds, hotels, large-scale performances, drapery uplighting and
stage lighting.
Packing List
- 5-in-1 Wireless LED Light
- Power cable
- User manual
- Warranty card
2. Safety Information
- Please consult skilled service technicians for any repairs required
- Always disconnect from the power source before setting up, moving and
servicing
- Avoid direct eye contact to the light when in operation
- Make sure the power supply voltage is compatible with this light
- Before installation, please check the light’s fasteners and mechanical
structure is in good condition and not damaged
- The light is designed for indoor use, below 40 degrees celsius
- Please do not expose this light to rain or water
- The fixture may be mounted in any position provided there is adequate
room for ventilation. Make sure there are no flammable and explosive
items within 0.5 meters.
- Please ensure the ground is always connected when plugged in
3
3. Dimensions and Specifications
Multi-voltage Operation: AC 100V/60Hz - 240V/50Hz
Maximum Power Usage: 135 W
LED Angle: 30 (+/-5) degrees
Lamp Life: 6,000-10,000 hours
Lamp Power: 9 pc x 15 W 5-in-1 LED’s
Wireless Connectivity Range: ~440’
Packing Size: 240 x 130 x 250 mm
Net Weight: 3kg
For Battery Operated Units
Battery Life: 4-5 hrs if all LED’s are on; up to 20 hrs if only 1 color
Recommended to charge the battery for at least 4 hours upon recharging
7.875”
Dimensions:
4.125”
8.125”
www.EddylightCo.com for more info and product support
1-800-914-3538
4. Main Function
5 Channel DMX Mode:
Channel
1
2
3
4
5
DMX
Value
0-255
0-255
0-255
0-255
0-255
Notes
Red dimming
Green dimming
Blue dimming
Amber dimming
White dimming
9 Channel DMX Mode:
Channel
1
2
3
4
5
6
7
8
DMX
Value
0-255
0-255
0-255
0-255
0-255
0-255
0-255
10-255
9
128-255
Notes
Red dimming
Green dimming
Blue dimming
Amber dimming
White dimming
Master dimming
Strobe
Color change/pulse
mode. DMX value
controls speed
Color fading & sound
activated. DMX
channel has no affect
Overrides strobe,
RGBAW values &
master dimmer
Overrides strobe,
RGBAW values &
master dimmer
5
5. Rear Panel Display and Operation
LED Display
Menu
Up Down Enter
Selection buttons
DMX OUT
DMX IN
120V AC OUT
DMX input/output
120V AC IN
Power in/out
Selection Buttons:
MENU: Access the menu or return to a previous menu option
UP: Menu selection or parameter increments
DOWN: Menu selection or parameter increments
ENTER: Select the current menu option
DMX IN/OUT:
For use when connecting to a DMX board or connecting master/slave.
Wireless Function:
When entering DMX mode (menu selection: “addr”), the unit will try to
connect to the wireless DMX network. Be sure your DMX board is
connected to a wireless transmitter and all power is on, as well as the
power switch to the wireless section on the light (the 2nd switch on the
back of the unit). The small LED indicator light next to the wireless
antenna on the unit will flash as it tries to connect. Flashing RED indicates
it’s failed to connect, flashing GREEN indicates it was successful. If it
failed to connect, the light will revert back to its last saved state, such as
COLO mode, etc. Try to connect again by pressing MENU and selecting
“addr” to begin the process again, notice the color of the indicator light,
and begin pressing the small button next to it. The LED indicator light will
cycle through various colors, which are different connection frequencies.
One of the colors/frequencies will connect to the DMX board and then it
will begin to flash GREEN. Once this has been setup, no other process is
required, and the unit should immediately connect once set to “addr”
mode.
www.EddylightCo.com for more info and product support
1-800-914-3538
6. Instructions for Manual Programming
MENU and submenus:
•
•
•
•
•
•
•
•
•
”addr”: DMX mode (A001-A512)
“Chnd”: Selects between 5-channel and 9-channel DMX modes
“SLmd”: Selects between Master/Slave modes (MASt, SL 1, SL 2)
”Shmd”: Selects different preset modes within the following submenu:
• “Sou1”: Sound activated (slowly color fades when no sound)
• “Colo”: Solid color (see Color Presets map on opposite page)
• “StCo”: Strobe (0-255 speed); uses color from “Colo” selection
• “FAde”: Fading color changes (speeds 1-8, 1 is fastest)
”LEd”: On/off, selects whether LED display constantly displays mode
”dISP”: reverses the orientation of the text on the LED display
”MAnu”: adjusts global master color levels of the unit (for all modes
including DMX use) as follows:
• “rEd”: 0-255
• “Gree”: 0-255
• “bLue”: 0-255
• “AMbe”: 0-255
• “WhIt”: 0-255
”teSt”: sequentially lights each color at full brightness (disregarding the
‘manual’ global master color setting in order: R, G, B, A, W, full
”FhrS”: machine use time
Press MENU to navigate through the main menu. Press ENTER to access
one of the submenus, or the selectable options for that menu item. Once a
desired setting has been set, press ENTER, and wait for a time-out/blackout period before the light returns to normal operation with that setting
saved. Options are saved even when the power is cycled. For example, if
you want to choose DMX mode A001, operate as follows:
•
•
•
•
•
Press MENU, to bring up the main menu
Press UP / DOWN or MENU until “addr” is selected
Press ENTER to choose, the display will blinking
Press UP / DOWN to change the address code to select “A001”
Press ENTER to select and store the current menu option. DMX mode
will be stored automatically and the screen will stop blinking.
7
For Preset Colors: Solid colors from the “Colo” mode (see previous
page) and their RGBAW values:
•
•
•
•
•
Press MENU, to bring up the main menu
Press UP / DOWN until “Shmd”
Press ENTER to choose, the display will be blinking
Press UP / DOWN to select “Colo” mode
Press ENTER to access the different color options as follows:
Colo #
Color
Name
Red
1
Red
255
2
Green
3
Green
Blue
Amber
White
0
0
0
0
0
255
0
0
0
Blue
0
0
255
0
0
4
Amber
0
0
0
255
0
5
White
0
0
0
0
255
6
Yellow
255
255
0
0
0
7
Magenta
255
0
255
0
0
8
Cyan
0
255
255
0
0
9
Champagne
0
0
0
255
255
10
Cold White
255
255
255
0
0
11
Warm White
255
255
255
255
255
12
CHASE SEQUENCE
-
-
-
-
-
When controlling via DMX, use the color values in the right hand side of
the chart.
www.EddylightCo.com for more info and product support
1-800-914-3538
7. Master/Slave Control
The MASTER functions as a master as long as it’s not in DMX mode (and
ideally no cable plugged into the DMX INPUT on the unit). It sends a
signal to the SLAVE through a DMX cable and synchronizes its settings to
it. Do not use more than 20 lamps or 60m of DMX cable.
The SLAVE units should be set to DMX mode and the address code set to
“A001” to receive the MASTER’s signal. Only one light can be set as a
master, but multiple lights can be set as slaves.
8. Cable Connection
A standard XLR connection is used for the DMX 512 protocol:
Note: In order to avoid failures and signal interference, it is recommended
to connect a 120Ω resistor (1/4W) at the end of the DMX connection as
shown below:
DMX512 does not include automatic error checking and correction, and so is not an
appropriate control for hazardous applications, such as pyrotechnics or movement of
theatrical rigging. False triggering may be caused by electromagnetic interference,
static electricity discharges, improper cable termination, excessively long cables, or
poor quality cables.
If using 5-pin DMX, please use a 5-pin to 3-pin cable adapter. Details on configuration
below: