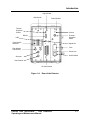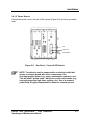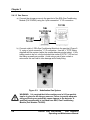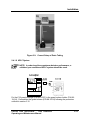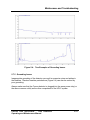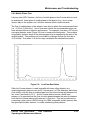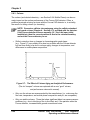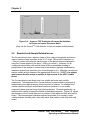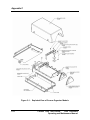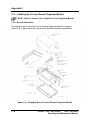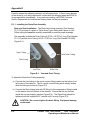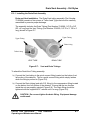
1
Corona® CAD® Detector
Corona®Plus CAD® Detector
Operating & Maintenance Manual
ESA Biosciences, Inc.
22 Alpha Road
Chelmsford, MA 01824-4171 U.S.A.
Telephone: (978) 250-7000
Fax: (978) 250-7090
www.esainc.com
P/N 70-6258
Rev. G
NOTICES:
The detector is covered by a limited warranty. A copy of the warranty is included with
this manual. The analyst is required to perform routine maintenance as described
herein on a periodic basis to keep the warranty in effect.
All information in this manual is subject to change without notice and does not represent
a commitment on the part of ESA Biosciences, Inc.
The Corona® CAD® and Corona®Plus CAD® Detectors and various components in these
detectors are covered by the following patents: US: 5,098,657; 5,374,396, 6,544,484
and 6,568,245.
© 2004, 2005, 2006, 2007, 2008 ESA Biosciences, Inc. All rights reserved. No part of
this manual may be reproduced or transmitted in any form or by any means without the
written permission of ESA Biosciences, Inc.
ESA, CAD, and Corona are registered of ESA Biosciences, Inc.
PEEK is a trademark of Victrex, plc.
Kalrez, Mylar and Teflon are registered trademarks of E.I. DuPont deNemours &
Co. Inc.
Kel-F is a registered trademark of the 3M Company.
Printed in the United States of America
WARRANTY
A. ESA Biosciences, Inc. (“Seller”) warrants to Buyer that each product manufactured by
Seller will be free from defects in material and workmanship in normal use from the date of
delivery to Buyer as the original purchaser, for the following periods: instruments and
equipment-one year; expendable items such as cells, sensors and electrodes-90 days.
This warranty does not cover, and no warranty is provided for, consumables and parts that
by their nature are normally required to be replaced periodically consistent with normal
maintenance, including, without limitation, fuses, tubing, pump piston seals, injector rotors,
check valves and filters. If any product covered by this warranty is returned to the original
shipping point, transportation charges prepaid, within the applicable warranty period set
forth above and upon examination Seller determines to its satisfaction that such product
was defective in material or workmanship, Seller will, at its option, repair or replace the
product or the defective part thereof or refund the original purchase price of the product.
The foregoing notwithstanding, Seller will not be responsible for damage to any product
resulting from misuse, negligence or accident or resulting from repairs, alterations or
installation made by any person or firm not duly authorized by Seller in writing or for any
damage to any cell assembly resulting from the flow being impeded. If any cell assembly
is used with control modules or potentiostats other than those manufactured by Seller, this
warranty shall be void.
B. If, at any time during the period ending ninety (90) days after delivery of any product to
Buyer, Buyer reports and documents any error in any software provided with such product
and developed by Seller or any failure of any such software substantially to conform to
Seller’s software description that limits or prevents use of the software by Buyer, Seller at
its option, will use reasonable efforts to correct any such error or failure, will replace such
software or will terminate Buyer’s license to use the software and refund the price of the
related product. In connection with any such termination and refund, Buyer will return the
related product to Seller forthwith upon request. This warranty shall apply only to those
portions of the software that were developed by Seller and that incorporate all program
corrections and modifications, if any, delivered to Buyer. It shall not apply to any error or
failure due to machine error or to the misuse by or negligence of any person or entity other
than Seller or to any software which is modified by any person or entity other than Seller.
C. If Buyer shall fail to pay when due any portion of the purchase price of any product or
any other payment required from Buyer to Seller, whether under the contract or otherwise,
all warranties and remedies granted in this Section and all of Seller’s warranties and
obligations to service, repair, replace, correct or otherwise remedy defects, errors or
failures under any other contract between Buyer and Seller may, at Seller’s option, be
terminated.
D. THE WARRANTIES STATED HEREIN ARE THE ONLY WARRANTIES GIVEN BY
SELLER WITH RESPECT TO THE PRODUCTS AND THE SOFTWARE PROVIDED
WITH THE PRODUCTS AND ARE GIVEN IN LIEU OF ALL OTHER WARRANTIES,
EXPRESS OR IMPLIED, INCLUDING, WITHOUT LIMITATION, ALL WARRANTIES OF
MERCHANTABILITY AND FITNESS FOR A PARTICULAR PURPOSE. BUYER’S
EXCLUSIVE REMEDIES AND SELLER’S SOLE LIABILITY FOR ANY NONCONFORMITY OR DEFECT IN THE PRODUCTS OR SUCH SOFTWARE WILL BE
THOSE EXPRESSED HEREIN.
Corona® CAD® and Corona®Plus CAD® Detectors
Operating and Maintenance Manual
i
E. With respect to products sold to Buyer but not manufactured or, in the case of software,
not developed by Seller, SELLER MAKES NO WARRANTY OF ANY KIND, EXPRESS OR
IMPLIED, INCLUDING, WITHOUT LIMITATION, ANY WARRANTY OF
MERCHANTABILITY OR FITNESS FOR A PARTICULAR PURPOSE, but Seller will make
available to Buyer, to the extent permitted by law and relevant contracts, the warranties of
the manufacturer of the relevant product or the developer of the software.
ii
Corona® CAD® and Corona®Plus CAD® Detectors
Operating and Maintenance Manual
SAFETY/OPERATING SYMBOLS
The following symbols appearing on the unit or in the manual are defined as
follows:
This symbol on the instrument indicates that the user should refer to
the operating manual before attempting to connect the power/interface
cables and operate the system.
This symbol on the back of the instrument indicates a functional earth
terminal.
The bold WARNING statement used throughout the manual presents
dangers that might result in personal injury.
The bold CAUTION statement used throughout the manual presents
hazards on conditions that could cause damage to the instrument or the
reporting of erroneous results.
The bold NOTE statement used throughout the manual highlights
important information about the detector and its use.
Failure to follow these statements may invalidate the warranty.
Corona® CAD® and Corona®Plus CAD® Detectors
Operating and Maintenance Manual
iii
WARNINGS AND SAFETY PRECAUTIONS
The ESA Corona™ CAD and CoronaPlus CAD detectors are general purpose
detectors for use with high performance liquid chromatography (HPLC). They
can be used to measure the level of a large number of compounds in a broad
variety of samples. The following precautions should be followed to minimize the
possibility of personal injury and/or damage to property while using either
detector.
Make certain that you are familiar with the contents of this manual before using
the detector. Do not use this instrument before fully understanding the contents
of this manual. Provide this documentation to the next user in the event that the
unit is borrowed. To ensure safe operation, read the following Safety
Precautions before using the instrument.
This instrument is a detector for use with a high-performance liquid
chromatography system. Use this instrument ONLY for this purpose.
The following precautions should be followed to minimize the possibility of
personal injury and or damage to property:
1) Maintain a well-ventilated laboratory. If the mobile phase contains a volatile
organic solvent, ensure that the laboratory is well ventilated so that a buildup
of organic solvent cannot occur.
2) The gas port to the instrument must be properly connected. The gas should
be clean, dry, devoid of organic solvents and particulates, and properly
regulated. Only nitrogen is recommended. DO NOT use helium. Use an
approved nitrogen generator capable of delivering +99% pure nitrogen (60125PSI; max flow 4 L/min) (70-6003). All nitrogen gas shall be
preconditioned using the ESA Gas Conditioning Module (70-8285).
3) Exhaust gases must be vented to an appropriate hood or gas collection
device, and NEVER vented directly into the laboratory. DO NOT use the
instrument unless the exhaust vent is connected properly. Outlet gas
venting should be at atmospheric pressure. A vacuum or restriction may
result in pressure changes within the detector resulting in baseline instability
and/or other problems.
iv
Corona® CAD® and Corona®Plus CAD® Detectors
Operating and Maintenance Manual
4) The drain tubing must be properly connected to both the detector and the
waste bottle. The drain tubing must be straight without kinks, dips or loops
(i.e., areas where fluid can accumulate). Any of these may lead to flooding
of the detector. Severe or prolonged flooding may damage the detector
and void the warranty.
5) Empty the waste bottle routinely. This is a closed system – do not allow the
detector to become flooded with waste solvent. Severe or prolonged
flooding may damage the detector and void the warranty.
6) Do not start the HPLC pump before the inlet gas is flowing and the Gas
On/Off valve is open. Otherwise, solvent can accumulate in the detector and
adversely affect performance.
7) Never stop the gas flow, and never switch the detector off before stopping
the HPLC solvent flow and allowing 5 minutes for drainage. Failure to do so
will cause solvent to accumulate inside the detector and adversely affect
performance.
8) Wear protective goggles when handling solvents. Install a sink as close as
possible to the module. If any solvents splash on the skin or eyes,
immediately rinse the affected parts in the sink. Ensure that appropriate eyewash and safety shower are available.
9) Familiarize yourself with each mobile phase compound’s MSDS (material
safety data sheet). Make certain that you understand the toxicological
properties, safe handling and correct disposal of all chemicals that are used
with the detector.
10) Only use volatile components (buffers, solvents etc) in the mobile phase. Do
not use either ammonium carbonate or ammonium bicarbonate in the mobile
phase. These tend to be “dirty” and contain particulates.
11) Although both detectors are compatible with the entire pH range, detector
performance decreases under basic conditions. If possible, keep the pH of
the mobile phase <7.5.
12) Either detector is compatible with all commonly used mobile phase
components (e.g., acetonitrile, tetrahydrofuran, methanol, isopropanol).
Make sure that other components in the HPLC system (e.g., piston seals,
injector seal, PEEK tubing) are also compatible with the mobile phase
components. However, only the CoronaPlus CAD detector can be used for
aqueous THF gradients (see #13 below).
Corona® CAD® and Corona®Plus CAD® Detectors
Operating and Maintenance Manual
v
13) Some solvents will cause the nebulizer to freeze during their evaporation
(e.g., aqueous-THF gradients) and will adversely affect system performance.
For solvents that have low specific heat capacities, use the CoronaPlus CAD
detector.
14) Both detectors are compatible with most HPLC column formats. However,
the detector is very sensitive to particulates. Make sure the column does not
suffer from “bleeding”.
15) The detector must receive mobile phase at a flow rate of 0.2-2.0 mL/min.
Lower flow rates may lead to aberrant chromatography and noise. If the
Corona CAD detector is to be used in a system where flow is split between it
and other detectors, make sure that the flow rate to the Corona CAD
detector is between 0.2-2.0 mL/min.
16) Avoid open flames and sparks. Do not use an open flame and do not use
any equipment that can cause sparks in the laboratory.
17) Static charges may build-up due to use of organic solvents. These charges
can lead to fire or explosion. Take appropriate precautions to eliminate the
buildup of static charges (e.g., ground the waste bottle).
18) If a leak occurs, turn off power to the module and remedy the situation
immediately.
19) All mobile phase and waste bottles should be placed into a container to
provide secondary containment.
20) All components of the HPLC system should be plugged into a grounded
power line. Make certain that all parts of the system are properly connected
to a common ground.
21) The cover should remain on the detector at all times.
22) Replace fuses only with those of proper type and capacity.
23) If any water gets onto the instrument, wipe it away immediately to prevent
rust. Do not use organic solvents as these may cause discoloration.
24) If the instrument cover or front panel becomes dirty, wipe it clean with a soft
dry cloth or tissue paper. For persistent stains use a soft cloth dipped in
dilute neutral detergent. Remove detergent by using a soft cloth dipped in
water. Finally, use a dry cloth to remove all moisture.
vi
Corona® CAD® and Corona®Plus CAD® Detectors
Operating and Maintenance Manual
25) Install the unit in a location where ambient temperature variations are
minimized. Avoid placing the unit in direct sunlight, near a heating or an air
conditioning duct.
26) The detector has a weight of 22lb (10kg) and a length of 20.5” (52.5 cm).
During installation, consider the combined weight of the HPLC system. The
lab bench must be strong enough to support the weight of the entire HPLC
system. It must be level, stable and have a depth of at least 23.6” (600 mm).
27) Ensure that all parts of the HPLC system are properly grounded. It is
strongly recommended that all parts of the system are connected to a
common ground.
WARNING: DO NOT attempt to bypass the earth ground
connection. A serious shock hazard could result.
28) The power consumption of the unit is 100VA. Check that the power supply
voltage is stable and that its current capacity is sufficient to operate all of the
components in the HPLC system. If not, the instrument’s performance may
be affected.
29) Always filter mobile phase through a 0.2µm filter prior to use. Always degas
the mobile phase as air bubbles may cause the pump to malfunction and
cause detector noise.
30) Dispose of waste liquid properly.
31) If the detector is not going to be used for prolonged periods of time flush the
detector with a neat (pH neutral) solvent for a few minutes to ensure that all
buffers, etc. are removed. Turn off the flow of mobile phase. Turn off gas
flow approximately 5 minutes later. Finally, turn off the detector. DO NOT
leave the detector exposed to either acidic or basic mobile phases.
If the equipment is used in a manner not specified by ESA
Biosciences, the protection provided by the equipment may be
impaired.
Corona® CAD® and Corona®Plus CAD® Detectors
Operating and Maintenance Manual
vii
IMPORTANT OPERATING CONSIDERATIONS
This manual contains detailed information about the use of the Corona™ CAD
and CoronaPlus CAD detectors. As a convenience to the user, a number of points
are presented below to assist in optimizing the use of the detector, protecting the
detector, and/or minimizing the possibility of erroneous results.
A. Use a Line Voltage Conditioning Device
If the input power to the detector is noisy (i.e., fluctuations in the line voltage from
the power source such as spikes, sags, dropouts, brownouts, etc.), interruptions
in the normal operation of the instrument may be observed. Such interruptions
may cause the unit to “reset”; this will stop the unit, shut off the gas flow, and
return the display to the initial screen or “greeting” screen.
While the detector includes internal AC power filters, excessive fluctuations and
brownouts may still create problems. If line voltage fluctuations or brownouts are
a common occurrence in your laboratory or if you would simply like to ensure that
power fluctuations do not lead to improper operation, loss of analytical methods
or default storage parameters; the use of a line voltage conditioner,
uninterruptible power supply (UPS), or power surge protector with power sag
protection is recommended. These devices can usually be obtained from
sources that carry computer supplies.
If you have any questions concerning this, please contact the ESA Service
Department or its Representative.
NOTE: A larger capacity for the UPS device is needed if the entire
HPLC system is to be covered by this UPS device. In this
situation, the total power consumption of your entire HPLC system
must be determined and the desired period of time that the system
should operate after the power interruption must be determined to
calculate the proper capacity of the UPS system.
In addition, it is strongly recommended that the detector does not share a circuit
with other electrical equipment that draw significant power from the AC line. This
equipment includes items such as fume hoods, refrigerators, ovens, centrifuges,
refrigerated cooling systems, vacuum pumps, etc.
viii
Corona® CAD® and Corona®Plus CAD® Detectors
Operating and Maintenance Manual
B. Avoid Radio Frequency Interferences (RFI)
Strong RFI may also cause disturbances or artifacts in the chromatogram or with
the operation of the detector. The detector has been designed to meet various
certification agencies stringent requirements for susceptibility to RFI. However, it
is still possible that a strong emitter of RFI could result in interference with the
Corona CAD detector. Therefore, the detector should not be placed close to
other instruments or machinery that could emit excessive RFI or magnetic fields
such as refrigerators, fume hoods, radio transmitter antennae, NMR instruments,
etc.
C. Avoid Exposure to Electrostatic Discharges
The detector has been designed to be immune to electrostatic discharge (ESD).
However, strong electrostatic discharges to the instrument could cause a
disturbance or artifact to the baseline or could interfere with the operation of the
detector. ESA strongly recommends that the detector is properly grounded to a
good earth ground. This should result in most ESD events being harmlessly
conducted to ground and thus avoiding changes or damage to the sensitive
electronics. In addition, we recommend that the operator take steps to reduce
the generation of static electricity in the vicinity of the detector. Measures to
reduce the chance or severity of ESD include:
¾ Increasing the relative humidity (especially during the winter)
¾ Ensuring that the operator touches a good earth ground (e.g., a metal water
pipe) just prior to touching the detector
¾ Installing antistatic mats in front of the detector
¾ Avoiding the use of carpeting near the detector
¾ The use of low or antistatic lab coats
D. Avoid Large Temperature Fluctuations
Large temperature fluctuations during a measurement can potentially lead to
baseline disturbances or other interference with the operation of the detector.
Similarly, operating the detector at temperatures outside of its intended operating
temperature range (10-35°C or 50-95°F) - might lead to artifacts or other
interference. Therefore, the temperature of the laboratory in which the Corona
CAD detector is used should be controlled. The laboratory temperature should
be within the specified operating temperature range and temperature fluctuations
should be kept at a minimum. Avoid placing the instrument in drafts (such as
near an air conditioning or heating duct, the heat output of a refrigerator or an
open window) and in direct sunlight.
Corona® CAD® and Corona®Plus CAD® Detectors
Operating and Maintenance Manual
ix
E. If the (Optional) Thermal Organizer Module is employed to Control the
Temperature, Allow Sufficient Time for Thermal Equilibrium
The time required to reach thermal equilibrium depends on the selected
temperature and the ambient temperature. The user should ensure that thermal
equilibrium has occurred before performing analytical separations.
F. With the Corona
Plus
CAD Detector Allow Sufficient Time for the Nebulizer
to Reach Thermal Equilibrium
The CornaPlus CAD detector requires approximately 30 minutes for the nebulizer
block to reach thermal equilibrium. The user should ensure that thermal
equilibrium has occurred before performing analytical separations.
CERTIFICATIONS
The Corona™ CAD and CoronaPlus CAD Detectors have the following
certifications:
USA
Canada
EU
FCC
UL 61010A-1 1st Edition
CSA Standard C22.2 No. 1010.1-92
EN 61326:1997 + A1:1998
EN 61010-1 (2001-02)
Part 15 Subpart B Class A
Specifications subject to change without notice.
x
Corona® CAD® and Corona®Plus CAD® Detectors
Operating and Maintenance Manual
DO's AND DON'Ts
This list contains some helpful hints to achieve success with the Corona
CAD Detector
DO’s
•
•
•
•
•
•
•
•
•
•
•
•
•
Use only volatile mobile phase additives, as with MS (see a list of suggested
additives, below).
Filter mobile phase through a compatible 0.2-micron filter (note: pre-filtered
‘HPLC-grade’ solvents (e.g., methanol and acetonitrile) typically do not
require filtration.
Avoid contamination of mobile phase with non-volatile material (e.g., pH
calibrators are a possible source).
Thoroughly flush all HPLC lines to remove non-volatile materials before
connecting.
Use mobile phase of pH < 7.5 whenever possible.
Use gas pressure of 35 +/- 1 psi, as provided by the ESA Gas Conditioning
Module (70-8285).
Use an in-line filter between the column and detector.
Use flow rates from 0.2 - 2.0 mL/min.
Allow for proper drainage with appropriate length of waste/drain lines.
Check level of waste bottle prior to operating the Corona CAD detector.
Use the recommended flow splitting technique when using the Corona CAD
detector in parallel with other detectors.
Always make sure that detector gas flow is on before starting pump flow.
(Ensure that the LED for ‘Gas On/Off” is illuminated and there are no errors
indicated on the Gas Flow screen).
Use a quadratic fit for calibration curves.
DON'Ts
•
•
•
•
•
•
•
•
Do not use non-volatile additives in the mobile phase.
Do not use either ammonium carbonate or ammonium bicarbonate in the
mobile phase.
Do not use a column that has been previously used with nonvolatile mobile
phases.
Do not empty waste bottle while mobile phase is flowing.
Do not flood the detector. Severe or prolonged flooding may damage the
detector and void the warranty.
Do not turn on pump flow without gas flowing through the detector.
Do not use columns that bleed (e.g., silica-based amino columns).
Do not use a linear fit for calibration curves.
Corona® CAD® and Corona®Plus CAD® Detectors
Operating and Maintenance Manual
xi
Additive/Buffer*
pKa
Buffer Range
Trifluoroacetic Acid (TFA)
Formic Acid
Ammonium Formate
Acetic Acid
0.3
3.75
3.75
4.76
2.8-4.8
2.8-4.8
3.8-5.8
Ammonium Acetate
4.76
3.8-5.8
*Not all inclusive.
Some Corona CAD Detector-Compatible Volatile Mobile Phase Constituents
xii
Corona® CAD® and Corona®Plus CAD® Detectors
Operating and Maintenance Manual
TABLE OF CONTENTS
Warranty ..................................................................................................................................i
Safety/Operating Symbols ................................................................................................... iii
Warnings and Safety Precautions.......................................................................................iv
Important Operating Considerations ................................................................................ viii
Do's and Don'ts.....................................................................................................................xi
CHAPTER 1: INTRODUCTION
1.1
1.2
1.3
1.4
1.5
1.6
1.7
1.8
1.9
Overview of the Corona CAD Detectors .................................................................. 1-1
Features of the Corona and Corona Plus Detectors................................................ 1-2
Overview of this Manual........................................................................................... 1-2
Benefits of the Detector ........................................................................................... 1-3
1.4.1 The Detector Module Includes ..................................................................... 1-3
1.4.2 Corona Detector Organizer Modules ........................................................... 1-4
1.4.3 Nitrogen Generator ...................................................................................... 1-4
Component Location................................................................................................ 1-5
Mode of Operation of the Detector........................................................................... 1-8
Additional Information ............................................................................................ 1-10
Support from ESA .................................................................................................. 1-11
Frequently Asked Questions.................................................................................. 1-12
CHAPTER 2: INSTALLATION
2.1
2.2
2.3
2.4
2.5
2.6
Introduction .............................................................................................................. 2-1
Environmental Conditions ........................................................................................ 2-1
2.2.1 Physical Location of the Corona Detector.................................................... 2-1
2.2.2 Power Requirements.................................................................................... 2-3
2.2.3 Space Requirements.................................................................................... 2-4
2.2.4 Nebulization Gas.......................................................................................... 2-5
Unpacking the Detector ........................................................................................... 2-5
Installing the Detector .............................................................................................. 2-6
2.41 Basic Installation .......................................................................................... 2-6
2.4.1.1 Locating the Detector...................................................................... 2-6
2.4.1.2 Power Source ................................................................................. 2-7
2.4.1.3 Gas Source ..................................................................................... 2-8
2.4.1.4 Exhaust ........................................................................................... 2-9
2.4.1.5 Drain and Vent Installation.............................................................. 2-9
2.4.1.6 HPLC System ............................................................................... 2-13
2.4.1.7 USB Connections ......................................................................... 2-15
2.4.1.8 Other Connections ........................................................................ 2-15
2.4.1.9 Setting up Corona Plus Nebulizer Heater ..................................... 2-15
Test Protocol.......................................................................................................... 2-16
2.5.1 Role of the Test Protocol............................................................................ 2-16
2.5.2 Setup.......................................................................................................... 2-16
2.5.3 Protocol ...................................................................................................... 2-17
ESA Biosciences Corona CAD Detector Test Worksheet ..................................... 2-20
Corona® CAD® and Corona®Plus CAD® Detectors
Operating and Maintenance Manual
xiii
2.7
2.8
2.9
2.10
2.11
2.12
General Operations ............................................................................................... 2-21
2.7.1 Turning off the Corona Detector................................................................. 2-21
2.7.2 Emptying the Waste Bottle......................................................................... 2-21
2.7.3 Storing the Corona Detector ...................................................................... 2-22
Other Detector Configurations ............................................................................... 2-22
2.8.1 Using the Corona in Series with other Detector ......................................... 2-22
2.8.2 Using the Corona in Parallel with another Detector ................................... 2-22
Setting up the Thermal Organizer.......................................................................... 2-23
Making Electrical Connections............................................................................... 2-24
2.10.1 Description of the Rear Panel of the Detector............................................ 2-24
2.10.2 Interfacing to the ESA Model 584 Solvent Delivery Module....................... 2-27
2.10.3 Interfacing to other Solvent Delivery Modules............................................ 2-28
Mobile Phase Formulation ..................................................................................... 2-29
2.11.1 Supplies ..................................................................................................... 2-29
2.11.2 Procedure................................................................................................... 2-29
2.11.2.1 Mobile Phase Preparation ........................................................... 2-29
2.11.3 Degassing Mobile Phase ........................................................................... 2-30
2.11.4 Wrap up...................................................................................................... 2-32
2.11.5 Mobile Phase Qualification......................................................................... 2-32
Column Conditioning Procedure ............................................................................ 2-33
2.12.1 Supplies ..................................................................................................... 2-33
2.12.2 Procedure................................................................................................... 2-33
CHAPTER 3: THE CORONA CAD FIRMWARE
3.1
3.2
3.3
3.4
3.5
xiv
Introduction .............................................................................................................. 3-1
Initialization of the Detector ..................................................................................... 3-2
The Keypad ............................................................................................................. 3-4
Creating/Editing a Corona CAD Detector Method ................................................... 3-5
3.4.1 Overview ...................................................................................................... 3-5
3.4.2 Edit the Method Select Screen..................................................................... 3-5
3.4.3 Edit the Security Screen............................................................................... 3-6
3.4.4 Edit the Parameters Screen ......................................................................... 3-7
3.4.5 Creating/Editing a CAD + TL Method........................................................... 3-8
3.4.5.1 Timeline Screen ............................................................................ 3-8
3.4.5.2 End Event Screen ....................................................................... 3-10
3.4.5.3 Set Contact Screen ..................................................................... 3-10
3.4.5.4 Autozero Screen.......................................................................... 3-11
3.4.5.5 Filter Screen ................................................................................ 3-11
3.4.5.6 Marker Screen............................................................................. 3-11
3.4.5.7 Range Screen ............................................................................. 3-12
3.4.5.8 Gas Screen ................................................................................. 3-12
3.4.5.9 Hold Screen................................................................................. 3-12
3.4.5.10 Loop Screen ................................................................................ 3-13
3.4.5.11 Reset Screen............................................................................... 3-13
3.4.6 Save Method Screen.................................................................................. 3-13
3.4.7 Method # Zero............................................................................................ 3-14
Using a Method to Collect Data ............................................................................. 3-15
Corona® CAD® and Corona®Plus CAD® Detectors
Operating and Maintenance Manual
3.6
3.7
The System Screens.............................................................................................. 3-18
3.6.1 Role of the System Screens....................................................................... 3-18
3.6.2 RS232 Setup Screen ................................................................................. 3-18
3.6.3 Deleting Methods Screen........................................................................... 3-19
3.6.4 Event Marks Screen................................................................................... 3-20
3.6.5 Date & Time Setup Screen ........................................................................ 3-21
3.6.6 Remote Screen .......................................................................................... 3-21
3.6.7 Inputs Screen ............................................................................................. 3-22
3.6.8 Contacts Screen......................................................................................... 3-23
3.6.9 Thermal Organizer Setup Screen .............................................................. 3-24
3.6.10 Self Test Screen......................................................................................... 3-25
3.6.11 Nebulizer Heater Setup Screen ................................................................. 3-25
How to Create a Timeline Method ......................................................................... 3-27
CHAPTER 4: USING THE DETECTOR IN A HPLC SYSTEM
4.1
4.2
4.3
4.4
4.5
4.6
4.7
4.8
4.9
Introduction .............................................................................................................. 4-1
Operating the Corona Detector................................................................................ 4-1
4.2.1 Turning On the Detector............................................................................... 4-1
4.2.2 Maintaining the Detector between Analyses ................................................ 4-3
4.2.3 Shutting Down the Detector ......................................................................... 4-3
Mobile Phase Considerations .................................................................................. 4-4
Column Considerations ........................................................................................... 4-4
Sample Considerations............................................................................................ 4-5
Maximizing the Performance of the Assay............................................................... 4-6
4.6.1 Overview ...................................................................................................... 4-6
4.6.2 Selection of the Proper Output Range ......................................................... 4-6
4.6.3 Setting the Filter ........................................................................................... 4-6
An Experiment to ensure that the Chromatograph and the Detector are
Functioning Properly ................................................................................................ 4-7
Analysis of Data ....................................................................................................... 4-9
Effects of Gradient Elution on Response ............................................................... 4-11
CHAPTER 5: MAINTENANCE AND TROUBLESHOOTING
5.1
5.2
5.3
Introduction .............................................................................................................. 5-1
Detector Maintenance.............................................................................................. 5-2
5.2.1 Overview ...................................................................................................... 5-2
5.2.2 Daily Maintenance........................................................................................ 5-3
5.2.3 Weekly Maintenance.................................................................................... 5-3
5.2.4 Monthly Maintenance ................................................................................... 5-4
5.2.5 Quarterly Maintenance................................................................................. 5-4
5.2.6 Additional Periodic Maintenance.................................................................. 5-4
5.2.7 Nitrogen Generator ...................................................................................... 5-5
Customer Service of the Detector............................................................................ 5-5
5.3.1 In-line Filter Elements .................................................................................. 5-5
5.3.1.1 Frequency of Changing Filter Elements ........................................ 5-5
5.3.1.2 Checking the Pressure Drop across the Filter............................... 5-6
5.3.1.3 Changing a Filter ........................................................................... 5-6
Corona® CAD® and Corona®Plus CAD® Detectors
Operating and Maintenance Manual
xv
5.4
5.5
5.6
5.7
5.8
5.9
5.10
5.11
5.12
5.13
5.3.2 Changing the Line Fuses ............................................................................. 5-7
5.3.3 Replacing the Gas Filters............................................................................. 5-8
Cleaning the Detector .............................................................................................. 5-9
5.4.1 Cleaning the Corona Detector Unit .............................................................. 5-9
5.4.2 Cleaning the Corona Detector Organizer and Thermal Organizer............... 5-9
Establishing a System Log .................................................................................... 5-10
General Troubleshooting Approach ....................................................................... 5-10
Detector Related Issues ........................................................................................ 5-12
5.7.1 Internal Electronic Diagnostic Programs .................................................... 5-12
5.7.2 Gas............................................................................................................. 5-14
5.7.3 Drainage..................................................................................................... 5-15
5.7.4 Gain Range ................................................................................................ 5-16
5.7.5 Grounding Issues ....................................................................................... 5-17
HPLC Related Issues ............................................................................................ 5-18
5.8.1 Pump Noise................................................................................................ 5-18
5.8.2 Mobile Phase Flow..................................................................................... 5-19
5.8.3 Column....................................................................................................... 5-20
5.8.4 Mobile Phase ............................................................................................. 5-21
Standard and Sample Related Issues ................................................................... 5-22
Thermal Organizer Issues ..................................................................................... 5-23
Noise Review ......................................................................................................... 5-24
General Troubleshooting Guidelines ..................................................................... 5-25
5.12.1 Erratic/Noisy Baseline ............................................................................. 5-27
5.12.2 High Background Currents...................................................................... 5-28
5.12.3 Increase in Back Pressure ...................................................................... 5-29
5.12.4 Loss of Response ................................................................................... 5-30
5.12.5 Inability to Autozero the Signal................................................................ 5-31
5.12.6 Detector Test Procedure ......................................................................... 5-31
Power Supply Board and Logic Board Replacement............................................. 5-32
5.13.1 Replacing the Power Supply Board ........................................................ 5-32
5.13.2 Replacing the Logic Board ...................................................................... 5-32
APPENDIX A: CORONA AND CORONA PLUS DETECTOR SPECIFICATIONS
A.1
A.2
A.3
A.4
A.5
A.6
General Operating Specifications ............................................................................A-1
Timeline Specifications ............................................................................................A-2
External Requirements ............................................................................................A-2
Physical Specifications ............................................................................................A-2
Environmental ..........................................................................................................A-3
Certifications ............................................................................................................A-3
APPENDIX B: RECOMMENDED SUPPLIES AND SPARE PARTS
B.1
B.2
B.3
B.4
B.5
B.6
B.7
xvi
Corona Accesories ..................................................................................................B-1
Corona Replacement Parts......................................................................................B-1
Cables......................................................................................................................B-1
Manuals ...................................................................................................................B-2
Fuses .......................................................................................................................B-2
Organizer Module Spare Parts ................................................................................B-2
Thermal Organizer Module Spare Parts ..................................................................B-2
Corona® CAD® and Corona®Plus CAD® Detectors
Operating and Maintenance Manual
B.8
B.9
Test Standards and Guard Column .........................................................................B-2
Nitrogen Gas Supply................................................................................................B-2
APPENDIX C: ORGANIZER AND THERMAL ORGANIZER
C.1
C.2
C.3
C.4
C.5
C.6
Overview ..................................................................................................................C-1
Unpacking the Organizer .........................................................................................C-1
Installing the Corona Organizer Module ..................................................................C-3
C.3.1 General Information .....................................................................................C-3
C.3.2 Removing the Organizer Chassis Plate .......................................................C-5
C.3.3 Installing the Pulse Damper .........................................................................C-5
C.3.4 Installing a Rheodyne Manual Sample Injector Valve..................................C-6
C.3.5 Installing the In-line Filter .............................................................................C-7
C.3.6 Installing the Column Holder ........................................................................C-7
C.3.7 Manual Sample Injector Overflow Line Bracket ...........................................C-8
C.3.8 Final Assembly.............................................................................................C-9
Installing the Corona Thermal Organizer Module ..................................................C-10
C.4.1 General Information ...................................................................................C-10
C.4.2 Removing the Organizer Chassis Plate .....................................................C-11
C.4.3 Installing the Pulse Damper .......................................................................C-11
C.4.4 Installing a Rheodyne Manual Sample Injector Valve................................C-12
C.4.5 Installing the In-line Filter ...........................................................................C-13
C.4.6 Installing the Temperature Probe...............................................................C-13
C.4.7 Installing the Column Holder ......................................................................C-13
C.4.8 Manual Sample Injector Overflow Line Bracket .........................................C-15
C.4.9 Final Assembly...........................................................................................C-15
Troubleshooting .....................................................................................................C-17
Maintenance and Cleaning ....................................................................................C-17
C.6.1 Maintenance on a Daily Basis....................................................................C-18
C.6.2 Maintenance on a Monthly Basis ...............................................................C-18
C.6.3 Cleaning .....................................................................................................C-18
APPENDIX D: FIRMWARE FLOW CHART......................................................................D-1
APPENDIX E: DRAIN/VENT ASSEMBLY - OLD STYLES
E.1
E.2
Drain Cap Assembly Compression Drain Fitting Components ................................E-1
E.1.1 Installing the Drain/Vent Assembly ..............................................................E-2
Drain Cap Assembly Barbed Drain Fitting Components..........................................E-6
E.2.1 Installing the Drain/Vent Assembly ..............................................................E-7
GLOSSARY........................................................................................................................ G-1
INDEX................................................................................................................................... I-1
Corona® CAD® and Corona®Plus CAD® Detectors
Operating and Maintenance Manual
xvii
This page intentionally left blank.
xviii
Corona® CAD® and Corona®Plus CAD® Detectors
Operating and Maintenance Manual
CHAPTER 1
1.1
INTRODUCTION
Overview of the Corona CAD Detectors
The ESA Biosciences Corona® CAD® and Corona®Plus CAD® Detectors (Figure 1-1),
are universal detectors that are designed to measure non-volatile and some semivolatile analytes in the eluent from a high performance liquid chromatographic
Plus
(HPLC) system. The Corona
detector is designed to be used with mobile phases
that may adversely affect the performance of the detector due to cooling of the
nebulizer (e.g., when using aqueous THF gradients).
This Operator’s Manual will cover many aspects of successfully installing and
Plus
detectors. While many areas covered will be
operating the Corona or Corona
similar for the two detectors, any differences between them will be highlighted
throughout this manual.
Figure 1-1: The CoronaPlus CAD Detector
(Optional Thermal Organizer Not Shown)
Corona® CAD® and Corona®Plus CAD® Detectors
Operating and Maintenance Manual
1-1
Chapter 1
1.2
Features of the Corona and CoronaPlus Detectors
•
Reliable and simple to operate.
•
Universal detection of nonvolatile and many semi-volatile analytes.
•
Four orders of magnitude dynamic range (nonlinear).
•
Low ng lower limits of detection.
•
Typically < 2% R.S.D. response variability.
•
Response magnitude is minimally dependent on the analyte’s chemical
properties.
•
Broad applicability.
•
Isocratic and gradient compatibility.
1.3
Overview of this Manual
The following topics are covered in this manual:
•
Installation (Chapter 2) - how the user incorporates the detector into the HPLC
system.
•
Detector Firmware (Chapter 3) - a step by step discussion of how the user
establishes an operating program and prepares the detector for use in the
HPLC system.
•
Using the Detector in an HPLC System (Chapter 4) - running the detector as a
part of an HPLC system.
•
Maintenance and Troubleshooting (Chapter 5) - includes a series of operations
that the user should perform on a routine basis to optimize the performance of
the detector, and the activities that the operator should use to determine the
cause of problems.
A series of appendices are also included that cover a number of topics including
accessories, spare parts, specifications and related information, and installation of
the organizer and thermal organizer modules.
1-2
Corona® CAD® and Corona®Plus CAD® Detectors
Operating and Maintenance Manual
Introduction
1.4
Description of the Detector
The ESA Biosciences Corona and CoronaPlus detectors are self-contained units
(Figure 1-1), and include the electronics, detector assembly, and all controls.
Specifications can be found in Appendix A.
1.4.1 The Detector Module Includes:
The User Interface
The detector user interface includes a display panel and a
keypad (Figure 1-2).
The display shows information from the system to the
user. It provides the operational status of the system,
assists the user in setting up and editing analytical methods
and displays stored methods.
The keypad is used to enter information from the user to the
system and is used for establishing and editing methods.
Power Module
The Power Module provides the appropriate power to the
various components in the system and the Thermal
Organizer (if installed) (Figure 1-4).
Logic Module
The Logic Module contains the microprocessor and
associated electronics (Figure 1-4). The input/output
connections and the remote ports are present on the Logic
Module. Analytical methods can be stored in memory (i.e.,
are saved if the power is turned off) and can be modified or
deleted as desired.
Nebulizer
Converts the eluent from the HPLC column to an aerosol.
Drying Tube
Removes the solvent molecules from the aerosol to form
particles.
Corona Chamber
Charges the solute particles.
Electrometer
Accumulates and measures the charge that has been
placed on the solute molecules as they pass through the
detector.
Gas Module
Contains the gas filters (externally) and houses the gas
plumbing (internally) (Figure 1-4).
Corona® CAD® and Corona®Plus CAD® Detectors
Operating and Maintenance Manual
1-3
Chapter 1
1.4.2 Corona Detector Organizer Modules
A Thermal Organizer Assembly (Part Number 70-5499TA) and an unheated
Organizer Module (Part Number 70-5499) are available as options to contain the
column, manual injector, in-line filters and related fluidics. These modules can be
fitted on top of the detector. The temperature of the Thermal Organizer Module can
be set as described in Appendix C.
1.4.3 Nitrogen Generator
A nitrogen generator (Part Number 70-6003) may also be purchased to convert
compressed air into nitrogen for use with the detector. The recommended
specifications for a nitrogen generator are presented in Table 1-1.
Table 1-1:
Nitrogen Generator Specifications
Nitrogen Purity
Nitrogen Flow
Min/Max Pressure
1-4
99%
Up to 4 L/min
60-125 PSIG
Corona® CAD® and Corona®Plus CAD® Detectors
Operating and Maintenance Manual
Introduction
1.5
Component Location
Figures 1-2 through 1-5 present the location of various components commonly used
in the operation of the detector.
Active Key
Indicator
Display
Manual Gas Valve
“On/Off” Key
“Soft” Keys
“Enter” Key
“Event Mark”
Key
“Remote”
Indicator
“Escape” Key
Remote
Numeric Keypad
and “Help” Button
“Autozero”
Key
Security
“Security”
Indicator
Scroll Up/Down
Keys
Active Key
Indicator
Figure 1-2: Front of the Corona CAD and
CoronaPlus CAD Detectors
Corona® CAD® and Corona®Plus CAD® Detectors
Operating and Maintenance Manual
1-5
Chapter 1
HPLC
Inlet
11.5“
(28.6 cm)
Vent
Drain
20.5“
(52.5 cm)
9“
(23 cm)
Figure 1-3: Front Left Side of Detector
1-6
Corona® CAD® and Corona®Plus CAD® Detectors
Operating and Maintenance Manual
Introduction
Logic Module
Gas Module
Power Module
Thermal
Organizer
Control
Ground
USB
Thermal
Organizer
Power
Filter Module
Brackets
Signal Out
RS232
Filter Module
Connections
IN
OUT
Fuse
Power Line
On/Off Switch
Gas Inlet
Gas Exhaust
I/O Connections
Figure 1-4: Rear of the Detector
Corona® CAD® and Corona®Plus CAD® Detectors
Operating and Maintenance Manual
1-7
Chapter 1
Pump Off
CC1
GND
GND
+
CC2
GND
GND
+
CC3
GND
GND
Autozero
GND
+
CC4
Gas Off
Strt
GND
Figure 1-5: Close-Up of I/O Connections
1.6
Mode of Operation of the Detector
The Corona detector is a mass sensitive detector that can respond to essentially all
non-volatile and some semi-volatile compounds in the sample that are eluted from
the column. The steps in the detection process, presented schematically in Figures16 and 1-7, include:
Nebulization of the Eluent - the mobile phase containing the analytes from the
column is introduced into the nebulizer, where pressurized gas (e.g., nitrogen) that
has been passed through a carbon filter and a high-efficiency particulate air (HEPA)
filter is used to form an aerosol of “ultra fine droplets”. An impactor is included in the
nebulizer to remove large aerosol droplets. Large aerosol droplets (which would not
dry properly and would lead to a larger amount of noise in the detector) strike the
impactor and are diverted to the drain and then to the waste bottle.
For the CoronaPlus detector, the nebulizer is maintained at 30oC in order to prevent
freezing of the nebulizer when used with some aqueous/organic gradients.
1-8
Corona® CAD® and Corona®Plus CAD® Detectors
Operating and Maintenance Manual
Introduction
Evaporation of the Solvent from the Aerosol - the remaining aerosol droplets are
directed into the drying tube where the solvent is completely evaporated. Since the
droplets are very small, they evaporate very quickly. The remaining analyte particles
are then directed into the corona region of the detector.
Charging of the Solid Particles - before the particles can be detected they must be
electrically charged. A secondary stream of gas forms positively charged ions as it
passes a high voltage corona needle. The stream of ions then pass through an
orifice into a mixing chamber forming a jet that collides with the opposing jet of
analyte particles. As the two jets collide and are mixed, the charge is diffusionally
transferred to the analyte particles. After leaving the mixing chamber, high mobility
excess ions are removed by a negatively charged, low voltage ion trap. Low mobility
singly charged particles greater than 10nm in diameter pass by the ion trap where
they then impinge on a particle screen filter.
Monitoring the Charged Particles - as the charged particles transfer their charge to
the screen filter, current is measured by a sensitive electrometer which in turn
generates a signal that is amplified and placed on the detector output.
Nebulization
Evaporation
Charging the
Particles
Monitoring
the Charge
Figure 1-6: Stages in Detection
Corona® CAD® and Corona®Plus CAD® Detectors
Operating and Maintenance Manual
1-9
Chapter 1
Figure 1-7: Schematic Overview of the Detector
1.7
Additional Information
A detailed discussion of the use of aerosol charging detection in HPLC is presented
in:
R.W. Dixon and D.S. Peterson, Development and Testing of a Detection Method
for Liquid Chromatography Based on Aerosol Charging, Anal. Chem. 2002, 74,
2930-2937.
To install and operate the detector in an HPLC system, it will be necessary to obtain
information from the manuals of other devices that are used in conjunction with the
detector. These include (but are not limited to) the pump, the analytical column, the
nitrogen generator, autosampler or injector, and the data recording/processing device
(recorder, integrator, personal computer, etc.).
1-10
Corona® CAD® and Corona®Plus CAD® Detectors
Operating and Maintenance Manual
Introduction
1.8
Support from ESA
ESA Biosciences maintains both applications and service departments to assist in
the event of any difficulty with the installation or operation of the instrument. Contact
Technical Support (Phone: 1-800-275-0102 or 978-250-7067; Fax: 978-250-7065) for
assistance.
The detector includes a number of diagnostic features so that potential problems can
be traced to the appropriate sub-system. When contacting the ESA service
department, please provide the serial number of your unit and the software version
number (which is displayed after the system has initialized. The software version can
also be obtained at any time by pressing the HELP button followed by the ESCAPE
button). If a diagnostic message or error is presented on the display, please be
prepared to provide that information to the service representative as well.
An on-line help system is included with the operating program, which can be
accessed at any time by pressing the HELP button.
ESA also offers instrument qualification services including Installation Qualification
(IQ) and Operational Qualification (OQ). Performance Qualification (PQ) is
performed by the customer, unless the Corona CAD detector is part of a complete
ESA HPLC system. For details, please contact ESA or your local representative.
A wide variety of instrumentation and supplies including pumps, autosamplers,
nitrogen generators, columns, data management software, detectors and mobile
phases are available from ESA. These components have been specifically designed
or selected to optimize the performance of your HPLC System.
A wide variety of Corona detector Application Notes are currently available from ESA
Biosciences.
For additional information, please contact ESA Biosciences, Inc. or your local
representative.
Corona® CAD® and Corona®Plus CAD® Detectors
Operating and Maintenance Manual
1-11
Chapter 1
1.9
Frequently Asked Questions
Question: As the detection principles of CAD and ELSD have two steps in common (nebulization and
evaporation) how can you explain that you can obtain a better consistency of response? The lack of
consistency of response of the ELSD is mostly due not to the detector itself but to the laws of physics
(the difference in response is mainly due to volatility and solubility differences). Have you for example
tested monosaccharides which give very different responses with ELSD? Can you do better?
Answer: In direct comparison studies where volatility and solubility are common variables with
flow injection analysis, yes, our data, including those with monosaccharides, show that charged
aerosol response magnitude appears to be much less dependent on analyte nature. The effect of
analyte volatility appears to be very similar to low temperature ELSD. Other variables that
reportedly affect light scattering response magnitude include the formation of solid crystals vs.
solvated particles (the former scattering light much more efficiently), specific absorption of light
(probably a minor effect) and more importantly the dramatic changes in efficiency of light
scattering with particle size (Rayleigh vs. Mie vs. refraction-reflection). This latter relationship
becomes most important with chromatographic separations when considering the actual peak
elution volume of each analyte. Differences in peak volume between analytes, governed by
individual analyte chromatographic variables, are the basis for differences in the peak
concentration seen by the detector. Particle size distribution differences that result from peak
concentration differences lead to dramatic differences in response with ELSD, again because of
the changes in efficiency of light scattering. The efficiency of particle charging and detection (i.e.
Corona CAD detection) has been shown to be much more uniform with particle size. Also, our
results suggest that Corona CAD detector response is not as dependent on the physical (e.g.,
crystalline) characteristics of the aerosol.
Question: You state that "Corona CAD detector’s unique method of detection allows quantitation
across a range that exceeds four orders of magnitude". On the other hand the calibration curve you
show seems to be non-linear. So what is the difference with ELSD?
Answer: CAD is not linear and a quadratic plot type present in all or most chromatography data
systems provides an easy way to calibrate. Alternatively, a log-log plot can be used. The
difference to ELSD is that CAD response is approximately proportional to the square root of
analyte mass across the entire dynamic range. The proportionality with ELSD changes from 0.67
to 1.3 to 2.0 through the dynamic range again due to the changes in efficiency of light scattering
with particle size. From a purely theoretical standpoint and in practice, calibration of the Corona
CAD detector is much simpler and ultimately can result in much more accurate quantitation than
ELSD.
Question: We have observed that response factors for the Corona CAD detector is not consistent for
the same compound over different concentration ranges. Why is this?
Answer: Response factors are not consistent for the same compound over different
concentration ranges because the CAD response is nonlinear. One would have to calculate the
concentrations using a quadratic fit.
Question: Why is the first part of the response curve more parabolic than linear?
Answer: The shape of the response curve is related to the expected square root proportionality
between mass and response. Mass vs. particle diameter has a cube root proportionality. Mean
charge per particle has a slightly >1 proportionality with particle diameter. This and perhaps other
factors lead to an observed square root proportionality.
1-12
Corona® CAD® and Corona®Plus CAD® Detectors
Operating and Maintenance Manual
Chapter 1
Question: Why does the Corona CAD detector response increase as the organic % increase?
Answer: The dependence of Corona CAD detector’s response on % organic appears to be
purely an effect of nebulization with an impactor and siphon. There is a greater loss of analyte
when eluted in aqueous solvent. The effect appears to be very similar to that of ELSDs (e.g.,
Alltech ELSD with impactor on).
Question: What occurs when the charge is transferred to particles? Is the charge only located at the
"external surface" of the particles? Or both inside and outside of the particle?
Answer: It is rational to assume that the majority of charge is toward the outer edges of the
particles.
Question: Can the Corona CAD detector be used with SFC?
Answer: We have not tried CAD with SFC at ESA Biosciences, but we do have customers that
use this approach.
Question: Does the corona description mean that gas is floating in the form of a ring around the
platinum wire? What sort of high mobility particles are removed by the ion trap? Where do the
negatively charged particles go? If you create a positive charge don’t you create a negative charge as
well?
Answer: The Pt wire, within a small chamber, is poised at a positive voltage and gas is
continuously swept through this chamber. This leads to the production of a corona plasma
whereby positive ions and electrons are generated from the reagent gas molecules. The
electrons accelerate toward the Pt wire while the positive reagent ions are swept through an
orifice to mix with an opposing stream of analyte particles (the aerosol). The ion trap removes the
high mobility positive ions (therefore the excess reagent ions) and low mobility positively charged
analyte particles are detected. The solvent is evaporated and thus does not form particles - rather
nonvolatile analyte forms particles that are charged and detected. Negatively charged particles
are essentially not formed, and the electron flow to the Pt wire provides the balance of charge.
Question: Is it possible to use a compound’s physical characteristics (e.g., molecular weight [MW],
melting point [MP] or boiling point [BP]) to predict its volatility and therefore detection by the Corona
CAD detector?
Answer: The simple answer is no. MW, MP and BP cannot be used to predict a compound’s
volatility with any great accuracy. For example, compounds that have similar MWs may have very
different volatilities due to polarity and hydrogen bonding. For example, glycerol (MW 92; BP
182 oC) was easily detected to <1ng o.c. but propylglycerol (propanediol) (MW 76; BP 188 oC)
was not detected by the Corona CAD detector.
Perhaps a better indicator of volatility is vapor pressure. Compounds with vapor pressures of
1.2 x 10⁻⁶ Torr (or greater) are susceptible to evaporation at 29 oC and may be problematic for
detection by the Corona CAD.
1-14
Corona® CAD® and Corona®Plus CAD® Detectors
Operating and Maintenance Manual
CHAPTER 2
2.1
INSTALLATION
Introduction
This chapter describes:
• Environmental Conditions (Section 2.2)
•
Unpacking the Detector (Section 2.3)
•
Installing the Detector (Section 2.4)
•
Test Protocol (Section 2.5
•
ESA Biosciences Corona CAD Detector Test Worksheet (Section 2.6)
•
General Operations (Section 2.7)
•
Other Detector Configurations (Section 2.8)
•
Setting up the Thermal Organizer (Section 2.9)
•
Making Electrical Connections (Section 2.10)
•
Mobile Phase Formulation (Section 2.11)
•
Column Conditioning Procedure (Section 2.12)
Corona and CoronaPlus detector specifications can be found in Appendix A.
2.2
2.2.1
Environmental Conditions
Physical Location of the Corona Detector
The detector should be operated in a facility with the following environmental
conditions:
•
The temperature range should be maintained between 10-35oC. The Corona
detector should not be installed near a window, ventilation duct or any other
device that can cause a significant change in the temperature. The humidity
should be maintained between 0-85% RH.
•
A suitable ventilation system must be provided. Many of the solvents that are
used in an HPLC system are toxic. Make certain that the room is equipped with
an exhaust system to ventilate vapors safely from the detector. Such ventilation
MUST be at atmospheric pressure. A vacuum or restriction may result in
pressure changes within the detector resulting in baseline instability and/or other
problems.
Corona® CAD® and Corona®Plus CAD® Detectors
Operating and Maintenance Manual
2-1
Chapter 2
•
Nitrogen gas must be available. A supply of nitrogen gas is required for the
operation of the detector. The gas must be supplied at 35.0 +/- 0.1 psi (2.4 bar)
and must be 99.99% pure.
WARNING: The nitrogen gas source must not be oil-pumped as oil in
the gas stream can clog the detectors in-line filters and may damage
the detector itself.
WARNING: The use of open flames in the laboratory must be
prohibited. Many of the solvents that are used in an HPLC system are
flammable. Make certain that the room is equipped with an exhaust
system to ventilate vapors safely.
WARNING: Do not install the detector where corrosive gas or
excessive dust is present. These can adversely affect the long-term
operation of the unit.
•
Install on a stable, flat surface. The detector should be installed on a laboratory
bench that is capable of supporting the entire HPLC system (e.g., a complete
HPLC system can weigh over 200lbs). The bench should have a minimum depth
of ~24" (60cm).
•
The special drain bottle provided with the instrument must be placed on a
surface (usually the floor) beneath the instrument. The drain and vent lines
should be shortened (if necessary) and connected to the vented cap and drain
bottle provided with the detector. If required by your facility, please provide a
secondary containment vessel for the drain bottle.
NOTE: Ensure that the two drain tubes are not kinked or blocked in
any way.
WARNING: If the detector does not drain properly the waste liquid
will backup and flood the detector. During operation always observe
that liquid is draining into the drain bottle. Severe or prolonged
flooding may permenatatly damage the detector and void the
warranty.
2-2
Corona® CAD® and Corona®Plus CAD® Detectors
Operating and Maintenance Manual
Installation
•
Only use appropriate mobile phases:
o If PEEK components are present in the HPLC system DO NOT use:
dichloroacetic acid; acetone; tetrahydrofuran (THF); dichloromethane;
chloroform; dimethylsulfoxide (DMSO). Although unlikely to be used with the
Corona detector, PEEK is not compatible with strong acids such as
concentrated sulfuric acid and concentrated nitric acid.
o Evaporation of some organic solvents can cool the nebulizer to such a degree
that water (as a trace contaminant or as part of an aqueous gradient) freezes
in the nebulizer leading to adverse detector performance. Only use the
CoronaPlus detector where nebulizer freezing is an issue (e.g., aqueous THF
gradients).
o If possible keep the pH of the mobile phase to ≤7.5 and always use volatile
salts or buffers.
o Do not use either ammonium carbonate or ammonium bicarbonate in the
mobile phase.
o Reference section 2.11, Mobile Phase Formulation for the procedure to create
the recommended detector mobile phase.
o Only use volatile mobile phases.
2.2.2
Power Requirements
WARNING: The Corona detector uses a three-prong power cord that
includes a ground wire. The unit must be connected to a properly
grounded three-prong power outlet to ensure safe and proper
operation. If there is any doubt about the power supply, a qualified
electrician should be contacted.
The 120 VAC power cable consists of a 3-prong receptacle for attachment to the
power inlet on the back of the detector unit and a three prong 15 amp plug
configuration for connection to a standard U.S. grounded outlet.
The 120 VAC 50/60 Hz power cable consists of a 3-prong receptacle for attachment
to the power inlet on the back of the detector unit. The other end of the cable has
three color-coded wires that are used to attach to the appropriate plug. The colorcoding of the wires meets ISO and VDE conventions as follows:
Earth Ground
Neutral
Line
Green with Yellow Stripe
Blue
Brown
The maximum power consumption of the unit is 100 VA.
Corona® CAD® and Corona®Plus CAD® Detectors
Operating and Maintenance Manual
2-3
Chapter 2
WARNING: The power plug should be installed by a qualified
electrician and should be an approved plug (e.g., CE, TUV, UL).
NOTE: The detector must be connected to an electrical outlet that
shares a common ground with other components of the
chromatographic system (e.g., pump, autosampler computers, etc.).
This will avoid “ground loops” which can create erratic results (e.g.,
varying background, high noise, spiking, etc.). Use of a common
power strip is highly recommended to ensure a common ground.
Although the detector contains a built-in line filter to reduce interference at any input
voltage, connection to an electrical line which also serves units with a large power
drain or which may be subject to power surges is not recommended (typical units of
this type include centrifuges, ovens, refrigerators and fume hoods). In addition, a
surge suppressor or an uninterruptible power supply (UPS) may be used. Surge
suppressors or UPS designed for personal computers are suitable.
The Corona and CoronaPlus detectors meet the requirements of Underwriters
Laboratories (UL), Canadian Standards Association (CSA) and European
Certification (CE) (see Certification section).
2.2.3
Space Requirements
The dimensions of the Corona detector are: 20.5” (L) x 9” (W) x 11.25 (H)
[52.5 x 23 x 28.6 cm]
The weight of the detector is: 22lbs (10kg)
The space requirements for the entire HPLC system depends on the configuration of
the system. Figure 2-1 shows the space requirements for a typical ESA HPLC
Corona detector system.
Figure 2-1: Approximate Dimensions for a Corona Detector System
2-4
Corona® CAD® and Corona®Plus CAD® Detectors
Operating and Maintenance Manual
Installation
NOTE: The detector should be placed in a position so that distance
between the end of the column and the mobile phase inlet on the
detector is minimized. This will reduce post column band
broadening effects and will optimize chromatographic resolution.
2.2.4
Nebulization Gas
A supply of nitrogen is required for operation of the detector. The gas must be pure
(typically +99.99%), free from particulates, devoid of volatile hydrocarbons/solvent
vapors (e.g., from a compressor). The gas must be supplied at a pressure of 60 psi,
for use with the Gas Conditioning Module (70-8285) or 35.0 +/- 0.1 psi if connecting
directly to the detector. The use of bottled nitrogen gas may be a quick and easy
source of nitrogen during the installation. However for longer term use, a nitrogen
generator (Part Number 70-6003) is highly recommended.
WARNING: The nitrogen gas source must not be oil-pumped as oil in
the gas stream can clog the detectors in-line filters and may damage
the detector itself.
WARNING: It is required that inline moisture and 0.1um particle
traps be in place for all nitrogen sources. Failure to provide
adequate nitrogen filtering can potentially cause damage to the
detector. A qualified trap assembly is included from ESA, Gas
Conditioning Module (Part Number 70-8285)
2.3
Unpacking the Detector
Carefully unpack your shipment and inspect the contents to verify receipt of all
components. The detector comes with a Customer Inventory Checklist which lists
the parts shipped with the unit. This document is found in the Manual, Appendix E. If
an ESA model 584 pump, autosampler, nitrogen generator, Organizer module or
Thermal Organizer module are included, they will be shipped in separate cartons.
NOTE: See Appendix B for a list of recommended supplies and spare
parts.
Carefully inspect the shipping carton(s) and all components. If any parts are missing,
call ESA's Customer Service Department and indicate the missing items via the part
numbers.
Corona® CAD® and Corona®Plus CAD® Detectors
Operating and Maintenance Manual
2-5
Chapter 2
WARNING: If there is any evidence that the Corona detector unit has
been damaged in shipping, do not install or power on the unit.
Immediately contact ESA [(800) 275-0102, (978) 250-7000] or its
representative for advice.
NOTE: The shipping carton should be retained as it can be used if it
becomes necessary to transport the detector.
2.4
2.4.1
Installing the Detector
Basic Installation
This section describes how the different connections are made to the Corona
detector.
Make connections in the following order:
2.4.1.1 Locating the dectector
Position the detector in a location so that the distance between the end of the HPLC
column and the detector inlet are minimized.
NOTE: By minimizing the column to detector distance post column
band broadening effects can be minimized and optimal
chromatographic resolution can be achieved.
2-6
Corona® CAD® and Corona®Plus CAD® Detectors
Operating and Maintenance Manual
Installation
2.4.1.2 Power Source
Connect the power cord to the back of the system (Figure 2-2) and into a grounded
outlet.
IN
OUT
Fuse
Power Line
On/Off Switch
Figure 2-2: Rear Panel - Corona CAD Detector
NOTE: The detector must be connected to an electrical outlet that
shares a common ground with other components of the
chromatographic system (e.g., pump, autosampler computers, etc.).
This will avoid “ground loops” which can create erratic results (e.g.,
varying background, high noise, spiking, etc.). Use of a common
power strip is highly recommended to ensure a common ground.
Corona® CAD® and Corona®Plus CAD® Detectors
Operating and Maintenance Manual
2-7
Chapter 2
2.4.1.3 Gas Source
a) Connect the nitrogen source to the gas inlet of the ESA Gas Conditioning
Module (P/N 70-8285) using the “quick connection” ¼” ID connection.
b) Connect outlet of ESA Gas Conditioning Module to the gas inlet (Figure 23), using a “quick connection” ¼” ID connection. Use the ¼” PTFE tubing
supplied with the system (white; the smaller diameter single tubing). If this
tubing needs to be cut, use the included tube cutter (P/N 70-7112) and cut
the tubing as neatly as possible. Avoid using a pair of wire cutters or
scissors as this can lead to tube damage and a leaky fitting.
Figure 2-3: Nebulization Gas System
WARNING: It is required that inline moisture and a 0.01um particle
trap be in place for all nitrogen sources. Failure to provide adequate
nitrogen filtering can potentially cause damage to the detector. A
qualified trap assembly is included from ESA, Gas Conditioning
Module (Part Number 70-8285).
2-8
Corona® CAD® and Corona®Plus CAD® Detectors
Operating and Maintenance Manual
Installation
2.4.1.4 Exhaust
Connect the gas outlet, located on the back of the detector (Figure 2-3), to a fume
hood or other venting device with the vent tube supplied.
Connect one end of the larger diameter single tubing to the Exhaust Outlet quick
connect fitting on the back panel of the detector and connect the other end to a fume
hood or vent. If required, this tubing should be cut in a similar manner to that of the
gas inlet tubing.
WARNING: Make certain that the venting device used does not
provide any positive or negative pressure on the detector exhaust
stream. Excessive pressure can result varying background, high
noise or signal spiking.
WARNING: Make certain that the exhaust gas does not enter the
laboratory. The exhaust gas may contain hazardous fumes.
2.4.1.5 Drain and Vent Installation:
The Drain/Vent tubing assembly (Part Number 70-7115) consists of a piece of Teflon
lined Tygon tubing and a piece of solid Teflon tubing with a piece of PEEK tubing
inside that must be carefully assembled to promote proper drainage.
The assembly includes the Drain Tubing 3/16”ID x 1/4”OD x 6’ long (Part Number 707113) with .015" ID x 1/16" OD x 5’ long PEEK Tubing (Gray) (Part Number 70-5996)
and the Vent Tubing 1/8”ID x ¼”OD x 6’ long (Part Number 70-6259) (Figure 2-4).
PEEK Tubing
Solid Teflon Tubing
Tygon Tubing
Teflon Lining
Vent Tube
Drain Tube
Figure 2-4: Vent and Drain Tubing
Corona® CAD® and Corona®Plus CAD® Detectors
Operating and Maintenance Manual
2-9
Chapter 2
To attach the Drain/Vent Tubing assembly:
a) Connect the Vent tubing to the quick connect fitting located on the bottom front
left portion of the detector. This is a quick connect fitting which simply latches
when the fitting is pushed in (Figure 2-6).
b) Connect the Drain tubing (end with SS fitting) to the compression fitting located
on the bottom front left portion of the detector. The inner PEEK tubing should
extend about ½” into the draing fitting on the machine. Ensure that the two
ferrules inside the nut are properly oriented (Figure 2-5). The Drain fitting
should be tightened with the supplied 9/16” wrench until it is snug (Figure 2-6).
CAUTION: Do no over-tighten the drain fitting. Equipment damage
could result.
Figure 2-5: Correct Orientation of Nut and Ferrule
Figure 2-6: Location of Fluidics Connections
2-10
Corona® CAD® and Corona®Plus CAD® Detectors
Operating and Maintenance Manual
Installation
c) Using the tubing cutter (Part Number 70-7112) from the Drain/Vent kit, cut both
the drain and vent tubing to a length (between the detector and waste bottle)
where there are no dips, kinks or loops. Cut the drain tubing 4" longer than the
vent tubing. A vertical drop is optimum. It may or may not be necessary to cut
the tubing, depending upon the installation. Leave enough excess in case the
tubing ends need to be cut and reinstalled. The inner PEEK tubing does not
have to run the entire length of the Teflon Tubing as long as ½” is extended into
the fitting on the Corona.
CAUTION: Because the vent tubing consists of two layers, it may be
necessary to flare the tubing. This will slightly widen the opening.
Take care not to damage the Teflon lining during attachment and
visually inspect the lining to ensure that it does not crimp during
installation.
d) Attach the other end of the vent tubing to the barbed fitting on the cap of the
Waste Bottle (P/N 70-7754). The vent tubing will be attached to the smaller
barbed fitting and the drain tubing will be attached to the compression fitting
(Figure 2-7). Carefully place the tubing over the barb ensuring that the inner
lining is completely over the barb. Grasp the tubing near the barb and push the
tubing onto the barb until it is all the way down.
e) Install the nut and ferrule onto the drain tubing as shown in (Figure 2-5). Insert
the drain tubing into the drain fitting (Figure 2-8) until it protrudes approximately
2" from the bottom of the cap (Figure 2-8). Screw the nut on to the fitting until it
is finger-tight. Using the wrenches supplied in the accessory kit, hold the body
of the fitting with the ½” end of one of the wrenches. Tighten the nut with the
9/16” end of the other wrench until it is snug, approximately three-quarters of a
turn with the wrench.
Drain
Relief Valve
Vent
Figure 2-7: Bottle Cap Connections
Corona® CAD® and Corona®Plus CAD® Detectors
Operating and Maintenance Manual
2-11
Chapter 2
f) Place the waste bottle in secondary containment in a secure location below the
detector (Figure 2-9). Make sure that the cap is tightened to prevent any gas
leaks. The waste bottle is a closed system under a slight pressure and has a
pressure relief valve on the cap in the event that the bottle becomes overpressurized (e.g., if exhaust is blocked).
NOTE: The cap contains a perfluoroelastomer (FFKM) sealing washer
(P/N 70-7785) to insure a leak-free fit to the bottle. Use care when
emptying the bottle to avoid damage to the washer.
NOTE: The cap contains a pressure relief valve, rated at 10 psi to
prevent overpressureization of the waste system.
2"
Figure 2-8: Drain Tubing Installation
2-12
Corona® CAD® and Corona®Plus CAD® Detectors
Operating and Maintenance Manual
Installation
Figure 2-9: Correct Setup of Drain Tubing
2.4.1.6 HPLC System
NOTE: In order to achieve maximum detector performance, a
validated, pre conditioned HPLC system should be used.
Put the C18 guard cartridge (P/N 88-12307) in the guard column holder (P/N 8812414). Precondition the guard column (P/N 88-12414) following the procedure
outlined in section 2.12.
Corona® CAD® and Corona®Plus CAD® Detectors
Operating and Maintenance Manual
2-13
Chapter 2
WARNING: Failure to properly condition the guard column can result
in varying background, high noise or signal spiking.
Connect the outlet of the autosampler to the inlet side of the guard column holder.
The autosampler, column holder and detector tubing connections should use 0.005"
PEEK tubing (Red) that is as short as possible.
Connect the tubing from the outlet of the guard column holder to the inlet of the 0.5
µm stainless steel filter assembly (P/N 70-4538). Then connect the outlet of the filter
assembly to the inlet of the detector (Figure 2-10).
NOTE: Try to minimize the column to detector distance so that post
column band broadening effects can be minimized and optimal
chromatographic resolution can be achieved.
WARNING: If using TFA based mobile phase is to be used, stainless
steel tubing must be used between the column, filter and detector.
CAUTION: Do not start the flow of mobile phase at this time.
Figure 2-10:
2-14
HPLC Inlet
Corona® CAD® and Corona®Plus CAD® Detectors
Operating and Maintenance Manual
Installation
2.4.1.7 USB Connections
If the HPLC system is using either the Agilent Chemstation® or EzChrom Elite®
Application, connect the detector to the workstation using the provided standard USB
cable (Type A-B, P/N 70-5713). Once the connection is made, install the appropriate
drivers using the CD’s provided.
Agilent – For use with Agilent ChemStation® (Version B.02.01 (SR1) or later) using
ESA ChemStation Driver (P/N 70-7102). See driver technical note for Versions B.03
of higher.
ESA "Elite" – For use with EZChrom™ Elite® for ESA Data Systems (Version 3.2 or
later) using ESA EZChrome Elite Driver included with the application installation
media.
2.4.1.8 Other Connections
If an external A/D converter is to be used or additional IO connections are required,
see section 2.10 for further information.
2.4.1.9 Setting up Corona Plus Nebulizer Heater
a) If using a CoronaPlus detector, press the System soft key on the main Corona
menu. Press the ▲ or ▼ key to select the nebulizer heater. Select the
[NEXT] soft key to access the Setup Screen (Figure 2-11).
NEBULIZER HEATER SETUP
Status = Normal
Power (OFF)
Temperature = xx.xC
[CANCEL]
[MENU]
[SAVE]
Figure 2-11: The Nebulizer Heater Setup Screen
b) Change the Power field to ON with the ▲ or ▼ key. Press Enter and then
press the [SAVE] soft key. The display will revert back to the Main Corona
menu.
The system will store the nebulizer heater status as ON and can only be changed to
OFF if edited and saved in the Nebulizer Heater Setup screen.
Corona® CAD® and Corona®Plus CAD® Detectors
Operating and Maintenance Manual
2-15
Chapter 2
2.5
2.5.1
Test Protocol
Role of the Test Protocol
This section provides a procedure that can be used to verify that the Corona detector
is functioning properly. This procedure is designed for initial system checkout and
can also be used for troubleshooting purposes. This protocol assumes that the
detector is part of either a Chemstation or EzChrom Elite system. If it is not, the
protocol may still be run using the appropriate setup and operational steps for your
specific configuration.
If problems are observed, contact ESA Biosciences or its representative. To assist
the service engineer, please fax the worksheet to ESA Biosciences’ Service
Department - Fax (978) 250-7092 or your local representative to describe the
problem and assist in the resolution of the problem.
Please retain a copy of the filled in worksheet for future reference. If the detector
requires service, this document will provide critical information as to the original,
installed state of the detector.
NOTE: ESA Biosciences has developed a Validation Protocol which
can be used to demonstrate that the Corona detector and related HPLC
equipment is operating in an acceptable manner. This protocol
includes Installation and Operational Qualifications, and is performed
by a factory trained service engineer. For details, please contact ESA
Biosciences or your local ESA Biosciences representative for pricing
and scheduling.
2.5.2
Setup
Create a set of methods using your HPLC Application to inject 10µl of each of the
following standards included in the installation kit. The sequence of the methods
should be as follows:
1x 500 µg/mL – Used for initial system conditioning
3x water blank
3x 500 µg/mL
3x 25 µg/mL
Load the standards into the autosampler to allow them to come to equilibrium with
the temperature setting for this instrument.
2-16
Corona® CAD® and Corona®Plus CAD® Detectors
Operating and Maintenance Manual
Installation
Note a typical method has the following characteristics:
Mobile Phase Flow Rate – 1.0mL/min
Column Temperature – ambient
Injection Volume – 10µl
Run Time – 2.0 minutes
2.5.3
Protocol
CAUTION: Make certain that the waste bottle is emptied on a routine
basis. It should not be allowed to get full. Failure to do this may result
in flooding of the detector. Severe or prolonged flooding may damage
the detector and void the warranty.
a) Turn on the detector using the On/Off switch (located on the back of the
detector Figure 2-2) and allow it to perform a Self Test. When the instrument is
first powered up the display will present a number of diagnostic screens (e.g.,
Figure 2-12). The program will sequentially check individual sections of the
detector. During this time the second line of the display will indicate the
sequential progress through the testing procedures.
CORONA SELF TEST RUNNING
Current Test - xxxx
Figure 2-12: The Corona Self Test Running Screen
NOTE: If a fault message is presented, turn the power off, wait a
few seconds and power the unit up again. If the fault message
appears once again, check the error code section (Chapter 5) and
take appropriate action to rectify the problem.
b) After the self test is completed successfully, the Version/Copyright screen
(Figure 2-13) will be presented for several seconds. Record the version
information on the worksheet.
CORONA
Version x.xxx
Copyright 2004
[NEXT]
Figure 2-13: The Version/Copyright Screen
Corona® CAD® and Corona®Plus CAD® Detectors
Operating and Maintenance Manual
2-17
Chapter 2
c) After several seconds, the instrument will automatically advance to the MAIN
MENU (Figure 2-14).
MAIN CORONA MENU
[SYSTEM]
Select desired operation
[EDIT]
[RUN]
Figure 2-14: The Main Corona Menu Screen
d) Start the delivery of nitrogen to the Gas Conditioning Module at a minimum
pressure of 60 psi.
WARNING: Always turn on the gas source first prior to starting the
flow of mobile phase. Turn on the detector, then turn on the gas flow
for a few minutes before running the pump.
e) Using the application in preview mode, turn on the detector.
f) Confirm the gas pressure is 35.0 psi +/- 0.1 psi. If required, adjust the gas
pressure using the adjustment knob on the ESA External Gas
Conditioning Module (P/N 8285) so that the pressure reads 35.0 psi +/0.1 psi. Record the pressure and initial current information on the
worksheet.
WARNING: The detector is designed to correctly operate at 35.0 +/- 0.1
psi. If the gas pressure provided is outside of the range specified the
detector will not provide consistent results.
g) Allow the gas to flow at least 5 minutes. Wait for the reported current to
stabilize. The current should be 0.05pA > I > -0.05pA.
h) Start the delivery of the mobile phase, see section 0
i) Mobile Phase Formulation for instruction on how to create the mobile phase,
at a rate of 1mL/min. Check all fittings to ensure there are no leaks and tighten
as appropriate.
j) Monitor the background signal of the detector. It will increase initially, and then
start to fall. Wait at least 10 minutes or until the current is stable and not
changing by more than 0.01 pA per minute. Record the initial and final I
values on the worksheet. Also record the information about the mobile
phase used.
NOTE: The initial current when flowing mobile phase can be as much
as 50-150 times the initial value without flow.
2-18
Corona® CAD® and Corona®Plus CAD® Detectors
Operating and Maintenance Manual
Installation
WARNING: If the detector does not stabilize after 60 minutes or if the
final current is not much lower than the initial value then this may
indicate contaminated mobile phase and/or solvents, column bleed, or
prior contamination of the HPLC system by mobile phases not
compatible with the Corona detector (e.g., ones that contain nonvolatile components).
k) Observe the FRatio and Total flow values and record them on the
worksheet.
l) Stop the preview mode and now run your sequence of methods and
record the results on the worksheet. Additionally keep a print out of all
chromatograms for future reference.
NOTE: A sharp peak should be observed on all the chromatograms
and the retention times for the peaks should be between 1.3 and 1.6
minutes
NOTE: Other than the initial solvent void peak, the blank injections
should be flat and provide a means of measuring base system noise.
NOTE: This is only intended to be a preliminary test that the Corona
detector is working properly. A more comprehensive Validation Test
is available from ESA, or can be created using the standards included
with your instrument.
Congratulations, your installation of the Corona Detector is complete!
Corona® CAD® and Corona®Plus CAD® Detectors
Operating and Maintenance Manual
2-19
Chapter 2
2.6
ESA Biosciences Corona CAD Detector Test Worksheet
GENERAL INFORMATION
Organization:
Address:
Operator:
Phone Number:
Fax Number:
Email Address:
Date:
Detector Unit S/N:
Software Version:
A) Startup Information
If there is an error message on the display when the unit is powered up, please indicate.
B) Mobile Phase Information
Lot Number
I Value
Expiration Date
C) Tests
Initial Conditions
Gas Pressure
Present Value
Current
B1) When Nitrogen is initially provided
B2) When Mobile Phase is turned on
B3) After stabilization
Operational
FRatio Reading
Total Flow Reading
Chromatogram
500 µg/mL
500 µg/mL
500 µg/mL
Present Value
Height
Expected Value
35.0 +/- 0.1 psi
Measured Value
Expected Value
(Y/N)
B2 > B1?
B3 < B2?
Operational
ICor Reading
VCor Reading
Ion Trap Reading
Area
Present Value
Retention Time
25 µg/mL
25 µg/mL
25 µg/mL
Remarks:
2-20
Corona® CAD® and Corona®Plus CAD® Detectors
Operating and Maintenance Manual
Installation
2.7
2.7.1
General Operations
Turning Off The Corona Detector
a) Turn off the pump.
b) Allow the gas to flow for at least 5 minutes.
c) Return to the main menu, if in run mode, then press the “Gas Off” switch on the
front panel.
d) Turn off the gas source to the detector.
e) Turn off the detector using the On/OFF switch.
2.7.2
Emptying the Waste Bottle
a) Turn off the pump.
b) Allow gas to flow for at least 5 minutes.
c) Shut of gas using “Gas On/Off” button.
d) Return Corona detector display to “main menu”.
e) Undo cap and empty waste bottle.
f) Check the FFKM sealing washer (Part Number 70-7785). Replace if damaged.
g) Reattach bottle cap. Make sure it is securely tightened.
NOTE: Make sure that the waste bottle cap is tight and that the
drain/vent tubing connections are tight. Failure to do so could result in
low or no detector response.
h) Return to Corona detector “run” screen.
i) Turn on gas flow, ensure that the gas pressure is normal, and that there are no
gas errors (e.g., Flow/Ratio error).
j) After a period of 5 minutes the flow of mobile phase can be started.
NOTE: If gas error messages appear check waste bottle cap and
tighten if necessary. Check tubing connectors. Check to ensure that
Gas ON/OFF LED is lit.
CAUTION: Make certain that the waste bottle is emptied on a routine
basis. It should not be allowed to get full. Failure to do this may result
in flooding of the detector. Severe or prolonged flooding may damage
the detector and void the warranty.
Corona® CAD® and Corona®Plus CAD® Detectors
Operating and Maintenance Manual
2-21
Chapter 2
2.7.3
Storing The Corona Detector
If the detector is not to be used for a few days it should remain connected to the
HPLC system. Keep the gas and mobile phase flows off. Remember to check the
level of fluid in the waste bottle and empty if needed.
If the detector is not to be used for extended periods, then it is probably best to
remove it from the HPLC system. Before disconnecting the Corona detector, flush it
with an appropriate solvent (i.e., devoid of salts) that is compatible with the mobile
phase. Typical mobile phase used for this operation is described in section 0.
WARNING: DO NOT leave highly acidic or basic mobile phases in the
detector as long term sedentary exposure can cause damage to the
detector.
Turn off gas source first and allow the gas to bleed off. Then undo the gas quick
connect fittings using the tool provided to push in the “collet” prior to removing the
fitting.
2.8
2.8.1
Other Detector Configurations
Using the Corona Detector in Series with another Detector
The Corona detector can be used in series with other detectors (e.g., UV etc).
However:
a) The Corona detector MUST be the last detector in the sequence.
b) Be aware that other detectors may contribute to band broadening, and have an
adverse effect on peak shape measured by the Corona.
2.8.2
Using the Corona Detector in Parallel with another Detector
When installing the Corona detector in parallel with another HPLC detector or in
parallel with a mass spec detector, care must be taken to assure a balanced
distribution of flows to each detector.
a) It is important when using a passive flow splitting device to consider the back
pressure from the Corona detector when you are adjusting (balancing) the flows
to each device. The Corona contributes a slight back pressure similar to that
created by approximately 1 foot of .005 diameter PEEK tubing. The Corona
detector MUST receive mobile phase flow rates between 0.2 and 2.0 mL/min.
b) One possible way to adjust the flows between the devices is to replace the
Corona detector with approximately 1 foot of .005” diameter PEEK tubing and to
then measure the flow rate emanating from the end of the tubing. Adjust the
flow balance so that the desired flow rate to the Corona is obtained, and then
replace the length of tubing with the actual connection to the Corona detector.
2-22
Corona® CAD® and Corona®Plus CAD® Detectors
Operating and Maintenance Manual
Installation
NOTE: Be sure to remove the extra length of tubing before
reconnecting the Corona detector to the splitter output.
2.9
Setting up the Thermal Organizer
If a thermal organizer is to be used, connect it using the Y cable (Part Number 705595). The double end of the cable is connected to the Thermal Organizer Control
socket on the Logic Module and the Thermal Organizer Power connector on the
Power Supply Module of the Corona detector. The single end is connected to the
Thermal Organizer. See Appendix C for greater detail.
a) To Enable the Thermal Organizer, press the System soft key from the main
Corona menu, and then press the ▲ or ▼ key to select the THERMAL
ORGANIZER. Select 'NEXT' to access the SETUP Screen (Figure 2-15).
T = Off
THERMAL ORGANIZER SETUP
Status = Normal
Power (OFF)
Setpoint (xx)C
Temperature = xx.xC
[CANCEL]
[MENU]
[SAVE]
Figure 2-15: The Thermal Organizer Setup Screen
b) Change the Power Control field to On with the ▲ or ▼ key. Press 'ENTER' this
will go to the setpoint to enter the desired temperature. Use the numerical
keypad to enter a temperature 10°C above ambient, press ENTER and then
press [SAVE]. The display will then revert back to the MAIN CORONA MENU
and indicate the temperature status.
The system will store the new temperature and will provide power to the heater
to raise the temperature. While the temperature is increasing, the present
temperature will be indicated with an up arrow (e.g., 33↑C).
Indicate on the worksheet that the temperature rose to the desired level and
stabilized.
Corona® CAD® and Corona®Plus CAD® Detectors
Operating and Maintenance Manual
2-23
Chapter 2
2.10 Making Electrical Connections
2.10.1 Description of the Rear Panel of the Detector
All electrical connections are made via the rear panel of the detector. The rear panel
is shown in Figure 2-16.
Logic Module
Gas Module
Power Module
Thermal
Organizer
Control
Ground
USB
Thermal
Organizer
Power
Filter Module
Brackets
Signal Out
RS232
Filter Module
Connections
IN
OUT
Fuse
Power Line
On/Off Switch
Gas Inlet
Gas Exhaust
I/O Connections
Figure 2-16: Rear Panel - Corona CAD Detector
2-24
Corona® CAD® and Corona®Plus CAD® Detectors
Operating and Maintenance Manual
Installation
The terminals on the rear panel of the Corona detector are used as follows:
•
Thermal Organizer Control - If a Thermal Organizer Module (Part Number
70-5499TA) is installed, the Y cable (Part Number 70-5595) is connected to the
Thermal Organizer Control socket on the Logic Module and the Thermal
Organizer Power connector on the Power Supply Module of the Corona detector
while the single cable end is connected to the Thermal Organizer. See Appendix
C for greater detail.
•
Analog Signal Out - Provides a 0V to 1V output to the recording device or
external A/D converter.
•
Power Cord Connection - The power cord is inserted into the receptacle on the
lower right of the rear panel.
Figure 2-17: The I/O Connection Block
•
I/O Connections - The Input/Output Connections block contains eight
connections for interfacing the detector to external devices [such as an
autosampler, a data station, pumps, valves, etc.] which can synchronize the
operation of these devices (Figure 2-17). The inputs are TTL compatible and the
outputs are true relays (contact closures). The two green terminal blocks must be
installed before the inputs/outputs can be used. Make sure they are oriented and
aligned properly before pushing or snapping them into place.
OUTPUTS - The terminals labeled CC1 to CC4 provide contact closures that can
be used to start an autosampler, integrator, pump gradient, change a valve
position, etc. The terminals are active only when the timeline function is used
(see Chapter 3, Section 3.4.5.3). Each of the terminals acts in a similar fashion.
The labeled designations are simply provided for the convenience of the user.
Corona® CAD® and Corona®Plus CAD® Detectors
Operating and Maintenance Manual
2-25
Chapter 2
When the output contact closures are used, there is no polarity (plus “+” or minus
“-”). The third wire on the cable (the ground wire on Part Number 70-4850) must
be attached to ground (GND) of the Corona detector.
The PUMP OFF output contact (CC5) is used to send a signal to the pump (or
other external device) to turn the pump off and stop the flow of mobile phase. If
the pressure of the nebulizing gas falls below 50% of the required gas volume,
this signal may be used to shut the pump off so that the detector is not flooded
with mobile phase.
INPUTS - The connector labeled STRT (start) is used when a method involving
the timeline program is to be started from an external device such as an
autosampler. A contact closure or shorting of the terminals (a signal of at least
0.5 second) is required from the external device.
It is strongly recommended that a true contact closure or relay closure be used for
the inputs on the I/O connections block (GAS OFF, AZ and STRT). If a TTL level
change is used the voltage must be between 0 and 5V and the polarity sense of
the device must match that of the detector (i.e., the “+” and the “-” of the external
device must be connected to the “+” and “-” of the detector, respectively). The “+”
terminal is the top one in each group and the “-” terminal is immediately below it,
followed by ground.
CAUTION: When connecting TTL inputs, ensure that the potential
across the terminals is set at 5V DC (or less). When connecting
outputs, the potential across the terminals must be less than 30V DC
and the current must be less than 0.5 A.
Gas Off turns off the supply of nitrogen gas to the nebulizer.
CAUTION: Nebulizer gas must be flowing through the detector
whenever mobile phase is being delivered to it. Failure to turn the
mobile phase off when the gas flow has stopped could damage
internal components of the detector. (Both connections to the drain
bottle must always be connected to allow the mobile phase to drain
from the nebulizer. The drain bottle must be emptied periodically to
prevent flooding of the detector). Severe or prolonged flooding may
damage the detector and void the warranty. The GAS OFF terminals
on the rear of the detector can accept a signal from an external
device (e.g., a pump or data station) to turn off the gas flow at the end
of a set of analyses or in the event of a system fault (e.g., the pump
stops). It is intended to save gas for those using nitrogen cylinders.
2-26
Corona® CAD® and Corona®Plus CAD® Detectors
Operating and Maintenance Manual
Installation
Autozeroing is used to return the signal to a “zero point” regardless of the current
being measured. If desired, the baseline can be autozeroed before injection of a
sample by a momentary shorting of the autozero terminal posts. The signal
should be sent by the autosampler or other external device.
When autozeroing, allow sufficient time between activation and injection to ensure
that the autozero command is completed. Alternatively, an autozero may be
performed during a run (see Timeline Event Options - Chapter 3). If this is the
case, make sure that autozero occurs at a point in the chromatogram where the
response is expected to be reasonably flat (i.e., 15 secs prior to the elution of a
peak). When the autozero is triggered via the terminal block connection, an event
mark can be provided after the output is zeroed.
2.10.2 Interfacing to the ESA Biosciences Model 584 Solvent Delivery Module
The ESA Biosciences Model 584 Solvent Delivery Module has the capability of
providing a contact closure in the event that it experiences an error. Types of errors
registered by the pump include (e.g., mechanical or electrical problem; the back
pressure of the HPLC system is outside the range of the upper or lower set pressure
limits; the pump runs out of mobile phase, etc.) - these errors cause the pump to stop
unexpectedly. This contact closure can be connected to the GAS OFF input on the
Corona detector so that if an error is registered in the pump, the detector can shut off
the gas flow to save gas.
NOTE: If using a pump other than the ESA model 584 solvent delivery
module, check with the vendor that their pump is capable of providing
such contact closures.
To setup and activate this function in the Model 584 pump, it is necessary to connect
the pump to the detector using one of the connection cables provided and set the
external events function on the pump. To connect the pump to the detector:
a) Insert the event cable plug into the pump EXT.CONTROL connector (see Model
584 Operators Manual).
b) Connect the orange and the yellow wires to the “+” and “-” terminals of the GAS
OFF I/O Connections, respectively.
c) Connect the black wire (common) to the GND terminal on the I/O Connections
on the Corona detector.
Corona® CAD® and Corona®Plus CAD® Detectors
Operating and Maintenance Manual
2-27
Chapter 2
To set external events on the pump:
a) While the pump is powered on, press the CE key to return to the initial screen.
b) Press FUNC key repeatedly until you come to the following screen:
c) Input “2” and then press ENTER.
d) Press CE to return the initial screen.
This operation has set the Event 2 of the pump’s Relay 2 (the Orange and Yellow
wires) to present a contact closure in the event of a pump error. Now when a pump
error occurs, the detector will turn the gas off.
In the event that the pump turns the gas off, correct the pump error. After the pump
has been repaired and is running normally, the detector can be turned back on.
Remember to restore gas flow to the detector before starting the flow of mobile
phase.
2.10.3 Interfacing to Other Solvent Delivery Modules
If your Solvent Delivery Module has the capability of providing a contact closure in
the event that it experiences an error. Types of errors registered by the pump
include (e.g., mechanical or electrical problem; the back pressure of the HPLC
system is outside the range of the upper or lower set pressure limits; the pump runs
out of mobile phase, etc.) - these errors cause the pump to stop unexpectedly. This
contact closure can be connected to the GAS OFF input on the Corona detector so
that if an error is registered in the pump, the detector can shut off the gas flow to
save gas.
See the manufacturer’s User’s Manual for the procedure to make this electrical
connection to the Corona Detector.
2-28
Corona® CAD® and Corona®Plus CAD® Detectors
Operating and Maintenance Manual
Installation
2.11
Mobile Phase Formulation
WARNING: Improper or contaminated mobile phase can result in high
background readings as well as extraneous noise. Take great care in
creating mobile phase and follow the exact steps outilined below.
2.11.1 Supplies
•
•
•
•
•
•
•
•
•
•
•
•
•
500mL Glass graduated measuring cylinder.
2000mL (2L) Glass graduated measuring cylinder.
Empty 2000mL (2L) glass solvent bottle and cap.
Type 1, 10-18 Mohm-cm water.
Omnisolve HR-GC Ultra pure HPLC grade Methanol (EMD – MX0480-6).
Parafilm.
Vacuum Pump.
Ultrasonic bath.
Stopper with hole.
Rubber tubing.
Qualified HPLC-Corona test system with guard column.
Label (Lab Safety; part # 22886).
Laboratory note (log) book.
2.11.2 Procedure
2.11.2.1
Mobile Phase Preparation
a) All glassware must be properly cleaned prior to use, in order to remove any
particles and extraneous solutes from the mobile phase preparation.
b) Only use Type 1 10-18 Mohm-cm water. Make sure that you let the first 500mL
(~30 seconds) of water drain to waste before use.
c) Use dedicated glassware. Do not clean in soap/detergents.
d) Clean 500mL graduated measuring cylinder with ~200mL Type 1 10-18 Mohmcm. Make sure internal surface the length of the cylinder is exposed to the
water. Drain. Repeat procedure twice more. Drain. If not used immediately,
cover with aluminum foil until use.
e) Clean 2000mL graduated measuring cylinder with ~200mL Type 1 10-18
Mohm-cm. Make sure internal surface the length of the cylinder is exposed to
the water. Drain. Repeat the procedure twice more. Drain. If not used
immediately, cover with aluminum foil until use.
f) Clean empty 2000mL waste bottle with ~200mL Type 1 10-18 Mohm-cm. Make
sure internal surface the length of the bottle is exposed to the water. Drain.
Repeat twice more. Drain. Use immediately – do not store.
Corona® CAD® and Corona®Plus CAD® Detectors
Operating and Maintenance Manual
2-29
Chapter 2
g) Measure 400mL Ultra pure HPLC grade Methanol using the 500mL cleaned
measuring cylinder and add to uncapped, cleaned solvent bottle. Record lot
number on label and lab note book.
h) Measure 1600mL Type 1 10-18 Mohm-cm water using the 2000mL graduated
measuring cylinder and add to uncapped, cleaned solvent bottle.
i) Cap bottle and invert several times to mix.
j) Place solvent bottle in ultrasonic bath.
2.11.3 Degassing Mobile Phase
a) Setup degassing apparatus as shown in Figure 2-18.
Stopper
Mobile Phase
Bottle
Rubber
Tube
Vacuum
Pump
Ultrasonic
Bath
Figure 2-18: Degassing Apparatus
b) Place mobile phase bottle in the ultrasonic bath.
c) Confirm water level for the ultrasonic bath is at proper operating level, about 1”
from the top of the ultrasonic bath – Figure 2-19. Add more water if
necessary. Change the water once a week.
d) Turn the timer on the ultrasonic bath to 10 minutes – Figure 2-19.
2-30
Corona® CAD® and Corona®Plus CAD® Detectors
Operating and Maintenance Manual
Installation
Water
Level
Timer
Figure 2-19: Water level and timer location
e) Place the stopper on top of the mobile phase bottle and hold in place until
vacuum seal is made when pump is turned on.
f) Turn the vacuum pump on. Make sure the stopper is sealed to the bottle.
Keep pump on for the whole of the degassing process at least 10 minutes.
g) Once degassing is completed, turn off the vacuum pump. Carefully remove
the rubber stopper from the mobile phase bottle. Remove the mobile phase
bottle form the ultrasonic bath. Secure cap. Wrap in Parafilm around cap and
neck of bottle.
h) Dry with paper towel.
Corona® CAD® and Corona®Plus CAD® Detectors
Operating and Maintenance Manual
2-31
Chapter 2
2.11.4 Wrap Up
a) Once degassed, place cap tightly on bottle and seal with Parafilm.
b) Label bottle and record the following information on label and in lab log book.
Methanol Lot Number
_________________
Date of Preparation
_________________
Expiration Date
_________________
Preparers Initials
_________________
Last Degassed on
_________________
_________________
_________________
c) Mobile phase not used within 48 hours must be degassed and mobile phase
older than 5 days should be discarded.
d) Clean measuring cylinders with Type 1 10-18 Mohm-cm water and leave
inverted on peg-board to dry. Do not leave upright, open to the air.
2.11.5 Mobile Phase – Qualification
a) Take mobile phase to the HPLC-Corona mobile phase test system.
b) Place pump inlet line into freshly degassed mobile phase.
c) Open valve on front of pump and purge.
d) When purging has stopped automatically, close valve and pump at 1.0mL/min.
e) Wait ~30 minutes for system to stabilize.
f) View Corona response using the software preview screen to ensure baseline
is stable (reaches a plateau).
g) Record the background current shown on Corona display panel in the log
book.
h) If background current is < or = 0.150pA, then the mobile phase is usable. If
background is >0.150pA, the mobile phase may be contaminated and should
be discarded.
NOTE: Background current results may vary depending on the state
of the HPLC system. The background values provided are used
internally by ESA on maintained HPLC Systems.
2-32
Corona® CAD® and Corona®Plus CAD® Detectors
Operating and Maintenance Manual
Installation
2.12
Column Conditioning Procedure
WARNING: DO NOT use a column in the system unless it has been
conditioned using the following procedure. Unconditioned columns
will cause erroneous results.
2.12.1 Supplies
•
HPLC Grade Methanol
•
SuperQ Water (or equivalent)
•
Guard Cartridge Holder, 20mm for 2.0 & 4.0 mm ID Cartridges (P/N 88-12414)
•
Guard Cartridges for Capcell Pak C18 MG Columns 3µm, 20 mm x 4 mm (P/N
88-12307)
•
0.005" PEEK tubing (Red)
•
Peek nuts/ferrules (P/N 70-5546)
2.12.2 Procedure
a) Pour ~ 200mL of HPLC Grade Methanol into cleaned glass Mobile Phase
Bottle.
b) Perform a purge pump and then initiate flow of methanol at 1mL/min through
all tubing, prior to connecting the column, for 5 minutes.
c) Stop the mobile phase flow.
d) Install the Guard Cartridge in Guard Cartridge Holder in the correct flow
orientation.
e) Using a permanent marker, mark the column holder with an arrow indicating
the correct flow direction.
f) Using appropriate nuts/ferrules (P/N 70-5546) from the Corona Accessory Kit
connect the column holder/cartridge to the 0.005" PEEK tubing (Red)
g) Direct the exit tubing to a waste container.
Corona® CAD® and Corona®Plus CAD® Detectors
Operating and Maintenance Manual
2-33
Chapter 2
h) Initiate flow of methanol at 1mL/min through the column for 30 minutes.
i) Stop flow of methanol.
j) Switch mobile phase to 20% Methanol, 80% H2O Test Mobile Phase,
prepared as described in section 0.
k) Flow mobile phase through column for 30 minutes.
l) Column is ready for use.
2-34
Corona® CAD® and Corona®Plus CAD® Detectors
Operating and Maintenance Manual
CHAPTER 3
3.1
THE CORONA CAD FIRMWARE
Introduction
All commands for the control and operation of the Corona® CAD® and Corona®Plus
CAD® Detectors may be entered via the keypad on the front panel (Figure 3-1),
which includes a 4 line by 40-character display panel. In addition, a number of
indicator lights (LED's) adjacent to certain keys on the front panel are used to
indicate that the corresponding feature is active (e.g., the GAS ON/OFF LED is lit
when the gas valve is open and the LED between the ▲ and ▼ buttons is lit when
the buttons are active). The detectors can also be controlled by EZChrom Elite for
ESA chromatography data systems.
A flow chart of the Corona CAD detector firmware is presented in Appendix D.
CORONA RUN
i = 0.000pA
Output = 0%
Range (100pA) Filter (None)
Offset ( 0)
[MENU]
[PREVIOUS] [NEXT]
Figure 3-1: Front Panel of Control Module of ESA
Biosciences Corona Detector
There are two modes of operation for the Corona detector:
•
Normal Operation - All parameters are held constant during a separation.
•
Timeline Based Operation - A broad variety of operations can be performed at
user specified times.
Corona® CAD® and Corona®Plus CAD® Detectors
Operating and Maintenance Manual
3-1
Chapter 3
The TIMELINE mode feature allows the user to perform the following operations:
•
•
•
•
•
•
Changing the current range and filter settings.
Autozeroing the detector.
Activation (opening, closing, and/or reopening) of up to four contact closures.
Placement of an event mark (event mode) on the detector output.
“Wait”...ing for a signal from an external device to perform an action (e.g.,
autozeroing the detector).
Looping - the timeline can be made to automatically repeat its programmed
sequence for repetitive analyses.
When a timeline operation is programmed, the detector will either perform an
operation or wait for an external signal, at the selected time.
If the system includes an optional Thermal Organizer, the temperature of the
organizer is set via the program as described in Section 3.6.9, and the temperature is
displayed on the main menu. The temperature cannot be programmed in a timeline
method.
The CoronaPlus detector can be used with the nebulizer heater on (for “freezing”
mobile phase mixtures e.g., aqueous-THF gradients) or off. The factory set
temperature of 30oC prevents the nebulizer from becoming obstructed or blocked by
ice (which usually presents as erratic baseline and noise). Ice may be formed from
water in the mobile phase when the nebulizer block is excessively cooled due to the
evaporation of THF (or some other solvents) during nebulization. Turning the
nebulizer heater on or off is covered in greater detail in Section 3.6.11.
3.2
Initialization of the Detector
When the Corona detector is turned on, the system undergoes an electronic self test.
If an electronic fault is found during the self test, an error message will be presented
on the display (see Chapter 5 for an explanation of the error code, and possible
remedies).
Upon successful completion of the self test, the initial display will appear as shown in
Figure 3-2.
CORONA
Version x.xxx
Copyright 2004
[NEXT]
Figure 3-2: The Version/Copyright Screen
3-2
Corona® CAD® and Corona®Plus CAD® Detectors
Operating and Maintenance Manual
The Corona CAD Firmware
After several seconds, the instrument will automatically advance to the MAIN
CORONA MENU (Figure 3-3). The temperature will only be indicated if the Thermal
Organizer is connected to the detector module (Figure 3-4).
MAIN CORONA MENU
[SYSTEM]
Select desired operation
[EDIT]
[RUN]
Figure 3-3: The Main Corona Menu Screen (no Thermal Organizer)
T = 23oC
[SYSTEM]
MAIN CORONA MENU
Select desired operation
[EDIT]
[RUN]
Figure 3-4: The Main Corona Menu Screen (with Thermal Organizer)
NOTE: The role of the four keys immediately below the screen is
dependent upon the screen that is presented. These keys are termed
“soft keys” since the definition of these keys is context sensitive.
The soft keys presented in Figures 3-3 and 3-4 are used as follows:
•
SYSTEM: accesses a series of screens that are used to select a variety of
general operating parameters such as defining default values, setting time/date,
defining the communication protocol to a personal computer, etc. These
screens are discussed in Section 3.6.
•
EDIT: accesses a series of screens to select the desired mode of operation and
establish a set of analytical parameters for data acquisition. A set of analytical
parameters is termed a METHOD, which can be stored and recalled as desired.
These screens are discussed in Section 3.4.
•
RUN: accesses the RUN METHOD SELECTION screen which is used to
choose a stored method to be run and then execute the selected method.
Selection and execution of a method is discussed in Section 3.5.
Corona® CAD® and Corona®Plus CAD® Detectors
Operating and Maintenance Manual
3-3
Chapter 3
3.3
The Keypad
The keypad is used to enter data (Table 3-1) or initiate an action (Table 3-2).
Table 3-1: Data Keys
Key
Numeric Keys
+
ENTER
▲ (*)
▼ (*)
HELP
ESCAPE
Function
Used to enter the appropriate value for various parameters (e.g.,
"offset"). Once the desired values are entered, press ENTER to accept.
Used to change the sign of a numeric entry. The sign should be changed
before the numeric entry is made.
Used to accept that the value presented in the display for a given
parameter is the desired value for that parameter and stores that value in
the instrument memory. If the value that has been entered is outside the
range for that parameter, the value will not be accepted and a message
with the appropriate limits will be presented.
Scroll to the next value in a sequence (e.g., the Current Range value).
When the desired value is presented, press ENTER.
Scroll to the previous value in a sequence (e.g., the Current Range
value). When the desired value is presented, press ENTER.
Presents context sensitive information about the active screen.
Clears partial entries so you may re-enter the correct values.
(*) Active only when its activity indicator LED is lit.
Table 3-2: Action Keys
Key
EVENT MARK
AUTOZERO
GAS
ON/OFF
Function
Used to place a spike on the recorder trace with a deflection (-5 to +5%
full scale).
Sets the output signal to zero at the current range in use.
This key, which is only active whilst running a method, is used to open or
close the valve for the nebulizing gas. It is a toggle switch; when the gas
valve is opened, the LED adjacent to it is illuminated.
The REMOTE LED on the keypad is illuminated when the detector is under the
control of an external device. The Corona CAD detector can be controlled by ESA’s
EZChrom™ Elite for ESA, or Agilent’s Chemstation software.
When configuring the detector for use with EZChrom™ Elite for ESA software, the
user has the option to lock the keypad. If the user does not choose this option, all
the keys on the keypad will remain active. If the user chooses to lock the keypad, or
is using Agilent’s Chemstation, all the keys on the keypad will be inactive except for
the two soft keys on the right of the keypad - these will allow the user to scroll
through the display screens.
3-4
Corona® CAD® and Corona®Plus CAD® Detectors
Operating and Maintenance Manual
The Corona CAD Firmware
The SECURITY LED on the keypad is illuminated when the system is operating in
local or remote modes and the security feature is active to prevent accidental
changes in the operating parameters. In "remote secure" mode, none of the front
panel keys are active.
3.4
Creating/Editing a Corona CAD Detector Method
3.4.1 Overview
To create (or edit) a Corona CAD detector method, the user should perform the
following steps (a-e):
Edit the Method Select Screen (Section 3.4.2)
Edit the Security Screen (Section 3.4.3)
Edit the Parameters Screen (Section 3.4.4)
Creating/Editing a CAD+TL Method [if Timeline operation has been selected]
(Section 3.4.5)
e) Save Method Screen (Section 3.4.6)
f) Method # Zero (Section 3.4.7)
a)
b)
c)
d)
3.4.2 Edit the Method Select Screen
NOTE: The protocol for editing a method is the same as that for
generating a new method.
When [EDIT] is selected on the Main Corona Menu screen (Figures 3-3 and 3-4), the
EDIT METHOD SELECT screen (Figure 3-5) is presented. This screen is used to
choose the method that is to be used for the analysis.
EDIT METHOD SELECT
Method # ( 1)
Name = Default Method
Mode (CAD )
D = --/--/---:-[CANCEL]
[NEXT]
Figure 3-5: The Edit Method Select Screen 1
The Corona CAD detector can store 25 analytical methods, which are sequentially
numbered from 1-25.
When the EDIT METHOD SELECT screen is opened, Method 1 is presented
displaying the mode of operation used in that method, its name (xxxx) and the date
that it was generated or last modified. The cursor will be found on the method
number.
Corona® CAD® and Corona®Plus CAD® Detectors
Operating and Maintenance Manual
3-5
Chapter 3
NOTE: When the detector is first received, Method 1 is provided as a
default set of conditions that can be used for testing as described in
Chapter 2. If desired, it can be modified and used as a user method.
If a different method is to be edited, press the ▲ arrow key until the desired method
is presented. As an example, if Method 2 is selected, the screen might appear as
shown in Figure 3-6 (CAD+TL indicates a method using the detector in Timeline
mode).
EDIT METHOD SELECT
Method # ( 2)
Name = Default Method
Mode (CAD+TL)
D = --/--/---:-[CANCEL]
[NEXT]
Figure 3-6: The Edit Method Select Screen for method 2
When the desired method is accessed it is possible to:
•
Change the mode. Press ENTER to move the cursor to the Mode field and use
the ▲ or ▼ key to access the appropriate mode.
•
Access the Security screen (Section 3.4.3) by pressing NEXT.
3.4.3 Edit the Security Screen
The Security screen (Figure 3-7) which can be accessed by pressing NEXT while in
EDIT SCREEN, is used to indicate if a user selected security code is required in
order to use the keypad. It allows authorized operators to prohibit unauthorized
users from changing parameters.
CORONA EDIT
Run time security (Off)
Run time security code
(
1)
[CANCEL]
[MENU]
[NEXT]
Figure 3-7: The Edit Security Screen
If the security code is to be activated (to lock the keypad of the detector), use the ▲
or ▼ keys, then press the ENTER key to change the Run time security legend to On.
This will activate the Run time security code field so that the desired security code
(four characters) can then be entered. Press ENTER then NEXT to access the
Parameters screen (Figure 3-8).
3-6
Corona® CAD® and Corona®Plus CAD® Detectors
Operating and Maintenance Manual
The Corona CAD Firmware
When security is used, the operator must enter the correct code to unlock the keypad
before performing any actions and then enter the code once more in order to re-lock
the keypad.
If the security feature is not to be used or present security code is not to be edited,
press [NEXT] as soon as this screen is presented.
The [CANCEL] button erases any entries that were made on this screen, the [MENU]
button returns to the EDIT METHOD SELECT screen and the [NEXT] button
accesses the Parameters screen (Figure 3-8).
3.4.4 Edit the Parameters Screen
The Parameters screen (Figure 3-8) is used to set a variety of detector parameters.
When the screen is accessed, the cursor will be found on the Range field.
Range (100pA)
Offset (
0)%
[CANCEL]
CORONA EDIT
Filter (None)
[PREVIOUS]
[NEXT]
Figure 3-8: The Edit Parameters Screen
The Range field is used to select the full-scale gain range for the detector. It is used
to ensure that the chromatographic peak is on scale and is sufficiently large. The
default value is 100 pA, and the range can be set from 1 pA to 500 pA via a 1, 2, 5
sequence using the ▲ or ▼ key. After the desired value is selected, press ENTER
to move the cursor to the Filter field.
The Filter field is used to select the desired electronic filter that is used to reduce the
noise in the chromatogram. The default is None, and the filter can be set to None,
Low, Medium and High using ▲ or ▼ keys. A detailed discussion of the use of the
filter is presented in Section 4.6.3. After the desired value is selected, press ENTER
to move the cursor to the Offset field.
The Offset field is used to change the position of the entire chromatogram with
respect to X-axis (e.g., so that two or more chromatograms can be presented on a
set of common axes). The offset can be set to any value within ± 50% of full scale
via the numeric keypad. If a non-valid value is entered, an error message will be
presented with the appropriate range.
Corona® CAD® and Corona®Plus CAD® Detectors
Operating and Maintenance Manual
3-7
Chapter 3
After desired settings are selected, press [NEXT]:
•
If the fixed parameter operation (Mode = CAD) is selected, skip Section 3.4.5
and save the method as described in Section 3.4.6.
•
If the Timeline operation (Mode = CAD+TL) is selected, enter the timeline as
described in Section 3.4.5.
3.4.5 Creating/Editing a CAD+TL Method (Timeline)
3.4.5.1 Timeline Screen
A timeline method permits one or more activities to occur at user specified times
during the run. To indicate that a timeline is desired, select CAD+TL in the Mode
Field (Figure 3-5).
The Timeline screen (Figure 3-9) is presented when the ENTER key is pressed on
the Parameter screen (Figure 3-8) if the timeline operation is selected.
TIMELINE
Time: ( 00.00) min.
Event: (Set Contact)
Contact (C1 )
set to (Off)
[CANCEL] [ADD STEP] [PREVIOUS] [NEXT]
Figure 3-9: The Timeline Screen
When the Timeline Screen is accessed (Figure 3-9), the cursor will be found on the
first character of the Time field. Now enter the time at which the “event” is to occur.
For example, to enter in a time of 23.75 minutes, press the 2, then the 3, then the 7
and finally the 5 keys (in that order). The numbers will only be accepted after all of
them are entered. All times must be entered to two decimal places (i.e., enter 8.00
min, not 8 min). Press ENTER to accept the number entered and to access the
Event field.
The Event field is used to select the desired action that is to occur at the indicated
time. Use the ▲ or ▼ key to select the event and press ENTER. The various events
that can be used in a timeline are listed in Table 3-3.
3-8
Corona® CAD® and Corona®Plus CAD® Detectors
Operating and Maintenance Manual
The Corona CAD Firmware
Table 3-3: Timeline Event Options
Event
Data Entry Options
Method of
Editing
End
Enter time to stop the
method.
Numeric keypad
▲ and ▼ keys
Set
Contact
Select Contact (CC1 to
CC4). Select On or Off or
Toggle
Autozero
Autozero signal
Filter
None, Low, Med, High
Marker
Height = -10 to +10% FS
Range
Current Range
Gas
On or Off
Hold
Input Condition (Gas Off,
Autozero, Start)
Condition options are (off to
on, on to off, off or on)
Loop to (x.xx) minutes,
Number of Loops, (0-9999)
No editing needed
▲ and ▼ keys
▲ and ▼ keys
▲ and ▼ keys
▲ and ▼ keys
▲ and ▼ keys
Numeric Keypad
Loop
Reset
This will stop the Timeline
sequence
This will reset to initial
parameters
Comments
This is the final time for data
collection.
External signal set on/off.
Each contact closure can
be set to on (closed) or off
(open) or toggle (change
state) as desired.
See notes a and b.
Change the smoothing filter
on the raw data.
Places a marker on the
output.
The current range for the
output. See note b.
Opens/closes gas valve
Indicates what the system
should wait for to perform
the selected action. E.g.,
hold for “on” then perform
autozero.
Establish a set of repetitive
operations. See Section
3.7 How to create a timeline
method.
Each Timeline must have
an ending time.
Contact closures will NOT
be reset.
a. Typically an autozero operation takes place before an injection (make sure that sufficient
time is allowed for completion of autozero prior to injection). If an autozero is to be performed
during a run, it should be set at a point where the chromatogram is reasonably flat and the
signal is low (i.e., the eluent does not contain an eluted compound). For optimal
performance allow a period of 15 seconds between an autozero event and the onset of a
peak.
b. For optimal performance, an AUTOZERO should be performed when a CURRENT RANGE
change is performed. If a data station is used, set the data station to inhibit integration during
the period from 0.1 minutes before and after the gain range change.
The third line of the screen is dependent on the nature of the selected event. In most
cases additional information will be required to indicate the desired action that is to
occur at the indicated time (e.g., for the Filter as event, desired filter level can be
selected via the ▲ or ▼ keys).
Corona® CAD® and Corona®Plus CAD® Detectors
Operating and Maintenance Manual
3-9
Chapter 3
A timeline can include a large number of events and each event should be performed
at a separate time. Once a timeline step is edited or created, press [ADD STEP] to
present Figure 3-10. The [DEL STEP] label over the second soft key is presented to
confirm that the step has been saved. Press the ENTER key to return the cursor to
the Time parameter so that the next Timeline event can be created. When a time is
entered for another step, the bottom line returns to that of Figure 3-9 (i.e., if a new
unique time is entered, the “DEL STEP” changes back to “ADD STEP”).
When the cursor is in the time field, the arrow keys can be used to scroll through the
entered activities. When an entered activity is being displayed, the second soft key
label will be DEL STEP as shown in Figure 3-10. Pressing this key will delete that
entry (activity).
TIMELINE
Time:( 0.00) min.
Event (End)
Stops time line clock
[CANCEL]
[DEL STEP] [PREVIOUS] [NEXT]
Figure 3-10: The Event SAVED Screen
3.4.5.2 End Event Screen
The End Event screen (Figure 3-11) is used to indicate the time at which the timeline
will terminate. When this screen is accessed, the cursor will be found on the Time
field which can be edited as described in Section 3.4.5.1. After the desired time is
entered, press [ADD STEP]. This command is used to prevent the detector from
running continuously.
TIMELINE
Event (End)
Time:( 0.00) min.
Stops time line clock
[CANCEL]
[DEL STEP]
[PREVIOUS]
[NEXT]
Figure 3-11: The End Event Screen
3.4.5.3 Set Contact Screen
The Set Contact screen (Figure 3-12) is used to change the position of a contact
closure at the indicated time. When this screen is accessed, the cursor will be found
on the Contact field. The desired contact closure (CC1 to CC5 [Note: CC5 is
dedicated to “Pump off”]) is selected via the ▲ or ▼ keys. Once the contact closure
is selected, the cursor moves to the Off/On field and the position is chosen using the
▲ or ▼ keys. After the desired selections are entered, press [ADD STEP].
3-10
Corona® CAD® and Corona®Plus CAD® Detectors
Operating and Maintenance Manual
The Corona CAD Firmware
TIMELINE
Time: ( 0.00) min.
Event: (Set Contact)
Contact (C1 )
set to (Off)
[CANCEL] [ADD STEP] [PREVIOUS] [NEXT]
Figure 3-12: The Set Contact Screen (for CC1)
3.4.5.4 Autozero Screen
The Autozero screen (Figure 3-13) is used to choose the time at which an autozero
event is to occur.
TIMELINE
Time: ( 0.00) min.
Event: (Autozero)
This will perform an Autozero
[CANCEL]
[ADD STEP] [PREVIOUS] [NEXT]
Figure 3-13: The Autozero Screen
See Table 3-3 for further information about autozeroing.
3.4.5.5 Filter Screen
The Filter screen (Figure 3-14) is used to select the level of signal filtering. The filter
selection (None, Low, Medium and High) is chosen using the ▲ or ▼ keys. A
detailed discussion of the use of the filter is presented in Section 4.6.3.
TIMELINE
Time: ( 0.00) min.
Event: (Filter)
Filter time: (None)
[CANCEL]
[ADD STEP] [PREVIOUS] [NEXT]
Figure 3-14: The Filter Screen (“none” selected)
3.4.5.6 Marker Screen
The Marker screen (Figure 3-15) is used to set an “event” mark on the output at the
indicated time. The marker can be set from -10 to +10% in 1% increments.
TIMELINE
Time: ( 0.00) min.
Event: (Marker)
Height (
5)%
[CANCEL]
[ADD STEP] [PREVIOUS] [NEXT]
Figure 3-15: The Marker Screen
Corona® CAD® and Corona®Plus CAD® Detectors
Operating and Maintenance Manual
3-11
Chapter 3
3.4.5.7 Range Screen
The Range screen (Figure 3-16) is used to select the range for the signal output at
the indicated time. The range can be set from 1 pA to 500 pA via a 1, 2, 5 sequence
using the ▲ or ▼ keys.
TIMELINE
Time: ( 0.00) min.
Event: (Range)
Range: (xx pA)
[CANCEL]
[ADD STEP] [PREVIOUS] [NEXT]
Figure 3-16: The Range Screen
NOTE: For optimal performance, an AUTOZERO should be performed
prior to a range change, in order to keep the signal on screen. If a data
station is used, set the data station to inhibit integration during the
period from 0.1 minutes before and after the gain range change.
3.4.5.8 Gas Screen
The Gas screen (Figure 3-17) is used to turn the gas on/off at the indicated time.
The choices are On or Off and are selected using the ▲ or ▼ keys.
TIMELINE
Time:( 0.00) min.
Gas valve: (Off)
[CANCEL]
[ADD STEP]
Event: (Gas)
[PREVIOUS]
[NEXT]
Figure 3-17: The Gas Screen
3.4.5.9 Hold Screen
The Hold screen (Figure 3-18) is used to indicate that the method should wait for an
input from an external device and to indicate what the appropriate input should be.
TIMELINE
Time: ( 0.00) min.
Event: (Hold)
Input: (Gas Off)
Hold for: (ON )
[CANCEL]
[ADD STEP] [PREVIOUS] [NEXT]
Figure 3-18: The Hold Screen
The Inputs include: Gas Off, Autozero, and Start. The “Hold for” conditions include:
off to on, on to off, off or on. Options can be selected using the ▲ or ▼ keys.
3-12
Corona® CAD® and Corona®Plus CAD® Detectors
Operating and Maintenance Manual
The Corona CAD Firmware
3.4.5.10 Loop Screen
The Loop screen (Figure 3-19) is used to indicate that a looping operation is to occur
at the indicated time. A detailed discussion of looping is presented in Section 3.7.
TIMELINE
Time: ( 0.00) min.
Event: (Loop)
Loop to: ( x.xx)
for: (
5) times
[CANCEL]
[ADD STEP] [PREVIOUS] [NEXT]
Figure 3-19: The Loop Screen
The time to reset the loop and the number of times that the loop should be performed
are chosen using the ▲ or ▼ keys.
3.4.5.11 Reset Screen
The Reset screen (Figure 3-20) is used to indicate that the system should be reset to
the original values (the values at 0.00 min) at the indicated time.
TIMELINE
Time: ( 0.00) min.
Event: (Reset)
Resets method to initial values
[CANCEL]
[ADD STEP] [PREVIOUS]
[NEXT]
Figure 3-20: The Reset Screen
3.4.6 Save Method Screen
The Save Method screen (Figure 3-21) is used to store the method in the detector’s
memory. When the screen is opened, the cursor will be located on the method
number of the next available unused method (even if editing a method that was
previously created). Use the▼ key to return to the method to be overwritten, or store
the newly edited method as a new method (using the unused method number that is
presented).
EDIT METHOD SAVE
Method # ( 3)
Name (
)
Mode = ()
D = --/--/---:-[CANCEL]
[PREVIOUS]
[SAVE]
Figure 3-21: The Save Method Screen
Corona® CAD® and Corona®Plus CAD® Detectors
Operating and Maintenance Manual
3-13
Chapter 3
After the method number has been selected, press ENTER. The cursor will move to
the Name field and additional information about the method (i.e., name of the
method, your initials, etc.) can be entered using the numerical keypad. Alphabetic
characters can be selected by pressing 9 and then using the ▲ key (e.g., pressing 9
then the arrow key two times will display the letter “B”). Pressing the 9 key again will
allow for the next alphanumeric character, etc. Method names can be up to 16
characters long.
To name the method “CURRENT”:
Press the 9 key and then the ▲ key until C is showing
Press the 9 key and then the ▼ key until U is showing
Press the 9 key and then the ▼ key until R is showing
Press the 9 key and then the ▼ key until R is showing
Press the 9 key and then the ▼ key until E is showing
Press the 9 key and then the ▼ key until N is showing
Press the 9 key and then the ▼ key until T is showing
The screen should now look like that presented in Figure 3-22.
EDIT METHOD SAVE
Method # ( 2)
Name (CURRENT)
Mode = ()
D = --/--/---:-[CANCEL]
[PREVIOUS]
[SAVE]
Figure 3-22: The Save Method Screen with Method ”Current”
When the desired alphanumeric characters are entered, press ENTER to return the
cursor to the Method # field.
Press the ENTER key and then press the [SAVE] key to complete the save
procedure. The method will now be stored in memory. The date and time will be
automatically entered when the method is saved. Press [NEXT] to continue and then
press [NEXT] to return to the Main Menu.
3.4.7 Method # Zero
Method #: (1) is initially displayed when [EDIT] is pressed while in the Main Menu.
Normally the ▲ key would be used to scroll to higher method numbers (both saved
and unused methods). If the▼ key is pressed, Method #: (0) is accessed. This
method contains the information for the last method that was overwritten.
NOTE: We recommend that you do not deliberately store a method
using Method #: 0, because it will be lost the next time a method is
overwritten.
3-14
Corona® CAD® and Corona®Plus CAD® Detectors
Operating and Maintenance Manual
The Corona CAD Firmware
3.5
Using a Method to Collect Data
a) Create and save the desired method.
b) Return to the MAIN CORONA MENU screen (Figure 3-23).
MAIN CORONA MENU
[SYSTEM]
Select desired operation
[EDIT]
[RUN]
Figure 3-23: The Main Corona Menu Screen
c) Press the [RUN] button to present the RUN METHOD SELECT screen
(Figure 3-24).
RUN METHOD SELECT
Method # ( 1)
Name = Default Method
Mode = CAD
D = --/--/---:-[CANCEL]
[NEXT]
Figure 3-24: The Run Method Select Screen
d) Select the desired method using the ▲ or ▼ keys and press NEXT.
e) The parameters for that method will be loaded and the first status screen will be
presented (Figure 3-25). The parameters are summarized in Table 3-4.
i = 0.000 pA
Range (10 pA)
[MENU]
CORONA RUN
Output = 0%
Filter (None)
[PREVIOUS]
Offset ( 0)
[NEXT]
Figure 3-25: The Corona CAD Run Screen 1
For the CoronaPlus detector, the Corona run screen will appear as in Figure 3-26.
Neb T = XX, where XX is ON or OFF. Use of the nebulizer heater is discussed in
Section 3.6.11.
i = 0.000 pA
Range (10 pA)
[MENU]
CORONA RUN
Output = 0%
Neb T = XX
Filter (None)
Offset ( 0)
[PREVIOUS]
[NEXT]
Figure 3-26: The CoronaPlus CAD Run Screen 1
Corona® CAD® and Corona®Plus CAD® Detectors
Operating and Maintenance Manual
3-15
Chapter 3
Table 3-4: Run Parameters
Parameter
i
Output
Current
Range
(R)
Filter
%Offset
T
Description
Current
% of full scale, display
of signal output sent to
recording device
Used to set the
sensitivity level of the
detector
Time constant for the
filter used to smooth
baseline (and signal).
Percent offset added to
baseline signal
Indicates current
temperature of the
thermal organizer, if
installed
Range
0 pA to +500 pA
Default
Type
Output
-100 to +100%
0%
Output
1 pA to 500 pA
(1,2,5 step increment)
100 pA
Input
None, Low, Med, Hi
None
Input
-50% to +50%
0%
Input
TA +10° to +45°C
Off
Output
NOTE: All values should remain somewhat stable. Significant
fluctuations within a run may be indicative of a serious issue. Review
Chapter 5 before contacting ESA Service.
f)
Press the [NEXT] button, and a second screen of data will be presented
(Figure 3-27). The parameters on this screen cannot be edited.
CORONA RUN
Gas Pressure = xx psi
Corona = Normal
[MENU]
[PREVIOUS]
[NEXT]
Figure 3-27: The Corona Run Screen 2
Gas Pressure refers to the pressure of the incoming gas and should correspond
closely to pressures measured at the gas inlet port.
Corona refers to the status of the Corona discharge and should show "normal" if the
Corona CAD detector is functioning properly. If showing: “Service” or “Failing”, see
Chapter 5.
g) Press the [NEXT] button, and a third screen containing diagnostic data will be
presented (Figure 3-28). The parameters on this screen can not be edited.
3-16
Corona® CAD® and Corona®Plus CAD® Detectors
Operating and Maintenance Manual
The Corona CAD Firmware
This screen provides current information with regards to both factory-set and
internally calibrated parameters. Keep a log of these values. If any of them changes
dramatically, then maintenance or service may be needed. An explanation of these
parameters, and typical values are presented in Table 3-5.
CORONA DIAGNOSTICS
Total Flow = x.xx
Flow Ratio = x.xx
Vcor = x.xxxkV
Icor = x.xxµA
IonT = x.xxV
[MENU]
[PREVIOUS]
[NEXT]
Figure 3-28: The Corona CAD Detector Diagnostic Screen
Table 3-5: Diagnostic Parameters
Parameter
Total Flow
Flow Ratio
VCor
ICor
IonT
Definition
The total measured gas flow
through the detector
The ratio of the flows of the
analyte particle gas stream to
the positively charged corona
secondary gas stream
Corona Voltage. The applied
voltage to the corona wire to
charge the secondary gas
stream
Corona Current. The current
required to charge the
secondary gas stream
Ion Trap Voltage. The voltage
required to remove the high
mobility charged particles
Value
>0.5
0.2 – 1.0
<3400 = Normal
3400 – 3900 = Service
>3900 = Failing
Stable approx 1.0µA
>18V
If the method includes a timeline, press the [NEXT] button. This will access the first
Timeline screen. A typical screen is presented in Figure 3.29.
TIMELINE
Time: ( 0.00) min.
Gas valve: (Off)
[CANCEL]
Event: (Gas)
[PREVIOUS]
[NEXT]
Figure 3-29: The Timeline Screen
Timeline screens can be scrolled through in the same manner as the data screens.
Once in the Corona CAD detector run mode and all parameters have been verified,
the Corona CAD detector is now ready to collect data.
Corona® CAD® and Corona®Plus CAD® Detectors
Operating and Maintenance Manual
3-17
Chapter 3
3.6
The System Screens
3.6.1 Role of the System Screens
The SYSTEM MENU screens are used to edit a variety of parameters that relate to
the overall use of the detector (rather than being related to a single method) and
include the following screens:
•
•
•
•
•
•
•
•
•
•
RS232 Setup Screen (Section 3.6.2)
Deleting Methods Screen (Section 3.6.3)
Event Marks Screen (Section 3.6.4)
Date & Time Setup Screen (Section 3.6.5)
Remote Screen (Section 3.6.6)
Inputs Screen (Section 3.6.7)
Contacts Screen (Section 3.6.8)
Thermal Organizer Setup Screen (Section 3.6.9)
Self Test Screen (Section 3.6.10)
Nebulizer Heater Setup Screen (Section 3.6.11)
The SYSTEM SETUP menu (Figure 3-30) is accessed by selecting [SYSTEM] on the
MAIN CORONA MENU (Figure 3-3). When the menu is selected, the RS232 screen
is presented. Other screens can be accessed via the ▲ or ▼ keys.
SYSTEM SETUP MENU
Select: (RS232 setup)
Setup serial output protocol
[CANCEL]
[NEXT]
Figure 3-30: The System Setup Menu Screen
To edit the various parameters press [NEXT].
3.6.2 RS232 Setup Screen
The RS232 Setup screen (Figure 3-31) is used to select the parameters to be used in
communication between the detector and personal computer. It can be accessed by
pressing [NEXT] on the SYSTEM SETUP MENU when the Select area field indicates
RS232 setup. The values indicated in Figure 3-31 are the default values set by ESA
and may need to be changed to conform to the communication requirements of the
computer and/or data station.
3-18
Corona® CAD® and Corona®Plus CAD® Detectors
Operating and Maintenance Manual
The Corona CAD Firmware
RS232 SETUP
Baud (38.4k) Parity (None)
Stop bits (1)
Data bits (8)
Handshaking (
None)
[CANCEL]
[MENU]
[SAVE]
Figure 3-31: The RS232 Setup Screen
When the screen is accessed:
The cursor will blink to the right of the Baud entry. Use the ▲ or ▼ keys to select the
desired value (the system can transmit data at 9.6K, 19.2K, and 38.4K baud). When
the desired value appears, press ENTER.
The cursor will blink to the right of the Parity field. Use the ▲ or ▼ keys to select the
desired value (None, Even or Odd). When the desired value appears, press ENTER.
The cursor will blink to the right of the Stop Bits entry. Use the ▲ or ▼ keys to select
the desired value (1 or 2). When the desired value appears, press ENTER.
The cursor will blink to the right of the Data Bits entry. Use the ▲ or ▼ keys to select
the desired value (7 or 8). When the desired value appears, press ENTER.
The cursor will blink to the right of the Handshaking entry. Use the ▲ or ▼ keys to
select None or Hardware. When the desired value appears, press ENTER.
After entering all RS232 parameters, press [SAVE] to save them.
NOTE: It is not necessary to scroll through the entire screen. Once the
appropriate field is edited, press [SAVE] to save the setup.
3.6.3 Deleting Methods Screen
The Deleting Methods screen (Figure 3-32) can be accessed through the SYSTEM
SETUP menu, and then by pressing the ▲ or ▼ keys.
SYSTEM SETUP MENU
Select: (Del methods)
Delete all user stored methods
[CANCEL]
[NEXT]
Figure 3-32: The System Setup Menu Screen
When [NEXT] is selected, the METHODS screen (Figure 3-33) is presented.
Corona® CAD® and Corona®Plus CAD® Detectors
Operating and Maintenance Manual
3-19
Chapter 3
METHODS
Delete all user stored methods?
[CANCEL]
[MENU]
[YES]
Figure 3-33: The Deletes all user stored methods Screen
The [DEL] key deletes all user-entered methods except Method 0. Method 0
contains the parameter values for the last method that was overwritten. See Section
3.4.7 for more information about Method # Zero.
3.6.4 Event Marks Screen
The Event Marks screen (Figure 3-34) can be accessed through the SYSTEM
SETUP menu, and by pressing the ▲ or ▼ keys.
SYSTEM SETUP MENU
Select: (Event Marks)
Set Event Mark (width, height, etc.)
[CANCEL]
[NEXT]
Figure 3-34: The System Setup Menu Screen
When [NEXT] is selected the Event Marks screen (Figure 3-35) is presented.
EVENT MARKS
Autozero Mark (OFF)
Event Width (4) sec.
[CANCEL]
[MENU]
Height (5) %
Height (5) %
[SAVE]
Figure 3-35: The Event Marks Screen
When the screen is accessed, the Autozero Mark events entry will blink. Use the ▲
or ▼ keys to select the desired value (Off or On). This new field is accessed via the
ENTER key and is used to indicate the height of the Autozero event mark; the range
is from 5 to 20%, and is selected through the keypad. After the Mark autozero
events field (and height field, if applicable) is edited, press ENTER to access the
Event width field. Select the desired width (1 to 5 seconds) of the event marker using
the ▲ or ▼ keys on the key pad, press ENTER and then press SAVE.
3-20
Corona® CAD® and Corona®Plus CAD® Detectors
Operating and Maintenance Manual
The Corona CAD Firmware
3.6.5 Date & Time Setup Screen
The Date & Time Setup screen (Figure 3-36) can be accessed through the SYSTEM
SETUP menu, and then by pressing the ▲ or ▼ keys.
SYSTEM SETUP MENU
Select: (Date & Time)
Set Date and Time
[CANCEL]
[NEXT]
Figure 3-36: The System Setup Menu Screen
When the [NEXT] key is selected, the DATE & TIME SETUP screen (Figure 3-37) is
presented.
DATE & TIME SETUP
Month (Jul) Day ( 7)
Year (2004)
AM/PM (PM)
Hour ( 3)
Min. (17)
[CANCEL]
[MENU]
[SAVE]
Figure 3-37: The Date & Time Setup Screen
Enter the present date and time by accessing each field and pressing ENTER after
the entry is made. Press the [SAVE] key to start the clock at the indicated time and
date.
3.6.6 Remote Screen
The Remote screen (Figure 3-38) can be accessed through the SYSTEM SETUP
menu, and then by pressing the ▲ or ▼ keys.
SYSTEM SETUP MENU
Select: (Remote)
Set Remote mode
[CANCEL]
[NEXT]
Figure 3-38: The System Setup Menu Screen
Select the [NEXT] key to present the REMOTE screen (Figure 3-39).
Corona® CAD® and Corona®Plus CAD® Detectors
Operating and Maintenance Manual
3-21
Chapter 3
REMOTE SCREEN
MENU will return to Main Menu
[MENU]
[RUN]
Figure 3-39: The Remote Screen
The Remote LED on the front panel will illuminate. Press [RUN] to enter the Corona
Run screen. The gas valve will open automatically and the corresponding LED will
illuminate.
3.6.7 Inputs Screen
The Inputs screen (Figure 3-40) can be accessed through the SYSTEM SETUP
menu, and then by pressing the ▲ or ▼ keys.
SYSTEM SETUP MENU
Select: (Inputs)
Set Input (Active/Inactive)
[CANCEL]
[NEXT]
Figure 3-40: The System Setup Menu Screen
Select the [NEXT] key to present the INPUTS screen (Figure 3-41).
INPUTS ACTIVE/INACTIVE
Autozero ( ACTIVE)
Gas off (
ACTIVE)
[CANCEL]
[MENU]
[SAVE]
Figure 3-41: The Inputs Active/Inactive Screen
This screen refers to two of the three inputs located on the Logic Module at the rear
of the detector. When Autozero input is in the Active (on) state as depicted in Figure
3-41, an Autozero event will occur if the autozero ± terminals on the I/O connector
block are shorted by an external device.
It may become useful during Timeline programming to pause two or three times
during a Timeline program to await return signals from external devices indicating
that they have completed their appointed tasks. External devices can include an
autosampler, a column switching valve, manual injectors, signal relays, etc. Normally
only one such input is needed and START is reserved for that purpose.
3-22
Corona® CAD® and Corona®Plus CAD® Detectors
Operating and Maintenance Manual
The Corona CAD Firmware
This screen also allows the user to set the Autozero and GAS Off inputs to an
Inactive (off) state. This allows the user to disable either/or both functions, without
having to remove the connections from the terminals on the I/O connector block.
If the Autozero and GAS On/Off states are turned to Inactive (off), then neither an
Autozero event can be triggered nor the gas be turned off via a contact closure in the
I/O Connector block on the rear panel. Under normal circumstances these two
devices are always left ON in the System menu.
3.6.8 Contacts Screen
The Contacts screen is used to activate the individual outputs and view the state of
the Inputs related to the I/O blocks on the rear panel. When the option is selected,
the screen shown in Figure 3-42 is presented.
SYSTEM SETUP MENU
Select: (Contacts)
Set Contacts & monitor inputs
[CANCEL]
[NEXT]
Figure 3-42: The Contacts Screen
If [NEXT] is selected, the SET CONTACTS and VIEW INPUTS Screen (Figure 3-43)
will be presented.
SET CONTACTS & VIEW INPUTS
C1 (OFF) C2 (OFF) C3 (OFF) C4 (OFF) PMP (OFF)
Gas off = OFF
Autozero = OFF
Start = OFF
[CANCEL]
[MENU]
Figure 3-43: The Set Contacts and View Inputs Screen
The C1-C4 entries describe the status of the four contact closures. The status of
each contact closure (on to off, or vice versa) can be changed by pressing [ENTER],
moving the cursor to the desired contact closure, pressing the ▲ or ▼ keys, and
finally pressing the [ENTER] key.
If the PMP parameter is set to ON, a signal (contact closure) will be sent to an
external device (e.g., a pump) in order to stop the flow of mobile phase to the system,
in the event the pressure of nebulizer gas is ≤ 50% of the nominal gas flow required.
NOTE: This signal can be used to protect the detector from possible
damage in the event that the gas flow is stopped or compromised but
the mobile phase is still being delivered.
Corona® CAD® and Corona®Plus CAD® Detectors
Operating and Maintenance Manual
3-23
Chapter 3
Changing the initial status of the contact closure outputs may become necessary if
the Corona detector is connected to other devices that need to be controlled using
Timeline. Being able to change them manually within the system menu permits
connections to other devices to be tested.
3.6.9 Thermal Organizer Setup Screen
The Thermal Organizer Setup screen (Figure 3-44) can be accessed through the
SYSTEM SETUP menu, and by pressing the ▲ or ▼ keys.
SYSTEM SETUP MENU
Select: (Thermal Org)
Setup Thermal Organizer
[CANCEL]
[NEXT]
Figure 3-44: The System Setup Screen
Press the [NEXT] key to access the Thermal Organizer Setup screen (Figure 3-45)
T = OFF
THERMAL ORGANIZER SETUP
Status = Normal
Power (OFF)
Setpoint (xx)C
Temperature = xx.xC
[CANCEL]
[MENU]
[SAVE]
Figure 3-45: The Thermal Organizer Setup Screen
This screen is used to set the temperature of a Thermal Organizer Module if present.
When this screen is accessed, the cursor appears in the field to the right of Power.
After choosing ON and pressing ENTER the cursor will appear to the right of
Setpoint. Use the ▲ ,▼or the numeric keypad to set the desired temperature (2560°C). After you have entered the desired value, press ENTER, then press SAVE.
The set temperature is stored in non-volatile memory and is automatically recalled
when the detector is powered up.
The Status field indicates the present state of the Thermal Organizer (e.g., Normal,
Not Installed, Board Error, Under Range, Over Range) and is used to indicate error
messages (Table 3-6). See Chapter 5 for further information.
3-24
Corona® CAD® and Corona®Plus CAD® Detectors
Operating and Maintenance Manual
The Corona CAD Firmware
Table 3-6: Thermal Organizer Error Codes
Code
0
-1
-2
-3
-4
-5
-6
-7
Message
Thermal Organizer not detected
Thermal Organizer malfunction
Thermal Organizer malfunction (logic)
Temperature out of range (under)
Thermal Organizer sensor malfunction
Thermal Organizer malfunction (logic)
Temp sensor or heater not responding
***Caution*** excess heating detected
NOTE: For proper temperature stabilization, the set temperature must
be at least 5oC above ambient.
3.6.10
Self Test Screen
The Self Test screen (Figure 3-46) can be accessed through the System Setup
menu, and by pressing the ▲ or ▼ keys.
SYSTEM SETUP MENU
Select: (Self Test)
Self Test Instrument Restart
[CANCEL]
[NEXT]
Figure 3-46: The System Setup Screen
If [NEXT] is chosen, The Corona detector will restart and proceed through its self
test.
If there are no error messages, the user can press the “Next” soft key to proceed to
the Corona detector main menu.
3.6.11
Nebulizer Heater Setup Screen
The Nebulizer Heater Setup screen is only available when using the CoronaPlus CAD
detector. The Nebulizer Heater Setup screen (Figure 3-47) can be accessed through
the System Setup menu, and by pressing the ▲ or ▼ keys.
Corona® CAD® and Corona®Plus CAD® Detectors
Operating and Maintenance Manual
3-25
Chapter 3
SYSTEM SETUP MENU
Select: (Nebulizer)
Nebulizer Heater
[CANCEL]
[NEXT]
Figure 3-47: The System Setup Screen
Select the [NEXT] button and the Nebulizer Heater Setup Screen (Figure 3.48) is
presented.
NEBULIZER HEATER SETUP
Status = Normal
Power (OFF)
Temperature = xx.xC
[CANCEL]
[MENU]
[SAVE]
Figure 3-48: The Nebulizer Heater Setup Screen
This screen is used to turn the nebulizer heater ON or OFF. When this screen is
accessed, the cursor appears in the field to the right of “Power”. After choosing ON,
press ENTER and then [SAVE].
The choice of ON or OFF is stored in the detector’s memory and is automatically
recalled when the detector is turned on. This is a factory set temperature (30oC) and
is not editable.
The Status field indicates the present state of the nebulizer heater (e.g., Normal,
Board Error, Under Range, Over Range) and is used to indicate error messages
(Table 3-7). See Chapter 5 for further information.
Table 3-7: Nebulizer Heater Error Codes
Code
0
1
2
3
4
5
6
7
Message
Nebulizer Heater not detected
Nebulizer Heater malfunction
Nebulizer Heater malfunction (logic)
Temperature out of range (under)
Nebulizer Heater sensor malfunction
Nebulizer Heater malfunction (logic)
Temp sensor or heater not responding
***Caution*** excess heating detected
NOTE: For proper equilibration of the nebulizer, wait for 30 minutes.
3-26
Corona® CAD® and Corona®Plus CAD® Detectors
Operating and Maintenance Manual
The Corona CAD Firmware
3.7
How to Create a Timeline Method
The following example instructs the user on how to create a timeline method. It was
used to generate data for the Impurity Testing 22 [Application Note (Part Number 706716)] (see Figure 3-49). Here, following an autozero, the gain range is
automatically changed from 1pA to 500pA at 1.50 mins before being set back to 1pA
at 3.90 mins (ready for the next run). This method is repeated for 10 samples.
1.0
1.0
0.9
Range = 1pA
0.8
Range = 500pA
0.8
0.4
0.2
100µg (on column)
Acetaminophen
0.6
0.5
Volts
0.6
5ng (on column)
Glucose
Solvent Void
Response
0.7
0.4
0.3
0.2
0.1
0.0
0.0
0.0
0.4
0.8
1.2
1.6
2.0
2.4
2.8
3.2
3.6
4.0
Minutes
Figure 3-49: Changing Gain Range During a Timeline Method
Typically, in the “timeline mode” the user has to select four parameters:
1.
2.
3.
4.
Analytical run time.
Number of samples to be analyzed (e.g., X) [loop will be X-1].
Event - e.g., gain range change.
Time of event.
Procedure:
1.
2.
3.
4.
5.
5.
Choose Edit Mode.
Choose Mode (CAD + TL), press enter to verify and then press Next.
Choose Security On or Off (user’s choice) then press Next.
Defaults are as follows: Range: (100pA); Filter: (None); Offset: (0%).
In this example, the method calls for an initial range of 1pA. Choose 1pA; Press
Enter to verify; Press Next.
Corona® CAD® and Corona®Plus CAD® Detectors
Operating and Maintenance Manual
3-27
Chapter 3
6. Timeline Parameters:
a. Time: (0.00) min
Event: (Hold)
Input: (Start)
Hold for: (ON)
Press “Add Step” soft key after each new timeline event.
b. Time: (0.10) min
Event: (Autozero)
Press “Add Step” soft key.
c. Time: (1.50) min
Event: (Range)
Range: (500pA)
Press “Add Step” soft key.
d. Time: (3.90) min
Event: (Reset)
This will reset values to original settings (i.e., Range).
Press “Add Step” soft key.
e. Time: (4.00) min
Loop to: (0.00)
Event: (Loop)
For: (9) times
In this example 10 injections are to be made (therefore, the loop must be 9
(i.e., X-1 = 10-1 = 9).
Press “Add Step” soft key.
f. Time: (4.10) min
Event: (End)
Stops timeline clock.
Press “Add Step” soft key.
Press Next and Save.
To start the timeline method:
Choose “Run” and then the method # that was saved.
The method will not start until it is triggered. It is probably best to initialize the
timeline method by a trigger from the autosampler.
NOTE: Initially a blinking cursor will appear on the “Range” field. Press
Enter until the cursor is no longer visible. A timeline event change
cannot take place when a blinking cursor is present on a particular
field.
3-28
Corona® CAD® and Corona®Plus CAD® Detectors
Operating and Maintenance Manual
CHAPTER 4
4.1
USING THE DETECTOR IN AN
HPLC SYSTEM
Introduction
The Corona CAD Detector is only to be used as an integral part of a High
Performance Liquid Chromatography (HPLC) system. This chapter discusses the
use of the detector in an HPLC system and includes:
•
•
•
•
•
•
•
•
4.2
Operating the Corona Detector (Section 4.2)
Mobile Phase Considerations (Section 4.3)
Column Considerations (Section 4.4)
Sample Considerations (4.5)
Maximizing the Performance of the Assay (Section 4.6)
Sample Experiment (Section 4.7)
Analysis of Data (Section 4.8)
Effects of Gradient Elution on Response (Section 4.9)
Operating the Corona Detector
4.2.1 Turning On the Detector
NOTE: A review of Cautions, Warnings and Safety Procedures are
presented in pages iii-xii. The user should review this information
before powering up the detector.
Like any other HPLC detector when first turned on, the Corona detector has to
stabilize before use. Usually, this takes approximately 10 mins. With the CoronaPlus
detector, the nebulizer block takes about 30 mins to reach thermal equilibrium. The
time taken for the thermal organizer to reach equilibrium will be dependent upon the
set temperature, the ambient temperature, and the number and type of components
contained within the organizer. Usually it should take no more than 30 mins.
If the Corona CAD detector is turned off and then on again, it will be necessary to
wait for the detector to stabilize.
To immediately begin analyzing samples we suggest that the detector is kept on and
that the flow of mobile phase and the nebulizer gas to the detector be maintained at
all times. An additional benefit of maintaining the power to the control module is that
the life of the internal battery (which protects stored methods) will be increased.
Corona® CAD® and Corona®Plus CAD® Detectors
Operating and Maintenance Manual
4-1
Chapter 4
To start the system:
a) Ensure that the waste bottle is empty and check that the waste lines are free
from bends, kinks or other interferences. Make sure that the bottle cap is on
tightly.
b) Turn on the detector and allow it to proceed through the Self Test.
c) Press the Run soft key to access methods.
d) Choose the desired method and press the Next soft key. This will open the
internal gas valve and allow gas to flow.
e) Confirm the input gas pressure is 35.0 +/- 0.1 psi and adjust the Gas
Conditioning Module as required.
f) Allow 5 minutes to equilibrate.
g) Start the delivery of mobile phase and allow the mobile phase to flow through
the system for 3-5 min at the appropriate flow rate (see Table 4-1) to expel the
air in the system and equilibrate the detector. The minimal flow rate to the
Corona detector is 0.2 mL/min. Flow rates <0.2 mL/min may cause the detector
to exhibit aberrant behavior.
Table 4-1: Flow Rate for Various Columns
Column Diameter
Typical Flow Rate
4.6 mm
3.0 mm
2.0 mm
1.0 mL/min
0.5 mL/min
0.2 mL/min
h) The detector is ready for data collection when the baseline falls to 0.5 pA and/or
is stable for a period of 5 to 10 minutes.
NOTE: The time that is required to obtain a stable baseline is dependent
upon the gain range used (i.e., sensitivity required) as well
as other factors such as the nature of the mobile phase, type of column
being used, etc.
i) Autozero the detector if necessary.
j) The detector is now ready for analytical measurements.
4-2
Corona® CAD® and Corona®Plus CAD® Detectors
Operating and Maintenance Manual
Using the Detector in a HPLC System
4.2.2 Maintaining the Detector between Analyses
The ideal situation to minimize downtime is to maintain the mobile phase flow and
gas flow in the Run mode when the detector is not being used. If the detector is kept
ready for operation in this manner, it is important to ensure that the mobile phase
reservoir(s) contain sufficient solvent for the maintenance period and the gas supply
is sufficient for this period. The pump “high pressure cut-off” should be set to
approximately 35 bar (500 psi) above that observed with the normal flow rate to
protect the system in case of a blockage. If possible, the detector rear panel “Gas
Off” contact closure should be connected to an appropriate device to note that the
flow of gas has stopped.
WARNING: Make certain that the volume of the waste bottle is sufficient
to allow for the collection of mobile phase during the maintenance
period. The waste bottle should NEVER be allowed to fill completely.
Severe or prolonged flooding may damage the detector and void the
warranty.
Maintaining the analytical conditions for lengthy periods may be expensive in terms of
solvent and gas consumption and increases the wear and tear on the pump(s). Two
commonly used alternatives are:
Maintain the flow at a lower flow rate (e.g., 0.1 or 0.2 mL/min). Increase the flow rate
to the desired operating level prior to resuming use, then monitor the baseline signal
to ensure that it is stable before making an injection.
Use a nitrogen generator rather than bottled gas (Part Number 70-6003 is
recommended).
4.2.3 Shutting Down the Detector
To shutdown the system:
a) Flush the system with a neat (neutral) solvent for a few minutes to ensure that
all buffers, etc. are removed. Do not leave the detector exposed for long
periods to either acidic or basic mobile phases.
b) Turn off the flow of mobile phase.
c) Turn off the gas approximately 5 minutes after the flow of mobile phase was
stopped.
d) Turn off the detector.
Corona® CAD® and Corona®Plus CAD® Detectors
Operating and Maintenance Manual
4-3
Chapter 4
4.3
Mobile Phase Considerations
The detector can be used to measure all non-volatile and many semi-volatile
analytes. The basis of the detection is the measurement of the charge on the nonvolatile particulates formed following the evaporation of the solvent. Since the
detector will produce a response to essentially all particulate matter contained in the
mobile phase, care must be taken to ensure that such material does not enter the
detector. Such extraneous particulate matter can come from the mobile phase itself,
the column (see Section 4.4), and even the sample (see Section 4.5).
•
Make sure the in-line filter is installed between the column and the detector.
•
Use only volatile salts in the mobile phase.
•
Do not use either ammonium carbonate or ammonium bicarbonate in the mobile
phase.
•
Use only solvents with minimal residue (check label on the solvent bottle). If a
particular solvent causes problems due to particulates, try a different lot or a
different vendor. Be aware that some solvents contain stabilizing agents that
may cause problems.
•
Use a pH of <7.5. Higher pHs may cause increased noise, background currents
etc.
•
When “pH”-ing, make sure that calibrators (used in checking the pH meter) do
not contaminate the mobile phase.
•
Filter mobile phase through a 0.2 µm filter prior to use.
•
Mobile phases that can cause freezing of the nebulizer (e.g., aqueous-THF
gradients should only be used with the CoronaPlus detector.
•
Degass prior to use. Degass on-line if necessary.
4.4
Column Considerations
The detector can be used with any HPLC compatible column (e.g., normal phase,
reverse phase gel permeation, chiral, etc). However, columns that are unstable (e.g.,
some diol columns), and release particles from the column bed (i.e., column bleed)
will produce noise in the detector, and should not be used. If such a problem is
encountered try using an equivalent column from a different manufacturer.
4-4
Corona® CAD® and Corona®Plus CAD® Detectors
Operating and Maintenance Manual
Using the Detector in a HPLC System
To minimize the potential effects of column decomposition:
•
Do not use the column at extremes outside of the pH range indicated by the
manufacturer.
•
When a new column is installed, pump 5 to 10 column volumes of the mobile
phase through it to waste before connecting the column to the detector.
•
Make sure that the column is compatible with the mobile phase being used
(e.g., some solid phases are not compatible with some organic solvents (e.g.,
cellulose-modified silica with acetone).
•
Use a dedicated column for each application. A column with unknown history
may have been exposed to non-volatile salts, or may be contaminated with
analytes capable of being eluted under the current experimental conditions
(e.g., producing ghost peaks).
WARNING: A column contaminated with non-volatile salts will cause
noise and spiking in the Corona CAD detector. Such issues may
continue for several hours after the column is removed.
4.5
Sample Considerations
The detector can be used with many different sample types. As with any HPLC
analysis, correct sample preparation is essential. The type of sample preparation
used (e.g., solid phase extraction; acid precipitation of proteins; organic extraction;
etc) will be both matrix and analyte dependent. As a precaution, samples should be
passed through a 0.2 µm filter prior to injection on the HPLC system.
As has been mentioned, the detector is extremely sensitive to contaminant particles.
Particles can form if an analyte comes out of solution when injected into the mobile
phase. Make sure that the analyte is soluble in both preparation solvent and mobile
phase, and that the preparation solvent and mobile phase are themselves
compatible.
The detector is sometimes used to measure trace contamination down to the 0.01%
level. Often, in order to measure such trace contaminants, it is necessary to analyze
high concentration of starting material. To prevent formation of particles, make sure
that all analytes in the starting material are soluble at the highest concentration used.
Corona® CAD® and Corona®Plus CAD® Detectors
Operating and Maintenance Manual
4-5
Chapter 4
4.6
Maximizing the Performance of the Assay
4.6.1 Overview
Once the appropriate chromatographic conditions for the compound(s) of interest
have been determined, a variety of steps can be used to optimize the performance of
the assay.
•
Sample cleanup steps are extremely important. This is important if using the
detector for the analysis of complex biological samples (e.g., urine). It is easier
to separate and detect a “clean” sample than one that has undergone only a
minimum of sample preparation.
•
If the compound of interest can be baseline separated from other components of
the mixture, detection and quantitation will be far more straightforward.
•
The “ideal” mobile phase for separation and the “ideal” mobile phase for
detection may be very different. It may be necessary to make a compromise to
obtain an appropriate level of sensitivity and selectivity.
4.6.2 Selection of the Proper Output Range
Ensure that the output from the detector agrees with the input of the recording device
being used. Select the gain range to ensure that the peak is on scale. This is usually
done by experience and/or experimentation (typically, the scale is set so that the
largest peak anticipated is 50-75% full scale). If the inappropriate gain range is
chosen, a peak may overwhelm the detector and produce aberrant data (see Chapter
5, Section 5.8.3).
4.6.3 Setting the Filter
The filter time constant is used to electronically reduce the noise in the
chromatogram. Four filter values are provided (None, Low, Medium, and High).
Typically none is used for the filter setting.
•
If no filter is used, the raw data is presented; if the signal is very noisy and the
sample concentration is low, it is possible that the peak may be lost in the noise.
•
If the high filter is used and the peak is small, it is possible that the peak will not
be observed because the high filter setting attenuates the signal.
The user should note that as long as standards and samples are all run under the
same conditions, the selection of the filter value will not affect analytical results so
long as the peak is clearly observable. If the peaks of interest are very sharp and
occur soon after injection, a short filter time is advised. If desired, you can also vary
the filter during a chromatographic run timeline using smaller filter times for the first
few min. of a chromatographic run and then using larger filter times later in the run.
4-6
Corona® CAD® and Corona®Plus CAD® Detectors
Operating and Maintenance Manual
Using the Detector in a HPLC System
4.7
An Experiment to ensure that the Chromatograph and the
Detector are Functioning Properly
NOTE: Instrument Validation Services (Installation and Operational
Qualifications) and an Instrument Validation Kit are available from
ESA. Please call your local ESA Biosciences representative for
information.
The experiment described below, which involves the detection of caffeine, is included
so that the analyst can perform an analysis with the Corona detector using a welldefined system. It might be useful to perform this experiment prior to developing
separation/detection parameters for the specific needs of the laboratory.
1. Materials Needed:
•
A mobile phase consisting of 20%/80% methanol/water (HPLC Grade).
•
500 µg/mL caffeine standards (included in Part Number 70-6565 Caffeine
Standards Kit).
2. Procedure:
a) Configure system as described in Chapter 2 with pump, pulse dampener,
injection device (either autosampler or manual injector with 10 µL injection
capacity), inline filter, and Corona detector. Connect the guard column (Part
Number 88-12414) between the in-line filter and the Corona detector. (Do not
use an analytical column).
b) Power up the detector and allow nitrogen gas (35 psi) to flow through for
approximately 10 min.
c) Activate the guard column by following the procedure outlined in Chapter 2, if
required.
d) Prepare a 20% methanol/80% water (HPLC grade) mobile phase and allow it
to pass through the system at 1 mL/min.
e) Create a method in the Corona detector with the current gain range set to 100
pA full scale, the Filter set to none, and the offset set to 0.
NOTE: When the instrument is shipped from ESA, this method is
provided as method 1.
Corona® CAD® and Corona®Plus CAD® Detectors
Operating and Maintenance Manual
4-7
Chapter 4
f) Wait 30 minutes and monitor the current. When it is stable, press the Autozero
key.
The baseline noise trace should be similar to that presented in Figure 4-1.
g) Inject a 10 µL sample of 500 µg/mL caffeine solution. The chromatogram
generated should be similar to that presented in Figure 4-2. (Caffeine’s
retention time should be approximately 0.6-0.7 min; typical peak area should be
approximately 2,500,000 units, ± 20%).
mV
Mobile Phase = 20% MeOH; 80% water
Corona Gain Setting = 100 pA full scale
Corona Filter Setting = None
24.9
24.8
24.7
24.6
24.5
24.4
24.3
24.2
24.1
24
0
0.5
1
1.5
2
2.5
3
3.5
4
4.5
min
Figure 4-1: Typical Corona CAD Detector Baseline Noise Trace
0.6
0.5
Volts
0.4
0.3
0.2
0.1
0.0
0.0
0.1
0.2
0.3
0.4
0.5
0.6
0.7
0.8
0.9
1.0
1.1
1.2
1.3
1.4
1.5
1.6
1.7
1.8
1.9
Minutes
Figure 4-2: Typical Chromatogram for Caffeine
Standard (5µg on Column)
4-8
Corona® CAD® and Corona®Plus CAD® Detectors
Operating and Maintenance Manual
Using the Detector in a HPLC System
h) A standard curve can be generated from 0-5000ng caffeine using the standards
provided. A typical standard curve is presented in Figure 4-3.
3000000
Peak Area
2500000
2000000
1500000
1000000
500000
0
0
1000
2000
3000
4000
5000
6000
Mass on Column (ng)
Figure 4-3: Typical Caffeine Standard Curve
4.8
Analysis of Data
The Corona detector response is not linear (typically “parabolic” in nature) and, as
such, an equation such as [A = a mb] can be used to describe the response (the
coefficients a and b are different). Mass vs. particle diameter has a cube root
proportionality, while mean charge per particle has a slightly >1 proportionality with
particle diameter. Consequently, the response of the Corona detector is
approximately proportional to the square root of the analyte mass across the entire
dynamic range. From a purely theoretical standpoint and in practice, calibration is
much simpler and ultimately can result in much more accurate quantitation than with
ELSD.
A quadratic plot type, present in all or most chromatography data systems, provides
an easy way to calibrate the Corona detector. Alternatively, a log-log plot can be
used. Table 4-2 shows typical response data for different steroid standards. Figures
4-4 and 4-5 presents these data as using a quadratic plot and a log-log plot,
respectively.
Corona® CAD® and Corona®Plus CAD® Detectors
Operating and Maintenance Manual
4-9
Chapter 4
Table 4-2: Response (area) for Different Steroids
Mass
(ng)
0
10
20
50
100
200
500
1000
2000
5000
10000
Steroid 1
Steroid 2
Steroid 3
0
7741.5
15361
45870
108576.5
227850
605444.5
1196883
2147457
4622897
7504657
0
8662.5
16932
33782.5
78820.5
176439
473053.5
981872.5
1993206
4335706
7465382
0
10209
18731.5
41635
101639
210761
579961
1170350
2148938
4767831
7749171
9000000
8000000
Response (area)
7000000
6000000
Steroid 1
Steroid 2
Steroid 3
5000000
4000000
3000000
2000000
1000000
0
0
2000
4000
6000
8000
10000
Mass (ng) on column
Figure 4-4: Response Curves for different Steroids
showing Quadratic Fit
4-10
Corona® CAD® and Corona®Plus CAD® Detectors
Operating and Maintenance Manual
Using the Detector in a HPLC System
10000000
Area
1000000
Steroid 1
Steroid 2
Steroid 3
100000
10000
1000
1
10
100
1000
10000
100000
Mass
Figure 4-5: Response Curves for different Steroids
showing a Log-Log Plot
4.9
Effects of Gradient Elution on Response
Under isocratic conditions, the behavior of the Corona detector is like most other
HPLC detectors (i.e., as the elution time increases, the peak height decreases; peak
width increases, but area remains the same) see Figure 4-6.
600
400
300
Progesterone
Testosterone
500
Response
Hydrocortisone
Prednisone
700
Mobile Phase: 70% MeOH
Flow Rate = 1mL/min
Column: Shiseido Capcell Pak C18
MG 4.6 x 250mm
Column Temperature = ambient
Injection Volume = 10µL
200
100
0
2.5
5
7.5
10
12.5
15
17.5
Minutes
Figure 4-6: Typical Analyte Response under Isocratic Conditions
Corona® CAD® and Corona®Plus CAD® Detectors
Operating and Maintenance Manual
4-11
Chapter 4
During gradient elution however, the response of the Corona detector increases as
the organic % increase. This is purely the consequence of nebulization with an
impactor and siphon. There is a greater loss of analyte when eluted in aqueous
solvent. The effect of the gradient on detector response is illustrated in Figure 4-7
(high to low organic) and Figure 4-8 (low to high organic).
HPLC Parameters:
Mobile Phase A: acetonitrile
Mobile Phase B: water
Flow Rate = 1mL/min
Gradient Profile: 30%B to 70%B from 0 to 40 mins.
Column: Asahipak NH2P- 4.6 x 250mm; 5µm
Column Temp. = 35oC
Injection Volume = 10µL
0.015
0.035
0.030
0.020
0.015
0.010
0.010
0.005
0.005
0.000
0.000
2
4
6
8
10
12
14
16
Volts
Maltohexaose
0.020
0.040
0.025
Maltoheptaose
Maltotetraose
Response
0.025
Maltopentaose
0.030
Maltotriose
Glucose
0.035
Maltose
0.040
18
20
22
24
26
28
30
32
34
36
38
40
Minutes
Figure 4-7: Effects of Gradient Elution on Analyte Response.
Measurement of Oligosaccharides using a High to Low Organic Gradient
Response
0.04
Volts
0.05
1.
11
G
ra
di
en
t
0.06
10
8
Isocratic
9
0.03
Serine
2.
Unknown
3.
Glutamic Acid
4.
Arginine
5.
Proline
0.06
0.05
6.
Valine
7.
Methionine
8.
Isoleucine
9.
Leucine
10.
Phenylalanine
11.
Tryptophan
0.04
0.03
Volts
Mobile Phase A: 0.1% TFA
Mobile Phase B: 0.1% TFA in ACN
Flow Rate = 0.6mL/min
Gradient Profile
Time
%B
0.00
0
5.00
0
20.00
40
23.00
40
23.01
0
28.00
0
Injection Volume = 10µl
Column = Shiseido MG C18, 4.6 x 250; 5µm
Column Temperature = ambient
4
3
0.02
7
5
0.02
6
1
0.01
0.01
0.00
0.00
2
4
6
8
10
12
14
16
18
20
22
24
26
28
Minutes
Figure 4-8: Effects of Gradient Elution on Analyte Response.
Measurement of Amino Acids using a Low to High Organic Gradient
4-12
Corona® CAD® and Corona®Plus CAD® Detectors
Operating and Maintenance Manual
CHAPTER 5 MAINTENANCE AND TROUBLESHOOTING
5.1
Introduction
Optimal detector performance will be maintained if the user performs a series of
routine maintenance activities on a periodic basis. Although this chapter primarily
relates to the Corona® CAD® and Corona®Plus CAD® Detectors, optimal analytical
performance requires that the complete HPLC system be well maintained.
This chapter provides information about:
•
Maintenance Related Topics
¾
¾
¾
¾
•
Detector maintenance (Section 5.2)
Customer service of the detector (Section 5.3)
Cleaning the detector (Section 5.4)
Establishing a system log (Section 5.5)
Troubleshooting Related Topics
¾
¾
¾
¾
¾
¾
¾
¾
General troubleshooting approach (Section 5.6)
Detector-related issues (Section 5.7)
HPLC-related issues (Section 5.8)
Standard and sample-related issues (Section 5.9)
Thermal organizer issues (Section 5.10)
Noise review (Section 5.11)
General troubleshooting guidelines (Section 5.12)
Logic board and power supply board replacement (Section 5.13)
NOTE: When the detector is initially installed, its performance is
verified by flow injection analysis (Chapter 2 - Section 2.7 - ESA
Biosciences Corona CAD detector Test Worksheet). In Chapter 4 a
caffeine chromatogram is generated (using the caffeine standard and
guard column (Section 4.7)). These data serve as a benchmark for
detector performance and can be used to compare the performance of
the system at some time in the future. Similarly, if problems are
observed in the use of a specific analytical procedure, these data can
be used to ensure that the chromatographic system is functioning
properly.
The user is encouraged to maintain a log of all operations of the detector;
maintenance activities and all observed problems should be entered into the log.
A discussion of the log is provided in Section 5.5.
Corona® CAD® and Corona®Plus CAD® Detectors
Operating and Maintenance Manual
5-1
Chapter 5
5.2
Detector Maintenance
This section reviews the maintenance that should be performed on a daily, weekly,
monthly and quarterly basis.
5.2.1 Overview
While the ESA Corona CAD detector requires little day-to-day maintenance, it is
recommended that:
•
Samples should be free of particulate matter. Samples should be filtered
through a 0.22 µm Nylon or PVDF membrane filter. Filters should be checked
to ensure that extractable materials are not present and they are compatible
with all constituents of the sample.
•
The mobile phase should contain only volatile components and be free of
particulate matter. Mobile phase should be filtered through a 0.22 µm Nylon or
PVDF membrane. Make certain that the filter is compatible with all constituents
of the mobile phase.
•
In-line PEEK filters are used before the detector. PEEK filters are acceptable
unless the mobile phase contains a solvent that is incompatible with PEEK (e.g.,
THF). If THF is to be used, use the stainless steel filter (Part Number 70-4538)
and appropriate frits (Part Number 70-4359).
•
Columns should be used in accordance with their manufacturers’
recommendations. Avoid columns that show column bleed.
NOTE: The Corona detector is just one component of a
chromatographic system. The performance of the Corona detector will
reflect the performance of the overall HPLC system. To maintain
optimal analytical performance it is important to perform routine
maintenance on each of the various HPLC system components (e.g.,
pump, autosampler, etc.).
The user should refer to the operating manuals for each component of the HPLC
system and perform the necessary maintenance activities on a periodic basis. ESA
provides preventive maintenance services for all ESA components.
Please contact ESA or your local ESA representative for details.
5-2
Corona® CAD® and Corona®Plus CAD® Detectors
Operating and Maintenance Manual
Maintenance and Troubleshooting
5.2.2 Daily Maintenance
NOTE: The frequency for performing the various activities is
dependent on the sample type, mobile phase composition, sample
cleanliness and a number of other factors. The frequency indicated
below should be considered as a guideline. As the user gains
experience with the system and the analytical procedure, it is
recommended that the user creates his (or her) own maintenance
protocols.
On a daily basis (or every time that the unit is started up):
a) Check that the waste bottle is empty and there are no bends, kinks or
obstructions in the waste lines.
b) Check that the pump is working properly and the solvent bottle(s) contain
sufficient mobile phase for the duration of the expected analysis.
c) Check that there is sufficient pump seal wash solution (if equipped). Make
certain that the pump seal wash system is primed and flowing properly.
d) Check that all connections are leak free.
e) If an autosampler is in the system, check that the tray temperature is correctly
set, the syringe is bubble free and the wash syringe has enough wash solution
for the day's analyses.
f)
Use fresh, filtered, degassed, mobile phase. Check that the solvent filter in the
mobile phase reservoir is clean. Replace the solvent filter if it is discolored.
g) Perform a test run using a standard or a well-defined sample and ensure that
the background currents and peak heights (areas) have not changed
appreciably from day to day.
h) Monitor the pump pressure and the temperature of the Thermal Organizer
Module (if equipped) and ensure that they have not changed significantly from
expected values.
5.2.3 Weekly Maintenance
On a weekly basis:
a) Replace the pump washing solution.
b) Perform a flow rate check on the pump.
c) Check all electrical connections to ensure that they are properly seated.
d) Perform all of the daily activities.
Corona® CAD® and Corona®Plus CAD® Detectors
Operating and Maintenance Manual
5-3
Chapter 5
5.2.4 Monthly Maintenance
On a monthly basis:
a) Replace the filter elements in any in-line filters (see Section 5.3.1).
b) Inspect the PEEK tubing to detect potential problems and replace if necessary.
c) Perform all of the daily and weekly activities.
5.2.5 Quarterly Maintenance
On a quarterly basis:
a) Inspect and change seals, check valves, and pistons in the pump (if necessary).
b) Replace the mobile phase filter.
c) Replace the filter element between the column and the detector.
d) Inspect and replace waste bottle ffkm sealing gasket (Part Number 70-7785).
e) Perform all of the daily weekly and monthly activities.
5.2.6 Additional Periodic Maintenance
a) The gas filters should be replaced as described in Section 5.3.3 at least once a
year.
9 IF the gas pressure falls below 35 psi the external Corona detector gas
filters or the Gas Conditioning Module filter may be clogged and require
replacement or the Gas Conditioning Module regulator may require
adjustement.
9 If the external gas supply contains volatile hydrocarbons (e.g., compressor
oils) it may clog the Corona detector’s gas filter assembly and they may
require more frequent replacement.
NOTE: Volatile hydrocarbons (e.g., compressor oils) in the external
gas supply to the Corona detector may cause permanent damage to
the instrument and void the warranty.
5-4
Corona® CAD® and Corona®Plus CAD® Detectors
Operating and Maintenance Manual
Maintenance and Troubleshooting
5.2.7 Nitrogen Generator
The nitrogen generator should be serviced every 6 months in order to maintain
optimal performance. All filter housings requiring routine service and are easily
accessible when the filtration access panel is opened. Replace the three filter
cartridges with those provided in the Maintenance Kit (Part Number 70-6230). The
maintenance kit contains two coalescing pre-filters and one final membrane filter.
When replacing the pre-filter cartridges, be sure to install the proper grade filter in the
proper housing (the housings are labeled).
To ensure consistent product performance and reliability, use only genuine
replacement parts and filter cartridges from ESA Biosciences, Inc.
The filter cartridges in the filter assemblies are removed by loosening the collar from
the filter assembly, lowering the filter bowl away from the filter head, and unscrewing
the element retainer from the base of the cartridge. Insert the new filter cartridge and
reassemble the housing in reverse order.
5.3
Customer Service of the Detector
5.3.1 In-Line Filter Elements
5.3.1.1
Frequency of Changing Filter Elements
In typical use, the filter elements become clogged and must be replaced on a periodic
basis. The frequency of replacement is dependent on the level of particulate matter
present in the mobile phase (pre-injector) and the sample (post injector), as well as
the production of fine particles from the analytical and/or guard column (post
column). If the filter must be replaced frequently (e.g., more than once a month) it
may be worthwhile to modify the composition of the mobile phase and/or switch to a
more stable column (e.g., a column from a different manufacturer) which might create
fewer fines (column bleed). Microbial growth may occur in mobile phases with low
levels (<3%) of organic solvents unless suitable precautions are taken.
A daily log of system pressure should be kept so that any pressure fluctuations can
be monitored, as this is a good indication of clogged filter elements.
Corona® CAD® and Corona®Plus CAD® Detectors
Operating and Maintenance Manual
5-5
Chapter 5
5.3.1.2
Checking the Pressure Drop Across the Filter
To measure the pressure drop across the filter element:
a) Turn off the mobile phase flow. Allow system pressure to drop to zero before
disconnecting any components.
CAUTION: Do not remove the system pressure by opening a fitting
on the high-pressure side of the column. The rapid pressure drop
can damage various components in the overall system. Always
allow the system to drop to zero before breaking any connections.
b) Disconnect the tubing on the downstream (outlet) side of the suspect filter.
c) Run the pump at a flow rate of 1 mL/min and record the pressure reading.
d) Disconnect the suspect filter and again record the pressure reading using a flow
rate of 1 mL/min.
e) Determine the filter pressure drop by subtracting the second reading from the
first reading. If the pressure drop is significant (100 psi [8 bar] or more), change
the filter.
5.3.1.3
Changing a Filter
To change a filter:
a) Turn off the mobile phase flow. Allow system pressure to drop to zero before
disconnecting any components.
CAUTION: Do not remove the system pressure by opening a fitting
on the high-pressure side of the column. The rapid pressure drop
can damage various components in the overall system.
b) Remove the filter assembly from the chromatographic system by removing the
nuts on either end of the assembly.
c) Remove both end nuts from the filter assembly.
d) Remove the used filter. If necessary, carefully insert a small wooden dowel or
plastic rod to dislodge the filter.
e) Rinse the filter housing with de-ionized water.
5-6
Corona® CAD® and Corona®Plus CAD® Detectors
Operating and Maintenance Manual
Maintenance and Troubleshooting
f)
Replace one end nut. Insert a new ESA filter element into the filter housing.
Ensure that the element is properly centered and seated against the surface of
the end nut.
CAUTION: Be careful not to scratch the filter.
g) Replace the second end nut and tighten carefully until contact between the cap
and the filter is felt. The filter is properly installed if both end nuts are
approximately an equal distance from the center of the filter housing. The fitting
should be finger tight, do not use a wrench or pliers and DO NOT over-tighten
as this can crush the filter, rendering it useless.
h) Re-install the filter housing in the chromatographic system. Ensure that the
direction of flow is as indicated on the filter housing.
NOTE: Initially, only the upstream end of the filter should be attached
to the HPLC system. Pump about 5 mL of the mobile phase through
the filter to waste before attaching the downstream end of the filter to
the detector (this step will serve to wash the filter and ensure that
particulate matter does not enter the detector).
5.3.2 Changing the Line Fuses
If the unit does not power up when the main power switch is turned on or if the
display and LED’s are suddenly no longer illuminated, it is possible that the fuse has
blown.
WARNING: Disconnect the Corona detector from line power before
removing the cover from the power input module. For continued
protection against the risk of fire, replace only with the same type and
rating of fuse.
To replace a fuse:
a) Turn off the power and remove the power cord from the unit.
b) Open the cover of the power input module using a small screwdriver or similar
tool.
c) Open the fuse block assembly.
d) Remove both of the fuses and replace the fuses with new ones. The
appropriate fuses are indicated in Table 5-1.
Corona® CAD® and Corona®Plus CAD® Detectors
Operating and Maintenance Manual
5-7
Chapter 5
Table 5-1: Fuses for Corona CAD Detector
Voltage
Fuse Rating
Part Number
250 V
T1A
70-6666
e) Holding the assembly on the sides, slowly slide the assembly in pressing in the
front until seated properly.
Close the cover to the power input module.
f)
g) If the fuses blow again, contact ESA or its representative for service. Do NOT
continue to replace fuses, as this could cause damage to the detector. Do NOT
remove the covers from the instrument as high voltages may be present and
injury could occur.
5.3.3 Replacing the Gas Filters
The gas filters should be replaced annually. The gas filters are replaced as a single
unit (Part Number 70-6224). Detach the existing filters by pressing on the ring on the
fitting and pulling on the tubing. The new filter simply snaps in the clamp and the
tubing snaps into the gas in and out connectors (Figure 5-1).
Gas Filter Unit
Figure 5-1: Location of Gas Filter Unit on Rear of the Detector
5-8
Corona® CAD® and Corona®Plus CAD® Detectors
Operating and Maintenance Manual
Maintenance and Troubleshooting
5.4
Cleaning the Detector
5.4.1 Cleaning the Corona Detector Unit
The outside of the detector can be cleaned with a soft towel moistened with a mild
detergent. This should be suitable for removing dust and fingerprints. Avoid getting
any liquid inside the detector as this could damage the unit. Avoid using abrasive
cleaners especially on the keypad and the display as this could cause scratches.
If it becomes necessary to disinfect the detector, a mild bleach solution can be used.
However, do not allow the bleach solution to remain on the detector for more than a
few minutes. The bleach solution should be wiped off with a damp towel. After
cleaning, the detector can be dried using a soft towel.
5.4.2 Cleaning the Corona Detector Organizer and Thermal Organizer
Follow the general cleaning procedures as described above for the detector unit.
However, it is more likely that the organizer module will become dirty due to spills
and leaks of the mobile phase over time.
It may also be necessary to remove the inner part of the organizer, the piece that
contains the column(s), etc. to facilitate cleaning in and around the pan and the
components (see Appendix C).
The outside of all the column(s), tubing, pulse damper, etc. may be cleaned
according to the above procedure.
CAUTION: When cleaning the Thermal Organizer Module, take care
that the cleaning material does not get on the Temperature Probe,
the Thermostat or the Heater Driver Board (located on the underside
of the chassis plate) as this could damage the organizer.
Clean the manual injector according to the manufacturer’s instructions. If it becomes
necessary to disinfect the organizer, a mild bleach solution can be used on all the
surfaces. However, do not allow the bleach solution to remain on the organizer for
more than a few minutes. The bleach solution should be wiped off with a damp
towel. After cleaning, the organizer and its contents can be dried using a soft towel.
Corona® CAD® and Corona®Plus CAD® Detectors
Operating and Maintenance Manual
5-9
Chapter 5
5.5
Establishing a System Log
A log that includes the usage and maintenance as well as any comments about
operation of the system should be maintained. This log should include the date, time,
technician's name, number of samples, any maintenance activities and any relevant
user comments about the performance of the system.
An example of a typical sample log is presented as Table 5-2. If a prescribed sample
log format is provided by your organization, then that can be used to capture the
relevant information.
Table 5-2: A Typical System Log
System
User
Name
Number
Samples
Sample Type
6-3-01
Jones
19
Catechols
220Bar
6-6-01
Davis
27
Compd 2319
6-6-01
Davis
29
Compd 2301
Date
Background
Maintenance
Activities
General
Comments
0.1pA
Daily activities
OK
20Bar
5pA
Weekly activities
Leaky fitting
on column
(repaired)
220Bar
0.1pA
Daily activities
OK
Pressure
Current
6-8-01
Jones
21
Compd 2318
220Bar
0.1pA
Daily activities
Significant
peak tailing
replaced
column
6-8-01
Smith
33
Compd 2367
220Bar
0.1pA
Weekly activities
OK
6-9-01
Smith
23
Compd 2400
220Bar
0.1pA
Daily activities
OK
5.6
General Troubleshooting Approach
This section is intended to provide the user with guidance to correctly identify and
correct problems that may be experienced with either the Corona or CoronaPlus
detectors.
NOTE: It is important to remember that although a problem may appear
to be associated with the detector itself, issues with the HPLC system,
the analytical method and sample preparation, can all adversely affect
the detector’s performance. DO NOT immediately assume that the
problem is caused by the detector.
5-10
Corona® CAD® and Corona®Plus CAD® Detectors
Operating and Maintenance Manual
Maintenance and Troubleshooting
The following is a set of general troubleshooting guidelines that can be used to
quickly isolate the cause of a potential problem. Subsequent sections cover Corona
detector related issues (Section 5.7), HPLC-related issues (Section 5.8) and sample
related issues (Section 5.9) in greater detail.
1. Turn on the Corona detector and observe the results of the automatic power on
tests. If the power on tests fail, note the error message and check the
recommended protocol presented in Table 5-3.
2. If the Corona detector does not turn on:
a. Check the AC power cord and make sure that power is being supplied to the
instrument.
b. Check the fuses on the rear of the instrument. Replace if necessary. Turn on
the detector. If the fuse blows again, contact an ESA Service Representative.
c. If still unable to turn on the Corona detector, contact your ESA Service
Representative.
3. Review Chapter 2 “Installation”.
a. Check that all gas connections are properly made and that gas is flowing.
b. Verify that the input gas pressure is at 35.0 +/- 0.1 psi and if not adjust the
Gas Conditioning Module as required.
c. Check that all fluid connections are properly made.
d. Check that the filter assembly on the rear of the Corona detector is properly
attached.
e. Verify that other HPLC equipment is connected and operating properly
according to the instructions for each instrument.
f. Verify that all synchronizing I/O connections are properly made and
functioning correctly.
g. Verify that the sealed drain assembly is properly connected to the Corona
detector and that the waste bottle is empty.
4. Review the maintenance section of this chapter. Verify that any recent
maintenance procedures were properly executed.
Corona® CAD® and Corona®Plus CAD® Detectors
Operating and Maintenance Manual
5-11
Chapter 5
5. Review the troubleshooting section of this chapter. For specific problems (such
as a noisy baseline) refer to the appropriate troubleshooting diagnostic chart
below.
NOTE: If the problem is not corrected using the above approach then
please notify ESA or your ESA Trained Service Representative for
support. You will be asked for a concise description of the problem, the
appearance of error messages and, depending upon the problem
information about the HPLC system, analytical method, sample type and
sample preparation. Other required information includes the detector
serial number and firmware version number.
NOTE: When the detector is initially installed, its performance is verified
(Chapter 2 - ESA Corona CAD detector Test Worksheet) and
a caffeine chromatogram is generated (e.g., using the caffeine standard
and guard column (Chapter 4 - Section 4.7)). These data serve as a
benchmark for detector performance. Re-validating the detector, and reanalyzing the caffeine standard may help expedite the troubleshooting
process.
5.7
Detector-Related Issues
These problems can be grouped into one of three categories: electronic issues (e.g.,
those related to the electrometer, Corona needle, the ion trap, and grounding); gas
issues (e.g., flow and pressure errors); and draining issues. Such problems can be
manifested either upon start-up (when the detector goes through its self test) and/or
during use (Operational Errors).
5.7.1 Internal Electronic Diagnostic Programs (Corona detector “Self Test”)
The Corona detector includes an internal diagnostic test program that is automatically
executed whenever the unit is powered on. This program is designed to determine if
the electronics are functioning properly. If no faults are detected, the display will
present the standard program screen. If the diagnostics program determines that
there is an electronic fault, a message will appear on the display (see Table 5-3).
5-12
Corona® CAD® and Corona®Plus CAD® Detectors
Operating and Maintenance Manual
Maintenance and Troubleshooting
Table 5-3:
Error
Code*
Test Failure
1
2
HV Potential
Max
HV Potential Min
4
HV Current Max
8
HV Current Min
10
Pressure
Transducer 1
Pressure
Transducer 2
Ion Trap Voltage
On
20
80
100
Ion Trap Off
200
Electrometer
Temp
400
Clock Not Set
Self Test Failure Codes, Causes and Options
Possible
Cause
Troubleshooting
Corona wire or high
voltage supply
Corona wire or high
voltage supply
Corona wire or high
voltage supply
Corona wire or high
voltage supply
Failure of transducer 1
Rerun Self Test. If Fails contact ESA Service
Failure of transducer 2
Rerun Self Test. If Fails contact ESA Service
Ion Trap Supply
Possible flooding of the detector. Turn off
HPLC flow. Check that bottle is not overfilled.
Check that drain assembly is free from loops,
kinks or blockages. Check vent and gas lines
for liquid. Flow gas (only) through the
detector for 1hr and then rerun Self Test. If
error 80 still present, repeat till test passes
(this may take >24hr, depending upon the
severity of flooding. If continues to fail
contact ESA Service
Rerun Self Test. If Fails contact ESA Service
Ion Trap supply
problem
Electrometer heater or
instrument is too cold
Rerun Self Test. If Fails contact ESA Service
Rerun Self Test. If Fails contact ESA Service
Rerun Self Test. If Fails contact ESA Service
Rerun Self Test. If Fails contact ESA Service
Wait for instrument to reach room
temperature. Rerun Self Test. If Fails contact
ESA Service
Rerun Self Test. If Fails contact ESA Service
Real-time clock (Logic
Board)
800
Clock Not
Real-time clock (Logic
Rerun Self Test. If Fails contact ESA Service
Running
Board)
1000
Battery Low
Real-time clock battery
Rerun Self Test. If Fails contact ESA Service
(Logic Board)
*Multiple errors can occur at the same time. In this case, the error code presented on the display
panel of the Corona CAD detector will be a sum of all failed tests.
NOTE: Failed tests can be reviewed by selecting the review soft key and
then pressing the Enter button to make the cursor appear in the test field.
Use the Up and Down arrows to scroll through the self test results.
In general, if a fault message appears on the display other than an error 80 (or a
error combination containing error 80), then turn the detector off, wait for a minute or
two and turn the system on again. If the fault message re-appears, call the ESA
Service Department at (800)-275-0102 or your ESA Representative.
Corona® CAD® and Corona®Plus CAD® Detectors
Operating and Maintenance Manual
5-13
Chapter 5
Please have the serial number of the instrument, the full text of the error message
and the software version number available. See Table 5-4 for related Operation
Errors.
5.7.2 Gas
Operation errors related to gas issues are presented in Table 5-4. Such errors can
be caused by the gas supply (under or over pressure), the Corona detector, and
whether the waste/drain system is effectively sealed.
Table 5-4:
Error Message
Corona = Service
Corona = Failing
Low ion trap voltage
Operation Errors, Causes and Options
Possible Cause
High voltage approaching
maximum level
High voltage unable to
maintain current at 1.0µA
Ion trap voltage too low
Gas Pressure = UNDERpsi
Loss of incoming gas from
source
Flow/Ratio Error
Gas Flow/Ratio is
compromised
Low Gas Flow Ratio
Low gas flow ratio error has
continued for >60 seconds
Low Total Gas Flow
Total gas flow error has
continued for >60 seconds
High Gas Flow Ratio
Gas flow ratio error has
continued for >60 seconds
High Gas Pressure
Incoming gas pressure
>45psi
5-14
Troubleshooting
Turn off and on. If detector still fails
contact ESA Service
Turn off and on. If detector still fails
contact ESA Service
Turn off and on. If detector still fails
contact ESA Service
Check that nitrogen gas is still being
delivered to the detector. Ensure that
the incoming gas pressure is 35psi
Check gas source. Check that waste
bottle cap is secured correctly. Check
that bottle cap gasket is undamaged
and sealing correctly. Check that
Drain/Vent tubing is free from loops,
kinks, and potential blockages, and that
all connections are secure. If unit still
fails, then there may be a blockage
within the Corona detector. Contact
ESA Service
Pump Off contact sent via I/O terminal.
Press any key to continue. Check all
Flow/Ratio variables (above). If detector
still fails, contact ESA Service
Pump Off contact sent via I/O terminal.
Press any key to continue. Check all
Flow/Ratio variables (above). If detector
still fails, contact ESA Service
Pump Off contact sent via I/O terminal.
Press any key to continue. Check all
Flow/Ratio variables (above). If detector
still fails, contact ESA Service
Adjust gas source pressure. If detector
still fails contact ESA Service
Corona® CAD® and Corona®Plus CAD® Detectors
Operating and Maintenance Manual
Maintenance and Troubleshooting
5.7.3 Drainage
Proper performance of the Corona and CoronaPlus detectors require that the
waste/vent system (detector-vent/drain tubing-waste bottle) be properly sealed (i.e.,
under positive pressure). Failure to secure the waste bottle cap properly can result in
a Flow/Ratio Operation error (see Table 5-4).
As the waste/vent system is a closed system, make sure that the waste bottle is
emptied routinely (e.g., daily prior to the start of an analytical run) otherwise
there is the possibility for the waste solvent to re-enter the detector. If this happens,
error messages such as Self Test Error Code 80 and Operation Error Flow/Ratio
Error may be presented. If this happens please refer to Tables 5-3 and 5-4 for
corrective action. Severe or prolonged flooding of the Corona detector may
require that the unit be returned to ESA for service. Damage caused by
flooding is not covered by the instrument’s warranty.
Make sure that the Corona CAD detector and its waste bottle and vent/drain tubing
are installed correctly (see Section 2.5.1 - Basic Installation) and that the vent/drain
tubing are free from loops, bends and obstructions (i.e., areas where waste solvent
can accumulate and adversely affect drainage). Failure to allow proper drainage of
waste solvent from the Corona CAD detector may adversely affect detector
performance causing pulsations in the baseline (e.g., see the chromatogram
presented in Figure 5-2) and cause flooding.
Figure 5-2: Example of Improper Drainage
(NOTE: the periodicity of spiking will be related to
“slugs” of waste solvent leaving the detector.)
Corona® CAD® and Corona®Plus CAD® Detectors
Operating and Maintenance Manual
5-15
Chapter 5
5.7.4 Gain Range
A given gain range has a finite mass range. In order to achieve the highest mass
sensitivity, the 100pA gain range is typically chosen. However, although this works
well for many applications, the measurement of very large masses may overwhelm
this gain range and produce aberrant data (e.g., Figure 5-3). This issue can readily
be observed when plotting standard (mass) curves; the response may actually starts
to decrease as the mass (on column) increases. If this is found to be the case, the
large mass measurements must be conducted at a less sensitive gain setting.
1.0
0.9
Truncated
Response
0.8
0.7
Response
0.6
0.5
0.4
0.3
0.2
0.1
0.0
0.00
0.25
0.50
0.75
1.00
1.25
1.50
1.75
2.00
2.25
2.50
2.75
3.00
3.25
3.50
3.75
4.00
Minutes
Figure 5-3: Overwhelming a Gain Range
5-16
Corona® CAD® and Corona®Plus CAD® Detectors
Operating and Maintenance Manual
Maintenance and Troubleshooting
Figure 5-4: Two Examples of Grounding Issues
5.7.5 Grounding Issues
Inappropriate grounding of the detector can result in excessive noise and spikes in
the baseline. Random baseline perturbations (Figure 5-4) can also be caused by
poor grounding.
Always make sure that the Corona detector is plugged into the same power strip (or
the same common outlet) as the other components of the HPLC system.
Corona® CAD® and Corona®Plus CAD® Detectors
Operating and Maintenance Manual
5-17
Chapter 5
5.8
HPLC-Related Issues
5.8.1 Pump Noise
This common problem is seen as rhythmicity in the baseline (Figure 5-5). The
frequency is dependent upon on the piston stroke volume (i.e., the mobile phase flow
rate). The magnitude of the response is typically dependent upon the severity of the
issue with the pump. The impact of pump noise to the analyst is dependent upon
what is to be accomplished. For high sensitivity analytical work, even slight pump
noise can have a major impact on the limit of detection of the assay.
Factors that can contribute to pump noise include, but are not limited to, the age and
quality of the pump, incorrect pump priming, sticking check valves, scratched pistons,
damaged seals, bubbles in the pump head, and mobile phase leaks.
Detector Response
Pump noise is relatively simple to diagnose. The frequency of the noise is directly
proportional to the flow rate. If the pump flow is halved (make sure that the flow rate
to the pump is still maintained above the lower recommended flow of 0.2 mL/min)
then the frequency of the noise will halve (as will the amplitude).
0.00
0.50
1.00
1.50
2.00
2.50
3.00
3.50
4.00
4.50
Minutes
Figure 5-5: Example of Pump Noise
Minimizing the pump noise will be dependent upon the root cause. The pump should
undergo routine maintenance (as recommended by the manufacturer). Mobile phase
should be degassed prior to use. HPLC fittings should be checked routinely.
5-18
Corona® CAD® and Corona®Plus CAD® Detectors
Operating and Maintenance Manual
Maintenance and Troubleshooting
5.8.2 Mobile Phase Flow
Like any other HPLC detector, the flow of mobile phase to the Corona detector must
be maintained. Interruption of mobile phase to the detector (e.g., due to pump
issues, leaks in the system, etc.) will have adverse effects on performance.
The flow of mobile phase to the detector must also be within the recommended limits
(i.e., >0.2 but <2.0 mL/min). Use of flow rates outside the recommended range can
have adverse effects on detector performance. For example, flow rates <0.2 mL/min
can cause detector noise (Figure 5-6) due to issues with nebulization. This problem
is typified by rhythmic noise in the chromatogram that is magnified at the apex of the
analytical peak. This problem can be avoided by making sure that the flow rate is
>0.2 mL/min. Flow rates >2.0 mL/min may overwhelm the nebulization process.
ADC1 A, ADC1 CHANNEL A (CF10\07300409.D)
mV
37.5
35
32.5
30
27.5
25
22.5
20
0.5
1
1.5
2
2.5
3
3.5
min
Figure 5-6: Low Flow-Rate Noise
Often the Corona detector is used in parallel with some other detector (e.g.,
spectrophotometric devices such as UV, fluorescence, or PDA detectors; and others
such as MS), with the flow of mobile phase from the column being split between the
two “arms” (see Section 2.5.7). As the Corona detector exerts a small back
pressure, it is important that the flow of mobile phase between the arms is balanced
such that the Corona detector still receives >0.2 mL/min. This can be achieved by
connecting a short piece of PEEK tubing (for PEEK compatible mobile phases) after
the spectrophotometric detector, to create a balancing back pressure.
Corona® CAD® and Corona®Plus CAD® Detectors
Operating and Maintenance Manual
5-19
Chapter 5
5.8.3 Column
The column (and related chemistry – see Section 5.8.4 Mobile Phase) can have a
major impact on the routine performance of the Corona CAD detector. Often, a
problem perceived as being an issue with the Corona CAD detector is, in actuality,
the result of a failing column (or chemistry).
NOTE: Generate a caffeine chromatogram using the caffeine standard
and guard column (Chapter 4 - Section 4.7)) provided with the detector.
If the Corona detector behaves normally (i.e., like it did upon initial
installation), then the current problem is due to the column/chemistry
and not the Corona detector per se.
•
Shifts in retention time or changes in chromatographic peak shape
(e.g., Figure 5-7) are unlikely to be due to a problem with the Corona detector
but are more likely to be due to column aging, changes in temperature, and
differences in mobile phase composition.
Good
Suspect
0.
0.
0.
0.
0.
1.
Minutes
1.
1.
1.
1.
2.
Figure 5-7: The Effect of Column Aging on Analytical Performance
(The old “suspect” column was replaced with a new “good” column,
and performance returned to normal).
•
Only use the column as recommended by the manufacturer (i.e., make sure the
flow rate, temperature, and mobile phase composition and pH, are compatible).
•
Only use stable columns. Those that show significant bleed can cause pressure
problems (e.g., due to blocking of the in-line filter) and, if the particles enter the
Corona detector, increased back ground currents and noise.
5-20
Corona® CAD® and Corona®Plus CAD® Detectors
Operating and Maintenance Manual
Maintenance and Troubleshooting
•
Not all columns in a particular format are equal. For example, a diol column
from one manufacturer may prove to be unusable (e.g., due to column bleed)
while one from a different manufacturer may work perfectly well.
•
Make sure that the column format used is compatible with the sample volume
and/or mass of analyte being separated. Overwhelming the column will lead to
aberrant chromatography (e.g., odd peak shape, shifting retention times etc).
•
Properly flush new guard/analytical columns to waste before attaching to the
detector.
5.8.4 Mobile Phase
•
Use only volatile salts in the mobile phase. Exposure of the detector to nonvolatile salts will lead to increased back ground currents and noise, and may
adversely affect the nebulizer. If the detector is inadvertently exposed to nonvolatile salts, flush with water to remove the salts (stop once the background
and noise have returned to normal).
•
Do not use either ammonium carbonate or ammonium bicarbonate in the mobile
phase. These chemicals are typically heavily contaminated and may cause
problems with back ground current and noise, and may adversely affect the
nebulizer. If the Corona detector is accidentally exposed to these compounds,
flush with water (as with non-volatile electrolytes - above).
•
Use only solvents with minimal residue (check label on the solvent bottle). If a
particular solvent causes problem due to particulates, try a different lot or a
different vendor. Be aware that some solvents contain stabilizing agents that
may cause problems.
•
Use a pH of <7.5. Higher pHs may cause increased noise, background currents
etc. Although not harmful, detector performance will not be equivalent to
conditions that use lower pH ranges.
•
When “pH”-ing, make sure that calibrators (used in checking the pH meter) do
not contaminate the mobile phase.
•
Filter mobile phase through a 0.2 µm filter prior to use.
•
Mobile phases that can cause freezing of the nebulizer (e.g., aqueous-THF
gradients) (see Figure 5-8) should only be used with the CoronaPlus detector.
•
Degas prior to use. Degas on-line if necessary. This will prevent bubbles from
forming in the mobile phase and reduce the chance for pump-related issues
(see above).
Corona® CAD® and Corona®Plus CAD® Detectors
Operating and Maintenance Manual
5-21
Chapter 5
Figure 5-8: Aqueous THF Gradients will cause the Nebulizer
to Freeze and cause Excessive Noise
(Only use the CoronaPlus CAD detector for this and related mobile phases)
5.9
Standard and Sample-Related Issues
The Corona detector has a dynamic range of four orders of magnitude and can be
used to measure trace impurities at the <0.1% level. With a limit of detection of
~10ng (on column) this requires that the mass of the parent compound analyzed
using the Corona detector to be about ~100µg (on column). However, not all
compounds are soluble in the mobile phase at this concentration leading to
precipitation of the analyte on column and in the detector (typically manifested by
increased system back pressure, poor chromatography, etc). Although a compound
may be soluble at high masses in the appropriate diluent (e.g., DMSO), the analyst
must ensure that the analyte is soluble at high masses in the HPLC mobile
phase.
The Corona detector can detect most non-volatile and some semi-volatile
compounds. The response of the Corona detector for semi-volatile compounds is
determined by the vapor pressure of the compound of interest. An effected semivolatile compound will give a diminished response (relative to a non-volatile
compound) when analyzed using flow injection analysis. Chromatographically, an
effected semi-volatile compound will show a diminished response. Figure 5-9, shows
the response of the Corona detector to a number of fatty acids and fatty acid methyl
esters. The chromatogram illustrates reduced responses for a number of semivolatile analytes including short chain fatty acids, and medium chain fatty acid ethyl
esters.
5-22
Corona® CAD® and Corona®Plus CAD® Detectors
Operating and Maintenance Manual
Maintenance and Troubleshooting
Figure 5-9: Analysis of Different Fatty Acids and Fatty Acid Ethyl Esters
*Diminished Response due to Semi-Volatility
Samples must be processed appropriately and filtered (e.g., through a 0.2 µm nylon
membrane) prior to analysis. The analyst must ensure that the final sample extract is
soluble not only in the sample diluent but also in the mobile phase being used, in
order to avoid precipitation.
The Corona detector is a universal detector (for most non-volatile analytes) so its use
with complex matrices (e.g., human urine; waste water, etc) may require more
extensive sample preparation (e.g., solid phase extraction) and/or gradient
separation.
5.10 Thermal Organizer Issues
If the Thermal Organizer is not functioning properly (i.e., the set temperature is not
reached or maintained), check to make sure that the interface cable between the
organizer and the detector is securely plugged into the Logic Module, Power Supply
Module, and the PC board on the underside of the chassis plate of the organizer.
Corona® CAD® and Corona®Plus CAD® Detectors
Operating and Maintenance Manual
5-23
Chapter 5
In addition, make sure that:
•
The remperature probe is placed all the way into the column clamp and secured
with the setscrew.
•
The column clamp is flush mounted on the chassis plate and is securely fitted to
the plate.
5.11 Noise Review
A brief synopsis of the potential sources of noise and troubleshooting is presented in
Figure 5-10.
SOURCE
FLOODING
GROUNDING
HPLC System
•
Self Test Error
Code 80
•
High Background
currents
•
High Background
currents
•
Erratic baseline
noise
•
Liquid in exhaust
or vents
•
“Mystery” peaks
•
Lack of liquid in
drain tubing
•
Check gas
pressure (35psi)
•
Remake mobile
phase
•
Check total flow,
or flow ratio
errors
•
•
Remove column
Check source of
gas
•
•
Use new HPLC
•
Contact ESA
Service
Ground detector
to HPLC
•
Contact ESA
Service
•
•
Check drain
tubing
•
Contact ESA
Service
•
•
HPLC
maintenance
Figure 5-10:
5-24
DRAINAGE
Narrow spikes in
baseline
•
Small dips or
peaks in baseline
Confirm that
HPLC and
detector are
plugged into
common power
source
•
Confirm proper
drain assembly
setup
•
Contact ESA
Service
Symptom
Troubleshooting
Sources of Noise
Corona® CAD® and Corona®Plus CAD® Detectors
Operating and Maintenance Manual
Maintenance and Troubleshooting
5.12
General Troubleshooting Guidelines
Although an HPLC system consists of several components, troubleshooting can be
simplified by consideration of the following guidelines:
a) In almost all cases, there is one cause for the problem. As an example, if an
aberrant baseline is observed, the problem can be caused by one of the
following:
•
The pump (e.g., the pump is not primed).
•
The mobile phase (the mobile phase is not suitably degassed or contains
contaminants).
•
The column (the column is contaminated and strongly eluted compounds are
being eluted).
•
The detector (there is an electronic problem).
•
The detector may be contaminated.
•
A fitting (a fitting may be leaking).
•
Injector (not injecting properly).
•
The waste container has overflowed.
b) A fundamental knowledge of the role of each component of the system is
extremely useful in diagnosing the problem.
c) The availability of spare parts to substitute is very useful in diagnosing the
problem.
d) If a problem is observed, run a “standard” sample to determine if the problem is
instrument related or analysis related.
e) If any aspect of the analytical conditions is to be changed, run a “before” and
“after” to ensure that the effect of the change is well understood. Do not
consider any change as “trivial”. As an example, if you change the supplier of
your mobile phase, verify that the change has no effect on the analysis.
f)
To isolate the source of the problem, it may be valuable to perform independent
checks of each of the components in the HPLC system. These tests should be
found in the operator’s manual for the individual components (see Section 2.5
for testing the Corona CAD detector).
Corona® CAD® and Corona®Plus CAD® Detectors
Operating and Maintenance Manual
5-25
Chapter 5
A series of diagnostic procedures is presented below that will assist in pinpointing the
cause of the problem.
CAUTION: When you are troubleshooting the system, do not relieve the
pressure by opening a fitting on the high-pressure side of the
instrument (e.g., do not open the fitting between the pump and column).
Instead, reduce the flow rate to zero and let the pressure fall slowly.
Failure to do this could damage various components in the system.
On rare occasions, the Corona display may “lock-up” or present nonsense
information. If this occurs:
a) Turn off the power to the unit.
b) Wait a minute and then turn the power back on.
NOTE: If the unit does not go through the normal power up procedure,
contact ESA Biosciences or your ESA Biosciences representative for
assistance.
5-26
Corona® CAD® and Corona®Plus CAD® Detectors
Operating and Maintenance Manual
Maintenance and Troubleshooting
5.12.1
Erratic/Noisy Baseline
Possible Cause
Pump problem
Leaks in the system
Detector output voltage not
matched to the recorder
Mobile phase not properly
mixed
Pulse damper membrane
rupture
Contaminants eluting from
column
System not grounded
Waste overflowed and
waste has re-entered the
detector
Electronics problem in
detector unit
Column temperature not
held constant
Comments
Check pump seals/check
valves for wear or leaks.
Check for leaks in system.
Review installation
procedure.
Recommended Solution
Replace seals if worn.
Replace check valves if
necessary.
Tighten all fittings.
Set voltages correctly.
Stir mobile phase.
Check for leaks. Use a
pulse damper known to be
good.
Trace levels of organic
compounds may be tightly
retained by the column.
All components of the
system must be connected
to a common ground.
Replace membrane or pulse
damper.
Remove column and see if
problem exists. Clean the
column and/or replace.
Check AC line receptacle –
verify that you have a true
ground.
Ensure that all HPLC
components share the same
ground.
Empty waste bottle. Operate
May cause permanent
instrument without mobile phase
damage to electrometer
(pump off) and with gas flowing
assembly.
(gas on) for several hours.
Perform detector test (Sec.
2.5.2). If problem persists,
contact Service at (800)275-0102
Maintain column at constant
Temperature variation
potentially due to problem in temperature.
organizer or temperature
If the Thermal Organizer is
change in laboratory.
included in the system, make
sure that it is operating properly
(see Chapter 5).
See comments in next
section
Corona® CAD® and Corona®Plus CAD® Detectors
Operating and Maintenance Manual
5-27
Chapter 5
5.12.2
High Background Currents
This section describes situations where the background current has noticeably
increased in a short period of time.
Possible Cause
Impurities in the mobile
phase
Comments
See Notes a, b
Highly retained compounds
This may occur when a
being eluted from the column. new mobile phase or
column is used.
Recommended Solution
To determine the source of
potential impurities, use another
source for each component of the
mobile phase on a sequential
basis.
Reduce the potential (if possible).
Allow the system to equilibrate for
an hour with the new mobile
phase or until the baseline is
stable and check the signal again.
Remove column and re-establish
flow. If signal drops, clean or
replace column.
Leaking fitting
Check for wetness around fittings
and tighten fittings
Contaminants leaching from
Check mobile phase reservoir
system components
filters, column end frits, replace if
necessary. Passivate system
components.
Empty waste bottle. Operate
May cause permanent
Waste bottle has been
damage to electrometer instrument without mobile phase
allowed to overflow and
assembly [not covered (pump off) and with gas flowing
backup into the detector
(gas on) for several hours.
by warranty].
Need to clean and dry all aspects
Detector flooded with solvent May occur if gas tank
of the flow path. Operate the
[pump on while no gas flow is empties and is not
instrument without mobile phase
replaced.
present]
(pump off) and with gas flowing for
several hours.
The ion trap may be off or
Will be indicated as a
Contact your ESA service
have a fault
power on test failure.
representative.
5-28
a.
If possible, avoid using triethylamine and other organic amines as chromatographic modifiers
since organic amines tend to contain impurities.
b.
High background currents may be observed when the mobile phase has been stored for a
period of time or some other change in the analytical protocol (frequently unintentional) is
made.
Corona® CAD® and Corona®Plus CAD® Detectors
Operating and Maintenance Manual
Maintenance and Troubleshooting
5.12.3
Increase in Back Pressure
Possible Cause
Comments
Accumulation of particulates Start at the pump and
check pressures at each
from the mobile phase or
component between
injected samples
pump and CAD detector.
Recommended Solution
Replace in-line filter elements
(Section 5.3).
Ensure that the mobile phase
and/or samples are filtered
through a 0.22 µm Nylon or PVDF
membrane filter.
Use a mobile phase with a
substantial fraction of an organic
solvent to prevent bacterial
growth.
Solubility of analyte
(standard or sample) in
mobile phase exceeded
Start at the pump and
check pressures at each
component between
pump and CAD detector.
Use freshly prepared mobile
phase. Bacterial growth in the
mobile phase may lead to
clogging of the filter.
Replace in-line filter elements
(Section 5.3).
Clean system using appropriate
solvent.
Make sure standard and/or
sample are soluble in mobile
phase. Use diluted
sample/standard or use a
compatible mobile phase.
Isolate suspect component.
Clogged injector or column
Refer to manufacturer’s cleaning
directions or replace rotor seal
and/or stator face on injector.
Plugged tubing
Column temperature has
fallen
Ensure that the mobile phase and
sample are filtered before use.
Isolate plugged tubing and
replace.
Maintain column at constant
Temperature variation
potentially due to problem temperature.
in organizer or
If the Thermal Organizer is
temperature change in
included in the system, make sure
laboratory.
that it is operating properly (see
Chapter 5).
Corona® CAD® and Corona®Plus CAD® Detectors
Operating and Maintenance Manual
5-29
Chapter 5
5.12.4
Loss of Response
This section describes the abrupt loss of a peak or peaks from the chromatogram
when using a set of analytical conditions which is known to provide a useful
chromatogram.
Possible Cause
Accidental change of a
parameter on the recorder,
chromatograph, detector
Compounds of interest not
sufficiently stable
Change in pH or mobile
phase composition
The injector may be
partially or fully clogged
Comments
Check settings and verify that the
Gas On/Off indicator is lit [On].
Some compounds will
decompose as a
function of time.
Mobile phases should
be freshly prepared.
Make sure that the
sample and mobile
phase are clean.
Detector unit malfunction
Column temperature not
held constant. Retention
times changed
Gas flow off
Incorrect gain range
selection
Gas flow reduced
Gas leak in waste bottle or
drain/vent tubing
5-30
Recommended Solution
Check stability as a function of time,
and prepare fresh standards. If
necessary, change conditions.
Use a cooled autosampler.
Check mobile phase and prepare
fresh phases.
Clean the injector.
Turn off module and re-initialize. If
error message reappears, contact
service.
Temperature variation
potentially due to
problem in organizer or
temperature change in
laboratory.
Retention times
changed.
No gas flow to induce
nebulization
Perform detector test (Chapter 2). If
problem remains, contact service.
Maintain column at constant
temperature.
If the Thermal Organizer is included,
make sure that it
is operating properly (see
Chapter 5).
Make sure gas is flowing into
detector [pressure should be 35 psi].
Select or move sensitive gain range
Reduced gas flow
Increase gas flow pressure at
leading to low response. regulator but do not exceed 40 psi.
Check gas filters and replace as
necessary.
Make waste bottle cap on tight and
Gas leak interrupts
all drain/vent tubing connections are
nebulization. Gas flow
value too low on display tight.
Corona® CAD® and Corona®Plus CAD® Detectors
Operating and Maintenance Manual
Maintenance and Troubleshooting
5.12.4
Loss of Response (Cont.)
Possible Cause
The corona charger may not
be able to maintain the
correct corona current
Electrometer filter is
contaminated
5.12.5
Comments
Recommended Solution
Return to ESA for repair.
Return to ESA for repair.
Inability to Autozero the Signal
Possible Cause
Comments
Recommended Solution
High background signal on a
very sensitive current range
(background >10 x gain)
Use a mobile phase that provides
a lower background (lower
concentration of impurities).
Autozeroing on a peak or
the void signal
Autozero on a very noisy
signal
Increase the current range.
Autozero on a relatively flat
section of the chromatogram.
Reduce the noise or increase the
current range.
5.12.6
Detector Test Procedure
Section 2.6 includes a test procedure that is used to verify that the detector unit is
operating properly. If the operator believes that the detector is not functioning
properly, the test procedure should be repeated. A worksheet is provided with the
test procedure that should be completed and sent to the ESA Service Department or
your local distributor to assist in diagnosing and solving any problem in the detector
unit.
Corona® CAD® and Corona®Plus CAD® Detectors
Operating and Maintenance Manual
5-31
Chapter 5
5.13
5.13.1
Power Supply Board and Logic Board Replacement
Replacing the Power Supply Board (Part Number 70-5436TB)
If the AC Power fuses repeatedly blow, or if the above procedures indicate that it is
necessary, change the power supply module as follows:
•
Remove the AC power cord.
•
Remove the two screws on the rear panel that hold the power supply assembly
to the chassis.
•
Using the power module removal tool (Part Number 70-6476) carefully pull the
power assembly away from the chassis.
•
Insert the new assembly.
•
Replace the two screws that hold the assembly in place.
5.13.2
Replacing the Logic Board
If it is necessary, change the logic module as follows:
•
Remove the AC power cord.
•
Remove the two screws on the rear panel that hold the logic assembly to the
chassis.
•
Carefully pull the logic assembly away from the chassis.
•
Insert the new assembly.
•
Replace the two screws that hold the assembly in place.
5-32
Corona® CAD® and Corona®Plus CAD® Detectors
Operating and Maintenance Manual
APPENDIX A
A.1
PLUS
CORONA AND CORONA
DETECTOR SPECIFICATIONS
General Operating Specifications
Operating Mode:
Charged Aerosol Detector
Mobile Phase Flow Rate:
Up to 2 mL/min
Wettable Surfaces:
316 stainless steel
Full Scale Output Range:
1 pA to 500 pA in 1-2-5 sequence
Filter Time Constants:
None, Low, Medium, High
Noise Specification:
< 750 fA peak to peak (20% methanol/80% water)
Signal Output:
0V to 1V DC
Output Resolution:
0.12 µV at 1V full scale
Maximum Sampling Rate:
3.5 samples/sec
Output Offset:
± 50% of the selected current range in 1% steps
Event Marker:
Triggered by keypad, timed operation or RS232
control, width, height, polarity
Autozero:
Triggered by front panel keypad, rear panel
contact closure, timed operation or RS232 control
Function Keys:
Autozero, Event Marker, Gas On/Off
RS232 Interface Capability:
Full parametric instrument control
Method Storage:
Up to 25 methods (any combination of Fixed Mode
and Timeline)
Settable Temperature Range:
(Thermal Organizer Option)
(Ambient +5°) to 60°C
Temperature Stability:
(Thermal Organizer Option)
< ± 0.5°C
Warm-up Time:
(Thermal Organizer Option)
< 30 minutes (typically)
Temperature Accuracy:
(Thermal Organizer Option)
≤ ± 0.5°C
Nebulizer Heater:
(CoronaPlus CAD detector only)
o
Factory set at 30 C
Corona® CAD® and Corona®Plus CAD® Detectors
Operating and Maintenance Manual
A-1
Appendix A
A.2
Timeline Specifications
Programmable Changes:
Selectable at times from 0 to 9999.99 minutes in
0.01 minute increments
Programmable Events:
Gas (on/off), Set Output Contact Closures (4),
Autozero, Filter, Marker, Current Range, Hold, Loop,
Reset Parameters
Program Repeats:
1 to 9999 using Loop command
Program Start:
Via front panel keypad or rear panel contact closure
External Device Control:
Control of up to 4 external devices via contact closures
A.3
External Requirements
Power:
100/240 VAC, 50/60 Hz, 100 VA
Gas:
Nitrogen Gas must not contain
volatile hydrocarbons (e.g., compressor oils)
Gas Operating pressure:
60 psi (4.14bar) into Gas Conditioning Module
Operating gas flow rate:
approximately 4 L/min
A.4
Physical Specifications
Dimensions:
Corona Module:
20.5" (L) x 9" (W) x 11.25" (H)
(52.5 cm x 23 cm x 28.6 cm)
Organizer Module:
18.5" (L) x 9" (W) x 5.3" (H)
(47 cm x 23 cm x 13.5 cm)
Weights:
Corona Module:
22 lbs (10 kg)
Organizer Module:
7.6 lbs (3.4 kg)
Thermal Organizer Module:
9.1 lbs (4.0 kg)
A-2
Corona® CAD® and Corona®Plus CAD® Detectors
Operating and Maintenance Manual
Corona and Corona
A.5
Plus
Detector Specifications
Environmental
Operating Temperature:
10-35°C
Humidity:
Maximum 80% RH (35°C), non-condensing
Storage Temperature:
-10 to 60°C
Specifications are subject to change without notice.
A.6
Certifications
The Corona Detector has the following Laboratory Equipment certifications:
USA:
UL 61010A-1 1st Edition
Canada:
CSA Standard C22.2 No. 1010.1-92
European Union:
EN 61326:1997 + A1:1998
EN 61010-1 (2001-02)
FCC:
Part 15 Subpart B Class A
Corona® CAD® and Corona®Plus CAD® Detectors
Operating and Maintenance Manual
A-3
Appendix A
This page intentionally left blank.
A-4
Corona® CAD® and Corona®Plus CAD® Detectors
Operating and Maintenance Manual
APPENDIX B
B.1
RECOMMENDED SUPPLIES AND
SPARE PARTS
Corona Accessories
Corona Accessories
Corona Accessory Kit (Table 2-1)
Thermal Organizer Module
Organizer Module
Nitrogen Generator
B.2
70-6225A
70-5499TA
70-5499
70-6003
Corona Replacement Parts
Corona Replacement Parts
Gas Filter Assembly, HEPA/Carbon, Corona
Corona Waste Bottle Cap Assembly, Solvent Compatible
(old style)
Corona Waste Bottle Cap Assembly, Solvent Compatible
(new style)
Bottle, 5.0 Liter Waste (Compatible with 70-7754 only)
FFKM Gasket, Waste Bottle Cap
Filter-HPLC Inline
Filter-SS Replacement Frits
Gas Filter Assembly, HEPA/Carbon, Corona
Gas Exhaust Hose Assembly, Corona
Drain/Vent Tubing Assembly, Corona (old style)
Drain/Vent Tubing Assembly, Corona (new style)
Gas Inlet Tubing ¼” (specify length)
Tubing Cutter (for new style Drain/Vent tubing)
¼” Stainless Nut and Ferrule Set
(Drain/Vent Tubing - both old and new style)
B.3
Part Number
Part Number
70-6224
70-7117
70-7754
70-7751
70-7785
70-4538
70-4539
70-6224
70-6261
70-6266A
70-7115
70-6260
70-7112
70-7120
Cables
Cables
BNC to Bare Wire Cable (Signal out to recording device)
BNC Male to Double Binding Post Adapter
Bare Wire to Bare Wire (I/O Connections)
Cable RS232, Corona to Computer
Cable, Interface Thermal Organizer to Corona
Corona® CAD® and Corona®Plus CAD® Detectors
Operating and Maintenance Manual
Part Number
70-1776
70-0219
70-4850
70-1743
70-5595
B-1
Appendix B
B.4
Manuals
Manuals
Part Number
Operating and Maintenance Manual
B.5
Fuses
Fuses
Part Number
Fuse, 1.0 amp (for 100/240 V operation), (2 fuses required)
B.6
Corona Organizer Accessory Kit (Table C-1)
Corona Thermal Organizer Accessory Kit
Standard Column Clamp Assembly (15 cm)
Short Column Clamp Assembly (5 cm)
Long Column Clamp Assembly (25 cm)
Cable, Interface Organizer to Corona
Caffeine Standards Set, 1.8 mL
Guard Column
Part Number
70-5651T
70-5366
70-5365
70-5367
70-5595A
Part Number
70-6565
70-7098
Nitrogen Gas Supply
Nitrogen Gas Supply
Part Number
Maintenance Kit, Nitrogen Generator
Filter-PVC 0.5µm, 47mm; 5/pk (for Gas Filter Holder)
B-2
70-5651
Test Standards and Guard Column
Test Standards and Guard Column
B.9
Part Number
Thermal Organizer Module Spare Parts
Thermal Organizer Module Spare Parts
B.8
70-0751
Organizer Module Spare Parts
Organizer Module Spare Parts
B.7
70-6258
70-6230
70-4507
Corona® CAD® and Corona®Plus CAD® Detectors
Operating and Maintenance Manual
APPENDIX C
C.1
ORGANIZER AND
THERMAL ORGANIZER
Overview
The Corona® Organizer Module and the Corona Thermal Organizer Module are
optional accessories for the Corona® CAD® and Corona®Plus CAD® Detectors, that
are designed to accommodate the various components of the fluidics system of the
HPLC, such as pulse damper, column(s), in-line filters, a Rheodyne manual sample
injector valve, tubing, and associated cables, etc. The organizer module is mounted
on top of the detector housing as shown in Figure C-1. The Corona Thermal
Organizer Module allows the analyst to maintain the temperature of the column
between ambient + 5oC and 60oC.
The components that are to be mounted in the module are determined by the
application for which the detector will be used. A typical organizer configuration
might include a manual sample injector, a pulse damper, an in-line filter before the
column, an HPLC column, and an in-line filter before the detector.
This chapter describes how the HPLC components are mounted in the modules as
well as maintenance and cleaning instructions.
C.2
Unpacking the Organizer
The organizer module is shipped in a single carton containing the module and an
accessory kit. Unpack the shipment and inspect the contents to verify receipt of all
components. A Customer Inventory Checklist for the Corona Organizer Module, is
presented in Table C-1.
Carefully inspect the shipping carton and all components. If there is any damage to
the carton or to any components, contact both the shipping agent and ESA
Biosciences (or its representative) immediately. If any parts are missing, call ESA's
customer service department and indicate the missing items via the part numbers.
The shipping carton should be retained as it can be used if it becomes necessary to
transport the organizer.
The module should be placed in an area that is free from drafts or significant
temperature changes. Avoid placing the organizer near air conditioning vents,
windows, ovens, etc.
Corona® CAD® and Corona®Plus CAD® Detectors
Operating and Maintenance Manual
C-1
Appendix C
The Corona Organizer Module and Thermal Organizer Module are identical to the
Coulochem III Organizer Module Thermal Organizer Module. When the modules are
employed with electrochemical cells, cell brackets are provided to mount the cells to
the housing. While these brackets are not required with the Corona Detector, they
are provided as a convenience to the user in the event that the organizer is used for
electrochemical detection with the Coulochem III detector.
Table C-1: Corona Organizer Module Accessory Kit
Quantity
2
16
1
1
6 feet
1
2
4
3
1
1
2
10
2
1
Item
Part Number
8-32 x 3/8 Screw and Star Washer for Manual Injector
Feet for Cells
Organizer Ground Strap
Column Grounding Cable
Tubing for Drain
Bracket for Manual Injector Overflow Line
Bracket for Holding Down Cells (a)
Plastic Screws for Cell Bracket (a)
Knurled Screws for Cell Bracket (a)
Panel with Hole for Manual Injector
Panel without Hole for Automated Injector
Knurled Thumbnuts for Panels
Weigh Boats for Injector Waste
Column Holder Non-Heated Assembly
Interface Cable Organizer to Corona
50-5213
70-4336
70-5625
70-5630
50-6224
70-5678
70-5439
70-5571
70-5564
70-5229
70-5418
70-5532
40-0172
70-5530
70-5595A
(a) Used for mounting electrochemical cells when the organizer is used with the
Coulochem III Detector
C-2
Corona® CAD® and Corona®Plus CAD® Detectors
Operating and Maintenance Manual
Organizer and Thermal Organizer
C.3
Installing the Corona Organizer Module
NOTE: Refer to Section C.4 to install the Corona Thermal Organizer
Module.
C.3.1 General Information
Cut the tubing for each connection and prepare the appropriate fittings before
installing the various components into the organizer. The tubing length should be
long enough to allow for a bit of play, but excessive tubing length post injector should
be avoided.
It is a good idea to use a heat gun or similar device to heat PEEK tubing in order to
bend it without unduly stressing it. If PEEK tubing is stressed it becomes weakened
and can either burst at lower pressures than expected or leaks or “sweating” may
occur. This is especially important when sharp bends are used (sharp bends can be
found in many configurations or applications used with the Corona Detector and the
Organizer Module).
Tubing to and from other components in the system (e.g., the pump) can be led into
the organizer via the vertical cuts in the cover (Section C.4.2).
An exploded view of the entire Corona Organizer Module is shown in Figure C-1.
Please refer to this figure as you assemble the Organizer Module.
NOTE: The exploded view included the cell brackets and related
hardware.
Corona® CAD® and Corona®Plus CAD® Detectors
Operating and Maintenance Manual
C-3
Appendix C
Figure C-1: Exploded View of Corona Organizer Module
C-4
Corona® CAD® and Corona®Plus CAD® Detectors
Operating and Maintenance Manual
Organizer and Thermal Organizer
C.3.2 Removing the Organizer Chassis Plate
All components are mounted on the Organizer Chassis Plate (Part Number 70-5231;
Figure C-2), which is, in turn, attached to the Organizer Tray. It is necessary to
remove the chassis plate from the organizer tray to attach the various components.
Knurled nuts for attaching
plate to tray
Figure C-2: Organizer Chassis Plate
To remove the Organizer Chassis Plate:
a) Remove the Organizer Cover by lifting it off.
b) Unscrew the three knurled nuts that attach the organizer chassis plate to the
tray. One nut is in the front (center) and the other two are in the corners at the
rear of the organizer.
c) Lift the organizer tray from the chassis plate.
C.3.3 Installing the Pulse Damper
To install the Pulse Damper:
a) The pulse damper is mounted on the rear of the front left side of the chassis
plate (Figure C-3) using 2 of the 4 screws that are supplied with the pulse
damper.
Mount damper
here
Figure C-3: Mounting the Pulse Damper
NOTE: Do not attach the rubber feet to the bottom of the pulse damper
when mounting it to the chassis plate.
Corona® CAD® and Corona®Plus CAD® Detectors
Operating and Maintenance Manual
C-5
Appendix C
C.3.4 Installing a Rheodyne Manual Sample Injector Valve
NOTE: It may be easier to connect the appropriate tubing to the manual
sample injector valve before installing it into the organizer.
To install the Manual Sample Injector:
a) Place the Organizer Injector Panel with the hole (Part Number 70-5229) onto
the organizer chassis plate (Figure C-4).
Figure C-4: Locating the Organizer Injector Panel
b) Affix the panel to the organizer chassis plate with the two thumbnuts provided.
c) Remove the handle from the injector valve using a hex wrench.
d) Attach the injector to the chassis so that the valve stem goes through the hole in
the Injector Panel and the part number of the injector is facing up. Fasten the
injector using the two screws and star washers (Part Number 50-5213) supplied
in the accessory kit.
NOTE: The screws and star washers are provided to ensure appropriate
grounding. Do not use the screws supplied with the
injector to mount the injector.
e) Reattach the injector handle and tighten the two hex setscrews. Make sure the
setscrews make contact with the flat portions of the valve stem. It will be
necessary to rotate the handle after tightening one setscrew to gain access to
the other setscrew.
Refer to the Operating Instructions provided with the injector for other information on
installation, proper use and care of the manual sample injector valve. These
instructions include information about the wiring for the position-sensing switch
(optional) that can be connected to another HPLC component, which is used to signal
the start of the injection.
C-6
Corona® CAD® and Corona®Plus CAD® Detectors
Operating and Maintenance Manual
Organizer and Thermal Organizer
The cabling for the position sensing switch can be directed outside of the organizer at
the back of the organizer along with the cell cables.
If an autosampler is to be used:
a) Place the Organizer Injector Panel without the hole (Part Number 70-5418) onto
the organizer chassis plate.
b) Affix the organizer injector panel to the organizer chassis plate with the two
thumbnuts.
c) Lead in the tubing from the autosampler through one of the ports on the proper
side of the organizer.
C.3.5 Installing the In-line Filter
If an in-line filter is employed, it should be connected between the injector and the
column. The filter holder can be allowed to sit on the floor of the chassis plate.
C.3.6 Installing the Column Holder
The column is clamped to the chassis plate using a Column Holder Assembly (Part
Number 70-5530) that is mounted to the right side of the chassis. The holder is
assembled as shown in Figure C-5 and is mounted to the side of the chassis via the
lower set of screw holes on the right side of the chassis as shown in Figure C-6.
Figure C-5: Column Holder Assembly
Corona® CAD® and Corona®Plus CAD® Detectors
Operating and Maintenance Manual
C-7
Appendix C
One holder should be used for short columns, and two holders can be used for longer
columns.
Figure C-6: Mounting the Column Holder Assembly
Connect the brackets to the left side of the chassis by the lip that fits into the
horizontal slit and the knurled screw that fits into the right side of the chassis (Figure
C-6). The plastic knurled screws (Part Number 70-5571) should be threaded into the
proper hole over a cell and secured finger tight.
C.3.7 Manual Sample Injector Overflow Line Bracket
The Manual Injector Overflow Line Bracket is an L-shaped piece with small holes for
tubing (Part Number 70-5678). It should be mounted to the underneath side of one
of the cell brackets. The overflow lines (vent tubes) from the injector valve should be
positioned through the small holes so that any overflow can drip into a Weigh Boat
(Part Number 40-0172) that is placed on the organizer chassis plate. The overflow
bracket is designed to keep the outlet of the vent tubes at the same vertical height as
that of the needle port to prevent siphoning of the sample.
Connect the brackets to the left side of the chassis by the lip that fits into the
horizontal slit and the knurled screw that fits into the right side of the chassis (Figure
C-7). The plastic knurled screws (Part Number 70-5571) should be threaded into the
proper hole over a cell and secured finger tight.
Figure C-7: Cell Bracket
C-8
Corona® CAD® and Corona®Plus CAD® Detectors
Operating and Maintenance Manual
Organizer and Thermal Organizer
C.3.8 Final Assembly
After you have made all connections:
a) Place the chassis plate into the organizer tray so that the three threaded studs
protrude through the bottom of the chassis plate.
b) Connect the Ground Strap Assembly (Part Number 70-5625) to the protruding
threaded stud at the left-rear corner of the chassis plate (see Figure C-1).
Attach the three knurled thumbnuts, which were removed in Section 5.3.2, and
finger tighten.
c) Mount the organizer module on top of the Corona Detector by inserting the latch
tabs at the front of the organizer into the two slots at the top back of the
detector’s bezel. Make sure the swivel plate of the latch assembly at the rear of
the organizer is underneath the top lip of the detector. Then tighten the latch
using the knurled thumbnut.
In most cases, the organizer is attached to the top of the Corona Detector, but it
can also be placed on the bench next to the unit if so desired. Remove the latch
mechanism at the rear of the organizer so the organizer will set flat on the
bench.
d) Connect the loose end of the Ground Strap Assembly to the ground screw on
the back of the Corona CAD detector. It is located in the upper right hand
corner (when facing the back of the detector) of the power supply module next
to the ground symbol (see page vii and Figure 2-1 in this manual).
NOTE: The Ground Strap that is provided will not reach to the Corona
when the organizer is placed next to it on a bench. The user must
provide a grounding cable for this configuration.
e) Connect the tubing for the drain onto the protruding tube on the right rear of the
organizer. Place the other end of the drain tubing in a waste container that is
situated lower than the organizer.
f)
Replace the cover.
g) Make all the necessary connections to your HPLC system.
The Corona CAD detector and its organizer module are now ready to be used.
Corona® CAD® and Corona®Plus CAD® Detectors
Operating and Maintenance Manual
C-9
Appendix C
C.4
Installing the Corona Thermal Organizer Module
NOTE: Refer to Section C.3 to install the Corona Organizer Module.
C.4.1 General Information
An exploded view of the entire Corona Thermal Organizer Module is shown in
Figure C-8. Please refer to this figure as the Organizer Module is assembled.
Figure C-8: Exploded View of Corona Thermal Organizer Module
C-10
Corona® CAD® and Corona®Plus CAD® Detectors
Operating and Maintenance Manual
Organizer and Thermal Organizer
C.4.2 Removing the Organizer Chassis Plate
All components are mounted on the Organizer Chassis Plate (Part Number 70-5231;
Figure C-9), which is attached to the Organizer Tray. It is necessary to remove the
chassis plate from the organizer tray to attach the various components.
Figure C-9: Organizer Chassis Plate
To remove the Organizer Chassis Plate:
a) Remove the Organizer Cover by lifting it off.
b) Unscrew the three knurled nuts that attach the organizer chassis plate to the
tray. One nut is in the front (center) and the other two are in the corners at the
rear of the organizer.
c) Lift the organizer tray from the chassis plate.
C.4.3 Installing the Pulse Damper
The pulse damper is mounted on the rear of the front left side of the chassis plate
(Figure C-10) using 2 of the 4 screws that are supplied with the pulse damper.
Mount damper
here
Figure C-10: Mounting the Pulse Damper
NOTE: Do not attach the rubber feet to the bottom of the pulse damper
when mounting it to the chassis plate.
Corona® CAD® and Corona®Plus CAD® Detectors
Operating and Maintenance Manual
C-11
Appendix C
C.4.4 Installing a Rheodyne Manual Sample Injector Valve
NOTE: It is recommended that you connect the appropriate tubing to the
manual sample injector valve before installing it into the organizer.
To install the Manual Sample Injector:
a) Place the Organizer Injector Panel with the hole (Part Number 70-5229) onto
the organizer chassis plate (Figure C-11).
Figure C-11: Locating the Organizer Injector Panel
b) Affix the panel to the organizer chassis plate with the two thumbnuts provided.
c) Remove the handle from the injector valve using a hex key.
d) Attach the injector to the chassis so that the valve stem goes through the hole in
the Injector Panel and the part number of the injector is facing up. Fasten the
injector using the two screws and star washers (Part Number 50-5213) supplied
in the accessory kit.
NOTE: The screws and star washers are provided to ensure
appropriate grounding. Do not use the screws supplied with the
injector to mount the injector.
e) Reattach the injector handle and tighten the two hex setscrews. Make sure the
setscrews make contact with the flat portions of the valve stem. It will be
necessary to rotate the handle after tightening one setscrew to gain access to
the other setscrew.
Refer to the Operating Instructions provided with the injector for other information on
installation, proper use and care of the manual sample injector valve. These
instructions include information about the wiring for the position-sensing switch
(optional) that can be connected to another HPLC component, which is used to signal
the start of the injection.
C-12
Corona® CAD® and Corona®Plus CAD® Detectors
Operating and Maintenance Manual
Organizer and Thermal Organizer
The cabling for the position sensing switch can be directed outside of the organizer at
the back of the organizer along with the cell cables.
If an autosampler is to be used:
a) Place the Organizer Injector Panel without the hole (Part Number 70-5418) onto
the organizer chassis plate.
b) Affix the organizer injector panel to the organizer chassis plate with the two
thumbnuts.
c) Lead in the tubing from the autosampler through one of the ports on the proper
side of the organizer.
C.4.5 Installing the In-line Filter
If an in-line filter is employed, it should be connected between the injector and the
column. The filter holder can be allowed to sit on the floor of the chassis plate.
C.4.6 Installing the Temperature Probe
The Temperature Probe (Part Number 70-5812) is placed in the access hole on the
lower half of the column holder (Figure C-12).
To install the Temperature Probe:
a) Loosen the clamping screw on the side of the column holder.
b) Slide the probe into the access hole until it is bottoms out.
c) Tighten the clamping screw against the probe.
d) Check to see that the probe is securely in place by slightly pulling back on it.
C.4.7 Installing the Column Holder
The Thermal Organizer is equipped with a 15 cm Column Holder Assembly (Part
Number 70-5366) that is clamped to the chassis plate on the right side of the chassis
(Figure C-13).
A 5 cm Column Holder Assembly (Part Number 70-5365) and a 25 cm Column
Holder Assembly (Part Number 70-5367) are available as options.
Corona® CAD® and Corona®Plus CAD® Detectors
Operating and Maintenance Manual
C-13
Appendix C
The lower half of the column holder is mounted on the two short standoffs on the
Organizer Chassis Plate. If it is necessary to remove the holder (e.g., to replace it or
clean the organizer) remove the screws that attach the holder to the standoffs.
When replacing the column holder, check that the holder sits flush to the chassis and
that nothing is caught underneath, so that maximum contact is made.
As you install the column holder, take care that the cable from the sensor will not
interfere with placing the column in the holder.
Figure C-12: Column Holder Assembly
Figure C-13: Mounting the Column Holder Assembly
C-14
Corona® CAD® and Corona®Plus CAD® Detectors
Operating and Maintenance Manual
Organizer and Thermal Organizer
C.4.8 Manual Sample Injector Overflow Line Bracket
The Manual Injector Overflow Line Bracket is an L-shaped piece with small holes for
tubing (Part Number 70-5678). It should be mounted to the underneath side of one
of the cell brackets. The overflow lines (vent tubes) from the injector valve should be
positioned through the small holes so that any overflow can drip into a Weigh Boat
(Part Number 40-0172) that is placed on the organizer chassis plate. The overflow
bracket is designed to keep the outlet of the vent tubes at the same vertical height as
that of the needle port to prevent siphoning of the sample.
Connect the brackets to the left side of the chassis by the lip that fits into the
horizontal slit and the knurled screw that fits into the right side of the chassis
(Figure C-14). The plastic knurled screws (Part Number 70-5571) should be
threaded into the proper hole over a cell and secured finger tight.
Figure C-14: Cell Bracket
C.4.9 Final Assembly
After all the connections are made:
a) Place the chassis plate into the organizer tray so that the three threaded studs
protrude through the bottom of the chassis plate.
b) Connect the Ground Strap Assembly (Part Number 70-5625) to the protruding
threaded stud at the left-rear corner of the chassis plate (see Figure C-8).
Attach the three knurled thumbnuts which were removed in Section C.4.2, and
finger tighten.
c) Mount the organizer module on top of the Corona Detector by inserting the latch
tabs at the front of the organizer into the two slots at the top back of the
detector’s bezel. Make sure the swivel plate of the latch assembly at the rear of
the organizer is underneath the top lip of the detector. Then tighten the latch
using the knurled thumbnut.
Corona® CAD® and Corona®Plus CAD® Detectors
Operating and Maintenance Manual
C-15
Appendix C
In most cases, the organizer is attached to the top of the Corona Detector, but it
can also be placed on the bench next to the Corona if so desired. Remove the
latch mechanism at the rear of the organizer so the organizer will set flat on the
bench. The organizer must also be set as close as possible to the detector to
ensure that the cell cables will readily reach it.
d) Connect the loose end of the Ground Strap Assembly to the ground screw on
the back of the Corona Detector. It is located in the upper right hand corner
(when facing the back of the detector) of the power supply module next to the
ground symbol.
NOTE: The Ground Strap that is provided will not reach to the Corona
Detector when the organizer is placed next to it on a bench. The user
must provide a grounding cable for this configuration.
e) Connect the Thermal Organizer Cable (Part Number 70-5595) between the
thermal organizer, the Power Input Module and the Logic Module (the latter two
modules are accessed via the rear of the detector chassis).
f)
Connect the tubing for the drain onto the protruding tube on the right rear of the
organizer. Place the other end of the drain tubing in a waste container that is
situated lower than the organizer.
g) Route the cell cables out the back of the organizer using the slots in the chassis
plate located at the rear of the organizer. Connect cell cables to the proper
connectors on the rear panel of the Corona Detector.
h) Replace the cover.
i)
Make all the necessary connections to your HPLC system.
Now the Corona CAD detector and its thermal organizer are ready to be used.
C-16
Corona® CAD® and Corona®Plus CAD® Detectors
Operating and Maintenance Manual
Organizer and Thermal Organizer
C.5
Troubleshooting
The left part of the top line of the Corona Main screen presents the temperature of
the Thermal Organizer when it is present. In the event that a fault is observed in the
organizer, this field will indicate a negative number as a code to indicate the nature of
the fault. The Corona help button can be used to present the text associated with the
particular error code displayed. The codes are indicated in Table C-2.
Table C-2: Error Messages - Thermal Organizer
Code
Message
0
Thermal Organizer not detected
-1
-2
-3
-4
-5
-6
Thermal Organizer malfunction
Thermal Organizer malfunction (logic)
Temperature out of range (under)
Organizer sensor malfunction
Thermal Organizer malfunction (logic)
Temp sensor or heater not responding
*** CAUTION ***
Excess heating detected
-7
Suggested Action
If installed, check Temperature Probe
connections
Check Temperature Probe connections
Check Temperature Probe connections
Check Temperature Probe and set point
Check Temperature Probe connections
Check Temperature Probe connections
Check Temperature Probe connections
REMOVE POWER, UNPLUG ORGANIZER
and CALL ESA
For assistance in troubleshooting and replacing components, please call ESA
Biosciences Technical Service or its authorized distributor.
C.6
Maintenance and Cleaning
The Corona Organizer Modules are designed to give years of trouble free use;
however, there are some general maintenance items that should be observed as with
all HPLC components and systems.
CAUTION: When you are cleaning the Thermal Organizer Module, take
care that the cleaning material does not get on the Temperature Probe,
the Thermostat or the Heater Driver Board (located on the underside of
the chassis plate) as this could cause damage.
In most cases, it is easier if the chassis plate and its contents are removed from the
organizer tray when replacing parts. It may also be easier to service the manual
injector (such as replacing tubing, connectors, etc.) with the chassis plate outside of
the organizer tray.
Corona® CAD® and Corona®Plus CAD® Detectors
Operating and Maintenance Manual
C-17
Appendix C
C.6.1 Maintenance on a Daily Basis
Check all fluid connections for leaks and fix as required. Clean up any spills
immediately.
C.6.2 Maintenance on a Monthly Basis
Check all cable connections including the ground strap cable. Tighten/secure as
needed.
C.6.3 Cleaning
Wipe up any spilled mobile phase or other liquids immediately. The inside and
outside surfaces of the organizer can be cleaned with warm soapy water and a soft
cloth. Use dilute bleach as a disinfectant. Wipe up any excess bleach and dry with a
cloth.
C-18
Corona® CAD® and Corona®Plus CAD® Detectors
Operating and Maintenance Manual
APPENDIX D
FIRMWARE FLOW CHART
Main Menu
System
Edit
Run
RS 232
Del Methods
Select Method
Select Method
Security select screen
Current, Output, Nebulizer views
Range, Filter, Offset view/modify
Event Marks
Date & Time
Range, Filter, Offset
Select Screen
Remote
Inputs
Contacts
Thermal Org
System
select
If TimeLine: add event
screen
Time, Event
Event conditions
Self test
Save Method screen
Nebulizer
(If Plus)
Corona® CAD® and Corona®Plus CAD® Detectors
Operating and Maintenance Manual
Pressure, Corona status view
Total Flow, Ratio Warning
Total flow, Flow ratio view
Corona voltage and current view
Trap voltage view
If Timeline: Events view
screen
Time, Event
Event conditions
D-1
Appendix D
This page intentionally left blank.
D-2
Corona® CAD® and Corona®Plus CAD® Detectors
Operating and Maintenance Manual
APPENDIX E
E.1
DRAIN/VENT ASSEMBLY –
OLD STYLES
Drain Cap Assembly (Part Number 70-7117) Compression
Drain Fitting Components
Table E-1 shows the list of items and their part numbers of the components
contained in the accessory kit.
Table E-1
Components Recorded on the Customer Inventory Checklist
Qty
Description
1
Corona Detector or Corona Plus Detector
1
Power Cord
1
Bottle Assembly - 4L Waste
1
Organizer Module
1
Thermal Organizer Module
1
Organizer Accessory Kit
1
Thermal Organizer Accessory Kit
1
Corona/Corona Plus Accessory Kit including:
1
Limited Warranty Registration Card
1
Cable BNC connector-to-Black and Red Wire
1
Cable I/O 2-Conductor
1
Small Flat Blade Screwdriver 3/32 x 2”
1
Corona Detector Operating Manual
1
In-Line Filter HPLC
1
Filter SS Replacement Frits
2
Tubing HPLC 10cm
1
Filter Gas Holder
1
Drain/Vent Tubing Assembly
1
Nut 1/16 PEEK Sealtight 10-32
1
Nut/Ferrule Set 1/4” SS
8 Ft
Tubing Gas Inlet
8 Ft
Tubing Gas Outlet
1
Fitting 1/4” Tube x 1/4” NPT
1
ESA Multitool
1
Caffeine Standards Kit*
2
Wrench, 1/2” X 9/16” Open-End
1
Guard Column 20 x 4mm BetaBasic 18*
1
Cable USB
*Used in detector verification (see Chapter 4).
ESA Part Number
70-6186A or 70-6967
70-1164
70-7060
70-5499
70-5499TA
70-5651
70-5651TA
70-6225A
10-0181
70-1776
70-4850
50-0257
70-6258
70-4538
70-4539
70-6398
70-4379
70-7115
70-5546
70-7120
70-6260
70-6261
70-4377
40-0288
70-6565
50-0868
70-7098
70-5713
NOTE: See Appendix B for a list of recommended supplies and spare
parts.
Corona® CAD® and Corona®Plus CAD® Detectors
Operating and Maintenance Manual
E-1
Appendix E
Carefully inspect the shipping carton(s) and all components. If there is any damage
to the carton(s) or to any components, contact both the shipping agent and ESA (or
its representative) immediately. If any parts are missing, call ESA's Customer
Service Department and indicate the missing items via the part numbers.
E.1.1 Installing the Drain/Vent Assembly
Drain and Vent Installation: The Drain/Vent tubing assembly (Part Number
70-7115) consists of a piece of Teflon lined Tygon tubing and a piece of solid
Teflon tubing that must be carefully assembled to promote proper drainage.
The assembly includes the Drain Tubing 3/16”ID x 1/4”OD x 6’ long (Part Number
70-7113) and the Vent Tubing 1/8”ID x ¼”OD x 6’ long (Part Number 70-6259)
(Figure E-1).
Tygon Tubing
Solid Teflon Tubing
Teflon Lining
Vent Tube
Drain Tube
Figure E-1: Vent and Drain Tubing
To attach the Drain/Vent Tubing assembly:
a) Connect the Vent tubing to the quick connect fitting located on the bottom front
left portion of the detector. This is a quick connect fitting which simply latches
when the fitting is pushed in (Figure E-3).
b) Connect the Drain tubing (end with SS fitting) to the compression fitting located
on the bottom front left portion of the detector. Ensure that the two ferrules
inside the nut are properly oriented (Figure E-2). The Drain fitting should be
tightened with the supplied 9/16” wrench until it is snug (Figure E-3).
CAUTION: Do no over-tighten the drain fitting. Equipment damage
could result.
E-2
Corona® CAD® and Corona®Plus CAD® Detectors
Operating and Maintenance Manual
Drain/Vent Assembly - Old Styles
Figure E-2: Correct Orientation of Nuts and Ferrules
Figure E-3: Location of Fluidics Connections
c) Using the tubing cutter (Part Number 70-7112) from the Drain/Vent kit, cut both
the drain and vent tubing to a length (between the detector and waste bottle)
where there are no dips, kinks or loops. Cut the drain tubing 4" longer than the
vent tubing. A vertical drop is optimum. It may or may not be necessary to cut
the tubing, depending upon the installation. Leave enough excess in case the
tubing ends need to be cut and reinstalled. The ends must be cut straight to
ensure a proper connection to the barbed fittings.
CAUTION: Because the vent tubing consists of two layers, it may be
necessary to flare the tubing by inserting the uncapped end of a ball
point pen into the tubing. This will slightly widen the opening. Take
care not to damage the Teflon lining during attachment.
Corona® CAD® and Corona®Plus CAD® Detectors
Operating and Maintenance Manual
E-3
Appendix E
d) Attach the other end of the vent tubing to the barbed fitting on the cap of the
Waste Bottle. The vent tubing will be attached to the smaller barbed fitting and
the drain tubing will be attached to the compression fitting (Figure E-4).
Carefully place the tubing over the barb ensuring that the inner lining is
completely over the barb. Grasp the tubing near the barb and push the tubing
onto the barb until it is all the way down.
e) Install the nut and ferrules onto the drain tubing as shown in (Figure E-2). Insert
the drain tubing into the drain fitting (Figure E-4) until it stops. Screw the nut on
to the fitting until it is finger-tight. Using the wrenches supplied in the accessory
kit, hold the body of the fitting with the ½” end of one of the wrenches. Tighten
the nut with the 9/16” end of the other wrench until it is snug, approximately
three-quarters of a turn with the wrench.
Pressure
Relief Valve
Drain Tubing
Compression Fitting
Vent Tubing
Barbed Fitting
Figure E-4: Bottle Cap Connections
f) Place the waste bottle in secondary containment in a secure location below the
detector (Figure E-5). Make sure that the cap is tightened to prevent any gas
leaks. The waste bottle cap (Part Number 70-7117) is a Teflon cap and
includes a Teflon gasket (Part Number 70-6895) inside to ensure a proper seal
(see Figure E-6). The waste bottle is a closed system under a slight pressure
and has a pressure relief valve on the cap in the event that the bottle becomes
over-pressurized (e.g., if exhaust is blocked).
E-4
Corona® CAD® and Corona®Plus CAD® Detectors
Operating and Maintenance Manual
Drain/Vent Assembly - Old Styles
Figure E-5:
Correct Setup of Drain Tubing
Bottle Cap with
Teflon Gasket
Teflon Gasket
Figure E-6:
Bottle Cap and Gasket
This section covers the installation of the old style drain/vent assembly and bottle
cap.
Corona® CAD® and Corona®Plus CAD® Detectors
Operating and Maintenance Manual
E-5
Appendix E
E.2
Drain Cap Assembly (Part Number 70-6915A) Barbed Drain
Fitting Components
Table E-2 shows the list of items and their part numbers of the components
contained in the accessory kit.
Table E-2
Qty
1
1
Components Recorded on the Customer Inventory Checklist
Description
Corona Detector Including:
Limited Warranty Registration Card
Cable BNC connector-to-Black and Red
1
Wire
1
Cable I/O 2-Conductor
1
Small Flat Blade Screwdriver 3/32 x 2”
1
Corona Detector Operating Manual
1
In-Line Filter HPLC
1
Filter SS Replacement Frits
2
Tubing HPLC 10cm
1
Filter Gas Holder
1
Drain/Vent Tubing Assembly
1
Nut 1/16 PEEK Sealtight 10-32
8 Ft
Tubing Gas Inlet
8 Ft
Tubing Gas Outlet
1
Fitting 1/4” Tube x 1/4” NPT
1
ESA Multitool
1
Caffeine Standards Kit*
1
Wrench, 1/2” X 9/16” Open-End
1
Guard Column 20 x 4mm BetaBasic 18*
*Used in detector verification (see Chapter 4).
E-6
ESA Part Number
70-6225
10-0181
70-1776
70-4850
50-0257
70-6258
70-4538
70-4539
70-6398
70-4379
70-6266A
70-5546
70-6260
70-6261
70-4377
40-0288
70-6565
50-0868
70-7098
Corona® CAD® and Corona®Plus CAD® Detectors
Operating and Maintenance Manual
Drain/Vent Assembly - Old Styles
E.2.1 Installing the Drain/Vent Assembly
Drain and Vent Installation: The Drain/Vent tubing assembly (Part Number
70-6266A) consists of two pieces of Teflon lined Tygon that must be carefully
assembled to promote proper drainage.
The assembly includes the Drain Tubing (Part Number 70-6299; 1/4” ID x 3/8”
OD x 4’ long) and the Vent Tubing (Part Number 70-6259; 1/8” ID x ¼” OD x 4’
long) shown in Figure E-7.
Tygon Tubing
Tygon Tubing
Teflon Lining
Teflon Lining
VENT TUBE
Figure E-7:
DRAIN TUBE
Vent and Drain Tubings
To attach the Drain/Vent Tubing assembly:
b) Connect the Vent tubing to the quick connect fitting located on the bottom front
left portion of the detector. This is a quick connect fitting which simply latches
when the fitting is pushed in (Figure E-9).
b) Connect the Drain tubing (end with S.S. fitting) to the compression fitting located
on the bottom front left portion of the detector. Ensure that the two ferrules
inside the nut are properly oriented (Figure E-8). The Drain fitting should be
tightened with the supplied 9/16” wrench until it is snug (Figure E-9).
CAUTION: Do no over-tighten the drain fitting. Equipment damage
could result.
Corona® CAD® and Corona®Plus CAD® Detectors
Operating and Maintenance Manual
E-7
Appendix E
Figure E-8: Correct Orientation of Nuts and Ferrules
Figure E-9: Location of Fluidics Connections
c) Using a straight blade or a sharp pair of scissors, cut both the Drain and Vent
tubing to a length (between detector and waste bottle) where there are no dips,
kinks or loops. A vertical drop is optimum. It may be necessary to cut the tubing,
depending upon the installation. Leave enough excess in case the tubing ends
need to be cut and reinstalled. The ends must be cut straight to ensure a proper
connection to the barbed fittings.
E-8
Corona® CAD® and Corona®Plus CAD® Detectors
Operating and Maintenance Manual
Drain/Vent Assembly - Old Styles
CAUTION: Because the tubing consists of two layers, it may be
necessary to flare the tubing by inserting the uncapped end of a ball
point pen into the tubing. This will slightly widen the opening. Take
care not to damage the Teflon lining during attachment.
d) Attach the other ends of the Drain/Vent tubing to the barbed fittings on the Cap
of the Waste Bottle. The Vent tubing will be attached to the smaller barbed
fitting and the Drain tubing will be attached to the larger barbed fitting
(Figure E-10). Carefully place the tubing over the barb ensuring that the inner
lining is over the barb. Grasp the tubing near the barb and push the tubing onto
the barb until it is all the way down.
Pressure
Relief Valve
Drain Tubing
Barbed Fitting
Vent Tubing
Barbed Fitting
Figure E-10: Bottle Cap Connections
e) Place the Waste bottle in secondary containment in a secure location below the
detector (Figure E-11). Make sure that the cap is tightened to prevent any gas
leaks. The waste bottle cap (Part Number 70-6915A) is a Teflon cap and
includes a Teflon gasket (Part Number 70-6895) inside to ensure a proper seal
(Figure E-12). The waste bottle is a closed system under a slight pressure and
has a pressure relief valve on the cap in the event that the bottle becomes overpressurized (e.g., if exhaust is blocked).
Corona® CAD® and Corona®Plus CAD® Detectors
Operating and Maintenance Manual
E-9
Appendix E
Figure E-11: Correct Setup of Drain Tubing
(Note Secondary Containment)
Bottle Cap with
Teflon Gasket
Teflon Gasket
Figure E-12:
E-10
Bottle Cap and Gasket
Corona® CAD® and Corona®Plus CAD® Detectors
Operating and Maintenance Manual
GLOSSARY
This glossary provides definitions of a broad variety of terms that are commonly used in
HPLC. For further information, the reader is referred to a standard text in HPLC such as:
L.R. Snyder and J.J. Kirkland, “Introduction to Modern Liquid Chromatography”, second
edition, Wiley Interscience, John Wiley and Sons, Inc., New York, 1979.
or
L.R. Snyder J.J. Kirkland and J.L. Glajch, Practical HPLC Method Development, 2nd
Edition, Wiley-Interscience, New York, 1997.
α (Separation factor): A measure of the difference in retention of two compounds that takes
into account the void volume of a column.
α = k2'/k1' = (V2-V0)/(V1-V0)
where: k1' and k2' are the capacity factors for peaks 1 and 2 respectively
V1 and V2 are the retention volumes for peaks 1 and 2 respectively
V0 is the void volume for the column
Artifact: An unwanted peak in a chromatogram. It may be due to sample, mobile phase or
instrumental contaminants.
Autozero: An instrument function, which allows the operator to establish the zero of an
output (recorder, integrator, etc.) so that all chromatograms start at the same baseline.
Background Noise: The recorder (or integrator) signal that is observed when the mobile
phase passing through the detector does not contain any species of interest. Variations in
the background noise may arise from a number of sources such as the pump, column or
detector.
Band: A zone on an HPLC column that contains one (or more) component(s) of a mixture
that is being separated.
Band Broadening: The phenomenon of diffusion of a band into a greater volume (e.g., post
column band broadening occurs in the tubing between the end of the column and the
detector).
Band Spreading: See band broadening.
Baseline Resolution: Chromatographic separation of two compounds such that the peaks
are totally isolated from each other. The tail from the first peak intersects the baseline before
the second peak begins.
Corona® CAD® and Corona®Plus CAD® Detectors
Operating and Maintenance Manual
G-1
Glossary
Baud Rate: The rate of transmission of data through the RS232 communications interface
from the detector to the computer (and vice versa).
Bed: A collection of a chromatographic media (usually silica) that is used to separate a
mixture. In HPLC this is usually termed the stationary phase.
Bonded Phase: A stationary phase in which a functional group is chemically bound to the
stationary phase (e.g., 5µm silica). The functional group can be polar (e.g., CN) or non-polar
(e.g., C18).
Calibration Curve: A plot of the detector response vs. concentration of a series of known
samples (standards). It is used to determine the concentration of the analyte in unknowns.
Capacity Factor: The capacity factor is the ratio of the amount of compound adsorbed on
the stationary phase to the total amount of compound in the mobile phase.
The capacity factor for an adsorbed compound on an HPLC column can be determined
experimentally by use of the following equation:
k' = (V1-V0)/V0
where: V1 is the retention volume of the compound of interest
V0 is the void volume of the column
Channel (Chromatography): A longitudinal void in the column that causes band spreading.
Channeling usually occurs near the column walls.
Chromatogram: A record of a separation that indicates the detector response as a function
of time. The chromatogram indicates the elution of electroactive species from the column.
Chromatography: The separation of compounds in a mixture that is effected by exploiting
the relative differences between their adsorbtion on a solid phase and their desorbtion into
the mobile phase. Chromatography involves the use of a dynamic equilibrium of the
compounds between the stationary phase and the mobile phase.
Collapse: The settling of the packing material in a column that leads to a column void.
Column: A cylinder that is used to contain the stationary phase. The mobile phase is
pumped through the column to chromatograph the sample.
Column Void: A portion of the column that is not packed with stationary phase. A column
void may be due to settling of the stationary phase or dissolution of the stationary phase by
the mobile phase.
Column Volume: The volume within a column that is not occupied by stationary phase.
Corona: A high voltage electrical discharge that is used to place an electrical charge on a
gas.
Corona Chamber: A region of the detector that charges the particles.
G-2
Corona® CAD® and Corona®Plus CAD® Detectors
Operating and Maintenance Manual
Glossary
Current: A flow of electric charge, usually measured in amperes or amps (A, mA, µA, nA,
pA, etc.).
Current Range: A setting on the Corona that relates to the current scale used for the signal
output. For example a Current Range of 100 pA indicates that a signal from -100 pA to 100
pA can be presented as a signal on the output of the detector for display and/or
quantification. Signals higher than 100 pA will be “clipped” or “cutoff”.
Default Setting: A setting of the detector parameter that is preselected by the manufacturer
(e.g., the default filter response is none).
Degassing: The removal of dissolved gases from the mobile phase. Degassing may be
affected by helium sparging or vacuum filtration.
Detection Limit: The smallest amount of a compound that will produce an observable
signal above the background noise. The signal-to-noise ratio that is selected is an integral
part of the definition of the detection limit for a given situation (e.g., a system has a detection
limit of 2µg of tricyclyne with a S/N of 3).
Detector: A device that is used to determine the presence or absence of analytes in the
mobile phase. A detector will provide an electric signal that can be related to the
concentration of the compound flowing through the detector.
Diffusion: The movement of a compound through a phase under the influence of a
concentration gradient. In the column, the compounds of interest will diffuse between the
mobile phase and the stationary phase as a part of the separation process.
Distribution Coefficient (D): For a chromatographic band that is equilibrated, the
distribution coefficient is the ratio of the concentration of the compound on the stationary
phase (Ss) to the concentration of the compound in the mobile phase (Sm).
D = [Ss]/[Sm]
where: [Ss] is the concentration of the compound in the stationary phase
[Sm] is the concentration of the compound in the mobile phase
Drying Tube: Device that removes the solvent molecules from the aerosol and thus forms
solid particles.
E: Abbreviation for Potential (in V or mV).
Efficiency (Chromatographic): A measure of the “effectiveness” of a column for a given
separation. Efficiency is measured by the number of theoretical plates on the column.
Efficiency (Detector): The detector efficiency is the ratio of the amount of analyte actually
detected to the total amount of analyte that passes through the detector.
Electrometer: Device that monitors the charge on the particles from the Corona chamber by
converting a flux of charged particles into an electrical current.
Corona® CAD® and Corona®Plus CAD® Detectors
Operating and Maintenance Manual
G-3
Glossary
Eluent: The liquid used as a mobile phase in high performance liquid chromatography.
Eluate: The mobile phase as it leaves the column.
Elute: To remove a band from an LC column through continuous flow of the mobile phase.
Elution Volume: The volume (time x flow rate) of solvent that is required to elute a given
component of the sample using a given HPLC system. The time is measured from the
instant of sample injection to the time of elution (of the center of the band).
Equilibrium: The condition when a chemical system is at rest. At equilibrium, the rate of
the forward reaction and the rate of the reverse reaction are equal, and as a result the
concentrations of the reactants and products remain constant.
Evaporation: Removal of the mobile phase by vaporization to provide solid sample particles
for charging.
Event Marker: A short pulse that is sent to the recorder (or other output device) that applies
a momentary 5% “signal”. It is used to denote some action on the output trace (e.g., an
event marker might be used to indicate the injection of the sample via a momentary baseline
deflection).
Filter (Signal): An electronic device that removes a portion of the noise in the signal output.
A filter provides a smoother baseline making it easier for peak detection and quantification.
Flow Rate: The rate at which the mobile phase is pumped through a column (usually in
mL/min).
Fronting: The phenomenon observed when the front of a peak is less steep than the tail of
a peak (an asymmetric peak).
Gain: The ratio of the increase in the size of the output signal over the input signal of a
detector.
Ghosting: The phenomenon observed when a late eluting peak in one chromatogram is
carried over into a second chromatogram.
Gradient: Refers to a programmed change in the composition of the mobile phase during
the separation.
H: Height equivalent to a theoretical plate (see theoretical plate).
HETP: Height equivalent to a theoretical plate (see below).
G-4
Corona® CAD® and Corona®Plus CAD® Detectors
Operating and Maintenance Manual
Glossary
Height Equivalent to a Theoretical Plate (H): A measure of the efficiency of a
chromatographic column.
H = L/N
where: L is the length of the column
N is the number of theoretical plates
i: Abbreviation for electrical current (in A, mA, uA, nA, etc.).
Injector: A device that is used to introduce a specified amount of sample into a LC system.
Interferent: A species that will produce an incorrectly higher signal for the compound of
interest due to the fact that it elutes at the same time as the compound of interest and has a
detector response that is covered by the conditions used for the compound of interest.
Integrator: A device that can calculate the area under and/or the height of a
chromatographic peak. An integrator is used for quantitative analysis.
I/O Connections: A terminal block on the logic module that is used to interface the detector
with other components on the system.
Isocratic: Refers to the use of a mobile phase with a constant composition during the
chromatographic separation.
Linearity: Refers to the ability of a property of a sample (e.g., concentration) to be directly
related to an experimentally measurable parameter (e.g., current) in a proportional
relationship. The linearity of a calibration curve is a factor of critical interest.
Linear Velocity: Average speed of the solvent front though a column (usually measured in
cm/sec).
Logic Module: Component of the detector that contains the microprocessor and associated
electronics. It includes the input/output connections and remote ports so that the detector can
interact with other components in the system.
Longitudinal Diffusion: Band spreading in the longitudinal direction of a column as a result
of randomized or eddy diffusion of the compound of interest.
Looping: Repetitive operation of a timeline method. At the conclusion of the method, the
method is automatically repeated.
Mass Sensitive Detector: A device that will provide a signal when a particle with the
appropriate characteristic is passed through it.
Mass Transfer: Transfer of mass from the mobile phase to the stationary phase (or vice
versa). Stationary phase mass transfer thus refers to the diffusion of molecules into and out
of the stationary phase.
Method: A set of analytical parameters that defines the operation of the Corona Detector.
Corona® CAD® and Corona®Plus CAD® Detectors
Operating and Maintenance Manual
G-5
Glossary
Microampere: A unit of current equal to 10-6 amps (abbreviated µA).
Microgram: A unit of mass equal to 10-6 gram (abbreviated µg).
Micromole: Amount of material equal to 10-6 mole (abbreviated µmole).
Milliampere: A unit of current equal to 10-3 amps (abbreviated mA).
Milligram: A unit of mass equal to 10-3 grams (abbreviated mg).
Millimole: Amount of material equal to 10-3 moles (abbreviated mmole).
Millivolt: A unit of potential equal to 10-3 volts (abbreviated mV).
Mobile Phase: The liquid that is used to transport a sample mixture through a
chromatographic bed. Often referred to as the eluent.
N: Number of theoretical plates for a column as measured by the efficiency of a column. N
can be calculated by the equation:
N = 16 (tR/tW)2
where: tR is the retention time (in seconds)
tW is the baseline width of the peak (in seconds)
n: Number of electrons transferred per molecule or ion in a reduction or oxidation.
Nanoampere: A unit of current equal to 10-9 ampere (abbreviated nA).
Nanogram: A unit of mass equal to 10-9 gram (abbreviated ng).
Nanomole: A unit of mass equal to 10-9 mole (abbreviated nmole).
Nebulization: The process of reducing the eluant into a fine mist or spray of liquid droplets.
The solvent in the mist is then evaporated to provide particles.
Nebulizer: Device that converts the eluent from the HPLC column into a mist or fine spray
of liquid droplets.
Noise: The signal that appears on a chromatographic output due to a variety of events that
are not a desired response of the detector. Noise can be random or regular (e.g., due to
pump pulsations).
Offset: The deflection of a recorder trace baseline so that two (or more) chromatograms can
be overlaid on a single presentation. Also, the moving of a recorder trace baseline so that
the output range of the detector/recording device can be altered (e.g., to display for negative
dips from the baseline).
Organic Modifier: An organic solvent (e.g., methanol and acetonitrile) that is used to alter
the elution characteristics of an aqueous solution that is used as the mobile phase.
G-6
Corona® CAD® and Corona®Plus CAD® Detectors
Operating and Maintenance Manual
Glossary
Organizer: A module that is designed to house the column, pulse damper, filters and related
fluidics. The thermal organizer module can be thermostated to maintain the separation at a
user-selected temperature.
Output: The signal that the detector provides to the recorder or other device (e.g., a data
station).
Packing: The stationary phase for HPLC.
Parity: A method of providing a mechanism for the validity of the transmission of data via an
RS232 interface.
Particle Size: The average particle diameter of the column packing material (usually in
microns (µm)).
Peak: An indication on the chromatographic output that the detector has observed the
presence of a compound in the mobile phase. The pen response will be above the baseline.
A peak has an approximately Gaussian shape.
Peak Area: The area underneath a recorder trace and above the extrapolated baseline.
The peak area is proportional to the amount of material in the sample. The peak area can be
approximated by the equation:
A = bh
where: b is the width of the peak at the base
h is the maximum peak height
Peak Height: The measurement of the distance on a chromatogram from the baseline to its
highest point for a peak. For an EDD generated peak, the peak height is usually given in
terms of current (amps).
Peak Width: The breadth of the peak. The peak width is frequently measured at the
intensity that is equivalent to 0.5 of the peak maxima. The peak width is usually expressed in
minutes or seconds.
Plate: In distillation theory, a plate is the height required for a single vaporization and one
condensation process. It is a measure of the efficiency of the column. This concept has
been transported to HPLC, where it is a measure of the efficiency of the column.
Power Module: Component of the detector that provides appropriate power to the various
components of the detector.
Pre-column: A short column that is placed before the analytical column to trap materials
that may be deleterious to the analytical column or interfere with the separation/detection.
Pulse Damper: A device that contains a reservoir of methanol or isopropanol and a
membrane that placed in the mobile phase line to diminish pulsations from the pump.
Corona® CAD® and Corona®Plus CAD® Detectors
Operating and Maintenance Manual
G-7
Glossary
R: Abbreviation for current range (in A, mA, µA, nA, etc.).
Remote Communication: The mode of operation in which the control of the detector is via
an external device (e.g., a personal computer).
Resistance: Opposition offered by a component to the flow of current in an electrical circuit.
Resolution: The separation of two peaks in a chromatogram. The resolution R is defined
by:
R = (V2-V1)/((0.5)(W2-W1))
where: V1 and V2 are the retention times for peak 1 and peak 2
W1 and W2 are the baseline width of peak 1 and peak 2
Response Factor: The amount of a compound that was injected, divided by the area under
the peak.
Retention Time: The time that has elapsed between the injection of a sample and the time
when the detector response is maximized (i.e., the top of the peak) for a given compound.
The retention time is usually reported in minutes and fractions of a minute (e.g., 4.62 min)
Retention Volume: The volume of mobile phase that is required to elute a compound from
a column.
Reverse Phase Column: A column in which the stationary phase is less polar than the
mobile phase used with it. Typically a reverse phase column consists of a column packing
material with either an alkyl chain (e.g., C18) or a somewhat polar side chain (e.g., CN).
RS232: A standard interface scheme for the transmission of digital information between a
computer and a detector. This is commonly called the serial mode of data transmission.
Selectivity (Chromatographic): The ability of a chromatographic system to separate two
compounds. Selectivity is measured in terms of the resolution of the chromatogram.
Selectivity (Detector): The ability of a detector to provide a distinct signal for the desired
compound in a mixture, while discriminating against all other materials in the mixture.
Sensitivity: Refers to the minimum detectable quantity of an analyte with a given set of
analytical conditions. The signal-to-noise ratio of the measurement should be indicated.
Serial Port: A communication port on the Corona that uses the RS232 protocol or one that
uses USB to transmit information. A method of transmission of data in which information is
transmitted one bit at a time.
Signal-to-Noise Ratio (S/N): The signal-to-noise ratio for a data point is obtained by
dividing the signal by the noise level that is associated with the measurement. A larger S/N
ratio is more desirable than a small one. As the S/N ratio approaches unity, the level of
certainty that a peak is real falls.
Signal Output: See Output.
G-8
Corona® CAD® and Corona®Plus CAD® Detectors
Operating and Maintenance Manual
Glossary
Solvation: The process of dissolving a material by a solvent.
Solute: The substance that is dissolved in a solvent.
Solvent: A liquid that is used as the mobile phase in HPLC or the liquid that dissolves the
solute.
Sparge: The process of bubbling He or N2 through a filtered solvent. Sparging is used to
displace dissolved gases that have a deleterious effect on the separation and/or detection of
analytes of interest. Sparging serves to displace CO2, which could change the pH of a
buffered solvent, and O2, which could take part in electrochemical processes.
Standard: A solution containing a known amount of the compound of interest. The detector
response is measured for a series of standards to obtain a standard curve.
Stationary Phase: The column packing material where adsorbtion and desorbtion of the
components of the sample takes place. The mechanism of the interaction could be via ion
exchange, adsorbtion or size exclusion.
System Menus: A selection of instrument parameters for the Corona Detector that are
infrequently changed.
Tailing: In theory, a chromatographic peak is Gaussian. If the longer retention time profile
of the peak is not Gaussian, the phenomenon is termed tailing and the peak is termed
asymmetric.
Temperature Coefficient: The rate of change of a phenomenon that is related to a change
in the temperature.
Theoretical Plate: See Plate.
Time Constant: The period of time it takes for the signal to drop to 2% of the signal after the
stimulus is removed.
Timeline: A mode in the Corona Detector that can cause events (such as a gain change,
autozero, event mark, etc.) to occur at designated times during a chromatogram.
Universal Detector: A device that will provide a response for every compound that passes
through it.
USB: A standard interface scheme for the transmission of digital information between a
computer and a detector.
Van Deempter Plot: A plot of the height equivalent to a theoretical plate as a function of the
linear velocity of the mobile phase. A van Deempter plot is used to determine the linear
velocity that provides the most efficient separation (i.e., the shortest HETP).
Void: A part of an HPLC column that does not contain packing material. A large void
causes a dramatic decrease in the efficiency of a column.
Corona® CAD® and Corona®Plus CAD® Detectors
Operating and Maintenance Manual
G-9
Glossary
Void Volume: The available volume of an LC system between the injector and the detector.
The void volume is the total volume of the system, less the volume occupied by the column
packing. This term is approximated by the peak in the chromatogram that corresponds to the
unretained analytes.
Volt: The unit of electrical potential difference.
W: Peak width or band width.
Wall Effect: Band spreading as a result of solvent flow along the column wall being different
than the flow through the center of the bed.
Word: The basic unit of information that is transmitted by the serial interface. The length of
the word is either 7 or 8 bits.
G-10
Corona® CAD® and Corona®Plus CAD® Detectors
Operating and Maintenance Manual
INDEX
A
Action keys
Additional
information
periodic maintenance
Analysis of data
Autozero screen
3-4
1-10
5-4
4-9
3-11
B
Basic installation
2-6
C
Cables
B-1
Certifications
x, A-3
Changing
a filter
5-6
the line fuses
5-7
Charging solid particles
1-9
Checking the pressure across the filter 5-5
Cleaning
C-18
the detectors
5-9
Column
5-20
conditioning procedure
2-33
considerations
4-4
Components location
1-5
Contacts screen
3-23
Corona
accessories
B-1
firmware
3-1
organizer modules
1-4
replacement parts
B-1
Creating a
CAD + TL method
3-8
Corona method
3-5
Customer
service of the detector
5-5
D
Daily maintenance
Data keys
Date & time setup screen
5-3, C-18
3-4
3-21
Degassing
apparatus figure
2-30
mobile phase
2-30
Deleting methods screen
3-19
Description of the
detector
1-3
rear panel
2-24
Detector
maintenance
5-2
related issues
5-12
test procedure
5-31
Diagnostic parameters
3-17
Do's and don'ts
xi
Drain and vent installation
2-9, E-2, E-7
Drain cap assembly
barbed components
E-6
compression components
E-1
Drainage
5-15
Drain/Vent assembly-old styles
E-1
E
Edit
method select screen
parameters screen
security screen
Editing a
CAD + TL method
Corona method
Effects gradient elution on response
Emptying the Waste Bottle
End event screen
Ensure functioning properly
Environmental
conditions
Erratic/noisy baseline
ESA Corona Test Worksheet
Establishing
a system log
Evaporation solvent aerosol
Event marks screen
Exhaust
Exploded view of the Corona
External requirements
Corona® CAD® and Corona®Plus CAD® Detectors
Operating and Maintenance Manual
3-3
3-5
3-7
3-6
3-8
3-5
4-11
2-21
3-10
4-7
A-3
2-1
5-27
2-20
5-10
1-9
3-20
2-9
C-4
A-2
I-1
Index
F
Features of the Corona
Filter screen
Final assembly
Firmware flow chart
Flow rate for columns table
Frequently
asked questions
changing filter elements
Fuses
1-2
3-11
C-9, C-15
D-1
4-2
1-12
5-5
B-2
G
Gain range
Gas
screen
source
General
information
operations
troubleshooting
approach
guidelines
Glossary
Grounding issues
Guard column
5-16
5-14
3-12
2-8
C-3
2-21
5-10
5-25
G-1
5-17
B-2
H
High background currents
Hold screen
How to create a timeline method
HPLC
related issues
system
I-2
2-1
2-6
C-7, C-13
C-3
C-10
2-11
E-2, E-7
C-7, C-13
C-5, C11
C-6, C-12
C-13
5-12
2-25
K
Keypad
Keys
action
data
3-4
3-4
3-4
L
Locating the Detector
Logic board replacement
Loop screen
Loss of response
2-6
5-32
3-13
5-30
M
5-28
3-12
3-27
5-18
2-13
I
Important considerations
Inability to autozero the signal
Increase in back pressure
Initialization of the detector
In-line filter elements
Inputs screen
Interfacing
to other solvent delivery module
to the solvent delivery module
Introduction
Installing the Detector
Installing the
column holder
corona organizer module
corona thermal organizer
detector
drain/vent assembly
in-line filter
pulse damper
sample injector valve
temperature probe
Internal electronic programs
I/O Connection Block Figure
viii
5-31
5-29
3-2
5-5
3-22
2-28
2-27
Maintenance and
cleaning
troubleshooting
Maintaining the detector
between analyses
Making Electrical Connections
Manual
injector overflow line
Marker screen
Maximizing performance
Method # zero
Mobile phase
considerations
formulation
flow
preparation
qualification
C-17
5-1
4-3
2-24
B-2
C-8, C-15
3-11
4-6
3-14
5-21
4-4
2-29
5-19
2-29
2-32
Corona® CAD® and Corona®Plus CAD® Detectors
Operating and Maintenance Manual
Index
Mode of operation
Monitoring charged particles
Monthly maintenance
1-8
1-9
5-4, C-18
N
Nebulizationof the eluent
Nebulizer heater
error codes
setup screen
Nebulization Gas
Nitrogen
gas supply
generator
Noise review
Normal operation
1-8
3-26
3-25
2-5
B-2
1-4, 5-5
5-24
3-1
O
Operating
symbols
the detector
Organizer
and thermal organizer
module spare parts
Other
connections
detector configurations
Overview of the Corona detector
iii
4-1
C-1
B-2
2-15
2-22
1-1
P
Physical
location of the Corona
specifications
Power
requirements
source
supply board replacement
procedure
Proper output range
Protocol
Pump noise
2-1
A-2
2-3
2-7
5-32
2-29, 2-33
4-6
2-17
5-18
R
Range screen
Rear of the detector
Recommended supplies
Remote screen
Removing the chassis plate
Replacing the gas filters
Reset screen
Role of the test protocol
RS232 setup screen
Run
parameters
3-12
1-7
B-1
3-21
C-5, C-11
5-8
3-13
2-16
3-18
3-3
3-16
S
Safety
precautions
iv
symbols
iii
Sample
considerations
4-5
Save method screen
3-13
Schematic of the detector
1-10
Self test screen
3-25
Set contact screen
3-10
Setting
the filter
4-6
up the Corona nebulizer heater 2-15
up the thermal organizer
2-23
Setup
2-16
Shutting down the detector
4-3
Space requirements
2-4
Spare parts
B-1
Specifications
A-1
Stages in detection
1-9
Standard and sample issues
5-22
Storing the Corona
2-22
Supplies
2-29, 2-33
Support from ESA
1-11
System
3-3
screens
3-18
Q
Quarterly maintenance
5-4
Corona® CAD® and Corona®Plus CAD® Detectors
Operating and Maintenance Manual
I-3
Index
T
Test
protocol
standards
Thermal organizer
error codes
issues
setup screen
spare parts
Time & date setup screen
Timeline
based operation
event options
screen
specifications
timer location figure
Troubleshooting
Turning
off the Corona
on the Corona
2-16
B-2
3-25
5-23
3-24
B-2
3-21
3-1
3-9
3-8
A-2
2-31
C-17
2-21
4-1
U
USB Connections
Unpacking the
detector
organizer
Using
a method to collect data
the Corona in
series w/another detector
parallel w/another detector
the detector in HPLC system
2-15
2-5
C-1
3-15
2-22
2-22
4-1
W
Warnings
Warranty
Water level figure
Weekly maintenance
Worksheet
Wrap up
I-4
iv
i
2-31
5-3
2-20
2-32
Corona® CAD® and Corona®Plus CAD® Detectors
Operating and Maintenance Manual