1
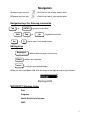
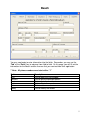
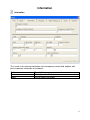
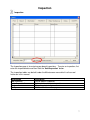
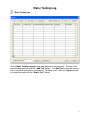
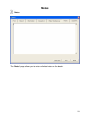
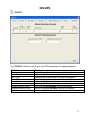
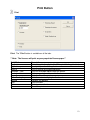
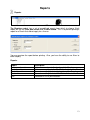
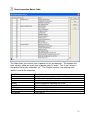
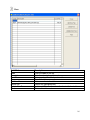
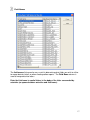
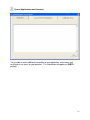
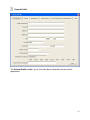
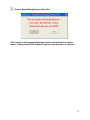
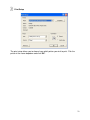
Beaches User’s Manual Beaches Health District Information System HDIS (Windows Ver. 4.0 ) Copyright 1998 by CHC Software, Inc All Rights Reserved CHC Software, Inc. Health District Information Systems [email protected] Table of Contents Introduction .....................................................................1 About This Manual ..........................................................1 Navigation ........................................................................2 Entering a Beach .............................................................4 Beach................................................................................5 Information.......................................................................6 Inspection ........................................................................7 Inspections ......................................................................8 Water Testing Log ...........................................................9 Notes ..............................................................................10 GIS/GPS..........................................................................11 Print Button....................................................................12 Reports...........................................................................13 Maintenance - Add/Delete/Modify Tables ....................14 Introduction This program is designed to assist you in organizing a systematic approach to entering your Beaches and provides accurate up-to-date records within your health district. Please review the manual carefully to obtain the maximum benefits. Little or no prior computer experience is necessary to operate this program. About This Manual The Beaches Module is simple to use. The maximum benefit with the least time spent will be obtained if you start at the first page of this manual and follow the directions exactly as you enter the first record in your computer. Square boxes in this manual surround the key you are to press on your keyboard. As an example, when you read , press the enter key on your keyboard. ENTER The word TYPE is followed by bracketed [ ] instructions of what to type into a field. Note: For Technical Support, email: [email protected] Navigation Whenever you see one click the left side of your mouse once. Whenever you see two click the left side of your mouse twice. Navigation Keys For Entering Information Tab ENTER or Shift Alt Tab R + to move to next field or Up Arrow to go back one field places you in the receipt screen. Editing Keys Backspace Delete Insert deletes one character left of cursor deletes one character inserting & overwriting modes When you see a pull-down field, click the arrow to the right to view all your choices. Starting HDIS MICROSOFT Windows Users Start Programs Health District Info Systems HDIS 2 Health District Information System Menu Bar HDIS (Health District Information System) has several different modules designed to assist your health district in its day-to-day operations. The Beaches module is a great addition to these modules and simplifies your record keeping, billing and information management needs. Select Environmental Health Select Beaches Beaches 3 Entering a Beach The FIND tab on the Beaches window is for locating a Beach. You can browse through the grid or type the Name in the Enter Name, License # or Street Address field. To find a Beach by License #, click the radio button labeled by License # and then enter the license number. To find a Beach by Street Address, click the radio button labeled by Street Address and enter the street address. To add a Beach to your list, click the Add button. Once the Beach is entered, you will not have to enter it again. 4 Beach You may now begin to enter information into the fields. Remember, you can use the “Tab” or the “Enter” key to advance from field to field. On this page, you will fill out the information for the Beach and the licensee that you received from their application. ** Note: All phone numbers must start with a “1” Button Print Previous Next Delete Add Modify Description Click to open the Print window Click to go to the previous beach Click to go to the next beach Click to delete the record Click to add a record Click to modify the record 5 Information Information This screen is for entering information in the emergency contact field, together with basic inspection information on the beach. Button Print Modify Description Click to open the Print window Click to modify the record 6 Inspection Inspection The Inspection page is for entering your beach inspections. To enter an inspection, first enter the inspection date and then click the “Add Inspection” button. The inspection tables can be built under the Maintenance menu which is discussed further on in this manual. Field/Button Add Inspection Delete Inspection* Print Modify Description Click to add an inspection Right – click to delete an inspection Opens the print window. Modifies the data on the page. 7 Inspections Inspections Once you have added the inspection, you can scroll through the information to check for possible violations and leave appropriate comments. 8 Water Testing Log Water Testing Log On the Water Testing Log page enter your water tests on the beach. To enter a test, enter the date and then click the “Add Test” button. The “Add Test” button will create a line in the grid to enter the test information. To delete a test, select the appropriate row in the grid and right-click the “Delete Test*” button. 9 Notes Notes The “Notes” page allows you to enter unlimited notes on the beach. 10 GIS/GPS GIS/GPS The ”GIS/GPS” tab allows you to enter your GPS coordinates for mapping purposes. Field/Button Street # Prefix Direction Prefix Type Street Name Street Suffix Prefix Direction Latitude Decimal Value Longitude Decimal Value Modify Description (automatically filled out when you enter the address) (automatically filled out when you enter the address) (automatically filled out when you enter the address) (automatically filled out when you enter the address) (automatically filled out when you enter the address) (automatically filled out when you enter the address) Enter the latitude DECIMAL value of the location. Enter the longitude DECIMAL value of the location. Click to modify the information on the page. 11 Print Button Print Print: The “Print” button is available on all the tabs. ** Note: The licenses will print on your preprinted license paper.** Field/Button Application Application year License Envelope - Park Envelope - Licensee Inspection Water Testing Log Preview Print OK Close Description Prints an application (right-click OK to print blank application). Specify the year for the application. Prints a license for the bathing beach. Prints an envelope addressed to the Beach. Prints an envelope addressed to the licensee. Prints the Beach inspection. Prints the water testing log for the beach. Previews the printout. Prints the form. Prints/previews the form. Closes the print menu. 12 Reports Reports The Beaches module has a set of pre-defined reports from which to choose. Each report will ask for From date issued and To date issued. This is to prevent printing a report for a Beach that did not apply for a license. You may preview the report before printing. Also, you have the ability to use filters to build a query. Reports Report Envelopes - Location Envelopes - Licensee Labels - Locations Labels - Licensee Lists Description Addresses envelope to the location of the Beach. Addresses envelope to the “Mail To” individual of the Beach. Generates mailing labels to the location of the Beach. Generates mailing labels to “Mail To” individual of the Beach. Generates a list of your Beaches. 13 Maintenance - Add/Delete/Modify Tables Maintenance The Maintenance Menu contains a list of the tables that you can modify for your program. 14 Beach Inspection Master Table This table allows you to enter your inspection list for your beaches. The number and letter columns allow you to put your inspection rules in “order”. The “Issue” column is the general title of your inspection “set”. The “Review” column is for entering each specific issue for the inspection. Field/Button Number Letter Issue Review Close Button Add Button Delete Button Print Button Description Groups review items under an issues listing Puts the rules in “order” Enter the Issue for the rule “set” Enter the guideline regarding the Issue Closes the table Allows you to add to the table Deletes a highlighted entry Prints the list 15 Fees Field/Button Code Description Local Fee Close Add New Fee Delete Fee Update New Fees Print Description Enter the code of the fee. Enter the description of the code. Enter your local health department fee. Closes the table. Adds a new fee to the table. Deletes the highlighted fee. Updates all Beaches based on the fees in the fee table. Prints a list of fee codes. 16 Field Names The field names listing can be very useful in determining what fields you wish to utilize to merge data for letters or when creating adhoc reports. The Field Name column is used to merge data into letters. Enter the field name in capital letters in the body of the letter surrounded by asterisks (no spaces between asterisks and field name). 17 Forms (Applications and Licenses) You are able to enter additional information to your application, registration, and certificate of use forms for your beaches. This information will appear on EVERY printout. 18 General Profile The General Profile enables you to fill out the basic information for your health department. 19 Letters HDIS provides you with the flexibility to write standard letters that can be sent to clients. These letters will pull data through use of the *. The * is placed on each end of the field name that you want to pull into the letter. Use capital letters to describe the field name. Example: *OWNER* = TOM GORDON 20 Reindex/Pack Bathing Beaches Data Files This function is only needed should your data be corrupted due to a power failure. Please contact CHC Software if you have any questions or concerns. 21 Print Setup The print setup allows you to choose from which printer you wish to print. Pick the printer in the name dropdown and click “OK”. 22 CHC Software, Inc. Health District Information Systems [email protected]