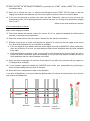
1
Document n° : Twinsensor_BT00660+_Kit Insert_V2.9_GB page 1 / 4 Rapid Test for the detection of ß-lactames + Tetracyclines in milk. For product codes: BT00660+ Introduction. TwinsensorBT code BT00660+ is a rapid test that allows you to detect simultaneously the presence of either ß-lactam and tetracycline molecules in a milk sample. Limits of detection – ppb (µg/l) Pénicillin-G 2–3 Ampicillin 3–5 Amoxicillin 3–5 Cloxacillin 6–8 Nafcillin 30 – 40 Cephapirin 6–8 Cefalonium 3–5 Cefazolin Cefoperazone 18 – 22 3–4 Ceftiofur 10 – 15 Chlortetracycline 45 – 55 Doxycycline 20 – 40 Oxytetracycline 56 – 75 Tetracycline 75 – 100 Summary of the protocol: • Add 200 µl of milk into one reagent micro-well and mix to homogeneity. • Incubate 3 min at 40°C. • • Dip one Dipstick into each micro-well. Continue incubating for 3 min at 40°C. • Read the colour intensities. Document n° : Twinsensor_BT00660+_Kit Insert_V2.9_GB page 2 / 4 Reaction Mechanism. TwinsensorBT is a competitive test involving two receptors in one single operation. The test requires using of two elements. The first element is a microwell containing a certain amount of both receptors and antibodies linked to gold particles and the second is a dipstick made up of a set of membranes where there are capture lines. The “control” line printed in red is visible all the time and the other two are the specific “test” lines placed on both sides of the control line. The unique line for penicillin and cephalosporin is located below the “control” while the line relating to tetracycline is located above it. When the reagent from the microwell is re-suspended with a milk sample, both receptors could bind the corresponding analytes during the first 3-minutes incubation at 40°C. Afterwards, when the dipstick is dipped into the milk, the liquid starts running vertically on the dipstick and passes through capture zones. When the sample is free of antibiotics, a colour development occurs at the specific capture lines, indicating the absence of the concerned analytes in the milk sample. On the contrary, the presence of antibiotics in the sample will not cause the coloured signal to appear at the specific capture lines. Composition of kits. Kits coded « BT00660+ » contain everything needed to perform 96 measurements. 12 pots each with 1 strip of 8 reagent microwells and 8 dipsticks. 1 Minipet of 200 µl and disposable tips. A « Positive Standard » containing powder to reconstitute “positive standard” raw milk of 4 ppb of PenG and 100 ppb Oxytetracycline. The Positive Std contains a bit of “red” dye. A « Negative Standard » containing powder to reconstitute “negative standard” raw milk. The Negative Std contains a bit of “green” dye. 1 information notice. The kit’s Certificate of Compliance. General Remarks. 1. At reception, store the kit in a dry place and at a low temperature between 2°C. and 8°C.. Before opening, let the plastic pots reach room temperature and avoid exposure of the product to moisture and light. 2. The format of Standards can be Glass Vials or Individual Plastic Tubes. The Standard Glass vials have to be re-hydrated with 1 ml of Pure Water and the Standard Individual Plastic tubes have to be re-hydrated each with 200µl of pure Water. Mix vigorously (vortex) to avoid clots. The reconstituted glass vial can be stored in the freezer at -20°C. Do not freeze/thaw more than one time. 3. Avoid using clotted milk with Twinsensor BT 4. The best temperature to perform the test is 40°C ± 3°C. Use the “Heatsensor” (or eventually) a water bath but any other type of incubator is not appropriate to perform the Twinsensor. (Refer to the used Heatsensor manual for setting at right temperature and timing). 5. Read the result within a 15-minute time-frame after the second incubation. Don’t do it after 15 minutes. 6. Instrumental readings must be done with Readsensor (see user manual). 7. When drying, the colour intensities of the lines will become sharper. 8. When positive result is recorded, the test results should be confirmed. 9. Empty one pot before opening another pot. Milk Powder dilution: In an appropriate bottle, mix 10 g of milk powder with 90 ml of warm (40°C) and distilled water. For an optimal dilution, shake vigorously. Document n° : Twinsensor_BT00660+_Kit Insert_V2.9_GB page 3 / 4 Directions for use. This procedure is described to easily run one single sample or a set of many samples. In that case, try to perform the test in cascade and avoid any delays when mixing reagent and milk but also when adding and removing dipsticks. Make sure you have the same incubation time and temperature for each sample. You shouldn’t test more than 8 samples at a time and, if there are more than 3 samples, you should use a multi-pipet. With more than 8 samples we recommend to share series of maximum 8 samples. 1. Choose a clean and dry place to perform the test and wash and dry your hands before starting. 2. Connect the Heatsensor and wait until the temperature of the heating block has stabilized at 40°C. It takes about 10 minutes for the temperature to stabilize at 40°C. 3. Before opening the reagents, take the kit out of the fridge and wait until the temperature of the reagents reaches the ambient temperature. Meanwhile, read the directions for use attentively. • The two main components of the test are: on the one hand, the dipsticks and on the other hand, the freeze-dried reagents. Both are in the white plastic pots. 4. Determine how many milk samples are to be tested and write on each tube an identification number. • The milk sample must be liquid and homogeneous. There can be neither clots nor sedimentation phases. The ideal temperature of the milk sample is between 4 and 20°C 5. Open one plastic pot and take out as many micro-wells as there are milk samples to be tested (the standard positive milk included) and put them directly into the holes of the heating block, which shows 40°C. • To open a pot of dipsticks, take off the safety ring by pressing it down the pot, take off the ring and get the stopper off the pot with your thumb. • The pot with dipsticks should always be well closed after reagents have been taken out. • A pot with dipsticks should be emptied before another is opened. • Be careful, if you do not intend to use all the 8 micro-wells, leave the set of 8 caps on the unused ones and do not tear off the strip of the eight caps but leave it on the micro-wells that will not be used. Do not try to separate individual caps and put them immediately back into the white pot, close and make sure it is tightly sealed. 6. Place the micro-well(s) in the heating block. 7. Place a new tip on the minipet and transfer 200 µl of milk into each of the micro-wells as follows: Keep the sucker of the minipet down to the bottom, dip the end of the tips into the milk and slowly release the sucker. When the sucker is back into its initial position, transfer the 200 µl of milk into the reagents, by slowly pushing the sucker down to the bottom. 8. With the Minipet, mix rapidly the reagents and the milk by sucking up and rejecting the liquid 5 times consecutively so as to get a homogeneous solution. Warning: when reagents and milk are in contact, the reaction begins. Mix quickly AND push IMMEDIATELY on START (RUN). 9. Start the timer by pressing the START (RUN)* button. The 3-minute countdown starts. • During that first incubation, each of the receptors detects whether or not there are antibiotics in the milk sample. It takes 3 minutes for the reaction to be complete. 10. During that time, open the same pot as before, take out as many dipsticks as there are analyses in progress and close the pot. Lay the dipsticks on a clean sheet and write down the number that matches the one of the milk sample. 11. When the 3 minutes are over, i.e. after the sound-signal, press START (STOP)* again to stop the ringing tone and dip the corresponding dipstick into each of the micro-wells laid in the incubator. • Make sure you put into the corresponding micro-well the dipstick with the same identification number as the one of the concerned milk sample. Document n° : Twinsensor_BT00660+_Kit Insert_V2.9_GB page 4 / 4 12. Start the timer for the second incubation by pressing the START (RUN)* button. The 3-minute countdown starts. 13. When the 3 minutes are over, i.e. after the sound-signal, press START (STOP)* again to stop the ringing tone and take the dipsticks out of the micro-wells to lay them down on a sheet of paper. 14. If you are not planning to perform any other test with Twinsensor, make sure that the pots are hermetically closed. Put everything back into the box and store it in a fridge at a temperature ranging from 2 to 8°C. *(Refer to the used Heatsensor manual) Visual interpretation of results : Make visual reading as follows: 15. First check whether the central control line is there. If it is not, regard the analysis as invalid and do not start (or continue) any interpretation. 16. When the central control line can be seen, interpret the two test lines as follows: 17. Examine one test line at a time and compare the signal of one test line with the signal of the control line. (Start with the bottom line of ß-lactams for example). a. If the test signal is more distinct than the control signal, the milk is NEGATIVE, which means that, given the sensitivity of our test, the milk sample contains fewer antibiotics than the value indicated in the table. b. If the test signal is as distinct as the control signal or less sharp than the control signal, the milk is POSITIVE, which means that, given the sensitivity of our test, the milk sample contains as many or more antibiotics than the value indicated in the table. 18. When you have interpreted one test line, do the same for the other line (continue with the upper line of Tetracyline for example). 19. If you hesitate, regard the sample as POSITIVE and confirm your interpretation by performing a second visual reading within the next 15 minutes. 20. Write down your assessment on each of the dipsticks. If you have a Readsensor, you should read the dipstick within 15 minutes of performing the test. See the user manual of Readsensor. Tetracycline CTRL ß-lactam POSITIF NEGATIF ß-lactam POSITIF POSITIF Tetracycline ß-lactam + Tetracycline