1
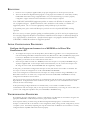
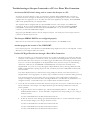
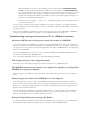
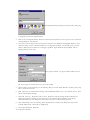
Aquadyne TechTip
TITLE: TROUBLESHOOTING PC COM PORT AND MODEM
COMMUNICATIONS WITH AN OCTOPUS.
Article # 072297-1
Last reviewed: 03/25/98
Keywords: Serial Port, Modem, Polling, AquaWeb, Node Not Responding
PRODUCTS AFFECTED
Octopus 2000, Octopus 3000, AquaNode, AquaWeb
For purposes of this Tech Tip, it is assumed that you are using an Octopus 3000, however, the tips discussed
can be applied to an Aquadyne product.
SYMPTOMS
The Octopus cannot send or receive data to a PC via the serial port. The typical AquaWeb error message is
Node Not Responding.
Note: AquaWeb uses Windows 95 to manage all serial (COM Port or MODEM), communications. Improperly
configured COM ports or MODEMS will prevent AquaWeb from communicating with the Octopus.
POSSIBLE CAUSES
For an Octopus connected to a PC via a Direct Wire Connection.
1.
An incorrect RS-232 cable is being used to connect an Octopus to a PC COM PORT via a direct Wire
Connection, or;
2.
The Octopus SERIAL PORT is not configured properly.
3.
The PC SERIAL PORT is not installed, selected, or configured properly.
4.
Another program has control of the COM PORT.
For an Octopus configured with a MODEM for dial-up communications.
1.
An incorrect RS-232 cable is being used to connect the Octopus a modem.
2.
The Octopus SERIAL PORT is not configured properly.
3.
The MODEM connected to the Octopus is not supported by Aquadyne, or the Aquadyne MODEM is not
properly configured.
4.
Another program has control of the MODEM.
RESOLUTION
1.
Check for use of Aquadyne supplied cables, the proper configuration of the Octopus and your PC.
2.
Then use the Microsoft HyperTerminal program to verify proper the installation of serial cables, modems,
COM PORT and modem settings. HyperTerminal is a key tool in determining if your PC is properly
configured to support advanced serial communications with an Octopus computer.
Note: COM PORT and MODEM configuration problems are common in the Windows 95 environment. They are
also very difficult to diagnose. AquaWeb should not be used to troubleshoot a cable, modem, or a Windows 95
configuration problem. This is a task more appropriately suited for Microsoft or your local dealer.
If the problem persists, please consult with Microsoft or your dealer to resolve the problem BEFORE contacting
Aquadyne.
When it is necessary to contact Aquadyne regarding an installation problem, you will be asked to first confirm that you
have successfully configured the Windows 95 environment to communicate with the Octopus as demonstrated through the
use of HyperTerminal as described herein. Aquadyne technical support is not equipped to troubleshoot Windows 95
COM PORT or MODEM installation or configuration problems.
INITIAL CONFIGURATION PROCEDURES
Configure the Octopus and connect it to a MODEM or via Direct Wire
Connection to a PC.
1.
To configure the Octopus, enter the Setup Menu, then the Data Logger Menu. Go to each parameter and
enter the following: Baud Rate: 19200, Data Format: 81N, Data Interval: 0 Min, Field Delimiter, Space, Flow
Control F/C: Disabled Leave the Menu selection at the Print Data Now, Enter to Select. When using
AquaWeb, you should never enter a Data Interval other than 0.
2.
If the Octopus will be accessed via a MODEM, connect the Octopus to an Aquadyne MODEM using an
Aquadyne supplied cable. If the Octopus will be connected directly to a PC, connect the Octopus to the
PC using the correct cable NULL MODEM cable also supplied by Aquadyne.
At this point, you should have configured the Octopus correctly and that the correct cables are installed. The
next step is to check the configuration of the PC COM PORTS and MODEM.
A PC can be configured to communicate with an Octopus via a dial-up connection using a MODEM, or via a
Direct Wire Connection. In either case, it is important that the PC COM PORT or MODEM be correctly
configured in the Windows 95 environment.
The steps in the next section are designed to test communications with the Octopus using the Microsoft program
HyperTerminal. If HyperTerminal is not installed on your PC, please do so now. Limited instructions can be
found at the end of this TechTip.
If after performing the HyperTerminal tests outlined below, you are unable to establish successful
communications with the Octopus, and you have previously confirmed that you are using the correct cables, then
you have a PC configuration problem with your COM PORT or MODEM setting.
TROUBLESHOOTING PROCEDURES
By completing the steps outlined above, your have confirmed that your Windows 95 environment recognizes the
appropriate MODEM or COM PORT, and that the proper cable is utilized.
In the steps that follow, you will be using the Microsoft HyperTerminal program to communicate with the
Octopus to confirm that all of the elements of the configuration (cables, settings, and PC configuration), work as
a complete system. Successfully completing this step will confirm that the Windows 95 environment is correctly
configured and that AquaWeb will install and work properly.
Troubleshooting an Octopus Connected to a PC via a Direct Wire Connection.
An incorrect RS-232 cable is being used to connect the Octopus to a PC.
To connect an Octopus directly to a PC, you will need an Aquadyne NULL MODEM cable. The pin-out
connections shown to the right are offered only for the purpose of confirming that you have a correct cable.
Aquadyne does not support the use of any cable other than those supplied by the company. NULL MODEM
cables can be purchased from your Aquadyne dealer.
The Aquadyne cable is configured with an 8 pin mini-DIN connector at the Octopus, and a DB25 male
connector at PC. If you have a DB25 Male connector on your PC, you will need a FEMALE GENDER
CHANGER to insert between the PC and the NULL MODEM cable. Or, if your PC has a DB9 Male
connector, you will need a DB9 Female Adapter.
Plug in the 8-pin Mini-Din connector into the Octopus serial port. The serial port on the Octopus is the last
connector on the left end of the case.
The Octopus SERIAL PORT is not configured properly.
Please refer to the section titled “Configure the Octopus and connect it to a MODEM or PC”.
Another program has control of the COM PORT.
Close all other programs. Your Windows 95 COM PORT settings might be incorrect or misconfigured. Contact
Microsoft or your computer dealer for assistance.
Perform PC HyperTerminal test through a Direct Wire Connection.
1.
The first test will be to go to the Octopus and instruct it to print out the datalog to its serial port. Since the
serial port on the Octopus is connected to your PC, you should see the datalog printed on your PC monitor.
Press the Enter Key on the Octopus. Go to Data Logger, Print Data Now screen and press the Enter Key.
If you see a stream on data displayed on the HyperTerminal screen, then the Octopus is communicating
with the PC. Make note of the MODEM or COM PORT that was used in this successful test of
HyperTerminal. If you do not see any data appear in HyperTerminal, then try selecting a different COM
PORT in HyperTerminal, repeating the process until you identify the correct COM PORT associated with
your connection
If no data is displayed; then you either have the wrong COM port selected, or the cable is incorrect, or
HyperTerminal is not setup properly. Go back to step 1 and follow each step to check the cabling and setup.
If no characters appear on your monitor, and you are using the correct cable and have configured the
Octopus according to the instructions above, then HyperTerminal or your Windows 95 environment is not
configured correctly. Contact Microsoft or your computer dealer for further assistance.
2.
If your PC has successfully received the data from the Octopus, the next step is to confirm that the PC can
initiate commands to the Octopus. From HyperTerminal, type the following commands in exactly the
format specified:
!
To get the data for current conditions type : U[Unit Serial Number]^G00<cr>. For example, 95000000001234567^G00<cr>. If this command is accepted then the Octopus will give you a string of
characters such as:
07/16/97 06:00:02AM 08.13 148 060.1F 058.0uS 00.0 000 A9
!
To Get the Contents of the datalog, type: U[Serial Number]^G05<cr>. If this command is accepted
then the Octopus will give you a string of characters such as:
07/16/97 07:00:01AM 08.13 148 060.1F 057.6uS 00.0 000 AE
07/16/97 08:00:59AM 08.14 148 059.7F 058.2uS 00.0 000 C8
07/16/97 09:00:58AM 08.14 148 059.6F 058.3uS 00.0 000 C8
The Serial Number of the unit you are attempting to access takes the form: PP-SSSSSSSSSSSSSSS.
The PP is the prefix, representing the first two digits of the serial number. The SSSSSSSSSSSSSSS is
the serial number suffix, and is exactly 15 characters long. The significant digits of the suffix part of the
serial number, printed on the unit label, are normally 6 or 7 digits. The other 8 or 9 digits are zeros.
Example: The unit label serial number is 97-003262. In order to get the datalog from the Octopus you
must enter U97-000000000003262 G05<cr>
Note: U & G must be capitals, ^ = space, <cr> = Carriage Return, G00 = Letter G and 2 Zeros, G05
= Letter G and Zero, Five
If you do not get a response from the above commands you may have entered the “G” command incorrectly,
you have entered an incorrect serial number, or you have a inoperable or defective COM PORT, or the cable you
are using is incorrect.
Once you have established communications with your Octopus, make note of the COM PORT or MODEM
settings, and exit HyperTerminal being careful to save the HyperTerminal file for future use.
Troubleshooting an Octopus Connected to a PC via a Modem Connection.
An incorrect RS-232 cable is being used to connect the Octopus to a MODEM.
To connect an Octopus to a MODEM, you will need an Aquadyne MODEM cable. The pin-out connections
shown to the right are offered only for the purpose of confirming that you have a correct cable. Aquadyne does
not support the use of any cable other than those supplied by the company. MODEM cables can be purchased
from your Aquadyne dealer.
If you have a DB25 Male connector on your PC, you will need a FEMALE GENDER CHANGER to insert
between the PC and the NULL MODEM cable.
Or, if your PC has a DB9 Male connector, you will need a DB9 Female Adapter.
The Octopus serial port is not configured properly.
Please refer to the section titled “Configure the Octopus and connect it to a MODEM or PC”.
The MODEM connected to the Octopus is not supported by Aquadyne, or the Aquadyne
MODEM is not properly configured.
Aquadyne supports the US Robotics Sportster modem. This modem may be purchased from your computer
dealer.
Another program has control of the MODEM or it is misconfigured.
Close all programs that may have access to the MODEM. Examples include FAX and Internet connection
programs such as America Online (AOL), which use proprietary programs known to take direct control of the
modem port. AquaWeb and HyperTerminal use the modem communication device drivers integrated into the
Windows 95 environment by Microsoft.
It is also possible that the modem is not properly installed on your PC. This is typically a software installation
issue. If you cannot make the modem dial a call, the chances are very good that your modem is not setup
properly. Contact Microsoft or you computer dealer for assistance.
Perform PC HyperTerminal test through a PC Modem.
An effective method for troubleshooting communication problems with the Octopus is to use the Windows 95
utility program, HyperTerminal, to identify and access a correctly installed MODEM PORT.
1.
Start HyperTerminal by clicking on the Start button and going
to Programs, Accessories, HyperTerminal.
2.
Click on the icon HyperTerminal. When the connection description box comes up, enter a new connection
“OctopusModem” and click OK
3.
Go to the Connect Using box and you should see and select your Windows 95 PlugNPlay Modem. If no
modem is listed, you have a modem installation or configuration problem. You should contact your PC
dealer or Microsoft for assistance in resolving this problem. HyperTerminal (and AquaWeb), will not
function properly in this state.
4.
Enter a phone number. Any phone number will do for now.
We are just going to confirm that we can access the modem.
5.
Click Configure, On Port Settings set the following: Bits per second: 19200, Data bits: 8, Parity: None, Stop
Bits: 1, Flow Control: None
6.
Click Advanced, On Advanced Port Settings: Check USE FIFO buffers; if it is not selected, select it. Click
OK on Advanced Port Settings.
7.
Click OK. On Com _ Properties, Click on Com_ Properties: click the Settings window and make the
following selections: Function, arrow, and ctrl keys act as: Terminal Keys, Emulation: Auto Detect,
Backscroll buffer lines: 500, Beep three times when connection or disconnecting: optional
8.
Click ASCII Setup, select the following: Echo typed characters locally: Check, Wrap lines that exceed
terminal width: Check. Click OK on ASCII Setup.
9.
On Octopus Properties: Click OK
10. Under File, click Save
11. Under Call, click Connect
At this point, your modem should dial the telephone and you should hear tones coming from the modem as the
call is dialed and connected. If you click the connect button and nothing happens, your modem is not
functioning properly. Contact Microsoft or your PC dealer for assistance.
CONFIGURING AQUAWEB FOR THE FIRST TIME
Using the HyperTerminal program and the steps outlined above, you should have now successfully
communicated with the Octopus via a Direct Wire or MODEM connection. This process has confirmed that
your Windows 95 environment is properly configured to communicate with the Octopus and you may now
proceed to use AquaWeb.
At this time, you should make specific note of the specific COM or MODEM port assignments that you used in
HyperTerminal to communicate with the Octopus.
You may now proceed to configure AquaWeb, entering this information in the Properties section of the
application as described in your user manual and related AquaWeb documentation.
OTHER USEFUL INFORMATION
Installing HyperTerminal From the Windows 95 Distribution Disk.
To install a Windows component after Windows has been installed
1.
Click the START button and go to the Settings, then to Control Panel. Then open the Add/Remove
Programs dialog box. Select the Window Setup and then Communications. HyperTerminal can be
installed from this section.
2.
To add all of the parts of a component, click the check box.
3.
To remove all of the parts of a component, clear the check box.
4.
To add or remove some of the parts of a component, highlight the component name, and then click
Details. Then, check or clear the parts as needed to add or remove them.
5.
When you have finished selecting the components to add or remove, click OK.
6.
Click OK again.
If you originally installed Windows 95 using a CD-ROM or floppy disk(s), you may be prompted to insert the
Windows installation disk(s) in your computer.
Note: Each component contains one or more parts. To see what is included in a component, highlight the
component, and then click Details.
Problems and Issues with the Windows 95 Environment
Configuration problems in the Windows 95 environment are common and can frequently make it difficult to
configure AquaWeb properly. Although Aquadyne cannot provide technical support for problems relating to the
Windows environment, we do suggest that our customers become familiar with the process of troubleshooting
device, and device driver problems.
To view Device Manager, follow these steps:
1.
1.Click the Start button, point to Settings, then click Control Panel.
2.
2.Double-click the System icon.
3.
3.Click the Device Manager tab.
If there is a problem with a device, it is listed in the hardware tree list under Computer.
The problem device has a symbol indicating the type of problem:
!
A black exclamation point (!) on a yellow field indicates the device is in a problem state. A device in a
problem state may or may not be functioning. A problem code explaining the problem is displayed for the
device.
!
A red “X” indicates a disabled device. A disabled device is a device that is physically present in the system,
consuming resources, but does not have a protected-mode driver loaded.
!
A blue “i” on a white field on a device resource in Computer properties indicates that Use Automatic Settings
is not selected for the device and that the resource was manually selected. It does not indicate a problem or
disabled state.
Contact Microsoft Technical Support or your computer dealer for assistance in resolving these problems.
Problems Associated with Ground Loops in a Direct Wire Connection
Configuration.
Anytime your Octopus is connected to a different A/C power source than your PC, there is potential for a ground
loop. A ground loop is created when the voltage supplied to two different devices is not the same. Should this
become a problem in a Direct Wire Connection, you will experience fluctuating parameter readings on the
Octopus, however, in extreme cases, damage to your Octopus could occur.
Contact Aquadyne Technical Support for the TechTip dealing with this problem.
Contacting Aquadyne
Prior to contacting Aquadyne Technical Service please read the appropriate manual sections relevant to your
problem, and also consulting the trouble-shooting guide located at the back of the user manual.
If you have completed any tests or experiments to isolate and diagnose your system please make notes and have
them available to help our technicians troubleshoot and answer your questions.
When Contacting Aquadyne Technical Service please be ready to provide the following information so that we
may help you in the quickest most effective manner.
Who are you: Your complete name address, daytime phone number, and an email address if you have one.
Which Aquadyne product is involved? The Aquadyne product involved, the product part number, the part
number revision letter, the system serial number and the software version number. The software version number
is displayed each time the power-up sequence is initiated.
On the Octopus 3000 and the AquaGuard, the serial number and software version are available in the NEW
PASSWORD menu. Entering the new password AQDYN will also display the serial number and software
version. After observing and recording the Software Version and Serial Number, press ENTER four times to
return to the Status Screen.
Technical Support is available at (858) 569-2082 X 135 from 10:00 AM to 5:00 PM, PST, Monday through
Friday. You may also send mail to [email protected].
Disclaimer
THE INFORMATION PROVIDED IN THIS AQUADYNE COMPUTER CORP. TECH TIP IS PROVIDED “AS IS”
WITHOUT WARRANTY OF ANY KIND. AQUADYNE COMPUTER CORP. DISCLAIMS ALL WARRANTIES,
EITHER EXPRESS OR IMPLIED, INCLUDING THE WARRANTIES OF MERCHANTABILITY AND FITNESS
FOR A PARTICULAR PURPOSE. IN NO EVENT SHALL AQUADYNE COMPUTER CORP. OR ITS SUPPLIERS
BE LIABLE FOR ANY DAMAGES WHATSOEVER INCLUDING DIRECT, INDIRECT, INCIDENTAL,
CONSEQUENTIAL, LOSS OF BUSINESS PROFITS OR SPECIAL DAMAGES, EVEN IF AQUADYNE
COMPUTER CORP. OR ITS SUPPLIERS HAVE BEEN ADVISED OF THE POSSIBILITY OF SUCH DAMAGES.
SOME STATES DO NOT ALLOW THE EXCLUSION OR LIMITATION OF LIABILITY FOR CONSEQUENTIAL
OR INCIDENTAL DAMAGES SO THE FOREGOING LIMITATION MY NOT APPLY.
Perform PC HyperTerminal test through a Direct Wire Connection.
1.
Start HyperTerminal by clicking on the Start button and going to Programs, Accessories, HyperTerminal.
2.
Click on the icon HyperTerminal. When the connection Description box comes up, enter a new connection
“OctopusDiretWire” and click OK
3.
The Phone Number dialog Box will appear, click cancel
4.
Go to File and click Properties. To configure HyperTerminal for an Octopus Direct Wire session, go to
Properties, Phone Number Connect using: select the Direct to Com “N” where “N” is a properly
configured COM PORT. In most, but not all PC’s, the setting would be COM PORT 2.
5.
Click Configure, On Port Settings set the following: Bits per second: 19200, Data bits: 8, Parity: None, Stop
Bits: 1, Flow Control: None
6.
Click Advanced, On Advanced Port Settings: DO NOT use FIFO buffers, click the selection box, if it is
selected, deselect it. Click OK on Advanced Port Settings.
7.
Click OK. On Com _ Properties, Click on Com_ Properties: click the Settings window and make the
following selections: Function, arrow, and ctrl keys act as: Terminal Keys, Emulation: Auto Detect,
Backscroll buffer lines: 500, Beep three times when connection or disconnecting: optional
8.
Click ASCII Setup, select the following: Echo typed characters locally: Check, Wrap lines that exceed
terminal width: Check. Click OK on ASCII Setup.
9.
On Octopus Properties: Click OK
10. Under File, click Save
11. Under Call, click Connect
If you have a valid COM PORT selected in the Windows 95 environment, and it is not otherwise in use by
another program, then you should not receive any error message after you click on the connect command. If an
error message is received, there is a problem with the COM PORT you have selected on your PC and further
diagnosis and troubleshooting will be necessary to resolve the problm.
Note: If no error is received after clicking on the Connect command, this does not necessarily mean that you
have selected the correct port that will be connected to the Octopus since there may be more than one COM
PORT available on your system.