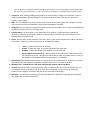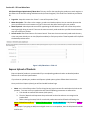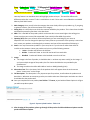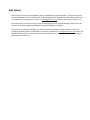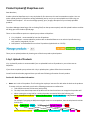
1
Product Upload @ ShopClues.com Dear Merchant, Product uplaod at ShopClues.com is very simple but for first time users this can be somewhat complex. You can either upload products in ShopClues catalog individually (one by one) or you can upload them in bulk using our “Product Feed Template”. You can also change quantity, price, images, description of your already uploaded products. From Store Manager Home Page, click on Catalog Tab (from the top menu option) and click Upload Products and that will bring you to the Product Upload page. There are three different options to upload your products at ShopClues. 1. 1-by-1 Upload - recommended for less than 50 products 2. Express Upload – recommended for products with no detailed features set or technical specifications e.g. size, material, mega pixel, CPU etc. 3. Bulk Upload – recommended for more than 50 products (upload with an .CSV file) There you can upload products by choosing one of the three product upload options. 1-by-1 Upload of Products 1-by-1 upload of product is recommended if you are uploaded less than 50 products in your online store at ShopClues. If you chose to uploade your products with 1-by-1 upload options, please follow these instructions. You will reach New Product page and there you will enter following information for each product Section # 1: Basic Product Information 1. Name: This is title of the product. The first thing that any buyer interacts first with when he looks at the products. To create a title you need make sure that the following parameters are adhered to: a. Title should not exceed 70 character (with spaces) b. The title/ Name should represent the product well so that the end user can recognize the product well. c. When creating the name/ title for a technical product we need to follow the following rule: Name of Manufacturer/Brand + Name of Product Series + Product Model No. + Key Feature+ Product + (Color) For example if you going to add/create a digital camera as a new product, then the title/name should be look like this: Sony +Cybershot S8500 + 14 Megapixel Digital Camera + (Black) Name of Manufacturer/Brand + Name of Product Series + Product Model No. + Key Feature + Product + (Color) Here Key feature is an Attribute which will highlight product to buyer. This could be different for different product live in case of T-shirt it could Polo or V-neck T-shirt and in case of Mobile it could 8GB Memory with 5MP Camera. 2. Categories: While creating/ adding a new product, we need to assign a category to the product, so that it shows in the dedicated/ allocated category. The product should also show in the correct hierarchy for product, in the catalog. 3. MRP: This is the MRP of the product, which can be same but in most cases higher than selling price. Please note that your store will be suspended if you articially inflate MRP of a product. 4. Selling Price: It is the end price at which the customer would buy the product. This is lower than the MRP and should be proved by merchant in the data sheet. 5. Full Description: The description is very important part for products, its talks about the products and describes it. Wherever we create any product, we need to take care of description and make sure that it should describe the product well. 6. Status: You may have various products in your store, but it is your choice to make these visible or invisible to the customer. Hence you product can be in any of the following statuses: 7. 8. 9. 10. Active – Product will show on the LIVE site Hidden - Product will show on the LIVE site but will not searchable Disabled - Product will shown at the backend not on the LIVE site Request Approval (for Merchant) – Will be shown at the backend and needs approval from our Shopclues to go LIVE. Merchant will not be able to make any product live on his own, as the ShopClues team double checks everything before it is made LIVE. Merchant Ref: Merchant Reference number is a unique number for identification the product (for merchant use) and will help you to identify the product to dispatch when there is an order for product. MFG Reg: This is a manufacturer’s reference code generally used for technical products In Stock: Here you will enter how much quantity you are committing for your store at ShopClues.com. You can change this quantity as many times as you want but if the quantity is more than zero, means your product can be bought by a customer and you will be responsible of delivering it. Merchant: Your Merchant marketing Name should be added here. (By Default it will add Merchant Name here (Right now not visible to Merchant.) Figure 1: Adding/ creating a new product - fields 1-10 11. Image: a. The Image is the face of product, it should be clear i.e. without any water mark(s) on the image. If you have multiple images of the product, the first choice should be the one provided by the manufacturer. b. The Image resolution should be 400 X 400 or less then 1MB (Uploading limit). You can also upload image through Image URL if available with you. 12. Alternative Text: This is the Name/ title of the product which will appear when the end customer does a “mouse-over” on the image Figure 2: Adding/ creating a new product - fields 11-12 Section # 2: SEO and Meta Data SEO (Search Engine Optimization)/ Meta data: This very vital for the searching the product on search engines. It also takes care of the SEO ranking and Meta search (on Search engines). This entails four fields that you need to fill: 2. Page title: Keep this same as the “Name”- name of the product (Title). 3. Meta description: This refers to the category, product and site description. You can mention phrases that you may think that the end customer may put in the search bar while searching for your product. 4. Meta keywords: Meta keywords are used for populating the SEO data on search site so that the product search gets high raking in search. These are the most commonly used words that you feel the end customer may use to find your product. 5. Search words: Search word we use for internal search. These are the most commonly used words that any visitor may enter directly on our site (Shopclues website) to find your product. These keywords will help fetch the desired products easier. Figure 3: SEO/Meta Data - fields 1-5 Express Upload of Products Express Upload of product is recommended if you are uploading products that do not detailed product features set or technical specifications. If you chose to uploade your products with Express Upload options, please follow these instructions. Once you click on Express Upload, you will land at add Products Page 1. Name: This is title of the product. The first thing that any buyer interacts first with when he looks at the products. To create a title you need make sure that the following parameters are adhered to: a. Title should not exceed 70 character (with spaces) b. The title/ Name should represent the product well so that the end user can recognize the product well. c. When creating the name/ title for a technical product we need to follow the following rule: Name of Manufacturer/Brand + Name of Product Series + Product Model No. + Key Feature+ Product + (Color) For example if you going to add/create a digital camera as a new product, then the title/name should be look like this: Sony +Cybershot S8500 + 12 Megapixel Digital Camera + (Black) Name of Manufacturer/Brand + Name of Product Series + Product Model No. + Key Feature + Product + (Color) Here Key feature is an Attribute which will highlight product to buyer. This could be different for different product live in case of T-shirt it could Polo or V-neck T-shirt and in case of Mobile it could 8GB Memory with 5MP Camera. 2. Main Category: Here you will select the category that most closely reflect your products e.g. if you going to upload a camera, you will choose Camera as a category 3. Selling Price: It is the end price at which the customer would buy the product. This is lower than the MRP and should be proved by merchant in the data sheet 4. MRP: This is the MRP of the product, which can be same but in most cases higher than selling price. Please note that your store will be suspended if you articially inflate MRP of a product. 5. Quantity (QTY): Here you will enter how much quantity you are committing for your store at ShopClues.com. You can change this quantity as many times as you want but if the quantity is more than zero, means your product can be bought by a customer and you will be responsible of delivering it. 6. Status: You may have various products in your store, but it is your choice to make these visible or invisible to the customer. Hence you product can be in any of the following statuses: Active – Product will show on the LIVE site Hidden - Product will show on the LIVE site but will not searchable Disabled - Product will shown at the backend not on the LIVE site 7. Image: a. The Image is the face of product, it should be clear i.e. without any water mark(s) on the image. If you have multiple images of the product, the first choice should be the one provided by the manufacturer. b. The Image resolution should be 400 X 400 or less then 1MB (Uploading limit). 8. Alternative Text: This is the Name/ title of the product which will appear when the end customer does a “mouse-over” on the image 9. Full Description: The description is very important part for products, its talks about the products and describes it. Wherever we create any product, we need to take care of description and make sure that it should describe the product well. 10. Once you complete with one product, Just hit Blue “+” button, at just beside of Status Option it will give you add new product option. Figure 3: Express Upload Product - fields 1-10 11. After Creating all the products, please go through all the product for SEO and Advance Option to make product fulfilment complete. Bulk Upload Bulk Upload of product is recommended if you are uploading more than 50 products. This process requires that you download an .CSV file called Product Feed Tempalte and feed all the basis but necessar inforamtion on products, save the file and then email it to [email protected] with your store name in subject line. Once your store is set-up you can go to product upload page from the Catalog> Manage Product Tab or you can click on the Step 2 of getting started box from Store Manager Home Page. Once you are at Product Upload page, you will click on Bulk Upload option, download the .csv file, start uploading required fields for each products, save the file, and email it to [email protected] and we will upload all those products in your online store. Please remember to include your store name in the subject line of email you send to us. Advance Option (Sandeep, you told me on line here but i forget that so can you please add that here). Once you completed General Tab of adding product, there is few more tab which is equally import to fulfil product to made live. 1. Variant Options: Variant Options is for product which have option/variants, like color, size etc. these can be managed here. a. Click “Select Variant Option” which will open new window from where you can select the Variant you looking by on Drop down. i.e. If you looking a Color option then follow following step (for every variant option): Figure 4: Variant Option- fields i. Click on select Variant option, from drop down, ii. Select “Color” as option and click on “Apply” button. iii. Before “Edit” the option, Go To Advance Inventory Options, under inventory tab, select, “Track with Options” field from drop down. iv. Click on Save Button to apply “Track with Options. v. Go to “Edit” button and select those color which available with your product. You can add and delete option according to your need. vi. After updating the option, click on “Save” button, it will create option for product. vii. For Size & Quantity Option: Click on select Variant option, from drop down, Select “Size” as option and click on “Apply” button. Go to “Edit” button and select those Size which available with your product. You can add and delete option according to your need. Before “Edit” the option, Go To Advance Inventory Options, under inventory tab, select, “Track with Options” field from drop down. Click on Save Button to apply “Track with Options”. Once your option has been save, go to “Option combinations” just below the option u have created After updating the option, click on “Save” button, it will Open a new widow where your will get Size and Quantity combination to update. Here you need to update the quantity against the size, i.e for shirt with 38 size have 15 quantity, so you need to select the size and in the box just update the no. Of quantity of same. Click on Blue “+” sign, it will give you option to select different size option to update the quantity. Figure 5: Variant Option- fields B. Option combinations: Option Combinations filed, you will get the window (See Figure 5) where you will See following field: I. Name of the Option. i.e size, color. II. ShopClues Code: leave it blank. III. Position: Position is listing sequence for option on product page, i.e if you want that Red should come first then give it position 1 and so on. Figure 6: Variant Option Combination - fields Advance Inventory Options Advance inventory Options is use for those product which need to track with variant option and have different Quantity for products. Here you will have the following Option: a. Inventory: This feature is used for those product which we need to track with quantity, like different color, size have different quantity then we need to select “Track with Option” (if there is no variant option of product then just leave it as it is, default it will be “Track without Option”) b. Avail Since: This feature is use when we have an product which is new launch and coming soon say today is 10th of October and product is going to launch in 20th of October so we have to select 20th October. (Note: This should remain blank by default. Fill this only if you want your products to be visible to customers only after certain date. c. Out of Stock Actions: By Default it will be “None”. This option is use only when you have a product with Advance buy as “avail since”. In the option, there is one feature “Sign up for notification” please do not select this option in any case. Shipping & Payments Shipping and payments option provide you to choose following option. 1. COD (Case on Delivery) Allowed: If you do not wise to sell your product on Case on Delivery then, please select “No” radio button, it will disabled COD option on your products. By Default it will on COD “Yes”. 2. Weight (Kg): This is the product actual weight with packaging. If you have this then please update it for products in this format: 1.00 3. Free Home Delivery: If there is no shipping charge for product then please checks the check box, it will show product with Free Home Delivery for buyer. 4. Shipping Charges: This is the option where you can mention the shipping charge if you want to show this separately. To update this option, please go through the Shipping charge table. 5. Delivery Time Estimate: This the option which will let know the buyer that when the product will delivery or how many business day it will take to buyer address. Figure 7: Shipping and Payments - fields Features Feature Tab is one of the most important part of product, here we need to update product feature which will highlight the product for different aspects, like Brand, Product material etc: In this Tab you will find following Option: 1. Key Feature: Brand: In this option, you need to select your Product brand from the drop down list. In case your brand is not listed here then please send request to [email protected] and we will list your brand here. 2. What’s in a Box: In this option, update the product and other item which are coming with the product. Say Samsung Galaxy Y Mobile, Charger, USB cable, User Manual and earplug. 3. Product Details: In this option, you need to update product feature or Attribute which is defined for product. In following figure, it showing T-shirt Feature, like Neck Lines, Style, Fabric etc. Please update these field as much as possible to make product more visible to customer. Figure 8: Shipping and Payments - fields