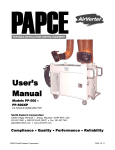
1
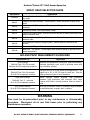
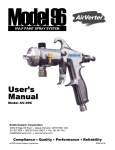
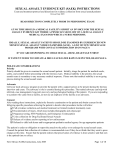
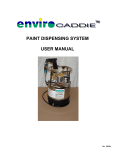
Snozzle HVLP PAINT SPRAY SYSTEM User ’ s Manual Detach III Snozzle Model SN-3000 Smith Eastern Corporation 10630-S Riggs Hill Road • Jessup, Maryland 20794-9425 USA 301.497.7600 • 800.937.HVLP (4857) • Fax 301.497.7613 [email protected] • www.airverter.com Compliance • Quality • Performance • Reliability © 2001 Smith Eastern Corporation 2000-04-21 AirVerter® Detach III™ HVLP Snozzle Spray Gun Please Read This Owner’s Manual BEFORE Using Your Detach III™ Snozzle Paint Spray Gun DO NOT OPERATE THIS EQUIPMENT WITHOUT USING PROPER PERSONAL SAFETY EQUIPMENT INCLUDING RESPIRATOR, GOGGLES AND SAFETY CLOTHING. OBSERVE ALL PRECAUTIONS RELATED TO SPRAYING. WARNING THIS EQUIPMENT IS OPERATED USING PRESSURIZED AIR. ALWAYS DISCONNECT SPRAY GUN FROM AIR AND FLUID HOSES AND DEPRESSURIZE SYSTEM PRIOR TO ANY MAINTENANCE OR DISASSEMBLY PROCEDURE. WARRANTY Smith Eastern Corporation warrants to the Purchaser that the Detach III™ HVLP Snozzle Paint Spray Gun Model SN-3000 is free from defects in material or workmanship under normal use and service for a period of twelve (12) months from the date of receipt by the Purchaser. Should any failure appear during this period, Smith Eastern shall, if given prompt written notice by the Purchaser, correct such nonconformity by repair or replacement of the nonconforming part, F.O.B. Smith Eastern’s repair facility. Repair parts are warranted for ninety (90) days from the date of shipment, but repairs or replacements to original equipment shall not renew or extend the warranty period of such equipment. Smith Eastern reserves the right to limit this warranty in cases of misuse or abuse. Any modifications to spray guns or recommended procedures will void the warranty. The foregoing warranty is exclusive and in lieu of other warranties of quality or performance, expressed, implied or statutory, including any warranties of merchantability or of fitness for a particular purpose. Why AirVerter Spray Gun Systems Work Better AirVerter® systems, by design, do not exceed 10 PSI at the spray head and prevent the operator from ® taking AirVerter spray guns out of compliance with EPA and California’s South Coast Air Quality Management District (SCAQMD) regulations. -2- DO NOT OPERATE SPRAY GUNS WITHOUT PERSONAL SAFETY EQUIPMENT AirVerter® Detach III™ HVLP Snozzle Spray Gun EQUIPMENT REQUIREMENTS Air Compressor High Pressure Air Hose ® Air compressors used with AirVerter Spray Guns must be able to HOLD a minimum of 40 PSI while spraying. Note: Position a pressure gauge in the air hose nearest the spray gun to be assured of the PSI required to satisfactorily spray your coating. 1. Air hose lengths up to 50 feet MUST have an I.D. of 3/8" including fittings. 2. Air hose lengths greater than 50 feet MUST have an I.D. of 1/2" including fittings. Pressure Pot or Diaphragm Pump The Snozzle must be used with a remote pressure pot. Be certain to follow manufacturer’s instructions. ATTACHING THE SNOZZLE EXTENSION TO A DETACH™ III SPRAY GUN 1. 2. 3. 4. 5. 6. 7. Before spraying, the Detach™ III Spray Gun must be converted to a Snozzle by the following steps: Remove the Air Pressure Fitting (DT-005) into the Atomizing Air Tube (SN-102) and and replace it with the Socket Head Cap attach the Air Cap Retaining Ring (AV-101) Screw (DT-004) found in your parts kit. to the Spray Head Housing (DT-3403). 8. Taking care not to bend the Snozzle Needle Remove the Air Cap Retaining Ring (AVAssembly (SN-104), insert the Needle 101), Air Cap (AV-189). through the rear of the handle casting and To remove the Fluid Needle (DT-007), first the Needle Guide Sleeve (DT-030) into the remove the Fluid Control Knob (DT-3012) Fluid Assembly. Place the Needle Tension and Needle Tension Spring (DT-3011). Push Spring (DT-3011) onto the Needle and the Needle Guide Sleeve (DT-030) back secure in place with the Fluid Control Knob against the handle casting and withdraw the (DT-3012). Needle from the rear of the gun. 9. Attach selected spray head to the front of the Remove the Fluid Nozzle (DT-3006) from the Snozzle Atomizing Air Tube. (Hint: Retract Fluid Tube (DT-3402) and replace it with the Needle using the trigger action while Snozzle Fluid Tube (SN-203). installing Spray Head. This helps protect the Place the Anti-Friction Washer (MF-003) Needle tip from damage.) with the larger ID in the Air Cap Retaining Ring (AV-101). 10.Attach an air supply hose to the fitting (AVPlace the Snozzle Adapter Collar (SN-101) 220A) at the base of the gun handle. and Atomizing Air Tube (SN-102) into the Air 11.Attach the fluid hose from your pressure pot Cap Retaining Ring (AV-101). to the Fluid Fitting (DT-3113) on the gun and Place the other Anti-Friction Washer (MFtighten. 003) into the Air Cap Retaining Ring (AV101), insert the Snozzle Fluid Tube (SN-203) DO NOT OPERATE SPRAY GUNS WITHOUT PERSONAL SAFETY EQUIPMENT -3- AirVerter® Detach III™ HVLP Snozzle Spray Gun OPERATING INSTRUCTIONS 1. The Detach III™ Model SN-3000 Snozzle Spray Gun operates with the trigger controling both the air and the fluid flow. 2. Too much pressure will create unnecessary overspray! Before Spraying 1. Follow the Air and Paint Management Guidelines listed on the following page. 2. Before paint is poured into the cup or diaphragm pump, make certain paint is properly mixed. This is particularly true when mixing multi-component paints. Use a paint shaker, rotary mixer, or paint paddle to achieve a homogeneous mixture. (Hint: Split your paint into two parts; the top will be lighter and the bottom will be heavier. Completely stir the bottom half of the paint and slowly add small amounts of the top half into the heavier bottom.) 3. Strain your paint to remove impurities. Use a cone strainer or a 100-mesh nylon bag or equivalent strainer. 4. Thin your paint according to the manufacturer’s specifications. 5. Ensure needle packings are properly adjusted. Needle packings are preset at the factory to proper tension. However, use and cleaning may alter this setting. To adjust needle packings to proper tension: 6. With gun disconnected from air and fluid sources, pull trigger to move the needle out of the nozzle. -4- Spraying 1. Air pressure forces paint from the paint container into the fluid chamber of the gun and out through the nozzle where the flow of atomizing air breaks the paint stream into tiny particles, creating the spray. a. Needle position controls the amount of paint flowing through the fluid nozzle. b. Trigger action controls needle position. c. The Fluid Control Knob at the rear of the spray gun controls trigger action. Turning the knob to the right will reduce the fluid flow, turning it to the left increases the flow. 2. If you are having problems with the operation of your paint gun, check the Trouble Shooting Guide at the end of the manual for possible causes and solutions. DO NOT OPERATE SPRAY GUNS WITHOUT PERSONAL SAFETY EQUIPMENT AirVerter® Detach III™ HVLP Snozzle Spray Gun SPRAY HEAD SELECTION GUIDE Spray Head Application SN-026R Rotating Precision Head Assembly - Round pattern. Allows the painter to spray at any angle. SN-027 Rotating Fan Head Assembly - Flat fan pattern. Allows the painter to spray at any angle. SN-029 Hatch channel 3/8" Round Head - Round pattern. Designed to reach behind hatch combings. SN-030 Internal Pipe Head - 360 Degree Spray Pattern. SN-031 Channel 180-Degree Head. Similar to SN-026R but able to reach further away from the gun extension tube. SN-032 Point Head (Rotating, 90 degree Spray pattern). Sprays 90 degrees from the extension tube. SN-033 Point Head (Non-rotating, Straight Pattern). Sprays directly to the front of the Snozzle SN-037 Non-rotating 90 Degree Point SN-040 MacroFlex – Fan pattern. Flexible spray head allows the painter to get around and behind obstructions AIR AND PAINT MANAGEMENT GUIDELINES Approximate PSI Application Thin Coatings Machines and implements, small parts, plant maintenance, controlled production work, work in enclosed areas with poor ventilation, priming. ZAHN #2 Test: 16 to 22 seconds Minimum 40 PSI compressor pressure Thin to Medium Coatings ZAHN #2 Test: 22 to 30 seconds 40 to 60 PSI compressor pressure High Solid Coatings ZAHN #3 Test: 37 + seconds 50 to 70 PSI compressor pressure 80% Solids Coatings 60 to 80 PSI compressor pressure Dual gun work for all of the above listed applications – will support up to 50’ of 3/8” ID hose for each gun. Also for higher production levels of all of the above. Marine epoxies, marine enamels, high production steelwork, high production with conveyer lines, large surfaces with thinner viscosity material, latex on wood or metal. Ultra high production levels on extremely large surfaces; un-thinned epoxies, enamels, latex, urethane. WARNING Gun must be de-pressurized prior to any maintenance or disassembly procedure. Disconnect all air and fluid hoses prior to performing any maintenance operation. DO NOT OPERATE SPRAY GUNS WITHOUT PERSONAL SAFETY EQUIPMENT -5- AirVerter® Detach III™ HVLP Snozzle Spray Gun CLEANING Cleaning the Detach III™ Snozzle Spray Gun 1. The Detach III™ gun is the only spray gun that allows you to clean the fluid section of the gun without immersing the entire gun in solvent. a. Unscrew the Connector Stud (DT-015). b. Pull the Spray Head (DT-3403) forward away from the handle and off the Fluid Needle (SN-104). Use caution to avoid damaging or bending the needle. c. Wipe the needle and handle clean with solvent and a clean soft cloth. d. Remove the Pattern Control Ring (AV101) and Snozzle Adapter/Atomizing Air Tube Assembly (SN-101/SN-102). Take care not to lose the Anti-Friction Washers (MF-003). e. With the wrench provided, remove the Snozzle Fluid Tube (SN-203) from the Fluid Tube (DT-3402) and clean thoroughly with brushes. f. Place the Spray Head into a container of solvent. g. Use round brush to clean Needle Packings (BCR-043). h. Inspect to make certain that all paint residue has been removed. i. Wipe all parts dry with clean cloth and reassemble. j. Replace Snozzle Fluid Tube into the Fluid Tube and tighten. k. When reattaching the Spray Head to the Gun Handle, first carefully insert the needle into the needle packing and gently push the Gun Handle onto the Spray Head. l. Insert the Connector Stud assembly and tighten. m. Replace Snozzle Adapter/Atomizing Air Tube, Anti-Friction Washers and Pattern Control Ring on the Fluid Assembly If using a gun cleaner, remove Snozzle Fluid Tube, place the Spray Head and Snozzle Fluid Tube in the cleaner and cycle. Then follow instructions above making sure all parts are clean and dry before re-assembly. SPRAY GUN PERFORMANCE IS DIRECTLY RELATED TO HOW WELL THE GUN IS CLEANED AFTER USE Cleaning Ancillary Equipment Wear Items 1. If using a 2-Quart Cup, be sure to clean all paint residue from the cup, with particular attention to the gasket and cup lip. (Hint: Periodically turning the gasket over prolongs gasket life.) Replace the O-Rings in the spray head assembly when they become worn, or broken. Different O-Ring materials respond differently to various solvents. If you are having trouble with your O-Rings because of dissolving in solvents, please call us at 1-800-937-4857 or e-mail to [email protected] to assist you in finding an appropriate O-Ring for your application. Lubricate 1. Use Vaseline or a non-silicone grease to lubricate the gun. 2. Lubricate all threaded connections for ease of maintenance. 3. Lubricate the Needle only where it passes through the needle packings. 4. DO NOT allow lubricant to get into the Fluid Tube, Nozzle, Air Cap, or interior of the paint chamber (areas where paint may come in contact with lubricant). -6- DO NOT OPERATE SPRAY GUNS WITHOUT PERSONAL SAFETY EQUIPMENT AirVerter® Detach III™ HVLP Snozzle Spray Gun DT-3011 AV-220A DT-017 BCR-043 DT-3113 DT-004 DT-403A DT-3403 DT-402 DT-027 DT-3026 DT-3300 SN-104 DT-3010 DT-015 DT-016 DT-018 AV-9606A SN-102 SN-101 AV-101 DT-030 MF-003 SN-203 DT-014 DT-3012 Detach III™ SNOZZLE PAINT SPRAY GUN MODEL SN-3000 ILLUSTRATED PARTS BREAKDOWN DO NOT OPERATE SPRAY GUNS WITHOUT PERSONAL SAFETY EQUIPMENT -7- AirVerter® Detach III™ HVLP Snozzle Spray Gun Detach III™ SNOZZLE PAINT SPRAY GUN MODEL SN-3000 PARTS LIST Part# AV-101* NSN 4940-01-353-8802 AV-220A - Description Pattern Control Ring Male Nipple, ¼NPT – ¼Ball AV-9606A 4940-01-439-9986 Pattern Control Valve Plug DT-004 4940-01-457-3985 Socket Head Cap Screw BCR-043 4940-01-457-3991 Needle Packing Cartridge DT-3010 4940-01-457-4001 Fluid Needle Guide DT-3011 4940-01-457-4008 Needle Tension Spring DT-3012 4940-01-457-4012 Fluid Control Knob DT-014 4940-01-457-4033 Connector Stud Knob DT-015 4940-01-457-4034 Connector Stud DT-016 4940-01-457-3964 Trigger Screws DT-017 4940-01-457-3981 Trigger DT-018 4940-01-457-3969 Atomizer Air Connector DT-3026 4940-01-457-1953 Air Control Valve DT-027 4940-01-457-1955 Plug, Low Pressure Channel DT-030 4940-01-457-1959 Needle Guide Sleeve DT-3113 4940-01-467-7195 Fluid Fitting DT-3300 4940-01-457-1940 Gun Handle DT-3402 4940-01-467-7198 Fluid Tube DT-3403 4940-01-467-7141 Spray Head Housing DT-403A - Set Screw MF-003* 4940-01-457-3944 Anti-Friction Washers (pair –1 large ID and 1 small ID) SN-101* 4940-01-457-3447 Snozzle Gun Adapter SN-102-XX* Note 1 Snozzle Atomizing Air Tube SN-203-XX* Note 1 Snozzle Fluid Tube SN-104-XX* Note 1 Snozzle Needle Assembly Note 1: NSNs for each length (12, 18 & 24 inch) are available. Call 1-800-937-4857 * Parts included in SN-3000A-XX -8- DO NOT OPERATE SPRAY GUNS WITHOUT PERSONAL SAFETY EQUIPMENT AirVerter® Detach III™ HVLP Snozzle Spray Gun SN-3227 High Wear Kit Part # NSN Description Qty BCR-043 4940-01-489-5986 Needle Packing Cartridge 2 DT-3011 4940-01-457-4008 Needle Tension Spring 1 DT-030 4940-01-457-1959 Needle Guide Sleeve 1 MF-003 4940-01-457-3944 Anti-Friction Washer (pair) 1 SN-411 3120-01-397-0977 Delrin Washer Bearing 1 SN-412 5330-01-395-6307 O-Rings (Bag of 12) 1 Spray Head Selection (ordered separately) SN-026R 4940-01-391-7032 Rotating Precision Head Assembly – Round Pattern SN-031 4940-01-391-7034 Channel 180 Degree Head SN-027 4940-01-391-8350 Rotating Fan Head Assembly – Flat Fan Pattern SN-029 4940-01-391-8344 Hatch Channel 3/8-in. Round Head – Round Pattern SN-040 MacroFlex (flexible spray extension, Fan pattern) DO NOT OPERATE SPRAY GUNS WITHOUT PERSONAL SAFETY EQUIPMENT -9- AirVerter® Detach III™ HVLP Snozzle Spray Gun SN-3225 Snozzle Bench Parts Kit Part# AV-101 DT-3011 DT-016 SN-104-XX* SN-411 SN-412 DT-004 BCR-043 DT-030 MF-003* NSN 4940-01-353-8802 4940-01-457-4008 4940-01-457-3964 Note 1 3120-01-397-0977 5330-01-395-6307 4940-01-457-3985 4940-01-457-3991 4940-01-457-1959 4940-01-457-3944 Description Pattern Control Ring Needle Tension Spring Trigger Screws Snozzle Needle Assembly Delrin Washer Bearing O-Rings (Bag of 12) Socket Head Cap Screw Needle Packing Cartridge Needle Guide Sleeve Anti-Friction Washers (pair –1 large ID and 1 small ID) Note 1: Specify length (12, 18 or 24 inch) when ordering -10- DO NOT OPERATE SPRAY GUNS WITHOUT PERSONAL SAFETY EQUIPMENT Qty 1 1 1 1 1 1 2 2 2 2 AirVerter® Detach III™ HVLP Snozzle Spray Gun Detach III™ SNOZZLE PAINT SPRAY GUN MODEL SN-3000 TROUBLESHOOTING GUIDE Problem Paint will not flow Inconsistent Spray Pattern (Spits and Sputters) Leakage at Front of Gun Distorted Spray Pattern -11- Probable Cause Remedy 1. Blockage in fluid nozzle 1. Clean or replace; strain paint 2. Loss of air pressure in cup 2. Search for air leaks and check cup gasket 3. Loose fluid nozzle 3. Tighten 4. Fluid Hose loose, damaged or clogged 4. Tighten, replace or clean; strain paint 5. Coating is too thick 5. Thin the coating 6. Loose Needle Packing 6. Replace packing 1. Running out of paint 1. Fill cup or pot, but never the top ¼ 2. Loose fluid tube 2. Tighten 3. Loss of fluid pressure 3. Search for air leaks or blockages 4. Loose needle packing 4. Replace packing 1. Damaged fluid needle 1. Replace 2. Wrong size fluid needle 2. Replace 3. Dirty fluid nozzle 3. Clean 4. Impurities in paint 4. Strain paint 5. Loose Needle Seat 5. Tighten 6. Fluid adjustment screwed all the way out 6. Rotate Fluid Control Knob (DT-3012) on rear of gun clockwise 7. Needle not firmly seated in the nozzle 7. Check for nozzle obstruction 8. Packing too tight 1. Dirty or damaged air cap 8. Replace Packing 1. Clean or replace 2. Dirty or damaged fluid nozzle or needle 2. Clean or replace 3. Fluid nozzle partially clogged 3. Clean 4. Fluid nozzle not centered with air cap 4. Replace air cap DO NOT OPERATE SPRAY GUNS WITHOUT PERSONAL SAFETY EQUIPMENT