1
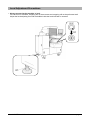
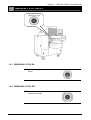
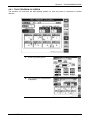
Automatic Weigh/Wrap Labeling Machine Omni-4000ST User’s Manual IMPORTANT • Read this manual thoroughly, and do not perform installation, operation, maintenance, or inspection unless you fully understand all of the contents. • Keep this manual in a safe place where you can refer to it easily while installing, operating, and carrying out maintenance or inspections. Omni-4000ST User’s Manual ISHIDA Co., Ltd., 2006 All rights are reserved. No part of this publication may be reproduced, stored in a retrieval system, or transmitted, in any form, or by any means, mechanical, electronic, photocopying, recording, or otherwise, without prior written permission of ISHIDA. No patent liability is assumed with respect to the use of the information contained herein. Moreover, because ISHIDA is constantly striving to improve its high-quality products, the information contained in this manual is subject to change without notice. Every precaution has been taken in the preparation of this manual. Nevertheless, ISHIDA assumes no responsibility for errors or omissions. Neither is any liability assumed for damages resulting from the use of the information contained in this publication. Omni-4000ST User’s Manual Important Notice Thank you for purchasing the ISHIDA Omni-4000ST. This manual explains the procedures to install, operate, and maintain the machine. Those who handle the machine must be aware of the hazards involved. These dangers may not be obvious, so it is imperative to follow the instructions detailed in this manual when installing, operating, and maintaining the machine. Therefore, we recommend that you thoroughly read and understand this manual before installing, operating, or maintaining the machine, and keep this manual in a safe place where you can refer to it whenever necessary. Safety countermeasures should be carefully considered and implemented before performing any installation, operation, or maintenance procedure not specifically described in this manual or indicated on the machine itself. ISHIDA is not liable for any damage, loss or injury that results from incorrect operation, insufficient caution, unauthorized modifications to the machine, or failure to follow the instructions contained in this manual. Change in Specifications Machine specifications and accessories may be changed at any time due to improvements or other reasons. Consult with your ISHIDA representative at any time to confirm the actual specifications of the purchased machine. Errors and Omissions The information in this manual has been carefully checked and is believed to be accurate. However, please understand that the descriptions in this manual may not agree with the actual machine due to machine improvements. The information is subject to change without prior notice in the future. ISHIDA assumes no responsibility for clerical, typographical or proofreading errors, or omissions. Limitations of Liability ISHIDA assumes no responsibility for special, indirect, or consequential damages, loss of profits or commercial loss in any way connected with the machine, whether such claim is based on contract, warranty, negligence, or strict liability. SHIDA shall assume responsibility for problems with the machine or the system based on an individual maintenance contract. However, ISHIDA shall not be responsible for secondary problems. ISHIDA assumes no responsibility for the user's programming of this machine, or any consequence thereof. In no event shall ISHIDA be responsible for warranty, repair, or other claims regarding the machine unless ISHIDA’s analysis confirms that the machines were properly handled, stored, installed, and maintained and not subject to contamination, abuse, misuse, or inappropriate modification or repair. Omni-4000ST User’s Manual page i Precaution Symbols This machine is manufactured for use according to proper procedures by a qualified operator and only for the purposes described in this manual. Warning symbols in this manual are divided into three categories, depending on the level of danger, or seriousness of potential injury. The definition of each of these warnings and precautions is shown below. Failure to heed these warnings or precautions may result in bodily injury or damage to the machine. Indicates information that, if not heeded, is likely to result in loss of life or serious injury. Indicates information that, if not heeded, could possibly result in loss of life or serious injury. Indicates information that, if not heeded, could result in relatively serious or minor injury, damage to the machine, or faulty operation. Precaution Stickers Warning stickers are affixed to the machine to warn operators of possible dangers. Keep these stickers clean at all times. Take precautions to ensure that they do not become unreadable or peel off. This sticker indicates that the main power should This sticker indicates that hands should be kept be disconnected when performing any type of away from hot surfaces. internal maintenance or service on the machine. This sticker indicates that there is a danger hands may get caught when the lift comes down, even after the emergency switch has been pressed. This sticker is placed on parts where there is a danger of the operator being cut by a cutting mechanism such as the cutter. Always press the emergency stop button before starting work near any cutting mechanism. This sticker indicates that the maximum load at full extension should not exceed 10 lbs. on the in-feed conveyer cover. This sticker indicates that there is a danger of electric shock on the power supply unit cover. page ii Omni-4000ST User’s Manual Handling Precautions DO NOT PUT HANDS IN THE WEIGHING, INFEEDING, OR WRAPPING AREAS. When you need to put your hand inside to take something out of the wrapping area, always press the Emergency Stop Button first. Otherwise, your hand may be caught in the machine. KEEP HANDS AWAY FROM THE FILM CUTTER. When you need to change the film or do anything near the film cutter, ensure to press the Emergency Stop Button first. Otherwise, the film cutter may come out and cut your hand. KEEP HANDS AWAY FROM THE FILM ROLLERS. When you need to change the film or do anything near the film rollers, ensure to press the Emergency Stop Button first. Otherwise, your hand may get caught in the film roller. DO NOT TOUCH, OR ALLOW CLOTHING TO TOUCH THE HEATER CONVEYER. The heater conveyer will remain hot for some time even after the power is switched OFF, and can cause burns if touched. Omni-4000ST User’s Manual page iii Installation Precautions Avoid the following places when installing the machine: • Places subject to high temperatures or high humidity • Places exposed to direct sunlight • Places where water or other liquids are easily spilled on the machine • Places subject to excessive vibration or unstable foundations • Places exposed to direct cold air from air conditioners or refrigerators • Places where the floor or foundation is unstable • Places subject to a lot of dust or dirt • Places with large voltage fluctuations Power Supply Precautions Heed the following precautions about power supply: • Use a power supply with rated voltage ground. • Prepare a dedicated power source. A power supply that generates voltage variation may cause a malfunction. • Do not stand on the power cord, and do not place anything heavy on the cord. Doing so may damage the cord, resulting in accident or trouble. page iv Omni-4000ST User’s Manual Level Adjustment Precautions • Always ensure that the machine is level. If the level is not centered, weighing will not be accurate and wrapping will not be performed well. Adjust the level adjusting feet until the bubble inside the level indicator is centered. Omni-4000ST User’s Manual page v Installation Space Precautions Allow ample space on either side of the machine and behind the machine to ensure easy access for maintenance. page vi Omni-4000ST User’s Manual CONTENTS CHAPTER 1 1.1 1.2 1.3 1.4 1.5 1.6 1.7 1.8 1.9 NAME OF EACH PART........................................................ 1-2 STROKE KEYS .................................................................... 1-3 LABELS, TRAYS, AND FILM ............................................... 1-4 OPERATION START / END ................................................. 1-6 EMERGENCY STOP ON/OFF ............................................. 1-7 FILM ROLL LOADING.......................................................... 1-8 FILM THEADING.................................................................. 1-9 LABEL SETTING................................................................ 1-12 DAILY MAINTENANCE ...................................................... 1-16 CHAPTER 2 2.1 2.2 2.3 2.4 2.5 2.6 2.7 2.8 2.9 2.10 2.11 2.12 2.13 2.14 BEFORE USING THIS MACHINE NORMAL MODE SCREENS IN NORMAL MODE ........................................... 2-2 PLU CALL UP ...................................................................... 2-4 WEIGHING / WRAPPING / LABELING................................ 2-8 WRAPPING ONLY ............................................................... 2-9 LABELING ONLY ............................................................... 2-10 TENTAIVE UNIT PRICE CHANGE .................................... 2-11 TENTATIVE CHANGE TO FIXED PRICE .......................... 2-12 TRAY CHANGE.................................................................. 2-13 MARKDOWN PRICE ......................................................... 2-14 MANUAL LABELING.......................................................... 2-16 DATE AND TIME CHANGE................................................ 2-18 CHECKING PRINT ITEMS FOR LABELING ..................... 2-21 MEMO PRESET BUTTON ................................................. 2-22 FUNCTION KEYS .............................................................. 2-26 CHAPTER 3 TOTAL MODE 3.1 3.2 3.3 3.4 TOTAL MENU....................................................................... 3-2 DAILY / ACCUMULATED TOTAL ......................................... 3-3 HOURLY + TRAY TOTALS................................................... 3-9 TOTAL CLEAR ................................................................... 3-15 Omni-4000ST User’s Manual page vii CHAPTER 4 PROGRAMMING MODE 4.1 4.2 4.3 4.4 4.5 4.6 4.7 4.8 4.9 4.10 4.11 4.12 PROGRAMMING MODE...................................................... 4-2 PLU FILE REGISTRATION .................................................. 4-3 PLU NAME REGISTRATION ............................................. 4-15 EXTRA MESSAGE REGISTRATION ................................. 4-17 POP MESSAGE REGISTRATION ..................................... 4-19 COUPON MESSAGE REGISTRATION ............................. 4-21 STORE NAME/ADDRESS REGISTRATION ..................... 4-23 TRAY MESSAGE REGISTRATION.................................... 4-26 DEPARTMENT NAME REGISTRATION............................ 4-32 CATEGORY PRESET REGISTRATION ............................ 4-34 PLU PRESET REGISTRATION ......................................... 4-36 TEXT EDITING................................................................... 4-37 CHAPTER 5 SETUP MODE 5.1 5.2 5.3 5.4 5.5 5.6 5.7 page viii STARTING PROCEDURE ................................................... 5-2 SETUP MENU...................................................................... 5-3 EXPIRY DATE SETTING ..................................................... 5-4 PASSWORD SETTING ........................................................ 5-6 WORD-WRAP WIDTH SETTING......................................... 5-7 REFERENCE DATA SETUP ................................................ 5-8 TOTAL ADD SETTING ....................................................... 5-11 Omni-4000ST User’s Manual Chapter 1 BEFORE USING THIS MACHINE 1 BEFORE USING THIS MACHINE CONTENTS 1.1 1.2 1.3 1.4 1.5 1.6 1.7 1.8 1.9 Omni-4000ST User’s Manual NAME OF EACH PART ................................................ 1-2 STROKE KEYS ............................................................. 1-3 LABELS, TRAYS, AND FILM ....................................... 1-4 OPERATION START / END .......................................... 1-6 EMERGENCY STOP ON/OFF ...................................... 1-7 FILM ROLL LOADING .................................................. 1-8 FILM THEADING........................................................... 1-9 LABEL SETTING ........................................................ 1-12 DAILY MAINTENANCE............................................... 1-16 page 1-1 Chapter 1 BEFORE USING THIS MACHINE 1.1 NAME OF EACH PART page 1-2 Omni-4000ST User’s Manual Chapter 1 BEFORE USING THIS MACHINE 1.2 STROKE KEYS Omni-4000ST User’s Manual page 1-3 Chapter 1 BEFORE USING THIS MACHINE 1.3 LABELS, TRAYS, AND FILM 1.3.1 LABELS Use the designated labels for this machine. • Label roll diameter: φ230mm or less • Label width: 35-80mm • Label length: 27-60mm When wrong-sized labels or those other than the designated labels are used, the labels may not be printed, not be fed correctly, or not be sucked by the applicator. 1.3.2 TRAYS Use the designated trays for this machine. Usable tray size • Width: 95-360mm • Length: 80-250mm • Height: 10-50mm Some trays might not be packed depending on the shape, material and weight even though the tray sizes are within the acceptable ranges. Unusable trays Following trays cannot be used. z Fragile trays z Trays made of transparent materials page 1-4 z Deformed trays z Dark blue trays zz Round or hollow-bottomed trays z Trays other than square and rectangular trays Omni-4000ST User’s Manual Chapter 1 BEFORE USING THIS MACHINE Filling the trays Appearance of a packed tray changes greatly depending on the filling. Avoid filling the trays as shown below to maintain a consistent wrapping appearance. z Contents not fit in the tray z Lopsided contents z Overfilled tray 1.3.3 FILM TYPE Use the film designated by ISHIDA, as packing may not be performed if other films are used. Contact your ISHIDA service representative for further details regarding usable films. Omni-4000ST User’s Manual page 1-5 Chapter 1 BEFORE USING THIS MACHINE 1.4 OPERATION START / END 1.4.1 OPERATION START The Fan and the Applicator Arm will start moving as soon as the Main Power Switch is turned ON. Do not put your hand inside the machine while the Main Power Switch is turned ON. . 1. Confirm that nothing remains on the Weigh Platter or in the wrapping area and turn ON the Main Power Switch. 2. After a while, the return operation confirmation screen is displayed. Press the [Return] button on the screen. The Heater Conveyer gets very hot and may cause burns. Ensure to keep your hand away from the conveyer. Do not put your hand inside the machine while performing the return operation. Movable units such as the Applicator, Conveyers, Lifts start moving to return to their original positions. 3. The initial screen is displayed. 1.4.2 OPERATION END 1. Do not touch the Heater Conveyer, as it remains very hot even after the Main Power Switch is turned OFF. page 1-6 Confirm that nothing remains on the Weigh Platter or in the wrapping area and turn OFF the Main Power Switch. Omni-4000ST User’s Manual Chapter 1 BEFORE USING THIS MACHINE 1.5 EMERGENCY STOP ON/OFF 1.5.1 EMERGENCY STOP ON 1. Press the Emergency Stop button. 1.5.2 EMERGENCY STOP OFF 1. Turn the Emergency Stop button clockwise to release. Omni-4000ST User’s Manual page 1-7 Chapter 1 BEFORE USING THIS MACHINE 1.6 FILM ROLL LOADING . 1. Before starting the film roll setting, press the Emergency Stop button. 2. Open the Film Replacement Door. 3. Make sure that the lever is parallel with the film core and insert the film roll around the holder until the roll clicks. Lever With pushing the end of the film core, align the near end with the film on the film position decal. 4. Film core Turn the lever vertical to the film core to secure the film roll position. Lever Film core 5. page 1-8 Close the Film Replacement Door. Omni-4000ST User’s Manual Chapter 1 BEFORE USING THIS MACHINE 1.7 FILM THEADING 1. Before starting to set the film, press the Emergency Stop button. 2. Open the Side Cover, and use the handle to lift up the Film Set Roller until it locks into position. 3. Open the Side Door. 4. Evenly cut the top edge of the film, and pull it up. Omni-4000ST User’s Manual page 1-9 Chapter 1 BEFORE USING THIS MACHINE 5. Confirm that the film edge is exactly aligned with the line appearing on the roll set position decal. 6. Stick the film on both Film Feed Belts. 7. Use the handle to slightly lift up to release the lock condition and lower the Film Set Roller. Lower the Side Cover. 8. page 1-10 Close the side door. Omni-4000ST User’s Manual Chapter 1 BEFORE USING THIS MACHINE 9. Release the Emergency Stop button 10. Press the [U] button on the screen. 11. Press the [FILM FEED] button. 12. The film is fed normally, and press the Emergency Stop button. 13. Remove the film. 14. Release the Emergency Stop button Make sure that the Emergency Stop button has been pressed before removing the film. Unless the Emergency Stop button is pressed, the film cannot be removed because it is pinched by clamps. Omni-4000ST User’s Manual page 1-11 Chapter 1 BEFORE USING THIS MACHINE 1.8 LABEL SETTING 1. Before starting to set a label roll, press the Emergency Stop button. 2. Open the Printer Cover. 3. If the Applicator is positioned in front of the printer, move the Applicator to the side. 4. Use the lever to open the print head. Make sure that the Emergency Stop button has been pressed before opening the Printer Cover. page 1-12 Omni-4000ST User’s Manual Chapter 1 BEFORE USING THIS MACHINE 5. Make sure that the print head is pulled up, and pull to slide the printer unit. 6. Release the Label Roll Stopper. 7. Set a label roll around the holder and thread the label paper as shown in the figure. 8. Set the end of backing paper with the stopper and turn the Label Take-up Bobbin counterclockwise until the label slack is taken up. Omni-4000ST User’s Manual page 1-13 Chapter 1 BEFORE USING THIS MACHINE 9. . Lock the Label Roll Stopper. 10. Slide the printer back to its original position. 11. Close the Print Head. 12. page 1-14 Release the Emergency Stop button Omni-4000ST User’s Manual Chapter 1 BEFORE USING THIS MACHINE 13. Press the [FEED] key several times to make sure that labels are normally issued. Ð 14. Close the Printer Cover. Omni-4000ST User’s Manual page 1-15 Chapter 1 BEFORE USING THIS MACHINE 1.9 DAILY MAINTENANCE Daily maintenance is vital to prolong machine use and to avoid trouble or failure. Keep the machine clean every day after work. The following precautions should be observed before cleaning this machine. • Make sure to turn OFF the Main Power Switch while cleaning the machine. • Some parts of the machine still remain hot although the Main Power Switch has been turned OFF. • A person cleaning this machine should keep all long hair up, wear a hat, appropriate • • • • • • clothing and shoes. Make sure to wash hands and wear clean gloves before cleaning the machine. Wet the cleaning cloth with a mild detergent and wring it thoroughly before use. Spray alcohol (80% vol.) on the areas in direct contact with food or trays for sterilization. A numeric key cover may be a good solution if the numeric keys get heavily soiled. Do not apply water directly as it can damage the machine. Lubricating each drive unit is not necessary. 1.9.1 MACHINE CLEANING page 1-16 1. Press the [U] button on the screen. 2. Press the [PREPARE CLEAN] button on the screen. Omni-4000ST User’s Manual Chapter 1 BEFORE USING THIS MACHINE 3. The display returns to the initial screen when the [Return] button is pressed. Cleaning Mode screen is displayed. Press the [Start] button on the screen. Note: When Cleaning Mode is executed, the Side Wrapping Plates and Rear Wrapping Plate are released and can be moved manually, and the Lift Unit elevates. 4. Turn OFF the Main Power Switch. 5. Open the Printer Cover. The Heater Conveyer remains hot even after the Main Power Switch has been turned OFF. Avoid touching the conveyer as you may burn yourself. Omni-4000ST User’s Manual page 1-17 Chapter 1 BEFORE USING THIS MACHINE 1.9.2 PLACES TO BE CLEANED page 1-18 Omni-4000ST User’s Manual Chapter 2 NORMAL MODE 2 NORMAL MODE CONTENTS 2.1 SCREENS IN NORMAL MODE..................................... 2-2 2.2 PLU CALL UP ............................................................... 2-4 2.3 WEIGHING / WRAPPING / LABELING ........................ 2-8 2.4 WRAPPING ONLY ........................................................ 2-9 2.5 LABELING ONLY........................................................ 2-10 2.6 TENTAIVE UNIT PRICE CHANGE...............................2-11 2.7 TENTATIVE CHANGE TO FIXED PRICE.................... 2-12 2.8 TRAY CHANGE........................................................... 2-13 2.9 MARKDOWN PRICE................................................... 2-14 2.10 MANUAL LABELING .................................................. 2-16 2.11 DATE AND TIME CHANGE ........................................ 2-18 2.12 CHECKING PRINT ITEMS FOR LABELING .............. 2-21 2.13 MEMO PRESET BUTTON .......................................... 2-22 2.14 FUNCTION KEYS ....................................................... 2-26 Omni-4000ST User’s Manual page 2-1 Chapter 2 NORMAL MODE 2.1 SCREENS IN NORMAL MODE 2.1.1 INITIAL SCREEN Displays the PLU list when pressed after a PLU number entry. Displays the PLU detail information when pressed. Displays the store number when multiple stores are used for production. Changes between In-line and Off-line Displays Main Menu screen when pressed. Performs the scale zero calibration. Displays the Memo Preset PLU screen when pressed. Numeric function keys Category Preset Keys Changes the wrapping mode (Wrap & Label/Label/Wrap). Main function keys Changes the data when pressed after numeric entry. Also displays the pack date setting screen when touched without numeric entry. Displays the markdown price print selection screen. Changes the data when pressed after numeric entry. Also displays the tray list screen when touched without numeric entry. Changes the data when pressed after numeric entry. Also displays the print selection screen when touched without numeric entry. page 2-2 Omni-4000ST User’s Manual Chapter 2 NORMAL MODE 2.1.2 EXAMPLE OF WEIGHING PLU SCREEN 2.1.3 EXAMPLE OF FIXED PRICE PLU SCREEN Displays the upper/lower weight limit setting screen when pressed. Omni-4000ST User’s Manual page 2-3 Chapter 2 NORMAL MODE 2.2 PLU CALL UP 2.2.1 PLU CALL USING KEYPAD 1. Make sure that the initial screen is displayed. 2. Enter a PLU number and press the [PLU] stroke key or [PLU No.] field on the screen. Lightly press the touch panel with your finger. Pressing the panel using pointed objects such as fingernails or mechanical pencils may damage the touch panel. EXAMPLE Call up PLU No.131. 3. page 2-4 The designated PLU screen is displayed. Omni-4000ST User’s Manual Chapter 2 NORMAL MODE 2.2.2 PLU CALL USING CATEGORY PRESET BUTTONS 1. Make sure that the initial screen is displayed. 2. Press the desired category button to make a selection. Lightly press the touch panel with your finger. Pressing the panel using pointed objects such as fingernails or mechanical pencils may damage the touch panel. EXAMPLE Call the PLU No.131 “Select Beef BNLS Shoulder Steak” under the category “BEEF”. 3. The Category Preset List screen is displayed. Press the [Select Beef BNLS Shoulder Steak] field to make a selection. 4. The designated PLU screen is displayed. Omni-4000ST User’s Manual page 2-5 Chapter 2 NORMAL MODE 2.2.3 PLU CALL USING THE CATEGORY PRESET LIST 1. Make sure that the initial screen is displayed. 2. Press the [PLU No.] field on the screen. 3. The Category Preset List screen is displayed. Lightly press the touch panel with your finger. Pressing the panel using pointed objects such as fingernails or mechanical pencils may damage the touch panel. Use the [V] and [U] buttons to turn over the screen until you find the desired PLU and press the desired field to make a selection.. EXAMPLE Call the “Select Beef BNLS Shoulder Steak”. page 2-6 Omni-4000ST User’s Manual Chapter 2 NORMAL MODE 2.2.4 PLU CALL USING MEMO PRESET BUTTONS 1. Make sure that the initial screen is displayed. 2. Press the [PRESET] button. 3. The Memo Preset screen is displayed. Lightly press the touch panel with your finger. Pressing the panel using pointed objects such as fingernails or mechanical pencils may damage the touch panel. 4. 000001 GROUND BEEF 000002 GROUND BEEF SPECIAL 000003 TEXAS GROUND BEEF 000008 SLICED BEEF SPECIAL 000009 SLICED TEXAS BEEF 000010 SLICED OREGON BEEF 000004 OREGON GROUND BEEF 000005 CALIFORNIA GROUND BEEF 000006 UTAH GROUND BEEF 000007 SLICED BEEF Press the desired Memo Preset button to make a selection. EXAMPLE Call the “SLICED BEEF” using Memo Preset button. Omni-4000ST User’s Manual 000004 OREGON GROUND BEEF 000005 CALIFORNIA GROUND BEEF 000006 UTAH GROUND BEEF 000007 SLICED BEEF page 2-7 Chapter 2 NORMAL MODE 2.3 WEIGHING / WRAPPING / LABELING This machine performs weighing, wrapping, and labeling for the selected PLU. EXAMPLE Perform weighing, wrapping and labeling for PLU No.131. Do not touch the tray after placing it on the Weigh Platter. Otherwise your hand may get caught in the In-feed Pusher that moves automatically immediately after the tray is placed. page 2-8 1. Make sure that the desired PLU screen is displayed. 2. Place a tray filled with a commodity in the middle of the Weigh Platter. The tray is weighed, wrapped, labeled, and discharged. Omni-4000ST User’s Manual Chapter 2 NORMAL MODE 2.4 WRAPPING ONLY This machine can also perform wrapping only if necessary. EXAMPLE Perform wrapping only for PLU No.131. 1. Make sure that the desired PLU screen is displayed. 2. Press the [WRAP/LABEL] button until the button display changes to [WRAP]. [WRAP/LABEL] is usually displayed. The button display will change in the order [WRAP/LABEL] → [LABEL] → [WRAP] each time the button is pressed. 3. Do not touch the tray after placing it on the Weigh Platter. Otherwise your hand may get caught in the In-feed Pusher that moves automatically immediately after the tray is placed. Place a tray filled with a commodity in the middle of the Weigh Platter. The tray is wrapped and discharged. Omni-4000ST User’s Manual page 2-9 Chapter 2 NORMAL MODE 2.5 LABELING ONLY This machine can also perform labeling only if necessary. EXAMPLE Perform labeling only for PLU No.131. 1. 2. Make sure that the desired PLU screen is displayed. Open the Printer Cover. Wrap mode automatically changes to [LABEL] when the Printer Cover is opened. 3. Do not touch the tray after placing it on the Weigh Platter. Otherwise your hand may get caught in the In-feed Pusher that moves automatically immediately after the tray is placed. page 2-10 Place a tray filled with a commodity in the middle of the Weigh Platter. The label is issued. Omni-4000ST User’s Manual Chapter 2 NORMAL MODE 2.6 TENTAIVE UNIT PRICE CHANGE This section explains about how to change the unit price for the selected PLU tentatively. EXAMPLE Change the unit price from $6.50 to $4.80 tentatively. 1. Make sure that the desired PLU screen is displayed. 2. Enter a new unit price using numeric keys and press the [U/P] stroke key. Î The unit price has been changed to the new unit price tentatively. Omni-4000ST User’s Manual page 2-11 Chapter 2 NORMAL MODE 2.7 TENTATIVE CHANGE TO FIXED PRICE This section explains about how to change the selected weighing PLU to the fixed price PLU tentatively. EXAMPLE Change the unit price $6.29 to the fixed price $7.00 tentatively. 1. Make sure that the desired PLU screen is displayed. 2. Enter the fixed price using numeric keys and press the [FIX] stroke key. Î The unit price has been changed to the new fixed price tentatively. page 2-12 Omni-4000ST User’s Manual Chapter 2 NORMAL MODE 2.8 TRAY CHANGE This section explains about how to change the tray type to be used for the selected PLU tentatively. EXAMPLE Change the tray type to Tray No.5 tentatively. 1. Make sure that the desired PLU screen is displayed. 2. Press the [TRAY No.] field on the screen. 3. The Tray Name List screen is displayed. 4. Press the desired field to select the tray number to be used. Lightly press the touch panel with your finger. Pressing the panel using pointed objects such as fingernails or mechanical pencils may damage the touch panel. The display automatically returns to the PLU screen, and the tray to be used has been tentatively changed. Omni-4000ST User’s Manual page 2-13 Chapter 2 NORMAL MODE 2.9 MARKDOWN PRICE This section explains about how to apply a markdown price for the selected PLU tentatively. EXAMPLE Change the tray type to Tray No.5 tentatively. 1. Make sure that the desired PLU screen is displayed. 2. Press the [M.D. PRICE] field on the screen. 3. The Markdown Price Mode Setting screen is displayed. Lightly press the touch panel with your finger. Pressing the panel using pointed objects such as fingernails or mechanical pencils may damage the touch panel. page 2-14 Omni-4000ST User’s Manual Chapter 2 NORMAL MODE MARKDOWN BUTTONS Buttons Function Special Price Pressing this button after numeric entry will register the special price in the total price field. Amount Discount Pressing this button after numeric entry will register the discount amount in the markdown price field. Rate Discount Pressing this button after numeric entry will register the discount rate in the markdown price field. Special Unit Price Pressing this button after numeric entry will register the special unit price in the unit price field. Unit Price Amount Discount Pressing this button after numeric entry will register the discount unit price in the unit price field. Unit Price Percent Discount Pressing this button after numeric entry will register the discount unit price rate in the unit price field. Omni-4000ST User’s Manual page 2-15 Chapter 2 NORMAL MODE 2.10 MANUAL LABELING This section explains about how to change auto labeling to manual labeling for the selected PLU data. 1. Make sure that the desired PLU screen is displayed. 2. Press the [U] button to display the function key screen. 3. Press the [AUTO LABELING] button to change the button display to [MANUAL LABELING]. Lightly press the touch panel with your finger. Pressing the panel using pointed objects such as fingernails or mechanical pencils may damage the touch panel. [AUTO LABELING] is usually displayed. The button display will change between [AUTO LABELING] and [MANUAL LABELING] each time the button is pressed. page 2-16 Omni-4000ST User’s Manual Chapter 2 NORMAL MODE 4. Make sure that [WRAP/LABEL] is displayed on the screen.. If not, press the [WRAP] or [LABEL] button until the button display changes to [WRAP/LABEL]. The button display will change in the order [WRAP/LABEL] → [LABEL] → [WRAP] each time the button is pressed. 5. Do not touch the tray after placing it on the Weigh Platter. Otherwise your hand may get caught in the In-feed Pusher that moves automatically immediately after the tray is placed. Place a tray filled with a commodity in the middle of the Weigh Platter. The tray is weighed, wrapped, and discharged. 6. Press the [FEED] stroke key to issue the label. Omni-4000ST User’s Manual page 2-17 Chapter 2 NORMAL MODE 2.11 DATE AND TIME CHANGE This section explains about how to change the Pack Date for the selected PLU data tentatively. EXAMPLE Change the Pack Date to Tray No.5 tentatively. 1. Make sure that the desired PLU screen is displayed. 2. Press the [PACK DATE] or [SHELF LIFE] field on the screen. 3. The Pack Date Setting screen is displayed. Lightly press the touch panel with your finger. Pressing the panel using pointed objects such as fingernails or mechanical pencils may damage the touch panel. page 2-18 Omni-4000ST User’s Manual Chapter 2 NORMAL MODE (1) Pack Date Enter the Pack Date (MMDD or MMDDYYYY) to be changed. X Press one of the following buttons. Print the Pack Date. Do not print the Pack Date. (2) Pack Time Enter the Pack Time (HHMM) when you want to print a certain Pack Time. X Press one of the following buttons. Print the Pack Time. Do not print the Pack Time. (3) Pack Time Select Press one of the following buttons. Select for printing the current time. Select for printing a certain time. (4) Sell-By Date Press one of the following buttons. Do not print the Sell-By Date. Print the Sell-By Date. Omni-4000ST User’s Manual page 2-19 Chapter 2 NORMAL MODE (5) Sell-By Time Enter the number of hours (1 9999 hours) for Sell-By Date. X Press one of the following buttons. Do not print the Sell-By Time. Print the Sell-By Time. (6) Shelf Life Enter the number of days (1 9999 days) for Sell-By Date.. X (7) Use By Enter the number of days (1 - 9999 hours) for Sell-By Date. Press one of the following buttons. Print the Pack Date. Do not print the Pack Date. page 2-20 Omni-4000ST User’s Manual Chapter 2 NORMAL MODE 2.12 CHECKING PRINT ITEMS FOR LABELING This section explains about how to set print items necessary for labeling. 1. Make sure that the desired PLU screen is displayed. 2. Press the PLU name display field. Lightly press the touch panel with your finger. Pressing the panel using pointed objects such as fingernails or mechanical pencils may damage the touch panel. . 3. The PLU Information screen is displayed. Check whether there are any missing items or mistakes for the selected PLU and make the necessary additions and corrections if any. Item fields below the comment field can be registered by pressing the field after numeric entry. When the field is pressed without numeric entry, displays the list for each item. 4. Press the [BACK] button when additions and corrections are completed. The display returns to the initial screen. Omni-4000ST User’s Manual page 2-21 Chapter 2 NORMAL MODE 2.13 MEMO PRESET BUTTON This section explains about how to register and delete Memo Preset buttons on the screen. Operation will become more efficient by registering the frequently called PLUs in these buttons. 000001 GROUND BEEF 000002 GROUND BEEF SPECIAL 000003 TEXAS GROUND BEEF 000008 SLICED BEEF SPECIAL 000009 SLICED TEXAS BEEF 000010 SLICED OREGON BEEF 000004 OREGON GROUND BEEF 000005 CALIFORNIA GROUND BEEF 000006 UTAH GROUND BEEF 000007 SLICED BEEF Turns over the screen. Changes the mode. Aborts respective operation mode and returns to the normal display. Truncates the PLU name. page 2-22 Executes each mode operation and returns to the normal display. Omni-4000ST User’s Manual Chapter 2 NORMAL MODE 2.13.1 MEMO PRESET DATA REGISTRATION EXAMPLE Register the PLU No.8 “SLICED BEEF SPECIAL” on the screen in Memo Preset button. 1. Make sure that the desired PLU screen is displayed and press the [PRESET] button. 2. The Memo Preset screen is displayed. Lightly press the touch panel with your finger. Pressing the panel using pointed objects such as fingernails or mechanical pencils may damage the touch panel. 3. Press the [REGISTER] button. 000001 GROUND BEEF 000002 GROUND BEEF SPECIAL 000003 TEXAS GROUND BEEF 000008 SLICED BEEF SPECIAL 000009 SLICED TEXAS BEEF 000010 SLICED OREGON BEEF UND EF 000004 OREGON GROUND BEEF 000005 CALIFORNIA GROUND BEEF 000006 UTAH GROUND BEEF GROUND BEEF GROUND BEEF GROUND BEEF BEEF GROUND BEEF GROUND BEEF GROUND BEEF BEEF 000007 SLICED BEEF 010 CED GON EF 4. The data will be overwritten when the registered Memo Preset button is pressed. Registration can also be performed by pressing the [Memo Preset] button after entering the PLU number. The display changes to the Memo Preset Programming mode. Press the Memo Preset button at the desired position. UND EF 010 CED GON EF The PLU data has been registered in the button. The display returns to the PLU screen. Omni-4000ST User’s Manual page 2-23 Chapter 2 NORMAL MODE 2.13.2 MEMO PRESET DATA DELETION 1. Lightly press the touch panel with your finger. Pressing the panel using pointed objects such as fingernails or mechanical pencils may damage the touch panel. 2. Press the [PRESET] button on the initial screen. The Memo Preset screen is displayed. 3. Press the [DELETE] button. 4. The display changes to the Memo Preset Delete mode. Press the desired memo preset to be deleted. 000001 GROUND BEEF 000002 GROUND BEEF SPECIAL 000003 TEXAS GROUND BEEF 000008 SLICED BEEF SPECIAL 000009 SLICED TEXAS BEEF 000010 SLICED OREGON BEEF BEEF 000004 OREGON GROUND BEEF 000004 OREGON GROUND BEEF 000005 CALIFORNIA GROUND BEEF BEEF BEEF 000005 CALIFORNIA GROUND BEEF 000006 UTAH GROUND BEEF 000006 UTAH GROUND BEEF 000007 SLICED BEEF 000007 SLICED BEEF EXAMPLE Delete the ““UTAH GROUND BEEF” Memo Preset button. page 2-24 Omni-4000ST User’s Manual Chapter 2 NORMAL MODE 5. Press the [CONFIRM] button. The deletion has been executed and the display returns to the normal screen. Omni-4000ST User’s Manual page 2-25 Chapter 2 NORMAL MODE 2.14 FUNCTION KEYS This machine has many convenient function keys. Main function keys are located at the bottom of the screen, and sub function keys on the Function Key screen. Numeric function keys Displays the Function Key screen Function keys Æ Function keys page 2-26 Omni-4000ST User’s Manual Chapter 2 NORMAL MODE FUNCTION KEYS Omni-4000ST User’s Manual page 2-27 Chapter 2 NORMAL MODE page 2-28 Omni-4000ST User’s Manual Chapter 2 NORMAL MODE Omni-4000ST User’s Manual page 2-29 Chapter 2 NORMAL MODE NUMERIC FUNCTION KEYS Function key Operation and how to use the function keys -Tare rate can be set when pressed after numeric entry. -To delete the setting, press the button after entering “0”. -Extra message number can be set when pressed after numeric entry. -To delete the setting, press the button after entering “0”. -POP number can be set when pressed after numeric entry. -To delete the setting, press the button after entering “0”. -Coupon message number can be set when pressed after numeric entry. -To delete the setting, press the button after entering “0”. -Front format number can be set when pressed after numeric entry. -To delete the setting, press the button after entering “0”. -Image number can be set when pressed after numeric entry. -To delete the setting, press the button after entering “0”. page 2-30 Omni-4000ST User’s Manual Chapter 3 TOTAL MODE 3 TOTAL MODE CONTENTS 3.1 3.2 3.3 3.4 Omni-4000ST User’s Manual TOTAL MENU................................................................ 3-2 DAILY / ACCUMULATED TOTAL ................................ 3-3 HOURLY + TRAY TOTALS .......................................... 3-9 TOTAL CLEAR ........................................................... 3-15 page 3-1 Chapter 3 TOTAL MODE 3.1 TOTAL MENU Returns to Main Menu screen. 1. Lightly press the touch panel with your finger. Pressing the panel using pointed objects such as fingernails or mechanical pencils may damage the touch panel. Press the [MENU] button. 2. Main Menu screen is displayed. Press the [TOTALS] button. If a password has been set for entering Total Mode, press the [TOTALS] button after password entry (6 digits). 3. page 3-2 Make sure that the initial screen is displayed. Total Menu screen is displayed. Omni-4000ST User’s Manual Chapter 3 TOTAL MODE 3.2 DAILY / ACCUMULATED TOTAL This section explains about how to obtain various daily and accumulated totals in this machine. 3.2.1 GRAND TOTAL 1. Press the [DAILY TOTAL] or [ACCUMULATED TOTAL] button on the Total Menu screen. 2. Daily Total Menu screen is displayed. Lightly press the touch panel with your finger. Pressing the panel using pointed objects such as fingernails or mechanical pencils may damage the touch panel. Press the [Daily Grand Total] button to select the desired report type. The Daily Grand Total screen is displayed. Omni-4000ST User’s Manual page 3-3 Chapter 3 TOTAL MODE 3.2.2 SALES TOTAL PER DEPARTMENT 1. Press the [DAILY TOTAL] or [ACCUMULATED TOTAL] button on the Total Menu screen. 2. Daily Total Menu screen is displayed. Lightly press the touch panel with your finger. Pressing the panel using pointed objects such as fingernails or mechanical pencils may damage the touch panel. Press the [Sales per Department] button to select the desired report type. The Sales per Department Total screen is displayed. page 3-4 Omni-4000ST User’s Manual Chapter 3 TOTAL MODE 3.2.3 SALES BY PLUS 1. Press the [DAILY TOTAL] or [ACCUMULATED TOTAL] button on the Total Menu screen. 2. Daily Total Menu screen is displayed. Lightly press the touch panel with your finger. Pressing the panel using pointed objects such as fingernails or mechanical pencils may damage the touch panel. Press the [Sales by PLU] button to select the desired report type. The Sales by PLU Total screen is displayed. Omni-4000ST User’s Manual page 3-5 Chapter 3 TOTAL MODE 3.2.4 ANALYSIS BY PLUS 1. Press the [DAILY TOTAL] or [ACCUMULATED TOTAL] button on the Total Menu screen. 2. Daily Total Menu screen is displayed. Lightly press the touch panel with your finger. Pressing the panel using pointed objects such as fingernails or mechanical pencils may damage the touch panel. Press the [Analysis by PLU] button to select the desired report type. 3. Analysis By PLU screen is displayed. Set the number of items to be displayed by pressing [SET] in the Enter Report Size field after numeric entry. Note: Enter “0” to display all items and totalize them. page 3-6 Omni-4000ST User’s Manual Chapter 3 TOTAL MODE 4. Press one of the following buttons in the “Classified” field to make a selection. Displays and totalizes data for all PLUs. Displays and totalizes PLU data for each department. Displays and totalizes PLU data for each group. 5. Press one of the following buttons in the “Analysis Type” field to make a selection. Displays and totalizes data in PLU number order. Displays and totalizes data in price descending order. Displays and totalizes data in weight descending order. Displays and totalizes data in quantity descending order. Displays and totalizes data in price ascending order. Displays and totalizes data in weight ascending order. Displays and totalizes data in quantity ascending order. 6. Press the [DETAIL] button on the screen. The display changes to the Analysis By PLU screen. Omni-4000ST User’s Manual page 3-7 Chapter 3 TOTAL MODE Æ Returns to Daily Total Menu screen. Æ 805 1 2 3 4 5 6 7 8 GROUND BEEF GROUND BEEF SPECIAL TEXAS GROUND BEEF OREGON GROUND BEEF CALIFORNIA GROUND BEEF UTAH GROUND BEEF SLICE BEEF SLICE BEEF SPECIAL 9 SLICE TEXAS BEEF 10 SLICE OREGON BEEF Returns to the previous screen 185.497 3561.52 11 6 14 2 8 4 28 7 3.410 1.950 3.000 0.503 0.900 0.600 5.740 2.800 120.47 87.75 84.00 24.14 35.10 25.20 200.90 67.20 20 12 6.110 3.604 183.30 108.12 Moves the cursor up and down. Turns over the screen. Changes the screen for each classification type set on the Analysis BY PLU screen. This is not usable when the classification type is set as “No Analysis”. page 3-8 Omni-4000ST User’s Manual Chapter 3 TOTAL MODE 3.3 HOURLY + TRAY TOTALS This section explains about how to obtain hourly and tray totals in this machine. Omni-4000ST User’s Manual page 3-9 Chapter 3 TOTAL MODE 3.3.1 HOURLY TOTALS HOURLY TOTALS 748 955.120 28 39 55 50 64 78 123 131 92 88 Returns to Operation Analysis Menu screen. 2397.29 3.8 5.2 7.3 6.7 8.6 10.4 16.5 17.5 12.3 11.7 Moves the cursor up and down. Turns over the screen. Displays the hourly totals in relation to the PLU quantities or prices. 1. Press the [HOURLY + TRAY TOTALS] button on the Total Menu screen. 2. The Hourly + Tray Totals screen is displayed. Lightly press the touch panel with your finger. Pressing the panel using pointed objects such as fingernails or mechanical pencils may damage the touch panel. Press the [HOURLY TOTALS] button on the screen. 3. Totals for each time zone screen are displayed. 64 78 123 131 92 88 8.6 10.4 16.5 17.5 12.3 11.7 Select the type of data to be analyzed. page 3-10 Omni-4000ST User’s Manual Chapter 3 TOTAL MODE 3.3.2 HOURLY PLU TOTALS H O U R LY P L U T O TA L S GROUND BEEF 165 55.120 0 0 0.0 0.0 8 4.8 12 7.3 6 3.6 11 6.6 23 31 13.9 18.7 48 26 29.0 15.7 397.29 Moves the cursor up and down. Turns over screen. Displays the hourly totals in relation to the PLU quantities or prices. 1. Press the [HOURLY + TRAY TOTALS] button on the Total Menu screen. 2. Press the [HOURLY PLU TOTALS] on the screen. 3. The Hourly PLU Totals screen is displayed. Lightly press the touch panel with your finger. Pressing the panel using pointed objects such as fingernails or mechanical pencils may damage the touch panel. H O U R LY P L U T O TA L S 0 0 Call the desired PLU by pressing the [PLU] stroke key after numeric entry. Omni-4000ST User’s Manual 0.000 0 0 0 0.0 0.0 0.0 0 0.0 0 0.0 0 0.0 0 0 0.0 0.0 0 0 0.0 0.0 0.00 page 3-11 Chapter 3 TOTAL MODE 4. Totals for each time zone screen are displayed. H O U R LY P L U T O TA L S GROUND BEEF 165 Select the type of data to be analyzed. page 3-12 55.120 0 0 0.0 0.0 8 4.8 12 7.3 6 397.29 3.6 11 6.6 23 31 13.9 18.7 48 26 29.0 15.7 Omni-4000ST User’s Manual Chapter 3 TOTAL MODE 3.3.3 HOURLY WRAP TOTALS 1. Press the [HOURLY + TRAY TOTALS] button on the Total Menu screen. 2. The Hourly + Tray Totals screen is displayed. Press the [HOURLY WRAP TOTALS] button to make a selection. Totals for each time zone screen are displayed. Omni-4000ST User’s Manual page 3-13 Chapter 3 TOTAL MODE 3.3.4 WRAP TOTALS BY TRAY 1. 2. Press the [HOURLY + TRAY TOTALS] button on the Total Menu screen. The Hourly + Tray Totals screen is displayed. Press the [WRAP TOTALS BY TRAY] button to make a selection. Wrap Totals by Tray are displayed. page 3-14 Omni-4000ST User’s Manual Chapter 3 TOTAL MODE 3.4 TOTAL CLEAR Returns to Total Menu screen. Displays Total Clear screen. Executes total clear. 1. Press the [TOTAL CLEAR] button on the Total Menu screen. 2. The Total Clear screen is displayed. Select the item from the accumulated totals. Press the desired button to make a selection of the items to be deleted among [DAILY] [TOTAL] [TIME ZONE] [TRAY TOTAL] and [PERIOD]. 3. Press the [EXECUTE] button to clear the selected total. Delete confirmation screen is displayed. Press [EXECUTE] to clear the selected items. Omni-4000ST User’s Manual page 3-15 Chapter 3 TOTAL MODE page 3-16 Omni-4000ST User’s Manual Chapter 4 PROGRAMMING MODE 4 PROGRAMMING MODE CONTENTS 4.1 4.2 4.3 4.4 4.5 4.6 4.7 4.8 4.9 4.10 4.11 4.12 Omni-4000ST User’s Manual PROGRAMMING MODE............................................. 4-2 PLU FILE REGISTRATION ........................................ 4-3 PLU NAME REGISTRATION.................................... 4-15 EXTRA MESSAGE REGISTRATION ....................... 4-17 POP MESSAGE REGISTRATION ............................ 4-19 COUPON MESSAGE REGISTRATION.................... 4-21 STORE NAME/ADDRESS REGISTRATION ............ 4-23 TRAY MESSAGE REGISTRATION.......................... 4-26 DEPARTMENT NAME REGISTRATION .................. 4-32 CATEGORY PRESET REGISTRATION................... 4-34 PLU PRESET REGISTRATION ................................ 4-36 TEXT EDITING.......................................................... 4-37 page 4-1 Chapter 4 PROGRAMMING MODE 4.1 PROGRAMMING MODE Displays Registration Menu 1/2 screen. Returns to Main Menu screen. Turns over the screen. REGISTRATION ITEMS Registration Items Contents PLU FILE/ PRICE CHANGE The PLU name and its relative data (unit price, fixed price, tare weight, register code, POP number, etc.) can be registered. PLU NAME The PLU name can be registered. EXTRA MESSAGE 1 The extra message 1 can be registered. POP MESSAGE The POP message can be registered. COUPON MSG The coupon message can be registered. EXTRA MESSAGE 2 The extra message 2 can be registered. EXTRA MESSAGE 3 The extra message 3 can be registered. STORE NAME The store name and address can be registered. TRAY MESSAGE The tray data such as name, size, and weight can be registered. DEPARTMENT The department name can be registered. GROUP The group name can be registered. PRESET KEYS The PLU data can be allocated to the memory preset key CATEGORY PRESET The PLU data indexed and linked to the category preset can be registered. page 4-2 Omni-4000ST User’s Manual Chapter 4 PROGRAMMING MODE 4.2 PLU FILE REGISTRATION PLU name and its relative data (unit price, fixed price, tare weight, register code, POP number, etc.) can be registered. Register the PLU data after selecting the PLU field listed on the screen. Returns to Registration Menu screen. Turns back the screen. Moves the cursor up and down. Turns over the screen. Displays PLU Data Registration screen. Deletes the selected data. Omni-4000ST User’s Manual page 4-3 Chapter 4 PROGRAMMING MODE 1. Press the [PLU FILE/PRICE CHANGE] button. 2. The PLU File Registration screen is displayed. Press the desired PLU filed to make a selection. Or, enter the desired PLU number (1 - 999999) using the numeric keys, and press the [PLU] stroke key. page 4-4 3. Press the [DETAIL] button on the screen. 4. PLU Data Registration 1/3 screen is displayed. Omni-4000ST User’s Manual Chapter 4 PROGRAMMING MODE 4.2.1 PLU DATA REGISTRATION 1/3 SCREEN Displays the called PLU name. Also, changes to the next registered PLU name when directly pressed. The text edit screen is displayed. Saves the PLU data and returns to the previous screen. Turns over the screen. Deletes the called PLU data. REGISTRATION METHOD The table below is the summarized registration examples. Select necessary items and make necessary registrations. Omni-4000ST User’s Manual page 4-5 Chapter 4 page 4-6 PROGRAMMING MODE Omni-4000ST User’s Manual Chapter 4 PROGRAMMING MODE Omni-4000ST User’s Manual page 4-7 Chapter 4 page 4-8 PROGRAMMING MODE Omni-4000ST User’s Manual Chapter 4 PROGRAMMING MODE 4.2.2 PLU DATA REGISTRATION 2/ 3 SCREEN Saves the PLU data and returns to the previous screen. Turns over the screen. REGISTRATION METHOD The table below is the summarized registration examples. Select necessary items and make necessary registrations. Omni-4000ST User’s Manual page 4-9 Chapter 4 page 4-10 PROGRAMMING MODE Omni-4000ST User’s Manual Chapter 4 PROGRAMMING MODE Omni-4000ST User’s Manual page 4-11 Chapter 4 PROGRAMMING MODE 4.2.3 PLU DATA REGISTRATION 3/3 SCREEN Saves the PLU data and returns to the previous screen. Turns over the screen. REGISTRATION METHOD The table below is the summarized registration examples. Select necessary items and make necessary registrations. page 4-12 Omni-4000ST User’s Manual Chapter 4 PROGRAMMING MODE Omni-4000ST User’s Manual page 4-13 Chapter 4 page 4-14 PROGRAMMING MODE Omni-4000ST User’s Manual Chapter 4 PROGRAMMING MODE 4.3 PLU NAME REGISTRATION A PLU name can be easily registered simply by pressing the [PLU NAME] button on the Registration Menu screen. Register the PLU name after calling the desired PLU. 1. Press [PLU NAME] on the Registration Menu screen. 2. Text edit screen is displayed. Specify the desired PLU. EXAMPLE PLU No. "1" Omni-4000ST User’s Manual page 4-15 Chapter 4 PROGRAMMING MODE 3. For character entry, refer to section 4.12 “Text Editing”. The called PLU name is displayed. Enter the desired text using the keyboard on the screen. 4. Press the [FIX] button to confirm the text image. 5. Press the [RETURN] button on the screen. Save confirmation screen is displayed. GROUND BEEF 000 001 2046 D BEEF Press the [EXECUTE] button to save the data. page 4-16 Omni-4000ST User’s Manual Chapter 4 PROGRAMMING MODE 4.4 EXTRA MESSAGE REGISTRATION Various messages can be registered in each extra message file. Register the desired message after selecting the desired message number (1 – 999999). 1. 2. Press the [EXTRA MESSAGE] button on the Registration Menu screen. Extra Message Registration screen is displayed. Press the desired message field on the screen to make a selection. Or, enter the message number (1 - 999999) and press the [PLU] stroke key. EXAMPLE Message No. "1" 3. Press the [EDIT] button.. 94% 4. For character entry, refer to section 4.12 “Text Editing”. Text edit screen is displayed. Enter the desired text using the keyboard on the screen. 000 001 2046 Omni-4000ST User’s Manual page 4-17 Chapter 4 PROGRAMMING MODE 5. Press the [FIX] button to confirm the text image. 6. Press the [RETURN] button on the screen. Save confirmation screen is displayed. Press the [EXECUTE] button to save the data. page 4-18 Omni-4000ST User’s Manual Chapter 4 PROGRAMMING MODE 4.5 POP MESSAGE REGISTRATION Various messages can be registered in the POP message file. Register the desired message after selecting the desired message number (1 – 999). 1. Press the [POP MESSAGE] button on the Registration Menu screen. 2. POP Registration screen is displayed. Press the desired message field on the screen to make a selection. Or, enter the message number (1 - 999) and press the [PLU] stroke key. EXAMPLE Message No. "1" 3. Press the [EDIT] button. 94% 4. For character entry, refer to section 4.12 “Text Editing”. Text edit screen is displayed. Enter the desired text using the keyboard on the screen. 001 000 001 078 Omni-4000ST User’s Manual page 4-19 Chapter 4 PROGRAMMING MODE 5. Press the [FIX] button to confirm the text image. 6. Press the [RETURN] button on the screen. Save confirmation screen is displayed. Press the [EXECUTE] button to save the data. page 4-20 Omni-4000ST User’s Manual Chapter 4 PROGRAMMING MODE 4.6 COUPON MESSAGE REGISTRATION Various messages can be registered in the coupon message file. Register the desired message after selecting the desired message number (1 – 999999). 1. 2. Press the [COUPON MESSAGE] button on the Registration Menu screen. Coupon Message Registration screen is displayed. Press the desired message field on the screen to make a selection. Or, enter the message number (1 - 999999) and press the [PLU] stroke key. EXAMPLE Message No. "1" 3. Press the [EDIT] button. 94% 4. For character entry, refer to section 4.12 “Text Editing”. Text edit screen is displayed. Enter the desired text using the keyboard on the screen. 000001 000 001 1022 Omni-4000ST User’s Manual page 4-21 Chapter 4 PROGRAMMING MODE 5. Press the [FIX] button to confirm the text image. 6. Press the [RETURN] button on the screen. Save confirmation screen is displayed. Press the [EXECUTE] button to save the data. page 4-22 Omni-4000ST User’s Manual Chapter 4 PROGRAMMING MODE 4.7 STORE NAME/ADDRESS REGISTRATION Various store names and addresses can be registered in the store name/address file. Register the desired name and address after selecting the desired store number (1 – 9999). Returns to Registration Menu screen. 9999 NAME ISHIDA 1 ADDRESS Selects the store data back and forth. SHIGA Displays the text edit screen. 94% 1/1 1. Press the [STORE NAME] button on the Registration Menu screen. 2. Store Name/Address Registration screen for Store No.9999 is displayed. Select “9999” for your own store. For character entry, refer to section 4.12 “Text Editing”. 9999 NAME The [NAME] field is automatically selected first. When selecting a store number other than “9999”, press [ ] [ ] to find the desired number, or enter the store number (1 - 9999) and press the [PLU] stroke key. SUPER ISHIDA ADDRESS KYOTO 1/1 94% EXAMPLE Store No. "1" Omni-4000ST User’s Manual page 4-23 Chapter 4 PROGRAMMING MODE 3. Text edit screen is displayed for name registration. Enter the desired text using the keyboard on the screen. 0001 000 001 096 4. Press the [FIX] button to confirm the text image. 5. Press the [RETURN] button on the screen. Save confirmation screen is displayed. Press the [EXECUTE] button to save the data. 6. Press the [ADDRESS] field to make a selection, and press the [EDIT] button on the screen. 9999 NAME HYPER ISHIDA ADDRESS 1 1/2 page 4-24 94% 2 Omni-4000ST User’s Manual Chapter 4 PROGRAMMING MODE 7. Text edit screen is displayed for address registration. Enter the desired text using the keyboard on the screen. 0001 000 001 096 8. Press the [FIX] button to confirm the text image. 9. Press the [RETURN] button on the screen. Save confirmation screen is displayed. Press the [EXECUTE] button to save the data. 10. Registered name and address appear on the screen. 9999 NAME HYPER ISHIDA ADDRESS SHIGA 1/2 Omni-4000ST User’s Manual 94% page 4-25 Chapter 4 PROGRAMMING MODE 4.8 TRAY MESSAGE REGISTRATION Tray names can be registered. Moreover, the size, name and other conditions of a tray can be registered. Tray Program screen includes 1/2 screen on which wrapping conditions can be registered and 2/2 screen on which labeling position can be registered. 4.8.1 TRAY PROGRAM 1/2 SCREEN Returns to Registration Menu screen. Turns over the next screen. Returns the wrapper and applicator to their original position. Performs the film setting operation. Performs the film feeding. Displays the tray list. Deletes the called tray data. 1. Press the [TRAY MESSAGE] button on the Registration Menu screen. 2. Tray Program 1/2 screen is displayed. Enter the desired tray number (1- 9999) using the numeric keys, and press the [PLU] stroke key. EXAMPLE Tray No. "4" page 4-26 Omni-4000ST User’s Manual Chapter 4 PROGRAMMING MODE 3. Measure the tray size and enter each value by pressing the corresponding field after numeric entry. 4. Select and press the desired film to be used. 5. Place a tray on the weigh platter in the middle of the weigh platter. 6. Press the [PLU] stroke key. The wrapper automatically starts as soon as the tray is placed on the weigh platter. The wrapping operation starts and the wrapped tray will be discharged. The weighing area can be used as the scale when [WEIGHT] is pressed. Press [WEIGHT] again to release this function after weighing. 7. Measure the tray and the film and enter each value. 8. Check the finished wrapping condition. Change the film tension and length if necessary. Omni-4000ST User’s Manual page 4-27 Chapter 4 PROGRAMMING MODE 4.8.2 TRAY NAME REGISTRATION Up to 10 characters can be registered for each tray name. 1. Press the [EDIT] button on the Tray Program screen. 2. Text edit screen is displayed. Enter the tray name using the keyboard on the screen. For character entry, refer to section 4.12 “Text Editing”. 3. Press the [RETURN] button on the screen. Save confirmation screen is displayed. Press the [EXECUTE] button to save the data. page 4-28 Omni-4000ST User’s Manual Chapter 4 PROGRAMMING MODE 4.8.3 TRAY PROGRAM 2/2 SCREEN The machine can memorize the label pasting position for each tray either in horizontal or vertical direction. 1. Press the [PAGE] button. 2. Tray Program 2/2 (Label) screen is displayed. Omni-4000ST User’s Manual page 4-29 Chapter 4 PROGRAMMING MODE 3. Enter a numeric value (1 – 4) for horizontal labeling position, and press the [SET] button in Label Position (Horizontal) field. 4. Label pasting test starts as soon as a tray is placed on the weigh platter. The tray is discharged when the [PLU] stroke key is pressed. 5. Adjust the labeling position based on the position where the label was pasted. (1) Press the [POSITION ADJUST] button of the set labeling position number. Labeling Position Adjustment screen is displayed. (2) Correct the labeling position. Items Right and left labeling position Operation Adjust right and left labeling position. The position can be moved in 1mm increments. Upper and under label application positions Adjust top and bottom labeling position. The position can be moved in 1mm increments. Rotation angle Change the labeling angle by pressing [+] and [-]. The angle can be set to 0°, 90° and - 90°. When the option printer is used, the angle can be changed in 15° increments. (3) Press [RETURN] to return to the Tray Program screen. page 4-30 Omni-4000ST User’s Manual Chapter 4 PROGRAMMING MODE 6. Enter a numeric value (5 – 8) and press [SET] in the Label Position (Vertical) field. Decide the labeling position in the same procedure. 7. Finally, decide the standard labeling position. Omni-4000ST User’s Manual page 4-31 Chapter 4 PROGRAMMING MODE 4.9 DEPARTMENT NAME REGISTRATION Department names can be registered. 1. Press the [DEPARTMENT] button on the Registration Menu screen. 2. The Department Name registration screen is displayed. 3. Press the desired department filed to make a selection when changing the text. The procedure for group name registration is same as the one for department name registration. Or enter the desired department number (1 - 9999), and press the [PLU] stroke key. Example Department No. "2" 4. page 4-32 Press the [EDIT] button on the screen when changing or creating the selected department name data. Omni-4000ST User’s Manual Chapter 4 PROGRAMMING MODE 5. For character entry, refer to section 4.12 “Text Editing”. Text edit screen is displayed. Enter the department name using the keyboard on the screen. 6. Press the [RETURN] button on the screen. Press the [EXECUTE] button to save the data. Omni-4000ST User’s Manual page 4-33 Chapter 4 PROGRAMMING MODE 4.10 CATEGORY PRESET REGISTRATION Returns to Registration Menu screen. PLU data list to be registered to the index is displayed. (Refer to section 4.10.2 “Registering Category Preset Keys from PLU List”.) Displays the index title registration screen. Deletes all the data in the selected index number 1. 2. Press the [CATEGORY PRESET] button on the Registration Menu screen. Category Preset Registration screen is displayed. Select the index to register. page 4-34 Omni-4000ST User’s Manual Chapter 4 PROGRAMMING MODE 3. Press the [List Registration] on the screen. 4. The PLU Preset Registration screen is displayed. PLU preset registration can also be performed by pressing the preset key after numeric entry. Select the PLU to allocate from the list. Specify the PLU to allocate with the cursor and press the allocation position key of the preset keyboard. Omni-4000ST User’s Manual page 4-35 Chapter 4 PROGRAMMING MODE 4.11 PLU PRESET REGISTRATION Register the commodity to PLU preset key used for the commodity call. Returns to Registration Menu screen. Turns over the previous screen. Moves the cursor up. Moves the cursor down. Turns over the next screen. PLU preset registration can also be performed by pressing the preset key after numeric entry. 1. Press the [PRESET KEYS] button on the Registration Menu screen. 2. The Memo Preset Registration screen is displayed. Select the PLU to allocate from the list. Specify the PLU to allocate with the cursor and press the allocation position key of the preset keyboard. page 4-36 Omni-4000ST User’s Manual Chapter 4 PROGRAMMING MODE 4.12 TEXT EDITING 4.12.1 KEY FUNCTIONS Key Function Used to select either for inserting a character or selecting the characters on the text display field. Touching this key changes the key display in the following order. / Used to select either black or red characters. Touching this key changes the key display in the following order. / Note: Available only when two-color print specification is used. / / / / / Used to emphasize the characters. Touching this key changes the key display in the following order. Used to emphasize the characters. This key is effective only when the two thermal heads are used. Touching this key changes the key display in the following order. Used to delete a character at the position where the cursor is positioned. Used to delete a character by moving the cursor back. Used to select the entered characters for editing the text. Also used to move the cursor left or right. Omni-4000ST User’s Manual page 4-37 Chapter 4 PROGRAMMING MODE Used to move the character line up or down. Used to finish the text edit screen. Used to copy the original file data to the destination file data. Used to confirm the edited text image on the text display field. Used to erase the entire text on the text display field. Used to perform carriage return. / Used to select either lower-case or upper-case characters. SHIFT ON: Lower-case characters SHIFT OFF: Upper-case characters Touching this key changes the key display in the following order. 4.12.2 SHIFT ON /OFF The [SHIFT ON] or [SHIFT OFF] button is used to select either lower-case or upper-case character. Shift OFF (Upper-case character) page 4-38 Shift ON (Lower-case character) Omni-4000ST User’s Manual Chapter 4 PROGRAMMING MODE 4.12.3 TEXT EDITING EXAMPLE Text editing procedure is explained by quoting the following PLU name edit screen as an example. 1. To erase the entire text displayed on the text display field, touch [ERASE] on the screen. Confirm that the text edit screen is displayed. Then, enter the desired PLU number and press the PLU key on the operating console. Example PLU No.5 2. Text edit screen for the PLU number “5” is called. Enter the desired characters. Example “Roast Fillet Steak” Edit the text as necessary. 3. When the text editing is completed, touch [FIX] to confirm the edited text image on the text display field. Then, touch [RETURN] to finish the text editing. Omni-4000ST User’s Manual page 4-39 Chapter 4 PROGRAMMING MODE 4. The confirmation screen appears on the display for saving. Then, touch [EXECUTE] to save the text. page 4-40 Omni-4000ST User’s Manual Chapter 4 PROGRAMMING MODE 4.12.4 EMPHASIZING CHARACTERS [STYLE 1] and [STYLE 2] keys are used to emphasize the characters. Touching this key changes the key display in the following order. Touching this key changes the key display in the following order. The following procedure explains how to emphasize characters. EMPHASIZING CHARACTERS FIRST 1. “Style 2” function is available only when two color thermal heads are used. Touch to select one of the “Style 1” functions. or or or or Example “Reverse” Touch [STYLE 1] repeatedly until [REVERSE] appears on the key display. 2. Enter the desired characters. Example “Roast Fillet Steak” Touch [FIX] to confirm the edited text image on the display. Omni-4000ST User’s Manual page 4-41 Chapter 4 PROGRAMMING MODE EMPHASIZING CHARACTERS LATER 1. Confirm that the existing text is displayed on the text display field. Otherwise, enter the desired characters. Example “Roast Fillet Steak” 2. Confirm that [SELECT] is selected on the screen. If not selected, touch [INSERT] to change the key display to [SELECT]. 3. Select [REVERSE] by touching [STYLE 1] repeatedly. Example “Reverse” 4. page 4-42 Use [←] and [→] keys to select the characters to be emphasized. Omni-4000ST User’s Manual Chapter 4 PROGRAMMING MODE 4.12.5 ERASING ENTIRE TEXT The following procedure is used to delete the entire text displayed on the text display field. 1. Confirm that the existing text is displayed on the text display field. Example “Roast Fillet Steak” 2. Touch [ERASE] on the screen to delete the entire text. 4.12.6 BACK SPACING The following procedure is used to move the cursor back, and delete a character if any. 1. If you have misspelled, press [BACK SPACE] on the screen to delete the character that has been lastly entered. Example “Roast Fillet Steal” Omni-4000ST User’s Manual page 4-43 Chapter 4 PROGRAMMING MODE 4.12.7 DELETING CHARACTERS The following procedure is used to delete a character at the position where the cursor is placed. 1. The displayed text is misspelled. Example “Roast Fillet Steak” 2. Place the cursor at the character to be deleted. Then, touch [DELETE] on the screen to delete the character. page 4-44 Omni-4000ST User’s Manual Chapter 4 PROGRAMMING MODE 4.12.8 INSERTING CHARACTER The following procedure is used to insert a character next to the right where the cursor is placed. 1. The displayed text is misspelled. Example “Roast Filet Steak” 2. Confirm that [INSERT] is selected on the screen. When not selected, touch [SELECT] to change the key display to [INSERT]. 3. Move the cursor to the position where the character to be inserted. Then, enter the character “L”. Omni-4000ST User’s Manual page 4-45 Chapter 4 PROGRAMMING MODE 4.12.9 COPYING ORIGINAL TEXT TO DESIGNATED FIELD The following procedure is used to copy the original text to the text field of the designated file. EXAMPLE Copy the text “Roast Fillet Steak” of the PLU No.5 to the PLU No.25. 1. Confirm that the INPUT field is selected (yellow). If not, touch the INPUT field first to declare that the numeric entry will be made. Then, enter the desired PLU number and press the PLU key on the operating console to designate the PLU file to which the original text is copied. 2. Enter the original PLU number using the numeric keys, and touch [COPY] on the screen. 3. The copy confirmation screen appears on the display. Then, touch [EXECUTE] to copy the original text to the text field of the designated file. page 4-46 Omni-4000ST User’s Manual Chapter 4 PROGRAMMING MODE 4. The text “Roast Fillet Steak” of the PLU No.5 is copied to the text display field of the PLU No.25. Omni-4000ST User’s Manual page 4-47 Chapter 4 page 4-48 PROGRAMMING MODE Omni-4000ST User’s Manual Chapter 5 SETUP MODE 5 SETUP MODE CONTENTS 5.1 5.2 5.3 5.4 5.5 5.6 5.7 Omni-4000ST User’s Manual STARTING PROCEDURE............................................. 5-2 SETUP MENU ............................................................... 5-3 EXPIRY DATE SETTING............................................... 5-4 PASSWORD SETTING ................................................. 5-6 WORD-WRAP WIDTH SETTING .................................. 5-7 REFERENCE DATA SETUP ......................................... 5-8 TOTAL ADD SETTING .................................................5-11 page 5-1 Chapter 5 SETUP MODE 5.1 STARTING PROCEDURE 1. Turn ON the Main Power Switch. 2. Press the [RETURN] button on the Check of Return Operation screen. 3. Wait until the initial screen appears. Press the [MENU] button. 4. Main Menu screen is displayed. Press the [SETUP] button. 5. page 5-2 Setup Menu screen is displayed. Set u p M e n u Sc re en ( 1/ 2) Omni-4000ST User’s Manual Chapter 5 SETUP MODE 5.2 SETUP MENU Changes to the first screen of the Setup Menu. Set u p M e nu Sc re en ( 1/ 2) Turns over the screen. Setup Menu Screen Display Fields Expiry Date Set Password Set Word-wrap Set Reference Data Set Totals Set Omni-4000ST User’s Manual Function Changes to the Expiry Date Setting screen. Switching days for expiry date and text for each field can be set. Changes to the Password Setting screen. Each password can be set for entering Registration, Setup, Total, and Subtraction modes. Changes to the Word-wrap Width Setting screen. Word-wrap related data can be set. Changes to the Reference Data Setup screen. Reference data can be set for a PLU in which “Refer” is selected in PLU registration. Changes to the Total Add Setting screen. • Set whether or not to add the data to totals. • Set a maximum of 20 target PLUs to be added to hourly totals. • Set the weight data type (fixed weight, actual weight) when a fixed price PLU is added to totals. page 5-3 Chapter 5 SETUP MODE 5.3 EXPIRY DATE SETTING Changes to the first screen of the Setup Menu. Expiry Date Setting Screen Text Edit Screen page 5-4 Omni-4000ST User’s Manual Chapter 5 SETUP MODE Display Fields Switch Days Before Switch After Switch Pack Date Omni-4000ST User’s Manual Function Press the [SET] button after numeric entry to set the entered data as switching days. When the expiry days are same as or before the “Switch Days”, the text in the “Before Switch” field is printed. When “0” is set in this field, switching does not happen and the text in the “Before Switch” field is printed. Select the “Before Switch” field. Press the [EDIT] button to display the text edit screen. Select the “After Switch” field. Press the [EDIT] button to display the text edit screen. Select the “Pack Date” field. Press the [EDIT] button to display the text edit screen. page 5-5 Chapter 5 SETUP MODE 5.4 PASSWORD SETTING Changes to the first screen of the Setup Menu. Password Setting Screen Display field Password Mode Selection Buttons page 5-6 Function Set the password data by pressing this button after 6-gigit numeric entry. Enter “000000” and press this button to cancel the password. Press the desired button(s) to select the mode that requires password entry. Omni-4000ST User’s Manual Chapter 5 SETUP MODE 5.5 WORD-WRAP WIDTH SETTING Changes to the first screen of the Setup Menu. Word-wrap Width Setting Screen Display Fields PLU Name Extra Message Width Extra Message Pitch Omni-4000ST User’s Manual Function Enter a numeric value (1-9999) and press the [SET] button to set the value (unit: 0.1mm) as a word-wrap width value. Enter a numeric value (1-9999) and press the [SET] button to set the value (unit: 0.1mm) as a word-wrap width value. Enter a numeric value (1-99) and press the [SET] button to set the value (unit: 0.1mm) as a gap between characters. page 5-7 Chapter 5 SETUP MODE 5.6 REFERENCE DATA SETUP Determines the settings and returns to the first screen of the Setup Menu. Turns over the screen. Reference Data Setup 1/2 Screen Reference Data Setup 2/2 Screen page 5-8 Omni-4000ST User’s Manual Chapter 5 SETUP MODE Display Fields Pack Date Print Sell By Date Print Shelf Life (days) Use By Date Print Use By Date (days) Pack Time Print Pack Time Flag Sell By Time Print Sell By Time Flag Unit Type Open Price Select Standard Tare Omni-4000ST User’s Manual Function Press “YES” or “NO” to set whether or not to print the Pack Date. This setting is effective only when “REFFER" is specified by the Pack Date Print setting in PLU registration. Press “YES” or “NO” to set whether or not to print the Sell By Date. This setting is effective only when “REFFER" is specified by the Sell By Date Print setting in PLU registration. Set the number of days for the Shelf Life Date. This setting is effective only when “REFFER" is specified by the Shelf Life Date Print setting in PLU registration. Press “YES” or “NO” to set whether or not to print the Use By Date. This setting is effective only when “REFFER" is specified by the Use By Date Print setting in PLU registration. Set the number of days for the Use By Date. This setting is effective only when “REFFER" is specified by the Use By Date print setting in PLU registration. Press “YES” or “NO” to set whether or not to print the Pack Time. This setting is effective only when “REFFER" is specified by the Pack Time Print setting in PLU registration. Specify the pack time to be used. Clock: Use the system clock. Designated: Use the time designated on the following screen. Press “YES” or “NO” to set whether or not to print the Pack Time. This setting is effective only when “REFFER" is specified by the Pack Time Print setting in PLU registration. Not used. Set the unit type for a fixed price item. This setting is effective only when “REFFER" is specified by the Unit Type setting in PLU registration. Select whether or not to allow price change in Normal Mode. This setting is effective only when “REFFER" is specified by the Open Price setting in PLU registration. Set the standard tray weight. This setting is effective only when “REFFER" is specified by the Forced Tare setting in PLU registration. page 5-9 Chapter 5 SETUP MODE Display Fields Logo #1, #2, #3 Safe handling image number page 5-10 Function Set the logo number. This setting is effective only when “REFFER" is specified by the Logo setting in PLU registration. Set the safe handling image number. This setting is effective only when “REFFER" is specified by the Safe Handling Image setting in PLU registration. Omni-4000ST User’s Manual Chapter 5 SETUP MODE 5.7 TOTAL ADD SETTING Determines the settings and returns to the first screen of the Setup Menu. Displays the Time Zone Set For Individual PLU screen. Total Add Setting Screen Determines the settings and returns to the Total Add Setting Screen. Clears the existing Daily PLU Time Zone Total. Cancels the settings and returns to the Total Add Setting Screen. Add a commodity to target commodities by pressing this button after selecting the desired PLU or entering the PLU number. Time Zone Set for Individual PLU Screen Omni-4000ST User’s Manual Delete a commodity from target commodities by pressing this button after selecting the PLU to be deleted. page 5-11 Chapter 5 SETUP MODE Display Fields Daily Total Accumulative Total Time Zone Total Tray Total Daily Total Auto Clear Fixed Price PLU Weight Addition Mode page 5-12 Function Select whether or not to add the data to Daily Total. This is not displayed at a slave machine in master/slave specification. Select whether or not to add the data to Accumulative Total. This is not displayed at a slave machine in master/slave specification. Select whether or not to add the data to Time Zone Total. This is not displayed at a slave machine in master/slave specification. Select whether or not to add the data to Tray Total. This is not displayed at a slave machine in master/slave specification. Select whether or not to clear Daily Total when turning off the machine. This is not displayed at a slave machine in master/slave specification. Select to add either “Fixed Weight” or “Real Weight” to the fixed price total. Omni-4000ST User’s Manual Design and specifications are subject to change without notice. 44 SANNO-CHO, SHOGOIN, SAKYO-KU KYOTO, 606-8392 JAPAN PHONE: 81-75-771-4141 FACSIMILE: 81-75-751-1634 URL: http://www.ishidajapan.com