1
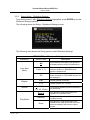
Pocket Album Deluxe OLED 2.8
2.8” Digital Photo Viewer
User’s Guide
Digital Foci, Inc. reserves the right to make improvements and/or changes to the
products and programs described in this User’s Guide at any time without notice.
Please read the entire User’s Guide before operating the device.
Digital Foci, Inc. assumes no responsibility for errors or omissions in this User’s
Guide. Nor does Digital Foci, Inc. make any commitment to update the information
contained herein.
Trademarks
Pocket Album Deluxe OLED and Digital Foci are trademarks of Digital Foci, Inc.
All names and products mentioned within this document are registered trademarks of their
respective companies.
©2008 Digital Foci, Inc. All rights reserved. This publication is intended for sole use by the
owner of the associated device. Neither this publication nor any part of this publication may
be printed and distributed, electronically distributed, reproduced, translated, or reduced to
any other electronic medium or machine readable form without the prior written permission of
Digital Foci, Inc.
Digital Foci, Inc., 3111 Via Mondo, E. Rancho Dominguez, CA 90221 USA
Limited Warranty
As the original purchaser of this product, you receive these warranties from Digital
Foci, Inc.
Your Pocket Album Deluxe OLED (hereafter referred to as “Device”) will be free
from defects in material and workmanship and will perform in substantial
compliance with your user documentation accompanying Device for one year from
the purchase date providing proper use of Device.
Your warranty rights will be honored so long as you read and follow your user
documentation for all aspects of operating Device. Any unauthorized or improper
use of Device may cause your warranty to become void.
If there is a problem or defect with your Device, please contact Digital Foci, Inc.
Disclaimer
This limited warranty is the only warranty Digital Foci, Inc. makes for Device. To the
extent allowed by Law, no other warranty applies, whether expressed, implied, or
statutory, including any warranty of merchantability, of fitness for a particular
purpose, or of non-infringement. This warranty does not cover accidental damage,
wear and tear, or consequential or incidental loss. Under no conditions is Digital
Foci, Inc. liable for loss of or damage to, a computer; nor loss of, or damage to,
programs, records, or data; nor any consequential or incidental damages, even if
Digital Foci, Inc. has been informed of their possibility.
Additional Rights
Some states or countries do not allow exclusion or limitation of incidental or
consequential damages, or limitations on the length of an implied warranty, so the
above limitations or exclusions may not apply to you. This warranty gives you
specific legal rights, and you may also have other rights which vary from state to
state or country to country.
Caring for Pocket Album Deluxe OLED 2.8
To keep Pocket Album Deluxe OLED in good condition and working properly,
follow these basic guidelines:
•
Do not drop, jar, bump, shock, or expose Pocket Album Deluxe OLED
to severe vibration.
•
Do not store or use Pocket Album Deluxe OLED in conditions where
the temperature is below -22°F (-30°C) or above 158°F (70°C).
•
To prevent risk of short circuit and damage, do not expose Pocket
Album Deluxe OLED to liquids, precipitation, or moisture.
•
For best battery life, make sure to periodically recharge your Pocket
Album Deluxe OLED to prevent the battery from becoming completely
depleted.
Pocket Album Deluxe OLED 2.8
User’s Guide
Table of Contents
1.
2.
3.
4.
5.
6.
Welcome! ....................................................................................................1
1.1.
Pocket Album Deluxe OLED 2.8 Features ......................................................1
1.2.
System Requirements for Photo Manager Software ...................................2
1.3.
Package Contents .................................................................................................2
1.4.
Device Layout ........................................................................................................3
Powering Pocket Album Deluxe OLED...............................................4
2.1.
Powering On/Off Pocket Album Deluxe OLED..............................................4
2.2.
Power Indicator LED ............................................................................................4
2.3.
Charging Pocket Album Deluxe OLED Battery .............................................4
2.4.
Battery Saving Features......................................................................................5
Setting Up Pocket Album Deluxe OLED.............................................6
3.1.
Home Screen - Main Navigation Screen .........................................................6
3.2.
Setup Options ........................................................................................................7
Viewing All Photos on Pocket Album Deluxe OLED.....................12
4.1.
Viewing Photos in Photo Thumbnail View ...................................................12
4.2.
Playing Photo Slideshow ..................................................................................12
4.3.
Changing Slideshow Options ..........................................................................13
4.4.
Scrolling Through Photos Manually ..............................................................14
4.5.
Deleting Photos ...................................................................................................15
Viewing Photos in Folder View ...........................................................16
5.1.
Viewing Photos in Folder View........................................................................16
5.2.
Viewing Different Folders .................................................................................16
5.3.
Copying and Moving Photos Between Folders ..........................................17
5.4.
Deleting Photos ...................................................................................................17
5.5.
Deleting Folder ....................................................................................................17
Displaying Calendar ..............................................................................18
6.1.
Running Photo Slideshow with Calendar.....................................................18
Page iv
Pocket Album Deluxe OLED 2.8
User’s Guide
6.2.
7.
Browsing Through Calendar............................................................................18
Adding Photos to Your Pocket Album Deluxe OLED ...................19
7.1.
About Photo Manager Software ......................................................................19
7.2.
Running Photo Manager Software on Windows.........................................20
7.3.
Running Photo Manager Software on Mac ..................................................25
8.
Frequently Asked Questions & Troubleshooting..........................30
9.
Appendix –Technical Specifications.................................................33
10. Regulatory Compliance ........................................................................34
Page v
Pocket Album Deluxe OLED 2.8
User’s Guide
1.
Welcome!
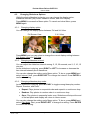
Congratulations on purchasing Pocket Album Deluxe OLED 2.8 – 2.8” digital
photo viewer.
1.1.
Pocket Album Deluxe OLED 2.8 Features
•
2.8” Active Matrix OLED screen with an astonishing contrast ratio of 10,000: 1
•
Cutting edge OLED technology provides excellent display of images with
higher brightness, better contrast, and wider viewing angles
•
Holds more than 4,000 digital photos on internal flash memory
•
Run automatic photo slideshows with adjustable time intervals or scroll photos
manually
•
Supports random playback
•
Browse your photos in Photo Thumbnail View and choose between displaying
your photos full screen view or 2 x 2 view
•
Organize your photos into 5 different folders and select specific folder to
playback
•
Built-in clock and calendar function - can have photos play in a slideshow in
the background
•
Comes with wrist strap and protective carrying case
•
Clear acrylic viewing stand included for easy desktop display
•
Photo Manager Software included for converting images from your computer
to Pocket Album Deluxe OLED (compatible with Windows Vista/XP/2000, Mac
10.5 & 10.4). The Photo Manager Software lets you crop and rotate photos
you wish to transfer, before automatically resizing them for optimal storage
and display on the device.
•
Runs on a Lithium-polymer battery with approximately 5 hours of battery life.
•
Easily recharge the battery with included AC adapter or with USB power by
connecting it to your computer.
Page 1
Version 1.1-R0
Pocket Album Deluxe OLED 2.8
User’s Guide
1.2.
System Requirements for Photo Manager Software
1. Computer running on:
o Windows Vista, XP, 2000
o Macintosh OS 10.5 & 10.4
2. One available USB Port
1.3.
Package Contents
•
Pocket Album Deluxe OLED 2.8”
•
USB cable
•
AC power adapter
•
Photo Manager Software
•
Carrying case
•
Wrist strap
•
Acrylic viewing stand
•
Quick Start Guide
Page 2
Version 1.1-R0
Pocket Album Deluxe OLED 2.8
User’s Guide
1.4.
Device Layout
Page 3
Version 1.1-R0
Pocket Album Deluxe OLED 2.8
User’s Guide
2.
Powering Pocket Album Deluxe OLED
2.1.
Powering On/Off Pocket Album Deluxe OLED
To turn on Pocket Album Deluxe OLED, press the Power Button. The Power
LED will turn green and the Digital Foci screen will appear while Pocket Album
Deluxe OLED initializes and powers on.
To turn off Pocket Album Deluxe OLED, press and hold the Power Button for 5
seconds. Pocket Album Deluxe OLED will show the message “Power Off” before
turning off.
2.2.
Power Indicator LED
The power indicator LEDs on Pocket Album Deluxe OLED indicates its power
status.
Green: Pocket Album Deluxe OLED is powered on.
Red – Flashing: Pocket Album Deluxe OLED battery is charging.
Red – Solid: Pocket Album Deluxe OLED battery has been fully charged.
2.3.
Charging Pocket Album Deluxe OLED Battery
Pocket Album Deluxe OLED has a battery life of approximately 5 hours on a full
charge. You can charge the battery either by the included AC power adapter or
by USB power from your computer.
It takes under 4 hours to fully charge Pocket Album Deluxe OLED when the
battery is completely empty. The battery will charge much more quickly when the
device is turned off. It will take longer to charge the battery if the device is on.
For best battery life, make sure to periodically recharge your Pocket Album
Deluxe OLED to prevent the battery from becoming completely depleted.
2.3.1. Charging Pocket Album Deluxe OLED by AC Adapter
Follow these instructions to charge the Pocket Album Deluxe OLED battery by
USB adapter:
3. Plug the AC power adapter into a wall outlet. The Red LED will light up,
indicating it is plugged in.
4. Connect Pocket Album Deluxe OLED to the AC adapter with the USB cable.
The Red LED on Pocket Album Deluxe OLED will be flashing, indicating that
it is charging.
5. If Pocket Album Deluxe OLED is turned on, turn it off to make the battery
charge faster.
6. With the device turned off, it takes under 4 hours to fully recharge an empty
battery. The Red LED will turn solid when the battery is fully recharged.
Page 4
Version 1.1-R0
Pocket Album Deluxe OLED 2.8
User’s Guide
2.3.2. Charging Pocket Album Deluxe OLED by USB Port
Follow these instructions to charge the Pocket Album Deluxe OLED battery by
USB power on your computer:
1. Connect Pocket Album Deluxe OLED to your computer with the USB cable.
2. Pocket Album Deluxe OLED will automatically turn on and show the “USB
Connected” message on its screen. The Red LED will be flashing to indicate
it is charging. Note that Pocket Album Deluxe OLED cannot be turned off
while it is connected to your computer.
3. It takes approximately 6 hours to fully recharge the battery by USB.
2.4.
Battery Saving Features
Pocket Album Deluxe OLED has two power saving features to conserve battery
power.
1. Screen Saver: If no button has been pressed and there is no activity for 20
minutes, the screen saver screen will be displayed. Pressing any button will
turn the screen back on. The screen saver will be disabled when the device
is running a photo slideshow.
2. Auto-off Timer: If no button has been pressed and there is no activity for 5
minutes (default setting), Pocket Album Deluxe OLED will automatically turn
off. This Auto Off feature will be temporarily disabled when the device is
connected to the computer by USB. You can adjust the Auto-off Timer (None,
5, 10, 15, and 30 minutes) to best match your needs by accessing the Setup
option. Refer to Section 3.2.4 Setup Option – System Settings for detailed
instructions.
Page 5
Version 1.1-R0
Pocket Album Deluxe OLED 2.8
User’s Guide
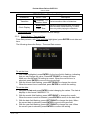
3.
Setting Up Pocket Album Deluxe OLED
3.1.
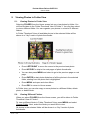
Home Screen - Main Navigation Screen
The screen below shows the Pocket Album Deluxe OLED Home screen:
From the Home screen, you can select the desired option among: Photo, Folder,
Calendar, and Setup.
Browse Mode
This option will …
Photo
View all photos on device in Photo Thumbnail View.
Folder
View photos by Folder in Folder Thumbnail View.
Calendar
Go to Calendar View.
Setup
Access Setup options.
Press HOTKEY to start playing a photo slideshow of all photos on the device
according to your slideshow settings.
Press MENU to access Device Information under Setup. This screen shows you
the number of photos on your Pocket Album Deluxe OLED in each folder, and
remaining space on the Internal Memory.
Page 6
Version 1.1-R0
Pocket Album Deluxe OLED 2.8
User’s Guide
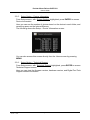
3.2.
Setup Options
From the Home screen, press RIGHT to move the cursor to SETUP. Next, press
ENTER to access Setup options.
The following screen shows the main Setup screen:
1. Press LEFT/RIGHT to move the cursor up and down.
2. Press ENTER to access the selected SETUP option.
3. To exit Setup menu, press the ESC button or select EXIT.
The following sections explain each of the Setup options and how to change the
settings.
3.2.1. Changing Values Under Setup Options
This section explains how to use the Lever Switch to change the settings.
1. Press LEFT/RIGHT to move the cursor up/down.
2. With the desired option highlighted, press ENTER to select the value for
changing. The selected value will flash, indicating that you can change the
value.
3. Press LEFT/RIGHT to change the value. When you are done, press ENTER
to confirm your setting. The highlight will return to solid instead of flashing.
4. To exit, press ESC to return to the main Setup screen.
Page 7
Version 1.1-R0
Pocket Album Deluxe OLED 2.8
User’s Guide
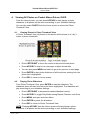
3.2.2. Setup Option - Slideshow Settings
From Setup screen, with Slideshow Settings highlighted, press ENTER to access
Slideshow Settings options.
The following shows the Setup - Slideshow Settings screen:
The following chart shows the Setup options under Slideshow Settings:
SETUP MENU – Slideshow Settings –
SUBMENU
Auto-Start
Mode
Display
Interval
SELECTION
Description
All
Automatically starts playing all photos in
a slideshow when device is powered on.
Folder 1 - 5
Automatically starts playing photos in the
selected folder in a slideshow when
device is powered on.
Off
Does not automatically start a slideshow
when powered on. The HOME screen will
be displayed.
Full
Display photos full screen.
2x2
Display photos in 2 x 2 view.
5,15, 30 sec
1, 5, 10, 15 min
Repeat
Play photos in sequential order and
repeat in a continuous loop.
Random
Play photos in random order in a
continuous loop.
Play Mode
Once
Page 8
Version 1.1-R0
Time interval between photo transitions in
the slideshow.
Play photos in sequential order once.
Slideshow will stop at the end of the last
photo and display will return to Home
screen.
Pocket Album Deluxe OLED 2.8
User’s Guide
SETUP MENU – Slideshow Settings –
SUBMENU
SELECTION
Transition
All, Effects 1 – 5,
Random, None
Clock Display
None, Both,
Date, Time
Description
Select transition effect of slideshow.
Select to hide time and date, show both
time and date, show date only, or show
time only while playing the slideshow.
* Underlined bold selections indicate the default settings.
3.2.3. Setup Option – Time and Date
From Setup screen, with Time and Date highlighted, press ENTER to set date and
time.
The following shows the Setup – Time and Date screen:
To set the time:
1. With Time highlighted, press ENTER. As the hour field is flashing, indicating
that you can change the value. Press LEFT/RIGHT to change the hour.
Make sure the AM and PM setting is correct. When the correct hour is
selected, press ENTER to move to the minute field.
2. With the minute field flashing, press LEFT/RIGHT to change the minute.
When the correct hour is selected, press ENTER to confirm the setting.
To set the date:
1. Navigate to Date and press ENTER to start changing the values. The date is
displays in this format: MM/DD/YYYY.
2. With the month field flashing, press LEFT/RIGHT to change the month.
When the correct month is selected, press ENTER to move to the date field.
3. With the date field flashing, press LEFT/RIGHT to change the date. When
the correct date is selected, press ENTER to move to the year field
4. With the year field flashing, press LEFT/RIGHT to change the year. When
the correct year is selected, press ENTER to confirm the setting.
Page 9
Version 1.1-R0
Pocket Album Deluxe OLED 2.8
User’s Guide
3.2.4. Setup Option – System Settings
From Setup screen, with System Settings highlighted, press ENTER to access
System Settings options.
Here you can set Auto-Off Timer and reset settings to default settings.
The following shows the Setup – System Settings screen:
Auto-Off Timer:
You can set the Auto-Off Timer on Pocket Album Deluxe OLED to have it
automatically turn off when no button has been pressed and there is no activity for
a certain amount of time. You can adjust the Auto-off Timer among 5, 10, 15, and
30 minutes. You can also select None to disable this feature.
Note: This Auto Off feature will be temporarily disabled when the device is
connected to the computer by USB.
Reset to Default:
Selecting this option will reset all settings to default settings and reset the time
and date.
The “Reset to Default Settings?” confirmation screen will be displayed. Select
No to cancel and select Yes to confirm.
Page 10
Version 1.1-R0
Pocket Album Deluxe OLED 2.8
User’s Guide
3.2.5. Setup Option – Device Information
From Setup screen, with System Settings highlighted, press ENTER to access
Device Information.
Here you can see the number of photos stored on the device in each folder, and
remaining space on the Internal Memory.
The following shows the Setup – Device Information screen:
You can also access this screen directly from the Home screen by pressing
MENU.
3.2.6. Setup Option – Technical Support
From Setup screen, with Technical Support highlighted, press ENTER to access
Technical Support screen.
Here you can view the firmware version, hardware version, and Digital Foci Tech
Support contact information.
Page 11
Version 1.1-R0
Pocket Album Deluxe OLED 2.8
User’s Guide
4.
Viewing All Photos on Pocket Album Deluxe OLED
From the Home screen, you can press HOTKEY to start playing a photo
slideshow of all photos on the device according to your slideshow settings.
You can also select PHOTO from the Home screen to access the Photo
Thumbnail View.
4.1.
Viewing Photos in Photo Thumbnail View
In Photo Thumbnail View, all photos on the device will be shown in a 3 by 3
matrix of photo thumbnails.
•
Press LEFT/RIGHT to move the cursor to the previous/next photo.
•
Press HOTKEY to skip to the next pages of photo thumbnails.
•
You can also press MENU and select to go to the previous or next page.
•
Press ENTER to start photo slideshow of all the photos, starting from the
photo that is highlighted.
•
Press ESC to return to Home screen.
4.2.
Playing Photo Slideshow
From Photo Thumbnail View, press ENTER to start the slideshow. The
slideshow show will start from the photo that is highlighted. The slideshow will
play according to your slideshow settings.
•
Press LEFT/RIGHT to decrease/increase slideshow interval.
•
Press HOTKEY to toggle Play Mode among Repeat, Random, and Once.
•
Press MENU and open and close Menu.
•
Press ENTER to pause the slideshow.
•
Press ESC to return to Photo Thumbnail View.
NOTE: Pressing HOTKEY from the Home screen will start playing a photo
slideshow of all photos on the device according to your slideshow settings.
Page 12
Version 1.1-R0
Pocket Album Deluxe OLED 2.8
User’s Guide
4.3.
Changing Slideshow Options
While the photo slideshow is playing, you can change the display option,
slideshow intervals, play mode, transition effects, and clock display.
Press MENU to access the Menu option. To cancel and close Menu, press
MENU again.
4.3.1. Changing display option:
You can change the display option between Full and 2x2 View.
Full Screen View
2 X 2 View
Press MENU and you can select to change the current display setting between
Full Screen View and 2x2 View.
4.3.2. Changing slideshow interval:
You can adjust the slideshow interval among: 5, 15, 30 seconds; and 1, 5, 10, 15
minutes.
As the slideshow is playing, press RIGHT or LEFT to increase or decrease the
time interval between photo transitions.
You can also change the setting under Menu option. To do so, press MENU and
select Interval. Next, press RIGHT/LEFT to change the interval. Press ENTER to
confirm the setting.
4.3.3. Changing slideshow play mode:
As the slideshow is playing, press HOTKEY to toggle among these play modes:
Repeat, Random, and Once.
•
Repeat: Plays photos in sequential order and repeat in a continuous loop.
•
Random: Play photos in random order in a continuous loop.
•
Once: Play photos in sequential order once. Slideshow will stop at the end
of the last photo and display will return to Home screen.
You can also change the setting under Menu option. To do so, press MENU and
select Play Mode. Next, press RIGHT/LEFT to change the setting. Press ENTER
to confirm the setting.
Page 13
Version 1.1-R0
Pocket Album Deluxe OLED 2.8
User’s Guide
4.3.4. Changing transition effects:
You can change the transition effects among:
•
None – No effect
•
All – Goes through all 5 effects in order
•
Effect 1 – Wipe from top to bottom; wipe from bottom to top
•
Effect 2 – Blinds from top; blinds from bottom
•
Effect 3 – Open from middle to top and bottom; close from top and bottom
to middle
•
Effect 4 – Scroll up; scroll down
•
Effect 5 – Slow wipe from top to bottom; slow wipe from bottom to top
•
Random – Selects Effect 1 - Effect 5 randomly
Press MENU and select Transition. Next, press RIGHT/LEFT to change the
setting. Press ENTER to confirm the setting.
4.3.5. Changing clock display:
You can select among the following clock display settings while playing the
slideshow: Hide time and date, Show both time and date, Show date only, and
Show time only.
Press MENU and select Clock Display. Next, press RIGHT/LEFT to change the
setting. Press ENTER to confirm the setting.
You can also press ENTER to pause the slideshow, and then press HOTKEY to
toggle the clock display options. Press ENTER again to resume the slideshow.
4.4.
Scrolling Through Photos Manually
While a photo slideshow is playing, you can view a particular photo by pressing
ENTER to pause the slideshow.
While the slideshow is paused, press RIGHT/LEFT to manually scroll to the
next/previous photo. The Pause symbol will flash at the bottom of the screen to
indicate that the slideshow is paused.
Press ENTER again to resume the slideshow.
Page 14
Version 1.1-R0
Pocket Album Deluxe OLED 2.8
User’s Guide
4.5.
Deleting Photos
You can delete a photo either in Photo Thumbnail View or during a photo
slideshow.
Deleting a photo in Photo Thumbnail View:
1. Scroll to the photo you want to delete.
2. With the selected photo highlighted, press MENU and select Delete Photo.
3. The device will ask for your confirmation. Select No to cancel and select Yes to
confirm the deletion.
Deleting a photo during a slideshow:
1. When the slideshow is playing, pause the slideshow by pressing ENTER.
While the slideshow is paused, you can press RIGHT/LEFT to manually scroll
to the next/previous photo.
2. As the photo to be deleted is displayed, press MENU and select Delete.
3. The device will ask for your confirmation. Select No to cancel and select Yes to
confirm the deletion.
Page 15
Version 1.1-R0
Pocket Album Deluxe OLED 2.8
User’s Guide
5.
Viewing Photos in Folder View
5.1.
Viewing Photos in Folder View
Selecting FOLDER from the Home screen lets you view photos by folder. You
will first be taken to the Folder Thumbnail View of Folder 1. You can then select
to view a different folder. You can organize your photos in a total of 5 different
folders.
In Folder Thumbnail View, all available photos in the selected folder will be
shown in a 3 by 3 matrix of photo thumbnails.
•
Press LEFT/RIGHT to move the cursor to the previous/next photo.
•
Press HOTKEY to skip to the next pages of photo thumbnails.
•
You can also press MENU and select to go to the previous page or next
page.
•
Press ENTER to start photo slideshow of all the photos in the selected
folder, starting from the photo that is highlighted.
•
Press MENU and open and close Menu.
•
Press ESC to return to Home screen.
In Folder view, you can also copy or move photos to a different folder, delete
photo, or delete folder.
5.2.
Viewing Different Folders
When you select FOLDER from the Home screen, you will be taken to Folder
Thumbnail View of Folder 1.
To view a different folder in Folder Thumbnail View, press MENU and select
Change Folder. Next, select the folder you would like to view.
All photos in the selected folder will be shown in a 3 by 3 matrix of photo
thumbnails.
Page 16
Version 1.1-R0
Pocket Album Deluxe OLED 2.8
User’s Guide
5.3.
Copying and Moving Photos Between Folders
You can copy or move a photo from one folder to another folder in Folder
Thumbnail View.
When you copy a photo, the device will make a copy of the photo so that same
photo will be in both the original and target folders. If you move a photo, the
photo will be moved to the target folder and deleted from the original folder.
1. Scroll to the photo you would like to copy or move.
2. With the selected photo highlighted, press MENU and select Copy to Folder or
Move to Folder.
3. Next, select the folder you would like to copy or move the photo to.
4. The device will show the confirmation message of ‘File Copy’ or ‘File Move’
while it copies or moves the photo.
5.4.
Deleting Photos
You can delete a photo in Folder Thumbnail View.
1. Scroll to the photo you want to delete.
2. With the selected photo highlighted, press MENU and select Delete Photo.
3. The device will ask for your confirmation. Select No to cancel and select Yes to
confirm the deletion.
5.5.
Deleting Folder
You can delete the entire folder in Folder Thumbnail View.
1. Select to view the folder you want to delete.
2. Press MENU and select Delete Folder.
3. The device will ask for your confirmation. Select No to cancel and select Yes to
confirm the deletion.
4. All photos in the selected folder will be deleted.
Page 17
Version 1.1-R0
Pocket Album Deluxe OLED 2.8
User’s Guide
6.
Displaying Calendar
Selecting CALENDAR from the Home screen will take you to the Calendar
View.
In Calendar View, you can view the calendar with your photos running in a
slideshow in the background. You will also be able to browse through the
calendar.
6.1.
Running Photo Slideshow with Calendar
In Calendar View, the current month with photo slideshow running in the
background according to your sideshow settings.
6.2.
•
Press RIGHT/LEFT to scroll to the next/previous photo.
•
Press HOTKEY to toggle between photo background and photo
background.
•
Press MENU and to change the slideshow interval, play mode, transition
effect, and clock display.
•
Press ENTER to pause the slideshow.
•
Press ESC to return to Home screen.
Browsing Through Calendar
To browse through the calendar, first press ENTER to pause the slideshow. The
Pause symbol will flash at the bottom of the screen to indicate that the slideshow
is paused.
While the slideshow is paused, press RIGHT/LEFT to scroll to the next/previous
month.
Press ENTER again to resume the slideshow. Note that the calendar displayed
will be the last month viewed.
Page 18
Version 1.1-R0
Pocket Album Deluxe OLED 2.8
User’s Guide
7.
Adding Photos to Your Pocket Album Deluxe OLED
7.1.
About Photo Manager Software
Photo Manager Software is the image conversion tool required for transferring
photos from the computer to your Pocket Album Deluxe OLED.
Run Photo Manager Software to transfer your images (JPG, TIF, GIF, PNG, and
BMP format) from your computer to Pocket Album Deluxe OLED. Photo Manager
Software lets you crop, rotate, and edit the images you wish to transfer, before
automatically resizing them for optimal storage and display on Pocket Album
Deluxe OLED.
Pocket Album Deluxe OLED can hold more than 4,000 images on its Internal
Memory.
Important Note:
While Pocket Album Deluxe OLED can be accessed on the computer directly as a
removable drive, photos will display on the Pocket Album Deluxe OLED ONLY IF
they transferred via the Photo Manager Software. In other words, you cannot copy
your photos directly from your computer to the Pocket Album Deluxe OLED
Internal Memory bypassing the software.
After the images are properly processed from the Photo Manager Software to the
Pocket Album Deluxe OLED, you will be able move them to different folders or to
a different Pocket Album Deluxe OLED via the computer.
Also, make sure not to alter the default folders labeled ‘FOLDER1’ through
‘FOLDER5’. These folders contain the photos that will display on your Pocket
Album Deluxe OLED.
Page 19
Version 1.1-R0
Pocket Album Deluxe OLED 2.8
User’s Guide
7.2.
Running Photo Manager Software on Windows
Pocket Album Deluxe OLED is compatible with Windows Vista, XP, and 2002.
Follow the instructions in this section to transfer photos from computer running on
Windows.
7.2.1. Installing Photo Manager Software
Connect Pocket Deluxe OLED to your computer by USB. The device will show
as a removable disk named “PAD-280” under My Computer.
1. Under My Computer, double-click the “PAD-280” drive to open up your Pocket
Album Deluxe OLED.
2. Next, double-click the “SYS” folder.
3. Double-click the “Photo_Manager_Software” folder.
4. Locate and run “PAD-280_Photo_Viewer.exe” inside the ‘WINDOWS’ folder.
5. The ‘Pocket Album Deluxe OLED 2.8 Photo Viewer – InstallShield Wizard’
Window will open up. Click Next to continue.
6. Next, click Install to start the installation.
7. When the installation is complete, click Finish.
8. A “PAD-280 Photo Manager” software icon will be installed on the desktop.
7.2.2. Running Photo Manager Software
IMPORTANT: Before starting Photo Manager Software, you must first connect
Pocket Album Deluxe OLED to your computer with the USB cable. Pocket
Album Deluxe OLED will turn on automatically and display a “USB Connected”
message on the screen.
1. You can run the software in 2 ways:
a. Double-click the “PAD-280 Photo Viewer” icon on the desktop
b. Go to Programs from the Start Menu, and click on Pocket Album Deluxe
OLED 2.8 > PAD-280 Photo Viewer.
2. The Photo Manager Software screen will open up (see Section 7.2.3).
Page 20
Version 1.1-R0
Pocket Album Deluxe OLED 2.8
User’s Guide
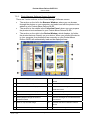
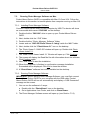
7.2.3. Photo Manager Software Screen Overview
There are 3 main sections on the Photo Manager Software screen:
1
The section on the left is the Browser Window, where you can browse
through the photos on your computer, and select and edit the photos to be
added to your Pocket Album Deluxe OLED.
The section in the middle is the Collection Panel, where you can prepare
the photos to be transferred to your Pocket Album Deluxe OLED.
The section on the right is the Device Window, which displays, by folder,
the photos that are currently on your device. When you connect the device
to your computer, the photos that are currently on your Pocket Album
Deluxe OLED will automatically load and be displayed here.
Current directory path
9
Device Window: Images currently on
device
2
Folder directory on computer
10
Current folder
3
Select default thumbnail display
11
Remove selected images from
Collection Panel
4
Select default thumbnail display
12
Remove all images from Collection Panel
5
Thumbnails of images in selected folder
13
Remove selected images from device
6
Add highlighted image as shown to
14
Remove all images in the selected folder
from device
Collection Panel
7
Click to crop and edit image
15
Transfer files from Collection Panel to
device
8
Collection Panel: Images to be transferred
Page 21
Version 1.1-R0
16
Close Photo Manager Software
Pocket Album Deluxe OLED 2.8
User’s Guide
7.2.4. Selecting Images to Convert/Transfer
Follow these instructions to select the images you wish to transfer to your
Pocket Album Deluxe OLED. Note that the photos in the Collection Panel are
not transferred onto your Pocket Album Deluxe OLED until you transfer them to
your device.
1. First, under Device Window, select the folder (Folder1 through Folder5) to
where you would like to transfer the photos.
2. Under Browse for Images, browse through the directories on your computer
to select the images you want to transfer. You current directory path is shown
on the top of the screen under Address.
Tip: Common photo storage locations:
a. For Windows XP users: Please browse C:\Documents and
settings\(Username)\My documents\My Pictures.
b. For Windows Vista users: Please browse C:\(Username)\Pictures.
3. As you browse different folders, thumbnails of available images in the selected
folder will be displayed.
4. Click on Settings (Tool Icon on the bottom) to select to display either the Whole
Image or select Crop it to Fit for Display.
¾ Select Crop to fit Display to automatically crop the photo to a 4:3 aspect
ratio size.
¾ Select Show Whole Image to display the entire image. The image will be
shown in letter box if it is not a 4:3 aspect ratio size.
Note: We recommend that you keep the Compression Ratio at Low Level.
5. Click on the thumbnail of the image you want to transfer so that it is highlighted.
If you would like to add the photo as it is shown, click Add Selected Photo to
Collection Panel to add it to the Collection Panel for transfer. To highlight
multiple photos, hold the Ctrl key as you make your selection.
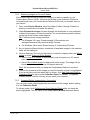
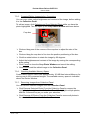
7.2.5. Cropping/Editing Images before Converting
You can crop, rotate, adjust brightness and contract of the image, before adding
it to the Collection Panel.
To edit an image, click Optimize and Crop Selected Photo while you have the
photo highlighted. This will open up the Crop Photo Window as shown below.
Page 22
Version 1.1-R0
Pocket Album Deluxe OLED 2.8
User’s Guide
Crop box
¾ Click and drag one of the corners of the crop box to adjust the size of the
box.
¾ Click and drag the crop box to fine tune the position positioning of the box.
¾ Click the rotate buttons to rotate the image by 90 degrees.
¾ Adjust the brightness and contrast of the image by moving the corresponding
slider setting.
¾ Click Cancel to close the Crop Photo Window and cancel the editing.
¾ Click Done to add the edited image to the Collection Panel.
7.2.6. Checking Available Memory Space
Pocket Album Deluxe OLED has approximately 110 MB free Internal Memory for
storing over 4,000 converted images. The available memory space is indicated
as “Free Space” on the top right hand corner
7.2.7. Removing Images from Collection Panel
You can remove selected images from the Collection Panel.
¾ Click Remove Selected Photo From the Collection Panel to remove the
highlighted photo(s) from the Collection Panel. To highlight multiple photos,
hold the Ctrl key as you make your selection.
¾ Click Remove All Photos From the Collection Panel to remove all photos
from the Collection Panel.
7.2.8. Deleting Images from Device
You can delete photos that are currently stored on your device.
¾ Click Delete Selected Photo On Your Device to delete the highlighted
photo(s) from your Pocket Album Deluxe OLED. To highlight multiple photos,
hold the Ctrl key as you make your selection.
¾ Click Delete All Photos Stored On Your Device to delete all photos in the
selected folder from your Pocket Album Deluxe OLED.
Page 23
Version 1.1-R0
Pocket Album Deluxe OLED 2.8
User’s Guide
7.2.9. Updating Images on Pocket Album Deluxe OLED
When you are ready to transfer the images shown in the Collection Panel to
your Pocket Album Deluxe OLED, click Transfer the Collection to Your Device.
Do not disconnected Pocket Album Deluxe OLED from your computer during
the transfer. During the transfer, an “Updating photos, please wait…” message
will be shown on your computer.
Once the transfer is complete, the converted images will be updated in the
Device Window. These images have been transferred to your Pocket Album
Deluxe OLED.
7.2.10. Safely Disconnecting Pocket Album Deluxe OLED from Your Computer
Follow these instructions to safely disconnect Pocket Album Deluxe OLED from
your computer:
1. Close Photo Manager Software.
2. Disable the device before unplugging it from the computer.
a. Locate the ‘Safely Remove Hardware’ icon in the icon tray at the lower
right-hand corner of your computer screen. You can move the mouse
pointer over the icons until you see the ‘Safely Remove Hardware’ label.
b. Double-click on this icon to open the ‘Safely Remove Hardware’ window.
c. Select the hardware device named ‘USB Mass Storage Device’.
d. Click on the Stop button and a confirmation window will appear.
e. Select “FOCI_PAD-280_320x240 USB Device”. Click OK at the
confirmation window to confirm the action.
f. Close the ‘Safely Remove Hardware’ window by clicking on the Close
button.
g. You will see a confirmation message telling you that it is safe to remove
the device.
3. Disconnect Pocket Album Deluxe OLED from your computer by unplugging
the USB cable.
Page 24
Version 1.1-R0
Pocket Album Deluxe OLED 2.8
User’s Guide
7.3.
Running Photo Manager Software on Mac
Pocket Album Deluxe OLED is compatible with Mac 10.5 and 10.4. Follow the
instructions in this section to transfer photos from computer running on Mac OS.
7.3.1. Installing Photo Manager Software
Connect Pocket Deluxe OLED to your computer by USB. The device will show
as a removable disk named “PAD-280” on the desktop.
1. Double-click the “PAD-280” drive to open up your Pocket Album Deluxe
OLED.
2. Next, double-click the “SYS” folder.
3. Double-click the “Photo_Manager_Software” folder.
4. Locate and run “PAD-280 Photo Viewer 3.1.dmg” inside the ‘MAC’ folder.
5. Next, double-click the "PhotoViewer 3.1" icon on the desktop.
6. The ‘Photo Viewer 3.1 MAC OS’ window will open up. Double-click Photo
Viewer Install 3.1.
7. The ‘Install Photo Viewer Install 3.1’ Window will open up. Click Continue.
8. The screen will display the Read Me file with information about the software.
Click Continue again.
9. Next, click Install to start the installation.
10. When the installation is finished, a confirmation message Installation
Succeeded will be displayed. Click Exit to close the window.
11. A “PhotoViewer” software icon will be installed on the desktop.
7.3.2. Running Photo Manager Software
IMPORTANT: Before starting Photo Manager Software, you must first connect
Pocket Album Deluxe OLED to your computer with the USB cable. Pocket
Album Deluxe OLED will turn on automatically and display a “USB Connected”
message on the screen.
1. You can run the software in 2 ways:
a. Double-click the “PhotoViewer” icon on the desktop
b. Go to Applications from Finder, and click on PhotoViewer.
2. The Photo Manager Software screen will open up (see Section 7.3.3).
Page 25
Version 1.1-R0
Pocket Album Deluxe OLED 2.8
User’s Guide
7.3.3. Photo Manager Software Screen Overview
There are 3 main sections on the Photo Manager Software screen:
1
The section on the left is the Browser Window, where you can browse
through the photos on your computer, and select and edit the photos to be
added to your Pocket Album Deluxe OLED.
The section in the middle is the Collection Panel, where you can prepare
the photos to be transferred to your Pocket Album Deluxe OLED.
The section on the right is the Device Window, which displays, by folder,
the photos that are currently on your device. When you connect the device
to your computer, the photos that are currently on your Pocket Album
Deluxe OLED will automatically load and be displayed here.
Current directory path
9
Device Window: Images currently on
device
2
Folder directory on computer
10
Current folder
3
Select default thumbnail display
11
Remove selected images from
Collection Panel
4
Select default thumbnail display
12
Remove all images from Collection Panel
5
Thumbnails of images in selected folder
13
Remove selected images from device
6
Add highlighted image as shown to
14
Remove all images in the selected folder
from device
Collection Panel
7
Click to crop and edit image
15
Transfer files from Collection Panel to
device
8
Collection Panel: Images to be transferred
Page 26
Version 1.1-R0
16
Close Photo Manager Software
Pocket Album Deluxe OLED 2.8
User’s Guide
7.3.4. Selecting Images to Convert/Transfer
Follow these instructions to select the images you wish to transfer to your
Pocket Album Deluxe OLED. Note that the photos in the Collection Panel are
not transferred onto your Pocket Album Deluxe OLED until you transfer them to
your device.
1. First, under Device Window, select the folder (Folder1 through Folder5) to
where you would like to transfer the photos.
2. Under Browse for Images, browse through the directories on your computer
to select the images you want to transfer. You current directory path is shown
on the top of the screen under Address.
Tip: Browse iPhoto Library (for example: \Users \{Username} \Pictures
\iPhoto Library) to locate your photos.
3. As you browse different folders, thumbnails of available images in the selected
folder will be displayed. You can choose to display either the Whole Image or
select Fit for Display.
¾ Select Fit Display to automatically crop the photo to a 4:3 aspect ratio
size.
¾ Select Whole Image to display the entire image. The image will be shown
in letter box if it is not a 4:3 aspect ratio size.
4. Click on the thumbnail of the image you want to transfer so that it is highlighted.
If you would like to add the photo as it is shown, click Add Selected Photo to
Collection Panel to add it to the Collection Panel for transfer. To highlight
multiple photos, hold the Command key as you make your selection.
Page 27
Version 1.1-R0
Pocket Album Deluxe OLED 2.8
User’s Guide
7.3.5. Cropping/Editing Images before Converting
You can crop, rotate, adjust brightness and contract of the image, before adding
it to the Collection Panel.
To edit an image, click Optimize and Crop Selected Photo while you have the
photo highlighted. This will open up the Crop Photo Window as shown below.
Crop box
¾ Click and drag one of the corners of the crop box to adjust the size of the
box.
¾ Click and drag the crop box to fine tune the position positioning of the box.
¾ Click the rotate buttons to rotate the image by 90 degrees.
¾ Adjust the brightness and contrast of the image by moving the corresponding
slider setting.
¾ Click Cancel to close the Crop Photo Window and cancel the editing.
¾ Click Done to add the edited image to the Collection Panel.
7.3.6. Checking Available Memory Space
Pocket Album Deluxe OLED has approximately 110 MB free Internal Memory for
storing over 4,000 converted images. The available memory space is indicated
above the Device Window.
7.3.7. Removing Images from Collection Panel
You can remove selected images from the Collection Panel.
¾ Click Remove Selected Photo From the Collection Panel to remove the
highlighted photo(s) from the Collection Panel. To highlight multiple photos,
hold the Command key as you make your selection.
¾ Click Remove All Photos From the Collection Panel to remove all photos in
the selected folder from the Collection Panel.
Page 28
Version 1.1-R0
Pocket Album Deluxe OLED 2.8
User’s Guide
7.3.8. Deleting Images from Device
You can delete photos that are currently stored on your device.
¾ Click Delete Selected Photo On Your Device to delete the highlighted
photo(s) from your Pocket Album Deluxe OLED. To highlight multiple photos,
hold the Commandl key as you make your selection.
¾ Click Delete All Photos Stored On Your Device to delete all photos in the
selected folder from your Pocket Album Deluxe OLED.
7.3.9. Updating Images on Pocket Album Deluxe OLED
When you are ready to transfer the images shown in the Collection Panel to
your Pocket Album Deluxe OLED, click Transfer the Collection to Your Device.
Do not disconnected Pocket Album Deluxe OLED from your computer during
the transfer. During the transfer, an “Updating photos, please wait…” message
will be shown on your computer.
Once the transfer is complete, the converted images will be updated in the
Device Window. These images have been transferred to your Pocket Album
Deluxe OLED.
7.3.10. Safely Disconnecting Pocket Album Deluxe OLED from Your Computer
Follow these instructions to safely disconnect Pocket Album Deluxe OLED from
your computer:
1. Close Photo Manager Software.
2. Properly eject Pocket Album Deluxe OLED by dragging the “PAD-280” icon
into the Trash Can.
3. Disconnect Pocket Album Deluxe OLED from your computer by unplugging
the USB cable.
Page 29
Version 1.1-R0
Pocket Album Deluxe OLED 2.8
User’s Guide
8.
Frequently Asked Questions & Troubleshooting
What is OLED? How is the OLED display better than conventional LCDs?
OLED stands for Organic Light-Emitting Diode. The "organic" in OLED
refers to organic material, with carbon being the basis of all organic
matter. The "LED" stands for "Light Emitting Diode" and describes the
process of converting electric energy into light. In other words, OLEDs
are composed of thin films of organic compounds that emits light with the
application of electricity.
Unlike conventional LCDs (Liquid Crystal Displays), OLEDs generate
light and do not require backlighting. OLED displays have these main
advantages:
¾ More accurate colors: LCD TVs reproduce colors by manipulating light
waves and subtracting colors from white light. OLED has more control
over color expression because it only expresses pure colors when an
electric current stimulates the relevant pixels. In OLED displays, each
pixel contains red, green, and blue elements, which work in conjunction to
create the millions of colors. The three colors are further refined by a color
filter, which purifies each color without the need for a polarizer, rendering
outstanding color purity.
¾ Higher contrast: Unlike LCDs which use a backlight and cannot show
true black, OLED technology can completely turn off pixels when
reproducing black. The result is deep black levels and high contrast ratio.
¾ Higher brightness: Because OLED elements individually emit light that
are directly displayed on the screen, high brightness levels can be
achieved.
¾ Wider viewing angle: OLED displays have close to a 180 degree viewing
angle. Because LCDs work by blocking light, they have an inherent
viewing obstacle from certain angles. OLEDs emit light and every pixel is
lit independently and that light will be seen from extreme viewing angles
easily and accurately.
Can I download image directly from a camera or memory card to Pocket
Album Deluxe OLED?
You cannot download images directly from a camera to the Pocket Album
Deluxe OLED. Your photos must be transferred from your computer and
via the included Photo Viewer Software (compatible with Windows
Vista/XP/2000, and Mac 10.5 & 10.4). The Photo Viewer Software lets
you crop and rotate photos you wish to transfer, before automatically
resizing them for optimal storage and display on the device.
Can I transfer photos from my computer directly onto Pocket Album Deluxe
OLED by click-and-drag?
Pocket Album Deluxe OLED can be accessed on the computer directly
as a removable drive. However, photos will display properly on the
Pocket Album Deluxe OLED ONLY IF they are transferred via the Photo
Page 30
Version 1.1-R0
Pocket Album Deluxe OLED 2.8
User’s Guide
Manager Software. In other words, you cannot copy your photos directly
from your computer to the Pocket Album Deluxe OLED Internal Memory
bypassing the software.
After the images are properly processed by the software and transferred
to the Pocket Album Deluxe OLED, you will be able move them to
different folders or to a different Pocket Album Deluxe OLED via the
computer.
Also, make sure not to alter the names of the default folders labeled
FOLDER1 through FOLDER5. These folders contain the photos that will
display on your device.
How is the most efficient way to charge the battery and how long takes it
take to charge the battery?
Charging the Pocket Album Deluxe OLED battery by connecting it to the
AC power adapter will be faster than charging it by connecting to your
computer USB port.
Turn off the device to shorten the charging time. The Pocket Album
Deluxe OLED battery will charge more quickly when the device is turned
off.
When the device is turned off, it takes approximately 4 hours to fully
recharge the Pocket Album Deluxe OLED battery by AC power.
For best battery life, make sure to periodically recharge your Pocket
Album Deluxe OLED to prevent the battery from becoming completely
depleted.
How can I adjust the slideshow interval?
You can change the slideshow interval during a slideshow on-the-fly.
While the slideshow is playing, press RIGHT or LEFT to increase or
decrease the slideshow interval.
You can also change the slideshow interval in Setup options. First,
access SETUP from the Home screen. Next, select Slideshow Settings.
Next, select Interval to change the settings.
You can adjust the time interval among: 5, 15, 30 seconds; and 1, 5, 10,
15 minutes.
How can I scroll through the photos manually?
While the slideshow is playing, press ENTER to pause the slideshow.
Next, press RIGHT/LEFT to manually scroll to the next/previous photo.
How can I reset my Pocket Album Deluxe OLED if it freezes?
In the case that Pocket Album Deluxe OLED encounters an error and
freezes, you can reset it by connecting it to the computer or AC power
adapter via USB. You will not lose any photos saved on your Pocket
Album Deluxe OLED.
I changed the settings under SETUP, but the settings do not seem to be
saved the next time I turn the device on.
Page 31
Version 1.1-R0
Pocket Album Deluxe OLED 2.8
User’s Guide
It might be the case that the device ran out of battery before the settings
were saved. Settings are saved only when the device is turned off. To
make sure the settings are saved, turn the device off after you changed
the settings.
I’m using Windows OS, I can start the Photo Viewer Software, but I am
having trouble locating my photos that are stored in the “My Pictures”
folder on my computer.
For Windows XP users:
Please browse to C:/Documents and settings/(Username)/My
documents/My Pictures.
For Windows Vista users:
Please browse to C:/(Username)/Pictures.
I’m using Mac OS, I can start the Photo Viewer Software, but I am having
trouble locating my photos in iPhoto on my computer.
On Mac, please browse to /Users/(Username)/Pictures/iPhoto Library to
locate your photos.
How do I arrange the order of the photos on my Pocket Album Deluxe
OLED?
The photos on your device will be displayed (1) first in the order of each
folder (Folder1, Folder2, …and Folder5), and (2) within each folder, in the
order that they were transferred to the device.
Every time you transfer the photos, they will be named in sequence
starting from 0001, 0002, 0003, …etc.. If you deleted 001, 002, 005-008,
(so you only have 003,004, 009), then the next time you transfer photos
to the same folder, the new photos be named 001, 002, 005-008 (taking
the open numbers available). On the Photo Viewer device window you’ll
see that the old and new photos are mixed in order (they’re in
alphabetical order), but when you display the images on the device they’ll
be in the order in which they were added to the device. In this example,
it’d be 003, 004, 009, 001, 002, 005-008.
To re-arrange the order, you can save a copy of the converted images,
and transfer them again to the device in the order you want.
Product Registration
Visit www.digitalfoci.com/registration to register your product. You will be
notified about any important updates on your Pocket Album Deluxe OLED.
Technical Support
If you have any questions about using your Pocket Album Deluxe OLED, please
contact Digital Foci, Inc. technical support at [email protected] or call (888)
NOW-FOCI / (888-669-3624).
Page 32
Version 1.1-R0
Pocket Album Deluxe OLED 2.8
User’s Guide
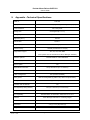
9.
Appendix –Technical Specifications
Model no.
Display
PAD-280
2.8” Active Matrix OLED (Organic Light-Emitting Diode) Display
Screen resolution
320 x 240 pixels
Viewing area
2.8” diagonal (2.3” x 1.7”)
Viewing angle
170 degrees horizontal & vertical
Brightness (cd/m2)
200 nits
Contrast ratio
10,000 : 1
Image capacity
Over 4,000 digital photos
Internal memory
128 MB (110 MB free for storage)
Image format support
JPG, TIF, GIF, PNG, BMP
(Note: photos must be transferred via Photo Manager Software)
Slideshow options
Photo display option
Manual slideshow & Auto slideshow
Full screen, 3 x 3 thumbnail view, 2 x 2 view, calendar with photo
Random option
Yes
Adjustable time intervals
Yes (5 seconds to up to 15 minutes)
Multiple transition effects
Yes (5 effects)
Folder management
Battery power
Yes (5 folders available)
Built-in rechargeable (by USB or AC) Lithium-Polymer battery
Battery life
Approximately 5 hours
On board clock & calendar
Auto off (battery saving feature)
Yes
Yes (off, 5 minutes up to 30 minutes)
Computer interface
OS compatibility
Software
USB 1.1
Windows Vista, XP Home/Pro, 2000; Mac 10.5 & 10.4
Photo Manager Software for converting images
Power
AC100-240V to DC 5V/1A
Dimensions
3.3" (L) x 2.7" (W) x 0.6" (H)
Weight
3.6 oz.
Page 33
Version 1.1-R0
Pocket Album Deluxe OLED 2.8
User’s Guide
10. Regulatory Compliance
FCC Part 15 Compliance
This device complies with Part 15 of the FCC Rules. Operation is subject to the following
conditions:
1.
This device may not cause harmful interference.
2.
This device must accept any interference received, including interference that may cause
undesired operations.
The device has been tested and verified to be within the energy emission limits for Class B digital
devices as defined in Part 15 of the FCC Rules. These limits are designed to provide reasonable
protection against harmful interference in a residential situation. This device generates, uses, and
can radiate radio frequency energy and, if not installed and used in accordance with the
instructions, may cause harmful interference to radio communications. Installed correctly, it
probably will not interfere with your radio or TV. However, we do not guarantee the absence of
interference.
If you modify the device in any way, without approval from Digital Foci, Inc., your device may
violate FCC regulations. Violation of FCC regulations may cause the FCC to void your rights to
use the modified device.
If you suspect this device is causing interference, power off and on the device while your radio or
TV is showing interference. If the interference disappears when you turn the device off and
reappears when you turn the device on, something in the device is causing interference.
To reduce interference, try these suggestions:
• Change the direction of the radio or TV antenna.
• Increase the separation between the device and radio or TV.
• Connect the device to a different outlet on a different circuit.
If these suggestions don’t help, consult your computer dealer or an experienced radio/TV
technician.
CANADIAN DOC STATEMENT
This digital apparatus does not exceed the Class B limits for radio noise for digital apparatus set
out in the Radio Interference Regulations of the Canadian Department of Communications.
Le présent appareil numérique n’émet pas de bruits radioélectriques dépassant les limites
applicables aux appareils numériques de las classe B prescrites dans le Réglement sur le
brouillage radioélectrique édicté par les ministère des Communications du Canada.
CE Standards
Testing for compliance to CE standards was performed by an independent laboratory. The unit
under test was found compliant to CE Class B specifications.
UL/CSA
This product is recognized per Underwriter Laboratories and Canadian Underwriter Laboratories
1950.
Page 34
Version 1.1-R0
3111 Via Mondo, E. Rancho Dominguez, California, 90221 USA
Copyright 2008 Digital Foci, Inc. All rights reserved.