1
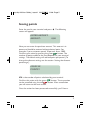
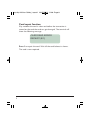
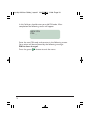
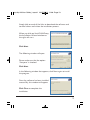
Loyalty A6 User Guide_Layout 1 30/05/2013 11:08 Page 1
DO IT YOUR WAY
iReward Loyalty User Manual
Y
T
L
A
Y
LO
CARD
Loyalty A6 User Guide_Layout 1 30/05/2013 11:08 Page 2
Loyalty A6 User Guide_Layout 1 30/05/2013 11:08 Page 1
Table of Contents
General Information ........................................ 02
Terminal User Guide ...................................... 03
Issuing Points .................................................. 05
Redeeming Points ............................................ 07
Other Main Menu Options .............................. 09
Setting Discount Percentage ............................ 11
Software and Terminal Driver
Download and Installation .............................. 12
Synchronization .............................................. 14
1
Loyalty A6 User Guide_Layout 1 30/05/2013 11:08 Page 2
General
Thank you for choosing iReward Loyalty.
This starter kit contains the following components:
•
•
•
•
•
•
Terminal
Batteries
Cable
Cards
Registration Forms
User Manual
Getting started only takes a few simple steps. Your terminal is
powered by batteries (please do not use rechargeable batteries).
With the enclosed cable you can also connect your terminal to
your PC for power. Or use the cable with a USB power plug.
Please Note:
If connecting to the mains for power using the USB power
adaptor provided, the batteries must be removed from
the terminal.
2
Loyalty A6 User Guide_Layout 1 30/05/2013 11:08 Page 3
Terminal User Guide
Terminal keys
ISSUE POINTS
UP
MENU
REDEEM POINTS
DOWN
ON/OFF
CANCEL
CORRECTION
CONFIRM
You can access the terminal menu by pressing the semi-circle
button in the top middle of your keypad. Scroll through the
menu using the two arrow buttons on the right and left hand
side of the menu button. Cancel any action with the red
button. The yellow
button enables you to correct any
errors. Confirm your actions with the green
button. For
daily use the following buttons are very important:
Issue points by entering the purchase amount
Redeeming points
Terminal switch on/off
Once the batteries are inserted or the terminal is connected to
the PC it’s ready to use. After two minutes the terminal will go
in to a standby mode to save power. By pressing the On/Off
button or inserting a customer card the terminal will switch
on again. To put the terminal back into standby mode press the
On/Off button again. If you want to shut down the terminal
completely, just remove the cable or batteries.
3
Loyalty A6 User Guide_Layout 1 30/05/2013 11:08 Page 4
Terminal initiation
After switching on your terminal, a number of system messages
will appear. After those messages you are asked to enter a PIN
code:
ENTER PIN CODE:
PIN:
For the first use of your terminal please type 0000. This PIN
code can be changed immediately. We strongly advise you to do
so. To change PIN code, see section on ‘PIN code modification’.
After entering the correct PIN code you will enter the main
screen:
27-4-2013
22:20
4
Loyalty A6 User Guide_Layout 1 30/05/2013 11:08 Page 5
Issuing points
Enter the card in your terminal and press
screen will appear:
ENTER AMOUNT:
AMOUNT:
. The following
0,00
Now you can enter the purchase amount. This amount is in
pence and should be entered without decimal point. For
example: if your customer spends 10 pounds, enter 1000.
Confirm your action by pressing the green
button. The
number of points added to the card depends on your terminal
settings. The default setting will add one point per pound. (To
change the discount setting, see the section ‘Setting the discount
percentage’).
ISSUE XX
POINTS?
XX is the number of points calculated by your terminal.
Confirm this action with the green
button. The transaction
can be cancelled using the red
button. After cancellation
you will return to the main screen.
Once the action has been processed successfully, you’ll hear a
5
Loyalty A6 User Guide_Layout 1 30/05/2013 11:08 Page 6
beep and the following screen will appear:
***CARD
BALANCE***
XX POINTS?
XX represents the new balance of points. Do not remove the
card before the transaction is done. After removing the card
from the terminal, the main screen will be displayed (press the
red
button if this screen does not appear).
Issuing points via the menu
You can also add points directly via the menu. This is especially
useful for adding points individually without entering a
transaction cost (e.g. to add 10 bonus points). Press the Menu
button and select ‘ISSUE POINTS’ by pressing the green
button. Scroll down to ‘ENTER POINTS’ and select using the
green
button. Here simply type in the number of points
that you wish to issue and then press the green
button to
complete. As above, the new card balance will be displayed.
Adjust the ‘points issue’ button
The standard setting for issuing points is by entering the amount
spent. The terminal also has the option to issue points by just
entering the points value directly. To set the issue button on
entering points press the menu button en scroll down to
SETTINGS and press the green
button. Then scroll down to
F1 FUNCTION and press the green
button again. Choose
the option POINTS and press the green
button to confirm.
The terminal will go back to the main screen. From now on the
issue button is programmed to issue points by just entering points.
6
Loyalty A6 User Guide_Layout 1 30/05/2013 11:08 Page 7
Redeeming points
To redeem points you can use the
screen will appear:
button. The following
REDEEM POINTS
POINTS: 0
Enter the number of points to be redeemed and confirm your
transaction with the green
button. If this transaction has
been processed correctly, a number of messages will appear on
your screen:
***CARD
BALANCE***
XX POINTS?
XX represents the adjusted card balance following redemption.
Do not remove the card before the transaction is complete.
After removing the card, the main screen will be shown on your
terminal (press red
button if this screen does not appear).
Please Note:
Adding and redeeming points are both transactions which
are stored on the chip of your customer’s card. When
processing, the card should not be removed from the
terminal. If this should occur, the card may become damaged.
In this case you may need to issue a replacement card to your
customer. In your online database you can easily transfer the
balance to the replacement account. You must then manually
add the balance to the replacement card using the terminal.
7
Loyalty A6 User Guide_Layout 1 30/05/2013 11:08 Page 8
Card repair function
If by accident the card is taken out before the transaction is
stored on the card the card can get damaged. The terminal will
show the following message:
CARD READ ERROR
REPAIR? (0/1)
Press 1 to repair the card. Wait till the card balance is shown.
The card is now repaired.
8
Loyalty A6 User Guide_Layout 1 30/05/2013 11:08 Page 9
Other main menu options
Press the Menu button to enter the menu. You can scroll
through the menu using the two arrow buttons to the left and
right of the menu button.
Card balance retrieval
As soon as you enter a card, your terminal will display the
balance of accumulated points. Retrieval of any card balance is
also included as an option in your terminal menu. Press the
green Menu button and scroll to CARD BALANCE. Press the
green
button to confirm your choice.
Card number retrieval
The card number is printed on the card. If the card incurs any
damage, the number may wear off or become illegible. To check
any card number, enter the menu using the Menu button and
scroll to CARD NUMBER. Confirm your choice with the green
button.
PIN code modification
In order to change the PIN code on your terminal, access the
menu using the MENU button and select the last option in the
menu: SETTINGS. Press the green
button and select the
second option under SETTINGS – CHANGE PIN. Press the
green
button to confirm your choice. The following screen
will appear:
ENTER PIN
PIN: _
9
Loyalty A6 User Guide_Layout 1 30/05/2013 11:08 Page 10
In this field you should enter your old PIN code. After
completion the following screen will appear:
NEW PIN
PIN: _
Enter the new PIN code and re-enter in the following screen.
Your action will be confirmed by the following message:
PIN has been changed.
Press the green
button to exit the menu.
10
Loyalty A6 User Guide_Layout 1 30/05/2013 11:08 Page 11
Setting discount percentage
Press the Menu button and select SETTINGS in your terminal
menu. Confirm your choice with the green
button. Scroll
down to ISSUE SETTINGS. Press the green
button. Select
POINTS FACTOR and press the green
button again.
Default factor is set to 0.01. This means that your card holders
will be credited one point per pound. If you change this points
factor to 0.02 for example, your terminal will add 2 points for
each pound spent. Enter the value of your choice and confirm
with the green
button.
The next option is FACTOR SHIFT. Just press the green
button to skip this option. STEP AMOUNT is the next option
and allows you to enter steps between points issued.
FOR EXAMPLE:
£5 - £10 = 5 points, £10 - £15 = 10 points.
Press the green
button to confirm. The MINUMUM
AMOUNT allows you to set a minimum spend to receive
points. The last setting is MAXIMAL POINTS. This is the
maximum points that can be issued at any one time
FOR EXAMPLE:
You have decided to offer your customers a 5% discount.
For each pound spent, you will grant 5 points.
To set your terminal accordingly, you will need to enter a
points factor of 0.05. Customers who have spent 10
pounds will be rewarded with 50 points.
One point represents a value of 50 pence, which equals
your 5% discount. This discount will only apply when card
holders redeem their points.
11
Loyalty A6 User Guide_Layout 1 30/05/2013 11:08 Page 12
Software and Terminal Driver
Download and Installation
Your terminal runs on batteries. Alternatively, you can connect
your terminal to your PC for power. For this purpose please use
the enclosed USB cable. You will also need this cable to transfer
data stored on your terminal to the online customer database.
IMPORTANT! Please do not connect the cable to your PC
before the driver has been installed.
All card transactions are stored on your terminal and you can
easily transfer all data to your online customer database .This
synchronizing process requires the Serial2LANProxy software
and the driver for the terminal.
You can easily download both of these from our website at
www.icomrewardloyalty.co.uk/support
Support Downloads:
• iReward Loyalty Brochure
• Serial2Lan Terminal Synchronisation
• Terminal Driver
Telephone Support:
If you have a problem or need guidance please call
0845 094 0707 and ask for iReward IT support.
12
Loyalty A6 User Guide_Layout 1 30/05/2013 11:08 Page 13
Simply click on each of the links to download the software and
terminal driver and initiate the installation process.
When you click on Serial2LANProxy
the Installation Wizard window on
the right will start.
Click Next.
The following window will open.
Please make sure that the option
‘Everyone’ is checked.
Click Next.
In the following window that appears, click Next again to install
the program.
Once the software has been installed
successfully, this window will appear.
Click Close to complete the
installation.
13
Loyalty A6 User Guide_Layout 1 30/05/2013 11:08 Page 14
Synchronization
By synchronizing the data on your terminal, all transactions are
uploaded into your CMM account.
Connect the terminal to your PC with the enclosed cable.
Before you can upload the transactions make sure that the
necessary software is installed on your PC. Check the Software
and Terminal Driver Download and Installation paragraph for
further reference. If you have any problems with installing the
software please contact our helpdesk.
After installing the software you can start synchronizing the
terminal. When the sync. software is running on your PC and
the terminal is not connected you will see the following X icon.
This means the program is waiting for a terminal connection.
When you connect the terminal the icon will change into
Press the menu button and scroll to the fifth option in your
menu, SYNCHRONIZE. Confirm your choice by pressing the
green
button. The terminal will begin transferring the
transactions.
On your PC the screen on the right
will show.
On the terminal the screen will show:
SYNCHRONIZE
PLEASE WAIT…
When the terminal is finished synchronizing it will return to the
main screen.
14
Loyalty A6 User Guide_Layout 1 30/05/2013 11:08 Page 15
Automatic synchronization
You can set the terminal to auto sync. To do this you will need
to meet the follwing requirements
The terminal must be connected to a PC with the sync. software
installed and connected to the internet.
Press the menu button and scroll down to SETTINGS.
Press the menu button again and scroll down to
SYNC PARAM and press the green
button.
Enter the code 195730. Choose 1 and press
the green
button.
Enter the time you want the terminal to auto sync and
press the green
button.
The terminal will return to the main screen. From now on the
terminal will start to synchronize on the selected time.
Error messages
Cannot find com port - When the terminal is connected to the
pc and the sync program shows the following X icon, then the
program cannot find the right com port. Contact our helpdesk.
Error 3 - There is no communication between the terminal and
the computer or no internet connection. Right-click on the
terminal icon in your system tray and close the program. Then
restart the program by double-clicking the desktop icon and try
again to synchronise. If you still get the error 3 message than
contact the helpdesk.
15
Loyalty A6 User Guide_Layout 1 30/05/2013 11:08 Page 16
Notes
......................................................................................................
......................................................................................................
......................................................................................................
......................................................................................................
......................................................................................................
......................................................................................................
......................................................................................................
......................................................................................................
......................................................................................................
......................................................................................................
......................................................................................................
......................................................................................................
......................................................................................................
......................................................................................................
......................................................................................................
......................................................................................................
......................................................................................................
......................................................................................................
......................................................................................................
Loyalty A6 User Guide_Layout 1 30/05/2013 11:08 Page 17
Notes
......................................................................................................
......................................................................................................
......................................................................................................
......................................................................................................
......................................................................................................
......................................................................................................
......................................................................................................
......................................................................................................
......................................................................................................
......................................................................................................
......................................................................................................
......................................................................................................
......................................................................................................
......................................................................................................
......................................................................................................
......................................................................................................
......................................................................................................
......................................................................................................
......................................................................................................
Loyalty A6 User Guide_Layout 1 30/05/2013 11:08 Page 18
Please dial 0845 094 0707 or
email [email protected]
for additional loyalty cards and/or registration forms.
8 Ash Tree Court, Woodsy Close, Cardiff Gate Business Park, Cardiff. CF23 8RW
T 0845 094 0707 | F 0845 094 0708 | W www.icomrewardloyalty.co.uk