1
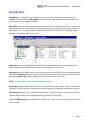
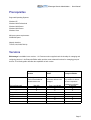
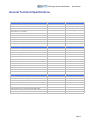
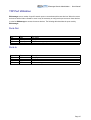
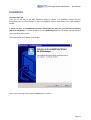
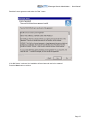
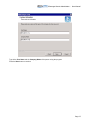
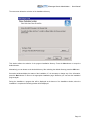
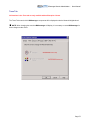
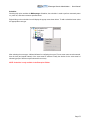
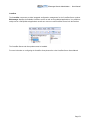
BOSmanager– Remote Administrator
User Manual
BOSmanager Remote Administrator - Users Manual
BOSaNOVA, Inc.
Headquarters US
2012 W Lone Cactus Dr
Phoenix, AZ 85027
Phone 866-864-5250 • Fax 623-516-8697
[email protected]
[email protected]
www.bosanova.net
BOSaNOVA UK Ltd
Headquarters UK
BOSaNOVA Limited
Action Business Centre
Swan Street
Leicester LE3 5AT
Phone 44 1509 276252 • Fax 44 1509 276253
[email protected]
[email protected]
www.bosanova.co.uk
September 10, 2008
Page 2
BOSmanager Remote Administrator - Users Manual
BOSmanager - Remote Administrator
User Manual
This document and related software are products of BOSaNOVA
This manual, software, and related firmware are protected by copyright. Any attempt to reproduce the
documentation, software, or firmware for this device without the express written consent of BOSaNOVA is a
violation of copyright law.
All Product and Trademark names mentioned in this document are the property of their respective owners.
Page 3
BOSmanager Remote Administrator - Users Manual
Table of Contents
Introduction - - - - - - - - - - - - - Prerequisites - - - - - - - - - - - - Versions - - - - - - - - - - - - - - General Technical Specifications - - - TCP Port Utilization - - - - - - - - - Ports Out - - - - - - - - - - - - - - Ports In - - - - - - - - - - - - - - - Installation- - - - - - - - - - - - - - Launching the Program for the first time
License Management - - - - - - - - License Installation from a File - - - - BOSmanager Product Overview - - - Main BOSmanager Window - - - - - Menu Bar - - - - - - - - - - - - - - File Menu - - - - - - - - - - - - - - Add Group - - - - - - - - - - - - - Refresh All... - - - - - - - - - - - - Browse All... - - - - - - - - - - - - Global Backup and Restore - - - - - Remove All… - - - - - - - - - - - - Exit - - - - - - - - - - - - - - - - - Modify Menu - - - - - - - - - - - - Move To - - - - - - - - - - - - - - Rename - - - - - - - - - - - - - - - Delete - - - - - - - - - - - - - - - Properties - - - - - - - - - - - - - - Group Properties - - - - - - - - - - General - - - - - - - - - - - - - - - IP Address Ranges - - - - - - - - - Subnet - - - - - - - - - - - - - - - Option - - - - - - - - - - - - - - - Device Menu - - - - - - - - - - - - Tools Menu - - - - - - - - - - - - - Options - - - - - - - - - - - - - - - General Tab - - - - - - - - - - - - - -
-
-
-
-
-
-
-
-
-
-
-
-
-
5
6
6
7
8
8
8
9
14
16
19
22
24
25
27
27
27
27
27
28
29
30
30
30
30
30
31
31
32
33
33
35
47
48
48
Page 4
BOSmanager Remote Administrator - Users Manual
Trees Tab - - - - - - - - - - - - - - - Browse Tab - - - - - - - - - - - - - - SNMP Tab - - - - - - - - - - - - - - PXE / TFTP Tab - - - - - - - - - - - Enable Log – View Log - - - - - - - - Create Inventory File - - - - - - - - - XP Embedded Image Restore - - - - - BOSmanager License - - - - - - - - - Special Functions - - - - - - - - - - - Terminal License - - - - - - - - - - - PXE Backup - - - - - - - - - - - - - View Menu - - - - - - - - - - - - - - Standard Buttons - - - - - - - - - - - Status Bar - - - - - - - - - - - - - - - Types of Icons - - - - - - - - - - - - Large Icons - - - - - - - - - - - - - - Small Icons - - - - - - - - - - - - - - List - - - - - - - - - - - - - - - - - - Details - - - - - - - - - - - - - - - - Device Status Icons - - - - - - - - - - Enterprise Edition Info - - - - - - - - - About - - - - - - - - - - - - - - - - - Searching for devices on the network - - Organizing Devices in BOSmanager - - Sorting devices - - - - - - - - - - - - Moving Devices - - - - - - - - - - - - Working with device(s) - - - - - - - - Single Device - - - - - - - - - - - - - Multiple Devices - - - - - - - - - - - Description of Remote Device Operations
Remote Assistance - - - - - - - - - - Remote Power On/Off (Wake On LAN) Reboot - - - - - - - - - - - - - - - - Receive Configuration - - - - - - - - - Send Configuration - - - - - - - - - - Import Configuration - - - - - - - - - Firmware Update - - - - - - - - - - - Factory Default - - - - - - - - - - - - -
-
-
-
-
-
-
-
-
-
-
-
-
50
53
56
58
59
60
62
63
64
65
65
66
66
67
67
68
68
69
70
71
71
71
73
73
74
75
76
76
78
79
79
79
79
80
80
80
80
80
Page 5
BOSmanager Remote Administrator - Users Manual
Send an INI or Registry File
Sends a Message to a Device
Personalize… - - - - - - Contacts - - - - - - - - -
-
-
-
-
-
-
-
-
-
-
-
-
-
-
-
-
-
-
-
80
80
80
81
Page 6
BOSmanager Remote Administrator - Users Manual
Introduction
BOSmanager is a graphical remote management tool for monitoring, configuring, and applying firmware
upgrades to networked devices. BOSmanager provides interaction with remote devices on the network from a
PC or server where the software is installed.
BOSmanager presents a simple graphical representation of devices on the network to the user. In the left hand
pane devices are listed in a tree view according to an assigned group; the right hand pane can be configured to
display only device icons (large or small) or details about the devices, including device model, MAC address,
DOM size, device status, and firmware revision.
BOSmanager searches specified networks and subnets to find compatible devices. It then displays these
devices in a tree view where each type of device can be identified with a specific icon.
BOSmanager uses the SNMP protocol to discover devices on the network and query configuration parameters
which allows BOSmanager to discover devices by other vendors. Specific types of devices can be enabled for
browsing by BOSmanager (printers, network devices, Microsoft Windows devices, etc).
NOTE: This SNMP option is only available in the Enterprise Edition.
BOSmanager graphical interface allows the user to group devices by location, network address, or department.
Operations such as configuration management or firmware updates can be applied to entire groups of devices.
BOSmanager allows the user to specify a background image for a group of devices. The devices can then be
located at specific locations on the background image to represent a “device map”.
Additionally BOSmanager Remote Administrator allows the user to take complete control of the terminal from a
remote location.
Page 7
BOSmanager Remote Administrator - Users Manual
Prerequisites
Supported Operating Systems:
Windows XP
Windows 2000 Professional
Windows 2000 Server
Windows 2003 Server
Windows Vista
Minimum system requirements:
30 MB disk space
Network Interface:
TCP/IP, LAN, WAN, Dial-Up
Versions
BOSmanager is available in two versions: 1. A Freeware version supplies basic functionality for managing and
configuring devices. 2. An Enterprise Edition which provides more advanced functions for managing groups of
devices. The following table describes the capabilities of each version.
License
Devices Supported
Device Search
Monitoring
Remote Assistance (VNC)
Single device actions
SNMP service
Multiple device actions
Scheduled device actions
FreeWare
Enterprise
Trial
version
Edition
Enterprise Edition
No charge.
Based on the number of
No charge.
Can be downloaded at
concurrent devices to be
Any number of devices
www.bosanova.net
managed.
the user requests to
Max 250
•
•
•
•
From 1 to 100.000
•
•
•
•
•
•
•
evaluate the software.
At Request
•
•
•
•
•
•
•
Page 8
BOSmanager Remote Administrator - Users Manual
General Technical Specifications
Technical Specifications
Freeware Edition
Enterprise Edition
Min 1 - Max 250
Min 1 – Max 100.000
Freeware
Sold per number of
Graphic User Interface
•
•
Device discovery via broadcast
•
•
Device discovery via IP range
•
•
Tree devices view
•
•
Grouping of devices
•
•
Group properties with IP range and SubNet Mask
•
•
Management for PC with BOSaNOVA CrossRun Agent/Client
•
•
Custom Background image for Group view
-
•
Sort network devices by properties
•
•
Devices Status monitoring
•
•
Off-line device configuration
•
•
Wake-On LAN support for remote device Power On
•
•
Remote device shutdown and restart
•
•
Configuration Backup
•
•
Configuration Restore
•
•
Configuration Cloning
•
•
Remote Software Update
•
•
Remote Assistance (shadowing)
•
•
Screen saver logo customization
•
•
Factory Image Restore for XPE Thin Client
•
•
Number of concurrent administrable remote network devices
Software licence
Administrative Functions
Integrated Features
FTP service for device software upgrade
•
•
HTTP service for device software upgrade
•
•
SNMP browsing support for SNMP device administration
-
•
Multiple actions with multiple Group device selection
-
•
Scheduler service for action planning
-
•
CrossRun Management Console for CrossRun application publishing
-
•
User Manager service for centralized configuration profile
-
Planned
Device Inventory file creation
-
•
Page 9
BOSmanager Remote Administrator - Users Manual
TCP Port Utilization
BOSmanager uses a number of specific network ports to communicate with remote devices. When the remote
devices are behind either a firewall or router it may be necessary to configure the port access on these devices
in order for BOSmanager to access the remote devices. The following table describes the ports used by
BOSmanager.
Ports Out
Protocol
UDP
TCP
UDP
TCP
Port
1680
21
161, 162
5800, 5900
Description
Thin Client
FTP service
SNMP browser
VNC shadowing Thin Client
Port
1680
161
69, 4011
5500
Description
Browsing devices
SNMP
TFTP, PXE service
VNC shadowing
Ports In
Protocol
UDP
UDP
UDP
TCP
Page 10
BOSmanager Remote Administrator - Users Manual
Installation
Installation from CD.
Insert the CD and wait for the main installation window to appear. The installation program will start
automatically after the CD is inserted. To begin the installation, click the Setup button in the main installation
window.
If you do not have an installation CD and have downloaded the setup file, you will need to manually
launch the installation. To do this, double click on the BOSmanager.exe icon. By default, the keyboard and
code page will be set to English.
The following window will appear on the display.
On all of the next setup screens press the Next button to continue.
Page 11
BOSmanager Remote Administrator - Users Manual
Read the license agreement and select the ”Yes” button.
If the “No” button is selected, the installation will terminate and need to be restarted.
Press the Next button to continue.
Page 12
BOSmanager Remote Administrator - Users Manual
Type in the User Name and the Company Name of the person using the program.
Press the Next button to continue.
Page 13
BOSmanager Remote Administrator - Users Manual
The next screen allows the selection of the installation directory.
This window allows the selection of the program installation directory. Press the Next button to accept the
default location.
Alternatively you can browse to the desired directory. After selecting the desired directory press the OK button.
Successive windows display the status of the installation. If it is necessary to change any of the information,
press the Back button to return to the appropriate installation page. Otherwise you can start the installation
program again.
During the installation a progress bar will be displayed at the bottom of the installation window, when the
installation is complete the following window will be displayed:
Page 14
BOSmanager Remote Administrator - Users Manual
If you want to launch BOSmanager, check the “Start BOSmanager” check box and press the Finish button.
Alternatively uncheck the check box and click the Finish button.
The installation program will create entries on the windows Program menu in the BOSaNOVA -> BOSmanager
folder as shown below.
Page 15
BOSmanager Remote Administrator - Users Manual
Launching the Program for the first time
The first time BOSmanager runs, it will prompt for some initial configuration information.
NOTE: The initial configuration can be modified at any time from within the BOSmanager program.
BOSmanager device browsing options.
The window shown above allows the control of how BOSmanager will search for devices on the network.
Refresh at Startup
When this option is checked, BOSmanager will browse the network and update the device list every time the
program is launched.
Refresh Timer
When this option is checked, BOSmanager will browse the network and update the device list at a user
selectable interval; the interval is controlled by the slider next to the right of the check box.
NOTE: These options can be changed from within the BOSmanager program.
Page 16
BOSmanager Remote Administrator - Users Manual
Broadcast
When checked, BOSmanager will attempt to discover devices on the network using a broadcast command.
NOTE: The broadcast command allows very fast refresh of the device list on the network, however in a
WAN environment this option may not work properly; routers and firewalls are generally configured not to pass
broadcast commands. In this case it is necessary to configure the IP Address Range.
IP Address Range
When checked, BOSmanager will attempt to discover devices on the network using a predefined IP address
range; BOSmanager sends a special packet to every IP address in the range and looks for a response. In this
case it is necessary to configure an IP address range. To configure an IP address range refer to the chapter on
Tools – Options – IP Range.
After configuring the options press the Finish button to launch the program. The BOSmanager program will
display a main window with two panes; the left hand pane displays devices arranges in a explorer like tree view,
while the right hand pane displays specific information about each device.
NOTE: When the BOSmanager program is first installed, it is installed as the Freeware version. To enable
the Enterprise functionality it is necessary to register the product and enter a license code. For more information
on licensing the Enterprise Edition of the software, refer to the next chapter on License Management.
Page 17
BOSmanager Remote Administrator - Users Manual
License Management
When the BOSmanager program is first installed, it is installed as the Freeware version.
To activate the Enterprise mode functionality it is necessary to enter a license code.
A license code is normally sent electronically via E-mail. Once you have received your license:
Start the BOSmanager program.
Select the Tools menu.
Click on the BOSmanager License menu item to display the following license dialog box.
Page 18
BOSmanager Remote Administrator - Users Manual
This window displays the information about the current license.
Click the License button at the bottom.
Page 19
BOSmanager Remote Administrator - Users Manual
This window displays the information about the product version and serial number.
A product serial number (supplied with the license) must be entered before the actual license.
Page 20
BOSmanager Remote Administrator - Users Manual
License Installation from a File
Before continuing please make sure you have the license file supplied by BOSaNOVA sales available.
Click on the Import File button and browse to the folder containing the supplied license file; select the license
file (*.lic) and click the OK button.
The following message will be displayed on successful activation of the license file:
Press the OK button to complete the license activation.
Installation From a Certificate File
Before continuing please make sure you have the license file document (usually supplied as a PDF file)
available for reference.
Enter the Serial Number from the license certificate.
Page 21
BOSmanager Remote Administrator - Users Manual
The serial number is a 10 digit number; make sure you enter ONLY 10 digits.
Once a serial number has been entered the Activation Code field will appear at the bottom of the licensing
dialog box. The activation code is a 22 letter field.
After entering the activation code press the Install button.
A dialog box will appear indicating a successful license activation.
NOTE: The previous procedure is for activation of the Enterprise License. Other codes may have to
be entered to activate other features of the product.
The activation procedure normally requires 3 steps as follows.
1. Activation of the Enterprise License
2. License number of Clients
3. License Software Subscription
Page 22
BOSmanager Remote Administrator - Users Manual
Completing the License Management
This window will display the version the BOSmanager as well as the Enterprise license activation information.
The license information is displayed as follows:
•
Enterprise license activation
•
License for 20 Clients
•
License for Software Subscription
Page 23
BOSmanager Remote Administrator - Users Manual
BOSmanager Product Overview
BOSmanager is a software product which allows remote administration of all BOSaNOVA networked devices as
well as the identification of any other manufacturer’s device which is compatible with the SNMP protocol.
The following paragraphs describe the basic features and advantages of using BOSmanager:
•
Starting BOSmanager.
BOSmanager can be started simply by clicking on the desktop icon or the Program menu link created
during the installation. BOSmanager will display a graphical interface for exploring network devices,
viewing network devices, and managing these devices. Refer to the chapter on the BOSmanager user
interface for more specific information on the three main areas of the BOSmanager interface.
•
Searching for devices on the network.
BOSmanager provides the capability to search for devices on the network. By default BOSmanager will
only search for BOSaNOVA devices; BOSmanager Enterprise Edition can be also be configured to
search for other manufacturers devices on the network using the SNMP protocol. Each device is
displayed as a unique icon type in a tree like view. Refer to the chapter on configuring BOSmanager for
more information on this topic.
Note: Every device seen on the network takes a license in BOSmanager.
•
BOSmanager Explorer Window.
The left hand pane of BOSmanager displays the discovered devices in an explorer tree-like view where
each device is represented by an icon specific to that device type. These devices can be “grouped” into
subfolders as specified by the user; grouping can be made according to IP address, device type,
location within the network, or any other convenient criteria. A unique IP address range can be specified
configured for each group as part of that group’s properties.
The right hand pane of BOSmanager displays the information about the selected item in the left hand
pane, similar to a Windows Explorer window. The selected item can be a single device or a group of
devices.
•
Monitoring/Configuring/Updating devices.
Device actions including configuration management, firmware upgrading, and monitoring can be
accomplished by right clicking on a device or group of devices and selecting the appropriate menu item
from the popup menu.
The following actions are available within the BOSmanager interface
Monitoring device status.
BOSmanager displays the status of each device using an icon with either a red or green indicator. A
device shown with an icon containing a green indicator is on line and active. A device shown with an
icon containing a red indicator is off line and unavailable.
Page 24
BOSmanager Remote Administrator - Users Manual
On-line management.
BOSmanager allows management of the device configuration using a simple intuitive interface. Simply
right click on the device in the left hand pane and a popup menu will appear; the popup menu provides
complete access to all of the operations available on the device.
Manage groups and multiple devices.
BOSmanager allows common operations to be performed on groups and/or individually selected
devices. This capability provides a simple, time saving method when needing to configure multiple
devices. It is also possible to apply a configuration from one device to groups of other devices in a single
operation. The group management capability is only available in the Enterprise Edition of the software.
Backup or Restore BOSmanager device configuration.
BOSmanager provides options for backing up and/or restoring the configuration. The backup information
includes the configuration of devices on the network as well as any groups and/or IP ranges; this
provides a snapshot of the user’s network configuration of devices.
Page 25
BOSmanager Remote Administrator - Users Manual
Main BOSmanager Window
Shown below are the main components of the BOSmanager window.
NOTE: The appearance of the BOSmanager window may vary depending on the host operating system.
The view above was taken from a standard Vista installation.
1. Title bar
The standard Windows title bar, which displays the program icon, the program name, and three buttons:
Minimize, Maximize, and Close.
2. Menu Toolbar
The toolbar menu contains icons for the most common BOSmanager tasks. These tasks will be
discussed in more detail in the following paragraphs.
3. Left User Interface Pane
The left hand pane of BOSmanager is where the devices are shown as unique icons (different icons
represent different device types). The devices will initially be displayed as children of the Network
Neighborhood icon at the top of the pane. If groups of devices are defined, the groups appear as folder
icons within the Network Neighborhood. The left hand pane behaves exactly like the Windows Explorer.
(i.e. – folders can be expanded to reveal subfolders and/or devices, devices can be expanded to reveal
Page 26
BOSmanager Remote Administrator - Users Manual
their configuration). To expand a device or folder node, double click on the icon or press the arrow to the
right of the icon. More detailed information on these operations are available in the following
paragraphs.
4. Right User Interface Pane
It is the screen area where are shown all the details of the selected left screen object. In this area
are available 4 views. Inside this area it is possible to execute single or multiple device selection and
with right mouse click you can display context menus to run specific remote actions.
More detailed information on each single options is available in the following paragraphs.
5. Status Bar
At the bottom of the BOSmanager window is a status area which displays the status of the current
operation. The status bar area also displays detailed information about the currently selected device or
group of devices such as MAC address, status, etc. More detailed information on the status bar area is
available in the following paragraphs.
Menu Bar
The BOSmanager menu bar is shown below. Just below the menu bar is a menu toolbar which provides rapid
access to the most common BOSmanager operations.
The menu bar contains the following items:
•
The File menu contains commands for browsing the network (searching for devices), backing up and
restoring the BOSmanager configuration, removing devices and/or groups, and adding devices and/or
groups.
•
The Modify menu contains commands for copying, moving, renaming, and deleting devices and groups.
This menu also provides access to the properties of a device and/or group via the Properties menu
item.
•
The Device menu contains all of the commands for working with devices and groups.
Page 27
BOSmanager Remote Administrator - Users Manual
•
The Tools menu provides access to functions for configuring the BOSmanager options, installing
licenses, and logging BOSmanager operations.
•
The View menu is used to configure the appearance of the BOSmanager interface.
•
The Info menu contains Web Site and About information.
The toolbar located just below the menu bar contains ICONS for accessing the most common BOSmanager
functions as described below.
1. Browse the ENTIRE network for devices and refresh the status of each device.
2. Refresh only a subgroup of the entire network of devices.
3. Move a device to another group or location.
4. View the properties of the selected device or group.
5. Change the way in which the devices are displayed in the right hand pane.
Page 28
BOSmanager Remote Administrator - Users Manual
File Menu
Add Group
Creates a new group for devices.
To create a group select the option, enter a descriptive name, and press the OK button. The new group
will appear with a folder icon under the Network Neighborhood node (or under the group in which it was
created – it is possible to have subgroups). Each group has its own set of properties the most important of
which is the IP range; this specifies which devices will be included in the group. Each group can also have
a subnet. Group properties are described in more detail in the following paragraphs.
Refresh All...
Refreshes all devices
Browse All...
Provides options for browsing the entire network or sub networks for devices and updating the device
status and/or configuration. The IP range for scanning devices can be specified for each group including
the Network Neighborhood.
Global Backup and Restore
Permits the backing up of the current BOSmanager configuration (Global Backup); the backup archive
contains all of the information on each device and group. The BOSmanager configuration can be restored
by selecting the Global Restore menu option.
The Global Backup option creates a single backup file with a *.bkp extension. The default location for this
file is in the BOSmanager Files subdirectory of the Windows user’s Documents and Settings directory.
Page 29
BOSmanager Remote Administrator - Users Manual
The Global Restore option allows the user to browse for a BOSmanager backup file (*.bkp). When doing
a Global Restore, BOSmanager will warn the user that this action will erase the current configuration.
Remove All…
The Remove All option allows the user to:
- Remove All Devices
removes all devices but leaves the group definitions intact.
- Remove All Groups and Devices
removes all devices and ALL groups.
Exit
Exits the BOSmanager program.
Page 30
BOSmanager Remote Administrator - Users Manual
NOTE: When exiting the program ALL groups, devices, and configurations will be saved.
However when the program is run again, the state and/or configuration of the devices may have changed;
for this reason it is recommended to enable the option for Refresh of the network when BOSmanager
starts.
Page 31
BOSmanager Remote Administrator - Users Manual
Modify Menu
Move To
Moves a device or group to another group.
To move a device or group select the item with the mouse in the left pane and then select the Move menu
item. A dialog box will appear displaying the network nodes; select the destination location for the item to
be moved.
Press OK to complete the operation.
Rename
Permits the renaming of a BOSmanager group.
To rename a group, select the group using the left mouse button; select the Rename menu item and enter
the new name. Press OK to complete the operation.
Delete
Deletes a group, a single device, or manually selected devices.
Select the group and/or device(s) using the mouse and select the Delete menu item. BOSmanager will
display a message for confirming the operation. NOTE: Devices and groups can be selected exactly like
files in the Windows Explorer – using ctrl, shift, and mouse.
Properties
Allows the viewing and modification of the device(s) and/or group properties.
NOTE: The properties displayed depend on the type of node which is selected (i.e.- a device, group,
or multiple selection of devices). A device’s properties are not available until the device configuration is
received by BOSmanager; this can be done manually from the menu or automatically every time
BOSmanager refreshes the network of devices.
Page 32
BOSmanager Remote Administrator - Users Manual
Group Properties
To modify the group properties select the group and select the Properties menu item; alternatively right
click on the group icon and select the Properties menu from the popup menu.
General
Allows modification of the group name.
Page 33
BOSmanager Remote Administrator - Users Manual
IP Address Ranges
Assigns one or more IP address ranges to the group.
To view and/or modify the address range(s) for the group, select the IP Range tab of the Group
Properties dialog box. You can select an existing IP range from those listed by checking the box next to
the range to be included. To add or modify the list of IP Ranges, press the IP Range button; another
dialog will appear for modifying or adding a new IP range.
Browse Delay
The Browse Delay is the time delay BOSmanager will use between the probing of IP addresses; it can
be modified using the vertical slider. A smaller Browse Delay is preferred since it reduces the time it
takes to refresh the list of devices on the network, however for very slow networks or a WLAN situation a
longer delay time may be needed.
Page 34
BOSmanager Remote Administrator - Users Manual
Subnet
The Subnet tab is used to enable the exploration of a specified subnet of the IP address range..
The Enable Subnet Control check box must be checked in order to define a subnet. The Subnet IP
address is the address of the subnet. The Subnet Mask is used to specify the which networks of the
Subnet IP will be explored for devices.
Option
The Option tab controls how the group’s devices will be displayed in the right hand pane. Choices are
Small Icons, Large Icons, Details, List, or Application Settings. The first three options display the
devices exactly like the Windows Explorer displays files. The Application Settings option allows the
user to specify an image for the background when Small Icons or Large Icons is the selected view.
To specify a background image, press the Import button and browse to the folder where the background
bitmap resides, select the image file, and press OK to import the image.
The Set Remap check box allows the devices to be moved on the background image to create a visual
map of the network. Available only in the Enterprise Edition
Page 35
BOSmanager Remote Administrator - Users Manual
The following table describes the available group visualizations:
Application Settings
Large Icons
Small Icons
List
Details
Use application settings as described above
Display devices as large icons
Display devices as small icons
Display devices in a list
Display devices in a list with detailed information
Set Remap, allows the device icons to be moved on the background image for large or small icon views.
Import, imports an image to be used for the background in large or small icon views.
Reset, resets the background image and device locations for large or small icon views.
Page 36
BOSmanager Remote Administrator - Users Manual
Device Menu
On the Device menu are all of the options for managing a device. Clicking the right mouse button on a device
within either the left or right pane will cause the following popup menu to be displayed.
This section describes some of the general options for configuring devices. For more detailed information on
configuring specific BOSaNOVA devices refer to the documentation for that device.
Page 37
BOSmanager Remote Administrator - Users Manual
Manage Connections
The Add Session is used to configure access to programs on the device.
Configuration
-
Receive, causes the device to send its complete configuration to BOSmanager.
The received configuration will update the local configuration for the device.
-
Send, BOSmanager will send the local configuration to the device.
-
Import from…, copies a configuration from another device to the selected device.
Only compatible devices (i.e.- devices of the same model) can be used as a source for the
configurations.
Using this option makes it very easy to copy or clone configurations to other devices.
If you select a model that is not compatible or the same model as the unit you are trying to import to, the
BOSmanager will not allow this and the OK button will be grayed out.
Page 38
BOSmanager Remote Administrator - Users Manual
-
If a correct model that is compatible with the unit you are trying to import to, the OK is no longer grayed.
Page 39
BOSmanager Remote Administrator - Users Manual
Select OK and Choose the copy configuration options:
Page 40
BOSmanager Remote Administrator - Users Manual
Upon completion select YES and the thin client will reboot.
Page 41
BOSmanager Remote Administrator - Users Manual
Once the thin client finishes the reboot the configuration will be copied.
Page 42
BOSmanager Remote Administrator - Users Manual
Firmware Update
The Firmware Update option is used to apply firmware upgrades and/or product add-ons to a device. To use
this option, a firmware upgrade file for the specific model of device must be obtained from BOSaNOVA;
attempting to apply an incompatible upgrade to a device will result in the following warning:
Before applying a firmware update make sure the upgrade file is the correct version for the device. Right click on
the unit and select Firmware Update.
Page 43
BOSmanager Remote Administrator - Users Manual
If you have downloaded a file from BOSaNOVA to your PC, select Embedded HTTP Service. Select OK.
Browse to the directory where you saved the image file, select the image and select Open.
Page 44
BOSmanager Remote Administrator - Users Manual
NOTE: During this process the file is unzipped prior to uploading to the thin client and that may take several
minutes so please do not interrupt the process or the DOM may be damaged.
Once the process starts you can see the progress bar and various files being transferred, once complete the unit
will reboot with the new image installed.
Power Options
-
Power On, sends a wake-on-lan packet to the device for power on.
Power Off, causes the device to power off.
Reboot, cause the device to reboot.
NOTE: These commands are sent via a network broadcast command. In a WAN environment, many routers
will NOT allow broadcast commands to pass through as network traffic therefore these functions will not operate
properly.
Page 45
BOSmanager Remote Administrator - Users Manual
Special Functions
The Special Functions menu supports some useful device operations as follows.
-
Factory Default, resets the configuration of the device to the factory default configuration.
NOTE: This operation will give the option to Keep Network Settings. If they are not kept it may make
the device unreachable on the network as it wil be set to DHCP.
-
Send Ini File, this function is specific to BOSaNOVA WTC Thin Clients.
Contact BOSaNOVA if it is necessary to modify the CE.net registry before performing this operation.
-
Shadowing, All BOSaNOVA Thin Client devices have the ability to be shadowed from BOSmanager
using the VNC protocol; the VNC viewing mode can either be complete control over the keyboard and
mouse, or view only.
View Only, the desktop on the device is viewed in a VNC window; activity on the device can be
monitored, but the keyboard and mouse will not be active.
Full Control, the desktop on the remote device will appear in a VNC window and the local mouse
and keyboard can be used to completely take over/control the device.
NOTE: For the Shadowing function to work properly, remote VNC connections MUST BE enabled on the
device.
Page 46
BOSmanager Remote Administrator - Users Manual
-
Send Message, this function allows a message to be sent to the terminal from the administration.
Prepare USB Configuration by using this option the user can store the terminal’s configuration on a
USB flash drive. The user can then plug that USB into any thin client (same model) and restore the
configuration either as a Partial or Full restore. This allows you to clone configuration by using a USB
flash drive instead of the BOSmanager.
Personalize
Allows the user to specify a custom screen saver image or a wallpaper image for BOSaNOVA Linux and CE.Net
Thin Clients.
Move To…
Moves the device to another group or location.
Delete
Deletes the device from the BOSmanager.
Page 47
BOSmanager Remote Administrator - Users Manual
Refresh
Refresh the state of the device.
Properties
Allows the viewing and/or modification of a device configuration.
Page 48
BOSmanager Remote Administrator - Users Manual
Tools Menu
The Tools menu allows the general configuration of BOSmanager operation, logging of device operations, and
licensing. More information on these operations is provided in this section.
Page 49
BOSmanager Remote Administrator - Users Manual
Options
Select the Options menu item from the Tools menu and the following dialog will be displayed.
General Tab
Receive Configuration upon New Device Check Box
When this option is checked the device configuration will automatically be uploaded when a new device is
detected. This option allows the configuration to be received without having to manually Receive the
configuration from the Device menu.
NOTE: The configuration received from the device by BOSmanager is stored locally; it is possible that the
configuration of the device itself can change as a result of local user interaction. Therefore it is important to
upload the configuration of the device before modifying the configuration.
Page 50
BOSmanager Remote Administrator - Users Manual
Sort By
Controls the default organization of devices and sessions within the BOSmanager graphical interface.
Devices
Type and Name, devices will be sorted by type and within each type by name.
Name, devices will be sorted by name only.
Sessions
Type and Name, sessions will be sorted by type and within each type by name.
Name, sessions will be sorted by name only.
Check Device Status
When this option is enabled (checked) BOSmanager will automatically refresh the device status at the
specified interval. The device refresh interval is controlled by the horizontal slider; the refresh interval
can be between one and ten seconds.
NOTE: Normally every device reports status to BOSmanager when the device is booted or when the
network is refreshed. Enabling this function will increase the network traffic. The Refresh option can be used to
manually refresh the device status.
Page 51
BOSmanager Remote Administrator - Users Manual
Trees Tab
All functions in the Trees tab are only available with an Enterprise License.
The Trees Tab controls which BOSmanager components will be displayed under the Network Neighborhood.
NOTE: When changing the trees that BOSmanager will display, it is necessary to restart BOSmanager for
these changes to take effect.
Page 52
BOSmanager Remote Administrator - Users Manual
Scheduler
Checking this option enables the BOSmanager Scheduler; the scheduler is used to perform automatic power
on, power off, and reboot events at specified times.
Right clicking on the scheduler icon will display the popup menu shown below. To add a scheduled event select
the appropriate event type.
After selecting the event type, a Wizard will start for configuring the event. First an event name must be entered,
then the time (and repeat interval) of the event must be selected. Finally the devices for the event must be
selected (groups of devices may be selected for an event).
NOTE: Scheduler is only available in the Enterprise Edition.
Page 53
BOSmanager Remote Administrator - Users Manual
CrossRun
The CrossRun component provides integrated configuration management for the CrossRun Server product.
BOSmanager displays the available CrossRun servers as well as the published applications; it is possible to
easily remove or add published applications as well as to remove or add CrossRun servers from the interface.
The CrossRun Server and client products must be installed.
For more information on configuring the CrossRun client please refer to the CrossRun Server Users Manual.
Page 54
BOSmanager Remote Administrator - Users Manual
Browse Tab
Select the Browse tab with the mouse to display the dialog shown below.
This window is used to configure the various options for device browsing.
Refresh Startup
When checked, BOSmanager will browse the network for devices (and refresh the device status) each time it is
launched.
Refresh Timing
When enabled, this option will cause BOSmanager to browse the network at the specified interval; the interval is
controlled by the horizontal slider.
Broadcast
Enables device discovery using a broadcast command on the network; this method of browsing devices is very
fast compared to an IP address range scan.
NOTE: Most routers and firewalls will not pass through network broadcast commands. In this case the
device discovery must use the Range IP method.
Page 55
BOSmanager Remote Administrator - Users Manual
Range IP Address
When this option is enabled BOSmanager will search for devices by sending a network discovery packet to
each IP address in a defined IP address range. In this case an IP address range must be defined. For more
information on IP address ranges refer to the section on Tools – Options – IP Range.
After the Browse configuration is complete press the OK button to apply the changes.IP Range Tab
Selecting the IP Range tab with the mouse will display the dialog shown below.
From this window it is possible to add, modify, or remove an IP address range. Once an IP address range has
been defined, it is possible to select this range for a group. The section on Group Properties describes how to
select an IP range for a group.
When BOSmanager is first installed there are no IP address ranges defined; the default IP address range is the
network to which the machine running BOSmanager belongs.
To create a new address range press the Add button.
Page 56
BOSmanager Remote Administrator - Users Manual
Enter a starting IP address (example - 192.168.0.1) and an ending IP address (example 192.168.0.100) and
press the OK button. The new address range will now appear in the listing of existing ranges. In the listing of IP
address ranges the Group column indicates the group to which the range belongs (if any).
To edit an IP address range press the Edit button.
To delete an IP address range, select the range to delete from the list box and click the Delete button.
NOTE: After defining an IP address range, this range my now be associated with a BOSmanager group.
For more information on selecting an IP address range refer to the section on Group Properties.
Page 57
BOSmanager Remote Administrator - Users Manual
SNMP Tab
Selecting the SNMP tab with the mouse will display the dialog box shown below.
The SNMP window is used to configure which types of devices to recognize using the standard SNMP network
management protocol.
The window displays a list of supported device types.
Check the box to the left of each device type to enable recognition of those devices no the network.
Press the OK button to confirm the configuration.
Page 58
BOSmanager Remote Administrator - Users Manual
When the network is refreshed, any device types enabled above will be displayed with a unique icon depending
on the type of device; the devices seen in the image above to the left at the bottom are other types of SNMP
devices.
Right clicking on these devices will display a popup menu with the available administration options. Different
devices may support different BOSmanager management options
NOTE: Each additional device displayed takes a license.
Page 59
BOSmanager Remote Administrator - Users Manual
PXE / TFTP Tab
Selecting the PXE / TFTP with the mouse will display the dialog box shown below.
This window is used to enable the BOSmanager integrated PXE and TFTP support.
NOTE: The following requirements are necessary to use these services:
-
The terminal BIOS MUST support the PXE boot protocol
An active DHCP service on the LAN
Enable PXE, TFTP Servers
Activates the integrated PXE and TFTP servers.
NOTE: When using these services it is necessary to specify a shared network directory (a standard
Windows share should be used). The disk space required for the backup / restore operations is either 512MB or
1000MB. The shared folder ideally should have at least 2GB of free space.
NOTE: These services require significant network bandwidth; it is not recommended that these services be
run over a WAN.
Server IP Address
Page 60
BOSmanager Remote Administrator - Users Manual
The name or IP address of a server/PC configured with a shared folder.
Share Name
Name of the shared folder on the server/PC.
User
A user account which has read/write access to the shared folder.
User Password
Password for the user account.
Press the OK button to confirm the settings.
Enable Log – View Log
To enable BOSmanager logging select the Enable Log menu item; this will enable the logging of all
BOSmanager operations. The View Log menu item is disabled as long as the Enable Log menu item is
checked (enabled).
The logging operation can be used to debug situations where devices cannot be seen on the network.
To obtain a BOSmanager log 1. Select the Enable Log menu item to enable logging.
2. Use BOSmanager in the normal way to perform device operations.
3. Deactivate logging by unchecked the Enable Log menu item.
Once logging has been stopped, the View Log menu item can be used to view the BOSmanager log.
Page 61
BOSmanager Remote Administrator - Users Manual
NOTE: The previous log file (if any) is overwritten each time Enable Log is selected.
Create Inventory File
To create an inventory file of all devices, select the Create Inventory menu item from the Tools menu as shown
in the diagram below.
This function is available only with the Enterprise License.
BOSmanager will prompt for a file name in which to save the device listing.
By default the subdirectory BOSmanager Files will be created in the user’s documents directory for storing the
file.
Inventory files can be generated as comma separated files (*.csv) or normal Windows Excel files (*.xls). The
following columns are included in the output:
DATE TIME; IP Address; MAC Address; Model; Network Name; DHCP status; Version
Page 62
BOSmanager Remote Administrator - Users Manual
It is possible to create an inventory of a group or multiple groups; simply select the group(s) using the mouse and
keyboard keys (CTRL/SHIFT) normally used to select files in the Windows Explorer. Once the desired groups
are selected select the Create Inventory menu item.
Page 63
BOSmanager Remote Administrator - Users Manual
XP Embedded Restore
This option is used to restore a flash disk image to a Embedded XP Thin Client device but has not been
implemented as of yet. To restore an image to an XPE thin client get the latest version of BOSaNOVA Manager
which can be found on BOSaNOVA’s FAQ area:
http://www.bosanova.net/faq/xtc_monitor.htm
Page 64
BOSmanager Remote Administrator - Users Manual
BOSmanager License
When installing BOSmanager the Freeware version of the software is always installed first. In order to activate
the Enterprise Edition it is necessary to enter a product serial number and activation code.
These codes are normally in a license file (*.lic) sent by E-mail; the activation codes can be obtained by
contacting BOSaNOVA Sales.
In order to start the licensing, select the BOSmanager License menu item from the Tools menu.
Refer to the licensing section in this document for more detailed information on licensing BOSmanager.
Page 65
BOSmanager Remote Administrator - Users Manual
Special Functions
The Special Functions submenu on the Tools menu, provides several useful tools for tracing and licensing
terminals.
Page 66
BOSmanager Remote Administrator - Users Manual
Terminal License
This menu item is used to license several BOSaNOVA Thin Client terminal models.
The Terminal License functionality is normally only use to restore licenses to terminals which have been
replaced or to terminals which have had the flash storage replaced. This option should only be used under the
direction of BOSaNOVA Technical Support.
Add License File
Imports a license file; the license file can be supplied either by BOSaNOVA or generated using the Export
Terminal List function.
Export Terminal List
Exports a list of terminals and license codes; this file can then be added to other BOSmanager installations for
automatic licensing.
Get Web Licence
Permits the automatic generation of terminal licenses from the BOSaNOVA license server; the name of the
server and a user name / password are necessary to license terminals. This information is made available to
BOSaNOVA distributors and OEMs by BOSaNOVA Technical Support.
PXE Backup
The PXE backup option allows the backup and restore of the device flash memory. To initiate the backup or
restore operation, the MAC address must be entered. This function will work on all models of terminals since it
simply reads or writes the entire flash drive.
NOTE: PXE Backup requires the PXE / TFTP server to be enabled as described earlier in this document.
Page 67
BOSmanager Remote Administrator - Users Manual
View Menu
The View menu is used to change how the devices are displayed in the right hand pane of the BOSmanager
interface; the available views are identical to those in a standard Windows Explorer. The View menu also allows
the user to show or hide various elements of the BOSmanager interface.
Standard Buttons
This option is used to show or hide the BOSmanager toolbar shown below.
Page 68
BOSmanager Remote Administrator - Users Manual
Status Bar
Show or hide the status bar at the bottom of the BOSmanager user interface; the status bar display areas are
shown below.
1. Information about the currently selected device
2. Network name of the selection
3. IP address of the device
4. Model number of the device
5. MAC address of the device
6. Firmware version of the device
7. License information. Total number of licenses and number of licenses in use.
Types of Icons
Controls how the devices are displayed in the right hand pane of the BOSmanager user interface.
NOTE: Regardless of the view type selected, multiple selection of devices and/or groups will be available
(only in the Enterprise Edition).
Page 69
BOSmanager Remote Administrator - Users Manual
Large Icons
Displays the large icon representation of the devices. In this view type it is possible to arrange the icons
manually. This can be useful when a background image for the group is specified – i.e. a map of the devices can
be created.
Small Icons
Displays the small icon representation of the devices. The position of the small icons can be changed as with the
large icon view.
Page 70
BOSmanager Remote Administrator - Users Manual
List
Displays the devices in a list type of view.
NOTE: This view type does not support a background image for the group.
Page 71
BOSmanager Remote Administrator - Users Manual
Details
Displays the devices in a list view with details about IP address, model, MAC address, firmware version, and
hardware platform.
NOTE: This view type does not support a background image for the group.
Page 72
BOSmanager Remote Administrator - Users Manual
Device Status Icons
Every remote device is identified using a unique icon.
Enterprise Edition Info
Website - Launches a browser to www.bosanova.net
About
Displays the BOSmanager product version as shown below.
Page 73
BOSmanager Remote Administrator - Users Manual
Page 74
BOSmanager Remote Administrator - Users Manual
Searching for devices on the network
The Devices → Options → Browse dialog box configures how BOSmanager will search the network for
devices (broadcast and/or IP Range) and when the device list will be refreshed; automatic refresh of the device
list can be performed at a user specified interval (in seconds).
To manually search the network for devices use the Browse the Network Neighborhood menu item.
Alternatively select a group with the left mouse button and press the F5 key.
BOSmanager will populate the device list with the devices it discovers.
NOTE: In order to browse the network, BOSmanager requires several TCP/IP ports to be opened on the
host PC and any firewalls and/or routers between the BOSmanager host and the remote devices. If these ports
are not opened BOSmanager will not be able to detect devices. Also most routers and firewalls will not pass
through a broadcast command; in this case the IP Range method of browsing must be used.
The ports used by BOSmanager are listed at the beginning of this document.
Organizing Devices in BOSmanager
BOSmanager allows the organization of devices into groups thereby allowing the user to work with groups of
devices when applying configurations, firmware updates, scheduled events, etc.
The organization of devices into Groups is normally done using an IP address range; that is each group is
assigned one or more IP address ranges to search for devices. Refer to the sections on Adding Groups and
Group Properties for more information on this topic.
NOTE: The group and device information is saved each time the BOSmanager program exits; this
information is used to initialize the device list each time the BOSmanager program is started.
Page 75
BOSmanager Remote Administrator - Users Manual
Sorting devices
When using the Details viewing mode it is possible to sort the devices by any of the displayed columns.
To sort the devices by a column, click the left mouse button on the column title.
This allows devices to be sorted by:
•
Name
•
IP address
•
Model
•
State
•
Firmware version
By default devices are sorted by the name.
Example: Click the Version column title and the devices will be sorted by firmware version number where
devices with the latest firmware are listed first.
Page 76
BOSmanager Remote Administrator - Users Manual
Moving Devices
It is also possible with BOSmanager to manually move devices from one group to another thus allowing any
arbitrary type of device grouping.
To move a device, select the device with the left mouse button and select the Move To menu item from the
Modify menu. A dialog box, as shown below, will appear listing the current groups; from this list select the
destination group for the selected device and press the OK button to confirm. Alternatively, right click on the
device and select the Move To menu item from the device popup menu.
It is also possible to select multiple devices and to move ALL of the selected devices to a specific group at once.
When using the large or small icon view, it is possible to move the location of the devices within the right hand
BOSmanager pane. In the group properties Option dialog, the Set Remap mode must be enabled. Then select
either the small or large icon view; devices are moved by clicking and holding the left mouse button down while
dragging the device icon to the desired location.
Page 77
BOSmanager Remote Administrator - Users Manual
The following example shows how it is possible to create a map-like view using a background image and placing
the devices at certain locations over the image.
Working with device(s)
Single Device
To work with a single device, click on the device with the left mouse button; selected device(s) will be displayed
with a blue background. It is also possible to directly click the right mouse button to display the device popup
menu.
The two ways to work with the device are:
1. Right click on the device to display the device popup menu
2. Select the device and use the Device menu
When right clicking on the device, the popup menu shown below will be displayed.
Page 78
BOSmanager Remote Administrator - Users Manual
The options on the device menu will depend on the type of device selected; for more information on device
specific functions refer to the product information for that device.
Page 79
BOSmanager Remote Administrator - Users Manual
Multiple Devices
BOSmanager allows a user to perform operations on multiple devices.
NOTE: Multiple device selection is only available in the BOSmanager Enterprise Edition.
Multiple selection of devices works exactly like multiple selection of files in the Windows Explorer.
To select consecutive multiple devices hold the Shift key down and select the first device, then select the last
device and all devices from the first selection to the last selection will be highlighted.
To select nonconsecutive devices hold the Control key down and select devices with the left mouse button;
each selected device will be highlighted
Once the devices have been selected, press the right mouse button over the selected device(s) to display the
device popup menu.
The following example shows the selection of multiple devices (both consecutive and nonconsecutive).
Page 80
BOSmanager Remote Administrator - Users Manual
The options on the device menu will depend on the type of device selected; for more information on device
specific functions refer to the product information for that device.
NOTE: Not all device functions will be available for multiple selections; the available operations depend on
the model(s) of devices selected.
Description of Remote Device Operations
This section describes the device operations common to all devices; for information on operations specific to a
particular model, refer to the documentation for the product.
Remote Assistance
All BOSaNOVA Thin Client devices have the ability to be shadowed from BOSmanager using the VNC protocol;
the VNC viewing mode can either be complete control over the keyboard and mouse, or view only.
The Remote Assistance functionality is useful for supporting remote users.
NOTE The remote assistance function should normally be password protected.
Remote Power On/Off (Wake On LAN)
Some types of devices support the wake on lan power control (Wake On LAN); for these devices it is possible to
remotely power off and power on the device using WOL network command.
NOTE: The wake on lan function using a network broadcast command. These types of commands
will not normally work in a WAN environment. (Most firewalls and routers do not pass broadcast
commands).
Power events can be scheduled to occur at a specific time using the BOSmanager Scheduler. For instance
turning off the devices at 6:00PM and turning them on at 7:00AM.
Reboot
Reboots the remote device.
NOTE: This operation will terminate all active sessions on the device.
Page 81
BOSmanager Remote Administrator - Users Manual
Receive Configuration
BOSmanager receives the configuration from the device
Send Configuration
BOSmanager sends the local configuration to the device
Import Configuration
Import a configuration from another device on the network.
Firmware Update
Allows the device firmware to be updated over the network.
The time it takes to complete this operation will vary depending on the device type and the network speed.
Each product model requires a specific file to perform an upgrade.
Factory Default
Resets the device configuration to the factory default state.
NOTE: This operation will give the option to Keep Network Settings. If they are not kept it may make the
device unreachable on the network.
Send an INI or Registry File
Sends a specific configuration file to the device. This operation should ONLY be performed with the assistance
of BOSaNOVA Technical Support.
Sends a Message to a Device
A popup message is sent to the device.
Personalize…
Allows the setting of bitmap images (background/screensaver) on the device; only available on some models of
Thin Clients.
Page 82
BOSmanager Remote Administrator - Users Manual
Contacts
BOSaNOVA, Inc.
2012 W. Lone Cactus Dr.
Phoenix, AZ 85027
Phone: 866-865-5250
Email: [email protected]
Web: www.bosanova.net
Technical Support Team
Phone: 866-864-5250
Fax: 623-516-8697
Email: [email protected]
Page 83