1
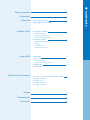
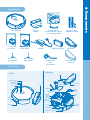
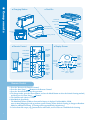
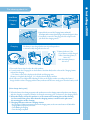
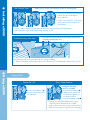
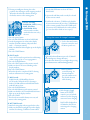
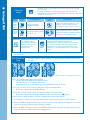
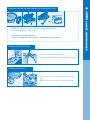
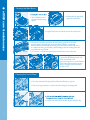
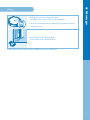
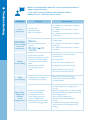
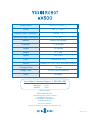
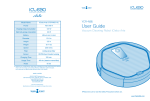
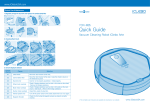
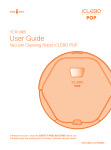
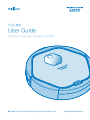
YCR-M05
User Guide
Robotic Vacuum Cleaner eX500
■Please be sure to read the Safety Precautions before use.
www.yujinrobotusa.com
2
Components
5
Reference
Tips for effective cleaning
Operating principles of eX500
7
Installing eX500
pre-operation check list
• Assemble side-brushes
• Insert remote control batteries
• Assemble Ultra Microfiber Mop
Pre-cleaning check list
• Install Base(Charging) Station
• Charging
• Set Current Time
• Install boundary area tape
8
Using eX500
• Power On/Off
• Start / Stop cleaning
• Using the move and charge functions
Cleaning mode
Set cleaning time
10
Emptying the Dust Bin and cleaning the Antibacterial Filter
Cleaning the Side Brushes
Cleaning the Sensors
Cleaning the Main Brush
Cleaning the Front Wheel
13
Using eX500
eX500 care & maintenance
● contents
Safety precautions
9
12
Storage
15
Troubleshooting
16
Error codes
17
1
● S a fe t y p r e c a utions
Please read this manual carefully and follow all warnings and instructions.
Users must be aware of operations prohibited by
Prohibited
this product.
Users must follow the instructions to avoid serious
Warning
injury or death.
Users must follow the instructions to avoid injury
Caution
or product damage.
Electric and power cord precautions
- Do not wrap the power cord tightly or place heavy objects on it.
Warning
→ This may cause electric shock or fire.
- Keep the pin and interface of the power plug clean from dust or water.
→ This may cause malfunction or electric shock.
- Do not pull the power cord or touch the power plug with wet hands.
→ This may cause electric shock or fire.
- Do not use a damaged power plug or power cord, or insert the power plug into a
loose outlet.
→ This may cause electric shock or fire.
- In the event water enters the internal part of the cleaner, the product should be sent
for service even though the product was dried.
- Do not repeatedly plug and unplug the product.
→ This may cause electric shock or fire.
- Caution should be taken when plugging the adapter directly into the charging socket.
→ This may cause electric shock or fire.
2
Prohibited
Warning
Caution
- Do not touch the charger's power cord with wet hands.
→ This may cause electric shock.
- Arrange cables or wires in the cleaning area before use to avoid entangling
with the robot.
→ This may cause fire or electric shock due to damaged cable.
- Remove light objects or clothing from the cleaning area before use.
→ This may damage the object or clothing while robot is in use.
Caution
- Remove small or fragile objects from the cleaning area before use.
→ Fragile objects may be damaged.
→ Remove coins or expensive jewelries before cleaning.
Caution
- Clear the floor of objects that may get in the way.
→ Thin towels, pads, power cords, table clothes, etc., may get tangled with the wheels.
Also objects on a table may fall off if the robot bumps a table.
Caution
Caution
Warning
Caution
Warning
● S a fe t y p r e c a utions
Precautions before using
- Empty the dust bin before operating eX500.
→ Suction function may not perform well if dust bin is full.
- Check that the main components such as antibacterial filter, brush
and dust bin are assembled properly before cleaning.
→ In the event you use eX500 without the main components, such as the
antibacterial filter or brush, the product will not clean properly, and such operation
may damage the product. Also, children and pets may be deemed as a barrier by
the eX500 resulting in certain areas not being cleaned.
- Do not operate eX500 when children or pets are present and left alone.
→ The children or pets may be attracted to eX500 and may hurt themselves attempting
to play with the product.
- Do not place the power cord on the floor when installing a charging station.
→ eX500 may drag the power line while auto-charge or cleaning.
- Keep the charging station away from water.
→ This may cause electric shock or fire.
3
● S a fe t y p r e c a utions
Precautions while using
Warning
Caution
Caution
Caution
Caution
Caution
Caution
- In the event of an unusual sound, smell or smoke emanating from the product, immediately
turn off eX500 and place it in a safe distance away from anything flammable.
→ This may cause electric shock or fire.
- Do not use eX500 on a table or any high surface.
→ This may damage the product.
- In rare instances eX500 cleaner may scratch or otherwise damage particular flooring.
In this event, discontinue use.
- In the event a large piece of plastic or other substance is vacuumed up, remove it immediately.
→ Serious damage to the eX500 can occur when it is used for a period of time with its suction
duct clogged.
- Tranport eX500 to another area when it is blocked by a threshold of the entrance
or ledge .
- Prevent eX500 from vacuuming liquid materials.
- Do not use eX500 near flammables such as cigarettes, hot materials or gasoline.
→ This may cause fire.
- Do not use use eX500 outdoors.
Precautions after using
Warning
Warning
- Prior to cleaning off foreign substances, turn OFF the power switch and then use the provided cleaning
brush to remove.
→ If eX500 operates all of the sudden, it may cause serious damage to the product.
Warning
- In the event eX500 or components are destroyed, contact the manufacturer or service
center for repair.
→ This may cause electric shock or fire.
Warning
Warning
Caution
Caution
Caution
4
- In the event a foreign substance is stuck to the sensor, eX500 may malfuction.
- Prior to cleaning the charging station, first pull out the power plug for safety reasons.
- Mishandling of the battery may cause an explosion or fire. At the end of the battery's service
life, dispose the battery in a lawful manner.
→ This may cause fire.
- Do not spray water directly on the product or wipe eX500 with volatile materials such as
benzene, thinner or alcohol when cleaning the product.
- Do not apply undue pressure to the bumper.
→ In case the bumper sensor is damaged, this may crash on the wall or with furniture.
- Do not disassemble, repair or alter the product except an authorized service provider.
→ This may damage the product.
MODE
CLOCK
TIMER
MAX
Robot Cleaner
YCR-M05
User Guide
sure to read
Cleaning Brush
(Cleaning Brush is inside
of the charging station)
Remote Control
(Batteries included)
YCR-M05
Quick Start Guid
e
Roboti
Robotic Vacuu
m Cleaner eX500
■Please be
Charging
Station
● Components
Components
c Vacuum Cleane
r eX500
the Safety Precaution
s before use.
www.yujinrobotusa.co
m
※The complete
user manual
is also available
to download
on our website
www.yujinrobo
tusa.com
User Guide
Side-Brush(R)
Quick Guide
Adapter
Side-Brush(L)
Antibacterial Filter
Boundary Area
Tape
(Virtual Wall)
Part Listing
Start/Stop Button
Camera
Front Wheel
Cover
Front Wheel
Dust Bin
Side-Brush
Lithium Ion Battery
Front Wheel
Position
Barrier
Sensor
Bumper
Ultra Microfiber
Wet Mop
● Bottom
● Top
Mode Button
Power Button
Mop Plate
Charging
Terminal
Mop plate
Main
Brush
Cover
Main
Brush
Fixed Pin for
Side-Brush
Wheel
On/Off Switch
Main Brush
Fixing Clip
Manual Charging Jack
5
● Components
● Charging Station
● Dust Bin
Antibacterial
/Blackout Filter
Filter Case
Charging Display
Dust Bin
Infrared Generator
Non-Slip
Pad
Blade
Charging Terminal
● Remote Control
Power Button
Direction Button
Enter Button
● Display Screen
Start/Stop
Button
Increase/
Decrease
Buttons
Time Setting
Button
Timer
Button
Charge Button
Change
Climbing
Height
Cleaning
Mode Button
Battery
Status
Time-set
Indicator
Mode Button
OPEN
Clock/
Cleaning
Time
Cleaning
Mode
Button
Auto(Navigation)
Mode
Random
Mode
Mopping
Mode
Climb Mode
Power
Mode
Button
Start/Stop
Button
Remote Control
1. Press the Power on the Remote Control.
2. Press the Start/Stop (
) Button on the Remote Control.
3. Press the Power Button to stop the operation.
4. To change modes, press the Power Button, and use the Mode Button to select the desired cleaning method,
and then press the Start/Stop (
) button.
5. The default mode is Auto + Climb.
6. Max Mode & Spot Mode
The Max Mode allows eX500 to clean until its battery is depleted. In Max Mode, eX500
starts in Auto(Mapping) mode to perform overall cleaning. When finished cleaning, it changes to Random
Mode for additional cleaning. (Cleaning will last approximately 120 minutes.)
※ On the floors like carpet, rug, patterned tiles and marble, set the iClebo to Climb Mode for cleaning.
6
Please follow the instructions below for high cleaning efficiency.
- Remove and empty eX500's dust bin after each use.
- Use the Area Boundary Tape to confine eX500 to a particular room or area, and prevent it from getting too
close to electrical cords, computer cords, or delicate objects on the floor, etc.
(Refer to P.10 Install Boundary Area Tape)
- Remove all the non-fixed objects such as toys, magazines or shoes from the cleaning area before cleaning.
- Do not lift up or move eX500 manually while operating.
( If you do this, the robot loses its way and skips areas.)
- Make sure to charge for at least 1 hour before using eX500 for the first time. (Refer to P.9 Charging)
● Re fe r e n c e
Tips for effective cleaning
Operating principles of eX500
Principles of the Robotic Vacuum Cleaner
This product recognizes the ceiling and obstacles with the camera and various sensors, and cleans by making a virtual
map in the CPU installed in the main body. It operates by drawing the most efficient map by determining the area that
has been cleaned and the area to clean. (Camera navigation is disabled in random mode.) With about 20 detection
sensors, eX500 can avoid wall or objects. (chair, vase, etc)
It climbs over an obsticle up to 0.79 inches in height, and floor sensors help it to avoid falling down stairs.
Be careful that pets or children do not force the robot to fall by playing with it.
How it works
This product has one main brush, two side brushes and vacuum motor. Debris on the floor is gathered by the
rotating side brushes, and is swept into the dust bin by the rotating main brush.
7
● Installing eX500
Pre-operation check list
Assemble side-brushes
1. After turning over eX500, identify the position of
the left and right side brushes.
2. Match the L side brush to the L marked on the bottom of
eX500. Then match the groove on the fixed pin and the
side brush and press on firmly.
3. Match the R side brush to the R marked on the bottom of
eX500. Then match the groove on the fixed pin and the
side brush and press on firmly.
CAUTION
Fit the side brush into the fixed pin of the robotic
vacuum cleaner matching the same shape.
Insert remote control batteries
Install 2 x AAA batteries before using the Remote Contol.
OPEN
1. Push the cover of the backside of the Remote Control downward to open.
2. Check (+)(-) of the batteries and install.
3. Match the cover to the groove, and close until “click” sounds.
Assemble Ultra Microfiber Mop
Ultra Microfiber Mop
Mop Plate
1
2
1. Turn over eX500, and install the Mop Plate by attaching it to the bottom of eX500 over the Dust Bin.
2. If Mopping mode is not used, keep the Mop Plate saperate from eX500.
※ In Mopping mode with mop plate attached, there may be cases that it is blocked by carpet, rug, or doorsill, and
cannot go forward normally. In such cases, moving the rug or carpet to one side and using Mopping
mode is recommended.
※ In some floor environments, there may be cases of not being able to go forward normally. If it cannot go forward
normally in the floor environment of marble floor or certain patterns, then also set Climb mode for cleaning.
8
1
2
3
Install Base
(Charging)
Station
4
1. Open the back cover of the Charging Station, and install
the adapter with connected power plug as shown in the figure 2 above.
2. Completely connect the charging jack of the adapter to the
jack inside the charging station.
Charging
● Installing eX500
Pre-cleaning check list
The battery is not charged at the time of product purchase.
so it must be fully charged before first use.
1
2
3
※ Battery Indicator Color
- Green: Battery is fully charged
- Yellow: Remaining battery is
50% or less
- Red: Remaining battery is
20% or less
1. Turn on the Power Switch on the side of the product.
2. Correctly match the Charging Pin on the bottom of the Main Body to the socket of the Charging Station,
and start the charging.
>> The battery status in the display window blinks and charging starts.
If battery is completely discharged, “Lo” is displayed in the display window.
3. Red, Yellow and Green light will be blinking in order on the display window according to the battery's
charge while the robot is charging and the battery indicator will become steady green when the battery is full.
[Auto-charge during use]
※ When the battery is low during an operation, this product moves to the charging station and performs auto charging.
After the charging is completed, it finishes cleaning the remaining space, and returns to the charging station.
※ When the battery is low, this product is set to return to the starting place of the cleaning.
So if it started from a place other than the charging station, it returns to the place near
the starting place of the cleaning.
※ Charging indicator color on Charging Station
- Red: change to eX500 is in operation away from the charging station, or the connection between eX500 and the
charging station is improperly connected.
- Green Blinking: Recharging
- Green: Recharge completed
9
● Installing eX500
Set Current Time
※ Make sure to set the current time for the set cleaning time.
1. Press the Clock button on the remote
control. The time on the display
screen will flash.
1
2
3
2. Set the "hour" with the (+)(-) buttons
on the remote control, and press the
Enter button.
3. Set the "minute" with the (+)(-) buttons on the remote control, and press the Enter button.
4. When the time is set, it confirms the setting with beep sound.
Install boundary area tape
※ Place the tape on the floor to prevent the robot from
entering an undesired area.
Bottom
side
Attach the tape at the top of stairs where there is a danger of falling.
→ If dust accumulates on the fall prevention sensors they may not “see downwards” and the robot may fall.
● Using eX500
Using eX500
Power On / Off
Press the Power Button ( ).
If you press it one more time,
it is turned off.
Start / Stop cleaning
Intelligent Cleaning
: AUTO+ CLIMB
1. Press the Power Button ( ).
※Make sure the AUTO and
CLIMB icons light up on
the display window.
2. Press the Start Button ( ).
※You can press the Climb Button on the remote
control to cancel Climb Mode. (If CLIMB
mode is off, the robot does not go over doorsills or
climb onto the carpet or rugs over 0.2 in. in height.)
10
Selected Cleaning
: RANDOM, SPOT(blinking)
, MAX, Wet Mop
A. RANDOM mode
It cleans with a random
method for the time set by
the user.
1. Press the power button
2. Press the MODE button to select RANDOM.
3. Set the cleaning time for robot in the display
window. (Default is 60 min. Adjust the time
with +, - on remote control.)
4. Make sure RANDOM icon lights up on the display
window.
5. Press the START button.
B. SPOT mode
It uses AUTO mode to perform focused cleaning
within a range of 1.6 ㎡ on a zigzag pattern.
1. Press the POWER button.
2. Press the SPOT button on the remote control.
3. Make sure the AUTO icon is blinking on the
display window.
4. Press the START button.
- When the robot has completed SPOT cleaning
mode, it will return to its starting point.
C. MAX mode
In MAX mode, eX500 will first clean in
AUTO mode. When the AUTO cleaning is
finished, eX500 will clean in RANDOM mode
until the battery is low.
1. Press the POWER button.
2. Press the MAX button on the remote control.
3. Make sure both the AUTO and RANDOM icons
lights up on in the display window.
4. Press the START
- The robot cleans until the battery runs out, and
returns to the starting point.
D. WET MOP mode
1. Attach the mop plate with mop pad to the robot.
2. Make sure the MOP icon lights up on the display
window. Deselecting CLIMB is recommended.
3. Use the MODE button to select AUTO or
RANDOM.
※Spot mode and Max mode can only be selected
by the remote control.
※In all mode selections, CLIMB is on by default.
If you want to turn it off, press the CLIMB button
on the remote control to turn off CLIMB mode.
(If you turn off CLIMB mode, the robot will not
go over doorsills or climb on to a carpet.)
● Using eX500
※During an intelligent cleaning, the robot
performs the cleaning in vision mapping method.
When the robot decides that the cleaning is
finsihed, it returns to the starting point.
Using the move & charge functions
2
3
1
1. Use the direction buttons
of remote control to send
eX500 to specific area.
2
1
3
- When the backward button is pressed, eX500 will
turn 180 degrees to change directions.
- If the direction button is pressed right after pressing
power button, it moves without cleaning (suction).
2
1
2
1
3
3
2. After eX500 has
started cleaning , if a
direction button is
pressed, it will move in
the desired direction
while cleaning.
3. If the charging (
)
button of the remote
control is pressed, it finds
and moves to the charging
station and starts charging.
BASE will be displayed on
eX500 when the robot is
returning to the charging
station.
11
● Using eX500
※ Climbing mode is on by default and eX500 will climb up a height
of 0.79 inches.
※ To prevent eX500 from climbing onto taller objects press the
CLIMB button. With climbing mode disabled the robot will only climb
a height of 0.79 inches.
Cleaning
mode
Set the Cleaning
mode
mode
Remote
control &
display
window
Cleans with camera
navigated mapping
AUTO
Only with
remote
control
Cleaning
mode
Explanation
RANDOM
Cleans in a random pattern for a set
duration. Set the duration with the
(+)(-) buttons on the remote control
After completing an AUTO cleaning,
eX500 will change to RANDOM mode
and clean until the battery is low.
Zigzag part cleaning within
a range of 1.6㎡
Status
Mopping
Explanation
Explanation
Status
The cleaning mode is
automatically changed to
Mopping mode once the
mop plate mounted
on the bottom
Door sill
adjust
Explanation
Enabling CLIMB mode will increase the
performance of climbing mode from 0.20 inches to
0.79 inches. However, even with climbing mode
the shape of a surface may prevent eX500 from
climbing over an obstacle less than 0.79 inches in
height.
※ During the cleaning of carpet or marble floor & patterned tile floors usage of AUTO + CLIMB mode is
recommended.
Set Cleaning
Time
※ When the TIMER is set for cleaning, the robot starts the cleaning at the set time
everyday.
1
2
3
※Refer to page 10 for setting the current time.
1. Press the TIMER button on the remote control.
→ The time indicator will blink in the display window.
If the cleaning time is set, it displays the set time.
At this time, to set a new cleaning time, press the TIMER button one more time.
2. Use (+)(-) to set the "hour" for the cleaning time and press the Enter button.
→ The set time is displayed in the display window.
3. Use (+)(-) to set the "minute" for the cleaning time and press the Enter button.
→ The set time is displayed in the display window, and the reservation icon ( ) appears.
4. Once the time setting completes, select the cleaning mode and press Enter button.
※ To cancel the reservation, press the timer button on the remote control, and press the Enter button.
※ When a TIMER cleaning reservation is set in AUTO mode, the robot will start cleaning at the set time and
return to the charging station when the cleaning is complete.
※ When a TIMER cleaning reservation is set in RANDOM mode, the robot will start cleaning at the set time
for the set duration and then return to the charging station.
12
1. Hold the Dust Bin as in the figure and separate Antibacterial Filter Cover.
2. Clean the Filter using Cleaning Brush.
※ Dust Bin can be washed with water.
However, completely dry them before assembling and using them again.
Cleaning the Side Brushes
● eX500 care & maintenance
Emptying the Dust Bin and cleaning the Antibacterial Filter
1. Separate the side brush with both hands.
2. Clean dust and foreign substances using the cleaning brush.
Cleaning the Sensors
1. Wipe the sensors on the Front Bumper of eX500 using
q-tips.
2. Wipe the sensors on the bottom of eX500 using q-tips.
13
● eX500 care & maintenance
Cleaning the Main Brush
2. Unlock the left/right-fixed
clip of the main brush.
2. Turn eX500 over and
place the bottom facing
upside.
4. Separate the brush cover then remove the main brush.
Furrow
5. Clean hair, carpet fiber and other substances may get stuck on the main
brush using the cleaning brush. Over time, hairs and fibers accumulate
between the main brush and the bearing. This extra friction which will causes
less efficient cleaning, more battery strain leading to shorter running time and
may ultimately stop eX500.
※ Use scissors or a knife along the main brush furrow to remove the hair.
CK
CLI
6. After cleaning, put the
pyramid-shaped bump on the side
of the main brush to the
pyramid-shaped recess on the bottom
of the robot.(Insert firmly to ensure
there is No gap between the brush
and the cam.)
Cleaning the Front Wheel
1. Press the front-wheel fix clip with both hands and lift up to seperate.
2. Remove foreign substances on the front wheel using the cleaning brush.
4. Put the front wheel back and lock in place with the clip.
ICK
CL
14
1. If eX500 is not used for a long period of time,
turn off the Power Switch on the side of the Main Body.
※ Please be aware that the battery could be discharged after an extended
period of non-use.
● Storage
Storage
2. Keep eX500 away from direct sunlight.
Store eX500 in a well ventilated location.
※ Please do not store any objects on top of eX500 as it may cause a malfunction
15
● Troubleshooting
Below is the explanation about the most occurred ‘breakdowns’
when using this product.
If you can’t solve the problem with information below,
please call your Customer service center.
Problem
It is not
cleaning well.
When I press
the power button
to turn on eX500,
it turns off
automatically.
eX500 is
not responding.
eX500
is not charging.
After cleaning,
eX500 is not
returning
to the
charging station.
16
Cause
▶ Dust Bin is full.
▶ Main Brush is dirty.
▶ Filter is contaminated.
Solution
▶ See <Product care & maintenance> and empty
the dust bin.
▶ See <Product care & maintenance> and use
main brush.
▶ See <Product care & maintenance> and clean
the dirty filter.
▶ Charge eX500.
▶Battery is charged but the dust
bin is full.
▶ Power switch is turned off.
▶ Remote Control batteries are dead.
▶ Infrared sensor or beam window
of the remote control are blocked
or dirty.
▶ Remote control is too close
to the Charging station or
eX500.
▶ See <Product care & maintenance> and empty
the dust bin.
▶ See <Product care & maintenance> and clean
main brush.
▶ Check the power switch on the bottom
of the main body.
▶ Re-charge eX500.
▶ Insert the battery of eX500 properly.
▶ Change the battery of a remote control.
▶ Wipe the infrared sensor & beam part
of the remote control with soft cloth.
▶ Charging station or eX500 is not
connected properly to the plug.
▶ Move farther away from the Charging
Station and press the button again while
pointing at eX500.
▶Power of the charging station
is not connected properly.
▶Infrared generator & ejector
on the Charging station and
detector of eX500 is dirty.
▶Cleaning started with auto-mode
but not from the charging station.
▶ Connect the power of the Charging Station
properly.
▶ Move the Charging Station. No objects should be
placed within 20 inches left/right or 5 feet in front
of the Charging Station.
This is to enable eX500 to return
to the home station automatically after
cleaning.
▶ eX500 must start cleaning from the charging
station to return to the charging station after
cleaning.
eX500 is
getting worse.
▶Empty and clean the dust bin.
▶Main brush is dirty.
▶See <Product care & maintenance>
(page 13) and clean the filter.
▶Main brush is dirty or hairs
are accumulating between the
main brush and the bearing.
▶See <Product care & maintenance>
(page 14) and clean the main brush.
● Troubleshooting
Noise of the
▶Dust bin is full or filter is
dirty.
Error Codes
Error display
Cause
Solution
Lifted wheel
Move eX500 to flat area.
C2
Cannot detect floor
Move eX500 to flat area in case the wheel is stuck on an
obstacle.
C3
Dust bin error
Dust bin is not properly assembled.
See <Product care & maintenance> and install properly.
C4
Wheel motor overload
Check if a foreign material such as hair or lint exists on the wheel.
See <Product care & maintenance> and remove the foreign
material.
C5
Brush motor overload
Check if a foreign material such as hair or lint exists on the main
brush or side-brush.
See <Product care & maintenance> and remove the foreign
material.
C6
Suction motor overload
See <Product care & maintenance>
and clean filter, empty the dust bin.
C7
Internal system error
Turn off the power switch of eX500 then turn it on again.
C8
Magnetic Sensor
Check that the front wheel & magnetic sensor are clean and
correctly installed.
● Error Codes
C1
17
Model Name
eX500 (YCR-M05- **)
Power
100 V ~ 240 V
Stand-by Power Consumption
Below 1 W
Main Body Energy Consumption
12 W
Battery
Lithium lon Battery
Diameter
13.8 inches
Height
3.5 inches
Weight
6.17 lbs
Speed
250 mm/s
Filter
Antibacterial filter
Sensor
Camera, IR, PSD, Gyro, Encoder, Bumper
Charging Time
110 min.
Usage Time
120 min. (based on normal floor)
Noise
58 dB[A]
Yujin Robot Customer Support : 1.855.926.1601
ㆍMonday-Friday 9 am to 6pm PST
Closed
ㆍSaturdays
ㆍSundays
Closed
MADE IN KOREA
©2014 Yujin Robot Inc.
16410 Manning Way, Cerritos, CA 90703
[email protected]
T 562.926.1601 F 562.926.1629
www.yujinrobotusa.com
One-Year Limited Warranty.
Specifications and features are subjected to change without notice.
iAMN.USA.500.V1