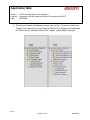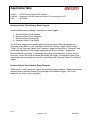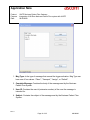
1
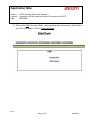
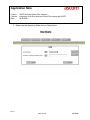
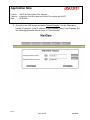
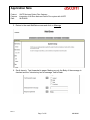
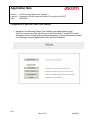
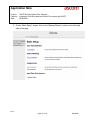
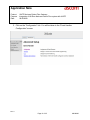
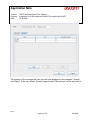
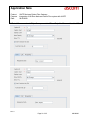
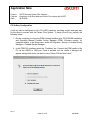
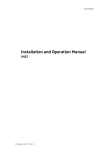
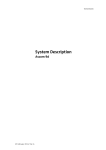
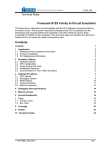
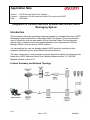
Product
Bulletin
Application
Note
Product:
Purpose:
Date:
UNITE Navicare Patient Flow Gateway
Integration of Hill-Rom Navicare Patient Flow system with UNITE
08/20/2008
Integration of Hill-Rom Navicare Systems with Ascom UNITE
Messaging System
Introduction
This document outlines the necessary steps and guidelines to integrate the Ascom UNITE
Messaging System with Hill-Rom’s Navicare Patient Flow System. This guide should be
used in conjunction with the appropriate Hill-Rom Navicare Patient Flow configuration
guide(s) and is intended for someone knowledgeable on the configuration of Hill-Rom
Navicare Patient Flow and Ascom UNITE systems.
It is assumed that the user has already installed UNITE products, according to their
respective installation guides. (See Related Documents section)
The steps, screen shots, and command line syntax depicted throughout this document are
based upon UNITE Navicare Patient Flow Gateway software version 2.13, ASCOM
Mailgate software version 2.23.
Product Summary and Network Topology
Rev. A
Page 1 of 25
AN-08006
Product
Bulletin
Application
Note
Product:
Purpose:
Date:
UNITE Navicare Patient Flow Gateway
Integration of Hill-Rom Navicare Patient Flow system with UNITE
08/20/2008
Hill-Rom Navicare Patient Flow Configuration
See Hill-Rom documentation: "INTEGRATING NAVICARE PATIENT FLOW WITH ASCOM
i75 AND UNITE"
TBLAB00297
Ascom UNITE Configuration
UNITE MailGate Appliance
MailGate is an SMTP mail server that provides each wireless device within a system with a
unique e-mail address. All e-mails that are sent to this address are forwarded to the
wireless device as a message. It is possible to configure which parts of an e-mail that is
sent to the wireless device.
MailGate will be used to integrate with the Navicare Patient Flow System. Messages from
Navicare Patient Flow will be sent via SMTP to the MailGate appliance and then relayed to
the Navicare Patient Flow Gateway. The user specified in the delivery address is used by
the Navicare Patient Flow Gateway as the device address for forwarding the message to
the proper device.
Configuration of MailGate
1. Navigate to the MailGate web administration page (http://xxx.xxx.xxx.xxx/admin) A
login pop-up window will appear. Log into the MailGate using the appropriate User
name and Password.
Rev. A
Page 2 of 25
AN-08006
Product
Bulletin
Application
Note
Product:
Purpose:
Date:
UNITE Navicare Patient Flow Gateway
Integration of Hill-Rom Navicare Patient Flow system with UNITE
08/20/2008
Rev. A
Page 3 of 25
AN-08006
Product
Bulletin
Application
Note
Product:
Purpose:
Date:
UNITE Navicare Patient Flow Gateway
Integration of Hill-Rom Navicare Patient Flow system with UNITE
08/20/2008
2. Click on the UNS link under “Other” on the left-hand side of the screen. This will take
you to the UNS screen. Click on Operating Mode.
Rev. A
Page 4 of 25
AN-08006
Product
Bulletin
Application
Note
Product:
Purpose:
Date:
UNITE Navicare Patient Flow Gateway
Integration of Hill-Rom Navicare Patient Flow system with UNITE
08/20/2008
3. Make sure the Operating Mode is set to Stand-alone.
Rev. A
Page 5 of 25
AN-08006
Product
Bulletin
Application
Note
Product:
Purpose:
Date:
UNITE Navicare Patient Flow Gateway
Integration of Hill-Rom Navicare Patient Flow system with UNITE
08/20/2008
4. Go back to the UNS screen and select Default Category. Set the “Messaging
handler IP address” to the IP address of your Navicare Patient Flow Gateway. Set
the “Messaging handler service name” to “EventHandler”
Rev. A
Page 6 of 25
AN-08006
Product
Bulletin
Application
Note
Product:
Purpose:
Date:
UNITE Navicare Patient Flow Gateway
Integration of Hill-Rom Navicare Patient Flow system with UNITE
08/20/2008
5. Return to the main MailGate screen and click on Message
6. Scroll down to Text forwarded to pager. Make sure only the Body of the message is
checked and the “Introductory text in message” field is blank.
Rev. A
Page 7 of 25
AN-08006
Product
Bulletin
Application
Note
Product:
Purpose:
Date:
UNITE Navicare Patient Flow Gateway
Integration of Hill-Rom Navicare Patient Flow system with UNITE
08/20/2008
Navicare Patient Flow Gateway
The Navicare Patient Flow Gateway is a Unite module based on the ELISE hardware. It
receives input from other Unite modules or from external equipment. The main functionality
of the Navicare Patient Flow Gateway is to perform event management and action rules. It
will convert events to actions in our systems, and also to provide an assignment interface to
offer the ability for users to dynamically assign recipients to events.
The Navicare Patient Flow Gateway will be used to integrate with the Navicare Patient Flow
System. Messages from Navicare Patient Flow will be sent via SMTP to the MailGate
appliance and relayed to the Navicare Patient Flow Gateway. This will then trigger a
corresponding event/action chain that will direct the message to the appropriate wireless
device.
Rev. A
Page 8 of 25
AN-08006
Product
Bulletin
Application
Note
Product:
Purpose:
Date:
UNITE Navicare Patient Flow Gateway
Integration of Hill-Rom Navicare Patient Flow system with UNITE
08/20/2008
Configuration of Navicare Patient Flow Gateway
1. Navigate to the Navicare Patient Flow Gateway web administration page
(http://xxx.xxx.xxx.xxx) This will take you to the “Basic Setup” screen Click on the
“Advanced” button. A login pop-up window will appear. Log into the Navicare Patient
Flow Gateway using the appropriate User name and Password.
Rev. A
Page 9 of 25
AN-08006
Product
Bulletin
Application
Note
Product:
Purpose:
Date:
UNITE Navicare Patient Flow Gateway
Integration of Hill-Rom Navicare Patient Flow system with UNITE
08/20/2008
2. On the “Basic Setup” screen, click on the “Backup/Restore” button on the left-hand
side of the page
Rev. A
Page 10 of 25
AN-08006
Product
Bulletin
Application
Note
Product:
Purpose:
Date:
UNITE Navicare Patient Flow Gateway
Integration of Hill-Rom Navicare Patient Flow system with UNITE
08/20/2008
3. The next screen that is displayed is the “Backup/Restore” screen. Click on the
“Browse…” button. When the Choose file pop-up window appears, navigate to
where you have stored the file: “Navicare Patient Flow Template.tar.gz” Select the
file and click the open button.
4. Click the “Restore” button. The “Browse” and “Restore” buttons will disappear
momentarily while the file is being restored. Wait until the restoration has completed
and click on the “Advanced” tab.
Rev. A
Page 11 of 25
AN-08006
Product
Bulletin
Application
Note
Product:
Purpose:
Date:
UNITE Navicare Patient Flow Gateway
Integration of Hill-Rom Navicare Patient Flow system with UNITE
08/20/2008
5. Click on the “Configuration” link. You will be taken to the “Event Handler
Configuration” screen.
Rev. A
Page 12 of 25
AN-08006
Product
Bulletin
Application
Note
Product:
Purpose:
Date:
UNITE Navicare Patient Flow Gateway
Integration of Hill-Rom Navicare Patient Flow system with UNITE
08/20/2008
6. On the Event Hander Configuration screen, click on the “+” sign next to the Event
Triggers” and make sure you see “Navicare Patient Flow” triggers in the expanded
list. If there are no “Navicare Patient Flow” triggers, repeat steps 2 through 4.
Rev. A
Page 13 of 25
AN-08006
Product
Bulletin
Application
Note
Product:
Purpose:
Date:
UNITE Navicare Patient Flow Gateway
Integration of Hill-Rom Navicare Patient Flow system with UNITE
08/20/2008
7. To complete the restoration, we now need to activate the configuration. Click on the
Activate configuration button at the top center of the “Event Handler Configuration
screen. A new pop-up window will appear. Click on the “Update Persistent elements”
radio button and click “Continue”. Another pop-up window will appear saying the
“Configuration successfully activated”, click “OK”
Rev. A
Page 14 of 25
AN-08006
Product
Bulletin
Application
Note
Product:
Purpose:
Date:
UNITE Navicare Patient Flow Gateway
Integration of Hill-Rom Navicare Patient Flow system with UNITE
08/20/2008
Navicare Patient Flow Gateway Event Triggers
In the standard backup template, there are four event triggers.
1.
2.
3.
4.
Navicare Patient Flow Cleanup
Navicare Patient Flow Transport
Navicare Patient Flow Assign
Navicare Patient Flow Default
The first three triggers are activated when a Navicare Patient Flow message arrives
containing a key word. For the “Navicare Patient Flow Cleanup” trigger the key word is
“Clean”; for the “Navicare Patient Flow Transport” trigger the key word is “Transport”; and
for the Navicare Patient Flow Assign” trigger the key word is “Assign”. Triggers are
executed based on position. If a message arrives with more than one key word, the key
word that occurs first in the list above will activate the trigger. If a Navicare Patient Flow
message arrives containing no key word, it will activate the “Navicare Patient Flow Default”
trigger.
Navicare Patient Flow Gateway Event Elements
There are four “event elements” used in the standard backup template. These elements are
assigned after a Navicare Patient Flow message has activated a trigger. The “event
elements” are shown in the next figure.
Rev. A
Page 15 of 25
AN-08006
Product
Bulletin
Application
Note
Product:
Purpose:
Date:
UNITE Navicare Patient Flow Gateway
Integration of Hill-Rom Navicare Patient Flow system with UNITE
08/20/2008
1. Msg Type: Is the type of message that caused the trigger activation. Msg Type can
have one of four values: “Clean”, “Transport”, “Assign”, or “Default”.
2. Complete Message: Contains the body of the message sent by the Navicare
Patient Flow System.
3. User ID: Contains the user id (extension number) of the user the message is
intended for.
4. Subject: Contains the subject of the message sent by the Navicare Patient Flow
System.
Rev. A
Page 16 of 25
AN-08006
Product
Bulletin
Application
Note
Product:
Purpose:
Date:
UNITE Navicare Patient Flow Gateway
Integration of Hill-Rom Navicare Patient Flow system with UNITE
08/20/2008
Event Assignment
After a trigger has been activated an “Event” will be assigned. In the standard backup
template, there are four possible events.
1. Navicare Patient Flow – Cleanup: Occurs when event element “Msg Type” is set to
“Clean”.
2. Navicare Patient Flow – Transport: Occurs when event element “Msg Type” is set
to “Transport”.
3. Navicare Patient Flow – Assign: Occurs when event element “Msg Type” is set to
“Assign”.
4. Navicare Patient Flow – Default: Occurs when event element “Msg Type” is set to
“Default”.
Action Configuration
For every event in the standard backup template, there is a corresponding action. The table
below shows the four events and the four actions:
Event
Action
Navicare Patient Flow – Cleanup IM
Navicare Patient Flow – Cleanup Action
Navicare Patient Flow – Transport IM
Navicare Patient Flow – Transport Action
Navicare Patient Flow – Assign IM
Navicare Patient Flow – Assign IM Action
Navicare Patient Flow – Default IM
Navicare Patient Flow – Default IM Action
Each action is an interactive message, meaning the recipient of the message will have the
ability to respond to the message, via soft keys. For the “Cleanup Action” and the
“Transport Action” the recipient will be able to “Accept” or “Reject” the message. For the
“Assign Action” and the “Default Action” the recipient will have the options to “Close” or
“Delete” the message. For all four actions, the message displayed on the wireless device
will be the “Subject” and “Body” that was sent to the user by the Navicare Patient Flow
System.
Rev. A
Page 17 of 25
AN-08006
Product
Bulletin
Application
Note
Product:
Purpose:
Date:
UNITE Navicare Patient Flow Gateway
Integration of Hill-Rom Navicare Patient Flow system with UNITE
08/20/2008
The following Table shows the Response Data for each message in the standard backup
template.
Action
Response Data
Response Data
(Accept/Close)
(Reject/Delete)
Navicare Patient Flow – Cleanup Action
Clean Accept
Clean Reject
Navicare Patient Flow – Transport Action
Transport Accept
Transport Reject
Navicare Patient Flow – Assign IM Action
Assign Close
Assign Delete
Navicare Patient Flow – Default IM Action
Default Close
Default Delete
Conditions based on these values of response type can be used to create further action like
message escalation. (No conditional response has been set in the standard backup
template.)
An example of the “Navicare Patient Flow – Cleanup Action” Interactive message is show
below:
Rev. A
Page 18 of 25
AN-08006
Product
Bulletin
Application
Note
Product:
Purpose:
Date:
UNITE Navicare Patient Flow Gateway
Integration of Hill-Rom Navicare Patient Flow system with UNITE
08/20/2008
The Navicare Patient Flow – Cleanup Action is assigned to the destination User ID that was
sent by the Navicare Patient Flow System.
The message that will be displayed on the handset will consist of the “Subject” and “Body”
that is sent by the Navicare Patient Flow System. The Priority is set to Normal.
Rev. A
Page 19 of 25
AN-08006
Product
Bulletin
Application
Note
Product:
Purpose:
Date:
UNITE Navicare Patient Flow Gateway
Integration of Hill-Rom Navicare Patient Flow system with UNITE
08/20/2008
The recipient of the message will have two soft keys displayed on their handset: “Accept”
and “Reject”. If the user selects “Accept” response data “Clean Accept” will be sent back to
Rev. A
Page 20 of 25
AN-08006
Product
Bulletin
Application
Note
Product:
Purpose:
Date:
UNITE Navicare Patient Flow Gateway
Integration of Hill-Rom Navicare Patient Flow system with UNITE
08/20/2008
XGate. If the user selects “Reject” response data “Clean Reject” will be sent back to XGate.
Rev. A
Page 21 of 25
AN-08006
Product
Bulletin
Application
Note
Product:
Purpose:
Date:
UNITE Navicare Patient Flow Gateway
Integration of Hill-Rom Navicare Patient Flow system with UNITE
08/20/2008
i75 Softkey Configuration
A soft key can be configured on the i75 VoWiFi handsets, providing a quick and easy way
for the users to interact with the Patient Flow System. To setup the soft key, perform the
following steps:
1. On the computer you have the PDM software installed (see TD 92325GB Installation
and Operation Manual Portable Device Manager (PDM), Windows version, for
complete details). In the Start menu, select All Programs > Ascom > Portable Device
Manager > Portable Device Manager
2. In the PDM GUI interface select the “Portables” tab. Connect the PDM cradle to the
PC via the RS232 or USB port. Place a portable into the cradle, a dialogue will
appear asking what action you want to take. Select “Edit but don’t save”.
Rev. A
Page 22 of 25
AN-08006
Product
Bulletin
Application
Note
Product:
Purpose:
Date:
UNITE Navicare Patient Flow Gateway
Integration of Hill-Rom Navicare Patient Flow system with UNITE
08/20/2008
The portable is shown in the list. The
icon in the Online column shows that the
portable is connected. The
icon in the Parameter column, indicates that the portable
is being synchronized
3. Click on the portable, to highlight it, then choose “Edit Parameters”
Rev. A
Page 23 of 25
AN-08006
Product
Bulletin
Application
Note
Product:
Purpose:
Date:
UNITE Navicare Patient Flow Gateway
Integration of Hill-Rom Navicare Patient Flow system with UNITE
08/20/2008
4. When the “Edit Parameters” window appears, select “NORMAL” > “SOFT KEY3”.
Under “Soft key name” type “NaviCar”. Under “Soft key function” select “Phone call”.
Under “Soft key user data” type in the IVR dial steam, followed by a P (for pause,
this may need to be adjusted to more than one P) followed by the User’s ID. In the
example shown below the IVR number is: 2345 and the user id is 1234.
5. Click on the “Save” button, to save your configuration changes.
Rev. A
Page 24 of 25
AN-08006
Product
Bulletin
Application
Note
Product:
Purpose:
Date:
UNITE Navicare Patient Flow Gateway
Integration of Hill-Rom Navicare Patient Flow system with UNITE
08/20/2008
Related Documents
Installation and Operation Manual, XGate
User Manual Administration, XGate
Programming Guide, Event Handler
Installation Guide ELISE2
Function Description MailGate
Installation and Operation Manual, IMS/IP-WiFi
Installation and Operation Manual Integrated Message Server
Installation and Operation Manual PDM, Windows version
TD92338GB
TD92364GB
TD92329GB
TD92232GB
TD92026GB
TD92322GB
TD92161GB
TD92325GB
Additional Information
If you have any questions or need additional information, please contact Ascom Technical
Assistance Center at 1-877-71-ASCOM, option 3.
Rev. A
Page 25 of 25
AN-08006