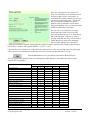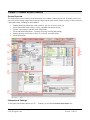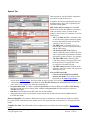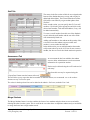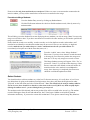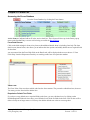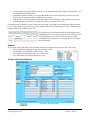
1
E-Com Administrator’s
Manual
©
v. 6.7; Hosted
Washington State’s
Special Education Forms Manager and
Electronic Compliance System
Website: http://ecomforspecialed.com/
©2000-2013 Portage Bay Solutions, Inc.
©2000-2013
Portage Bay Solutions, Inc.
TABLE OF CONTENTS
Chapter 1: Overview of System and ESM Duties................................................................................. 4 Overview: What is E-Com? ................................................................................................................................... 4 How to Use This Manual ....................................................................................................................................... 4 Duties of the E-Com System Manager.................................................................................................................. 4 Chapter 2: Staff and Password Maintenance....................................................................................... 5 How to Add a New Staff Member .......................................................................................................................... 5 Edit User ID and Password Information ................................................................................................................ 5 Modify Staff Data................................................................................................................................................... 7 How to Replace Staff Members............................................................................................................................. 7 Individual Staff Service Roster Reports................................................................................................................. 9 List an Individual Staff Member’s Students ........................................................................................................... 9 Chapter 3: Student Screen Features................................................................................................... 10 Screen Overview ................................................................................................................................................. 10 Information & Settings ......................................................................................................................................... 10 School, Staff and Notes Settings......................................................................................................................... 11 Student Access Data........................................................................................................................................... 11 Placement Tab .................................................................................................................................................... 12 Special Tab ......................................................................................................................................................... 14 Staff Tab.............................................................................................................................................................. 15 Assessment Tab.................................................................................................................................................. 15 Merge Duplicate Student Records ...................................................................................................................... 15 Delete Students................................................................................................................................................... 16 Chapter 4: Forms List........................................................................................................................... 17 Accessing the Forms Database .......................................................................................................................... 17 Form Detail Screen ......................................................................................................................................... 17 Value Lists....................................................................................................................................................... 17 Required or Default Text Fields ...................................................................................................................... 17 Previewing and Printing Blank Forms ................................................................................................................. 18 Chapter 5: Admin Screen..................................................................................................................... 19 Chapter 6: System Maintenance ......................................................................................................... 21 Set and Change System Preferences ................................................................................................................. 21 Access Log...................................................................................................................................................... 21 Text Editing ..................................................................................................................................................... 22 Batch Editing ................................................................................................................................................... 23 Form Data (Undeleting Forms) ....................................................................................................................... 25 Schools ........................................................................................................................................................... 26 Calendar.......................................................................................................................................................... 27 District Prefs .................................................................................................................................................... 28 Adding Required Fields or Default Text to Fields................................................................................................ 29 Copyright © 2000-2013, Portage Bay Solutions
www.portagebay.com
Page 2
Printed: 11/07/13
Form Lists Editing................................................................................................................................................ 30 Chapter 6: Tips, Help System & Troubleshooting ............................................................................. 32 Quick Tips ........................................................................................................................................................... 32 Support................................................................................................................................................................ 32 Trouble-Ticketing System ............................................................................................................................... 32 Troubleshooting Forms ....................................................................................................................................... 33 Areas of Service .............................................................................................................................................. 33 Staff Unable to Type in Forms ........................................................................................................................ 33 Unable to Activate a Form............................................................................................................................... 33 Duplication Dialog issues ................................................................................................................................ 34 Summary of Services Matrix ........................................................................................................................... 34 Edit Value Lists ............................................................................................................................................... 34 Typos .............................................................................................................................................................. 34 Forms Printing Blank ....................................................................................................................................... 35 Deselecting Drop-Down List Choices.............................................................................................................. 35 Troubleshooting Student Records....................................................................................................................... 35 Special Tab – LRE Code Calculation.............................................................................................................. 35 Chapter 8: Glossary.............................................................................................................................. 36 Copyright © 2000-2013, Portage Bay Solutions
www.portagebay.com
Page 3
Printed: 11/07/13
Chapter 1: Overview of System and ESM Duties
Overview: What is E-Com?
E-Com is a multi-user relational database. Multi-user means that staff across a network can gather all of a
student’s forms in one location for easier review and auditing of student history. Though E-Com does not
eliminate the requirement of printed forms stored in permanent student records, it does greatly simplify the
process of creating and managing the forms.
E-Com helps special education staff quickly create, store, and print special education forms, thereby helping
to eliminate inconsistencies and promoting compliance. The purpose of the E-Com system is to allow special
education teachers, psychologists, and other professionals to:
• Better collaborate in a team environment and provide improved student support.
• Create, store, and print special education forms required by the State of Washington for Special Education
students.
• Organize and store student, parent, school, and staff information related to students.
• Promote compliance with state and federal requirements
This manual will provide the E-Com System Manager (ESM) with system information and instructions for
tasks involved in maintaining the E-Com system.
How to Use This Manual
•
•
•
•
Use the Table of Contents to find a topic quickly.
The “Glossary” section at the back of this manual explains terms associated with the E-Com system and
referred to in this manual.
A list of do’s and don’ts called “Tips from the Trenches” appears in Chapter 6, along with
troubleshooting tips.
Most of the specific task instructions are listed in tables with pictures of buttons and other screen
elements you need to work with along. Be sure to do each step in the order shown.
Duties of the E-Com System Manager
The E-Com System Manager (ESM) has the following duties:
• In cooperation with Portage Bay Solutions, to add new forms and to change or delete existing forms to
conform to new state requirements or district standards. The ESM also maintains the E-Com system’s list
of active forms.
• To add new staff members to the staff table and to add or change staff member data.
• To add new schools to the school table and to add or change school data.
• To assign and change user IDs, passwords, and access levels.
• To insure that E-Com data is appropriately backed up and to test restores of backups.
• To help users search for and correct data entry problems such as incomplete records.
• To install the E-Com system for new users as needed, in cooperation with district technical staff.
Copyright © 2000-2013, Portage Bay Solutions
www.portagebay.com
Page 4
Printed: 11/07/13
Chapter 2: Staff and Password Maintenance
How to Add a New Staff Member
A new staff record must be added to the Staff table before a User ID, password, or any students are assigned to
that staff member in E-Com.
Go to the Staff Entry screen by clicking any Staff button.
Add a new Staff member by clicking the Create New Staff button (under “Actions” on the
left-hand side of the screen).
Enter the staff person’s name in the first and last name fields.
You may wish to add an email address for each staff member. Phone
numbers, if entered in the Phone field, may populate to certain
forms, so please use work numbers only in the Phone field (Phone 2
does not currently populate to forms, and may be used for home
numbers).
Select a Default Screen from the Default Screen drop down list (item
#1 right). This will be either the Student tab, the To Do tab, the
Admin Screen (for level 2 users only), or the Student List screen
(showing all students assigned to the staff member).
E-Com automatically assigns the Staff ID number (item #2 right). If
you use E-Com’s student import function, and you want case
manager information to be imported from the Skyward system, the
staff ID in E-Com must match the staff ID in Skyward in order for
that information to appear properly.
Note: Staff ID numbers should only be changed when entering a new staff member – if you change the ID for
already-existing staff members, you will break the connection between the staff and their currently-assigned
students.
New staff members default to having the ‘Include Staff in Pop-Up Lists’ checkbox checked. If the checkbox is
unchecked, the staff member will NOT be able to log into E-Com.
The next step is to assign the new staff member a user name and password.
Edit User ID and Password Information
How to Assign or Edit E-Com User IDs, Passwords, and Access Levels.
Be sure you are on the Staff screen for the individual whose user name and password you need to assign or
change.
Click on the Edit Login/Password button to bring up the screen below.
Copyright © 2000-2013, Portage Bay Solutions
www.portagebay.com
Page 5
Printed: 11/07/13
For a new staff person to have access to ECom, you must define a user ID and password
for them on this screen. For user name, we
recommend first initial, last name, but you may
use whatever pattern you prefer – please note,
however, that there should be NO spaces;
hyphens can be problematic as well and we
suggest leaving them out (so, Ann Jones-Smith
would be ajonessmith, for instance).
For new users, it is good policy to assign a
generic password, such as new1234# and
select the checkbox next to “User must change
PW upon next login.” That way, as soon as
they log in the first time, they will be asked to
change the generic password to something
more complex and specific to themselves.
Complex passwords are required, meaning that they must be at least 7 characters long, and they must contain at
least 1 letter, 1 number, and 1 special character (! @ # $ % ^ & *).
Choose an access level for the new staff member. See the list below, or the one provided to the side of the login
entry screen for more information on what the various access levels can and cannot do in E-Com.
Click the Save button to save your changes and return to the Staff Screen.
There is a general description of each level in the password edit dialog box. The table below shows a more
complete list of capabilities.
Capabilities
Access Level
6
5
4
3
2 (Admin)
View forms/batches
Y
Y
Y
Y
Y
View student records
Y
Y
Y
Y
Y
Find students
Y
Y
Y
Y
Y
Print/email/PDF forms & batches
Y
Y
Y
Y
Add/delete own forms & own batches
Y
Y
Y
Y
Run reports
Y
Y
Y
Y
Edit unlocked forms
Y
Y
Y
Y
Transfer forms to other batches
Y
Y
Y
Y
Mark forms as done
Y
Y
Y
Y
Add Notes/To Dos to student
Y
Y
Y
Y
Delete own notes
Y
Y
Y
Y
Duplicate form/batches
Y
Y
Y
Y
Insert text on forms
Y
Y
Y
Y
Add/delete (own) documents to student
Y
Y
Y
Edit student records
Y
Y
Y
Add student records
Y
Y
Add/edit programs for student
Y
Y
Add Areas of Service to student
Y
Y
Lock or unlock forms and batches
Y
Add/delete staff and schools
Y
Import/export data
Y
Copyright © 2000-2013, Portage Bay Solutions
www.portagebay.com
Page 6
Printed: 11/07/13
Edit locked forms
Y
Force password changes
Y
Modify program for forms/staff
Y
Reassign students to staff
Y
Set system preferences
Y
Delete/merge student records
Y
Run student updates
Y
Undelete forms & batches
Y
Modify Staff Data
Sometimes you will need to make modifications to a staff member’s information. Follow the procedures below to
find the staff member and make the changes.
Procedures for Finding a Staff Member:
Go to the Staff Entry screen by clicking any Staff button.
•
•
•
Click on the Find button.
Enter all or part of the name or other identifying information in the appropriate fields.
Click the “Continue” button in the Status Area (see “Glossary”), or hit the Enter key on your
keyboard.
Once the staff record has been found, click or Tab into the field(s) to be changed. Type the correction
over the selection. You can also cut and paste to make corrections.
How to Replace Staff Members
There are two steps to follow in order to replace a staff member. Please note, if your student import includes
case manager names, you can simply change the case manager name in Skyward and wait until the import
changes these. This will work for case managers, but not for teachers or most other staff.
1. Transfer the students in the staff member’s caseload to one or more other staff members. Because the
Staff Entry screen for the staff member contains a list of his or her students, it is easier to transfer the
students to another staff member before you remove the original staff member from the E-Com
system. See Step 1 below.
2. If the staff member is leaving the district, you may remove the staff member’s account from the Staff
table by deactivating their record. See Step 2 below.
Step 1: Re-Assign Students to a Different Staff Member
E-Com allows you to change all of the students in a staff member’s caseload to any other active staff
member. If your district uses SIS imports and imports the case managers’ names, you may simply change the
names in Skyward; if the staff IDs for the new staff assigned match their staff IDs in E-Com, the names of
the case managers will update automatically for active students. The Skyward import will not update names
for OT, PT, Teacher, SLP or Psychologist. Those must be updated as shown below.
Please Note: The ‘Replace Field Contents’ functionality described in this section has the potential to change
data in every record in your system. If you are unsure about these instructions, ask a Portage Bay support
person to assist you the first time you perform this operation.
Procedures for Re-Assigning Students:
Go to the Staff screen by clicking any Staff button.
Click the Find button.
Copyright © 2000-2013, Portage Bay Solutions
www.portagebay.com
Page 7
Printed: 11/07/13
Enter the name of the staff member whose
students are being re-assigned. When the entry
for that staff member comes up, select one of
the role buttons.
Note: If you have staff members who serve in
different roles (as case manager and as SLP, for example), you will have to do separate operations to reassign
students assigned to the staff’s different roles.
Determine if you want to reassign only the active students currently assigned to this staff member. If so, leave the
“Active Only” checkbox checked. If you want to reassign all active and inactive students, uncheck the “Active
Only” box.
Click the My Students button at the bottom of the staff screen. You will then be able to view the
records of those students assigned to the staff role you searched, in List view.
If the students in the staff member’s case load are to be divided among several
staff members, decide which students you will reassign first. In list view, you
may use the blue circle to the left of the student name to omit students who will
be reassigned in a later operation. You will reuse the My Students button to
reassign these omitted students later.
Once you have a list of the students who will be reassigned to the new staff member, go to the first student record
in the list by clicking on the blue name link.
Reassign this record to the new staff member by clicking in the yellow box
next to the staff role. A list of staff members will appear. Select the name
of the new staff member for this student.
Then you can make the same change to all of the other students as follows:
•
•
•
Go back to the pop-up list you just changed.
Leaving the list box open with your cursor in it, go up to the “Records”
menu;
Select “Replace Field Contents.”
Copyright © 2000-2013, Portage Bay Solutions
www.portagebay.com
Page 8
Printed: 11/07/13
In the dialog box, confirm that the selected field should be changed to the new
staff member’s staff ID number by verifying that it references the correct field
(Case Manager, Teacher, SLP, etc.).
Click the “Replace” button.
Note: The default button in the Replace Field Contents dialog box is Cancel.
Read the choices carefully before you click a button or hit the Enter key.
Repeat as needed until all students to be reassigned have been reassigned, and no active students appear in any
roles on the old staff member’s screen. You may leave inactive students assigned to the staff member for
historical purposes, if you prefer.
Step 2: Remove Staff Members from the Staff Table
Procedures for Removing a Staff Member:
Go to the Staff Entry screen by clicking any Staff button.
Click the “Find” button.
Enter all or part of the name or other identifying information in the appropriate fields. Hit the Enter key.
Once the staff record is found, uncheck the box next to “Include Staff in Pop-up Lists.” This will
remove the staff name from any staff pop-ups. The staff member will also no longer be able to log in.
If you wish to clean up old staff records, you may also delete inactive staff using the “Delete” button on
the staff screen. We recommend waiting for 2-3 years after deactivation before deleting staff records.
Individual Staff Service Roster Reports
In addition to accessing the service roster report for the district, you may also print, email or export
individual staff service rosters to an excel document. Simply do a find for a staff member, and on their staff
page, go up to the Reports item, and select “My Service Roster.” Note: This only works if you use the 14.1 or
14.11 summary matrix form in your district.
List an Individual Staff Member’s Students
To easily find, print or export a list of all students assigned to a particular staff member, do a find for that
staff member. On their Staff screen, select the tab for the role you are interested in (case manager, teacher,
other) and click the “My Students” button. From the list that appears, select the “Print” button. From here,
you can export the list as an Excel document, email it as a PDF, or print it.
Copyright © 2000-2013, Portage Bay Solutions
www.portagebay.com
Page 9
Printed: 11/07/13
Chapter 3: Student Screen Features
Screen Overview
The Student Entry screen is where all the information for a student is entered and stored. From this screen, users
can access and/or manage (depending on their privileges and the setup at their district) a variety of items related to
a particular student, including but not limited to:
•
•
•
•
•
•
Student identifying information such as address, age, area of service needs, etc.
School information such as home, serving, and other non-district schools.
Teacher, case manager, and other staff assignments
Forms and batch management – Creating, accessing, emailing and printing
Printing shortcuts for envelopes, labels, cover sheets, and other reports.
Parent information.
Information & Settings
To the right of the website shortcut (Go To …) buttons, you will find the Student Information area.
Copyright © 2000-2013, Portage Bay Solutions
www.portagebay.com
Page 10
Printed: 11/07/13
From this section, users can view:
1) Student demographic data – address, phone, “Active”
status, disabling condition, language, etc.
2) Student’s Areas of Service – this is a view of the services
defined for the student.
3) Quick “keyword” classifications – this is done via various
keyword checkboxes to the right of the Area of Services
section
For example: “Transport” denotes whether a student requires
transportation in order to receive services.
4) Eval and IEP dates – Any updates made to these fields after
the forms/batches have already been added to a student may
be updated by using the Refresh button on the Batch listings.
Note: Many changes made manually on the Student screen will be
overwritten by the data imported from SIS, if your district uses
this functionality.
School, Staff and Notes Settings
1. Schools: This section contains the schools associated with a
student including: Home, Serving, and other Non-District schools.
2. Staff: Case managers, teachers, psychologists, speech/language
pathologists, and physical and occupational therapists can be set
here.
Selecting the triangle next to any of the staff assignments will take
you to the Staff Screen for that individual. Staff members listed
here may also be emailed by selecting the envelope icon, if your
district uses that function.
3. Notes: As on the Staff screen, this field can be used for notes.
4. Alerts & Warnings: A checked Compliance Alert box means the
student is active and
•
•
•
•
the next IEP date has passed; or
the next evaluation date has passed; or
his/her condition is developmentally delayed and s/he is older than 9 years old; or
the student is within 120 days of his/her third birthday and the next evaluation date is outside that
timeframe.
A checked Compliance Warning box means the student is active and the areas of service are not aligned with
the current IEP.
Student Access Data
This section allows users to confirm when a
student record was created or the last time it was
modified. The same information can also be
viewed from the Special tab.
Copyright © 2000-2013, Portage Bay Solutions
www.portagebay.com
Page 11
Printed: 11/07/13
Forms Tab
More detailed information about the Forms tab can be
found in the User manual. Common questions for
administrators here have to do with locked forms or
batches, and address selection for forms and envelopes.
You can tell if a batch is locked by the checked
“Locked” checkbox in the Batch view area. At this time,
it may only be locked or unlocked by level 2 users.
Note: Locked batches may be duplicated to other
students; they should automatically unlock when they
appear on the second student record.
You can tell if a form is locked in the Form view area
below the batch view; a locked form will have red
highlighting around the “Done” checkbox. The
checkbox may be marked as done, or not; it makes no
difference to the lock.
If users experience difficulty in entering data into a
form, please check to see if it is locked. Locked forms
may be unlocked by level 2 users by opening the form
and unchecking the “Locked” checkbox in the yellow
navigation area to the right of the form, near the bottom.
Another item to note on this tab is the “Address to Print”
drop-down located in the Parent Info section. The
address selected here is considered to be the “preferred
student address,” and as such, will be the one used on
forms, envelopes, and in other locations. If the address
that appears on a form is incorrect, please check the
address selected here, and correct the selection as
necessary.
Notes Tab
More detailed information about the Notes tab can
be found in the User manual.
The Notes tab is a convenient place to keep track of
things that need to be done for a particular student.
Notes may be assigned to any active staff member.
If the note is marked as a “To Do” item, the To Do
tab of the staff member assigned will be the top tab shown each time they log into E-Com, until the item is
marked as done.
In addition, the student name on every staff screen that student is assigned to will appear highlighted in red until
the To Do item is marked as done.
Copyright © 2000-2013, Portage Bay Solutions
www.portagebay.com
Page 12
Printed: 11/07/13
Placement Tab
The placement screen is divided into four areas:
1) The Areas of Service section
• Any area of service displayed here will also be
listed on the Student Information section of the
Student Screen.
• Clicking the Add Area* button (1a) allows a user
to manually add a new Area of Service.
* Areas of service added here will display an error warning
that doing so may cause discrepancies between the areas
identified during the evaluation process and the IEP. Only
users with level 2 or level 3 access may edit areas of service
from this tab.
•
•
•
Clicking the green Delete & Archive circle (1b)
allows user to delete and archive the area to the
History section.
Clicking the red X (1c) allows the user to delete
areas. Using this selection does not archive the
area.
Goal forms with different Areas of Service than
those defined by the evaluation will display the
alert shown in red (1d).
2) The History section
• Shows prior qualifying areas and testing
information, if those have been archived.
3) The Programs section
• The student shown at right is actively enrolled (as
shown by the start date with no end date).
• Level 2 and level 3 users may add programs with
the “Add Prog” button or delete them by clicking
the red X.
• A start date (with either no end date, or an end date
in the future) is required for a checkmark to appear
in the Special Education program box on the
student screen.
• You will need to enter end dates when the student
exits the program, to uncheck the Special
Education enrollment checkbox. Future exit dates
are allowed; when the exit date has passed, the
program check box will uncheck.
4) The Projected Placement section
• Acts as a planning tool that allows users to track future placement and services for the student.
• When you add a school here, the student will appear in the Projected School list on the School Data Entry
Screen.
Copyright © 2000-2013, Portage Bay Solutions
www.portagebay.com
Page 13
Printed: 11/07/13
Special Tab
Data required for state and federal compliance
may also be found on this screen.
In addition, the Projected Graduation date may
be changed here. Note: This is updated by the
WesPAC student update.
LRE Codes and Percentages are calculated
based on all services the student is receiving as
of the current day’s date, as shown on the
student’s most recent 14.1 (summary of services
matrix) form.
• The % of Time in GE is a calculated value
for the time in the general education setting,
based on data entered on the current IEP’s
summary of services matrix.
• The LRE Code is calculated by E-Com
based on the % of time in special education
and the LRE setting.
• The Exception LRE Code field may
contain a manually entered LRE code or the
code as imported from the district’s student
information system (WesPAC, for example).
• The Final LRE Code reflects the LRE
Code field, unless an Exception LRE Code
has been entered. Exception LRE Codes
overwrite the calculated LR code.
• The LRE setting should be defined on the
Summary of Services matrix, but can also be
defined on this tab.
•
•
•
•
Eval and IEP date fields:
• Current and Next IEP/Eval and IEP
meeting date fields: These fields are also
displayed on the Student Information
section on the Student Screen. Revisions made to dates on either screen will update dates on the other.
Conforming to state and federal standards, the Next IEP/IEP Meeting and Next Eval fields default to 1 or 3
years minus a day (respectively) from the current date set.
Exception Date fields: To create a default Exception Date for the next Eval or next IEP or IEP Meeting,
enter the desired date in one of these fields. Adding an Exception Date will also modify its respective
Next/Due field entry.
Due Date field: The date that an IEP is due may be entered here.
Other information, such as referral date, parent consent date, and the like may also be added below the
Eval/IEP date fields.
Medicaid Eligibility: The student’s Medicaid status may be entered here. If the student is marked as eligible
here, there will be a red header on the student screen. If an expiration date is entered here, it will appear in that
header.
Template For field: Use of this field ties the student being viewed to the listed staff member’s My Template
button.
Copyright © 2000-2013, Portage Bay Solutions
Page 14
www.portagebay.com
Printed: 11/07/13
Staff Tab
The names in the first section of this tab are assigned at the
bottom of the Student data entry screen, and can only be
added and deleted there. The General Education Teacher
field will be auto-filled if you get student updates from
WesPAC.
In the second section, you can specify other E-Com staff
members. Click in the yellow popup box and click on the
desired staff member. Title and email address, if any, will
be added automatically.
To remove a staff member from this area of the Student's
record, delete the staff number and the rest of the fields
will automatically blank out.
Adding staff members to the student on this portion of the
screen will cause the student to appear on that staff
member’s screen, under the Other tab.
In the third section, you can add information about other
staff persons who may not be in E-Com for one reason or
another, but who are involved with the student in question.
Assessment Tab
An assessment tab has been added to the student
screen to allow administrators to track assessment
information for a particular student.
Entries may be deleted using the red X at the end of
each entry.
Data from this area may be exported using the
“Export Data” button near the bottom of the tab.
This will allow you to export the data in a number of different formats; we recommend .csv or .tab as these
formats are easy for Excel to open.
The values in the drop-down lists can be edited in the Admin-> Pref area, under the Lists 3 tab.
Merge Students
The Merge Students feature is used to combine the forms of two students and place them on one record while
deleting the other from the system. This is useful in the case when there are duplicate students and you would like
to merge the forms into a single student record.
Copyright © 2000-2013, Portage Bay Solutions
www.portagebay.com
Page 15
Printed: 11/07/13
Please note that only forms and batches are transferred. If there are notes or assessment data connected to the
inactive student, you may wish to transfer these to the active account before the merge.
Procedure to Merge Students
Go to the Student Entry screen by clicking any Student button.
Click the Find button and enter the criteria to find the student records, either by name or by
student number.
This will bring you to the Student List screen displaying the two students you wish to merge. Note: You may only
merge two records at a time. If you have more than two records for the same student, you will need to perform the
merge more than once.
Please check the records over carefully, to make sure they are in fact duplicate records, and not that a staff
member has accidentally overwritten the student name on one record. Once you are sure they are duplicate
records, mark the one you wish to keep as “Active” and deactivate the one you wish to delete. We
recommend you keep the one with the most data (notes, etc.).
From the “Admin” menu, select “Merge Students.”
Please note: If you have more than two records that need
to be merged, you will need to perform the merge more
than once. You may only merge two records at a time.
This Merge Students message will appear. Click “Yes” to
proceed or “Cancel” if you wish to abort the merge. Notes
that are connected to the deleted account will need to be
transferred to the active student’s record before the
merge. Once the merge is completed, placement areas
should be verified and updated as needed.
Delete Students
You should not have to delete students very often, but if it becomes necessary, it is easily done. A level 2 user
may delete them by going to the student record in question. Once there, pull down the drop-down list under
“Records” on the main menu and select “Delete Record.” Note: This should only be used for students added to
E-Com in error; there should be no batches or other items in the record. If there are, think carefully before
deleting the student record – you are deleting history you may need.
The student record will be deleted, and an entry to that effect will be recorded in the Access Log. The student
record will disappear from all staff and student lists, but E-Com keeps a hidden record with all pertinent
information and history. If you need to re-enter this student into E-Com, please contact Portage Bay Solutions.
Copyright © 2000-2013, Portage Bay Solutions
www.portagebay.com
Page 16
Printed: 11/07/13
Chapter 4: Forms List
Accessing the Forms Database
Go to the Forms Database by clicking the Forms button.
Active forms are indicated with an X in the Active check box. These forms will show up in the Forms pop-up
menu on the Student Entry screen as well as being accessible for Batch Editing.
Form Detail Screen
Click on the black triangle in front of any form to edit additional details about it, including form help. The form
detail screen (shown below) also allows you to indicate the form options and modify default text or required fields
for that form.
Any text entered into the Form Help field, on the Details tab, will be displayed when a user chooses ‘E-Com
Form Help’ from the Help menu when they are working on this form for a particular student.
Value Lists
The Form Value Lists area shows which value lists the form contains. They cannot be edited from here, however.
You must go to the form itself to edit the lists.
Required or Default Text Fields
If you have set any default text or required fields on the form, you may edit those here, by clicking on the
Default/Required Fields tab. Once there, you will find a list of all the set fields in the form. Click on the red X to
delete a field you no longer want set. You may also edit the default text or the error message here.
Copyright © 2000-2013, Portage Bay Solutions
www.portagebay.com
Page 17
Printed: 11/07/13
Previewing and Printing Blank Forms
To preview a form, click on the blue form name..
To print an individual blank form, click on the Printer icon next
to the desired form.
To print a blank copy of all the forms in the current form listing
(the current found set), click the Blank Forms button.
To print a list of the forms, click the Print List button.
Copyright © 2000-2013, Portage Bay Solutions
www.portagebay.com
Page 18
Printed: 11/07/13
Chapter 5: Admin Screen
Admin users have access to a great deal of information that users with lower-level access do not have. Most of the
is available through the Admin screen.
Procedures for the Admin Screen:
Go to the Admin screen by clicking on any Admin button.
From this screen, you can create new staff or student records, or run searches for staff or students. You also have
access to a number of other administrative functions.
Due & Compliance Alert Items
Click on the buttons near the top of the screen to easily view the students
with past evaluation dates, past IEP dates, compliance alerts, etc.
The number of students in each area will display when you hover the
cursor over the top of each button. If you click a button and hear a tone, that means that there are no records
matching that search.
A student will be marked with a Compliance Warning if they are active and their areas of service are not aligned
(only if the preference of 'limit goals to eval' is set to yes in your district).
A student is marked with a Compliance Alert if they are active and at least one of the following criteria are met:
• The next IEP date has passed;
• The next Evaluation date has passed;
• The student’s disabling condition is developmentally delayed and s/he is older than 9 years of age; or
• The student is within 120 days of his/her third birthday and the next evaluation date is outside that
timeframe.
Click the Print button to print the list you are currently viewing.
Copyright © 2000-2013, Portage Bay Solutions
www.portagebay.com
Page 19
Printed: 11/07/13
Reports
From the right-hand section of the page, you can go to the Reports page, or select either
a CEDARS or a generic export. The Generic Export button will create an export file
containing the fields listed below. It will be up to district personnel to remove specific
columns to create required or desired files.
•
•
•
•
ID #
name (last, first/alpha)
state count age
grade
•
•
•
•
building
disability code
LRE
current entry date
•
•
•
•
•
current IEP date
current assessment date
referral date
withdrawal date
reason withdrawn
The button does not perform a find or a sort, so those functions must be performed prior to clicking the button.
Admin Tools
The Admin Tools drop-down gives you quick and easy access
to the most frequently used Admin Control Panels. Simply click
in this box and select from the options available to go
immediately to that panel. For a more detailed description of
each tool, see Chapter 6.
On the Staff Data Entry screen, you may select the default screen. Admin users may select Admin as their default
screen.
Selecting the Admin Screen as Your Default Screen:
Go to your Staff Entry screen by clicking the Staff button on any screen.
From the drop down list, Default Screen, select “Admin”.
Next time you log into E-Com, this will be the screen that you land on.
Copyright © 2000-2013, Portage Bay Solutions
www.portagebay.com
Page 20
Printed: 11/07/13
Chapter 6: System Maintenance
The ESM can perform system maintenance from the Administrative Control Panel screen, available through the
Admin Tools drop-down list.
Set and Change System Preferences
Go to the Admin Control Panel screen by clicking the Admin button.
An easy way to access the Control Panels has been added to the Admin
screen. Simply place your cursor in the drop-down box under “Admin
Tools...” and select the item you wish to access from the list that appears. You
may also follow the directions below.
Access Log
The Access Log maintains a records of many actions performed in E-Com, including user logins, work with forms
and batches, and the deletion of student records.
View the Access Log:
Go to the Admin Control Panel screen by clicking the Admin button.
Select Access Log from the Admin Tools drop-down list. The access log shows a screen with a list of detailed
activity records, with the most recent activity at the bottom of the page.
Find Log Entries
Click the green “Find” button on the upper Status toolbar.
When the find screen appears, you should be able to select a number of different criteria. You can select a Type
from the drop-down list, enter a date, a staff name, a form name, a student name, or any combination of these.
Once you have entered your criteria, you can either hit the Enter key on your keyboard, or click the “Find” button
again.
Purge Log
First, find the records you want to purge. Purges cannot be undone, so be careful.
Once you have found the set of records you wish to purge, click the
“Purge Log” button. The purge log dialog box will appear, asking you to
confirm that you want to purge the records.
Copyright © 2000-2013, Portage Bay Solutions
www.portagebay.com
Page 21
Printed: 11/07/13
The default button in the delete dialog box is the Cancel button. You must
manually select the “OK” button.
Remember that a records purge cannot be undone once it has been
confirmed. Be sure you want to purge the records before you do so!
Text Editing
The Text Library consists of commonly used text entries, including Goals and Tests. Users can access the
library and copy entries out of it by clicking on the Insert Text button on any form. Admin may edit the text
library, insert new entries, and delete old entries.
Go to the Admin Control Panel screen by clicking the Admin button.
Select Text Editing from the Admin Tools drop-down list.
The Text Editing screen allows you to manage commonly used text that has been created by
users. Use the Find button to find previously-entered text for editing, or use the “New Text”
or “Delete” buttons to the left to create new text entries or delete old ones.
If you need to modify an already-existing entry, you may use the Find button. Once the search screen comes
up, we recommend entering as much text as possible in the large text field at the bottom to identify the entry
you want. If there is a typo, enter the incorrectly-spelled word.
If you have more than one record in the found set, you can move through them using the small gray arrow set
in the top right corner, until you find the record you were looking for (or until you have corrected all the
found entries).
We recommend that you run a search before adding a new test, to (1) verify that the test does not already
exist in your copy of E-Com and (2) to get an idea of the names that similar tests may be named. If two tests
are available in E-Com with the exact same name, the test that will be added to the form when that name is
selected is the test that appears first in E-Com (and that may not be the test you want used). Be sure that the
name you use for any new tests does not already occur in this area.
Once you have verified that the test you want to add is not already in E-Com, click the “New Text” button.
Select “Test” and enter the test area from the drop-down list, and the unique test name into that field. Then
you may copy and paste the text from a Word document. Tables will not maintain their formatting, but if you
have lined up text in Word using tabs, that formatting will be retained. You cannot copy and paste from
Copyright © 2000-2013, Portage Bay Solutions
Page 22
www.portagebay.com
Printed: 11/07/13
Excel documents. You may also type the text in, if you prefer.
You may format the text using the ruler and the text formatting menu. If those are not visible, you may make
them appear via the “View” menu along the top of the E-Com screen.
The items in the drop-down Category lists (viewable when you choose “Other” as the text option) may be
edited in the “Text Categories” section on the Lists 2 tab in Admin-> Pref.
To delete an entry, do a search for the entry you wish to delete. Once you have verified that you have the
correct entry, use the “Delete” button to remove it from E-Com. It may not be recovered. It will not be
removed from any location where it may have been used in the past; it simply will no longer be available in
future.
Batch Editing
Batches are sets of grouped forms that can be added to a student screen via the Add Batch button. The batches are
maintained and grouped by the ESM. You may edit existing, create new, and delete old batches. Plaese note; if
you deactivate a form and replace it with another, this action does not change your batches. You must go into
your batches and edit them manually.
Viewing Batches
Go to the Admin Control Panel screen by clicking the Admin button. Select Batch
Editing from the Admin Tools drop-down.
From the list, click on a black triangle to view
details of an existing batch.
NOTE: Batches will not be available to staff
members unless the ‘Active’ checkbox is
checked.
Copyright © 2000-2013, Portage Bay Solutions
www.portagebay.com
Page 23
Printed: 11/07/13
Replacing Deactivated Forms with New Forms
•
•
•
•
To find batches where you need to replace deactivated forms, first make note of the old form number
(say, form 7) and the new replacement form number (7.1, for instance).
Go to Batch Editing.
Once there, open any batch.
Click the Find button, and enter the deactivated form number into the “form ID” field. Hit Find or the
Enter key on your keyboard.
•
When the search is complete, check the number of batches found, in the top right corner. You can move
through the batches found using the back and forward arrows here.
•
Remove the deactivated form from the list inside the batch using the red X, and add the new version of
the form.
Adding a New Batch
From the Batch List screen, click New Batch.
This will bring up the Batch Data Entry screen. Here you may enter detailed information about the new batch by
selecting the type and typing a batch name. Be sure to select which program(s) the batch should belong to, as
well.
Click on the Add Form button to select the forms you would like to include in the
new batch.
Copyright © 2000-2013, Portage Bay Solutions
www.portagebay.com
Page 24
Printed: 11/07/13
A pop-up list of all available forms will appear.
Note: Only forms marked Active will display in
this list. If your desired form does not appear,
return to Form Editing and mark that form as
Active.
Note: Sometimes forms may appear in the batch
without a title. These are forms that were active when
they were added to a batch, but are no longer active.
Deactivated forms are not automatically removed
from or replaced in a batch; you must do that
manually.
You may select whichever active form you want to add. Once added, you have the ability to determine the sort
order; delete the specific form from the batch using the ; or add more forms by repeating the Add Form step.
Check “Create one for each area” if you would like a form to be created for each area of service that has been
previously defined. This is generally only used for Goal forms and Progress Reports.
You edit batches in much the same way. Select the triangle in front of a batch you want to edit to open it, use the
Add Form button to add needed forms and the red X to delete forms that are no longer to be used in this batch.
Form Data Editing: Undelete
The Form Data area should be accessed with caution as it allows the administrator to edit form data directly,
without accessing the actual form that the data was entered on. One of the more common reasons to access Form
Data is to retrieve an accidentally deleted form.
Go to Form Data by selecting it from the drop-down list under Admin Tools. Once
there, click on the Find button.
Deleted forms will have a “-1” in the student ID field, so use this to help narrow the found records.
•
•
•
In the "Student Information" area, fill in the student name, and enter -1 in the ID field (#1 and #2 in the
figure above).
If just one form was deleted, and you know the form number, you can enter that in the "Form Specific
Information" – otherwise leave this blank.
Run the find by either hitting your Enter key or by clicking the Find button again.
Copyright © 2000-2013, Portage Bay Solutions
www.portagebay.com
Page 25
Printed: 11/07/13
•
•
•
The records that come up should be either all (if you didn't fill in the form number) or the specific (if you
did) deleted forms for that student.
If multiple records are found, you can page through the form records, using the tool next to the “Quit”
button in the navigation bar, until you find the one you want.
Find the form you want to undelete (check the batch info, the IEP info, the date, whatever will tell you),
and while in that record, hit the "Undelete Form" button at the top of the screen.
If an entire batch was deleted, you do basically the same thing, only filling in batch information (third or fourth
box over, depending on your version of E-Com) rather than form specific information. Use the “Undelete Batch”
button instead of the “Undelete Form” one.
If you want to go to the related student record directly from the
Form Data screen, you can click on the blue link “First/Last” next
to the student name. Note: This will not take you to student
records that have been deleted. You will get an error message in
that circumstance.
Schools
To access the school data entry screen and either change an existing school record or create a new one by:
• Click on the Admin Button at the top of your E-Com screen.
• On the Admin screen, find the “Admin Tools...” field
• Select Schools from the drop-down list available there.
• You will be taken to the School data entry screen.
Create a New School Record
Click the Create New button.
Copyright © 2000-2013, Portage Bay Solutions
www.portagebay.com
Page 26
Printed: 11/07/13
The Name, School ID, and District
(highlighted in yellow here) are
required fields. All others are
optional. Note: If your district uses
the SIS import, the School ID listed
here must match the School ID in
Skyward in order for the school to
appear correctly on student records in E-Com.
We recommend filling in the Instructional Minutes per week and the Spanish school name, if the school has one.
A few fields to note:
• Instructional Minutes per week – The value placed here is used as one of the factors needed to calculate
LRE codes. That calculation is performed on the Summary of Services Matrix form (#14.1) and is then
displayed on the Special tab for a given student.
• Spanish School Name – If this field is filled in, the Spanish version of the school name will appear on
Spanish language forms.
• Students (Home School) – The students listed here are all the students whose Home School is assigned
as the currently viewed school. For any given student, this is assigned via the School, Staff and Notes
Settings section of the Student Screen.
• Students (Serving School) – Similar to the Students (Home School) table, students listed here are all the
students whose Serving School is assigned as the currently viewed school.
• Students (Projected School) – A list of all students whose Projected School has been assigned as the
currently viewed school. This is assigned via the Placement tab of the Student Screen.
Sometimes you need to make modifications to a school’s information. Follow the procedures below to find
the correct school and make the changes.
Procedures for Finding a School:
• Click on the Admin Button at the top of your E-Com screen.
• On the Admin screen, find the “Admin Tools...” field
• Select Schools from the drop-down list available there.
• You will be taken to the School data entry screen.
• Once on the School data entry screen, click the green Find button.
• Enter all or part of the school name or other identifying information in the appropriate fields.
• Click the “Continue” button in the Status Area (see “Glossary”), or hit the Enter key on your keyboard.
• Click or Tab into the field(s) to be changed. Type the correction over the selection. You can also cut and
paste to make corrections.
Calendar
Administrative users now have access to a calendar that allows for the setting of
holiday/non-work days. This aids in the auto-calculation of evaluation due dates.
When a Parent Consent date is entered on the student Special tab, the due date is
calculated using this calendar. It may be reached at Admin-> Pref-> Calendar
(last item under the “Edit...” list at the left.
The calendar comes pre-loaded with standard “no school” dates, but will need to
be modified for your specific district. Yellow-highlighted dates on the calendar
are non-school dates; clicking on a date will turn it into a non-school day if it is
not already, and vice versa. Peach-colored dates are weekends.
Copyright © 2000-2013, Portage Bay Solutions
www.portagebay.com
Page 27
Printed: 11/07/13
District Prefs
On the District Prefs screen, you can change the information that appears on the form headers – school district(s)
name, address, phone, and fax numbers.
Lists Tab
This tab contains lists that are used on the Student Data Entry screen as drop-down lists. You may also edit
the areas of service that can be defined for a student on this screen. To edit a list, simply click inside the box
of the desired list and scroll to the bottom. Then type in the next value. The list will automatically save what
is entered in the box.
Copyright © 2000-2013, Portage Bay Solutions
www.portagebay.com
Page 28
Printed: 11/07/13
Lists 2 Tab
The lists on the Lists 2 tab can be edited in the same way as the lists on the “Lists” tab.
1. Programs contains the list of programs that will appear on the Projected Placement area of the
Student screen, under the Placement tab.
2. Zip Codes entered in this location will appear as a drop-down list in the student demographic area of
the Student data entry screen, as well as on the Parent data entry screen.
3. Referral Reasons will appear as a drop-down list on the Special tab of the Student screen.
4. Text Categories allows you to set the items in the drop-down lists under “Text Categories” in the
Text Editing area.
5. Assessment Domains, Assessment Instruments & Assessment Metrics allow you to modify the
entries in the drop-down lists on the Student screen Assessment tab.
Adding Required Fields or Default Text to Fields
Admins can set fields in Master forms to be required – the check will be done at the time that the form is marked
as complete or done – as well as adding default text to fields in forms. Note: If a field has default text, while it can
be marked as required, if users do not touch the text that appears, the “Required” warning will not be triggered. ECom administrators should use care when entering default text that they want users to change.
To set default text or a required field, go to the Forms list by clicking on the Forms button. Find the form you
want to set up, and click on the blue link. Once on the form, put your cursor in the field that you want to make
required, or where you want default text to appear. Then, go up to Form Options and select “Set Field
Default/Req.” You will get a dialog box like the one below.
Leave the field name as is; E-Com fills this in
automatically. In the “Field Title” area, enter
information that will make it clear which field this
is. The title will appear on the form detail screen,
so if it is not clear, you may have difficulty later
determining which field on the form is being
referred to.
If you want default text entered in the field, place that text in the “Default Text” field. Make sure that the default
Copyright © 2000-2013, Portage Bay Solutions
www.portagebay.com
Page 29
Printed: 11/07/13
text makes sense in the context of the field, in case it remains as is on the form. Default text is useful in an
instance where you want particular phrasing on a form for most students. Staff can still change it for individual
students, if need be, but for most students the text can remain unchanged.
If you want to make sure the field has an entry specific to the individual student, you should use the Required
checkbox instead of default text.
Checking the “Required” checkbox means
that if staff leave that particular field
empty, a warning message will appear
when the form is marked as complete or done. The text of this warning message is what you enter in the Error
field. If it is a long form, it is good policy to supply a page number for the required field, so staff don’t have to
hunt through the form to find the field in question.
Forms cannot be marked as complete until all required fields have been filled. If you choose to make any fields on
any forms required, we suggest that you instruct your staff to use the “Completed” checkbox. If they turn in IEP
or Evaluation documents with the checkbox unchecked, you have no assurance that all required fields have been
populated.
Note: Default text will not appear on any form that was added to a student record prior to the default text being
added to the form detail. It will not appear on the form in the form list; it will only appear when the form is
assigned to a student.
Form Lists Editing
The pop-up and checkbox lists on most forms can be edited as follows:
Verify that the form is active, as noted by a check in the Active box on the Forms list.
Go to your Staff screen and click on the My Template button. Add the form to your template student.
Open the form.
Choose Edit Lists from the Form Options menu in the top menu bar.
This will take you to the Forms Value list screen. From here, you can view or edit existing lists by
clicking on the black arrow to the left of the list.
You can add a description of the location in the “List Descriptor” field to indicate where the list will be
found on the form, if that is not already available.
Copyright © 2000-2013, Portage Bay Solutions
www.portagebay.com
Page 30
Printed: 11/07/13
After clicking the black arrow in front of one of the value lists, you will be brought to a screen
displaying all the values for that particular value list. The values can be added, edited, or deleted here.
If the form is in both English and Spanish, there will be two columns for the values, one for English and
one for Spanish. You must enter the Spanish values; E-Com does not have a translation function.
Note: Do not use carriage returns within line items.
After making changes to the list, click Go to Form. Check to make sure the list
you edited appears correctly. If not, go back using the “Edit Lists” option again
and correct it.
Changes made in value lists in this manner will appear on all copies of the
form, no matter where they are.
Copyright © 2000-2013, Portage Bay Solutions
www.portagebay.com
Page 31
Printed: 11/07/13
Chapter 7: Tips, Help System & Troubleshooting
Quick Tips
Delete Dialog Boxes
Please read the delete dialog buttons carefully. The default button is ‘Cancel’, so if you
automatically hit Enter, it won’t delete the record, just cancel the request.
Deselecting DropDown List Choices
On drop-down lists, you can choose one option from among a number of different options. If you
decide to make another choice, you can select that choice from the drop-down, but if you decide to
clear the field of an already-selected choice, the easiest way to do so is to go back into that field,
and hit either your Backspace or Delete key. The field should blank.
Saved User Names/
Passwords
We do not recommend that individuals save their user names or passwords, as this makes E-Com
less secure. If they save their credentials, the dialog box for login may not appear, which also makes
it more difficult for others in log in under their own credentials on that computer. In order to make
it appear, the user should hold down the Option (Mac) or Shift (Windows) key while opening the
file.
There are more tips online at http://www.ecomforspecialed.com/index.php?page=tips-2 - be sure to check out our
video help, as well!
Support
Support is available in a number of ways. You can check the user manual and the administrator manual, which are
available at http://www.ecomforspecialed.com/index.php?page=support-2 in PDF or in a searchable online
format. You can click the onscreen Help button within E-Com; this will show question marks that you can hit to
access additional information on that topic, or filmstrips that you can view that show you how to handle the item
in question.
In addition, we have a troubleshooting guide with the most frequently asked questions from all districts using ECom. Checking here to see if others have had the same question may solve the problem immediately. If it is not
covered in any of these locations, you can access the trouble-ticketing system.
Trouble-Ticketing System
The easiest way to do this when you’re in E-Com is to go up to the Help menu and select “Create Support Ticket”
from the drop-down list. This will automatically create an email with some of the information that we need, along
with an area for you to write the specifics of the problem. (If you are an E-Com administrator, this email will be
generated and sent to the support ticket system. If a non-administrative user creates a support ticket, they will
have to fill in the address of their local E-Com administrator since administrators are the first line of support.)
Another easy way, especially you are not in E-Com at the time, is to send an email directly to
[email protected]. This will create a new ticket in the ticketing system, in the same way that
selecting “Create Support Ticket” does inside E-Com. Once again, non-administrative users should first contact
the local E-Com administrator; it may be resolved in-house more quickly and easily.
Both these ways are preferable to sending an email directly to a Portage Bay Solutions staff person, as the support
tickets are available to all staff members, and the ticketing system is always monitored by at least one staff
person. (You may also call, but the phone is not monitored in the same way that the email system is.)
When we receive a ticket, we generally want to immediately check out the situation. We are greatly helped in this
endeavor by any information you can give us. A sentence along the lines of “My forms are not working” does not
give us enough information. Which forms? On what student? What exactly is happening (Areas of service not
Copyright © 2000-2013, Portage Bay Solutions
www.portagebay.com
Page 32
Printed: 11/07/13
carrying over to the student screen from a 4.5 form? Demographic data not appearing correctly when a form is
duplicated to another student? [Again, what form, which students?]) If the report came from a staff member, did
you try it yourself? What happened for you? Any of this information will speed up the answer; please help us help
you.
Any information you give us up-front will be one less thing we won’t have to come back and ask you for. For
security purposes, we suggest referencing students by student number, rather than by name, in support requests.
Sample ticket: When we print some of the forms come out blank. It is very inconsistent. We do not know
which ones they will be.
What we needed to know: What forms, by number, did this happen with? Was it all forms of that
particular number, or was it just with certain students? If certain students, which students? Was it all
forms with that student? Was it all forms that a particular staff member printed? Some forms that a
particular staff member printed? At any point along the line, was there an error message? If so, what did
the error message say?
Additional useful knowledge: Was it a particular printer? What things did you try when you were
troubleshooting this? A screenshot of any error message is wonderful and hugely appreciated.
Sample ticket: [Staff member name] can not log in. He is getting a message that his login has been
disabled. I did a find so that I could his user ID and password and try logging in on a computer here in my
office. I get a screen with one question mark in each field for staff information.
This is great information. There’s a user name and error message text. The admin tried it and got the
same result, with additional information about question marks in the fields. It allowed us to know
immediately that the staff file had somehow been corrupted, and we were able to recover it and get all
staff members logged in with a minimum of fuss.
Troubleshooting Forms
Areas of Service
If areas of service don’t appear on the student record, it may be because there is another form 4.5 in the
student’s forms (perhaps in a different batch) that is more recent that the one where the areas of service
are being listed. The areas of service from the most recently added 4.5 form are the ones that appear on
the student record. You can search in Form Data (Admin-> Admin Tools-> Form Data) for the student
name and 4.5 as the form number; this will tell you how many 4.5 forms this student has, and which one
is most recent (please remember, however, that the search may turn up deleted 4.5 forms, as well).
Staff Unable to Type in Forms
If staff members (level 5) are unable to type in forms, but admin level users can, check to see if the forms
are locked for some reason. Locked forms will appear in the batch list with a red highlight around the
“Done” box in the batch view on the Student Screen.
Unable to Activate a Form
Check to make sure that the form has been assigned to the Special Education program. Click the black
triangle in front of the form number. The "Available Programs" checkbox is mid-screen, above the large
Copyright © 2000-2013, Portage Bay Solutions
www.portagebay.com
Page 33
Printed: 11/07/13
text box for Form Help. Simply check the appropriate checkbox and you should now be able to activate
the form, add it to batches, and use it in E-Com.
Duplication Dialog issues
If the student name is not in pop-up list, or you get an “Invalid Information” message when typing the
student name in the duplication dialog box, make sure the student record has a student number.
Depending on the version of E-Com you are using, the student may also need to be active in order to
duplicate forms or batches to him or her.
Summary of Services Matrix
If a student doesn’t appear on a service roster when he or she should, you should check the student’s
summary of services matrix form (14.1) carefully. In order for the minutes to appear on the service roster:
•
•
•
•
The student must be active,
A staff member must be assigned to the service, and
The summary form in question must be the most recent summary matrix form in the student’s record.
The “as of” date on the form must between the start and end dates of the services. The services must
start before and end after the “as of” date in order to calculate correctly on the matrix form.
If the above data is correct and the minutes still do not calculate correctly, the next step is to check that
the service location is listed as being a Special Education service location. This is determined by a
checkbox in the “Service Location” list on the Lists 2 tab in the system preferences. Click on the Admin
button on any screen, then on the Pref button. When the systems preferences screen appears, click on the
Lists 2 tab. The first area in the upper left on this tab defines the service areas available on the summary
matrix form, and determines whether they are counted in the special education minutes.
Edit Value Lists
The pop-up and checkbox lists on most forms can be edited by the district as follows:
1.
2.
3.
4.
5.
Make sure the form you wish to edit the lists on is marked as active in the Forms list.
Go to your Template Student and add the form to the Other Batch.
Open the form on your Template Student record.
Choose Edit Lists from the Form Options menu along the menu bar at the very top of the window.
You'll go to a list of the value lists available for that form. (Note: You can add text in the “List
Descriptor” field to indicate where the list will be found on the form, if it's not already noted there.)
6. Click the black arrow in front of the list you wish to edit. This will bring you to a screen displaying
all the values for that particular value list. Values can be added, edited, or deleted here.
7. After making changes to the list(s), click the Go to Form button.
8. Check here to make sure the changes appear as you wish.
Typos
If there are typos in the value lists on forms, you should be able to correct those yourself, as shown above,
although you may also send us an email, so that we can correct them in our master copy of E-Com. If
there is a typo or inaccuracy on a form, please submit a support ticket with the form number, approximate
location of the error, and what you believe the correct spelling or grammar to be.
Copyright © 2000-2013, Portage Bay Solutions
www.portagebay.com
Page 34
Printed: 11/07/13
Forms Printing Blank
When a form prints blank with no student data, it may be that the option “Print Blank Record” has been
selected in the print dialogue box. To correct this, change the selection to “Print Current Record.” This
will correct the problem.
Deselecting Drop-Down List Choices
On drop-down lists, you can choose one option from among a number of different options. If you decide
to make another choice, you can select that choice from the drop-down, but if you decide to clear the field
of an already-selected choice, the easiest way to do so is to go back into that field, and hit either your
Backspace or Delete key. The field should blank.
Troubleshooting Student Records
Special Tab – LRE Code Calculation
If your district uses form 14.1 for the summary of services matrix form, the LRE code fields on the
Special tab will calculate the LRE code as of the current date, using the LRE setting and the percentage of
time in the General Education classroom based on the most recent summary matrix form in the student’s
record. The IEP date on the student record, and the IEP date on the most recent summary matrix form
must match. This calculation may be overwritten by the LRE Exception Code field.
There may be a number of reasons that the LRE code on the Special tab does not calculate correctly.
1. Check the LRE setting at the bottom of page 2 on the most recent 14.1 form in the student record. Be
sure it is correct, and that the total minutes are calculated correctly.
2. Check the IEP date on the student record against the IEP date on the most recent form.
a. If the IEP listed on the student record is a past due date, and the IEP date on the 14.1 form is the
new one, the IEP dates don’t match, and so, even if the matrix is completed, that form will not be
used for the calculation.
b. If the most recent 14.1 form is one with the old due date, and the IEP date on the student record is
past due, the end of services date on the form will have passed, and the LRE code on the Special
tab will be ‘1’ automatically, no matter what the 14.1 form shows. The 14.1 form calculates
minutes as of a day that you may set, while the LRE Code field on the Special tab calculates as of
the current date.
c. If the IEP date field on the most recent summary matrix form is blank, any minutes listed will not
be found.
d. If the IEP date on the student record is a future one, the services listed on the new summary matrix
will not have started yet, and the LRE code on the Special tab will be ‘1’ automatically.
Copyright © 2000-2013, Portage Bay Solutions
www.portagebay.com
Page 35
Printed: 11/07/13
Chapter 8: Glossary
Browse Mode: Browse mode lets you enter data and look at records. Browse mode is the default mode of the ECom system. See “Mode” in this glossary to find out how to change modes.
Button: A button is a picture of a button on a screen, that, when clicked, will perform an automated function.
Three types of buttons are used in the E-Com system:
• Navigation button: You bring up E-Com’s screens by clicking the appropriate button. Navigation buttons
include “goto” buttons and buttons that bring you to a new blank screen, such as the “New Student”
button on the Student Data Entry screen.
• Task button: Some common E-Com tasks, such as printing, have been assigned buttons.
• Radio button: A button that looks like a two-dimensional circle instead of a three-dimensional button. It is
a toggle switch between two opposing conditions, such as “true” and “false” or “show” and “hide.” You
toggle between the two conditions by clicking the button with the mouse. When the button is in “true” or
“on” position, a black dot appears inside the circle. When the button is in the “false” or “off” position, the
circle is empty. Examples of radio buttons are the buttons that set preferences on the forms system
preferences screen. Only one choice is possible from a set of radio buttons.
Check Box: A field that, like a radio button, acts as a toggle switch between two opposing conditions, such as
“true” and “false.” When you click in an empty check box, an “X” appears in it. This is the “true” or “yes”
position. When you click in a check box showing the “X,” the “X” disappears. This is the “false” or “no” position.
More than one choice is possible from a set of check boxes.
Data Area: The part of every E-Com screen in which data is entered or viewed. The data area of the screen is
always visible. Most of the work done in the E-Com system is done in the data area.
Database: The entire collection of information pertinent to the E-Com system. The information in the E-Com
database is organized into separate files called tables, which are based on data type. In addition, the E-Com
system contains a separate table that functions as a template for each special education form.
E-Com System Manager (ESM): The system operator for the E-Com system. Also called “you” in this manual.
ESM: See “E-Com System Manager” above.
Field: A field is a component of a record. Each field stores one piece of data. Fields can store text, numbers,
dates, times, or calculation results. Fields can take the form of a text box, a list box, a check box, or a radio
button.
Find Mode: A User mode designed to help you locate one or more records in a particular table. Clicking a “Find”
button takes you into find mode. See “Mode” in this glossary to find out how to change modes.
Layout Mode: A user mode designed to help you change the way the screen appears or is organized and the way
your data is organized when printed. See “Mode” in this glossary to find out how to change modes. Users can not
access the layout mode. See Error! Reference source not found. for directions on making simple changes to the
layout screens.
Layout: The arrangement of data fields, buttons, graphics, and other elements of a screen or printed document.
Each table can have different layouts for different functions. A layout has one or more parts, such as a header,
footer, and body.
Link: An arbitrary number, usually invisible to users, that links one table in the E-Com system database to
another.
List Box: A field which contains a list box of data entry choices from which to choose. E-Com system list boxes
have a text box above the list. If the entry you need is not on the list, E-Com will usually allow you to type in an
entry.
Copyright © 2000-2013, Portage Bay Solutions
Page 36
www.portagebay.com
Printed: 11/07/13
Mode: The E-Com database gives you four interfaces (depending on access level) in which to work with data.
They are browse mode, find mode, preview mode, and layout mode. Modes are shown in a pop-up window at the
bottom of the table window and in the mode menu at the top of the screen. In both places, the current mode is
marked. Simply click on one of the other modes to make a change.
Preview Mode: A User mode that shows you what the page will look like when printed. See “Mode” in this
glossary to find out how to change modes.
Portal: A list of data from the related table that appears in a record. Examples are the list of forms that appears on
the right side of the Student Data Entry screen, or the list of students that appears on the right side of the Staff
Data Entry screen. Data shown in a portal comes from a different, related table.
Radio Button: See “Button.”
RCW: The Revised Code of Washington, the state statutes that govern Washington State. You will find
references to RCW chapters and sections in the WAC table.
Relational Database: A database made up of more than one table that can be used together to provide
information needed by users. Although each piece of data is entered once and stored in one table in the database,
the construction of the database allows users to access that data from other tables. If the data in the original table
changes, all other appearances of that data will change.
Record: All the information about one subject in the E-Com database. For example, the information on a
particular student that appears on the Student Data Entry screen is that student’s record.
Screen: An area in which users can view, search for, or change data pertaining to a particular topic (students or
schools, for example). The interface mask acts as a guide for working with data. Please note that the data shown
on a particular screen may not all be stored in the same table (see Portals).
Script: A sequence of one or more written commands that automate E-Com system actions or tasks. Scripts direct
the actions that result from clicking buttons in the E-Com system. Additional scripts can be accessed by clicking
on the Script menu.
Status Area: The gray area to the left of each screen that shows the number of records, and whether the records
are sorted or unsorted. The flip cards at the top of the status area allow you to move back and forth from one
record to another.
Table: A subset of the data in the E-Com database. The tables contained in the E-Com database are discussed in
“E-Com system Components”. Another name for a table is file.
Text Box: A field that appears as an empty box on the screen, into which information can be typed. Some text
boxes are equipped with list boxes from which you can select the correct entry.
User or End User: A special education teacher, psychologist, assistant, or special education administrator who
has or should have access into the E-Com system. Please note that not everyone listed in the Staff table is a User.
WAC: The Washington Administrative Code, the code of state regulations that governs Washington State.
WSIPC Data: Data on special education participants compiled by the Washington School Information Processing
Co-operative (WSIPC). Updates to WSIPC data are imported into the E-Com system by the ESM.
Copyright © 2000-2013, Portage Bay Solutions
www.portagebay.com
Page 37
Printed: 11/07/13