1
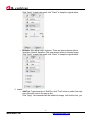
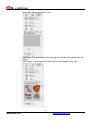
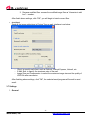
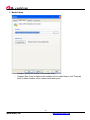
User Guide Model: SC 88934 Contents Read First ................................................................. Unpacking your product ........................................... Installation .............................................................. The Photo2File ...................................................... Loading Prints............................................................ Loading Slides........................................................... Loading Negatives ................................................ Capturing images ...................................................... Transferring Images ................................................. Using Blaze Photo .................................................... Cleaning and Maintenance ........................................ Troubleshooting........................................................... Technical Specifications .............................................. Warranty 1 2 3 4 5 6 7 8 9 10 10 11 13 This product comes with a 90 day warranty for issues that are a result of manufacture defects. Contact your retailer or Spectare Products for instructions on obtaining warranty service. Contact For questions and support on this product that can not be solved by your retailer please contact: Spectare Products 6081 Meridian Ave Suite 70-308 San Jose, CA 95120 http://spectareproducts.com [email protected] Copyright© 2009 SuMaWah LLC All rights reserved. The Spectare® name and logo are registered trademarks of SuMaWah LLC. BlazePhoto® is a registered trademark of BlazeVideo Inc. Microsoft DirectX®,Windows XP and Vista are registered trademarks of Microsoft Inc. Adobe Acrobat® is a registered trademark of Adobe Inc. Spectare Photo2File Read First 1 Thank you for purchasing the Spectare Photo2File. Please take some time to read through and follow these important safety and operation instructions. IMPORTANT: TO PRESERVE THE LIFE OF YOUR PRODUCT DO NOT EXPOSE THIS PRODUCT TO RAIN OR MOISTURE. CAUTION: RISK OF ELECTRIC SHOCK. DO NOT DISASSEMBLE THIS UNIT. TO PREVENT THE RISK OF ELECTRIC SHOCK, DO NOT REMOVE COVER. NO USER- SERVICEABLE PARTS INSIDE. REFER SERVICING TO QUALIFIED PERSONNEL. VENTILATION - The device should be situated so that its location or position does not interfere with its proper ventilation. For example, the unit should not be situated on a bed, sofa, rug or similar surface that may block the ventilation openings. HEAT - The device should be situated away from sources of high heat such as radiators or stoves. USB POWER SOURCE - The device should be connected to a USB power supply from a connected computer with USB 2.0 compliant connection. CLEANING - We strongly suggest using a clean, dry, non-alcohol cotton swab to insert into the device and clean the glass surface periodically to produce a clear image NON USE PERIOD - The USB cord for the device should be unplugged from the computer when the unit is left unused for a long period of time. USB OVERLOADING - Do not overload the USB connections on your computer. Disconnect other USB devices such as a wireless mouse, MP3 Player, mobile phone or other USB powered devices. If too many devices are connected to the computer their may be inadequate power for the Photo2File to operate properly SERVICING - The user should not attempt to service the device beyond those means described in the operating instructions. All other servicing should be referred to qualified service personnel. user's guide 2 Unpacking your Product The following items should be included: Please contact your retailer if you have not received any of these items a Photo2File USB Cable CD ROM Installer b Negative Holder c Slide Holder d Three Photo Holders Spectare Photo2File Installation Unpack your Photo2File and take out the CD. Please check our website for the most recent drivers and application software at: http://spectareproducts.com/support/ and install the newer software version from the web if available. a IMPORTANT: Before connecting to the Photo2File to the computer for the first time insert the CD ROM and choose the following options on the CD: PLEASE FOLLOW THIS ORDER: 1. Install the Driver. 2. Install the BlazePhoto Software. 3. Install Directx 9.0: NOTE: if you are running Windows XP Service Pack 2 or higher or Windows Vista and XP professional this is not needed. 4. Install Acrobat Reader if you do not have this installed on your computer already. INSTALL SOFTWARE FIRST then RESTART COMPUTER AFTER INSTALLATION PLEASE RESTART YOUR COMPUTER-- THIS IS IMPORTANT. b c After restart, connect the USB cable from the Photo2File to your computer. Connect the small end of the USB cable to the Photo2File Unit, then connected the large end of the USB cable to the computer. NOTE: If many USB devices are connected to your computer such as Mobile Phones, Media players or other USB powered devices there may be inadequate power for the Photo2File. Please unplug all unneeded USB devices before using the Photo2File. Upon the first connection of the Photo2File the Hardware Wizard will automatically launch. Choose the selection to search and automatically install the hardware drivers. Then follow the on-screen instructions for the Hardware wizard to install your drivers into your system. 3 d user's guide 4 The Photo2File Slot for Print Holder Insert either the 3 1/2 x 5, 4x6 or 5x7 print holder from the Top Side. Capture Button: Press this button to capture and save the image that is loaded in the holder. Ready Lights: Slot for Slide or Negative Holder Insert the holder from the RIGHT Side only. Input Selection Slide BOTH switches to the PRINT position or FILM/SLIDES according to the type of image. These lights will be illuminated to show that either the slide or negative is loaded correctly, USB Connection or that a print is loaded correctly Use this port to connect the USB cable to your PC Computer. This allows for transfer of images to your computer plus gives power to the device. Spectare Photo2File Loading Prints Select the appropriate holder according to the print size that you wish to capture 3 1/2 x 5” 4x6” 5x7” 5 a Hold the print in your hand and slide it into the holder right side up. Make sure it slides all the way to the bottom of the holder. Next insert the holder into the slot at the top of the Photo2File. Make sure that the image is facing towards the Photo2File controls as shown. b Next, put BOTH levers on the top of the Photo2File to the PRINTS position. You are now ready to Capture images-- see Capturing images on Page 8 for more details. After capturing the image remove the print and insert a new one for the next capture. c There is a thumb hole on the back of the holder for easy removal of the print. user's guide 6 Loading Slides a Hold up the slide toward the light. Face the trademark side of the slide away from you. Look through the slide and it should appear normally (not a mirror image). Open the slide holder at the marked spot. With the slide holder laid open, place the slide into recessed area in the holder as shown-- the slide should fit perfectly. NOTE: Handle slides with care. any dust, scratches or fingerprints will show up on your saved images. If possible use cotton gloves when handling slides. It is recommended to use compressed air to remove any dust on the negatives. These items are not included with the Photo2File but can be purchased from an office supply, camera or electronics retailer. b Close the slide holder and press the edges so that it locks in place. c Insert the Slide holder into the slot on the RIGHT side of the Photo2File as shown. Push the holder into the Photo2File gently and it should lock into place on the first image. d Next, put BOTH levers on the Top of the Photo2File to the Film/Slide position. You are now ready to Capture images-- see Capturing Images on Page 8 for more details. Spectare Photo2File Hold up the negative toward the light. As you look through the negative you should be able to read the small negative numbers normally (not a mirror image). Loading Negatives 7 a Open the negative holder at the marked spot With the negative holder laid open, place the negative into holder as shown so the notches line up with the notches on the holder. NOTE: Handle negatives with care. Any dust, scratches or fingerprints will show up on your saved images. If possible use cotton gloves when handling negatives. It is recommended to use compressed air to remove any dust on the negatives. These items are not included with the Photo2File but can be purchased from an office supply, camera or electronics retailer. b Close the Negative holder and press the edges so that it locks in place. c Insert the negative holder into the slot on the RIGHT side of the Photo2File as shown. Push the holder into the Photo2File gently and it should lock into place on the first image. Next, put BOTH levers on the Top of the Photo2File to the Film/Slide position. You are now ready to Capture images-- see Capturing images on Page 8 for more details. d user's guide 8 Capturing images a After installation of the Photo2File Driver, BlazePhoto and connection of the Photo2File to the computer as described on page 3: u Click on the START menu of your Windows PC and go to ALL PROGRAMS then launch BlazePhoto from the programs menu, wait for the application to launch. “BlazePhoto” Window. u u b Choose “GET PHOTO” from the menu Choose “Acquire from Photo Scanner” for capturing prints - OR - “ Acquire from Film Scanner” for capturing slides or negatives. “Select Scanner & Video Device” Window u u Film Scanner preferences c u u u Select “OTV SCANNER”. Save files in: press the “..” button to the right and select the location that the scanned images will be transferred into. Color depth: Select 32 or 48 bit color. DPI: Choose 1800 or 3600 DPI resolution Media Type: Choose media you are scanning: Slides, negatives or black&white negatives 3x5, 4x6 or 5x7 prints u Photo Scanner preferences u Open Brightness Manual Control Box: Select this option to open an additional control panel to control the brightness. After all settings have been made click the OK button. “OTV” Scanner Window. d Spectare Photo2File This window will show you a preview of the image that is loaded to the Photo2File holder. NOTE: When you capturing 3 1/2 x 5” or 4x6” prints you will see the entire holder area including the border around the print, however this border will be cropped according to the photo size selection you made on the preference screen once the image is saved. Adjusting color and exposure: u u u Transferring Images 9 Press the Color/Brightness adjustment button to bring up the control panel. Make adjustments to the brightness and color on the control panel and note the changes on the preview image. Click the Exit button to save the settings. e Manual Controls: u If you selected “Open Brightness Manual Control Box” from the preferences window you will see an additional control panel. From this panel select “MANUAL” and then set the “Dark Level” to further darken the images. If the “AUTO” button is selected then Dark Level setting will be ignored. f To Capture Images: NOTE: To get the best quality capture please wait a few seconds for the image to adjust. u Click “CAPTURE” on the preview window or press on the Photo2File u The captured images will appear as thumbnails on the film icon above. u You may store up to 12 images before saving them to your computer g IMPORTANT: After capturing the images you need to save them to your computer. If you exit the preview window before pressing the SAVE button the images on the film strip area will be lost. To Save Images: u u u To delete a captured image select the image and press the “DELETE” button. Click the “SAVE” button to transfer all of the images in the filmstrip area to your computer. After the transfer is completed, press the “CAPTURE” button again to continue. The previous images will be deleted from the thumbnail view. After you are finished click EXIT to return to the Blaze Photo Application. h user's guide 10 Using Blaze Photo Using BlazePhoto: After exiting the capture window the images you saved will appear in BlazePhoto main window in the directory that was chosen. These images and can be edited using BlazePhoto. There are many editing features that can be accomplished using the software. Pease refer to the BlazePhoto Supplement Guide that is included in the User Manual on the CD ROM or go to http://www.blazevideo.com/ for more details and support on using this software. Cleaning & Maintenance Periodically and after consistent use the Photo2File should be cleaned using a compressed air canister to clean the dust out of the inside chamber. u Insert the end of the straw from the compressed air canister into the door on the right side so that it opens. u Hold the can in an upright position and gently blow out any dust on the inside of the Photo2File. a NOTE: Compressed air is not included with the Photo2File but can be purchased from an office supply, photo supply or electronics retailer. When not in use please disconnect the Photo2File from the computer and store in a clean, dry and dust-free environment. Spectare Photo2File Troubleshooting 11 PROBLEM: Photo2File will not connect to the computer and you will get an error message that says “Can not find camera”. SOLUTION: Check your operating system: At the time of release the Photo2File is only compatible with Windows XP and Windows Vista. To check your Windows operating system version go to the START Menu under windows, Highlight “My Computer” with the cursor and press the Right button of the mouse. In the Pull down menu select “PROPERTIES” this will give the operating system version and service pack number. Please make sure you have the following specs on your computer: 300 MB or more of free and available space on the hard disk A least 512 MB of RAM memory. Windows XP service pack 2 or higher. If you have Windows XP Service Pack 1 you must either update your computer via the Microsoft Update or install the Direct-X drivers that are included on your CD. USB 2.0 port on your computer If you have Windows Vista please verify that you have installed the appropriate 32 bit or 64 bit drivers. If you still can not get the Photo2File to connect try the following steps: 1. Launch BlazePhoto-- choose GET PHOTO and SCANNER & VIDEO DEVICE. Ensure that 'OVT Scanner' is selected. 2. RESTART YOUR COMPUTER WITH YOUR Photo2File PLUGGED IN then try step 1 again. 3 USB CONNECTION: disconnect ALL of the other USB devices from your computer including the Photo2File-- Then Restart your computer. After restart connect the Photo2File to a DIFFERENT USB port-- make sure it is connected directly to the computer and not through a Hub. We have noted that some computers have maybe one port as a USB 1.0 connection and another port that is a USB 2.0 connection-- so you need to figure out which connection will work the best. 4. REINSTALL THE DRIVERS: go to http://spectareproducts.com/support/ and select the Photo2File Product. Then download the latest set of software drivers available through the website. Follow the instructions on the website to uninstall the old drivers and reinstall the new ones. user's guide 12 Troubleshooting Cont... 4 CHECK YOUR HARDWARE DEVICE MANAGER: On Windows XP Click on Start and then rollover the MY COMPUTER icon Right click the MY COMPUTER icon and select Properties. On the properties Window Select the hardware tab and then click on the Device Manager. Leave your device manager window open and plug in the Photo2File. The Device Manager Screen will refresh and you may see an icon that appears as an "unknown device". From the device manager window click on the "unknown device". From the window for this device click on the “Driver” tab and then click the option to "reinstall driver". Follow the instructions to reinstall the driver automatically. Afterward it should find the right driver, "OVT Scanner" and install this for you. PROBLEM : I am using a different software other than BlazePhoto to capture and edit my images. SOLUTION: You can use any “Twain” compatible software to capture images and edit the images. Adobe PhotoShop®, PhotoShop Elements® or other party image editing software can be used if desired. If you are using software other than BlazePhoto you still must install the Drivers for the Photo2File that are included on the CD ROM. Please refer to the user manual and support for the software you are using. Spectare Products can not troubleshoot or support software related problems when using these other solutions. PROBLEM: Blurry images SOLUTION: Please ensure that the work space you are using is stable and does not have any moving objects on it. Even the slightest vibrations can cause blurred images. Also, make sure there are no dust particles or hairs on your slides or on the Photo2File - see page 10 for instructions on cleaning the Photo2File FOR THE MOST RECENT TROUBLESHOOTING TIPS AND SUPPORT GO TO http://spectareproducts.com/support/ Spectare Photo2File 13 Technical Specifications Sensor: Focus Range: Exposure : Color balance: Scan high resolution: Data conversion: Scan Method: Light source: Resolution: Power: Interface: Operating System: Software: Dimensions: Language: 2.5" inch 5MP CMOS sensor (5,174,400 pixels) Fixed focus Auto Auto 3,600 dpi interpolation resolution 10 bits per color channel Single pass Backlight(3 white LED) 3600 DPI: 5184x3600 or 1800 DPI: 2592x1800 Powered from USB USB 2.0 Windows XP/VISTA (32 bit or 64 bit) BlazePhoto & Scanner driver 5.8” H x 8.2” W x 8.7” L English,French,German,Italian,Spanish, Traditional Chinese,Simplified Chinese,Japanese MADE IN CHINA This device complies with part 15 of the FCC rules. Operation is subject to the following two conditions: (1) This device may not cause harmful interference and (2) this device must accept any interference received, including interference that may cause undesired operation. user's guide Table of Contents . Overview ............................................................................................................................................................. 2 1.1 Introduction ..................................................................................................................................................... 2 1.2 Features ......................................................................................................................................................... 2 1.3 System Requirements .................................................................................................................................... 3 . Appearance ......................................................................................................................................................... 4 . Operation Guide .................................................................................................................................................. 4 3.1 Importing Photos.................................................................................................................................. 4 3.2 Organizing Photos ............................................................................................................................... 8 3.3 Previewing Photos ............................................................................................................................. 10 3.4 Editing Photos.................................................................................................................................... 13 3.5 Creating ............................................................................................................................................. 21 3.6 Sharing Photos .................................................................................................................................. 23 3.7 Settings .............................................................................................................................................. 26 . Contact Support ............................................................................................................................................. 31 . Overview 1.1 Introduction BlazePhoto, a powerful and complete digital photo utility, integrates photo importing, previewing, organizing, editing, creating and sharing. Compliant with multiple locations, BlazePhoto allows you to import digital photo from hard disc folder, CD/DVD disc, DC/DV, PC Cam or any other removable devices; lets you flexibly classify, view and edit image. There are also multiple sharing choices available for you to choose, you can print, email, burn CD, create slideshow DVD and create html album. BlazePhoto provides an ideal solution for your lifetime of memories organizing and enjoying, brings you an exciting and easy way to share your memories with anyone, at any time and anywhere. BlazePhoto supports most popular image formats: such as JPG, BMP, TIF, GIF, PNG, WMF, EMF, etc. BlazePhoto also supports EXIF2.1, for those edited or converted JPG, TIF, and their EXIF info will not lose. 1.2 Features • • • Import Photos: BlazePhoto supports multiple image locations, can import image from hard disk folder, CD/DVD disc, DC/DV, PC Cam or any other removable devices; BlazePhoto can real-timely capture and save image from PC Cam, transfer image between DC and hard disk folder; BlazePhoto also allows you to freely search for your desired image. Organize Photos: BlazePhoto sorts image by people, place and events tags, and you can also create your own favorite tags. Preview Photos: Provided with multiple image preview modes: get photo from disk, from history record or from catalog; supports Single Picture, Big Thumbnail, Small thumbnail, Preview Thumbnail view modes, you can also view full screen image and image slide show. BlazeVideo, Inc. 2 www.blazevideo.com • • • Edit Photos: Easily edit image, provided with multiple popular edit functions, such as rotate, crop, flip, resize, etc. Supports enhance function: remove red eye, adjust color, blur/sharp, auto enhance; supports creating function: add text, add clip, add frame, add filter such as Mosaic, Windy, Motion, Gray, Emboss, etc. Create: Create single or multiple images into html album, burn to CD disc or create slideshow DVD. Share Photos: Print single or multiple images, send email, batch resize, rename and change image format. 1.3 System Requirements Basic CPU Intel Celeron 400MHz or higher System Memory 128MB RAM or higher Operating System Intel Pentium III 700 MHz 256 MB RAM Windows 98 SE/ME/ 2000/ XP Display Card Sound Card Recommended 16 bit, 4MB memory, supports DirectX 24 bit, 8MB memory, supports DirectX PCI sound cards, Integration chipset on Mother Board, USB audio devices etc. compatible with Windows and stereo speakers DirectX DirectX 8.1 or later Hard-disk Available Capacity BlazeVideo, Inc. At least 10 MB 3 www.blazevideo.com . Appearance . Operation Guide 3.1 Importing Photos You can get photos from hard disk folder, Scanner Video Device, Camera& Removable Device, you can also freely search for your desired photos on local disk. BlazeVideo, Inc. 4 www.blazevideo.com • • Browse Folders Default get photo from hard disc folder, you can select folder from the folder tree on the left of the main window. Get Photo from Scanner & Video Device 1. Capture photo from scanner or video device, the captured photos will be saved into the specified folder. Drop-down click "Get Photo" button and select "Scanner&Video Device", or select File->Get Photo->Scanner&Video Device, below dialog box pops up: BlazeVideo, Inc. 5 www.blazevideo.com 2. Click "Browse" button to specify saving directory and click "OK" button, below menu pops up: 3. Click "Capture" button, thumbnail of current image will appear, you can also continually capture image, after selecting the image, and the image will be saved into the specified directory. BlazePhoto will auto display the captured images as thumbnails in Preview window. • Get Photo From Camera&Removable Devices 1. Get photo from camera or removable devices. Once connects camera or removable device to PC, below dialog box will auto pops up: BlazeVideo, Inc. 6 www.blazevideo.com • 2. After select the desired image, click "Transmit" button, the selected images will be transmitted into specified folder; Click "Transmit All", all images in the device will be transmitted into specified folder, BlazePhoto will auto display all the selected images. Search on Local Disc 1. Click "Get Photo-> Search on Local Disc" or select "File ->Get Photo->Search on Local Disc" to eject below dialog box: BlazeVideo, Inc. 7 www.blazevideo.com 2. Drop-down click "Look In" box under "Search Options" to select your desired destination, default is "All Hard Discs"; Drop-down click "Search Filter" to select the desired image format, default is "All Pictures"; Fill in the minimum size of the desired image, default is 50K. 3. Click "Search" button to start searching files, click "Stop Search" to stop searching files. 4. After search finishing, all the images will be listed in Search Results area, click a selected folder, you will preview the thumbnails of all the images under it. 3.2 Organizing Photos Organizing photo by different catalogs: by People, Place, Events, etc, you can also create your desired tags. 1. Get Photo from Catalog In "Preview" window, click the third button "Get Photo from BlazeVideo, Inc. 8 www.blazevideo.com Catalog" , below tag folder tree will display: Move mouse to blank area and right click, you will perform New Tag, Edit Tag, Delete Tag operations. 2. Create New Tag Right click to select "New Tag", you will create a new tag. Create new sub-tag: Move mouse to an existing tag, right click to select "New Tag", you will create a new sub-tag under this tag. Type your desired tag name, and select a tag icon, click "OK", a new tag name will be added in tag tree. 3. Edit Tag Select a tag and right click "Edit Tag", below dialog box pops up for you to modify: BlazeVideo, Inc. 9 www.blazevideo.com Type new tag name and select a tag icon, click "OK", the tag will be modified. 4. Delete Tag: Move mouse to the desired tag, right click to select "Delete Tag", and click "Yes" to delete this tag. 5. Sort Photo by Tag: Please take any one of below steps to add tag into image: 1. Click a tag, drag and drop it to a target image, the tag icon will display at the left bottom of the image. 2. Select one or multiple images, right click to select "Attach to Tag", then select a target tag, the tag icon will display at the left bottom of the image. 3. Select one or multiple images, drag and drop them into target tag, the tag icon will display at the left bottom of these images. 6. Remove Tag: Right click a tagged image, select 'Remove Tag" and select the desired tag name you want to remove, the tag icon will disappear from the image. 7. View Photo by Tag: Tick-on a tag, all photos with this tag will be displayed in right preview area. 8. Hide Tag Icons: Move mouse to blank area in Thumbnail mode, right click to select "Hide Tag Icons". 3.3 Previewing Photos Select a picture folder either from disc, from history record, or from catalog, if there are photos under this folder, the images will display with thumbnails or single picture mode on the right preview area. • Select Photo Source: Below three modes are available: 1. Get Photo from Disc: select a picture folder in folder tree, the right window will display all the supported photos under this folder as thumbnails or single picture. BlazeVideo, Inc. 10 www.blazevideo.com 2. Get Photo from History Record: BlazePhoto can auto add the viewed picture folder into history record. Select a folder in history record, the right window will display all the supported photos under this folder as thumbnails or single picture. 3. Get Photo from Catalog: View photos by sort. (For the detailed sort ways, please refer to Organizing Photos). Tick-on a desired sort, all the photos of this sort will display as thumbnails or single picture. • Preview Modes: There are below preview modes available: 1. Single Picture: display a current selected image 2. Big Thumbnails: display big thumbnails of all the images 3. Small Thumbnails: display small thumbnails of all the images 4. Preview_Thumbnail: upper area displays the selected image with large size, below area display thumbnails of all the other images. 5. Full Screen Display: full screen display image. 6. Slideshow: Slideshow preview all the images, you can also set background music, effect time and interval time in Options Setting. Shortcut to switch preview modes: Double click thumbnails to switch to Single Picture mode; Double click single picture to switch to thumbnail mode. • Sort By: 1. 2. 3. 4. • Sort by Name: sort pictures by file name. Sort by Time: sort pictures by time of creating file. Sort by Size: sort pictures by file size. Sort by Type: sort pictures by file type, for same type files, sort by file name. Right Click Menu: There are three menus available: 1. Right click a thumbnail to pop up below menu: BlazeVideo, Inc. 11 www.blazevideo.com View the selected image Edit the selected image Add the selected image into System Tray Copy the selected image Cut the selected image Delete the selected image from hard disk Add tag into selected image Remove tag icon from selected image Print the selected image Set the selected image as desktop wallpaper Locate the selected image on hard disk Show properties of the selected image 2. Move mouse to blank space between thumbnails, right click to popup below menu: Select all the thumbnail photos Hide tag icon on the photos 3. In Single Picture displaying status, right click the image to popup below menu: counter clockwise rotate photo clockwise rotate photo Zoom in or zoom out to make photo fit in window Display photo with actual size BlazeVideo, Inc. 12 www.blazevideo.com 3.4 Editing Photos Select an image, click "Edit" button, or right click a thumbnail then select "Edit", Edit window will appear as below: 1. Select Photos in Preview stage, select one or more photos, and the selected photos will display in Picture Tray. Note: If holding photos in Picture Tray, you will keep the selected photos in Picture Tray even when you switch to other window. Hold Photos: 1. Select a photo and click "Hold" button in Picture Tray; 2. Select a photo and drag it into Picture Tray; 3. Select a photo and right click to select "Hold in Picture Tray" Clear Photos from Picture Tray: 1. Select the desired photo and click "Clear" button, you will clear the selected photo from Picture Tray. Note: If not select any photo in Picture Tray, you will clear all photos in Picture Tray. 2. Edit Photos Select an image, click "Edit" button, or right click a thumbnail then select "Edit", Edit window will appear. 1. General: Rotate: Click “Left" button to counter-clockwise rotate image; click "Right" button to clockwise rotate image. BlazeVideo, Inc. 13 www.blazevideo.com Click "Apply" to apply the result, click "Reset" to keep the original status. Flip: Click "Horizontal" to horizontally flip image, click "Vertical" to vertically flip image. Click "Apply" to apply the result, click "Reset" to keep the original status. Resize: Default is to "Manual" resize, there are below three ways to resize: 1. Drag the arrow button around the image to resize, the current image size will display in the left edit box; 2. Type your desired width and height, or type your desired percent number; 3. Drop down click to select desired resolution to resize. Keep Ratio: Select to keep the width to height ratio as same as original image. BlazeVideo, Inc. 14 www.blazevideo.com Click "Apply" to apply the result, click "Reset" to keep the original status. Crop: There are two crop modes available, "Free Crop" and "Keep Aspect Ratio". Default is "Free Crop". Free Crop: Move highlight area or freely drag the arrow button around the image to select crop area. Keep Aspect Ratio: Select to keep the width to height ratio as same as original image. Click "Apply" to apply the result, click "Reset" to keep the original status. 2. Enhance Photos: Remove Red Eye: drag and drop to select the red eye area, you will see the after effect of removing red eye. BlazeVideo, Inc. 15 www.blazevideo.com Click "Apply" to apply the result, click "Reset" to keep the original status. Adjust Color: To change brightness, contrast, hue and saturation of the image. Drag the slide bar or click "-", "+" button to adjust. Click "Apply" to apply the result, click "Reset" to keep the original status. Blur/Sharp: Rightwards drag the slide bar to make image sharp; leftwards drag to be blur. BlazeVideo, Inc. 16 www.blazevideo.com Click "Apply" to apply the result, click "Reset" to keep the original status. Enhance: Auto adjust color of photos. There are three enhance effects: Normalize, Stretch, Equalize. Click one desired effect to enhance image. Click "Apply" to apply the result, click "Reset" to keep the original status. 3. Create: BlazeVideo, Inc. Add Text: Type characters in Edit Box, click "Font" button to select font style, size, effect and color in the pop-up box. Click "Apply", the characters will be added into image. Left click the text, you 17 www.blazevideo.com can modify the size and color of text. BlazeVideo, Inc. Add Clips: Click and select a clip in the clip list, the clip will be added into the image. Click "Apply" to add clips; click other clip, you will change to other clip. 18 www.blazevideo.com Add Frame: Click and select a frame in the frame list, the frame will be added into the image. Click "Apply" to add frames; left click the frame, you will select other frame. Filter: Select a filter, drag the intension bar to adjust the effect, click "Apply" to apply BlazeVideo, Inc. 19 www.blazevideo.com the filter. 3. Save Photos After finishing editing, click "Save" or "Save As" button in the tool bar, or select "File->Save" or "File->Save As" menu, you will save the edited image. Note: If directly save image, BlazePhoto will backup the original photo and append .BAK to extension in current directory. You can also set the saving option in Setting by tick-on or tickoff "Backup files and append .BAK to extension". 4. Edit Tool Bar 1. 2. 3. 4. 5. 6. Undo: cancel last operation. Redo: repeat last operation. Copy: copy selected item onto clipboard. Paste: paste the item on clipboard onto image. Delete: delete the selected items, such as added clip, frame or text. Merge All: merge all the added items(clip, frame, text, etc) into the image, not allowed to modify again. 7. Save: save current image. 8. Save As: save current image as another file. 9. Zoom Out: display current image with smaller size(keeping original image size) 10. Zoom Bar: drag to change image displaying size(keeping original image size). 11. Zoom In: display current image with larger size(keeping original image size) 12. Fit to Window: make current image fit to window. BlazeVideo, Inc. 20 www.blazevideo.com 13. Actual Size: display picture with actual size. 14. Show/Hide Original Picture: toggle-switch to show or hide the original picture 3.5 Creating BlazePhoto provides three creating modes: Create Disc, Create Slideshow DVD, Create html albums. Drop down click "Create" button or click the relative create button at the right bottom of the main interface to select your desired create items. • Create Disc: Backup and burn image collections in the Picture Tray into CD disc, the interface is as below: Select a CD writer and fill in the right disc volume info, click "Burn", you will begin to burn the images. Note: If you have not installed CD writer in your PC, the Target Drive box and below relative info will not be available, you will not burn the images to CD disc. BlazeVideo, Inc. 21 www.blazevideo.com • Create Slideshow DVD: Make all the image collections in Picture Tray into slideshow DVD, and select to burn it or not, the interface is as below: o TV Mode: Set video standard as PAL or NTSC. NTSC--National Television System Committee, mainly used in Japan, US, Canada, Mexico, etc, with 720*480 resolution; PAL--Phase Alternating Line, mainly used in China, Hongkong, Middle East and Europe, with 720*576 resolution. o Display Mode: Set video display mode as LetterBox or Pan & Scan. o Aspect Ratio: Set aspect ratio as 4:3 or 16:9. o Interval Time: Set the interval time between two images. o Temporary Work Space: Specify a directory as the temp folder to create slideshow DVD. o Output Folder: Specify a directory to save the created slideshow DVD. Click "Start" button to create slideshow DVD. After creating finished, a dialog box will appear to enquire you whether to burn into disc, if click "Yes", you will burn the DVD into disc just like burn a normal DVD movie. • Create Html Album: Create all the image collections in Picture Tray into html page, and enquire you whether to burn into disc, the interface is as below: BlazeVideo, Inc. 22 www.blazevideo.com Select your desired album style, destination folder and other settings, click "OK", you will begin to create a html page. After creating finished, a dialog box will popup to enquire you whether to burn into disc, if click "Yes", you will burn the html page into disc just like burn a normal data disc. 3.6 Sharing Photos BlazePhoto provides three sharing modes: Print, Export to Folder and Send Email. Drop down click "Share" button or click the relative share button at the right bottom of the main interface to select your desired share items. BlazeVideo, Inc. 23 www.blazevideo.com • Print: Print all the image collections in Picture Tray, the operation interface is as below: Layout: There are two modes available: Individual Prints and Picture Package, which are described as below: 1. Individual Prints: print selected pictures one by one, multiple different images on one page is possible. 2. Picture Package: same one picture per page, the copies depends on the image size and picture package format. o Individual Print Format: multiple prints size available: 2.1"×2.8", 3.5"×5", 4"×6", 5"×7", Full Paper, Actual Size. o Print Single Photo Per Page: print one image per page, maybe there is some blank space on paper. o Crop to Match Paper: the aspect ratio of the image may differ with the printed one, crop some part to fit paper size. o BlazeVideo, Inc. 24 www.blazevideo.com Picture Package Format: if select "Picture Package" layout, decides how many copies of the same image printed on each page. o Select Printer: if multiple printers installed, please select a target printer. o Page Range: Print All: Print all previewed image; Print Range: select to print specified images. o Page Setup: Set options of print paper, such as size and specification, etc. o After finishing above setting, click "Print", you will begin to print your image collections. • Output to Folder Batch change the info of all the images collected in Picture Tray, such as file size, format, and name, the interface is shown as below: Destination: 1. Place modified image in source folder: Save all the image collections in Picture Tray into their original folder. 2. Place modified image in following folder: Export all the image collections in Picture Tray into specified folder. o Image Size and Format: 1. Maximum Photo Size: the changed image size is limited within your specified size. 2. Convert Image to: Change image format. o File Options 1. Remove original files: delete the original image files from hard disk folder after conversion finishes. o BlazeVideo, Inc. 25 www.blazevideo.com 2. Rename modified files: rename the modified image files as "character in edit box" + number. After finish above settings, click "OK", you will begin to batch convert files. • Send Email Send all the image collections in Picture Tray as mail, interface is as below: o o o Client: to specify mail client, such as Outlook, Outlook Express, Hotmail, etc. E-Mail Size: to specify the maximum size of the mail. Image Size and Compression: to select the maximum image size and the quality of JPEG file after conversion. After finishing above settings, click "OK", the selected email program will launch to send email. 3.7 Settings 1. General BlazeVideo, Inc. 26 www.blazevideo.com Language: Select the interface language, you should relaunch the program after setting to make the change take effects. o Default Start Folder: Set the default folder to open after launching program. o Capture Picture Save Folder: Select a folder to save the image captured from digital devices. o Backup Files on Save: after editing images, backup the original files as "file name.BAK" before saving edited file. o BlazeVideo, Inc. 27 www.blazevideo.com 2. Media Library o o Location: specify the location of the media library. Compact Now: there is maybe some useless info for media library, click "Compact Now" to delete useless info to reduce media library size. BlazeVideo, Inc. 28 www.blazevideo.com 3. Slideshow Background Music: add background music for slideshow preview, can be mp3 or wma file. o Effect Time: the effect time between two images. o Interval Time: the interval time between two images. o BlazeVideo, Inc. 29 www.blazevideo.com 4. Advanced o o Show tags icon: show tags icon while previewing pictures. File Associations: Set BlazePhoto as default application to view pictures, click it to pop up below menu: BlazeVideo, Inc. 30 www.blazevideo.com Select All-Select all file formats in the list to be default opened by BlazePhoto Select None-Cancel all file associations with BlazePhoto Default-Click to select the file type default associated with BlazePhoto OK-Submit the file associations setting, the selected file format will be directly opened by BlazePhoto Cancel-Exit and keep original setting . Contact Support Please collect the following information and E-mail us. We will respond you as soon as possible: • • • • • • Your device brand name and model BlazePhoto’s version number Windows Operating System’s version Hardware configuration (sound card, VGA card, Image Capture card) and their specifications The warning message The time and process descriptions about your troubles. Email: [email protected] Web site: http://www.blazevideo.com BlazeVideo, Inc. 31 www.blazevideo.com