1
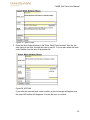
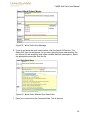
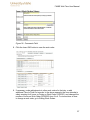
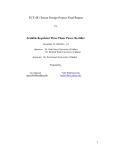
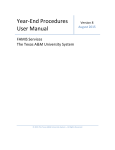
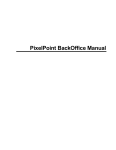
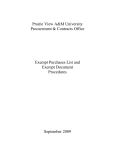
FAMIS Web Time User Manual Haight, Timothy 3/3/2012 FAMIS Web Time User Manual Table of Contents Introduction ..................................................................................................................... 3 User Requirements ......................................................................................................... 3 Purpose ........................................................................................................................... 3 Time Card Description..................................................................................................... 4 Access FAMIS Web Time ............................................................................................... 6 Invalid Login Errors ......................................................................................................... 7 Adding a New Time In/Time Out Record ....................................................................... 11 Editing a Time In/Time Out Record ............................................................................... 15 User Works a Split Overnight Shift ............................................................................ 15 User Works Different Hours One Day ........................................................................ 17 Absences ................................................................................................................... 20 Adding Work Orders ...................................................................................................... 22 Editing Work Orders ...................................................................................................... 28 Approving Your Time Card ............................................................................................ 30 Hours Less Than 40 ...................................................................................................... 31 Deadline to Submit Time Card ...................................................................................... 31 2 FAMIS Web Time User Manual Introduction The FAMIS Web Time system was designed to make time entry for individuals who are required to track time in and time outs, as well as work orders. This system was developed for these reasons: The University of Idaho implemented a web based time system that does not track work orders. In order to use this system, a separate entry would have to be made in FAMIS to enter the work order. The current time card system in FAMIS records time cards on a daily basis. The desire is to be able to manage time cards on a weekly basis. User Requirements To use the FAMIS Web Time system, the user must: Have access to a computer connected to the University of Idaho network. Have an account in the PROD database. Have an account in FAMIS. Purpose The purpose of this document is to: List the user requirements. Instruct how to log in. Instruct how to enter / edit time in/time out records. Instruct how to enter / edit work order / hours records. 3 FAMIS Web Time User Manual Time Card Description Number 1 2 3 4 5 6 7 Item Logged in Employee Name Open Calendar Button Description Indicates who is logged in Opens a calendar to allow you to select a different week Close Calendar Button Closes the calendar User Manual Button Opens the online user manual in a separate browser window or tab Supervisor Approval Visible if you are a supervisor. When clicked, Button opens the Supervisor Approval Form, which is used to approve employee time cards Selected Week Indicates the selected week. This can be changed by opening the calendar and selecting a different week Time In/Time Out Enters the default times that are stored in FAMIS Table Enter Default into Time In/Time Out table for the logged in user Times Button for the selected week. 4 FAMIS Web Time User Manual Number 8 9 10 11 12 13 14 15 Item Time In/Time Out Table Insert New Day Button Time In/Time Out Table Time In/Time Out Delete Record Button Time In/Time Out Edit Record Button Work Order/Hours Table Enter Default Hours Button Hours Drop Down List Work Order/Hours Table Insert New Day Button Work Order/Hours Table 16 Work Order/Hours Table Insert Record Button 17 19 Work Order/Hours Table Delete Record Button Work Order/Hours Table Edit Record Button Approve Button 20 Refresh Button 18 Description Allows logged in user to enter a new Time In/Time Out record. Shows the Time In/Time Out records for the logged in user for the selected week. This table shows the hours the logged in user worked during the selected week. Absences and Exemptions are indicated by a Y in the appropriate fields. Allows the logged in user to delete a Time In/Time Out record. Allows the logged in user to edit the selected Time In/Time Out record. Enters the value of the Hours Drop Down List into the logged in user's Work Order/Hours table for the selected week. Allows the logged in user to change the number of default hours when the /Hours Table Enter Default Hours Button is clicked. The default value is 8. Allows the logged in user to insert a new Work Order/Hours record. Shows the work orders and paid hours for the logged in user for the selected week. If absences are indicated in the Time In/Time Out table, such as holidays, sick time, leave, etc, these are accounted for by a work order, so there may be a difference between the number of hours in the Time In/Time Out and the Work Order/Hours tables. The logged in user's pay is based on the Work Orders/Hours table. Allows the logged in user to insert a record in the Work Orders/Hours table. When clicked, the date for the selected day is entered in the Insert Work Order Hours form. Allows the logged in to delete the selected Work Order/Hours record. Allows the logged in user to edit the selected Work Order/Hours record. Allows the logged in user to approve the selected week's time card. When clicked, the status is changed to "E APPROVE" Refreshes the screen 5 FAMIS Web Time User Manual Number 21 Item Logout Button Description Closes the time card form and returns the logged in user to the login screen. Access FAMIS Web Time There are several ways to access FAMIS Web Time. You can put an icon on your desktop, go directly to the FAMIS Net Services page (http://facilities.dfm.uidaho.edu) or start from the FAMIS section of the Administrative Applications page 1. FAMIS Administrative Applications Page (http://banner.uidaho.edu/famis) 2. Select FAMIS Self Service – which will open the Net Services page. The following screens may look slightly different depending on the browser used. Internet Explorer is generally safest. 3. Click FAMIS Web Time 6 FAMIS Web Time User Manual 1. Enter your User Name and Password, then click the Login button 2. If you successfully enter your User Name and Password, you will be taken to your time card for the current week. Figure 3 - Current Time Card Invalid Login Errors The User Name and Password fields are required. If you do not enter these fields, or enter an incorrect User Name or Password, an error message will appear. Check that the User Name and Password is correct and try again. If you still are having problems logging in, contact the FAMIS Administrator, 885-2880 or the Fiscal Office. 7 FAMIS Web Time User Manual Default Time Cards If you work the same schedule most weeks, entering your time each week can be completed with only a few mouse clicks. Many Facilities Services employees have a default schedule stored in FAMIS, which allows the FAMIS Webtime to load default time in/time outs and work orders. If your default schedule is stored in FAMIS, then to complete your time card each week, you would do the following: 1. If this is the first time you logged into FAMIS Webtime, your time card will look something like Figure 6 below. Figure 6 - First of the Week Time Card 2. If there are no Time In/Time Out records, click the Add Time In/Time Out button. This will create Time In/Time Out records for the current week showing. Figure 7 - After Adding Blank Time In/time Out Records 8 FAMIS Web Time User Manual 3. Click the Delete button in the Time In/Time Out table for the days you do not work. Example 1: If you work Monday - Friday, delete Sunday and Saturday. Example 2: If you work overnight where you have a split shift during the day starting on Monday afternoon and ending on Saturday morning, delete Sunday. Figure 8 - After Deleting Non Working Days 4. Click the Enter Default Times button above the Time In/Time Out table. This will flood in your default time in and time outs into the table for the current week showing. Figure 8 - After Entering Default Time In/Time Outs 5. Click the Enter Default Hours button above the Work Orders/Hours table. This will enter 8 hours in each record in the Work Order/Hours table for the current week showing. 9 FAMIS Web Time User Manual If you work a different number of hours each day (for example 4 X 10 hours), change the number of hours in the drop down list to the number of default hours, then click the Enter Default Hours button. Figure 9 - After Entering Default Hours for Work Orders 6. Click the Approve button (below the Work Orders/Hours table) to approve the weekly time card. This will change the Labor Status for your Work Order/Hours table for the current week showing to E APPROVE. Figure 9 - After Approving Your Time Card 7. Click the Logout button to log out and return to the Login Screen. 10 FAMIS Web Time User Manual Adding a New Time In/Time Out Record There may be times when you will need to add a Time In/Time Out record, such as getting called in to work on a day off. To add a new Time In/Time Out record: 1. Click the Insert New Day button (located above the Time In/Time Out table). This will open the Insert New Day form. Figure 9 - Insert New Day Form 2. Click the Work Date field to bring up the calendar. Select the work date from the calendar. In Figure 10 below, April 20, 2012 has been selected. When a date is selected, it is entered in the WORK DATE field. Figure 10 - Selecting Work Date 11 FAMIS Web Time User Manual 3. Enter the start time in the IN 1 field. It can be entered by enter typing the start time in the IN 1 field, or by selecting the start time from the drop down list. All the start and end times must be in the HH:MM AM/PM format, such as 07:30AM. Also the minutes must be in 15 minute increments (00, 15, 30, or 45). If you type the time in the start or end time fields, the field will auto complete. Figure 11 - IN 1 Times Drop Down List Figure 11 - IN 1 Field Filled In 12 FAMIS Web Time User Manual 4. Enter the end time in the OUT 1 field like you did in the IN 1 field. Figure 12 - Entering Time in OUT 1 Field Using Auto complete. 5. Repeat steps 3 and 4 above for the IN 2 and OUT 2 fields. Figure 13 - IN 2 and OUT 2 Fields Entered 13 FAMIS Web Time User Manual Figure 14 - New Day Entered 6. Click the New Day button (below the Exempt field) to add the new day. 7. In Figure 13 above, the user started at 07:30AM and stopped for lunch at 11:30AM on 22-JUN-2012. The user resumed work at 12:30PM and finished work for the day at 04:00PM. If additional time in and time outs are necessary, the IN and OUT pairs 3 and 4 are available. In Figure 15 below, the user worked a split graveyard shift, starting at 12:00AM (midnight), stopping at 02:00AM, starting again at 05:00PM, stopping for lunch at 09:00PM, starting again at 10:00PM, and ending the day at 12:00AM (midnight). Figure 15 - IN and OUT Pairs 1 Through 3 Used Showing Split Day 14 FAMIS Web Time User Manual Editing a Time In/Time Out Record The Enter Default Times button above the Time In/Time Out table uses values stored in FAMIS to enter your default time in/time records into your time card for the selected week. When you work a different schedule than your default, then it becomes necessary to edit your time in/time out records manually. The easiest way to edit a time in/time out records is to click the Enter Default Times button to enter the default times, and then modify the record. Below are some examples when the time in/time out hours may need to be updated after the default hours have been applied. User Works a Split Overnight Shift 1. Click the Edit button in the record to be edited. Figure 16 - Time In/Time Out Table 2. In Figure 16 above, it shows the user has a split shift, where he clocks in at 12:00AM, clocks off at 02:00AM, clocks in at 5:00PM, clocks off at 09:00PM, clocks in at 10:00PM, and clocks off at 12:00PM 6 days a week. In this example, the user needs to remove the first time in/time out pair on Monday (12:00AM - 02:00AM), as well as the second and third time in/time out pairs on Saturday (05:00PM - 09:00PM, 10:00PM - 12:00AM). So the Edit button for Monday has been clicked. 15 FAMIS Web Time User Manual Figure 17 - Edit Time In/Time Out Form 3. Make the changes to the time in and time out pair. In this example, remove the values in TI_1 and TO_1. Figure 18 - Edited Time In/Time Out Form 4. Click the Update Time In/Time Out button to save the changes. In the above example, the values for the second and third time in/time out pairs will shift to the first and second pairs. 16 FAMIS Web Time User Manual 5. Repeat steps 2-4 for any other days to be edited. In this example, Saturday needs to be updated to remove the second and third time in/time out pairs. In Figure 19 below, the second and third time in/time out pairs on Saturday have been removed so now the correct number of hours is showing for a user working split shifts during a given week. Figure 19 - Time Card With Split Hours User Works Different Hours One Day There are times where you may need to work different times on a given day. To change these hours, do the following: 1. Click the Edit button in the record to be edited. Figure 20 - Time In/Time Out Table 17 FAMIS Web Time User Manual 2. In this example, the user came in early on Monday to be able to leave early. So the start time needs to be changed to 07:00AM. He clocked out for lunch at 11:00AM, clocked back in at 12:00PM, and left for the day at 4:00 pm. Figure 21 - Edit Time In/Time Out Form 3. Enter the start time in the IN or OUT field(s) that needs updating. It can be entered by enter typing the start time in the IN 1 field, or by selecting the start time from the drop down list. All the start and end times must be in the HH:MM AM/PM format, such as 07:30AM. Also the minutes must be in 15 minute increments (00, 15, 30, or 45). If you type the time in the start or end time fields, the field will auto complete. Figure 22 - Editing TI_1 field 18 FAMIS Web Time User Manual 4. Press the TAB key twice to go to the next field. Enter the time like you did in step 3 above. Figure 23 - Editing TO_1 field 5. Repeat steps 3 and 4 above, if necessary. Figure 24 - Editing TI_2 field 19 FAMIS Web Time User Manual Figure 25 - Editing TO_2 field 6. Click the Update Time In/Time Out button to save the changes. Figure 25 - Time Card Showing Edited Times on Monday Absences The Time In/Time Out table is used to record the time you are actually working. Absences, such as holidays, leave, and sick time are indicated by a Y in the Absence field. In the example below, Monday is a holiday, and the user is not working that day. 20 FAMIS Web Time User Manual To indicate the absence, do the following: 1. Click the Edit button in the record to be edited. Figure 26 - Time In/Time Out Table 2. Check the Click if your are Absent box. Figure 27 - Updating Absent Flag 3. Click the Update Time In/Time Out button. This will change the Absent flag to Y and remove time in / time out values for that record. 21 FAMIS Web Time User Manual Figure 28 - Updating Absent Flag Adding Work Orders Default work order records are created weekly. If you work a regular schedule, then all you would need to do is update the number of hours worked for each work order by clicking the Enter Default Hours==> button above the Work Orders/Hours table to update your labor records for the week. You are paid based on the entries in the Work Order/Hours table. In the Time In/Time Out table, absences are indicated by a Y in the Absent field, and the total hours are the number of hours actually worked. For the Work Order/Hours table, these absences must be accounted for. For example, on Monday, February 15, 2010, the user was absent due to the President's Day Holiday. In the Work Order/Hours table, this was accounted for with Work Order S1300323 (FACILITIES HOLIDAY). There are times when you will need to add a work order, such as when you do work on a work order other your default work order, such as S1300320 (FACILITIES DEFAULT TIME, FY13). To add a new work order: 22 FAMIS Web Time User Manual 1. Click the Insert New Work Order button above the Work Order/Hours table. Figure 29 - Work Order/Hours Insert New Order Button Figure 30 - Insert Work Orders/Hours Form 23 FAMIS Web Time User Manual 2. Click the Work_Date field to bring up the calendar. Figure 31 - Work_Date Field Calendar 3. Click the date in the calendar to enter the date into the Work_Date field. Press the TAB key to go to the Hours field. Figure 32 - Work_Date Field Filled In 4. Enter the number of hours in the Hours field. The hours must be between 0 and 12. A decimal is not required, but if a partial hour is to be entered, it must be in quarter hour increments (.25, 50, or .75). Tab to the next field. 24 FAMIS Web Time User Manual Figure 33 - Hours Field 5. Enter the Work Order Number in the "Enter Work Order Number" field. As you start typing in the field, the field will start to auto fill. You can also select the work order number from the auto fill dropdown list. Figure 34 WO Field If you enter an incorrect work order number, an error message will appear and the Insert WO button will disappear. Correct the error to continue. 25 FAMIS Web Time User Manual Figure 35 - Work Order Error Message 6. If you do not know the work order number, click the Search WO button. The Select WO from List will appear. As you start typing the work order number, the list will auto fill with matching work order numbers and their descriptions. Select the appropriate work order from the list. Figure 36 - Work Order Selected from Search box 7. Enter your comments in the Comments field. This is optional. 26 FAMIS Web Time User Manual Figure 38 - Comments Field 8. Click the Insert WO button to save the work order. 9. If necessary, make adjustments to other work orders for that day, or add additional Time In/Time Out records. In the above example, the user attended a safety meeting for 4 hours on Friday on Work Order S1000301, and changed the number of hours on Work Order S1000320 from 8 to 4. For instructions on how to change a work order, go to Editing Work Orders. 27 FAMIS Web Time User Manual Editing Work Orders There may be occasions where a work order needs to be changed. For example, a user may perform work on a different work order part of the day, and the number of hours on the default work order needs to be changed. In the Adding Work Order section, a new work order, S1000301, was added. The number of hours for default work order, S1000320, needed to be changed. To edit a work order: 1. Click the Edit button for the Work Order/Hours record that needs to be changed. Figure 40 - Edit Button for Work Order/Hours Record to be Changed 2. Edit the items that need to be changed. In this example, the number of hours needs to be changed to 4. Figure 41 - Editing Hours for Work Order 28 FAMIS Web Time User Manual 3. Notes: The hours must be between 0 and 12. A decimal is not required, but if a partial hour is to be entered, it must be in quarter hour increments (25, 50, or. .75). If you enter a different work order, the work order must be a valid work order, otherwise an error message will appear and the Update WO button will disappear. Figure 42 - Work Order Error Message 4. Click the Update WO button to save the changes. Figure 43 - Time Card With Work Order Inserted 29 FAMIS Web Time User Manual Approving Your Time Card At the end of the work week, you will need to approve your time card. After your time and work orders have been entered for the week: 1. Click the Approve Button 2. The status will be updated to E-Approve 30 FAMIS Web Time User Manual Hours Less Than 40 If your total hours are less than 40, this warning will appear. If this is OK, then click OK, then the status will update to E Approve. If you click CANCEL, then the Status will change to Entered, and you can update your time card. Deadline to Submit Time Card So that your time card can be processed, your time card for the week must be approved no later than the following Monday at 9:00 am. When it’s a holiday, you may be requested to submit your time card the Friday (or the last day worked) before the holiday. The Fiscal Office will notify you by email of any changes. 31 FAMIS Web Time User Manual Change History Date March 3, 2010 June 22, 2012 November 9, 2012 28 July 2015 Description Initial Document Reformatted, Updated Document Updated Manual Update to use Net Services page Changed By Tim Haight Tim Haight Tim Haight Mike F 32