1
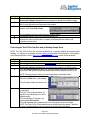
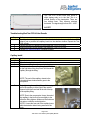
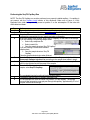
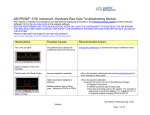
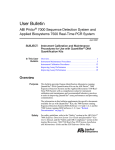
To navigate within this document
use the
or
keys
ABI PRISM® 310 Genetic Analyzer
Test CCD 4-Color and Seq Fill Capillary Run Modules
BEFORE PERFORMING ANY TROUBLESHOOTING WORK ON YOUR ABI PRISM® 310
GENETIC ANALYZER, PLEASE READ THE INSTRUMENT USER’S MANUAL FOR SAFETY AND
WARRANTY INFORMATION AND FURTHER DETAILS ON USE OF THE SYSTEM.
NOTE: Text in this fashion indicates a link to a picture or another section of this/another document.
Please contact AB Technical Support if you have any questions regarding this procedure.
About the Test CCD 4-Color and Seq Fill Capillary Run Modules
The ABI PRISM® 310 Genetic Analyzer collects fluorescent signals from dye-labeled fragments
passing through a polymer-filled glass capillary. Data quality can be affected if the capillary window is
dirty or improperly positioned. The “Test CCD 4-Color” run detects the cleanliness and quality of the
capillary. The “Seq Fill Capillary” run flushes fresh polymer through the capillary.
When to Perform the Test CCD 4-Color and/or Seq Fill Capillary Run Modules
Test CCD 4-Color:
• Every time a new capillary is installed on the instrument.
• Any time a used capillary is reinstalled/repositioned on the instrument.
Seq Fill Capillary:
• To prime a new capillary.
• If the Test CCD 4-Color Run results are not optimal.
• If noisy/elevated baseline is encountered during a run.
• To check the system for polymer leaks.
Performing the Test CCD 4-Color Run as a Stand-alone Module
NOTE: The Test CCD 4-Color Run must be performed on a properly installed and polymer-filled
capillary. If a capillary is not present, see the Capillary Install section of this document. If the capillary
is not filled with polymer, see the Performing the Seq Fill Capillary Run section of this document.
Step
1
2
3
4
Action
Ensure that the instrument is on and that a filled capillary is properly installed.
If Data Collection software is not on, manually launch it.
From the File menu, select New, and then click on one of the four sample sheet
configurations appropriate for your sample and plate configuration.
In the new sample sheet window, enter “Test CCD 4-Color” for the name of the sample.
If you are creating a Sequencing sample sheet:
• Select a dye set/primer file
• Select a matrix file
• Save the sample sheet as “Test CCD 4-Color”
If you are creating a Genescan® Software
sample sheet:
• Save the sample sheet as “Test CCD 4Color”
Close the sample sheet window when finished.
Page 1 of 7
Test CCD 4-Color and Seq Fill Capillary Module
Step
5
6
7
8
9
Action
From the File menu, select New, and then click on either Sequence Injection List or
Genescan® Software Injection List, according to the sample sheet made in step 4.
From the Sample Sheet drop-down list, select the sample sheet made in step 4. This
will fill in the injection list with the name of the sample.
From the Module drop-down list for this
sample, select Test CCD 4-Color.
The completed injection list will look like the example above.
Click Run to start the Test CCD 4-Color stand-alone run.
The laser will excite the detection cell window and gather data. As the run progresses,
examine the scan line information. Compare your results with the criteria in the
evaluation section below.
Performing the Test CCD 4-Color Run with an Existing Sample Sheet
NOTE: The Test CCD 4-Color Run must be performed on a properly installed and polymer-filled
capillary. If a capillary is not present, see the Capillary Install section of this document. If the capillary
is not filled with polymer, see the Performing the Seq Fill Capillary Run section of this document.
Step
1
2
3
4
5
Action
Ensure that the instrument is on and that a filled capillary is properly installed.
If Data Collection software is not on, manually launch it.
From the File menu, select New, and then click on either Sequence Injection List or
Genescan® Software Injection List, according to the samples you will be running.
From the Sample Sheet drop-down list, select the sample sheet that you plan to run.
This will fill in the injection list with the sample names of the samples you plan to run.
NOTE: This step presumes that you have already filled out a sample sheet.
Highlight row 1 of the injection list and
then from the Edit menu, select Insert.
This will create a blank row above row 1.
6
What was previously Injection 1 will now
be Injection 2.
Fill in the “Tube & Sample Name” for
Injection 1 by selecting any one of the
sample names.
Fill in the “Module” for Injection 1 by
selecting Test CCD 4-Color.
Fill in the remainder of the modules for the run if they have not been auto-filled.
NOTE: The Test CCD 4-Color module does not actually inject any sample. Therefore,
do not be concerned about using any sample as a result of this procedure.
Page 2 of 7
Test CCD 4-Color and Seq Fill Capillary Module
Step
7
8
Action
Click Run to start the Test CCD 4-Color with an existing sample sheet. The laser will
excite the detection cell window and gather data. As the run progresses, examine the
scan line information. Compare your results with the criteria in the evaluation section
below.
After the Test CCD 4-Color is finished, the rest of the run will proceed.
Evaluating the Test CCD 4-Color Results
To evaluate the results of a Test CCD 4-Color run, apply the following THREE rules:
Rule
1
2
3
Criteria
Number: The Test CCD 4-Color run should generate FOUR distinct baselines. The
four baselines are – Red, Blue, Black, and Green.
Flatness: The four baselines should be relatively FLAT – meaning the lines are
horizontal. The lines should not be sloping, wavy, spiked, or rounded.
Position: All four baselines should be under ~2000 rfu’s. Typical baselines will range
from the low hundreds (400-600) to the low thousands (1100-1500). Typically, blue and
green are the lower baselines while yellow and red are the higher baselines. This is not
an absolute rule – depending on the laser in use.
This Test CCD 4-Color result (left) shows four
excessively high baselines (~8000rfu). It was
generated as a result of improper positioning of
the capillary in the capillary holder.
REJECT
This Test CCD 4-Color result (left) shows
relatively low baselines (~200rfu). The lines are
compressed on one another and are difficult to
distinguish.
REJECT
This Test CCD 4-Color result (left) shows
drastically sloped baselines. The lines are
actually exceeding the high range of the
window. This was generated by an dusty
capillary window.
REJECT
Page 3 of 7
Test CCD 4-Color and Seq Fill Capillary Module
This Test CCD 4-Color result (left) shows a
slight sloping early on in the test. This is a
normal function of the laser/optics. There are
four distinct lines. They become relatively
horizontal. The signal range is from 500 – 1000.
ACCEPT
Troubleshooting Bad Test CCD 4-Color Results
Step
1
2
3
4
Action
Carefully clean the capillary window with a lint-free lab wipe dampened with clean 70%
ethanol and re-position the capillary back into the detector window. Repeat the Test
CCD 4-Color.
Perform the Seq Fill Capillary run then repeat the Test CCD 4-Color.
Install and prepare a new capillary and repeat the Test CCD 4-Color.
Contact AB Technical Support if problems persist.
Capillary Install
Step
1
2
3
4
Action
Open the instrument doors.
Open the heat plate door and the detector window door.
Remove a capillary from the curved plastic tube.
Partially unscrew the capillary fitting (p/n 005404)
on the right side of the pump block and thread the
capillary through the fitting.
NOTE: The end of the capillary closest to the
colored dot/clear window section goes to the
pump block.
5
Begin tightening the capillary fitting while keeping the capillary in place. Ensure that the
end of the capillary is to the right of the vertical
channel in the block and well to the left of the tip
of the capillary fitting.
NOTE: Due to the compressive forces, the end of
the capillary in the block will move slightly to the
left as the fitting tightens. Make sure the end does
not enter or cross the vertical junction.
NOTE 2: Leave the free end of the capillary loose
while the detection side is being secured to the
block.
Page 4 of 7
Test CCD 4-Color and Seq Fill Capillary Module
Step
6
Action
Once the capillary is secure, pull slightly on the
capillary. It should not move. Carefully clean the
capillary window with a lint-free lab wipe
dampened with clean 70% ethanol.
NOTE: Rub this area vigorously but minimize
bending the capillary window. This ensures any
particulates, dust, or contaminants are removed.
7
Carefully position the capillary into the detector
window.
The colored dot above the capillary window should
rest at the top border of the detector window plate.
With one hand keeping the capillary in place, close
the detector window door with the opposite hand.
8
9
10
11
12
Affix a small piece of thermal tape to the capillary above the detector window door to
secure the capillary.
Thread the free end of the capillary through the electrode thumbscrew. The capillary
should be as close to the electrode as possible without touching it. The capillary should
either be flush with the electrode or protrude beyond it no more than 0.5mm.
Affix a second small piece of thermal tape to
the capillary above the electrode thumbscrew
to secure the capillary. The entire set-up
should look like this:
Close the heat plate door.
As a final step, perform the Autosampler Calibration. For a detailed tutorial, please see
the “Autosampler Calibration” document at:
http://home.appliedbiosystems.com/support/apptech/
Page 5 of 7
Test CCD 4-Color and Seq Fill Capillary Module
Performing the Seq Fill Capillary Run
NOTE: The Seq Fill Capillary run must be performed on a properly installed capillary. If a capillary is
not present, see the Capillary Install section of this document. Make sure to have a 1.5-mL
Eppendorf tube (with the cap cut off) present at position 3 on the autosampler. Fill the tube with
sterile deionized water.
Step
1
2
3
4
5
6
7
8
9
Action
Ensure that the instrument is on and that a capillary is properly installed.
If Data Collection software is not on, manually launch it.
From the File menu, select New, and then click on one of the four sample sheet
configurations appropriate for your sample and plate configuration.
In the new sample sheet window, enter “Seq Fill Capillary” for the name of the sample.
If you are creating a Sequencing sample sheet:
• Select a dye set/primer file
• Select a matrix file
• Save the sample sheet as “Seq Fill Capillary”
If you are creating a Genescan® Software
sample sheet:
• Save the sample sheet as “Seq Fill
Capillary”
Close the sample sheet window when finished.
From the File menu, select New, and then click on either Sequence Injection List or
Genescan® Software Injection List, according to the sample sheet made in step 4.
From the Sample Sheet drop-down list, select the sample sheet made in step 4. This
will fill in the injection list with the name of the sample.
From the Module drop-down list for this
sample, select Seq Fill Capillary.
The completed injection list will look like the example above.
Click Run to start the Seq Fill Capillary stand-alone run.
The autosampler will move the waste vial (position 3) to the capillary. The syringe
pump will then proceed to pump polymer through the capillary. Approximately 4-7uL of
polymer will be flushed through.
Page 6 of 7
Test CCD 4-Color and Seq Fill Capillary Module
Contacting AB Technical Support
By Telephone:
By Internet:
By E-mail:
1-800-831-6844
http://www.appliedbiosystems.com/support/
Then click on “Frequently Asked Questions” and then the “Ask a Question” tab.
[email protected]
Manually Launching Data Collection Software
Double-click on the shortcuts on the
computer desktop.
Alternatively, navigate via the Apple
Menu/Start Menu.
On the Macintosh® computer
On the PC
For Research Use Only. Not for use in diagnostic procedures.
Notice to Purchaser: License Disclaimer
Purchase of this software product alone does not imply any license under any process, instrument or
other apparatus, system, composition, reagent or kit rights under patent claims owned or otherwise
controlled by Applera Corporation, either expressly or by estoppel.
Applied Biosystems, ABI PRISM, and GeneScan are registered trademarks and AB (Design) and
Applera are trademarks of Applera Corporation or its subsidiaries in the US and/or certain other
countries. All other trademarks are the sole property of their respective owners.
Page 7 of 7
Test CCD 4-Color and Seq Fill Capillary Module