1
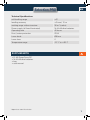
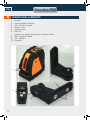
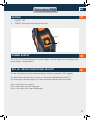
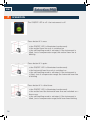
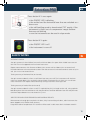
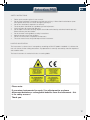
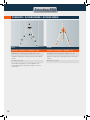
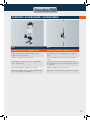
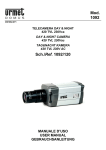
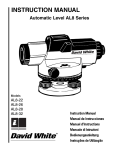
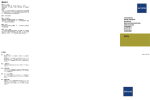
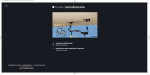
DE | EN | FR
FL 40-PowerCross SP
BEDIENUNGSANLEITUNG
USER MANUAL
MODE D‘EMPLOI
www.geo-fennel.com
EN
Dear customer,
Thank you for your confidence having purchased a geo-FENNEL instrument of
„Selection Pro“ series. This high-quality product was produced and tested with
due prudence.
Among others „Selection Pro“ is defined by even clearer visible lines which you
are originally used to from our standard range of instruments.
This manual will help you to operate the instrument appropriately. Please read
carefully - particularly the safety instructions. A proper use guarantees a longtime
and reliable operation.
geo-FENNEL
Precision by tradition.
10
Contents
1. Supplied with
A
2.
Operational elements
B
3.
Keypad
C
4.
Power supply
D
5.
Set up / multi-functional mount
E
6.
Operation
F
7.
Safety notes
G
EN
Technical Specifications
self-levelling range
± 3°
levelling accuracy
± 3 mm / 10 m
working range without receiver
30 m* (radius)
Power supply (all lines illuminated)
3x AA Alkaline batteries
Operating time
40 hours
Dust / water protection
IP 54
Laser diode
635 nm
Laser class
2
Temperature range
-10° C to +45° C
SUPPLIED WITH
•
•
•
•
A
FL 40-PowerCross SP
3x AA Alkaline batteries
bag
user manual
*depends on room illumination
11
EN
B
OPERATIONAL ELEMENTS
1.
2.
3.
4.
5.
6.
7.
8.
9.
10.
Keypad
Laser emitting windows
1/4“ thread for tripod
Battery case
Hanging hole
Belt slot
Interlock for height adjustment of elevator table
5/8“ thread for tripod
1/4“ adapter
Magnets
1
9
2
7
6
5
4
3
8
12
10
EN
C
KEYPAD
1.
2.
ON/OFF LED
ON/OFF horizontal and vertical laser line
1
2
POWER SUPPLY
D
Put in 3 x AA Alkaline batteries into the battery case (4) (take care to polarity) and
close battery compartment.
SET UP / MULTI-FUNCTIONAL MOUNT
E
Fix the instrument on the multi-functional mount by using the 1/4“ adapter.
To move the instrument up or down on the mount declamp the knob (7).
For locking the desired position of the instrument tighten the knob again.
Use of the laser on a tripod.
Use of the laser with the magnets.
Use of the laser with strap attachment.
13
EN
F
OPERATION
The ON/OFF LED is off - the instrument is off
Press button H-V once:
• the ON/OFF LED is illuminated continuously
• the vertical laser line only is switched on
• the self-levelling mode is activated; if the instrument is
tilted, (out of compensator range) the vertical laser line is
blinking
Press button H-V again:
• the ON/OFF LED is illuminated continuously
• the horizontal laser line only is switched on
• the self-levelling mode is activated; if the instrument is
• tilted, (out of compensator range) the horizontal laser line
is blinking
Press button H-V a third time:
• the ON/OFF LED is illuminated continuously
• the vertical and the horizontal laser line are switched on =
laser cross
• the self-levelling mode is activated; if the instrument is
tilted, (out of compensator range) both laser lines blinking
14
EN
Press button H-V once again:
• the ON/OFF LED is blinking
• the vertical and the horizontal laser line are switched on =
laser cross
• the self-levelling mode is de-activated (TILT mode); if the
instrument is tilted. (out of compensator range) thelaser
lines are not blinking
• now the instrument can be used in slope mode
Press button H-V again:
• the ON/OFF LED is off
• the instrument is now off
SAFETY NOTES
G
ACCURACY CHECK
Set up instrument in the middle of two walls which are about 5 m apart. Mark visible laser cross on
one wall. Turn unit to opposite wall and mark laser cross.
Repeat measurements with distance of about 0,6 m to one wall and about 4,4 m to second wall.
Deviation between two measurements taken from the centre and two measurements taken at 0,6 m
and 4,4 m must not exceed 3 mm.
Testing accuracy of horizontal line (end to end)
Set up instrument about 5 m from a wall. Mark laser cross on wall. Turn instrument until the laser
cross has moved about 2,5 m to the left side and check if horizontal line is within ± 2 mm of laser
cross marked on wall. Repeat measurement by turning instrument to the right side
Testing accuracy of vertical line (end to end)
Set up instrument about 5 m from a wall. Fix a plumb line of 2,5 m length to the wall, using a plumb
bob. Bring laser line into coincidence with the plumb line. Deviation between laser line and plummet
cord from top to bottom must not exceed ± 1,5 mm.
SPECIFIC REASONS FOR ERRONEOUS MEASURING RESULTS
Measurements through glass or plastic windows; dirty laser emitting windows; after instrument has
been dropped or hit. Please check accuracy.
Large fluctuation of temperature: If instrument will be used in cold areas after it has been stored in
15
EN
warm areas (or the other way round) please wait some minutes before carrying out measurements.
CARE AND CLEANING
Handle measuring instruments with care. Clean with soft cloth only after any use. If necessary damp
cloth with some water. If instrument is wet clean and dry it carefully. Pack it up only if it is perfectly
dry. Transport in original container / case only.
ELECTROMAGNETIC ACCEPTABILITY (EMC)
It cannot be completely excluded that this instrument will disturb other instruments (e.g. navigation
systems); will be disturbed by other instruments (e.g. intensive electromagnetic radiation nearby
industrial facilities or radio transmitters).
CE-CONFORMITY
Instrument has CE-mark according to EN 61010-1:2001 + corr. 1+2, IEC 60825-1:2008:05.
WARRANTY
This product is warranted by the manufacturer to the original purchaser to be free from defects in
material and workmanship under normal use for a period of two (2) years from the date of purchase.
During the warranty period, and upon proof of purchase, the product will be repaired or replaced (with
the same or similar model at manufacturers option), without charge for either parts or labour. In case
of a defect please contact the dealer where you originally purchased this product. The warranty will
not apply to this product if it has been misused, abused or altered. Without limiting the foregoing,
leakage of the battery, bending or dropping the unit are presumed to be defects resulting from misuse
or abuse.
EXCEPTIONS FROM RESPONSIBILITY
1.
2.
3.
4.
5.
6.
16
The user of this product is expected to follow the instructions given in operators’ manual.
Although all instruments left our warehouse in perfect condition and adjustment the user is
expected to carry out periodic checks of the product’s accuracy and general performance.
The manufacturer, or its representatives, assumes no responsibility of results of a faulty or
intentional usage or misuse including any direct, indirect, consequential damage, and loss of
profits.
The manufacturer, or its representatives, assumes no responsibility for consequential damage,
and loss of profits by any disaster (earthquake, storm, flood etc.), fire, accident, or an act of a
third party and/or a usage in other than usual conditions.
The manufacturer, or its representatives, assumes no responsibility for any damage, and loss of
profits due to a change of data, loss of data and interruption of business etc., caused by using
the product or an unusable product.
The manufacturer, or its representatives, assumes no responsibility for any damage, and loss of
profits caused by usage other than explained in the users‘ manual.
The manufacturer, or its representatives, assumes no responsibility for damage caused by wrong
movement or action due to connecting with other products.
EN
SAFETY INSTRUCTIONS
•
•
•
•
•
•
•
•
•
•
Follow up instructions given in user manual.
Do not stare into beam. Laser beam can lead to eye injury. A direct look into the beam (even
from greater distance) can cause damage to your eyes.
Do not aim laser beam at persons or animals.
The laser plane should be set up above eye level of persons.
Use instrument for measuring jobs only.
Do not open instrument housing. Repairs should be carried out by authorized workshops only.
Please contact your local dealer.
Do not remove warning labels or safety instructions.
Keep instrument away from children.
Do not use instrument in explosive environment.
The user manual must always be kept with the instrument.
LASER CLASSIFICATION
The instrument is a laser class 2 laser product according to DIN IEC 60825-1:2008-05. It is allowed to
use unit without further safety precautions. Eye protection is normally secured by aversion responses
and the blink reflex.
The laser instrument is marked with class 2 warning labels.
Please note:
If you return instruments for repair / for adjustment to us please
disconnect batteries or rechargeable batteries from the instrument - this
is for safety reasons!
Thank you.
17
ZUBEHÖR / ACCESSORIES / ACCESSOIRES
FS 10
FS 30-L
ARTIKEL-NR. / REFENCE NO. / RÉFÉRENCE 302000
ARTIKEL-NR. / REFENCE NO. / RÉFÉRENCE 156
Kurbelstativ / elevating tripod / trépied à colonne
Kurbelstativ / elevating tripod / trépied à colonne
drehbarer Stativkopf / rotating head / Tête de trépied
rotative
drehbarer Stativkopf / rotating head / Tête de trépied
rotative
53 - 163 cm; 2,3 kg
90 - 285 cm; 2,3 kg
Dosenlibelle, Tragetasche / Circular bubble, with
carrying bag / Nivelle sphérique intégrée, Saccoche
de transport
26
ZUBEHÖR / ACCESSORIES / ACCESSOIRES
WH 2
KS 3
ARTIKEL-NR. / REFENCE NO. / RÉFÉRENCE 290610
ARTIKEL-NR. / REFENCE NO. / RÉFÉRENCE 520100
Wand- & Deckenhalter / wall and ceiling mount /
support mural et de plafond
Klemmsäule / floor-to-ceiling-pillar / canne support
laser
robust / solid / particulièrement solide
Robuste Ausführung / solid construction / modèle
robust
Große Plattform / large platform size / grande platforme: 150 x 95 mm
wird zwischen Boden und Decke festgeklemmt / to
be fixed between floor and ceiling / bloquée entre sol
et le plafond
Einteilung / graduation / graduation: cm/inch
Adapter / adapter / filetage: 5/8“ & 1/4“
für alle geo-FENNEL Laser / for all geo-FENNEL laser
/ pour tous les lasers geo-FENNEL
Max. Länge / maximal length / longueur max.: 3,40 m
27
geo-FENNEL GmbH
Kupferstraße 6
D-34225 Baunatal
Tel.
+49 561 / 49 21 45
Fax
+49 561 / 49 72 34
[email protected]
www.geo-fennel.de
Technische Änderungen vorbehalten.
All instruments subject to technical changes.
Sous réserve de modifications techniques.
09/2013
Precision by tradition.