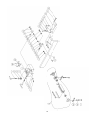
1
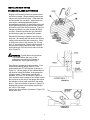
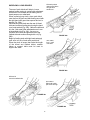
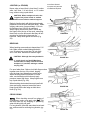
6" Wedgebed Jointer ShearTec II
MJOIN6100-0130
MJOIN6200-0130
OPERATING MANUAL
17101 Murphy Avenue. Irvine, California 92614
www.lagunatools.com
800.234.1976
Table of contents
SAFETY INSTRUCTIONS ................................................................................................................... 2
RECEIVING T HE JOINTER ............................................................................................................... 4
INSTALLATION ..................................................................................................................................... 4
MOUNTING JOINTER TO STAND..................................................................................................... 5
CUTTERHEAD GUARD I NSTALLATION & REMOVAL ................................................................ 6
INSTALLING DUST CHUTE................................................................................................................ 6
GROUNDING INSTRUCTIONS .......................................................................................................... 7
SAFETY SWITCH ................................................................................................................................. 8
ADJUSTMENTS .................................................................................................................................... 8
INSTALLING NEW KNIVES ................................................................................................................ 9
STANDARD BLADES CUTTERHEAD............................................................................................... 9
SHEARTEC 2 CUTTERHEAD ...........................................................................................................11
CUTTERHEAD REMOVAL .................................................................................................................11
DEPTH OF CUT .................................................................................................................................. 12
JOINTING KNIVES ............................................................................................................................. 12
TABLE GIBS AND LEVELING .......................................................................................................... 13
FENCE ADJUSTMENTS: TILT ........................................................................................................ 13
BASIC OPERATIONS ........................................................................................................................ 15
PARTS DIAGRAMS ............................................................................................................................ 19
PARTS LIST ......................................................................................................................................... 22
1
SAFETY INSTRUCTIONS
For Your Safety Read Instruction Manual Before Operating Jointer
As with all machines, there is a certain amount of hazard involved with the use of this jointer. Use the machine with
the respect and caution demanded where safety precautions are concerned. When normal safety precautions are
overlooked or ignored, personal injury to the operator can result.
Wear eye protection.
Always keep cutter head and drive guards in place and in proper operating condition. Do not remove guard for
rabbeting operations.
Never make jointing , planning, or rabbeting cut deeper than 1/8 in.
Always use hold-down/push blocks for jointing material narrower than 3 inches, or planning material thinner
than 3inches.
Never perform jointing. Planning, or rabbeting cuts (with jointers provided with a rabbeting guard) on pieces
shorter than 8 inches (203 mm) in length.
Keep guards in place and in working order.
Remove adjusting keys and wrenches. Form habit of checking to see that keys and adjusting wrenches are
removed from tool before turning it on .
Keep work area clean. Cluttered areas and benches invite accidents.
Don’t use in dangerous environment. Don’t use power tools in damp or wet locations, or expose them to rain.
Keep work area well lighted.
Keep children away. All visitors should be kept safe distance from work area.
Make workshop kid proof with padlocks, master switches, or by removing starter keys.
.
Don’t force tool. It will do the job better and safer at the rate for which it was designed.
Use right tool. Don’t force tool or attachment to do a job for which it was not designed.
Use proper extension cord. Make sure your extension cord is in good condition. When using an extension
cord, be sure to use one heavy enough to carry the current your product will draw. An undersized cord will
cause a drop in line voltage resulting in loss of power and overheating Table (see Figure 9) shows the correct
size to use depending on cord length and nameplate ampere rating. If in doubt, use the next heavier gage. The
smaller the gage number, the heavier the cord.
Wear proper apparel. Do not wear loose clothing, gloves, neckties, rings, bracelets, or other jewelry which
may get caught in moving parts. Nonslip footwear is recommended. Wear protective hair covering to contain
long hair.
Always use safety glasses. Also use face or dust mask if cutting operation is dusty. Everyday eyeglasses
only have impact resistant lenses, they are NOT safety glasses.
Secure work. Use clamps or a vise to hold work when practical. It’s safer than using your hand and it frees
both hands to operate tool.
Don’t overreach. Keep proper footing and balance at all times.
Maintain tools with care. Keep tools sharp and clean for best and safest performance. Follow instructions for
lubricating and changing accessories.
Disconnect tools before servicing; when changing accessories, such as blades, bits, cutters, and the like.
Reduce the risk of unintentional starting. Make sure switch is in off position before plugging in.
2
Use recommended accessories. Consult the owner’s manual for recommended accessories. The use of
improper accessories may cause risk of injury to persons.
Never stand on tool. Serious injury could occur if the tool is tipped or if the cutting tool is unintentionally
contacted.
Check damaged parts. Before further use of the tools, a guard or other part that is damaged should be
carefully checked to determine that it will operate properly and perform its intended function – check for
alignment of moving parts, binding of moving parts, breakage of parts, mounting , and any other conditions
that may affect its operation. A guard or other part that is damaged should be properly repaired or replaced.
Direction of feed. Feed work into a blade or cutter against the direction of rotation of the blade or cutter only.
Never leave tool running unattended. Turn power off. Don’t leave tool until it comes to a complete stop.
Do not perform jointing operation on material shorter than 8 in , narrower than 3/4 in, or less than 1/4 in thick.
Do not perform planing operation on material shorter than 8 in , narrower than 3/4 in, or wider than 6” in or
thinner than 1/2 in.
Maintain the proper relationships of infeed and outfeed table surfaces and cutter head knife path.
Support the work piece adequately at all times during operation; mqintain control of the work at all times.
Do not back the work toword the infeed table.
Do not attempt to perform an abnormal or a little-used operation without study and the use of adequate holddown/push blocks, jigs, fixtures, stops and the like.
Hand safety. It is good practice to move the hands
in an alternate motion from back to front as the work
continues through the cut. Never pass the hands
directly over the cutter knife. As one hand approaches
the knives remove it from the stock in an arc motion
and place it back on the stock in a position beyond
the cutterknife.
Three inch rule. When working a piece of wood on
the jointer, follow the 3 inch radius rule. The hands
must never be closer than 3 inches to the cutter head.
Health hazards. Some dust created by power
sanding, sawing, grinding, drilling and other construction activities contains chemicals known to cause cancer,
birth defects or other reproductive harm. Some examples of these chemicals are:
* Lead from lead-based paint.
* Crystalline silica from bricks and cement and other masonry products.
* Arsenic and chromium from chemically-treated lumber.
Your risk from these exposures varies, depending on how often you do this type of work. To reduce your
exposure to these chemicals, work in a well-ventilated area, and work with approved safety equipment, such
as those dust masks that are specifically designed to filter out microscopic particles.
Familiarize yourself with the following safety notices used in this manual:
!
CAUTION: (This means that if precautions are not heeded, it may result in minor or moderate injury
and/or possible machine damage)
!
!
WARNING: (This means that if precautions are not heeded, it could result in serious injury or
possibly even death).
3
RECEIVING T HE JOINTER
Upon delivery, open shipping containers and check
that all parts are in good condition. Any damage
should be reported to your distributor and
shipping agent immediately. Before proceeding
further, read your manual and familiarize yourself
thoroughly with assembly, maintenance and
safety procedures.
Contents of box 1:
1 jointer stand
1 door
1 dust chute
Contents of box 2:
1 jointer assembly
1 fence assembly
1 pulley cover
1 belt
1 cutterhead guard
2 hold-downs
1 hardware bag
The contents of the hardware bag are drawn full
scale in Figure 1.
FIGURE 1
Moisten a soft cloth with kerosene and remove
t he protective coating from all machined
surfaces of the jointer. Do NOT use an
abrasive p ad. Do not use gasoline, acetone or
lacquer thinner, as this may damage painted
surfaces.
Although some users prefer a wax coating for the
table surfaces, white talcum powder rubbed in
vigorously once a week with a blackboard eraser
will fill any casting pores and form a moisture
barrier. Talcum powder will not stain wood or
mar finishes.
INSTALLATION
FIGURE 2
Tools required
12mm and 14mm wrenches screwdriver
Locate the jointer in an area that is level and
provides a solid foundation. Make sure that any
potential kick- back i s not i n line with aisles,
doorways, w ash stations or other work areas.
4
MOUNTING JOINTER TO STAND
1. Position the jointer on the stand so that
the pulley attached to the cutterhead on the
jointer is directly above and on the same side
as the motor pulley.
2. Use three lock bolts and spring washers to
firmly fasten the jointer to the stand. The bolts
are threaded up through the holes in the stand
into the base of the jointer. See Figure 2. Use
a wrench to tighten.
INSTALLING B ELT
FIGURE 3
To attach the belt to the cutterhead pulley and
motor pulley, first reach into the dust chute
with a wrench and loosen the four bolts
holding the motor to the mount b racket. Align
the pulleys u sing the slotted holes on the
mounting bracket. Raise the motor as high as
possible and mount the belt on to both pulleys.
Allow the motor to drop and create tension on
the belt. Pull down on the motor to achieve
the de- sired belt tension (the correct belt
tension is achieved when the belt can be
deflected approximately one inch at the center
belt span using light finger pressure as shown
in Figure 3.) Snug tight the four bolts.
Pulley Cover
1/4*1/2 Screw
Flat washer
FIGURE 4
INSTALLING PULLEY COVER
The pulley cover is mounted with four 1/4-20
x 1/2 handle screws and four flat washers to
the threaded holes in the base, as shown in
Figure 4.
INSTALLING FENCE TO BED
Referring to Figure 5:
1. Take the lock handle (E), flat washer (F),
and lock nut (G) from the carton.
2. Place the fence assembly (A) onto the table
(B) Be sure the key stock (D) on the bed lines
up with the channel (C) in the fence casting.
3. Place the flat washer (F) on hole(H); insert
the lock handle (E) through the fence casting
and the table casting.
4. Thread the lock nut (G) onto the lock
handle
(E). Make sure the tab on the nut faces up
and engages the slot in the table casting.
*Note: For rabbeting operations use hole (J).
FIGURE 5
5
CUTTERHEAD GUARD I NSTALLATION &
REMOVAL
!
WARNING: Use the jointer guard for
al l operations.
1. Disconnect jointer from power source.
2. Turn knob (A) counterclockwise to create
tension on spring, and hold it there.
See Figure 6
3. Insert guard post (B) down through hole in
front of ledge.
4. Slightly turn knob (A), if necessary, until
the guard seats itself, and the spring
engages the slot at the end of the guard
post.
5. Check the guard for proper tension. If
guard does not spring back into place
when pulled back from cutterhead,
remove guard and adjust spring tension by
repeating steps 1-3 until correct tension
is achieved. NEVER run the jointer without
the guard being in place and in perfect
working order.
FIGURE 6
INSTALLING DUST CHUTE
Mount the dust chute to the pre-tapped holes in
the
side of the stand with four 1/4-20 x 1/2 handle
screws and four flat washers. See Figure 7.
FIGURE 7
6
must be reconnected for use on a different type of
electric circuit, the reconnection should be made by
qualified service personnel and after reconnection, the
tool should comply with all local codes and ordinances.
GROUNDING INSTRUCTIONS
!
WARNING: If the machine does not come
wired to run, the electricals and motor
wiring must be done by a qualified
electrician. The machine must be
properly grounded to help avoid
electrical shock and possible death.
Follow the recommendations made by
the National Electrical Code for
grounding.
EXTENSION CORDS
Use proper extension cord. Make sure your extension cord is in good condition. When using an extension cord, be sure to use one heavy enough to carry
the current your product will draw. An undersized cord
will cause a drop in line voltage resulting in loss of
power and overheating. Figure 9 shows the correct
size to use depending on cord length and nameplate
ampere rating. If in doubt, use the next heavier gauge.
The smaller the gauge number, the heavier the cord.
1. All grounded, cord connected tools:
In the event of a malfunction or breakdown, grounding
provides a path of least resistance for electric current
to reduce the risk of electric shock. This tool is
equipped with an electric cord having an equipmentgrounding conductor and a grounding plug. The plug
must be plugged into a matching outlet that is properly installed and grounded in accordance with all local codes and ordinances. Do not modify the plug
provided - if it will not fit the outlet, have the proper
outlet installed by a qualified electrician.
Improper connection of the equipment-grounding conductor can result in a risk of electric shock. The conductor with insulation having an outer surface that is
green, with or without yellow stripes, is the equipment-grounding conductor. If repair or replacement
of the electric cord or plug is necessary, do not
connect the equipment-grounding conductor to a live
terminal. Check with a qualified electrician or
service personnel if the grounding instructions are
not completely understood, or if in doubt as to
whether the tool is properly grounded.
Use only 3-wire extension cords that have 3prong grounding plugs and 3-pole receptacles that
accept the tool’s plug.
Repair or replace damaged or worn cord immediately
2. Grounded, cord-connected tools intended for use
on a supply circuit having a nominal rating less than
150 volts:
This tool is intended for use on a circuit that has an
outlet that looks like the one illustrated in Sketch A,
Figure 8. The tool has a grounding plug that looks
like the plug illustrated in Sketch A.
A temporary adapter, which looks like the adapter illustrated in Sketches B and C in Figure 8, may be
used to connect this plug to a 2-pole receptacle as
shown in Sketch B if a properly grounded outlet is not
available. The temporary adapter should be used only
until a properly grounded outlet can be installed by a
qualified electrician. The green-colored rigid ear, lug,
and the like, extending from the adapter must be connected to a permanent ground such as a properly
grounded outlet box.
Note: In Canada, the use of a temporary adapter is
not permitted by the Canadian Electrical Code
3. Grounded, cord-connected tools intended for use
on a supply circuit having a nominal rating between
150-250 volts, inclusive:
This tool is intended for use on a circuit that has an
outlet that looks like the one illustrated in Sketch D
Figure 8. The tool has a grounding plug that looks
like the plug illustrated in Sketch D.
Make sure the tool is connected to an outlet having
the same configuration as the plug. No adapter is
available or should be used with this tool. If the tool
REWIRING MOTOR FOR 230 VOLTS
When rewiring the supplied electric motor for 230 volts,
be sure power cord is unplugged then change the
connections as illustrated in the diagram in the motor
wiring box. Always secure wire nuts with friction tape.
A new plug will be required for 230 volts as illustrated in
Figure 8, Sketch D.
GROUNDING PIN
FIGURE 8
Note: In Canada, the use of a temporary adapter is
not permitted by the Canadian Electrical Code.
Ampere
Rating
Ampere
Volts
115/230
Total length of cord in feet
25'
Rating Not
More
Than
More
Than
0
6
10
12
6
10
12
16
50'
100'
150'
AWG
18
18
16
14
16 16 12
16 14 12
16 14 12
12 Not recommended
FIGURE 9
Note: The reconnection shall be made by qualified
service personnel.
7
SAFETY SWITCH
The jointer is equipped with a push-button
switch that will accept a safety padlock (not
included). See Figure 10. To safeguard your
machine from unauthorized operation and
accidental starting by young children, the use of
a padlock is required.
ADJUSTMENTS
FIGURE 10
Tools required
8mm, 10mm 12mm, and 19mm wrenches
3mm and 6mm hex wrenches
G
RAISING AND LOWERING TABLES
Figures 11 and 12
D
C
To adjust infeed table:
1. Loosen the rear thumb screw (B), and the
locking handle (C).
FIGURE 11
2. Raise or lower the height adjustment
handle (D) until the scale (G) reads
approximately at the correct depth of cut.
3. Turn the locking handle (C) until it is snug,
then fine-tune the adjustment with the height
adjustment handle (D) by rotating it until the
scale reads exact .
(Clockwise raises the table, counterclockwise
lowers the table.)
NOTE: The fine adjustment handle has 1/16"
travel per rotation.
4.
B
E
When set, retighten screw (B).
F
To adjust outfeed table:
1.
Loosen thumbscrew (E).
2.
Turn handwheel (F) located on the
underside of the outfeed table.
3.
When set, retighten thumbscrew (E).
FIGURE 12
WARNING:
There is a Depth Stop Limited on the back side
that must be released if cutting a depth greater
than 1/8".
If hand wheel seems jammed, please check and
release the Depth Stop Limiter on the back side
of the jointer.
8
INSTALLING NEW KNIVES
STANDARD BLADES CUTTERHEAD
Unplug or disconnect jointer from power source
and lock out power. When installing new knives
remove only one knife at a time. Clean the knife
slot and install the new knife. Adjust and lock
new knife in cutterhead assembly before
proceeding to next knife. To remove the old knives,
loosen gib locking bolts (A) with an 8mm wrench,
and remove gib, knife, and jack screws, Figure 13.
Using a hex wrench, turn jack screws (B) down
one turn. Clean the jack screws, gib, knife slot,
and knife thoroughly and replace jack screws.
Sandwich knife and gib together and drop into
knife slot. Be certain that the back of the knife is
resting on the seat of the jack screw plug. Next,
a shop scale should be placed flat on the
end of the cutterhead. Slide the knife out until it
is flush with the end of the shop scale. Set the
knife locking gib 1/32 inch in from the end of the
knife, Figure 14.
!
FIGURE 13
WARNING: Set the knives no more than
.015 inches above the body of the
cutterhead to minimize the hazard of
kickbackand severe personal injury.
Snug the two outside gib locking screws. If you
have a knife setting gauge, place it on the
outfeed table and "0" the indicator as shown in
Figure 15. Lift the gauge off the outfeed table to
see how far below the bottom of the gauge the
indicator travels. The indicator should read
between .025 and .050 as shown in Figure 16.
If the indicator reads outside of this range, loosen
the set screw in the side of the gauge and adjust
the indicator so that it will read within the range
above. Zero the indicator as shown in Figure 15.
Repeat this process until indicator reads within
the .025 to .050 range.
Always zero the indicator (as shown in Figure 15)
before each use.
FIGURE 14
FIGURE 15
9
Now place it on the outfeed table to the rear of
the cutterhead with the flat indicator point over
the cutterhead (Figure 17) Insert a hex wrench
into the jack screw and rock the cutterhead back
and forth. Watch the pointer on the knife-setting
gauge. The pointer will begin moving to- ward
"0". When the pointer reaches "0", it is parallel
with the outfeed table. Move the gauge to the
front of the cutterhead and repeat the above
procedure.
This adjusting process puts the knife into the
knife slot with the tip parallel and flush with the
outfeed table. Once the correct knife height has
been estab- lished, secure the gib locking screws.
Begin with the center screw (to prevent buckling
or uneven knives).
FIGURE 16
If a knife setting gauge is not available, use
a standard shop scale. Stand the scale on its
edge on the outfeed table; the scale should
extend over the cutterhead. Using the above
method, raise knife until it just touches t he
scale at t he high point o f the cutterhead arc.
FIGURE 17
OUTFEED TABLE AND KNIVES
The outfeed table must be set exactly level
with the knives at the highest point of their
revolution. Knives must also be parallel to the
outfeed table. To check alignment:
!
è
WARNING: Disconnect machine from
power source before making alignments.
1. Place a steel straightedge on outfeed table
and extend it over the cutterhead as shown in
Figure 18.
FIGURE 18
2. Rotate the cutterhead by hand. If a knife is
too low or too high at either end, lightly loosen
the two lock screws in the knife, as shown in
Figure 18. Move the knife until it barely
scrapes the straightedge, and tighten the lock
screws securely. Makesure each knife does
not extend more than .015 inches beyond the
cutterhead.
3. For a final check, set the infeed table for no
more than a 1/64" cut, turn on machine and run
a piece of wood over the cutterhead for 6 to 8
inches. The stock should rest firmly on both
tables with no space under the finished cut as
shown in Figure 19.
Remember, NEVER attempt to take off more
than 1/64" in each pass when making outfeed
table ad- justments.
FIGURE 19
10
CUTTERHEAD REMOVAL
SHEARTEC 2 CUTTERHEAD
If removal of the cutterhead is necessary, do
the following:
WARNING: Knife inserts are dangerously sharp.
Use extreme caution when inspecting,
removing or replacing knife inserts.
!
The knife inserts on the Jointer are four-sided.
When dull, simply remove each insert, rotate it
90° for a fresh edge, and re-install it. No further
adjustment is necessary. Use the two provided
torx wrench to remove the knife insert screw.
Use one of the torx wrenches to help hold the
cutterhead in Position, and the other to remove
the screw. See Figure 19A. It is advisable to
rotate all inserts at the same time to maintain
consistent cutting. However,
if one or more knife inserts develops a nick,
rotate only those inserts that are affected.
Each knife insert has an etched reference mark
so you can keep track of the rotations.
WARNING: Disconnect jointer from
power source.
1. Remove the entire fence assembly by
releasing lock handle and removing hex nuts
(see page 4) Lift the fence off the machine.
2. Loosen the bolts connecting the motor to the
motor mount and remove the drive belt from
cutter- head pulley (see page 4).
3. Lower both infeed and outfeed tables to
expose the cutterhead.
4. Remove the two bolts and spring washers
which secure the cutterhead to the base, as shown
in Figure 19B
IMPORTANT: When removing or rotating
inserts, clean saw dust from the screw, the
insert, and the cutterhead platform. Dust
accumulation between these elements can
prevent the insert from seating properly, and
may affect the quality of the cut.
5. Remove the cutterhead assembly, with studs
at- tached, by lifting cutterhead straight up from
base. The belt pulley may be left on cutterhead
to assist in raising the cutterhead.
6. Remove pulley and both bearing housings
with attached studs from the cutterhead.
Before installing each screw, lightly coat the
screw threads with machine oil and wipe off any
excess.
Securely tighten each screw which holds the
knife inserts before operating the jointer!
NOTE: You may wish to keep on hand an extra
cutterhead in order to maintain shop productivity.
7. When mounting new cutterhead to base, make
sure the curved seats of the base are cleaned and
free of dust and grease.
Make sure all knife insert screws are tightened
securely. Loose inserts can be propelled at high
speed from a rotating cutterhead, causing injury.
FIGURE 19B
FIGURE 19A
11
DEPTH OF CUT
Depth of cut is determined by the height of the
infeed table relative to the high point of the
knives on the cutterhead.
When facing the width of a board (as opposed to
the edge of a board), NEVER attempt to take
off more than 1/64" with each pass.
The depth of cut is indicated by the scale located
on the front of the jointer base as shown in
Figure 20.
FIGURE 20
JOINTING KNIVES
After extended use it will be necessary to
sharpen the knives on the cutterhead assembly
so that all three knives protrude exactly the
same height above the cutterhead .
To joint the knives:
!
WARNING: Disconnect machine from
power source. Use approved eye
protection whenever sharpening blades.
FIGURE 21
1. Remove the cutterhead guard
2. Place a metal straightedge across both
tables as shown in Figure 21, and make
sure both tables are set t o the exact height
o f the high point o f the knives.
3. Clamp a block of wood across the infeed
table as shown in Figure 22 in order to block
the end of a fine India stone or oilstone
during the jointing opera- tion. This helps to
prevent kickback of the stone.
4. Turn machine on.
5. Keeping hands well clear of the cutterhead,
place the stone i nto position a s shown in
Figure 22, and slide the oilstone back and
forth across both tables until the knives are
lightly jointed.
FIGURE 22
6. TURN MACHINE OFF and visually inspect
each knife. If only the high knife has been
touched, lower the OUTFEED table 0.003”
and continue the sharpening process until all
three knives have been touched by the stone.
7. Replace cutterhead guard.
12
TABLE GIBS AND LEVELING
The table gibs on your machine are factory
adjusted and may never require readjustment.
Should any adjustment become necessary, do
the following:
1. Lightly loosen the gib adjusting screws (A),
Figure 23. By loosening the lock nuts first the
set screws should be loose enough to move
the table.
2. Support the end o f the table and a t the
same time, raise it up slightly, (it is
recommended that an- other person hold
and support the table when per- forming
these adjustments). Snug the gib screws. Any
adjustment of the gibs is very minute,
perhaps even 1,000th of an inch. If the gibs
are too tight the adjustment handles will be
difficult to turn. If the gibs ar e too loose the
tables could sag. Keep checking the level
of the tables with a straightedge until leveling
is achieved. When tables are level,
tighten the lock screws.
A
A
FIGURE 23
FENCE ADJUSTMENTS: TILT
Fence adjustments are made with the lock
handles shown in Figure 24. To slide the
fence f orward or back on the table, loosen
lock handle (A), slide the fence to the desired
position and tighten handle (A) to secure
fence.
C
To tilt the fence forward:
1. Loosen locking bolt (B), Figure 24.
2. Place a machinist protractor or triangle on
the table and against the fence. Adjust the
fence to the desired angle and tighten
locking bolt (B) to secure the fence.
A
To tilt the fence back:
B
1. Loosen locking bolt (B), Figure 24.
2. Flip back the stop block (C).
3. Adjust the fence to the desired angle and
tighten locking bolt (B) to secure fence.
!
CAUTION: When the jointing operation
is finished with the fence tilted back, do
not forget to flip the pivot stop block
back to its original position.
FIGURE 24
NOTE: The handle (A, Figure 24) can be
adjusted to a more convenient position
by loosening the nuts on its opposite
end, turning the handle to the proper
position, and retightening the nuts.
13
B
Fence Stop Adjustments
Periodically check the 90° and 45° backward
(135°) tilt accuracy of the fence with an angle
measuring device, such as an adjustable
square or machinist’s protractor.
C
E
D
F
90º Fence Adjustment
Referring to Figure 24A:
The 90º stop is controlled by the stop bolt (E)
and the stop plate (C).
1. Set the infeed table to approximately the
same height as the outfeed table.
A
FIGURE 24A
2. Move the fence by releasing lock handle
(D) and pushing the fence assembly
until it overlaps the tables (B).
3. Tighten lock handle (D).
4. Adjust the fence to a 90º angle by releasing
lock handle (J) pulling up on the fence
handle and tightening the lock handle (J).
Note: The stop bolt (E) should be resting
against the stop plate (C).
A
FIGURE 25
5. Place an angle measuring device on the
table and against the fence to confirm a 90º
setting (A, Fig. 25).
FIGURE 25
6. If the fence is not square to the table,
release the lock handle (J), loosen the hex
nut (F), and turn the stop bolt (E) until the
fence is square to the table.
F
FIGURE 25
A
7. Tighten the lock nut (F) to retain the setting.
Tighten the lock handle (J).
45º Fence Backward Stop Adjustment
Referring to Figure 26:
E
G
C
D
The 45º fence backward stop (fence
positioned away from the operator) is
controlled by the stop bolt (E).
B
H
J
FIGURE 26
1. Loosen the lock handle (A). Move the
stop plate (D) out of the way and position
the fence at the 135º angle. Make sure
the fence sits against the stop bolt. (E).
2. Tighten the lock handle (A)
3. Place an angle measuring device on the
table and against the fence to confirm a
135º setting
(A Fig.27).
A
4. To adjust, loosen the lock nut (F), turn the
stop bolt (E) until a 135º angle is obtained.
5. Tighten the lock nut (F).
FIGURE 27
14
two handed push
block
BASIC OPERATIONS
Before m aking any c uts on t he s tock, m ake a
f ew practice cuts by r aising t he i nfeed t able
to “ 0" a nd with the power disconnected. In this
manner you will acquaint yourself with the feel
of jointer operations.
SURFACING
Adjust depth of cut. It is better to make cuts of
approximately 1/64 inch. This will enable you
to hav e better control over the material being
surfaced. Make several passes if necessary to
obtain proper stock removal.
Never surface pieces shorter than 12 inches or
thinner than 3/8 inch without the use of a
special work holding fixture. Never surface
pieces thinner than 3 inches without the use of
a push block. On stock 8" to 12" long use a
single two-handed push block (Fig. 27a). On
stock longer than 12 inches use two push
blocks ( Fig. 27b). With narrow stock use the
type push block shown in Fig. 27c. When
surfacing short stock over 4 inches wide, use
two (2) push blocks to guide material over
cutterhead (Fig. 27d).
FIGURE 27a
two push blocks
for stock longer
than 12 inches
L-shaped push block
for narrow stock
FIGURE 27b
two push blocks
with dowels
for short stock
over 4 inches wide
FIGURE 27c
FIGURE 27d
15
SURFACING: L ONG BOARDS
The use of push blocks w ill help to i nsure
against hands coming in contact with cutterhead
in the event of a kickback and as trailing end of
board passes over cutterhead.
When surfacing l ong s tock, p lace push block
near the front of piece and start feeding wood with
the right hand until guard has opened and cut is
started (Fig. 28a).
Place second push block near the rear of infeed
table and continue feeding stock using the hand
over hand method (Fig. 28b). Before the left hand
is in the 3 inch area of the cutterhead move it over
to the outfeed side (Fig. 28c). As soon as
possible follow with the right hand over to the
outfeed side and continue through with cut (Fig.
28d).
Begin by feeding stock with right hand and apply
pres- sure to front of stock with push block.
When the stock is longer than twice the length
of the infeed and outfeed tables, another
helper or support table must be used to
support the stock.
left hand pushes
down toward fence
as right hand
starts feed
FIGURE 28a
near cutter,
feed hand
over hand
FIGURE 28b
left hand is
moved to outfeed side
On outfeed
Side both hands
pull stock through
FIGURE 28c
FIGURE 28d
16
move fence forward
to expose only amount
of cutterhead required
JOINTING (or EDGING)
Never edge a board that is less than 3 inches
wide, less than 1 /4 inch thick, or 12 inches
long, w ithout using a push block.
è
!
CAUTION: When workpiece is twice the
l ength of the jointer infeed or outfeed
table use an infeed or outfeed support .
Begin by feeding stock with right hand and apply
pressure to front of stock with push block. When
edging, make cuts of approximately 1/16 inch
for hardwood and 1/8 inch for softwood.
When edging wood wider than 3 inches lap
the fingers over the top of the wood, extending
them back over the fence such that they will act
as a stop for the hands in the event of a
kickback. Keep stock against the fence (Fig.
29).
FIGURE 29
BEVELING
When beveling never make cut deeper than 1/16
inch. Make certain material being beveled is
over 12 inches long, more than 1/4 inch thick
and 1 inch wide. Set fence to desired angle.
!
è
CAUTION: Although fence may be tilted in
FIGURE 30a
or out for bevel cut, Sunhill Machinery
recommends for safety reasons the fence
b e tilted in, if possible, making a cradled
cut (Fig. 30a).
For wood wider than 3 inches, hold with fingers close
together near the top of the stock, lapping
over the board and extending over the fence.
When beveling material less than 3 inches
wide, use beveled push blocks and apply
pressure toward the fence. Keep fingers near
top of push block (Fig. 30b).
When beveling short material use one bevel hold
down and apply pressure toward the fence.
Keep thumb above the ledge on hold down
block (Fig. 30c).
FIGURE 30b
CROSS GRAIN
NOTE: When beveling around four edges of
a workpiece, make cross grain cuts first. This
will help clean up any chipping or splintering
when beveling the end grain.
For long boards, follow the same hand-over-hand
pro- cedure used for surfacing long boards, (pg.
15).
FIGURE 30c
17
SKEWING ( SHEAR CUTTING)
When edging or facing burl or birds-eye maple,
it is not unusual to deface or mar the surface
being finished. This i s caused b y the
cutterhead b lades a t times cutting against the
grain. In order to prevent the defacing or
marring of this type wood, it is necessary to
skew, or angle finish, the material being
worked. See Figure 31.
1. Release the fence locking handle and
remove the two hex nuts and flat washer
holding the fence to the fence support (see
page 4). Remove the fence.
2. Remove the key from the fence slide base.
FIGURE 31
3. Replace the fence assembly at the desired
angle across the cutterhead. Secure the
fence to the sup- port with the two hex nuts
and flat washer, then tighten the fence locking
handle.
PUSH B LOCKS
Push blocks are simple, yet necessary tools to
assist the operator especially when jointing
thin or short stock. Illustrated in Figure 32 are
three types of push blocks commonly used in
jointing. Push blocks may be obtained
commercially or easily constructed.
NOTE: The Jointer is supplied with two push
block for feeding stock.
FIGURE 32
18
PARTS DIAGRAMS
19
20
21
PARTS LIST
Key
Part No.
Descriptions
Q'ty
1
360034-901
KNOB FENCE
2
2
006002-091
FLAT WASHER
1
3
380209-901
T-NUT
1
4
051131-000
HOLDER FENCE
1
5
290003-901
BOLT SHOULDER
1
6
170047-901
PLATE STOP
1
7
006002-097
FLAT WASHER
13.5*40*3.0t
2
8
011002-103
SPRING PIN
4*12
2
9
380080-000
KEY
1
10 011002-105
SPRING PIN
4*20
1
11 050373-000
CLAMP
12 006001-069
FLAT WASHER
10*20*3.0t
1
13 006001-082
FLAT WASHER
10.5*28*3.0t
1
14 003105-103
CAP SCREW
3/8"-16NC*1-1/2"
2
15 003602-102
FLAT HD SOC. SCREW
5/16"-18NC*1-5/8"
1
16 050031-000
FENCE
1
17 360676-901
STUD PIVOT
2
18 009010-200
HEX. NUT
19 290004-901
BOLT SHOULDER 10*6
1
20 130007-903
NUT PIVOT
1
21 130008-903
NUT HANDLE
1
22 170598-901
STOP FENCE
1
23 009008-200
HEX. NUT
7/16"-14NC(17.4B*9.52H)
1
24 009005-200
HEX. NUT
5/16"-18NC(12.7B*6.75H)
2
25 003003-208
HEX. SCREW
5/16"-18NC*1-3/4"
1
26 360035-902
SHAFT LOCK
1
27 130009-903
BLOCK ASM DEPTH
1
28 130055-903
SLEEVE FENCE
1
29 009012-200
HEX. NUT
30 360038-901
HANDLE SHAFT
1
31 250034-615
KNOB FENCE TILT
1
32 170048-901
BRACKET FENCE
1
33 006001-032
FLAT WASHER
6.6*13*1.0t
3
34 003301-101
PAN HD SCREW
1/4"-20NC*1/2"
3
1
1/2"-20NF(19.05B*11.11H)
5/8"-18NF
22
2
2
Key
Part No.
Descriptions
Q'ty
35 003003-205
HEX. SCREW
5/16"-18NC*1"
36 050032-000
TILT PLATE
1
37 230015-901
STUD PIVOT
4
38 009022-100
HEX. NUT
3/8"-16NC
4
39 922884-000
TABLE ASS'Y
CSA/UL
1
.1 003104-103
CAP SCREW
5/16"-18NC*3/4"
1
.2 003104-107
CAP SCREW
5/16"-18NC*2"
2
.3 003201-102
SET SCREW
1/4"-20NC*3/8"
3
.4 009004-100
HEX. NUT
1/4"-20NC
5
.5 006305-100
LOCK WASHER
8.2*15.4
2
.6 006709-100
WAVE WASHER
WW12A
1
.7 010203-000
RETAINING RING
ETW-6
3
.8 010208-000
RETAINING RING
ETW-12
2
.9 230013-901
SET SCREW
5
.10 380066-000
GIB
2
.11 050734-000
TABLE OUTFEED
1
.12 190011-901
COLLAR
1
.13 006004-086
FLAT WASHER
.14 130011-903
CLAMP
1
.15 360037-000
SCREW ELEVATION
1
.16 051123-000
TABLE INFEED
1
.17 050083-000
BASE
1
.18 360056-901
SHAFT
1
.19 170101-901
FIXED PLATE
1
.20 170102-901
TILT PLATE
1
.21 290035-901
STUD PIVOT
1
.22 360058-901
GUARD POST
1
.23 130016-000
ADJUST PLATE
1
40 230053-000
SCREW WING
2
41 003202-103
SET SCREW
5/16"-18NC*3/4"
2
42 009005-100
HEX. NUT
5/16"-18NC
3
43 130015-903
FIXED PLATE
44 003104-103
CAP SCREW
45 230027-901
BOLT
1
46 571984-000
POINTER
1
48 250035-629
PUSH BLOCK
2
11.5*16*0.5t
1
1
1
5/16"-18NC*3/4"
23
5
Key
Part No.
Descriptions
Q'ty
49 920201-000
HANDLE ASS'Y
1
50 920165-000
HANDWHEEL
1
51 050065-901
BLOCK ASM DEPTH
1
52 360033-901
PLUNGER
1
53 280010-000
SPRING
1
54 380085-901
HOUSING PLUNGER
1
55 230156-615
KNOB PLUNGER
56 230016-000
LOCK HANDLE
60 006307-100
LOCK WASHER
10.2*18.5
5
61 003006-301
HEX. SCREW
3 STANDARD BLADES CUTTERHEAD
ASS'Y
3/8"-24NF*89mm
2
.1 000701-103
FLAT HD SOC. SCREW
M5*0.8P*12
.2 220009-000
CUTTER HEAD
1
.3 280052-000
SPRING
6
.4 003201-102
SET SCREW
.5 050018-901
BEARING HOUSING
1
.6 920153-000
KNIFE LOCK BAR ASS'Y
3
.7 210006-000
KNIFE
3
.8 030206-000
BALL BEARING
6202-2NSE
1
.9 012003-009
KEY
5*5*25
1
.10 030207-000
BALL BEARING
6203-2NSE
1
.11 050019-901
BEARING HOUSING
1
.12 050020-901
PULLEY
1
SHEARTEC 2 CUTTERHEAD ASS'Y
1
.1 922856-000
SHEARTEC 2 CUTTERHEAD
1
.2 850587-000
HARDWARE BAGE FOR SHEARTEC 2
1
65-1 921738-000
65-2 922855-000
22*1/4"-20NC
1
1
1
1/4"-20NC*3/8"
6
2
038201-702 TORX SCREW
#10-32UNF*12.5
10
040703-000 TORX WRENCH
T-25
2
922844-000 KNIFE INSERT ASSY
15*15*2.5t*5PCS
1
.3 050018-901
BEARING HOUSING
1
.4 030206-000
BALL BEARING
6202-2NSE
1
.5 030207-000
BALL BEARING
6203-2NSE
1
.6 050019-901
BEARING HOUSING
1
.7 050020-901
PULLEY
1
.8 012003-009
KEY
5*5*25
1
.9 003201-102
SET SCREW
1/4"-20NC*3/8"
2
24
Key
Part No.
Descriptions
Q'ty
70 002301-201
RIVET
71 920155-000
CUTTERHEAD GUARD ASS'Y
1
72 170045-901
RETAINER
1
73 280009-000
SPRING
1
74 110024-000
KNOB
1
75 110004-000
RETAINING KNOB
1
76 003305-206
PAN HD SCREW
KNIFE SETTING GAUGE ASS'Y FOR
STANDARD CUTTERHEAD
5/32"-32NC*5/8"
87 040003-000
HEX. WRENCH
3mm
1
88 040201-000
WRENCH BOX
8*10
1
89 040204-000
WRENCH BOX
12*14
1
95 170095-000
BELT GUARD
96 006002-032
FLAT WASHER
6.6*13*1.0t
12
97 003301-201
PAN HD SCREW
1/4"-20NC*1/2"
12
98 250036-615
DUST CHUTE
1
100 937575-000
ON-OFF SWITCH
1
.1 841007-001
ON-OFF SWITCH
1
.2 250479-615
BOX SWITCH
1
.3 170694-902
PLATE SWITCH BEZEL
1
.4 000302-209
PAN HD SCREW
.5 380332-905
PIN
.6 000302-203
PAN HD SCREW
M4*0.7P*10
2
.7 008002-200
HEX. NUT
M4*0.7P
2
.8 006501-100
LOCKWASHER
4.3*8.5
2
101 453011-013
POWER CORD
SJT 14AWG*3C*2400mm
1
104 230010-000
STUD PIVOT
1
105 110005-000
DOOR LATCH
1
106 009006-200
HEX. NUT
3/8"-16NC
1
107 003302-202
PAN HD SCREW
1/8"-40NC*3/8"
4
108 006002-001
FLAT WASHER
4.3*10*1.0t
4
111 922857-000
STAND ASS'Y
1
.1 172993-000
STAND
1
.2 922370-000
COVER ASS'Y
1
79 920206-000
2*5
6
3
1
1
M4*0.7P*25
2
1
112 020004-000
STRAIN RELIEF
SB8R-1
1
116 006305-100
LOCK WASHER
8.2*15.4
8
117 006002-056
FLAT WASHER
8.5*23*2.0t
8
25
Key
Part No.
118 900758-000
Descriptions
Q'ty
MOTOR ASS'Y
1.5HP.1PH
1
.1 603067-000
MOTOR
1.5HP*1PH
1
.2 012003-010
KEY
5*5*30
1
.3 050021-901
MOTOR PULLEY
.4 003201-102
SET SCREW
1/4"-20NC*3/8"
2
.5 021316-000
STRAIN RELIEF
MG16A-10B-ST
1
.6 473003-006
MOTOR CORD
SJT14AWG*3C*750mm
1
119 003003-203
HEX. SCREW
5/16"-18NC*3/4"
4
120 014102-000
V-BELT
A36
1
121 006307-100
LOCK WASHER
10.2*18.5
3
122 004902-101
SCREW HEX SER FI 3/8-16*3/4
3/8"-16NC
3
123 009005-200
HEX. NUT
5/16"-18NC
1
137 172317-902
COVER
138 009102-200
HEX. NUT
3/8"-16NC
4
139 004001-101
LOCK KONB
5/16"-18NC*3/4"
2
140 250400-000
WHEEL
141 003005-206
HEX. SCREW
3/8"-16NC*2-1/2"
4
142 003303-105
PAN HD SCREW
3/16"-24NC*3/8"
5
143 011003-207
SPRING PIN
5*30
1
148 173015-902
PLATE
149 040004-000
HEX. WRENCH
1
2
4
1
4mm
1
2014/06
26