1
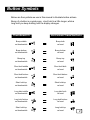
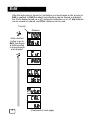
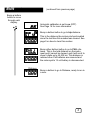
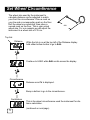
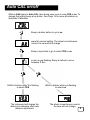
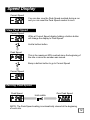
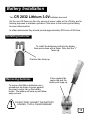
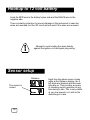
Rallye
and
V R L ig h t
(Red color case)
Racing
(Silver color case)
MADE IN USA
www.icoracing.com
Contents
Contents
Introduction
Overview of operation
New Functions
Button Symbols
Page
................................. 1
................................. 1
................................. 2
Setup functions
Edit
Set wheel circumference
Show clock/hide clock
Auto CAL on/off
Zero trip distance
.................................
.................................
.................................
.................................
.................................
3
5
7
8
9
.................................
.................................
.................................
.................................
.................................
.................................
.................................
.................................
.................................
.................................
.................................
.................................
.................................
.................................
.................................
10
11
11
11
11
11
12
12
12
13
13
15
15
16
16
Functions in a race
Moving through the race displays
Distance display
Adjusting the distance
Moving the decimal
Zeroing the distance
Sensor operation indicator
Speed display
View Peak Speed
Zero Peak Speed
Clock display
Set Clock Time
Shut OFF & Turn ON
Automatic Shut OFF
Automatic wheel calibration
Manual wheel calibration
VR only
Display backlighting (VR only)
Battery message (VR only)
................................. 17
................................. 17
Installation
CR2032 Battery Installation
Motorcycle battery hookup (VR only)
Sensor setup
................................. 18
................................. 19
................................. 19
Overview of operation
Both instruments share the same functions. The primary difference is that the VR
Light can be connected to the motorcycle's 12 volt battery, which is needed to
power the display backlighting which is inside the VR Light.
There are two basic modes - Edit mode and Race mode.
Edit mode is used to setup wheel circumference, setup Clock, setup Automatic
Calibration, view and zero trip distance, and to view full distance. Once the
motorcycle moves .01 km it is in Race mode and Edit mode cannot be accessed.
Race mode has these primary displays:
* Distance
* Current Speed
* Clock time (if enabled in Edit)
Race mode also allows access to Peak Speed, which is the highest Speed
reached during a ride.
New Functions
Several new functions, which our previous models did not have, have been
included:
* Edit mode
* Clock display can be hidden from the Race mode display rotation.
* Clock (if enabled) runs while the instrument is Shut OFF.
* Automatic Calibration can adjust the wheel circumference to match the
roadbook.
* Full time sensor indicator
1
Button Symbols
Below are the symbols we use in this manual to illustrate button actions.
Bump of a button is a quick press, short hold is a little longer, while a
long hold you keep holding until the display changes.
Thumbswitch
Instrument head buttons
Bump middle
on thumbswitch
Bump both
on head
Bump bottom
on thumbswitch
Bump bottom
on head
Bump top
on thumbswitch
Bump top
on head
Short hold middle
on thumbswitch
Short hold both
on head
Short hold bottom
on thumbswitch
Short hold bottom
on head
Short hold top
on thumbswitch
Short hold top
on head
Long hold middle
on thumbswitch
Long hold both
on head
Long hold bottom
on thumbswitch
Long hold bottom
on head
Short hold top
on thumbswitch
Long hold top
on head
2
Edit
Functions
After the instrument is turned on, but before you have begun a ride, access to
Edit is enabled. In Edit the wheel circumference can be viewed or adjusted,
the Clock display turned on or off, Automatic calibration on or off, trip distance
can be viewed or cleared, and FULL distance can be view.
Top tick
Distance
Hold a bottom
button to go to
Edit, then bump
a bottom button
to move through
each display.
3
(Continued on next page)
Edit
Functions
Bump a bottom
button to move
through each
display.
(continued from previous page)
Automatic calibration is set to no (OFF)
See Page 16 for more information.
Bump a bottom button to go to trip distance.
This is the distance the motorcycle has travelled
since the last time this number was cleared. See
page 9 on how to clear this number.
Bump either bottom button to go to FULL distance. This is the total distance on the instrument and it cannot be cleared, and it will scroll to
show 5 digits up to 65,535 km. This distance is
retained even if all batteries are removed and
the motorcycle's 12 volt battery is disconnected.
Distance
Bump a bottom to go to Distance, ready to run in
a race.
4
Set Wheel Circumference
The wheel size used by the instrument to
calculate distance can be adjusted to match
your front tire circumference. Place a mark on
your tire and a corresponding mark on the floor.
Roll the wheel one revolution, then place a
second mark on the floor. This is your actual
wheel size. For our example we will adjust the
instrument to a wheel size of 215 cm.
cm
Top tick
Distance
While the tick is on at the top left of the Distance display
hold either bottom button to go to Edit.
Continue to HOLD while Edit scrolls across the display.
Circumference
Release once Cir is displayed.
Bump a bottom to go to the circumference.
Centimeters
This is the wheel circumference used the instrument for distance calculation.
(continued on next page)
5
Set Wheel Circumference
(continued from previous page)
Centimeters
While at this display bumping a top button will enable changing
the number.
Bump Top
The 0 is now flashing. Bumping a top button increments that
digit by 1.
Bump a top 5 times
5 is now flashing. Bump a bottom button to move to the next digit.
Bump a bottom 1 time
2 is now flashing. Bump a top until 1 is displayed.
Bump a top 9 times
1 is flashing. Holding a bottom will stop the flashing and enter
215 as the new wheel circumference.
HOLD a bottom to stop flashing
Centimeters
215 will be now be used by the instrument for distance calculation. See page 14 for more details on automatic wheel calibration.
6
Clock display show/hide
While in Edit bump to CLOC, then bump once more to view YES or no. To
change this setting bump a top button.
Bump a bottom button to go to YES.
YES is the current setting. The Clock will be displayed
while in Race mode.
Bump a top button to go to select YES or no.
n (no) is now flashing. Bump a bottom to move
between Y & n.
HOLD a bottom while Y is flashing
to select YES
The Clock will be displayed
while in Race mode
7
HOLD a bottom while n is flashing
to select no
The Clock will NOT be displayed
while in Race mode
Auto CAL on/off
While in Edit bump to Auto CAL, then bump once more to view YES or no. To
change this setting bump a top button. See Page 16 for more information on
Automatic Calibration.
Bump a bottom button to go to no.
no is the current setting. The wheel circumference
used in the race will not change.
Bump a top button to go to select YES or no.
n (no) is now flashing. Bump a bottom to move
between Y & n.
HOLD a bottom while Y is flashing
to select YES
The instrument will change the
wheel circumference after each
distance adjustment.
HOLD a bottom while n is flashing
to select no
The wheel circumference used in
the race will not change.
8
Zero trip distance
While in Edit bump to trip, then bump once more to view the distance.
trip distance measures how far you have ridden since the
last time this number was cleared in Edit. It does not
clear automatically.
Bump a bottom button to go to trip distance.
0348 km
HOLD the middle button to zero the number.
The instrument will measure distance during each ride
until trip distance is again zeroed.
9
Moving
xxxxx through the race displays
Distance
Hold a bottom button
( Only while tick is on )
Bump middle
Current Speed
Bump a bottom
Peak Speed
Hold a bottom
Bump middle
Clock standby
Set Start Time
Hold a bottom
Bump middle
Distance
Back to the
Distance readout
10
Distance
Display
Functions
Hold
top
Adjusting the distance
Distance
Bump
top
+ .1 or .01
Bump
bottom
– .1 or .01
Hold
bottom
Moving the decimal point
Distance
Distance
&
&
Hold BOTH bottom buttons at the same
time until the decimal stops flashing.
Repeat to move decimal back.
Zeroing the distance
Zero Distance
Distance
Long hold middle button
Sensor operation indicator
Distance
The sensor is
closed
11
Each time the wheel sensor closes
while at the Distance display, the 2
left digits are blanked and the lower
ticks are on. This provides a means
of checking sensor operation at any
time during a ride. This is only visible
at very low speeds, so it will not be
distracting in a race.
Clock
SpeedDisplay
Display
Current Speed
You can also view the Peak Speed reached during a run
and you can reset the Peak Speed readout to zero.
View Peak Speed
Current Speed
While at Current Speed display holding a bottom button
will change the display to Peak Speed.
Hold a bottom button
Peak Speed
This is the maximum KPH reached since the beginning of
the ride or since the number was zeroed.
Bump a bottom button to go to Current Speed
Current Speed
Zeroing Peak Speed
Peak Speed
Hold middle
Zero Peak Speed
NOTE: The Peak Speed reading is automatically cleared at the beginning
of each ride.
12
Clock Display
Clock display
If the Clock display is enabled (See page 7) it will be available
during a race. It the display is flashing the Clock has not been
set.
NOTE: The clock will run continuously as long as the unit is
powered by the CR2032 Lithium batteries or the 12 volt motorcycle battery, even while the instrument is Shut OFF.
Set Clock Time
Our example: 08:15
Clock display
At the Clock Display HOLD the bottom button to adjust the
numbers.
HOLD a bottom button
The right digit is now flashing. Bump a top button 5 times to
adjust the digit to 5.
Bump a top 5 times
The 5 is now flashing. Bump a bottom to move to the next digit.
Bump a bottom to move to the left
The 0 is now flashing.
(Continued on next page)
13
Clock
Display
Set Clock
Time
(continued from previous page)
0 is flashing. Bump a top to change digit to 1.
Bump a top button
Bump a bottom to move to the next digit.
Bump a bottom button
0 is now flashing. Bump a top 8 times to change the digit to 8.
Bump a top 8 times
8:15 is the desired time. Hold a bottom to start the Clock at
8:15.
Hold a bottom button
Clock Running
The Clock is now running.
14
Shut OFF & Turn ON
any of the 3 run modes
While at any of the 3 Race modes holding both buttons on
the instrument head will Shut OFF the instrument.
Hold both buttons on the instrument head to Shut OFF.
Bump any button to Turn ON
Distance
Since the instrument was manually Shut OFF it will display
zero when Turned ON.
Automatic Shut OFF
Off
After 2 hours of no button activity or no wheel
movement, the instrument will automatically
Shut OFF.
Bump any button
to Turn ON
NOTE: Upon turn ON after an automatic Shut
OFF, the Distance at the time of the Shut OFF
will be displayed. From there operation can be
resumed from that distance, or the distance can
be zeroed.
15
Automatic wheel calibration
If Automatic Calibration is ON (See Page 8) each time an adjustment to the distance is performed (other than Zeroing the distance) the instrument will do an
automatic adjustment to the wheel circumference it uses to measure the distance travelled.
NOTE: This calculation has many safeguards which prevent the instrument from
making an unusual adjustment. It has been proven in 15 years of USA Enduros.
If you get lost, then return to the course and make an adjustment, the instrument WILL NOT calculate a new wheel circumference. It will ignore the adjustment and use the same wheel circumference as before the adjustment.
At the start of each day's ride the instrument does not use the Automatic Calibration wheel circumference from the previous ride. It will use the wheel circumference set in Edit (See page 5) until a manual distance adjustment is performed along the course. It then begins adjusting to that day's course.
Manual wheel calibration
If Automatic Calibration is OFF the rider will have direct access to the wheel circumference in Edit after each time he zeros the distance (See page 11)
Distance
Hold either bottom until "Cir" is displayed, then release.
Bump a bottom button to go to wheel circumference.
While the wheel circumference is displayed bump a top
button to change the circumference, or bump a bottom
to go back to the Distance display.
If the instrument distance is consistently less than
the roadbook then increase the circumference.
If it is running ahead of the roadbook then
decrease the circumference.
Avoid making any large adjustment.
EXAMPLE: After 50.0km the instrument reads
52.5km, which is roughly 5% error. Decrease the
wheel circumference by 11cm to 209cm.
16
Display backlighting (VR only)
A VR that is properly connected to the motorcycle's 12V battery will illuminate
the display continuously while it is ON. While ON it will draw only 25 milliamps
of power. When the VR is OFF the backlighting goes off and the instrument
draws only 30 microamps (.030 milli amps)
Battery message (VR only)
If the wires to the motorcycle's battery become disconnected
on a VR then the display backlighting goes off and a bAtt
message is displayed upon Shut OFF or Turn ON.
The instrument will continue operation using the internal lithium batteries.
bAtt flashes upon Turn ON or Shut
OFF.
17
Battery
xxxxx Installation
Two
CR 2032 Lithium 3.0V batteries are used.
On the non-VR these are the only source of power, while on the VR they are for
backup purposes to maintain operation if the wires to the motorcycle's battery
become disconnected.
In either instruments they should provide approximately 200 hours of ON time.
Installing batteries
To install the batteries push into the holder,
then press down with a finger. Note that the "+"
faces up.
Positive side faces up
Removing batteries
Press against the
center tab and the
battery will snap up
To remove the lithium batteries use a
screwdriver as shown to press against
the round, center tab on the battery
holder. The battery will snap up and allow
easy removal.
DO NOT PREY AGAINST THE BATTERY
HOLDER, IT WILL CAUSE DAMAGE!
18
Hookup to 12 volt battery
Hook the RED wire to the battery's plus side and the BLACK wire to the
negative side.
There is polarity protection to prevent damage to the instrument in case the
wires are reversed, but the VR circuit will not work if the wires are reversed.
Attempt to avoid routing the wires directly
against the ignition coil and spark plug wiring.
Sensor
setup
Race Functions
Distance
The sensor is
closed
19
Each time the wheel sensor closes
while at the Distance display, the 2
left digits are blanked and the lower
ticks are on. This provides a means
of checking sensor operation at any
time during a ride. This is only visible
at very low speeds, so it will not be
distracting in a race.