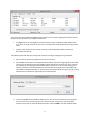
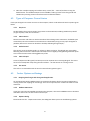
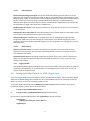
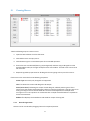
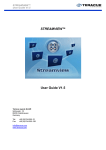
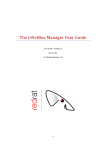
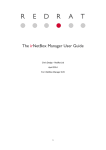
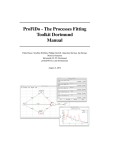
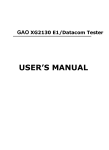
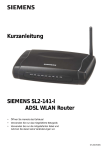
1
RedRat Control User Guide Chris Dodge – RedRat Ltd April 2014 For RedRat Control V3.16 1 Contents 1. 2. 3. 4. Introduction Prerequisites and Installation The First Step – Capture of Remote Control Signals Controlling the Computer Using a Remote Control Handset 4.1 Creating a Mapping Set 4.2 Types of Computer Control Action 4.2.1 Key Press 4.2.2 Mouse Action 4.2.3 Audio Control 4.2.4 Macro Output 4.2.5 Exe Action 4.3 Further Options and Settings 4.3.1 Mapping set changes with foreground application 4.3.2 RedRats Menu Item 4.3.3 Options Dialog 4.3.4 Logging On/Off 4.4 Setting up RedRat Control for XMP-1 Signal Input 5. RedRat Control for the Output of IR Signals 5.1 Creating Macros 5.1.1 Re-ordering Actions 5.1.2 Editing Actions 5.1.3 Testing Actions and Macros 5.2 Macro Output Using SendMacro/SendMacroW 5.2.1 -output <output name> 5.2.2 –verbose 5.2.3 -block 5.2.4 -help 5.3 Using SendMacroW 5.4 Alternative Applications 5.4.1 The Scheduler Application 5.4.2 RedRat Hub 5.4.3 TestManager 2 3 3 3 4 4 6 6 6 6 6 6 6 6 6 6 7 7 8 9 9 10 10 10 10 10 10 10 11 11 11 11 11 1. Introduction RedRat Control allows you to: 1. IR INPUT: Use an infrared remote to control PC applications. This is done by initiating various actions on the PC when RedRat Control recognizes IR signal input, such as creating key strokes, mouse movement or direct PC audio control. Section 4 describes this in more detail. 2. IR OUTPUT: Provides a simple method for PC applications to output IR signals, for example a web server or batch file scripts. Output of IR signals is based around Macros (sets of IR signals) that can then be output using a small command line utility called SendMacro (or SendMacroW). See section 5 for further information. 2. Prerequisites and Installation Before installing RedRat Control, please ensure that you have the following installed: The RedRat Signal Database Utility. The signal database utility can be downloaded from the RedRat website at: http://www.redrat.co.uk/Software/SignalDBUtil. 3. The First Step – Capture of Remote Control Signals To use RedRat Control, for both PC control or for output of IR signals, the IR signal dataset needs to be captured from the original remote control handset. This is done with the Signal Database application: The steps to create the database are as follows: 1. Add a device/remote (Edit Add Device/Remote) 2. Select the new device and add an IR signal to it (Edi t Add Signal). 3. In the “Add New Signal” dialog, give the signal an appropriate name, then press the Learn IR button. 3 4. Point the remote at the RedRat and press the remote control button twice, separating the presses by one or two seconds. When pressing the button, make sure it is a firm press, but not too long. 5. Add as many signals from the remote as you intend use with RedRat Control. 6. Save the signal DB (File Save As…). The captured signals can be tested to validate that they have been recorded correctly and so recognized when input by using the decode window (View Decode Window). Once started, point the remote at the RedRat3 and press some of the buttons you aim to use. 4. Controlling the Computer Using a Remote Control Handset The aim here is to control an application running on the PC using a remote control handset, for example if simulating STB firmware on a computer or controlling a media player. IR signals are picked up by the USB RedRat3-II device and passed on to RedRat Control, which then decodes the signal and initiates an operation as a result. Note: RedRat Control has a default IR recognition algorithm built into it that works well with a wide range of remote controls. However there is such a range of remote control signal types and protocols that RedRat Control may not recognize all IR signal types. In addition, the long-range RC detector built into the RedRat3-II is tuned to one particular carrier frequency (38KHz by default) and so if you remote control handset uses a different carrier frequency, then this may impact signal recognition reliability. If you are encountering difficulties with reliable IR signal recognition then please contact RedRat support. 4.1 Creating a Mapping Set To setup RedRat Control to control an application on the PC it has to be told what action it should map to which incoming IR signal. To briefly explain some of the terminology used here: A Mapping is how a single remote control signal maps to an action. A Mapping Set is a collection of such mappings, usually for a particular application. For example you may have one mapping set for Windows Media Player and another for iTunes. Given that there are different mapping sets for different applications, one can tell RedRat Control to monitor which application is currently in the foreground and automatically switch mapping set to the correct one. 4 The screen shot above shows the RedRat Control interface once a simple mapping set has been created for basic control of iTunes. The configured actions are: The Right button on a Sky Digibox remote will cause the key combination CTRL-RIGHT to be sent, which in iTunes skips to the next track. The Left button similarly goes back to the previous track. Volume +(up)/-(down) on the remote are setup to control Windows audio, increasing or decreasing the volume. The following steps will take you through the process of creating a mapping set as given above. 1. Start iTunes (or whichever application you want to control) 2. Start RedRat Control and from the Signal Database Utility drag either single signals or the whole remote control dataset into the main RedRat Control window. As we do not yet have a name for the mapping set, the dialog box shown below will prompt you for one. Give the mapping set a name (e.g. iTunes) and then optionally enter the full name of the application executable to be controlled in the Application box, or press Choose. The Choose button brings up a list of running applications from which the appropriate one can be selected. 3. In the main RedRat Control window, double-click in turn on each of the remote control signals that you want to use. This brings up a box in which you can set the action type and values specific to that type, for example KeyPress with key value of ‘RIGHT’ with the modified ‘CTRL’ 5 4. 4.2 Now that a simple mapping set has been setup, save it (File Save As) and test it using the Enable button. This enables IR input from the RedRat, so bring iTunes to the foreground and validate that pressing remote control buttons has the desired effect. Types of Computer Control Action Each input IR signal can initiate an action on the computer, which can be selected from the options given below. 4.2.1 Key Press As described in the previous section, key presses can be simulated, including modifier keys SHIFT (to give capitals), CTRL, ALT and others. 4.2.2 Mouse Action Mouse movement and clicks can also be simulated. If simulating mouse movement, the default post action delay is 0 so that smooth mouse movement is obtained by using as many input IR signals as possible. (See section 4.3.3.1 for details on the delay following IR signal input.) 4.2.3 Audio Control This directly controls the PCs audio, i.e. volume up, down and mute. The default post action delay following the mute action is 500ms (half a second) so that a slightly prolonged IR signal button press won’t cause the mute state to be toggled many times. 4.2.4 Macro Output A macro (sequence of IR signals) can be output as the response to an incoming IR signal. The macro has to have already been setup using the Macro Editor – see the section on creating macros. 4.2.5 Exe Action This will run an executable with the set of command line arguments given. 4.3 Further Options and Settings 4.3.1 Mapping Set Changes with Foreground Application As mentioned previously, RedRat Control can automatically detect which foreground application is running and set the mapping set accordingly. If this is not required, then remove the check from the check box. 4.3.2 RedRats Menu Item If you have more than one RedRat attached to the computer, then use the RedRats menu to find then and select which one is to take remote control input. 4.3.3 Options Dialog Found under the File Options menu item, this dialog box allows you to set the following options: 6 4.3.3.1 General Options Default delay following input signal: This inserts dead time following the execution of an action before the next remote control signal is acted on. Why is this needed? Some remote handsets send IR signals quite rapidly, so anything more than the lightest button press will cause multiple signals to be sent, resulting in the action being initiated multiple times. Putting in a pause (dead-time) following each signal input will ensure that what is intended to be a single button press will actually be translated as a single action. Units are in milliseconds. Enable IR input on startup: If the program is required to accept IR input as soon as it is started, then check this option. Hide window when minimized: Removes the window from the taskbar when it’s minimized. A small icon remains in the notification area (right) on the task bar. Default mapping set: If RedRat Control is configured so that the mapping set changes with the foreground application, then one mapping set can be chosen as the default mapping set, so the application will use this if the foreground application is not recognized or no mapping set is given for that application. 4.3.3.2 Mouse Control Mouse acceleration factor: If a remote control button is held down to move the mouse a long distance across the screen, then the mouse speed will gradually increase. The rate of increase is controlled with this option. Maximum mouse speed: If the mouse acceleration continues, then it soon reaches a speed that is difficult to manage. This option sets the maximum speed the mouse can reach, in units of screen pixels per input signal. 4.3.4 Logging On/Off This enables/disables logging of IR signal input, which can be useful if the program does not seem to produce the desired effects, or you would like to track IR signal input for some other reason. Log output is sent to the selected file. 4.4 Setting up RedRat Control for XMP-1 Signal Input If you are using an XMP-1 remote handset to control an application on the PC, then this is setup slightly differently as the decoding process is different. As a result, RedRat Control has to be setup to use just XMP-1 remote controls or just standard remote controls. To setup for XMP-1 decoding, edit the RedRatControl.exe.config file which is found in the program installation directory, which on most systems is either: C:\Program Files\RedRat\RedRat Control or C:\Program Files (x86)\RedRat\RedRat Control (64-bit systems) Uncomment or add the following line to the <appSettings> section of the file: <appSettings> <add key="DecoderType" value="XMP1" /> … </appSettings> 7 When the program is re-started, it will pick up this new setting and so when a new mapping is added, the following dialog box will be shown: The XMP registration code for the handset should be entered, plus a range of codes for the keys of interest on the remote handset. (This currently assumes that this information is available, but a future enhancement will be the ability to extract this information from the remote control signal.) Each of the mappings added then needs to have its action defined, such as which key code to send. 5. RedRat Control for the Output of IR Signals RedRat Control has also been designed to support the output of IR signals from third party programs, such as webservers or PVR (computer based video) applications, or to create a simple scripting infrastructure. The basic unit of IR output is the Macro, i.e. one or more IR signals, which are created with the macro editor. 8 5.1 Creating Macros Take the following steps to create a macro: 1. Open the Macro Editor from the Edit menu. 2. Click Add to insert an empty macro. 3. Click Rename to give it a name descriptive of its intended operation. 4. Ensure the macro is selected (blue or grey background) and then drag an IR signal from the signal database utility to the right hand pane of the macro editor. This will create a new row in the action list. 5. Repeat drag and drop operation for all IR signals that are going to form part of the macro. Each action in the action list has the following properties: Action Type: Currently only IR signals are supported. Info: This shows the remote and IR signal to be output. Pause (units of ms): Following the output of each IR signal, a default pause is given. This is important so that audio/visual equipment is able to recognize the discrete Ir signals rather than seeing one long stream of concatenated IR. This value can be adjusted, for example when turning on a TV or set-top box it can sometimes take a couple of seconds before it responds to further IR commands. RedRat: This displays which RedRat is to be used for output of the signals. 5.1.1 Re-ordering Actions Actions can be re-ordered by dragging them to the required position. 9 5.1.2 Editing Actions Double clicking on an action will bring up an action editor dialog. 5.1.3 Testing Actions and Macros Both single actions and complete macros can be tested by right-clicking on the action or macro respectively. 5.1 Macro Output Using SendMacro/SendMacroW Once macros have been created, RedRat Control can be instructed to output them using the SendMacro (or SendMacroW) executables. These are very lightweight native Windows applications that send a Windows Message to RedRat Control, instructing it to output the macro. RedRat Control has to be running for this to work. They can be found in the directory in which the RedRat Control has been installed, which on most systems is either: C:\Program Files\RedRat\RedRat Control or C:\Program Files (x86)\RedRat\RedRat Control (64-bit systems) If you want to send a macro from another application, such as a web server in response to a button press, then the SendMacro executable can be used in conjunction with RedRat Control. Once RedRat Control is running, type in the following at a command prompt: SendMacro BBC1 This will cause RedRat Control to output the macro called BBC1 to the RedRat setup for the macro (or the first found RedRat if none set). SendMacro options are: 5.2.1 -output <output name> Sends the macro out via the given RedRat (or output group if using an irNetBox), overriding the IR output set in the macro. 5.2.2 -verbose Prints out messages to the console window tracing the program’s operation. This can be useful when testing. 5.2.3 -block In some situations you may not want SendMacro to return until it has completed the macro output, especially if used within systems that send long lists of macros for output. By using this option, SendMacro will block while the macro is being output and will only complete once the macro is finished. 5.2.4 -help Prints out a simple help message. 10 5.3 Using SendMacroW As SendMacro is a console application, in many situations it will cause a DOS or command window to be shown briefly while it is run. To overcome this program, use the SendMacroW version of the program instead, which is a Windows application rather than a console application. It is identical in operation to SendMacro, but does not have the -verbose or –help options, however all other command line information is passed in the same way. Please note that when using the –block option from a command line, it appears as if SendMacroW returns immediately. This is in fact not the case, but as it is a Windows application, it starts in its own execution environment and so is not run in the DOS execution environment. 5.4 Alternative Applications IR signal output via RedRat Control is somewhat limited, so for some situations there are other applications that may be more suitable: 5.4.1 Scheduler Application To output macros at particular points in time or at repeated intervals then the RedRat Scheduler can be used. 5.4.2 RedRat Hub If you want to output IR signals from multiple computers or have a high-throughput of IR signals then RedRat Hub is a more scalable solution. It uses network communication so clients can control it from remote computers. 5.4.3 TestManager This is a licensed application but includes more advanced scripting and also interactive control capabilities. 11