1
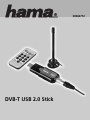
www.hama.de
Hama GmbH & Co KG
Postfach 80
86651 Monheim/Germany
Tel. + 49 (0) 90 91 / 5 02-0
Fax + 49 (0) 90 91 / 5 02-2 74
[email protected]
www.hama.de
00062772-06.05
00062772
DVB-T USB 2.0 Stick
L TV USB receiver User Manual
Copyright note
© Copyright 2005. All rights reserved. Hama GmbH & Co.KG reserves the right to modify the products and information at any time without prior notice. This user manual may not be reproduced in any from without the explicit written
consent of Hama GmbH & Co.KG.
Notes on trademarks and brands
•
•
Microsoft and Windows are trademarks of the Microsoft Corporation
All other trademarks and brands in this user manual are the property of the respective owner.
Contents
Contents
2
Chapter 1: Introduction
3
Chapter 2: Installing the DTV/System Software Installation
2.1 Configuring the DTV user program
2.2 Setting the recording process
2.3. Configuring the display
2.4. Configuring the recording
2.5. Configuring the timeshift
4
5
7
10
10
11
Chapter 3: DTV Software Overview
3.1 Control panel
3.2 Right-click menu and keyboard access
3.3 Functions
3.4 Additional Functions
12
12
13
14
14
Chapter 4: Trouble shooting
16
2
Chapter 1: Introduction
Introduction
The DVB-T USB 2.0 receiver is completely compatible with the DVB-T protocol and can receive digital TV via antenna so you can receive and enjoy digital transmissions on desktop and laptop PCs.
Installation is very easy and the device provides a user-friendly USB interface. No external power pack required.
Thanks to the elegant and compact design, you can enjoy the programmes in digital quality at home, the office or
on the go.
It also operates as a digital video recorder. You can record your favourite programs on the hard drive either in real
time or according to the time schedule.
Package contains:
•
•
•
•
•
•
DVB-T USB 2.0 Stick
IR remote control
Quick guide for installation
External DVB -T antennae (passive)
USB cable
CD with CD KEY
Please make sure to keep the CD cover with the CD key; otherwise you can no longer reinstall the software.
3
Chapter 2 Installing the DTV/System Software Installation
The software for the DVB-T transmission is very powerful. You can enjoy the digital sound output and visual
effects in high quality. The software not only allows you to receive the TV programmes, but also enables you to
make digital video recordings (DVR) in real time. The Timeshift function ensures that you don't miss the best
moments.
Once the software is installed, the DVB-Tplayer.exe symbol appears. Simply move the cursor and double click
this symbol to start the program.
Once the DTV software has started, you can use the control panel as follows.
4
2.1 Configuring the DTV user program
Due to the various countries or regions, the DVB-T has its own frequencies. The following manual should help you
in configuring the parameters in your region.
Scanning frequencies:
1. Click
on the control panel and then select Scan Channels.
5
2. Select the RF frequency. You can select one of the following options:
(1) Land/Region: Select your location.
(2) All: If you do not find your location on the Land/Region list, select this
option.
(3) Area: You can determine your own frequency range. Select VHF or UHF
and then enter its frequency range.
(4) Single: If you know the exact frequency of a digital program, you can
enter its frequency here.
3. Click Start to scan the frequency according to the selected RR frequency option.
4. Click Save As to store all of the scanned channels.
5. Click OK to exit the control panel.
Note: The channel list is stored as a TBL file.
6
2.2 Setting the recording process
Two methods are available for recording: Recording in real time or according to the time schedule.
I. Recording in real time: When recording the program in real time mode, the recorded file is stored in the
default target folder under C:\Programs\DTV\DVB-T USB 2.0\Capture\Video.mpg. To store this program file
at another location, you can create the path as desired.
Once you have carried out the above setting, click
on the control panel, if you would like to view the digital
programs. When the recording starts, the clock is displayed in red on the left side of the control panel. To stop the
recording, click.
7
II. Recording according to the time schedule: Select Setup and the recording option. Then select Activate
Default. Double click Channel in the default recording section.
8
When the Recording Input window appears, select the channel and enter the start time and end time of the recording. Click OK to continue.
Once the recording ends, the ok menu is displayed as follows.
Note: You cannot simultaneously record two programs that have different frequencies.
Note: Observe the capacity of recording device. A recording lasting for several hours can exceed the capacity of
the hard drive.
9
2.3 Configuring the display
In the display configuration window, you can set the brightness, contrast and richness as desired. Move the mouse
cursor to perform theses settings. To reset the setting to the default setting, click Reset
2.4 Configuring the recording
You can record and store an image. When the TV program is displayed, click
stored. To find this image and open the image file, click.
10
and the image is recorded and
2.5 Configuring the timeshift
If you must leave in the middle of the program, you can start the timeshift function. Simply click Play when you
return. The system plays the program starting from the time you left. The longest time shift is ten minutes.
11
Chapter 3: DTV Software Overview
3.1 Control panel
Symbol functions
Symbol
Function
Symbol
Function
Full screen
Play
Online help
Rewind, Fast-forward
Previewing several channels
Stop
Channel up and down
Pause
Channel recall
Video recording
Personal selection
Photo
Timeshift
Mute
Open saved file
Volume up
Configuration
Volume down
Electronic program guide
Radio transmission reception
for DVB-T
Online help
Teletext
12
3.2 Right-click menu and keyboard access
Right-click while the DTV application software is running and the menu appears with the functions and keyboard
access as follows:
Function display
Quick link
Feature description
Play
Input
Plays the program
Pause
Space
Interrupts playback
Stop
S
Stops playback
Record
R
Records the current program
Mute
M
Switches off the sound output
Fast-forward
F
Fast-forwards the current program
Rewind
B
Rewinds the current program
Next channel
N
Switches to the next program
Previous channel
P
Switches to the previous program
Channel recall
L
Switches to the previously selected channel
Personal selection
Ctrl+M
Opens menu with personal selection
Search several channels
Ctrl+W
Searches several channels (non-synchronised)
Language selection
Ctrl+L
Selects the language
Timeshift
T
Starts of stops the timeshift function
Photo
G
Records an individual image as a photo
Installation
E
Starts the installation function
Display control panel
O
Shows or hides the control panel
Picture size
Selects the picture size between 60%, 100%, 150%
Full screen
W
Switches to full screen or window
Volume up
+
Increases the volume
Volume down
_
Reduces volume
About
Ctrl+A
Displays the information about the DTV version
Help
H
Online help
Close
Ctrl+X
Closes the DTV program.
13
3.3 Functions
Clock
The clock is automatically set to the time of the host computer.
Channel title display
The current channel name is displayed on the control panel in the language set by the channel provider.
Video recording
To record videos, click
. Recording can also be determined according to the time schedule on the Recording
Configuration screen in the Properties menu.
Previewing several channels
To simultaneously preview several channels, click
on the control panel.
To display the desired program, select the program and click Play.
Note: Previewing FTA-channels is only possible with the same transponder
Photo
Click
, to record a still image of the program that you are currently viewing.
Teletext
The Teletext application is a simple teletext browser. To start this function, click
functions when the DVB-T USB 2.0 receiver is operating.
on the control panel. It only
Electronic program guide (EPG)
Click
on the control panel, to enter the electronic program guide provided by the channel provider. The
electronic program guide provides you with additional information about the transmitted programs.
3.4 Additional Functions
•∞ Mute display: when you click Mute, the
symbol illuminates on the control panel.
(Warning! This selection partially affects the quality and the functions. Do not use this function under normal conditions. We recommend that you switch off this function after updating the RF information.)
•∞ Recording display: When the recording starts in real time or according to the time schedule, the
displayed in red on the control panel.
symbol is
•∞ Display source: When playing the program via the antenna, the control panel displays its source as follows.
If it displays the recorded or selected image, the control panel displays the file
names or status as follows
14
•∞ Volume display: When you set the volume, the volume Symbol
changes accordingly.
•∞ Electronic program guide menu: To enter the program menu, select
on the control panel. You then
receive information about the channel programs such as the program schedule.
(This function depends on whether it is provided by the channel provider or not.)
General setting function:
a. Full screen function - when you select this function, the Play window is maximised on the entire screen.
b. OSD function - displays the selected command and the selected function for several seconds in the
right-hand lower corner of the screen.
c. Mobile mode - when you select the Mobile mode, the reception quality improves while the receiver moves.
But this requires a lot of power. Therefore, we do not recommend this when the batteries in the system are insufficiently charged.
15
Chapter 4: Troubleshooting
This chapter should help you in remedying faults that can occur during installation and operation.
1. The DVB-T USB 2.0 receiver does not function properly.
Check whether the driver is correctly installed. You can check this in the driver installation in the Device Manager
under Control Panel. In the device category, a device with the designation DTV USB Receiver (DTV USB receiver)
must be present. If this is not the case, remove the USB Stick connect it to the USB port, follow the steps and reinstall the driver.
2. Windows cannot find the DVB-T USB 2.0 receiver.
a. Check whether the DVB-T USB 2.0 receiver has been properly connected to the USB port.
b. After connecting the DVB-T USB 2.0 receiver to the USB port, wait at least 3 seconds before starting the
DVB-T USB 2.0 receiver.
c. Restart the operating system.
d. Select Add/Remove Hardware Device under Control Panel of Windows to install the correct driver.
e. Disconnect the USB stick and reconnect it. Make sure to wait 3 seconds between disconnecting and
reconnecting the USB stick.
f. Connect the DVB-T USB 2.0 receiver to another USB port on the PC o.
3. Windows cannot find the driver for the DVB-T USB 2.0 receiver.
Make sure that the supplied driver has been placed into the CD-ROM drive during the installation.
Enter the correct directory in which the driver is located, if you manually perform the installation process.
4. Installing the DTB-T USB 2.0 receiver software.
Select setup.exe on the CD-ROM.
Follow the instructions of the installation wizard to install the software.
5. No channel is found during the auto scan.
Check the cable connection between the DVB-T USB 2.0 receiver and the antenna.
Make sure that the cable is properly connected to the card connection.
Close the DTV program, disconnect the DVB-T USB 2.0 stick and reconnect it. Make sure to wait 3 seconds between disconnecting and reconnecting the USB stick. Restart the DTV program.
6. Error messages or blank screen
This can be the result of poor signal quality. The DVB-T USB 2.0 receiver does not receive sufficient program data
or receives the wrong data. Check the connection between the DVB-T USB 2.0 receiver and the antenna.
Check the VGA card driver or the VGA chip on the printed circuit board.
Make sure it can operate with the Microsoft Windows 2000/XP operating system.
Install Microsoft DirectX9.0 and Media Player 7.0 or a higher version.
7. The video is playing, but there is no sound
Check the soundcard or the volume setting.
16
8. I cannot play the program
Make sure that installed the soundcard driver and the soundcard functions.
Please note that the soundcard and its driver must be installed, regardless of whether or not you need to activate
the sound.
Check the signal quality and signal strength.
9. The sound is ok but the screen is blank during playback.
Make sure that the VGA driver and Microsoft DirectX8.1 have been properly installed.
10. The DVB-T MPEG2 video on the laptop is stuttering during playback.
Playing the DVB-T MPEG2 video consumes too much power. To improve performance, ensure that the
Energy-saving mode of the laptop o is deactivated so that the CPU can be operated at its maximum frequency.
11. The remote control does not work. The DVB-T USB 2.0 receiver does not respond when I press the remote
control buttons.
Der Empfänger des DVB-T USB 2.0-Stick muß Sichtkontakt zur Fernbedienung haben, damit das Gerät die
Kommandos vom Fernbediengerät empfangen kann.
Note:
1. Depending on the location, the digital DVB-T antenna can be affected by objects and the weather.
This can cause poor signal quality. We recommend installing an antenna on the roof for indoor reception.
2. Although this product can be moved, it should not be moved at high speeds. Check the other associated
products for these requirements.
3. If you use the recording timer, real time recording or timeshift function, make sure there is sufficient space
on the hard rive to save the amount of data.
4. To ensure that the device operates properly, please follow the instructions in the user manual and the
installation instructions. Improper use can result in instability or cause the system to crash.
We reserve the right to expand or delete the application or its functions. All newly issued drivers and applications
are listed on our web site. We are not responsible for further notification.
17