1
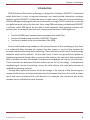
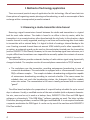
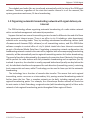
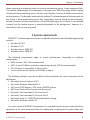
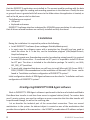
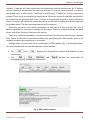
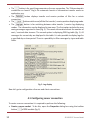
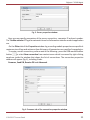
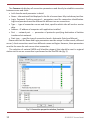
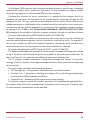
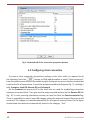
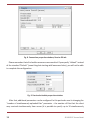
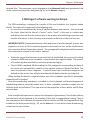
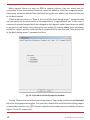
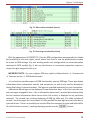
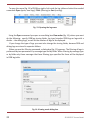
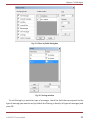
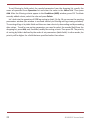
Media Management and Automation System
for Broadcast
DIGISPOT® II DDB Agent
USER MANUAL
December 2012, Version 2.15
© DIGISPOT System GmbH
TABLE OF CONTENTS
Introduction. . . . . . . . . . . . . . . . . . . . . . . . . . . . . . . . . . . . . . . . . . . . . . . . . . . . 3
1 Methods of technology application. . . . . . . . . . . . . . . . . . . . . . . . . . . . . . . . 4
1.1 Reserving a studio-transmitter data channel. . . . . . . . . . . . . . . . . . . . . . . . . . 4
1.2 Organizing automatic broadcasting network with signal
delivery via Internet . . . . . . . . . . . . . . . . . . . . . . . . . . . . . . . . . . . . . . . . . . . . . . . . . . . . 5
1.3 Organizing automatic broadcasting network with delivery
of main program via satellite channel. . . . . . . . . . . . . . . . . . . . . . . . . . . . . . . . . . . . 6
1.4 Organizing a correspondent network. . . . . . . . . . . . . . . . . . . . . . . . . . . . . . . . . 6
1.5 Creating a reserve server. . . . . . . . . . . . . . . . . . . . . . . . . . . . . . . . . . . . . . . . . . . . 6
2 System requirements. . . . . . . . . . . . . . . . . . . . . . . . . . . . . . . . . . . . . . . . . . . 7
3 Installation. . . . . . . . . . . . . . . . . . . . . . . . . . . . . . . . . . . . . . . . . . . . . . . . . . . . 8
4 Configuring DIGISPOT®II DDB Agent software. . . . . . . . . . . . . . . . . . . . . . . 8
4.1 Configuring server connection. . . . . . . . . . . . . . . . . . . . . . . . . . . . . . . . . . . . . . 10
4.2 Configuring client connection. . . . . . . . . . . . . . . . . . . . . . . . . . . . . . . . . . . . . . . 14
5 DDB Agent software working technique. . . . . . . . . . . . . . . . . . . . . . . . . . . 17
Contact information. . . . . . . . . . . . . . . . . . . . . . . . . . . . . . . . . . . . . . . . . . . . . 23
© DIGISPOT System GmbH
Digispot ® II DDB Agent
Introduction
DDB (Distributed Data Base) technology is designed for building a DIGISPOT II distributed
media data base in order to organize automatic and administrated information exchange
between various DIGISPOT II media data bases. In other words, if we have several installations
of Media DB separated geographically, but combined into a single TCP/IP network (or connected
to a global network such as the Internet), then, using DDB technology and dedicated DIGISPOT
II software called DDB Agent we are able to build automatic data exchange between the
various bases according to specified rules. Among main functions of DDB Agent are:
• Transfer of MDB items between bases (metadata and audio files).
• Transfer of broadcasting schedule in DIGISPOT II format.
• Transfer of schedule items stored outside of the MDB.
From a radio broadcasting standpoint, the principal feature of this technology is that there
is a substantial delay between the moment the data request is sent and the moment the
received data becomes ready for broadcasting. That’s why the practical use of this technology
should be made well in advance. On the other hand, as there are generally few updates of
broadcasting material during a day on musical radio stations, the amount of data transferred
daily is minimal and does not exceed a few dozens of megabytes per day for each direction.
These characteristics determine the main spheres of use for this technology – automation of
broadcasting on remote transmitting centers for radio stations with small daily amounts of
updated broadcasting material.
Among other important features of this technology is the ease of scaling (increasing the
number of directions) and independent data transfer between directions. As a result, a unique
set of data can be transferred for each direction. For example, the commercial part of the
schedule can be individual for each direction.
© DIGISPOT System GmbH
3
1 Methods of technology application
There are several practical ways of application for this technology. We will now look into
three options of organizing remote planning and broadcasting, as well as one example of data
exchange within a correspondent journalist network.
1.1 Reserving a studio-transmitter data channel
Reserving a signal transmission channel between the studio and transmitters is a typical
task for most radio stations. The studio is based in an office in the city center, while the
transmitter is in a remote location, often found outside the city limits. In this situation, a data
transfer channel is usually organized, working in real time and transferring data from studio
to transmitter with a minimal delay. It is logical to think of creating a channel backup in this
case. Creating a second channel does not warrant 100% stability and is often impossible. As
an option, an automatic guard can be used on the workstation located near the transmitter
(such as DIGISPOT®II DJin Guard). However, in this case the backup signal loses relevance, as it
is quite difficult and sometimes even impossible to manually update the contents of reserve
players each day.
The offered solution provides automatic backup of radio station signal using dynamically
changed schedule. The complex consists of two workplaces connected via TCP/IP network.
• The workplace near the transmitter, providing autonomous broadcasting in case of
connection breakdown. This workstation is equipped with a «Региональный Автомат
РБД» software complex . The complex includes a broadcasting configuration capable
of autonomous broadcasting according to received schedule. If for some reason the
schedule does not reach the broadcasting station, the Automatic Gap Filler module
enters into action. The commutation in this case is usually performed with an external
“guard”.
The office-based workplace for preparation of a special backup schedule for up to several
days in advance. Usually, a modified version of the main schedule (with no dynamic elements:
live airs, news and so on) is used as a backup. Here, DIGISPOT II DJin Plan and DDB Agent
software or, alternatively, “DJin DDB Editor” software complex are used. The latter includes
DJin Editor planning software, as well as DDB Agent and Media DB. It is not required to allocate
a separate workstation for DDB Agent. It can be run by one of the machines with DIGISPOT II
DJin Plan installed.
4
© DIGISPOT System GmbH
Digispot ® II DDB Agent
The schedule and audio files are transferred automatically with the help of the DDB Agent
software. Therefore, regardless of the state the transfer channel is in at the moment, the
system guarantees continuous, 24-hour broadcasting.
1.2 Organizing automatic broadcasting network with signal delivery via
Internet
The DDB technology allows organizing automatic broadcasting of a radio station network
with a centralized management and material preparation.
Suppose that we have several transmitting centers located in different cities and all of them
have permanent Internet access. There is an office in city N including a sales department,
editorial and a recording studio. Then, by installing autonomous broadcasting stations (with
«Региональный Автомат РБД» software) on all transmitting centers, and DJin DDB Editor
software complex in central office of city N (which should also have Internet connection)
we get a Distributed Media Data Base. Completing a respective network configuration, the
broadcasting network created in the main office, together with all accompanying broadcasting
materials, will be automatically sent to regional transmitting centers for further broadcasting.
The speed of transfer is determined by the capacity of connection lines. Obviosuly, this scheme
will be perfect for radio stations with fully automatic broadcasting and no operator (live DJ)
involved. In practice, the schedule is usually prepared beforehand (usually one day before the
air). An individual schedule can be prepared for each direction (transmitting center), containing
local commercials and news, while IT technology can be used to liven up a bit the automatic
broadcasting.
The technology has a function of cascade data transfer. This means that each regional
transmitting center can serve as a intermediary link, passing received broadcasting material
further down the line. Thus, a complex network can be built, including regional and subregional broadcasting points. For example, the «Dorozhnoye Radio» network of Russia has
its main center in Saint-Petersburg, a regional center (with broadcasting point) in Pskov and a
network of sub-regional broadcasting points throughout Pskov region of Russia.
© DIGISPOT System GmbH
5
1.3 Organizing automatic broadcasting network with delivery of main
program via satellite channel
Suppose that we have the signal of the main radio program on a satellite and can accept this
signal in any point of relevant region. Apart from that, there are several transmitting centers in
various cities and an office with a sales department and editorial in city N. The program on the
satellite can be both our own program lifted from the office-based studio and a third-party
program broadcasted by means of a license.
In this situation the DDB technology allows automation of preparation, sending and
output of local commercial blocks on all regional transmitting centers. The hardware and
software configuration remains the same: “Regional DDB Automat” software complex with
Retransmission option or “Regional 777 DDB Automat” software complex on all regional
broadcasting points and DIGISPOT II with a “Media Planner Sales DDB” software complex or
“DHin DDB Editor” software in the central office.
Working technique: commercial broadcasting schedule is created in central office
for all regional transmitting centers (broadcasting points). With the help of the DDB Agent
the broadcasting schedule and air data (clips, jingles and so on) are transferred to regional
broadcasting centers. The insertion of local commercials to retransmitted program (received
from the satellite) is performed by DTMF or high-frequency marks. It is not recommended to
use audio images of jingles in this case as necessary quality (reliability) of recognition cannot
be reached.
1.4 Organizing a correspondent network
For network informational radio stations the DDB technology may be interesting from the
broadcasting material exchange standpoint (recordings of news programs, live airs, interviews,
local news and so on), both between the center and the branches and between the branches
themselves. In this case the network is built from several equal Media Data Bases in which
special categories of “exchange bank” are created. When you save a DB item to such a category,
it will be automatically received by the other participants of the exchange.
1.5 Creating a reserve server
Another variant of using the DDB technology is the creation of a reserve broadcasting server
which is a cheap variety of cluster technology. DIGISPOT II system as whole does not offer any
reserve system for broadcasting server, relying on OS means in this matter. IT technology
6
© DIGISPOT System GmbH
Digispot ® II DDB Agent
allows organizing an automatic switch to reserve broadcasting server if main equipment fails.
The clearest disadvantage of this approach is the high price. DDB technology allows creating
a backup of the broadcasting server and the used schedule, if not a full-blown reserve of the
working process. This backup is automatically updated. The disadvantages of this approach are
that, firstly, if main broadcasting server fails, switching to reserve should be done manually.
Secondly, because of the particularities of the DDB technology, the schedule is not updated
instantly, but the update process is completed gradually in the background. However, it is
much better than no reserving at all.
2 System requirements
DIGISPOT® II software operates on Intel-compatible machines under the following operating
systems:
• Windows XP SP3
• Windows 7 SP1
• Windows Server 2003 SP2
• Windows Server 2008 SP2
The following requirements apply to system performance, depending on software
configuration:
• RAM: at least 1 Gb, 3 Gb recommended
• HDD: at least 10 Gb for installation and getting started, 250 Gb recommended
• CPU: Pentium IV compatible, 2 GHz or faster
• Local network with a capacity of 100 Mbs or higher
The following software must be installed on the workstation for correct operation of the
application:
• Microsoft Internet Explorer 6 SP1
• Microsoft Windows PowerShell 1.0
• SQL Server 2005 Express / SQL Server 2008 R2 Express
• SQL Server Native Client (comes with the server)
• Microsoft .Net Framework 3.5 Service Pack 1
• Microsoft .Net Framework 2.0 Service Pack 2
• Microsoft Visual C++ 2008 SP1 Redistributable Package
• Microsoft Windows Installer 4.5
For correct work of DIGISPOT II applications it is required that the account under which the
application is run must have permission for reading and recording to file system folder that
© DIGISPOT System GmbH
7
that the DIGISPOT II applications are installed to. The account used for working with the data
base must have rights for reading and recording operations in the data base. Usually the user
or group of users is granted with full access to the folder where the application is located, as
well as the db_owner role for data base.
The following are required:
• USB ports
• Keyboard and mouse
DIGISPOT® II software interface is designed for 1024x768 screen resolution. It is also required
that all drivers of used hardware are correctly installed and fully functional.
3 Installation
During the installation it is required to perform the following:
• Install DIGISPOT®II software (from catalogue Distribs\ddbsetup.exe).
• In most cases the software comes with a protection key (HaspHL) and you need to
install the driver for it. To do this, run the installation program \Utils\HaspHLDrivers\
HaspUserSetup.exe
• In case of remote use (broadcasting consoles, broadcasting mixing boards) it is required
to install GPI device driver. If connected via LPT port it is required to install GPI driver
for LPT port. The driver is included in the distributive package. To install it, run Utils\
GPI_DRV_LPT\Install.bat.
• To work with integrated data base you will have to install Microsoft SQL Server 2005 /
2008 / 2008R2. Recommendations on the installation of Microsoft SQL Server can be
found in “Installation and basic configuration of DIGISPOT®II system”.
Initial configuration details of DDB Agent software are described in “Installation and basic
configuration of DIGISPOT®II system”.
4 Configuring DIGISPOT®II DDB Agent software
Work in DIGISPOT®II DDB Agent software is performed in the form of schedule and Media
Data Base item transfer in real time from server to regional station (client). To create a data
send / receive system, you need to configure a server connection that the data transfer will
be performed through, as well as the receiving side.
Let us describe the technical part of the server-client connection. There are several
workstations in the system. An abstract object is created on one of the workstations that
provides the end point of the connection – the SOCKET (a combination of IP address and port
8
© DIGISPOT System GmbH
Digispot ® II DDB Agent
number). A number of client connections are created on another workstation. An IP address
and port numbers are specified for each one of them. The server (server socket) is usually in
the waiting cycle. In other words, “watching” a specific port, it “wakes up” if new connection is
created. There is also a possibility to simply check if there are currently available connections,
set timeout for an operation and so on. As soon as a connection request is received from the
client, the server will switch the connection to the socket that is sending the data and go back
to standby mode. The data exchange process will commence.
Currently, the server only allows connection to one client; in this case the port and IP
address specified in connection settings are the same. There is no data exchange between
server and other clients via this particular socket.
Thus, for a technical standpoint, a server connection is a connection that receives requests
from clients (within the server-client architecture), performing the data transfer process via
network between two computers or processes.
Configuration of server and client is performed in DDB module (fig. 1) of the application.
Let us briefly describe the interface buttons of this module:
• The
and
buttons are designed for creation and deletion of new
connections
• The
,
,
and
buttons are responsible for
managing already configured connections.
Fig. 1. DDB module window
© DIGISPOT System GmbH
9
• The
button is for specifying parameters of server connection. The “Allow automatic
connection on launch” flag is for automatic launch of information transfer mode on
application run.
• The
button displays transfer and receive position of files for a certain
connection.
• The
button switches on/off the file transfer / receive position displaying mode.
• The
button is for switching between data transfer / receive log displaying
modes. The information can be displayed in two ways. The first option includes the user
seeing messages organized in lines (fig. 2). This means information about the number of
sent / received data streams. The second option is displaying DDB log table (fig. 1). All
messages for current day are displayed in the table. It is also possible to display logs for
a specified day or time period. There is a possibility to filter messages by types and table
fields.
Fig. 2. Log display
Now let’s go to configuration of server and client connections.
4.1 Configuring server connection
To create a server connection it is required to perform the following:
• Create a server socket. To do this, open the Properties dialog box using the toolbar
button
of DDB module (fig. 3).
10
© DIGISPOT System GmbH
Digispot ® II DDB Agent
Fig. 3. Server properties window
Here you may specify parameters of the server connection: computer IP and port number.
The “Enable autostart” flag is for automatic launch of information transfer mode on application
run.
On the Other tab of the Properties window log recording module properties are specified:
maximum size of logs and minimum free disk space; all parameters are specified in megabytes.
To create a server connection, perform one of the following: press the DDB module toolbar
button
or select New connection from context menu which is accessed by right-clicking
anywhere inside the window that shows the list of connections. The connection properties
window will appear (fig. 4), including 4 tabs:
Common, Send DB, Receive DB and Advanced.
Fig. 4. Common tab of the connection properties window
© DIGISPOT System GmbH
11
The Common tab displays all connection parameters used directly to establish connection
between server and client.
• Let’s describe each parameter in detail:
• Name – informational field displayed in the list of connections. May include any text line.
• Login, Password, Confirm password – parameters used for connection identification.
Login and password must be different for different server connections.
• Type – type of connection: server and client, specifies which side will send or receive
data.
• Address – IP address of computer with application installed.
• Port – network port — parameter of protocols specifying destination of batches
transferred via network.
• Start type – specifies type of connection launch: Automatic (Auto) and Manual.
Please note that the Name and Login parameters must be unique. In other words, different
server / client connections must have different names and logins. However, these parameters
must be the same for each server-client connection.
The selection of material (MDB and Schedule category) that should be sent to regional
station via this server connection is performed on the Send DB tab (fig. 5).
Fig. 5. Connection properties window, Send tab
12
© DIGISPOT System GmbH
Digispot ® II DDB Agent
On the figure, MDB structure with categories containing items of specific type is displayed
(commercials, jingles, music, broadcasts and news). To send categories to regional station
check the flags opposite of each selected MDB structure element.
If sending the Schedule via server connection, it is required to also configure the list of
schedules (you can select an item from the list provided by the system by changing the OFF
parameter to ON). This way, only the needed schedules will be tracked. Please note that the
Schedule parameter is a link (name) to the schedule that will be sent via this server connection.
It is important to note that this parameter is case sensitive! The schedule is stored in the form
of a group of files (*.blk) in the \\Drive:\Folder\Subfolder1\...\ROOT\PLAYLIST\YYYY-MMDD catalogue (if the schedule is stored on a remote computer, the path to it will be as follows:
\\ComputerName\RootShare\ROOT-folder\PLAYLIST\YYYY-MM-DD).
Several independent schedules may be present in the system (in this case by schedule we
mean the whole broadcasting plan, not the schedule for a certain day only). For example, it
may be the schedule for different broadcast frequencies. Accordingly, each schedule has a
name and is stored on the disk separately from other schedules (for example),
\\ComputerName\RootShare\ROOT-folder\PLAYLIST_new\YYYY-MM-DD).
The Advanced tab (additional parameters) of the connection Properties dialog box is shown
on fig. 6. By default, the following categories are available in the working area of the tab: IO,
Send and Receive. Let us describe the additional parameters available here.
The IO category includes periodicity of keep-alive message and timeout of keep-alive
message. These are batches of messages exchanges between server and client for keeping up
the connection.
The Send category includes the following parameters:
• TCP message size – the parameter that defines the size of sent batches.
• File block size – parameter controlling the reading of file and allowing configuration
according to available hardware possibilities.
• Compress files – parameter of files compression during sending.
The Receive category contains the Number parameter for simultaneously uploaded files –
the number of files that can be simultaneously received by client from server. Currently, up to
10 simultaneously uploaded files can be specified.
© DIGISPOT System GmbH
13
Fig. 6. Advanced tab of the connection properties window
4.2 Configuring client connection
To create a client connection (connection settings on the client side) it is required to do
the following. Press the
button on DDB module toolbar or select “New connection”
from the context menu which is accessible by right-clicking on any area inside the window that
contains the list of connections. Connection properties window will appear (fig. 7), including 4
tabs: Common, Send DB, Receive DB and Advanced.
On the Common tab you must fill in the fields that are used for establishing connection
between server and client. Then you need to assign received material on the Receive DB tab
(fig. 8). To start receiving information stream you need to check the Receive material flag.
There is a possibility to specify exact DB category where the material received from server will
be stored. The category is created automatically for all types of received items. On the figure
shown below the material is automatically stored in the category “Test”.
14
© DIGISPOT System GmbH
Digispot ® II DDB Agent
Fig. 7. Connection properties window, Common tab
• Refresh (HH:MM) – the time after which the update of client’s MDB window contents
occurs to reflect the changes received from server. The time is specified in hours and
minutes.
• Request modifications (HH:MM) – the period of server request about recent DB changes
(as is the case with the previous parameter, it is specified in hours and minutes).
To receive the schedule from server it is required to fill in at least one field of the Schedules
to receive list.
To create a link to the recently created schedule press the
button under the list of
received schedules. Connection properties window (fig. 9) will appear on the screen, including
4 parameters:
• Src sch name (Source schedule name) – “the source”. This parameter defines the link
to the schedule that will be sent from server connection.
• Dst sch name (Destination schedule name) – “the receiver”. This is the link to the
schedule that will directly accept data from server (in other words, the server schedule).
• Refresh (HH:MM) – the time after which client schedule is updated.
• Request modifications (HH:MM) – the period of server request about recent changes
in the schedule.
© DIGISPOT System GmbH
15
Fig. 8. Connection properties window, Receive DB tab
Please remember that all schedule names are case sensitive! If you specify “default” instead
of the standard “Default” (same thing but starting with lowercase letter), you will not be able
to complete the configuration.
Fig. 9. Received schedule properties window
After that, additional parameters can be configured. In this particular case its changing the
“number of simultaneously uploaded files” parameter – the number of files that the client
may received simultaneously from server (it is possible to specify up to 10 simultaneously
16
© DIGISPOT System GmbH
Digispot ® II DDB Agent
received files). This parameter can be changed on the Advanced (additional parameters) tab
of the connection properties dialog box (fig. 6), in the Receive category.
5 DDB Agent software working technique
The DDB technology is designed for transfer of files and schedules to a regional station
(client). The material is transferred in the following way:
• A connection is established by server IP address between two stations – the server and
the client. Note that the idea of a “server” and a “client” in this case is a relative one
and defines the role that the stations play in the process of establishing connection and
transfer of material. In fact, the very same station can be both a client and a server.
IMPORTANT NOTE: If connection between client and server is lost (for example, if server was
stopped or an error in client connection properties occurred), the user will be notified about
the connection failure (Connection refused). The message will be displayed until the moment
the connection is restored or the client is stopped.
• When the connection between server and client is established, the process of tracking
changes in MDB and server schedules is launched on the regional station. The process
of transferring data specified in connection properties begins.
• Client’s MDB is updated. While sending the files, categories corresponding to those of
the server are automatically created on the regional station in Media Data Base. The
items are stored in these categories. If certain items from transferred categories are
deleted on the server, they will also be automatically deleted on the receiving end.
When sending the data to a regional station, only those schedules specified in connection
properties will be tracked.
From the broadcasting standpoint, a schedule is a fixed, planned and formed sequence of
broadcasting material, sorted by output time. To form a schedule, creation or import of a set
of blocks must be performed. Then you must set the properties of these blocks and fill them
concrete data.
Each schedule block possesses a special set of properties (parameters). Part of them defines
how the block will be displayed in the schedule. Other part is responsible for timing. There is
also a parameter that influences the process of block transfer via DDB: the Regional block flag,
included in the block properties (fig. 10) on the Extra tab. It is the block of own broadcasting,
created on the main station.
© DIGISPOT System GmbH
17
When regional blocks are sent via DDB to regional stations, they are mixed and not
rerecorded. If new items received from the server are added to a block on a regional station,
these items will not be deleted from the block during the next update, but moved to the end
of the block instead.
Please note that there is a “Keep at the end of the block during import” parameter that
you can specify on the main station in the properties of a regional block item. In this case, if
contents of received regional block are changed on the regional station (new items are added
to any part of such blocks), then, during the next update, all recently added items will always
be kept at a higher position inside the block compared to the item that had “Keep at the end
of the block during import” parameter set for it.
Fig. 10. Extra tab of the block properties window
The flag “Keep at the end of the block during import” flag can be checked on the Extended
tab of the item properties window. The item that is kept at the end of the block during import
is marked by an anchor icon . There are examples of sent and received schedules shown on
figures 11 and 12, respectively.
18
© DIGISPOT System GmbH
Digispot ® II DDB Agent
Fig. 11. Main station schedule (server)
Fig. 12. Receiving end schedule (client)
With the appearance of DIGISPOT®II DJin the DDB configuration was expanded to include
the possibility to limit user rights, which means that there is now an administration system
for access to DDB settings. Any user working under such configuration can view information
contained in DDB module (fig. 1) but any interference in connection properties requires a
respective right assigned to this user.
IMPORTANT NOTE: You can configure DDB user rights in Administration → Common tab
→ Common section → DDB Administration.
Let us look into another aspect of DDB functionality, namely DDB logs. These logs display
information about information transfer and acceptance, as well as are used by developers
during fine fixing of various functions. The logs are recorded separately for each connection.
Information about logs can be displayed in two distinctive ways. In the first case the user
sees messages arranged in lines – this is information about sent / received data streams (only
the last received information about server-client link activity is displayed at any particular
moment). The second case involves displaying of DDB log table only. The table includes all
receive / send messages for current date; it is also possible to view logs for a particular day or
a period of time. There is a possibility to sort and filter the messages by types and table fields.
To switch between receive / send log displaying modes use the
button.
© DIGISPOT System GmbH
19
To open the menu (fig. 13) of DDB logs right-click inside the log table and select the needed
command: Open (open, view logs), Filter (filtering) or Sort (sorting).
Fig. 13. Opening the log menu
Using the Open command you open a new dialog box View order (fig. 14), where you must
do the following: specify DDB log storing folder, log type (standard DDB logs or logs with a
divider – the debug logs), as well as the number of logs to be displayed.
If you change the type of logs you must also change the storing folder, because DDB and
debug logs are stored in separate folders.
When you use the Filtering command, a dialog box (fig. 15) appears. The filtering of logs is
performed by two parameters: by message type and by fields. When filtering by message type
or by fields only those messages that have filtering type specified for them will be displayed
in DDB log table.
Fig. 14. Viewing mode dialog box
20
© DIGISPOT System GmbH
Digispot ® II DDB Agent
Fig. 15. Filters by fields dialog box
Fig. 16. Sorting window
To set filtering by a particular type of messages, check the field that corresponds to the
type of message you want to use (by default the filtering is done by all types of messages) and
press OK.
© DIGISPOT System GmbH
21
To set filtering by fields select the needed parameter from the dropping list, specify the
name of operation from Operation list and enter the value in the Value field. Then press
Add. After the filtering criteria appear in the Conditions (AND) window, press OK. To delete
recently added criteria, select the rule and press Delete.
Let’s look into the operation of DDB log sorting in detail. On fig. 16 you can see the sporting
parameters window (the window is accessed similarly to filtering and log viewing windows).
The sorting of logs is by table fields and there are two criteria: by descending and by ascending
data values. To add a new sorting parameter you need to select the needed field from the
dropping list, press Add, and, if needed, modify the sorting criteria. Then press OK. The priority
of sorting by fields is defined by the order of set parameters (table fields). In other words, the
priority will be higher for a field that was specified earlier than others.
22
© DIGISPOT System GmbH
Contact information
DIGISPOT System GmbH
Grillparzerstraße 6a D - 22085, Hamburg, Germany
Tel.: +49 (40) 229-88-83, Fax: +49 (40) 22-32-09
http://www.digispot.com
e-mail: [email protected]
TRACT-SOFT, LLC
197101, ul. Kronverkskaya, 23, Saint-Petersburg, Russia
Tel.: +7 (812) 490-77-99, Fax: +7 (812) 233-61-47
http://www.digispot.ru
e-mail: [email protected]
© DIGISPOT System GmbH