1
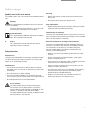
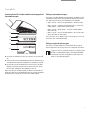
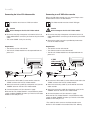
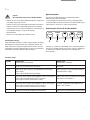
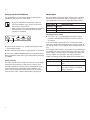
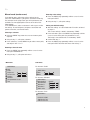
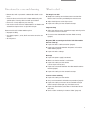
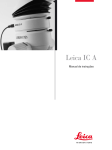
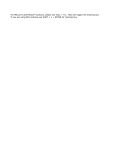
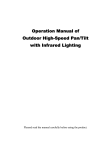
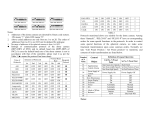
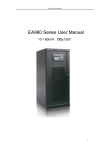
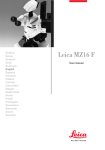
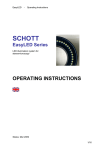
Leica IC A
User manual
Contents
Safety concept
Symbols used in this user manual . . . . . . . . . . . . . . . . . . . . . . . . . . . . . . . . . . . . . . . . . 3
Safety directions . . . . . . . . . . . . . . . . . . . . . . . . . . . . . . . . . . . . . . . . . . . . . . . . . . . . . . . . 3
Overview of the instrument . . . . . . . . . . . . . . . . . . . . . . . . . . . . . . . . . . . . . . . . . . . . . . . 4
Assembly
Inserting Leica IC A video module into beam path of stereomicroscope . . . . . . . . 5
Fitting to stereomicroscopes . . . . . . . . . . . . . . . . . . . . . . . . . . . . . . . . . . . . . . . . . . . . . . 5
Fitting to surgical microscopes . . . . . . . . . . . . . . . . . . . . . . . . . . . . . . . . . . . . . . . . . . . . 5
Connecting the Leica IC A video module . . . . . . . . . . . . . . . . . . . . . . . . . . . . . . . . . . . 6
Connecting to an S-VHS video recorder . . . . . . . . . . . . . . . . . . . . . . . . . . . . . . . . . . . . 6
Use
Operating modes . . . . . . . . . . . . . . . . . . . . . . . . . . . . . . . . . . . . . . . . . . . . . . . . . . . . . . . . 7
Control panel of Leica IC A video module . . . . . . . . . . . . . . . . . . . . . . . . . . . . . . . . . . . 7
Carrying out the white balance . . . . . . . . . . . . . . . . . . . . . . . . . . . . . . . . . . . . . . . . . . . . 8
Normal mode . . . . . . . . . . . . . . . . . . . . . . . . . . . . . . . . . . . . . . . . . . . . . . . . . . . . . . . . . . . 8
Manual mode (monitor menu) . . . . . . . . . . . . . . . . . . . . . . . . . . . . . . . . . . . . . . . . . . . . . 9
Functions of menus . . . . . . . . . . . . . . . . . . . . . . . . . . . . . . . . . . . . . . . . . . . . . . . . . . . . . 10
Directions for care and cleaning . . . . . . . . . . . . . . . . . . . . . . . . . . . . . . . . . . . . . . . . . 11
What to do if . . . . . . . . . . . . . . . . . . . . . . . . . . . . . . . . . . . . . . . . . . . . . . . . . . . . . . . . . . 11
Technical data . . . . . . . . . . . . . . . . . . . . . . . . . . . . . . . . . . . . . . . . . . . . . . . . . . . . . . . . . 12
2
Safety concept
Symbols used in this user manual
Servicing
The symbols used in this user manual have the following meanings:
• Repairs may only be carried out by Leica-trained service
technicians.
• Only original Leica spare parts may be used.
Warning
This symbol denotes information which must be read
and obeyed.
Failure to adhere to these directions can result in malfunctioning of, or damage to, the instrument.
Useful information
This symbol denotes additional information or explanations which promote understanding.
Action
This symbol within the text indicates that certain
operations must be carried out.
Safety directions
Permitted uses
The Leica IC A video module is attached to stereomicroscopes
in order to observe the images on monitors or to take up the
images on an S-VHS video recorder.
Prohibited uses
• The use of the instrument in a different manner from that
described in this user manual can lead to injury, malfunction
and damage.
Legal requirements
• Adhere to general and local regulations relating to accident
prevention and environmental protection.
EC declaration of conformity
The Leica IC A video module and its accessories are constructed in accordance with the latest technologies and are provided
with an EC declaration of conformity.
Directions for the person in charge of the instrument
The Leica IC A video module has been developed and manufactured in accordance with the latest technologies. Hazards
can nevertheless arise during its use. Before fitting the
Leica IC A video module and setting it into operation, pay
attention to the following points:
• Read this user manual and follow the directions for safety
and care.
• Ensure that the Leica IC A video module is used only by
persons authorized to do so.
• Ensure that this user manual is always available at the place
where the Leica IC A video module is in use.
• Carry out regular inspections to ensure that the users are
adhering to safety requirements.
• Use only the plugs or cables supplied.
• If a fault which could cause injury develops in the product,
inform your local Leica agency or Leica Microsystems
(Switzerland) Ltd., CH-9435 Heerbrugg.
• The service interface (COMP) is reserved exclusively for
servicing. Misuse of this interface will cause malfunctioning.
• Read the user manual for your stereomicroscope and
observe the directions for safety and care.
• Do not dismantle the Leica IC A video module.
Use in medicine
The video module Leica IC A (for Leica M stereomicroscopes) has not been tested in accordance
with the German medical products law (MPG), or with
IEC 601-1-1 (Europe), or with FDA or FDI (USA).
The video module may be used only if compliance with
these standards is not required.
3
Overview of the instrument
3
1
2
1
2
3
4
Leica IC A video module PAL or NTSC
Power unit and connecting cable for Leica IC A video
module, with power cable
S-VHS cable for monitor or video recorder
Assembly
Inserting Leica IC A video module into beam path of
stereomicroscope
Fitting to stereomicroscopes
The Leica IC A video module can be fitted to any Wild or Leica
stereomicroscope having the appropriate dovetail ring mount.
The sequence can be any of the following, for example:
• Optics carrier – Leica IC A video module – binocular tube
• Optics carrier – coaxial incident light housing – Leica IC A
video module – photo tube or drawing tube
1
2
3
4
5
Unscrew the clamping screws (2) and (4) as far as they will
• Optics carrier – beam splitter – Leica IC A video module –
binocular tube
• Optics carrier – Leica IC A video module – discussion tube –
binocular tubes (on both sides)
For instructions on assembly, refer to "Accessories" in the user
manual for your stereomicroscope.
Fitting to surgical microscopes
The Leica IC A video module can be fitted to Leica surgical
microscope and to accessory which has a dovetail ring mount.
The Leica IC A has not been tested in accordance with
IEC 601-1-1 (Med GV, Europe) or with FDA, FDI (USA)
and may be used only if compliance with these standards is not required (page 3).
go.
Insert the Leica IC A video module (3) into the dovetail ring of
the stereomicroscope (5) and tighten the clamping screw (4).
Fit the tube (1) into the dovetail ring of the Leica IC A video
module in accordance with the user manual for the stereomicroscope, and tighten the clamping screw (2).
When the Leica IC A video module has been inserted into the
beam path, 80% of the available light goes to the two eyepieces
for observation and 20% to the Leica IC A video module.
5
Assembly
Connecting the Leica IC A video module
Connecting to an S-VHS video recorder
With an S-VHS video recorder, you can record images transmitted from the Leica IC A video module.
The monitor must have an S-VHS connection.
The video recorder must be of the S-VHS type.
Caution
Caution
Risk of damage to the Leica IC A video module.
Risk of damage to the Leica IC A video module.
Disconnect the plug of the power unit from the Leica IC A
video module before connecting or disconnecting the S-VHS
cable.
Disconnect the plug of the power unit from the Leica IC A
video module before connecting or disconnecting the S-VHS
cable.
Observe the safety instructions provided by the manufac-
• The socket "COMP" is only for servicing.
turer of the video recorder.
Requirements
Requirements
• The monitor must be switched off.
• The monitor must be switched off.
• The Leica IC A video module must be separated from the
power unit.
• The video recorder must be switched off.
• The Leica IC A video module must be separated from the
power unit.
S-VHS
video recorder
2
1
4
1
3
2
Connect the S-VHS cable (1) to the monitor and to the
"VIDEO" socket on the Leica IC A video module.
Attach the connecting cable (3) of the power unit (2) to the
"POWER" socket on the Leica IC A video module.
5
4
3
Connect the S-VHS cable (1) to the video recorder and to the
"VIDEO" socket on the Leica IC A video module.
Attach the connecting cable* (2) to the monitor and to the
video recorder.
Connect the power unit (2) to the mains supply.
Attach the connecting cable (4) of the power unit (3) to the
When the Leica IC A video module is connected to the power
supply, the diode "POWER" (4) comes up. The Leica IC A video
module is now ready for use.
Connect the power unit (3) to the mains supply.
"POWER" socket on the Leica IC A video module.
When the Leica IC A video module is connected to the mains
supply, the diode "POWER" (5) comes up. The Leica IC A video
module is now ready for use.
* The cable (2) which connects the video recorder to the
monitor is not included in the standard Leica IC A delivery.
6
Use
Caution
Operating modes
Risk of damage to the Leica IC A video module.
The Leica IC A video module has two operating modes:
Normal mode and manual mode.
In normal mode, you work with the Leica IC A video module.
In manual mode, you match the Leica IC A video module to your
requirements in terms of e.g. colour and brightness.
• Protect the Leica IC A video module from direct sunlight and
from other strong light sources.
• Protect the Leica IC A video module from damp and vapours.
• Protect the Leica IC A video module from dust and always
keep the dust cover on when the module is not in position on
the stereomicroscope or surgical microscope.
Control panel of Leica IC A video module
• Avoid vibration.
• Do not use a sharp object to activate the keys.
Avoiding ghost images
Under dark-field conditions, and also under low-light conditions,
both eyepieces in the binocular tube should be covered. This
keeps out parasitic light which might otherwise enter through
the eyepieces and get reflected into the camera, and therefore
it eliminates disturbing reflexes and ghost images.
POWER
AWB
1
2
3
ENTER
MENU
4
5
The keys (1, 3, 4 and 5) and the diode (2) on the control panel of
the Leica IC A video module have various functions, depending
on whether the module is operating in normal mode or in
manual mode.
Functions of keys
Key/LED
Normal mode
(monitor menu not activated)
Manual mode
(monitor menu activated)
1
Carries out the white-balance procedure
No function
2 (LED)
Comes up as soon as Leica IC A video module is attached to
mains supply
Flashes during white-balance procedure
Comes up soon as Leica IC A video module is
attached to mains supply
3
Press once: Current basic setting appears in menu; refer also to
section "Manual mode (monitor menu)" on page 9
Press again: Activates the next basic setting
Reduces the size of a parameter and activates
menu points in the submenu
4
Press once: Current basic setting appears in menu; refer also to
section "Manual mode (monitor menu)" on page 9
Press again: Activates the previous basic setting
Increases a parameter and activates menu
points in the sub-menu
5
Changes to manual mode (displays monitor menu)
Moves the cursor downwards in the main menu
7
Use
Carrying out the white balance
Normal mode
The white balance ensures that the image on the monitor is
reproduced with the correct colour tones.
For normal mode, select those basic settings which cannot be
altered, and the user-defined settings. These basic settings
were optimized in the factory for certain illumination modes.
• During the white-balance procedure, cover the
right-hand eyepiece if you are not using it. Stray
light results in wrong values.
• Make sure that, during the white-balance procedure,
the illumination is not altered and that the white
specimen is not moved.
Basic setting
Illumination mode
INCIDENT Incident light
BRIGHT FIELD
Transmitted light, bright field
DARK FIELD
Transmitted light, dark field
Selecting the basic setting
POWER
AWB
1
ENTER
MENU
2
Place a white specimen, e.g. a sheet of white paper, under
the stereomicroscope.
Adjust the illumination to what is required later for recording.
Press key (1) AWB (Auto White Balance). The diode (2) flashes.
When the diode (2) stops flashing, the white-balance procedure
is complete.
Colour correction
The colour reproduction of single-chip cameras is restricted by
the physical characteristics of CCD sensors, and it is never
possible to reproduce the entire colour range faithfully. If, for
critical mixed colours and for difficult light conditions, the
colours are not rendered correctly, they can be corrected in
the main menu "Color", submenu Red or Blue (see page 10).
8
Press the ">" or "<" key repeatedly until the basic setting
required is displayed on the monitor. This basic setting is
now active.
If none of the basic settings gives you a satisfactory image,
refer to the section "Manual mode (monitor menu)" on page 10.
This tells you how to use the monitor menu to adapt a basic setting.
The changed setting remains stored under the user-defined setting "TEMP" after you quit the monitor menu, even if you switch
off the camera. If further changes are made to the setting, the
values in "TEMP" are overwritten. The setting selected in
"TEMP" can also be stored under "USER" via the monitor menu.
User-defined setting
TEMP
USER
Significance
The latest setting stored in the monitor
menu
The latest setting to be stored
(see section "Storing user-defined
settings", page 10)
Use
Manual mode (monitor menu)
Returning to the settings
In the monitor menu, adjust the various settings for the
Leica IC A video module, e.g. brightness and colour rendering.
The overview on this page shows you which parameters are
available. The next page explains how to set the Leica IC A
video module.
In the "MAIN menu", select a sub-menu in which you can alter
the settings. To reset brightness, brightness evaluation and
gamma correction, use the main menu.
Press the "MENU" key repeatedly until the cursor is on the
Selecting a sub-menu
Using the "MENU" key, move the cursor to the menu point
menu point "EXIT".
Using the key ">", call up the settings.
Storing user-defined settings
Alter the settings as is described under "Functions of menus"
on page 11.
The current setting is stored in the memory "TEMP".
In the main menu, press the "MENU" key repeatedly until the
cursor is on the menu point "Set parameter to user".
The image is now stored and is in the memory "USER".
required.
Using the key ">", call up the sub-menu.
Confirm with key ">".
In the sub-menu, use the "MENU" key to select a menu point,
Press the "MENU" key repeatedly until the cursor is on the
and adjust it with "<" or ">".
menu point "EXIT". Quit the main menu with the key ">".
Returning to the main menu
Press the "MENU" key repeatedly until the cursor is on the
menu point "MAIN Menu".
Using the key ">", call up the main menu.
Main menu
MAIN Menu
EXIT
Color
Brightness
Accentuate
Gamma
Window
Set parameter to user
Info
Sub-menus
For the menu "Color":
MAIN Menu
Red
Blue
For the menu "Window":
MAIN Menu
WindowDisp
WindowSize:
Window X:
Window Y:
OSD: white
ON/OFF
ON/OFF
For the menu "Info":
MAIN Menu
LEICA IC A (PAL)
SW-Version Vxx
HW-Version Vxx
9
Use
Functions of menus
hanging the evaluation window for brightness adjustment and
brightness evaluation
Changing colours (Color)
This function changes the size and position of the evaluation
window (1).
In the sub-menu of Color, adjust the red and blue tones separately.
In the main menu, select the menu point Color and use the
key ">" to change to the sub-menu.
Window-Y
Select Red or Blue. Weaken the tone with key "<" and in-
tensify it with key ">".
Window-X
Brightness
With Brightness, you adjust the basic brightness of the entire
image.
Window Size
Accentuate
With Accentuate, brighter or lighter areas of the image are
emphasized. Either the darker features (slider left) or the
brighter features (slider right) can be brought to the basic value
set with Brightness.
Example:
With dark-field applications in transmitted light, important information is concealed in the dark parts of the image, and the
bright background is of no interest.
With bright-field applications in transmitted light, or with incident light, the important information is in the bright parts of the
image, and the dark parts usually are of no interest.
Within the main menu, call up the sub-menu Window.
Gamma correction
In the menu points Window-X horizontal and Window-Y verti-
This parameter is for matching the camera to your monitor.
This brightness control or brightness evaluation relates
only to the evaluation window. Settings for the evaluation window are described in the following chapter.
In the menu point Window Disp ON/OFF, use the key ">" to
1
Using the "MENU" key, position the cursor in front of the menu
point Window Disp ON/OFF and use the key ">" to display the
evaluation window.
In the menu point Window Size, use the keys ">" and "<" to
alter the field coverage.
Within the main menu, select the menu point Brightness,
Accentuate or Gamma.
The key "<" shifts the bar to the left (setting weakened)
The key ">" shifts the bar to the right (setting intensified).
cal, use the keys ">" and "<" to position the evaluation window.
show or hide the evaluation window.
Changing the colour of the background characters
You can change the colour of the background characters from
white to black.
Within the main menu, call up the sub-menu Window.
In the sub-menu OSD: white ON/OFF, use the key ">" to
change the colour of the characters.
10
Directions for care and cleaning
• Remove dust with a pneumatic rubber bulb and with a soft
brush.
• Clean the lenses of the Leica IC A video module only with
special optics cleaning cloths and with pure alcohol.
• Do not use a sharp object to press the keys.
• Use the dust cover when the video module is not fitted to the
stereomicroscope or to the surgical microscope.
Protect the Leica IC A video module against
• improper handling
• dust, damp, vapours, acids, alkalis and other corrosive substances
What to do if ...
The image is too dark
Readjust the settings on the video camera and monitor.
Refer to the instructions provided by the manufacturer.
Adjust the brightness of the light source.
Inspect the settings on the stereomicroscope.
Image not sharp
Adjust the settings on the stereomicroscope, referring to the
instructions for that instrument.
Ensure that the video module has been fitted correctly
(page 5).
• oil and grease.
No power (LED on control panel of Leica IC A video module
does not come up)
Inspect the mains cable connection (page 6).
Inspect the connection between the power unit and the
video module (page 6).
Inspect the mains voltage.
No image
Inspect the power supply (see above).
Make sure that the monitor is switched on.
Inspect the settings on the monitor
(correct input channel, etc.).
Inspect the connection between the video module and the
monitor (page 6).
Inspect the settings on the stereomicroscope.
Incorrect colour rendering
Inspect the settings on the monitor.
Carry out the automatic white balance procedure (page 8).
Inspect the settings and status of the stereomicroscope
(filter inserted in beam path e.g. with fluorescence).
Inspect the illumination (colour filter in illumination beam
path, etc.).
Correct colour rendering in the menu "Color" (page 10).
11
Leica IC A Technical data
Monitor
Field coverage
with 10× eyepieces
Tube factor
• On camera side
• Observation down binocular tube
Partition of light
Stereo base
At least S-VHS
Corresponds to diameter of
intermediate image of 21 mm
0.29×
1.0×
20% video, 80% observation
24 mm
Camera data
CCD sensor
CCD with colour mosaic filter
Number of pixels
Pixel size
Shutter control
Signal-to-noise ratio
Sensitivity to light
Power supply
Weight
EMV standards
Input voltages
Mains plug
Secondary voltage
Low-voltage plug
85 V to 264 V / 47 Hz to 63 Hz
IEC 320
12 V DC
MiniDIN 5-pole
Environmental conditions
Operating temperature
Storage and transport temp.
Permitted air humidity during use
+10°C to +40°C
–20°C to +55°C
< 85 %
440'000 pixels, >470 TV lines
Y/C (S-VHS)
PAL (stock no. 10 446 237) or
NTSC (stock no. 10 446 238)
1/3“ interline transfer
PAL: (752H × 582V)
NTSC: (868H × 492V)
PAL: 6.5 µm × 6.25 µm
NTSC: 6.35 µm × 7.4 µm
Shutter: 1/50s to 1/2’000’000 s
AGC: 6 db to maximum of
30 db
> 49 dB (with AGC = 6 and
shutter 1/2’000’000 s)
Low-noise image
uptake up to 3 lux
12 V, 200 mA
480 g (without power unit)
EN 55011, EN 50082-1,
EN 61000-3-2, EN 61000-3-3
In accordance with the ISO 9001 certificate, Leica Microsystems (Switzerland) Ltd.,
Stereo & Macroscope Systems, has at its disposal a management system that
meets the requirements of the international standard for quality management.
Leica Microsystems (Switzerland) Ltd
Stereo & Macroscope Systems
CH-9435 Heerbrugg
Telephone +41 71 726 33 33
Fax +41 71 726 33 99
www.leica-microsystems.com
www.stereomicroscopy.com
Illustrations, descriptions and technical data are not binding and may be changed without notice.
Printed on chlorine-free paper with a high content of recycled fibre.
M2-393-004en • © Leica Microsystems (Switzerland) Ltd • CH-9435 Heerbrugg, 2002 • Printed in Switzerland – V.2004 – RDV
Resolution
Video outlet
Video standards
Power unit