1
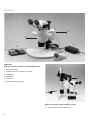
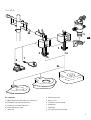
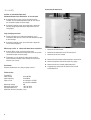
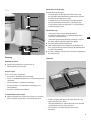
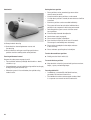
Leica
Motor-Focus
System
User manual
Manuel d’utilisation
Gebrauchsanweisung
Manual de empleo
Contents
Description . . . . . . . . . . . . . . . . . . . . . . . . . . . . . . . . . . . . . . . . . . . . . . . . . . . . . . . . . . . . . . 4
Safety concept . . . . . . . . . . . . . . . . . . . . . . . . . . . . . . . . . . . . . . . . . . . . . . . . . . . . . . . . . . 4
Overview . . . . . . . . . . . . . . . . . . . . . . . . . . . . . . . . . . . . . . . . . . . . . . . . . . . . . . . . . . . . . . . . 6
Assembly
The components . . . . . . . . . . . . . . . . . . . . . . . . . . . . . . . . . . . . . . . . . . . . . . . . . . . . . . . . . 7
Assembly . . . . . . . . . . . . . . . . . . . . . . . . . . . . . . . . . . . . . . . . . . . . . . . . . . . . . . . . . . . . . . . 8
Use
Switching on and off . . . . . . . . . . . . . . . . . . . . . . . . . . . . . . . . . . . . . . . . . . . . . . . . . . . . . . 9
Acoustic signal . . . . . . . . . . . . . . . . . . . . . . . . . . . . . . . . . . . . . . . . . . . . . . . . . . . . . . . . . . 9
Stops . . . . . . . . . . . . . . . . . . . . . . . . . . . . . . . . . . . . . . . . . . . . . . . . . . . . . . . . . . . . . . . . . . . 9
Footswitch . . . . . . . . . . . . . . . . . . . . . . . . . . . . . . . . . . . . . . . . . . . . . . . . . . . . . . . . . . . . . . 9
Handswitch . . . . . . . . . . . . . . . . . . . . . . . . . . . . . . . . . . . . . . . . . . . . . . . . . . . . . . . . . . . . 10
The focusing position: Storing, travelling, cancelling . . . . . . . . . . . . . . . . . . . . . . . . . 10
Focusing with the PC . . . . . . . . . . . . . . . . . . . . . . . . . . . . . . . . . . . . . . . . . . . . . . . . . . . . 10
EN
3
Description
Safety concept
Purpose
Before you try to set up and use the motor-focus system, read:
The purpose of the motor-focus system is to provide motordriven coarse and fine focusing by means of a manual control,
a footswitch, or through a computer. Five exact focus settings
can be stored so that the instrument can travel to them directly.
The motor-focus system offers the following advantages over
manual focusing:
•
this user manual, and in particular the safety notes
•
the user manual for your stereomicroscope or macroscope,
including the notes about safety and care.
•
Easy to use, even with heavy outfits
•
Ergonomically better
•
More flexibility for the user
•
Leaves the hands free
•
Saves time during repetitive tasks.
The motor-focus system is intended for the motor-driven raising
and lowering of the LEICA MS5, MZ6, MZ8, MZ12, MZAPO and
MZ FLIII stereomicroscopes and of the LEICA M420 macroscope
on Leica incident- and transmitted-light stands, and on the large
swinging-arm stand, and it replaces the mechanical drive
housing. The motor-focus system consists of
Permitted uses
•
a column with motor-focus mechanism
For Leica stereomicroscopes
•
a transformer with a power cable
The modular design of the motor-focus system enables it to be
fitted to the incident- and transmitted-light stands and large
swinging-arm stand of the LEICA MS5, MZ6, MZ8, MZ12, MZAPO
and MZ FLIII stereomicroscopes and of the LEICA M420
macroscope.
•
a manual control and/or a footswitch and/or a PC
interface kit.
User manual
Prohibited uses
The use of the motor-focus system in a different manner
from that described in this user manual can lead to injury,
malfunction and damage.
The present user manual describes the design and use of
the motor-focus system. There is a separate user manual for
the stereomicroscope or macroscope.
•
Do not fit different plugs.
•
Do not attempt to modify the motor-focus system.
•
Do not dismantle any part of the motor-focus system unless
instructions for doing so are given in the user manual.
For safety directions, and for detailed information about the
stereomicroscope or macroscope and how to clean it,
and about its stands, illuminators and accessories, please
refer to the user manual for that instrument.
•
Do not allow the motor-focus system to be opened
by unauthorized personnel.
Place of use
The motor-focus system is intended for use only in closed rooms.
Responsibilities of person in charge of instrument
4
•
Ensure that the motor-focus system is operated, maintained
and repaired only by authorized and trained personnel.
•
Ensure that personnel who use the motor-focus
system have read and understood this user manual
and in particular all safety instructions.
Safety regulations
Power cable
•
Inspect the power cable regularly for damage. If it is
defective, replace it immediately, because it can cause
the instrument and ancillary equipment to become
electrically live, endangering personnel. Do not pull at
the power cable.
•
Position the power cable carefully and make sure that
no-one can become entangled in it or fall over it.
Repairs and servicing
•
Only Leica-trained service technicians, or technical
specialists assigned by the person in charge
of the instrument, are permitted to carry out repairs.
•
Only original Leica spare parts may be used.
•
Disconnect the power cable before opening the
transformer, otherwise there is a risk of injury through
electric shock.
Cleaning
•
Disconnect the power cable before you attempt to clean the
motor-focus system.
•
Respect the warning signs relating to the handling of liquids.
•
Read and follow the notes about cleaning which are given in
the user manual for the instrument.
Precautions by the manufacturer
•
The motor-focus system is electromagnetically
compatible in accordance with the directive 89/336/EEC
and can be operated at the same time as other
electrical appliances.
•
Low-voltage protection prevents electric shock if the
circuit inside the motor housing is touched.
•
Stops on the column, and end-switches on the motor
housing, limit the upward and downward movement of the
motor-focus system. The end-switches prevent it from
attempting to travel further when it encounters the stops.
Warning: Danger of crushing and other injuries
When focusing, keep your fingers away from:
•
the space between the motor housing and the lower stop
•
the space between the objective and the object, the
surface of the stand, the stage insert and the stage.
Precautions by the manufacturer: The lower stop must be
adjusted individually in accordance with the characteristics
of the object (see below).
EN
Liquids
Be careful when handling liquids. If spilt on electrical
appliances, they can:
•
cause the instruments and accessories to become
electrically live, endangering personnel
•
cause damage to the equipment.
Legal requirements
Adhere to general and local regulations relating to accident
prevention and environmental protection.
Conformity with European Community directive
The motor-focus system and its accessories are constructed in
accordance with the latest technologies and are provided with
a statement of conformity with EC requirements.
Safety note
Always set the lower stop correctly in relation to the object
(see page 9). If it is set too low:
•
the user’s hands might get crushed between the objective
and the object
•
the object might get flattened or otherwise damaged
•
the objective might get damaged.
5
Overview
2
1
3
5
4
Components
Motor-focus system on incident- or transmitted-light stand
1 Stereomicroscope
2 Stand with column and motor-focus system
3 Transformer
4 Handswitch
7
5 Footswitch
6 Standard PC (not illustrated)
Motor-focus system on large swinging-arm stand
7 Inclinable carrier rod with motor focus
6
Assembly
2b
5
EN
4
3
1a
3
8
7
1b
2a
The components
4 Microscope carrier
1a 300mm-long column with motor-focus mechanism
5 Optics carrier
1b Inclinable carrier rod with motor focus
6 Transformer (not illustrated)
2a Incident- or transmitted-light stand
7 Handswitch
2b Large swinging-arm stand
8 Footswitch
3 Lower stop
9 PC interface kit (not illustrated)
7
Assembly
Connecting the motor focus
Incident- or transmitted-light stand
Column with motor-focus mechanism ➜ base of stand
Using three Allen screws, secure the column to the
incident- or transmitted-light base (refer to user manual
for stereomicroscope or macroscope).
Using the clamping screw, secure the lower stop to the
column, taking the position of the object into account
(see page 9).
1
Large swinging-arm stand
2
Fit the inclinable carrier rod to the horizontal arm in
accordance with the user manual for the stereomicroscope
or macroscope.
3
Using the clamping screw, secure the lower stop to the
carrier rod (see page 9).
Microscope carrier ➜ column with motor-focus mechanism
Using an Allen screw, secure the microscope
carrier to the column of the stand (refer to user manual for
stereomicroscope or macroscope).
1 Connector for transformer
2 Connector for footswitch or for PC interface kit
3 Connector for manual control
Fit the optics carrier, binocular tube and accessories
to the stereomicroscope or macroscope in accordance
with the user manual.
Transformer
Respect the directions for safety on pages 4 and 5.
Technical data
Type MST31
Input voltage
Input frequency
Input current
85 to 264 VAC
47 to 440 Hz
max. 0.80 A at 115 VAC
max. 0.50 A at 230 VAC
Operating voltage
30V
Operating temperature
+10°C to +40°C
Storage temperature
–20°C to +55°C
Maximum mechanical loading 12 kg
8
Connect the transformer to the motor-focus mechanism.
Connect the power cable to the electricity supply.
Connect the manual control and/or footswitch.
If appropriate, connect the PC interface kit instead
of the footswitch.
Use
Safety measures for the stops
Read the warnings on page 5.
•
The fixed stop (5) on the upper part of the column, and
the adjustable stop (6) beneath the motor housing, limit the
movement of the motor-focus system.
•
In addition, there is an end-switch (7) on top of the motor
housing and another one beneath it. If, during focusing,
an end-switch touches the stop, there is a series of beeps
and the movement ceases.
5
7
4
Set the lower stop
•
so that your hands have enough room between
the objective and the object, even when the motor-focus
system has reached the stop
•
so that during focusing the objective cannot press against
the object and damage either objective or object.
EN
Place the object beneath the objective.
Look into the eyepiece and carefully bring the object into
6
8
focus using the manual control (see page 10), the footswitch
or the PC (see page 10).
Use the clamping screw (8) to secure the lower stop beneath
the motor housing.
Focusing
Footswitch
Switching on and off
Switch on the motor-focus system (switch 4).
•
Confirmation by acoustic signal.
Acoustic signal
There is an acoustic signal when:
•
the system is switched on (one short beep)
•
there is a changeover between coarse and fine focusing (one
short beep)
•
the focus position is stored (two short beeps)
•
the focus position is cancelled (two short beeps, pause,
two long beeps)
•
the stop is reached (series of beeps)
16
15
To switch off the acoustic signal
When switching on the system, press switch 11 or 12 on the
manual control (see page 10), or activate the footswitch.
•
To focus using the footswitch: Left-hand switch (15) = up;
right-hand switch (16) = down.
•
To change between fast- and fine focusing: Press left-hand
and right-hand switches at the same time.
•
Focus positions cannot be stored by means of the
footswitch.
9
Handswitch
Storing the focus position
11 12
10
•
Focus positions can be stored only by means of the
manual control or the PC.
•
A maximum of five focus positions can be stored.
•
If a sixth focus position is stored, the one nearest to it will be
cancelled.
•
Each focus position can be cancelled individually.
•
The system will travel to each of the individual focus
positions in the sequence in which they were stored.
•
Switching off the system cancels all of the stored
focus positions.
Place the object beneath the objective.
Set the lower stop (see page 9).
Focus on the first point in the object.
Press the black switch (12) for at least 1.5 seconds.
10 Rotary knob for focusing
11 Red switch for alternating between coarse and
fine focusing
12 Black switch for storing or cancelling up to five focus
positions and for travelling to the stored positions
The storage is confirmed by two short beeps.
Focus on the second point in the object and store
in the same way.
Focus and store up to five points in the object.
Travel to the stored focus positions
Focusing with manual control
Briefly press the black switch (12).
Respect the safety notes on pages 4 and 5.
•
Focus with the red rotary knob (10): Anticlockwise = down;
clockwise = up.
•
Change between coarse (rapid) focusing and fine focusing by
briefly pressing the red switch (11).
•
When the system is first switched on, the rapid focusing
mode is active.
10
To cancel the focus positions
Keep the black switch (12) pressed until you hear two short
beeps, a pause, and two long beeps.
Focusing with the PC
•
In addition to a standard PC with RS232 interface,
you need a PC interface kit from Leica.
•
The individual functions and commands are described
in a separate user manual for the PC interface kit.