1
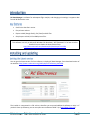
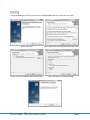
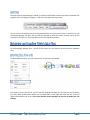
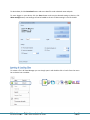
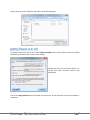
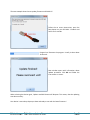
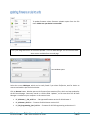
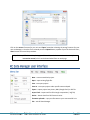
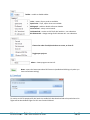
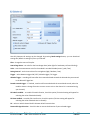
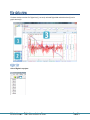
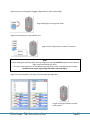
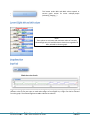
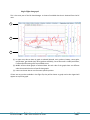
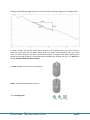
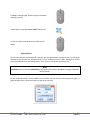
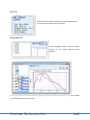
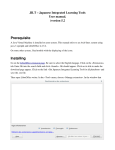
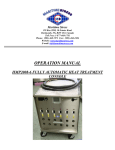
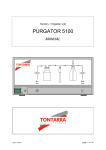
Key features .............................................................................................................................................. 3 Getting the latest version ......................................................................................................................... 3 Installing .................................................................................................................................................... 4 Updating.................................................................................................................................................... 5 Obtaining files from units ......................................................................................................................... 5 Opening & loading files ............................................................................................................................. 6 Updating firmware on RC units................................................................................................................. 7 Updating firmware on old RC units........................................................................................................... 9 Menu bar................................................................................................................................................. 10 OLC Download..................................................................................................................................... 11 RC Altimeter #3 ................................................................................................................................... 12 Toolbar .................................................................................................................................................... 13 Flight list .................................................................................................................................................. 14 Current flight MIN and MAX values ........................................................................................................ 16 Graph section .......................................................................................................................................... 16 Graph tab ............................................................................................................................................ 16 Info tab ................................................................................................................................................ 22 Multigraph tab .................................................................................................................................... 22 RC Data Manager is software for subsequent flight analysis, and changing unit settings. It supports data from all RC Electronics units. Small in size but fast in action. Easy to learn and use. Export to KML (Google Earth), CSV (Excel) and IGC files. Graph export to PNG, JPG or BMP picture files. Note! This software runs only on Microsoft Windows OS. Mandatory .NET framework 3.5 or later must be installed. You can obtain the latest version from: http://www.microsoft.com/download/en/details.aspx?id=17851 You can get the latest version of all our software, including RC Data Manager, from download section of our website: http://www.rc-electronics.org/index.php?link=software_download. The installer is compressed in a ZIP archive, therefore you may need additional software to unzip it. If you don’t have zip software, you can use open source software called 7-zip (http://www.7-zip.org). After downloading the zip file, unzip it and run SetupRcDataManager.exe. Follow the next steps: Step 1: Click Next. Step 2: Accept the license agreement and click 'Next'. Step 3: Set up an installation path and click Next. Step 4: Review the installation settings. Step 5: Click Finish. Once you have RC Data Manager installed, you will be notified about new versions when released by the program itself. A blinking note appears in the menu bar, right next to the menu. You can click on the blinking note to directly download the new version and install it. You will have your old RC Data Manager still open, but you will be prompted to allow the installer to close it prior to new installation. Follow the on screen guidance to finish the update procedure. RC Data Manager supports .fltm, .flt and .fl3 files, which you can obtain from RC Electronics hardware units. To obtain data from units, you can use menu bar or device icon on toolbar. You need to connect the unit to your PC with the supplied USB cable first and left click on the device icon after. New window opens where you can download or erase flight data from the unit. Pilot and flight name template can be set. In the same window, device manager can be used to modify the unit settings. To obtain data, click the Download button and save a data file under a desired name and path. To erase logger on your device, click the Erase button and to write selected settings to device, click Write settings button, note settings will not be loaded to the unit if 'Write settings' is not left clicked. To review a file in RC Data Manager you can simply open it with double click or load it from the menu bar or device icon on toolbar. You can then search for a flight file and load it into RC Data Manager: To update firmware on your RC unit, select Update available button from the Device menu (if enabled and blinking, otherwise your firmware is up to date). Window similar to this one opens with list of current and earlier firmware versions with descriptions. Click on the Begin update button and follow the instructions, do not disconect the unit untill update is completed. The next example shows how to update firmware on RC Multi 2! Follow the on screen insturctions, press the boot button on your RC Multi 2 module and hold it for 3 seconds. Progress bar illustrates the progress. Usually it takes about 10 seconds. New window opens with information about update procedure. Click OK and follow the instructions on screen. When selecting the Device again, 'Update available' button will disapear. This means, that the updating was done correctly. Your device is now always kept up to date and ready to use with the latest firmware! To update firmware select Firmware uploader option from the File menu. Make sure your device is connected! This is just integrated version of Firmware Uploader v 1.2 in RC Data Manager. You can use also standalone version available from our web page. New window opens. Select the correct COM port, which can be easily found if you select File/Device, wait for device to connect and read the port from the title bar. Click on Browse button. Window opens with firmware (hex extension) files, which are kept updated by the RC Data Manager. Commonly stored in a folder called ‘Updates’, on the same drive the RC Data Manager is installed on your computer. In this case we have: RC_Altimeter_2_FAI_v015.hex -- FAI approved firmware version for RC Altimeter 2. RC_Altimeter_v215.hex -- firmware for RC Altimeter version 2.15. RC_FXJ_Programming_Card_v15.hex -- firmware for RC FXJ Programming card version 1.5. Click on the correct firmware for your unit and 'Open' remember selecting the wrong firmware for your unit can damage it. Once the file is selected press the Upload button, update of your RC device will start; Abort button will cancel the procedure. If you find any difficulties with updating your RC module, read the instruction written in Update instruction manual, which can be downloaded from our web page. New – create a new blank project. Open – open existing flight file. Save – save open project. Save As – save open project under specific name and path. Export – export project into picture, KML (Google Earth) or IGC file. Import Task – import task for GPS triangle competition (*.afg file) Device – obtain data from RC Electronics units. Firmware uploader – copy new firmware to your connected RC unit. Exit – exit RC Data Manager. Toolbar – enable or disable toolbar. Units – meters, feet or yards are available. Speed units – km/h, mph or knots are available. Multigraph – enable or disable reference altitude. Vario interval – set up a vario interval. OLC download – receive an IGC file for OLC web site – see subsection. RC Altimeter #3 – change settings for RC Altimeter #3 – see subsection. Choose the order of multiple windows on screen, or close all. Toggle open projects. About – shows program version info. News – opens the latest news about RC Electronics (enabled and blinking only when you have unread news waiting). To receive an IGC file prepaired for OLC web site, enable OLC data download and select path where this flights will be downloaded. Flights for OLC must contain GPS data! Here RC Altimeter #3 settings can be changed. By pressing Read settings button, you can download settings file (default is settings.ini) from your SD card. Pilot – change the name of the pilot. Low voltage alarm – set value for the low voltage alarm (when light for low battery will start blinking). Units – sets the measurement units for the module's recorded altitude (meter / yard / feet). Saving interval – set the interval time for saving data (High / Medium / Low). Trigger – select between trigger ON / OFF / Altitude trigger / RC trigger. Altitude Trigger – recording will start after the measured altitude exceeds the altitude that you entered in the Altitude Trigger box. Record external trigger – if checked, a marker will be recorded with the next altitude record, when the module detects a change from min to max or max to min on the channel it is connected to (eg your throttle) FXJ switch enabled – to enable FXJ switch function, check this option (FXJ switch setting will appear for selecting the value of desired altitude). FXJ time enabled – to enable FXJ time function, check this option (FXJ time setting will appear for selecting the value of desired time in seconds). RF – select on which channel the RC Altimeter #3 will transmit data. Reverse RC triger direction – check this box to reverse the direction of your selected trigger. By pressing Write settings button, you can save settings file to your SD card. Settings file must always have the same name as previous and ini extension (default is settings.ini). Otherwise RC Altimeter #3 will not be able to read settings from SD card. New – creates a new blank project. Open – open an existing flight data file. Device – open a Device manager window (see section “Obtaining files from units”). Save – save currently opened and selected file. Export to image – export currently selected graph to .png, .jpg or .bmp picture file. Export to Google Earth – export currently selected flight data to .kml file. Export to IGC – export currently selected flight data to .igc file. Export to CSV – export currently selected flight data to .csv file. Offset – sets a selected point to a starting point (altitude and time to 0). Chop – cuts a flight into pieces at selected points. File data window consists of a flights list(1), currently selected flight MIN and MAX values(2) and a graph section(3). A list of flights in a project: Flights order can be changed by dragging a flight before or after another flight. Drag & drop flights to change their order. Flights can be renamed or removed from a list. Right click on a flight name to rename or remove it. Note! 1. When holding the SHIFT key while removing a flight, the warning DOES NOT appear and the selected flight is removed without any notice. 2. The last remaining flight on the list can’t be removed. Please create a new blank project instead. Consider to back up the original flight files before removing flights. Flights can be put together in one project from multiple open flight files. Drag & drop flights between multiple open projects. This button under MIN and MAX values expands or retracts graph section for easier multiple-project (reviewing, merging,…) collapses the manageme Note! These values are minimum and maximum values of currently selected flight only! All available data is shown here regardless of data, selected to show on graph. Flight Overview Graph Flight overview graph shows the altitude of all flights in a currently selected project. Each flight has different color so they are easier to read and manage. As from flights list, a flight can also be selected from this graph. The selected flight turns red to indicate its selection. Single Flight data graph This is the main part of the RC Data Manager. It shows all available data that is obtained from the RC units. 1 2 3 (1) In upper row, data to show in graph is selected (altitude, vario, markers, battery, servo pulse, temperature, gps altitude (only when gps data available), current file name is visible (with offset, if selected) and zooming tools are available to use. (2) Middle section shows graphs of selected data. On each side of the graph there are different scales that match the color of specific data graphs. (3) Lower row shows data on current mouse pointer position. If there are any markers available in the flight file, they will be shown on graph and a color legend will appear on top of the graph. Climbing or descending average speed can easily be shown by drawing triangle over an altitude graph. To draw a triangle, click the left mouse button anywhere on the graph to get a start point and then move the mouse. Start and end points always stick to the graph, vertically aligned with your mouse cursor. To select end point, click the left mouse button again. A triangle is now drawn, showing time, altitude and average climbing / descending speed calculated with altitude over time. To discard the triangle, double-click the left mouse button. To zoom in or out, use the mouse scroll wheel or draw a rectangle around desired zoom area or use zooming tools. To move a zoomed graph, hold the right mouse button and drag it around. To fit a flight into a graph (zoom = 100%) use this icon, or click on the third mouse button (normally a scroll wheel). Offset function This function sets time and altitude off. It actually sets the selected point in graph to zero. The only data affected by this function are altitude and time, to be modified to user’s needs. Although the whole graph gets shifted in time, everything before “zero” time can still be seen by zooming out. Note! FAI altitude value (if available) DOES NOT get affected by this function regardless of changes made with Offset function. To use the Offset function, click the Offset Icon in toolbar, and left-click on a desired point in graph. A popup window opens, where the offset can also be set manually. After the offset is applied, its values appear in brackets next to the flight name. Example for offset: To reset the graph into the original state, click the Offset icon again, select any point in graph and click the Reset to default button. Chop function The Chop function does exactly what its name says. It chops - divides a flight into several flights. The quantity of those is user defined by a number of points selected + 1, so 3 points make 4 flights, etc. New flights inherit the old flight name where additionally underscore and a sequence number are added. Note! Once divided, flights can’t be merged into one flight again. Please consider to back up the original flight files before using the Chop function. To use this function click the Chop icon in toolbar and select desired points in graph. To delete a point, simply click on it again and it will disappear. When finished choosing new points, click the Finish chopping button. You can cancel the process, by clicking the Cancel chopping button. After flight is chopped, new flights will be visible in a flights list and a flight overview graph. Information about flight is shown in Info tab of graph section. You can also write some note for the flight. With multigraph function, multiple altitude graphs can be shown together when selected. Zooming procedure is the same as with single graph, MIN & MAX values of selected flight are also visible on the bottom left side of the screen. April 2012 April 2012 January 2013 Initial release of user manual. Added chop and offset description. Added import task, OLC download, upload firmware, altimeter #3 settings