1
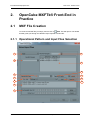
USER MANUAL OpenCube MXFTk® Front-End 2.6 Copyright EVS Broadcast Equipment SA – Copyright © 2005-2013. All rights reserved. This publication, including all photographs, illustrations and software, is protected under international copyright laws, with all rights reserved. Neither this user manual, nor any of the material contained herein, may be reproduced without written consent of the author. Disclaimer The information provided in this user manual is "as is" and without warranty of any kind, expressed or implied, including those of merchantability and fitness for a particular purpose, or arising from a course of dealing, usage or trade practice. This user manual is for informational use only and subject to change without notice. While every effort has been made to ensure that the information contained in this user manual is accurate, up-to-date and reliable, EVS Broadcast Equipment SA makes no warranties or representations regarding the accuracy or completeness of the information. In no event shall EVS Broadcast Equipment SA or any of its affiliates be liable for any damage, including incidental or consequential damages, lost profits, or lost data, or any indirect damages even if EVS Broadcast Equipment SA or any of its affiliates have been informed of the possibility thereof. Trademark Recognition All product names used in this manual are the properties of their respective owners and are acknowledged. This product includes software developed by the OpenSSL project for use in the OpenSSL toolkit (www.openssl.org). This product includes software developed by the Apache Software Foundation (www.apache.org). Improvement Requests Your comments will help us improve the quality of the user documentation. Do not hesitate to send improvement requests, or report any error or inaccuracy in this user manual by e-mail to [email protected]. Regional Contacts The address and phone number of the EVS headquarters are usually mentioned in the Help > About menu in the user interface. You will find the full list of addresses and phone numbers of local offices either at the end of this user manual (for manuals on hardware products) or on the EVS website on the following page: http://www.evs.com/contacts User Manuals on EVS Website The latest version of the user manual, if any, and other user manuals on EVS products can be found on the EVS download center, on the following webpage: http://www.evs.com/downloadcenter I EVS Broadcast Equipment S.A. Issue 2.6.A October 2013 The present document shall be governed by Belgian law. In case of a dispute, all parties shall submit to the exclusive jurisdiction of the court of Liège. II USER MANUAL OpenCube MXFTk® Front-End 2.6 Table of Contents TABLE OF CONTENTS ............................................................................ III REVISION HISTORY................................................................................. V 1. PRELIMINARIES ................................................................................. 1 1.1 MXF File Format ..........................................................................................................1 1.2 OpenCube MXFTk® Front-End Installation .................................................................1 1.2.1 Windows Platform............................................................................................1 1.2.2 Linux Platform ..................................................................................................1 1.2.3 Apple Platform .................................................................................................2 1.2.4 OpenCube MXFTk® Front-End Activation ......................................................2 1.3 OpenCube MXFTk® Front-End Overview ...................................................................2 2. OPENCUBE MXFTK® FRONT-END IN PRACTICE ........................... 4 2.1 MXF File Creation ........................................................................................................4 2.1.1 Operational Pattern and Input Files Selection .................................................4 2.1.2 Single and Multi-file Selection .........................................................................7 2.1.3 Output File Selection – Standard Operational Patterns ..................................9 2.1.4 Output File Selection – Atomic Operational Patterns ....................................10 2.1.5 Source and Output Package Edition .............................................................11 2.2 MXF File Browsing .....................................................................................................12 2.2.1 File History.....................................................................................................12 2.2.2 File Packages ................................................................................................13 2.2.3 Data Tracks ...................................................................................................14 2.2.4 Metadata Tracks ............................................................................................15 2.2.5 Framework Sets ............................................................................................16 2.2.6 Set Properties ................................................................................................16 2.3 Package Timecode and Metadata Edition .................................................................17 2.3.1 New Metadata Track .....................................................................................18 2.3.2 Remove Metadata Track ...............................................................................18 2.3.3 Add Metadata Segment .................................................................................18 2.3.4 Remove Metadata Segment ..........................................................................19 2.3.5 Replace Framework ......................................................................................19 2.3.6 Add Metadata ................................................................................................19 2.3.7 Edit Metadata ................................................................................................20 2.3.8 Remove Metadata .........................................................................................20 2.4 Partial Restore ...........................................................................................................21 2.5 DCP Creation .............................................................................................................22 2.6 IMP Creation ..............................................................................................................28 III USER MANUAL OpenCube MXFTk® Front-End 2.6 Revision History Preliminaries Document Version Revision Date Author Change Description 2.6. A 10-Oct-2013 VPO Update user manual to OpenCube MXFTk® Front-End 2.6 V USER MANUAL OpenCube MXFTk® Front-End 2.6 1. Preliminaries 1.1 MXF File Format MXF (standing for Material eXchange Format) is a file format aiming to improve data and metadata exchange. The targeted objective is the interoperability between content creation mainframes, work stations and peripherals. This wrapper file format was designed to make use of current and forthcoming data formats. Hence, it not only allows exchange of contents in MPEG, DV or else but also improves interoperability between editing systems. In the meantime, it also permits conveyance of metadata following standardized schemes. 1.2 OpenCube MXFTk® Front-End Installation 1.2.1 Windows Platform If you received OpenCube MXFTk® Front-End on a CD, insert it in your CD drive. The installation should start automatically. If not, open an explorer window and look for the executable “Setup.exe” and launch it. During the installation procedure, your antivirus software may warn you about the execution of Windows scripts. You may safely ignore these warnings. 1.2.2 Linux Platform Unzip the file and create the destination directory '~/MXFTkFrontEnd'. > unzip MXFTkFrontEnd-2.5.0.zip > mkdir ~/MXFTkFrontEnd Launch the script to install the « License Key Manager » software into the '~/MXFTkFrontEnd' directory. > OCPackage/Linux/KeyManager-2.5.0.sh --prefix=$HOME/MXFTkFrontEnd -exclude-subdir Launch the script to install the « MXFTk® Front-End » software into the '~/MXFTkFrontEnd' directory. > OCPackage/Linux/MXFTkFrontEnd-2.5.0.sh --prefix=$HOME/MXFTkFrontEnd -exclude-subdir Set the MXF_HOME_FRONTEND variable and launch the « License Key Manager » software. > MXF_HOME_FRONTEND=~/MXFTkFrontEnd ~/MXFTkFrontEnd/bin/licensekeysmanager Click on the « Load license file » button. Select the file which is in the 'OCPackage/Licenses' directory. Preliminaries 1 EVS Broadcast Equipment S.A. Issue 2.6.A October 2013 Quit the « License Key Manager » software. You can know execute the 'MXFTkFrontEnd' software. > ~/MXFTkFrontEnd/bin/mxftkfrontend 1.2.3 Apple Platform OpenCube MXFTk® Front-End comes as a self-extractible archive. Double-click on OpenCube MXFTk® Front-End package to launch the installation. The default installation path is in the “Applications” directory however you may choose to install it elsewhere. If you have not installed OpenCube MXFTk® Front-End in the default installation path, you have to set an environment variable: o MXF_HOME_FRONTEND which should contain the path to the root directory of your OpenCube MXFTk® Front-End installation directory. o (installation_directory/MxfTkFrontEnd.app/Contents/SharedSupport/MxfTk). 1.2.4 OpenCube MXFTk® Front-End Activation OpenCube MXFTk® Front-End requires a valid license key to work. Temporary license keys for evaluation purpose are available from EVS OpenCube’s website (http://www.evsopencube.com). After creating an account there, you will get access to a download area where you will be able to retrieve a one-month license key file. If you purchased OpenCube MXFTk® Front-End you should have received a permanent license key file. To enable your software, you will need to install the OpenCube Key Manager also freely available for download and load your license file in this application. After agreeing to the license you will be ready to start working with OpenCube MXFTk® Front-End. 1.3 OpenCube MXFTk® Front-End Overview OpenCube MXFTk® Front-End is an application built on top of OpenCube MXFTk® C++ OEM SDK library for Linux, Mac OS X and Windows operating systems. It enables wrapping of MXF files embedding your audiovisual material, MXF file unwrapping, partial restore of MXF files and metadata update. OpenCube MXFTk® Front-End can read and partial restore all normative files ranging from Op1a to Op3c as well as OpAtom operational patterns. It can create MXF files following operational patterns Op1a to Op2b and OpAtom. It also includes support of SONY eVTR, XDCam, Panasonic P2, Panasonic AVC-LongG and Avid files. OpenCube MXFTk® Front-End was built to demonstrate the main features of MXF and all of them can be automated using OpenCube MXFTk® C++ OEM SDK library. 2 Preliminaries USER MANUAL OpenCube MXFTk® Front-End 2.6 1 2 3 5 4 6 7 Part Description 1 Menu and dockable toolbar. 2 File History Overview. Displays the time of edition, the product used to edit the file and also mentions the operational pattern. 3 Packages Overview. Displays the packages of the file. 4 Data tracks Overview. Displays the tracks of the selected package. 5 Metadata tracks Overview. Displays the metadata tracks of the selected package. 6 7 Preliminaries Framework Sets Overview. Displays the metadata tree of the selected metadata track. Set Properties Overview. Displays the properties of the selected metadata set. 3 EVS Broadcast Equipment S.A. Issue 2.6.A October 2013 2. OpenCube MXFTk® Front-End in Practice 2.1 MXF File Creation To create a new MXF file you simply need to click on New. This will open a new wizard that will guide you through the different steps required to build a file. 2.1.1 Operational Pattern and Input Files Selection 1 8 2 9 10 3 11 4 12 5 13 6 7 4 OpenCube MXFTk® Front-End in Practice USER MANUAL OpenCube MXFTk® Front-End 2.6 This page lets you select the operational pattern (Op) of the file and the media files you want to embed. The drop-down box (1) is a list of operational patterns available for creation. You will also find here some predefined manufacturers patterns that are heavily used (SONY eVTR, XDCam IMX, XDCam DV, XDCam proxy and Panasonic P2/AVCLongG files). The choice of the operational pattern depends on what you want to do with the MXF file: Op1a: the most common operational pattern. It is used to embed media files in an MXF file and play them all together simultaneously and in their entirety. These files contain a single source package where the media files are stored and a single material package representing the output of the file. Consequently, the number of parallel and play-list packages is forced to 1 and cannot be changed. OpZero: this is an Op1a file with a single meda track and structure constraints to ensure play while record capability. Op1b: these files contain at least two source packages and a single material package referencing all the source packages. All the source packages are played simultaneously. Consequently, the number of parallel packages cannot be lower than 2 and the number of play-list packages is forced to 1. Op2a: these files contain at least two source packages and a single material package referencing all the source packages. The source packages are played one after the other. Consequently, the number of parallel packages is forced to 1 and the number of play-list packages cannot be lower than 2. Op2b: these files contain at least four source packages and a single material package referencing all the source packages. This is a combination of Op1b and Op2a where a set of source packages is played simultaneously and is then followed by another set of source packages played simultaneously. Consequently, the number of parallel and play-list packages cannot be lower than 2. OpAtom: OpAtom files are MXF files embedding a single source and a single material package. On top of this, the source package should only contain a single media file. However, the material package is representing a combination of several OpAtom files in order to build a complete editing. When you create OpAtom files you should keep in mind that one MXF file will be created for each media file you provide and the files should remain altogether to be played later on. Similarly to standard operational patterns, it is possible to create OpAtom1a, OpAtom1b, OpAtom2a and OpAtom2b files. DCP (SMPTE): DCP files are OpAtom files compliant with the SMPTE429 standards relative to DCI distribution package MXF files. DCP (Interop): DCP files modified to be compliant with some manufacturer’s DCinema servers. eVTR: this will create an Op1a file following the exact properties of a SONY eVTR file. You will need to provide one IMX sequence (30, 40 or 50 Mb/s) and one 8channel AES audio file. XDCam IMX: this will create an Op1a file following the exact properties of a SONY XDCam Optical IMX file. You will need to provide one IMX sequence (30, 40 or 50 Mb/s) and one 8-channel AES audio file. XDCam DV: this will create an Op1a file following the exact properties of a SONY XDCam Optical DV file. You will need to provide one DV IEC sequence and four 1channel AES file or four 1-channel WAV files. XDCam Proxy: this will create an Op_pd_proxy (Professional Disc Proxy) file following the exact properties of a SONY XDCAM MPEG4 proxy file. You will need to provide one MPEG4 file and four A-law (embedded in WAV) files. OpenCube MXFTk® Front-End in Practice 5 EVS Broadcast Equipment S.A. Issue 2.6.A October 2013 XDCam HD: this will create an Op1a file following the exact properties of a SONY XDCam Optical HD file. You will need to provide one MPEG2 HD following Sony’s requirements and 4 or 8 audio channels depending on the profile. P2: this will create a set of 3 or 5 OpAtom1b files following the exact properties of Panasonic P2 files. You will need to provide 1 DVCPro (25, 50 or 100 Mb/s) file or 1 AVC-Intra (50 or 100Mbps) file and two or four 1-channel AES audio file or two or four 1-channel WAV files. Panasonic AVC-LongG: this will create an Op1b file following the exact properties of Panasonic AVC-LongG file. You will need to provide 1 AVC/H.264 file, an optional ancillary file and a number of 1-channel AES/WAV audio files. XDCam IMX SxS: this will create an Op1a file following the exact properties of a SONY XDCam SxS IMX file. You will need to provide one IMX sequence (50 Mb/s) and one 8-channel AES audio file. XDCam DV SxS: this will create an Op1a file following the exact properties of a SONY XDCam SxS DV file. You will need to provide one DV IEC sequence and four 1-channel AES file or four 1-channel WAV files. XDCam HD SxS: this will create an Op1a file following the exact properties of a SONY XDCam SxS HD file. You will need to provide one MPEG2 HD following Sony’s requirements and 4 or 8 audio channels depending on the profile. Avid OpAtom: This will create OpAtom files. These MXF can be natively edited by an Avid editing system. Avid OpAtom AMT: Same as Avid OpAtom but uses Avid Media Toolkit (AMT) provided by Avid instead of OpenCube implementation. AS-02: this will create an AS-02 MXF file. AS-02 is an Application Specification defined by the American Media Workflow Association (AMWA) aiming at creating a factory format. AS-03: this will create an AS-03 MXF file. AS-03 is an Application Specification defined by the American Media Workflow Association (AMWA). It defines a vendorneutral subset of the MXF Op1a file format. AS-11: This will create an AS-11 MXF file. AS-11 is an Application Specification defined by the American Media Workflow Association (AMWA). It defines a vendorneutral subset of the MXF Op1a file format. You will need to provide one IMX or AVCIntra sequence and audio files. AS-11 (UK DPP): This will create an AS-11 MXF file compliant with the UK DPP Shim. IMF Essence Component: This will create an IMF MXF file compliant with the SMPTE ST2067-2 Core Constraints. After choosing the operational pattern you can adjust the number of parallel packages (the number of source packages that will be played simultaneously) with the control box (2) and the number of play-list packages (the number of source packages that will be played sequentially) with the control box (8). The view (9) is a summary of the material package of the MXF file. It represents the output timeline of your MXF file. In the drop-down box (4) you can select one of the source packages and edit its content. In the list box (6) you will find a summary of the media files embedded in the current package. You can remove some of them by selecting them and clicking on Remove (12). In order to add a media file to that package, click on Add (13). This will open a new dialog where you will be able to select a single file sequence (dv, dif, mpg, imx, etc.) or a multifile sequence (j2k, bmp, etc.). 6 OpenCube MXFTk® Front-End in Practice USER MANUAL OpenCube MXFTk® Front-End 2.6 You can also set the default edit rate (3) for the media where this information cannot be directly retrieved from the media itself (audio, still images). You may also choose not to embed the media files in the MXF file but instead to access them as an external reference. In this case, you should check the check box (5). Only one external reference per package is allowed. You can perfectly place an external reference on an existing MXF or on a media file. Finally, each media file you embed can be encrypted to protect its content. To do so, select the package you want to encrypt and check the Crypted (11) box. Then you can select each of the source files from the package and define the cryptographic and cipher key (7) that will be used for the encryption. The cryptographic key will be public and stored explicitly in the MXF file metadata. However, the cipher key will be private and will be required upon decoding of the MXF file. 2.1.2 Single and Multi-file Selection If you select Single file it will open a browser window where you will be able to select the media file you want to insert in the currently selected package. OpenCube MXFTk® Front-End supports the following formats: DVCam, DVCPro 25, 50 and 100 Mbps, D10, MPEG 2 Video and Audio Elementary Stream, MPEG 2 Program Stream, MPEG 2 Transport Stream, MPEG 4, H.264, AVC-Intra, Wave, Broadcast Wave, AES, A-law. If you select Still images it will open the following dialog box: OpenCube MXFTk® Front-End in Practice 7 EVS Broadcast Equipment S.A. Issue 2.6.A October 2013 1 2 3 4 This dialog box is designed so that you can select a series of still images that will be stored in the same directory and that are also numbered sequentially. You first need to select the directory where the files are located. This step is performed by selecting the Browse button (1). Once the selection is performed, the drop-down boxes (2) will be refreshed and there you will be able to select the basename and extension of the files to be inserted. Finally, in the “Range” control you will be able to set the number of the first and last images as well as the step and the number of digits in the filename sequence. For instance, in the previous screenshot the following series of file will be used: C:/valid/test/sequence0002.j2k C:/valid/test/sequence 0004.j2k C:/valid/test/sequence 0006.j2k … C:/valid/test/sequence 0498.j2k C:/valid/test/sequence 0500.j2k 8 OpenCube MXFTk® Front-End in Practice USER MANUAL OpenCube MXFTk® Front-End 2.6 2.1.3 Output File Selection – Standard Operational Patterns This page will open if you have chosen to create a SONY, Op1a, Op1b, Op2a or Op2b file. It will let you select the path of the output MXF file. Click on the Browse button to open a browser window and select the path where you want to create the MXF file. OpenCube MXFTk® Front-End in Practice 9 EVS Broadcast Equipment S.A. Issue 2.6.A October 2013 2.1.4 Output File Selection – Atomic Operational Patterns This page will open if you have chosen to create a Panasonic, OpAtom_1a, OpAtom_1b, OpAtom_2a or OpAtom_2b file. In that case, several MXF files will be created. Click on the Browse button to open a browser window and select the output directory. You can then type the base name that will be used to name the resulting MXF files. The resulting filenames will correspond to the base name followed by the package coordinates used in the previous page (i.e. MyOpAtomFile-1-1, MyOpAtomFile-1-2, MyOpAtomFile-2-1, MyOpAtomFile-2-2). Note In the case of Panasonic P2 files the base name must be exactly 6-character long and a directory “Contents” will be created similarly to what would produce the camcorder. 10 OpenCube MXFTk® Front-End in Practice USER MANUAL OpenCube MXFTk® Front-End 2.6 2.1.5 Source and Output Package Edition This page lets you redefine the name, timecode and descriptive metadata of your output and source packages. Click on Edit to open the package edition dialog in order to set the timecode and/or add descriptive metadata to your package. For further information about package edition, please refer to the chapter Package Timecode and Metadata Edition. You are also given the opportunity to rename your packages in the appropriate line edit box. If you do not want to edit the packages, OpenCube MXFTk® Front-End will generate a default name and timecode so you can also choose to safely skip this step. Finally, click on Finish to launch the MXF file creation. After processing, the resulting MXF file will be automatically loaded in the main window. OpenCube MXFTk® Front-End in Practice 11 EVS Broadcast Equipment S.A. 2.2 Issue 2.6.A October 2013 MXF File Browsing To open an MXF file you simply need to click on Open. This will launch a new dialog where you will be able to select the file to be displayed in OpenCube MXFTk® Front-End main window. If you wish to open a set of OpAtom files – and notably Panasonic P2 files - you should click on Open OpAtom instead. This will display a new dialog where you will be able to select several MXF files. OpAtom files are a set of MXF files linked together by a common editing (material package). Therefore, an OpAtom file opened alone misses some of the information stored in its linked files. As a result, when opening such files with OpenCube MXFTk® Front-End you should load the whole set of OpAtom files. If you wish to open Panasonic P2 files and if these files are stored in their standard directory structure, you simply need to select one of them and OpenCube MXFTk® Front-End will automatically find and load its associated files. After opening an MXF file, the main window is refreshed to display its content. If you wish to open the different DCP mxf files composing a DCP, you should click on Open DCP. A window asks you to choose the folder containing your DCP files. Then all mxf files found in this folder will be opened. To play the MXF file in the OpenCube XFReader or Windows Media Player you may click on Play (feature available only on Windows platform if you have installed MXFTk Reader). Finally, you may extract the whole metadata tree of this MXF file by clicking on Output XML. 2.2.1 File History This view displays the current MXF version of the file and its operational pattern. Then each line of the view lists chronologically the changes that occurred. It mentions the date of modification, the company, the product, the product version and the platform used at the time of update. 12 OpenCube MXFTk® Front-End in Practice USER MANUAL OpenCube MXFTk® Front-End 2.6 2.2.2 File Packages This view draws the list of all the packages included in the file. You may find two types of packages in an MXF file: Output (Material) Package: A material package represents an output of the file. This is a set of tracks built as a combination of the source packages. Most MXF files contain a single output, however highest operational patterns (Op1-2-3c) allow several output packages. Source Package: A source package represents the audiovisual material of the file. This is a set of tracks referring to the video, audio or data embedded in the file. It contains detailed information on the media. Additionally, MXF provides mechanisms for timecode and descriptive metadata annotation of packages. OpenCube MXFTk® Front-End main window lets you visualize this information. Clicking on a package will display its content in the main window. Furthermore, this version of OpenCube MXFTk® Front-End lets you manipulate and modify the packages at will. In order to redefine the timecode or update the metadata tracks of a package you can click on Edit Package (refer to the chapter Package Timecode and Metadata Edition for a complete overview of this feature). OpenCube MXFTk® Front-End in Practice 13 EVS Broadcast Equipment S.A. Issue 2.6.A October 2013 2.2.3 Data Tracks This view displays the essence tracks of the package you selected in the previous view. You may find here four different types of tracks: Timecode tracks are used for timecode annotation. You will find information on the origin and duration of the package here. Picture, sound and data tracks. o If you are in a source package, each of these tracks will display a summary of the media they represent. For instance a track may contain PAL DVCPro at 50Mbit/s starting at timecode 00:20:45:00 and having a duration of 5 seconds. Still in a source package, you may extract the content of the track in a media file. After selecting a track, simply click on Extract essence , select the destination file and click on Save to cause the unwrapping of the selected essence. If the track actually contains a series of still image, the “Multi Files” dialog box will open so that you can configure the output name of the files that will be created (please refer to the chapter Single and Multi-file Selection for more information on how configuring the output files) o If you are in an output (material) package, these tracks will display the combination of source packages used to produce the output. This is represented as a concatenation of “source clips”. Each source clip refers to one of the source package in its entirety or to a part of it. You are also given the option to extract the content of a source clip by clicking on Extract essence o 14 . Essence extraction is also available when right-clicking on the track or source clip name. OpenCube MXFTk® Front-End in Practice USER MANUAL OpenCube MXFTk® Front-End 2.6 o Some MXF files (Digital Cinema Intermediate) may contain encrypted data tracks that you will be able to extract only if you provide the right key. To set the key, right click on the protected track from a source package and select SetCipherKey. This will open a dialog box, where will be reminded the public key protecting this track and where you will be asked to set the corresponding private key. Note If you have selected a mono AES3 audio track (as found in SONY XDCam DV or Panasonic P2 files), you are given the option to extract the audio in WAV format instead of AES format. To do so, you simply need to activate Options > Extract AES to WAVE before performing the extraction. 2.2.4 Metadata Tracks This view will be available only if the MXF file contains descriptive metadata tracks. It displays the metadata tracks of the package you selected in the previous view. MXF organizes descriptive metadata in tracks, each track contains one or several metadata segments used to annotate a given time span. Then, each metadata segment contains a descriptive metadata tree following a standardized descriptive metadata scheme. The most commonly used scheme in the MXF world is the Descriptive Metadata Scheme 1 (ST380 - DMS-1) which gives the choice between 3 different metadata trees (also called frameworks) to append to metadata segments. Finally, MXF allows three different types of descriptive metadata tracks, each of them allowing different assembly of metadata segments: Static tracks contain metadata segments referring to the entirety of the package. These tracks do not have origin or duration. Timeline tracks are used to annotate continuously the tracks of the package. They are built as a concatenation of metadata segments. Event tracks are used to annotate sporadically the tracks of the package. Parts of the track may have no metadata segments and metadata segments may overlap. If you right-click on a metadata segment you will be given the option to extract its metadata tree in an XML file. If you select this option a file dialog will open to let you specify the location of the XML file to be created. OpenCube MXFTk® Front-End in Practice 15 EVS Broadcast Equipment S.A. Issue 2.6.A October 2013 2.2.5 Framework Sets This view will be available only if you selected a metadata segment in the previous view. It displays the entirety of the descriptive metadata tree. You may click on a set in order to display its properties in the following view. In order to edit the descriptive metadata sets you may refer to the chapter Package Timecode and Metadata Edition for a complete overview of this feature. 2.2.6 Set Properties This view will be available only if you selected a metadata set in the previous view. It displays the properties associated to this set. In order to edit the properties of a set you may refer to the chapter Package Timecode and Metadata Edition for a complete overview of this feature. 16 OpenCube MXFTk® Front-End in Practice USER MANUAL OpenCube MXFTk® Front-End 2.6 2.3 Package Timecode and Metadata Edition This dialog box is available when clicking on Edit Package in OpenCube MXFTk® Front-End main window or during file creation. It lets you (re)define the timecode and descriptive metadata tracks of the corresponding package. If you are not familiar with MXF, please refer to the chapter Metadata Tracks for a brief overview of the descriptive metadata structure before continuing. The top part of this dialog box displays the current timecode track of the package. You can modify the timecode in, the frame rate as well as the drop frame behavior. The bottom part is a tree view of all the metadata tracks in this package. All the actions that can be undertaken on this view are available with a right-click on the nodes of the tree. You can create and delete descriptive metadata tracks; create and delete metadata segments, append and remove sets and properties from the tree. Finally, after clicking on OK or closing the window, you can save the changes you made to your file at any time by clicking on Save. OpenCube MXFTk® Front-End in Practice 17 EVS Broadcast Equipment S.A. 2.3.1 Issue 2.6.A October 2013 New Metadata Track This feature is available when right-clicking on the background of the metadata tracks view or right-clicking on an existing metadata track. It opens the following dialog box. In the drop-down control box you can set the metadata track type (static, timeline or event) and set the name of the track. The choice of the track type depends on the nature of the metadata you wish to add. If it annotates the package, the most appropriate type is “Static Track”; if it corresponds to particular events occurring in the sequence, the most appropriate type is “Event Track”; finally if it continuously annotates the sequence (for instance updating the shoot location whenever it changes) the most appropriate type is a “Timeline Track”. This step creates a new track but you still need to create metadata segments in order to append metadata to your package. 2.3.2 Remove Metadata Track This feature is available when right-clicking on an existing metadata track. It causes the permanent destruction of the track. 2.3.3 Add Metadata Segment This feature is available when right-clicking on an existing metadata track. A metadata segment is the entity containing a metadata tree. It opens the following dialog box: 18 OpenCube MXFTk® Front-End in Practice USER MANUAL OpenCube MXFTk® Front-End 2.6 There are four fundamental settings to keep in mind when creating a metadata segment: Duration: this is the duration (expressed as a number of frames) of the metadata segment along the metadata track. You should set this value if you are working on an event or timeline track. On a static track the metadata is not related to time annotation. Event tracks allow event of a nil (0) duration and it is perfectly valid to set the duration to -1 if it is unknown. TC IN (timecode in): this is the starting point of the metadata segment along the metadata track. You should set this value if you are working on an event track. On a static track the metadata is not related to time annotation and on a timeline track the segments are appended one after the other so that the TC IN of the following metadata segments corresponds to the TC OUT of the previous segment. Framework: There are three types of predefined frameworks in the Descriptive Metadata Scheme 1 (scene, clip and production). Each of them defines a different metadata dictionary which suits most of the usual needs. You are given the option to create a complete metadata tree corresponding to one of this framework by loading an XML file. Alternatively, if you wish to build the metadata tree step by step using OpenCube MXFTk® Front-End interface you just need to set which kind of framework you want to work with. Comment: This will be stored in the MXF file and should comment the nature of this metadata segment. It will also be displayed in the views of OpenCube MXFTk® Front-End. 2.3.4 Remove Metadata Segment This feature is available when right-clicking on a metadata segment of a timeline or event metadata track. It causes the permanent destruction of the segment. 2.3.5 Replace Framework This feature is available when right-clicking on a scene, clip or production framework node of the tree. It lets you remove the entire framework from the segment and set a new one instead. 2.3.6 Add Metadata This feature is available when right-clicking on a metadata set of a metadata tree. It opens the following dialog box that lets you specify a new property that will be added as a child to the current metadata set. OpenCube MXFTk® Front-End in Practice 19 EVS Broadcast Equipment S.A. Issue 2.6.A October 2013 The drop-down combo box contains the complete list of metadata sets and properties that can be added. The field “Type” is a reminder of the format of the data expected in the field “Value”. 2.3.7 Edit Metadata This feature is available when right-clicking on a metadata set of a metadata tree. It opens a dialog box similar to the previous one. To edit the metadata you can set a new value in the appropriate field. 2.3.8 Remove Metadata This feature is available when right-clicking on a metadata set or property of a metadata tree. It causes the permanent destruction of the tree starting from the selected root. 20 OpenCube MXFTk® Front-End in Practice USER MANUAL OpenCube MXFTk® Front-End 2.6 2.4 Partial Restore This dialog box is available when clicking on Partial restore. Thanks to this feature you will be able to create a new MXF file by retrieving only the part of the file you are interested in. You simply need to specify the TC IN (timecode in) and TC OUT (timecode out) and OpenCube MXFTk® Front-End will create the resulting MXF file for you. The dialog box is initialized with the TC IN and TC OUT corresponding to the whole file. You may change these values in order to define the time span you are interested in. These timecode values are relative to the output package (material). If your MXF file contains several output packages, each of them will be restored. To launch the process you simply need to click the browse button, select the destination file and hit the OK button. Note A partial restore operation may change the value of the operational pattern of the resulting file. OpenCube MXFTk® Front-End in Practice 21 EVS Broadcast Equipment S.A. 2.5 Issue 2.6.A October 2013 DCP Creation OpenCube MXFTk® Front-End includes a wizard to build complete Digital Cinema Packages (DCP) from existing MXF files or from compatible essence. The following wizard appears when clicking on New DCP( ) icon in the main window. Clic on button Next to start creating a new DCP. 22 OpenCube MXFTk® Front-End in Practice USER MANUAL OpenCube MXFTk® Front-End 2.6 The second page of the wizard contains the following fields: Directory is the root folder of the entire DCP. Selecting a directory will enable the other parts of the wizard. It is strongly recommended to choose an empty directory or a directory containing the DCP mxf files only. Label is the name of your composition. Kind is the type of composition (trailer, teaser, ...). By clicking on Next the reel page appears. OpenCube MXFTk® Front-End in Practice 23 EVS Broadcast Equipment S.A. Issue 2.6.A October 2013 In basic mode (default), you can choose the different files which will compose your reel. Check box Enable cut displays new fields used to set origin and duration used for the sources. 24 OpenCube MXFTk® Front-End in Practice USER MANUAL OpenCube MXFTk® Front-End 2.6 In the reel page, you can create a reel from an existing mxf file by clicking on Browse button and selecting a DCP-compatible MXF file. It is possible to create a new MXF file by clicking on New. If you choose the second way, the MXF wizard appears by clicking on New. The MXF wizard is a simplified version of the MXF creation wizard. In this wizard, you have to configure the following elements: Source: JPEG 2000, MPEG-2 video or Wave file. DCP Track File: the generated MXF file. Manufacturer interop can be set if you want to generate SMPTE files or Interoparable files. Crypt: set the checkbox and enter the cryptographic key id and the cipher (primer) key of the track file. Once all the fields filled, OK button is enabled. You can accept your configuration and the MXF will be created. Then you come back to the reel wizard. OpenCube MXFTk® Front-End in Practice 25 EVS Broadcast Equipment S.A. Issue 2.6.A October 2013 Now you can choose or create your audio file or choose a subtitle file. Once you have chosen at least a video or an audio MXF file, you can validate your reel by clicking on Next. 26 OpenCube MXFTk® Front-End in Practice USER MANUAL OpenCube MXFTk® Front-End 2.6 A reel has been added, you can now choose to add another reel or finalize your composition. If you choose Yes, the reel page is displayed again for a new reel. If you choose No, you reach the ending page. Clicking on Finish will create your complete Digital Cinema Package. OpenCube MXFTk® Front-End in Practice 27 EVS Broadcast Equipment S.A. 2.6 Issue 2.6.A October 2013 IMP Creation OpenCube MXFTk® Front-End includes a wizard to build complete IMF Packages (IMP) from existing MXF files. The following wizard appears when clicking on New IMP( ) icon in the main window. The first page of the wizard contains the following fields: Directory is the root folder of the entire IMP. Selecting a directory will enable the other parts of the wizard. It is strongly recommended to choose an empty directory or a directory containing the IMP MXF files only. IMF Application chose the IMF Application for which you want to create an IMP. Each IMF Application has different requirements for the video files. Click on button Next to start creating a new IMP. 28 OpenCube MXFTk® Front-End in Practice USER MANUAL MXFTk® Front-End 2.6 In the next wizard pages you will have to select the Video, Audio, Subtitles and Ancillary Data files that you want to pack in the new IMP. If the selected files are not present in the IMP Directory they will be copied from their current location to the IMP Directory. The IMP Wizard will check the selected files are compliant with the requirements of the selected IMF Application and requirements from the IMF Core Constraints. OpenCube MXFTk® Front-End in Practice 29 EVS Broadcast Equipment S.A. 30 Issue 2.6.A October 2013 OpenCube MXFTk® Front-End in Practice USER MANUAL MXFTk® Front-End 2.6 In the next page of the IMP Wizard, you will define the Composition Playlist (CPL) content. You must first set a label for the CPL and a “Kind” from the list. Then you can edit each Sequence (Image, Audio, Timed-Text, Ancillary Data). By default each sequence is filled with all the corresponding files selected in the previous pages of the IMP Wizard. You can: Add a file from the list of corresponding files selected in the previous pages of the IMP Wizard. The file will be added to the end of the sequence. Edit opens a window in which you can edit the EntryPoint and Duration to be played of the selected file. Move Up the selected file in the sequence Move Down the selected file in the sequence Remove the selected file from the sequence Remove All the files from the selected sequence OpenCube MXFTk® Front-End in Practice 31 EVS Broadcast Equipment S.A. Issue 2.6.A October 2013 In the next page you will be asked if you want to add another CPL to the IMP. If you answer No, the next page will be the Finalize page. Clicking on Finish will create your complete IMF Package (CPL(s) and PKL). 32 OpenCube MXFTk® Front-End in Practice