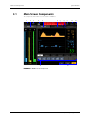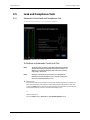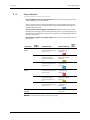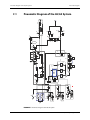
1
VAULT COPY Operating Instructions ™ | ™ Anesthesia System A N E S T H E S I A S YS A TNEEM S T H E S I A S YS T E M A5_A3_Ops Covers-046-001606-00_Eng.indd 1 9/29/11 1:09 PM Operating Instructions ™ | ™ Anesthesia System A N E S T H E S I A S YS A TNEEM S T H E S I A S YS T E M A5_A3_Ops Covers-046-001613-00_Eng.indd 1 9/29/11 1:09 PM A5™ and A3™ are U.S. trademarks of Mindray DS USA, Inc. Selectatec® is a registered trademark of Ohmeda. Copyright © Mindray DS USA, Inc., 2010. All rights reserved. Contents of this publication may not be reproduced in any form without permission of Mindray DS USA, Inc. Table of Contents Foreword ................................................................................................................................................................................................................................. vii Indications For Use .............................................................................................................................................................................................................. vii Responsibilities of Operators ........................................................................................................................................................................................... vii Warnings, Cautions, and Notes ....................................................................................................................................................................................... vii Warnings.................................................................................................................................................................................................................................. viii Cautions................................................................................................................................................................................................................................... xii Notes......................................................................................................................................................................................................................................... xv Warranty Statements .......................................................................................................................................................................................................... xvii Disclaimers.............................................................................................................................................................................................................................. xvii Phone Numbers and How To Get Assistance............................................................................................................................................................. xviii Manufacturer’s Responsibility ......................................................................................................................................................................................... xviii Symbols.................................................................................................................................................................................................................................... xviii Product Description....................................................................................................................................................1 - 1 General System Overview ...................................................................................................................................................................................................1 - 2 General Description....................................................................................................................................................................................................1 - 2 Key Features ..................................................................................................................................................................................................................1 - 3 Fresh Gas Dosing .........................................................................................................................................................................................................1 - 3 Flow Control ..................................................................................................................................................................................................................1 - 4 Flow/Pressure Sensing ...................................................................................................................................................................................1 - 4 Vaporizer Mounting....................................................................................................................................................................................................1 - 4 Anesthesia Ventilator.................................................................................................................................................................................................1 - 4 Breathing System ........................................................................................................................................................................................................1 - 4 Anesthetic Gas Scavenging System (AGSS) .......................................................................................................................................................1 - 5 Power Management / Battery Supply..................................................................................................................................................................1 - 5 Workplace Ergonomics..............................................................................................................................................................................................1 - 7 Physical Views..........................................................................................................................................................................................................................1 - 8 Main Unit (Front View)...............................................................................................................................................................................................1 - 8 Main Unit (Rear View).................................................................................................................................................................................................1 - 10 Main Unit (Left View)..................................................................................................................................................................................................1 - 12 Main Unit (Right View)...............................................................................................................................................................................................1 - 13 Main Unit (Top View)..................................................................................................................................................................................................1 - 14 Breathing System (Top View) ..................................................................................................................................................................................1 - 15 Breathing System (Left View) ..................................................................................................................................................................................1 - 17 Anesthetic Gas Scavenging System (AGSS) (Top, Front, and Right Views) ............................................................................................1 - 18 Installation ..................................................................................................................................................................2 - 1 Unpacking.................................................................................................................................................................................................................................2 - 3 Initial Setup...............................................................................................................................................................................................................................2 - 4 Install the Vaporizer...............................................................................................................................................................................................................2 - 5 Filling and Draining the Vaporizer ........................................................................................................................................................................2 - 7 System Interface .........................................................................................................................................................3 - 1 Main Screen Components...................................................................................................................................................................................................3 - 2 System Information Header ...............................................................................................................................................................................................3 - 5 Elapsed Timer................................................................................................................................................................................................................3 - 5 Patient Size ....................................................................................................................................................................................................................3 - 5 Alarm and Prompt Messages ..................................................................................................................................................................................3 - 5 Alarm Silence Icon.......................................................................................................................................................................................................3 - 6 Date and Time ..............................................................................................................................................................................................................3 - 7 Battery Status................................................................................................................................................................................................................3 - 8 Fresh Gas Flow Display.........................................................................................................................................................................................................3 - 9 Waveforms Tab .......................................................................................................................................................................................................................3 - 10 Waveform Color ...........................................................................................................................................................................................................3 - 10 Waveforms Autoscaling ............................................................................................................................................................................................3 - 11 A5/A3™ Operating Instructions 046-003777-00 i Table of Contents Spirometry Tab (A5 Only) ....................................................................................................................................................................................................3 - 12 Loop Type.......................................................................................................................................................................................................................3 - 13 Show Reference ...........................................................................................................................................................................................................3 - 13 Save Loop .......................................................................................................................................................................................................................3 - 13 Review Loops Button .................................................................................................................................................................................................3 - 14 Demographics Tab.................................................................................................................................................................................................................3 - 16 Ventilation Mode Tabs..........................................................................................................................................................................................................3 - 18 Measured Values Area ..........................................................................................................................................................................................................3 - 20 System Softkeys ......................................................................................................................................................................................................................3 - 21 Setup Softkey ................................................................................................................................................................................................................3 - 21 Alarms Softkey..............................................................................................................................................................................................................3 - 21 Silence Softkey .............................................................................................................................................................................................................3 - 21 Setup...........................................................................................................................................................................................................................................3 - 22 General Tab....................................................................................................................................................................................................................3 - 22 Display Tab ...............................................................................................................................................................................................................................3 - 24 System Tab................................................................................................................................................................................................................................3 - 27 Network Configuration..............................................................................................................................................................................................3 - 29 Service Tab................................................................................................................................................................................................................................3 - 32 Preoperative Tests......................................................................................................................................................4 - 1 Preoperative Test Schedules ..............................................................................................................................................................................................4 - 2 Test Intervals .................................................................................................................................................................................................................4 - 2 Inspect the System.................................................................................................................................................................................................................4 - 3 Pre-operative Checkout List ...............................................................................................................................................................................................4 - 4 Introduction...................................................................................................................................................................................................................4 - 4 Suggested Pre-operative Checkout List..............................................................................................................................................................4 - 4 System Self-Test......................................................................................................................................................................................................................4 - 7 Leak and Compliance Tests ................................................................................................................................................................................................4 - 9 Automatic Circuit Leak and Compliance Test ...................................................................................................................................................4 - 9 Manual Circuit Leak Test ...........................................................................................................................................................................................4 - 14 Power Failure Alarm Test.....................................................................................................................................................................................................4 - 17 Pipeline Tests ...........................................................................................................................................................................................................................4 - 18 O2 Pipeline Test............................................................................................................................................................................................................4 - 18 N2O Pipeline Test.........................................................................................................................................................................................................4 - 18 Air Pipeline Test............................................................................................................................................................................................................4 - 19 Basic Ventilation Testing......................................................................................................................................................................................................4 - 20 Cylinder Tests...........................................................................................................................................................................................................................4 - 21 Check the Cylinder Pressure....................................................................................................................................................................................4 - 21 O2 Cylinder High Pressure Leak Test ....................................................................................................................................................................4 - 21 N2O Cylinder High Pressure Leak Test .................................................................................................................................................................4 - 21 Air Cylinder High Pressure Leak Test....................................................................................................................................................................4 - 21 Flow Control System Test....................................................................................................................................................................................................4 - 22 Vaporizer Tests ........................................................................................................................................................................................................................4 - 23 Vaporizer Back Pressure Test...................................................................................................................................................................................4 - 23 Manual Leak Test .........................................................................................................................................................................................................4 - 23 Vaporizer Leak Test.....................................................................................................................................................................................................4 - 23 Breathing System Tests ........................................................................................................................................................................................................4 - 25 Bellows Test ...................................................................................................................................................................................................................4 - 25 Breathing System Leak Test in Manual Ventilation Status ...........................................................................................................................4 - 25 APL Valve Test...............................................................................................................................................................................................................4 - 25 Alarm Tests ...............................................................................................................................................................................................................................4 - 27 Prepare for Alarm Tests .............................................................................................................................................................................................4 - 27 Test the O2 Concentration Monitoring and Alarms ........................................................................................................................................4 - 27 ii 046-003777-00 A5/A3™ Operating Instructions Table of Contents Test the Low Minute Volume (MV) Alarm...........................................................................................................................................................4 - 28 Test the Apnea Alarm.................................................................................................................................................................................................4 - 28 Test the Continuous Airway Pressure Alarm .....................................................................................................................................................4 - 28 Test the High Paw Alarm...........................................................................................................................................................................................4 - 28 Test the Low Paw Alarm............................................................................................................................................................................................4 - 28 Preoperative Preparations ..................................................................................................................................................................................................4 - 30 Inspect the AGSS ....................................................................................................................................................................................................................4 - 31 Operations...................................................................................................................................................................5 - 1 Powering On the A5/A3 Anesthesia System ................................................................................................................................................................5 - 2 Powering Off the A5/A3 Anesthesia System ................................................................................................................................................................5 - 2 Patient Setup............................................................................................................................................................................................................................5 - 3 Discharge / Standby Mode.......................................................................................................................................................................................5 - 3 Select the Patient Size (Adult, Pediatric, Infant) ...............................................................................................................................................5 - 4 Oxygen Sensor Calibration .................................................................................................................................................................................................5 - 4 Input Fresh Gas .......................................................................................................................................................................................................................5 - 5 Set N2O, Air, and O2 Inputs ......................................................................................................................................................................................5 - 5 Set Anesthetic Agent .................................................................................................................................................................................................5 - 5 Select the Desired Anesthetic Agent ........................................................................................................................................................5 - 6 Adjust the Concentration of Anesthetic Agent ....................................................................................................................................5 - 6 Ventilation Modes ..................................................................................................................................................................................................................5 - 7 Monitored Parameters...............................................................................................................................................................................................5 - 7 Ventilation Modes .......................................................................................................................................................................................................5 - 7 Change Ventilation Mode ........................................................................................................................................................................................5 - 7 Set Manual Ventilation Mode..................................................................................................................................................................................5 - 8 Make Settings before Starting Mechanical Ventilation Mode ....................................................................................................................5 - 10 Set Volume Control Ventilation (VCV)..................................................................................................................................................................5 - 10 To Set VCV Mode ..............................................................................................................................................................................................5 - 11 Set Pressure Control Ventilation (PCV) ................................................................................................................................................................5 - 11 To Set PCV Mode ..............................................................................................................................................................................................5 - 12 Synchronized Intermittent Mandatory Ventilation (SIMV)...........................................................................................................................5 - 12 Pressure Support in Synchronized Intermittent Mandatory Ventilation (SIMV) .......................................................................5 - 12 Synchronized Intermittent Mandatory Ventilation–Volume Control (SIMV-VC) ......................................................................5 - 13 Synchronized Intermittent Mandatory Ventilation–Pressure Control (SIMV-PC) - A5 Only .................................................5 - 13 To Set SIMV-VC or SIMV-PC Mode .............................................................................................................................................................5 - 13 Set Pressure Support Ventilation (PS) ..................................................................................................................................................................5 - 14 To Set PS Mode .................................................................................................................................................................................................5 - 14 Start Mechanical Ventilation ..............................................................................................................................................................................................5 - 16 Stop Mechanical Ventilation ..............................................................................................................................................................................................5 - 16 Relationships of Ventilation Parameters........................................................................................................................................................................5 - 16 Parameter Monitoring (Waveforms)................................................................................................................................................................................5 - 17 Pressure...........................................................................................................................................................................................................................5 - 17 Auto-zeroing the Pressure Sensors ...........................................................................................................................................................5 - 18 Volume ............................................................................................................................................................................................................................5 - 18 Inspired O2 (FiO2).........................................................................................................................................................................................................5 - 18 Spirometry (A5 Only)..................................................................................................................................................................................................5 - 19 Spirometry Loops ............................................................................................................................................................................................5 - 19 Waveform Autoscaling ..................................................................................................................................................................................5 - 20 Alarms and Messages .................................................................................................................................................6 - 1 Introduction .............................................................................................................................................................................................................................6 - 2 Alarm System Self-Test..............................................................................................................................................................................................6 - 2 Types of Alarms and Messages...............................................................................................................................................................................6 - 3 Alarm Indicators...........................................................................................................................................................................................................6 - 4 A5/A3™ Operating Instructions 046-003777-00 iii Table of Contents Displaying Alarms ..................................................................................................................................................................................................................6 - 5 Displayed Order of Alarm Messages.....................................................................................................................................................................6 - 7 Setting Alarm Volume ..........................................................................................................................................................................................................6 - 8 Silencing Alarms .....................................................................................................................................................................................................................6 - 9 Alarm Limits..............................................................................................................................................................................................................................6 - 10 Setting Alarm Limits ...................................................................................................................................................................................................6 - 10 Loading Alarm Defaults.............................................................................................................................................................................................6 - 11 Auto Alarm Limits........................................................................................................................................................................................................6 - 12 Alarm and Prompt Messages .............................................................................................................................................................................................6 - 13 Physiological Alarm Messages................................................................................................................................................................................6 - 14 Technical Alarm Messages .......................................................................................................................................................................................6 - 15 Startup Alarm Messages ...............................................................................................................................................................................6 - 15 CPU Board Runtime Alarm ...........................................................................................................................................................................6 - 17 Power Board Runtime Alarm .......................................................................................................................................................................6 - 17 Electronic Flowmeter Board Runtime Alarm .........................................................................................................................................6 - 18 Ventilator Control Board Runtime Alarm ................................................................................................................................................6 - 19 Prompt Messages ........................................................................................................................................................................................................6 - 21 Prompt Messages Displayed in Alarm Area ...........................................................................................................................................6 - 21 Prompt Messages Displayed in Pop-up Area ........................................................................................................................................6 - 21 Maintenance ...............................................................................................................................................................7 - 1 Theory of Operation ..............................................................................................................................................................................................................7 - 3 Block Diagram..........................................................................................................................................................................................................................7 - 3 Maintenance Schedule.........................................................................................................................................................................................................7 - 4 Breathing System Maintenance ........................................................................................................................................................................................7 - 4 Flow Sensor Calibration .......................................................................................................................................................................................................7 - 5 O2 Sensor Calibration............................................................................................................................................................................................................7 - 6 Calibrate the O2 Sensor.............................................................................................................................................................................................7 - 7 Water Build-up in the Flow Sensor...................................................................................................................................................................................7 - 9 Prevent Water Build-up .............................................................................................................................................................................................7 - 9 Clear Water Build-up ..................................................................................................................................................................................................7 - 9 AGSS Transfer Tube Maintenance....................................................................................................................................................................................7 - 9 Cleaning and Disinfection...................................................................................................................................................................................................7 - 10 General Guidelines......................................................................................................................................................................................................7 - 10 Cleaning and Disinfecting Agents / Autoclaving.............................................................................................................................................7 - 10 External Surfaces..........................................................................................................................................................................................................7 - 10 Bellows Assembly........................................................................................................................................................................................................7 - 11 Inspiration and Expiration Valves ..........................................................................................................................................................................7 - 14 Oxygen Sensor..............................................................................................................................................................................................................7 - 16 APL Valve ........................................................................................................................................................................................................................7 - 17 PAW Gauge....................................................................................................................................................................................................................7 - 18 Bag Arm...........................................................................................................................................................................................................................7 - 19 Absorber Canister........................................................................................................................................................................................................7 - 20 Breathing System Block.............................................................................................................................................................................................7 - 21 AGSS (Anesthetic Gas Scavenging System) and AGSS Transfer Hose......................................................................................................7 - 24 Regular Maintenance............................................................................................................................................................................................................7 - 26 Product Specifications................................................................................................................................................8 - 1 Standards Compliance .........................................................................................................................................................................................................8 - 2 Safety Designations...............................................................................................................................................................................................................8 - 3 Oxygen Enriched Environments ............................................................................................................................................................................8 - 3 Wiring and PC Board Materials ...............................................................................................................................................................................8 - 3 Physical Specifications..........................................................................................................................................................................................................8 - 4 Stability Configurations and Conditions........................................................................................................................................................................8 - 4 iv 046-003777-00 A5/A3™ Operating Instructions Table of Contents Environmental Specifications ............................................................................................................................................................................................8 - 5 Electrical Specifications........................................................................................................................................................................................................8 - 6 Main Electrical Power Specifications ....................................................................................................................................................................8 - 6 Battery Power Specifications...................................................................................................................................................................................8 - 6 Auxiliary Electrical Outlets........................................................................................................................................................................................8 - 6 Communication Ports................................................................................................................................................................................................8 - 7 Pneumatic Specifications ....................................................................................................................................................................................................8 - 8 Pipeline Supply (N2O, Air, O2) .................................................................................................................................................................................8 - 8 Cylinder Supply (N2O, Air, O2).................................................................................................................................................................................8 - 8 Drive Gas.........................................................................................................................................................................................................................8 - 8 N2O Automatic Cutoff................................................................................................................................................................................................8 - 8 O2 Controls ....................................................................................................................................................................................................................8 - 8 Oxygen Ratio Controller............................................................................................................................................................................................8 - 8 Breathing System Specifications ......................................................................................................................................................................................8 - 9 Breathing System Volume........................................................................................................................................................................................8 - 9 CO2 Absorber Assembly............................................................................................................................................................................................8 - 9 Water Trap......................................................................................................................................................................................................................8 - 9 Vaporizer Connections ..............................................................................................................................................................................................8 - 9 Breathing System Connections ..............................................................................................................................................................................8 - 9 APL Valve ........................................................................................................................................................................................................................8 - 9 Breathing System Temperature Controller........................................................................................................................................................8 - 10 Breathing Circuit Parameters ..................................................................................................................................................................................8 - 10 Materials .........................................................................................................................................................................................................................8 - 10 Anesthetic Gas Scavenging System (AGSS)..................................................................................................................................................................8 - 11 Ventilator Specifications ......................................................................................................................................................................................................8 - 12 Displays and Controls Specifications ..............................................................................................................................................................................8 - 15 Electronic Controls......................................................................................................................................................................................................8 - 15 Pneumatic Controls ....................................................................................................................................................................................................8 - 15 Alarms.........................................................................................................................................................................................................................................8 - 17 Safety Specifications .............................................................................................................................................................................................................8 - 18 ASTM F 1208 – 89 (2005) Disclosures..............................................................................................................................................................................8 - 20 Leakage of Breathing System..................................................................................................................................................................................8 - 20 Resistance of Breathing Systems ...........................................................................................................................................................................8 - 20 CO2 Absorber Resistance..........................................................................................................................................................................................8 - 20 CO2 Absorber Capacity..............................................................................................................................................................................................8 - 20 Unidirectional Valve Opening Pressure...............................................................................................................................................................8 - 20 Data Storage (Non-Volatile) and Recording .................................................................................................................................................................8 - 21 Electromagnetic Capability ................................................................................................................................................................................................8 - 22 Accessories ................................................................................................................................................................. A - 1 Accessory Kits ......................................................................................................................................................................................................................... A - 2 AGSS........................................................................................................................................................................................................................................... A - 2 Breathing System .................................................................................................................................................................................................................. A - 2 CO2 Absorbent Canister...................................................................................................................................................................................................... A - 3 Flow Sensor ............................................................................................................................................................................................................................. A - 3 Gas Cylinder Accessories .................................................................................................................................................................................................... A - 3 Gas Supply Hoses .................................................................................................................................................................................................................. A - 3 Manuals and Reference Cards .......................................................................................................................................................................................... A - 4 Mounting Accessories ......................................................................................................................................................................................................... A - 4 Networking and USB Storage ........................................................................................................................................................................................... A - 5 O2 Sensor.................................................................................................................................................................................................................................. A - 5 Vaporizers................................................................................................................................................................................................................................. A - 5 A5/A3™ Operating Instructions 046-003777-00 v Table of Contents Parameters and Factory Defaults ..............................................................................................................................B - 1 Waveform/Spirometry Tabs (A5 Only)............................................................................................................................................................................B - 2 Alarm Limits..............................................................................................................................................................................................................................B - 3 Setup Menu ..............................................................................................................................................................................................................................B - 4 Alarm Volume and Log.........................................................................................................................................................................................................B - 6 Date and Time .........................................................................................................................................................................................................................B - 6 Demographics .........................................................................................................................................................................................................................B - 6 Ventilation Modes ..................................................................................................................................................................................................................B - 7 Linked Ventilation Parameter Relationships ................................................................................................................................................................B - 12 Non-Linked Ventilation Parameter Relationships ......................................................................................................................................................B - 14 Pneumatic Diagram ....................................................................................................................................................C - 1 Pneumatic Diagram of the A5/A3 System.................................................................................................................................................................... C - 2 Abbreviations, Symbols, and Units of Measure ...................................................................................................... D - 1 Abbreviations ......................................................................................................................................................................................................................... D - 2 Symbols..................................................................................................................................................................................................................................... D - 3 Units of Measure.................................................................................................................................................................................................................... D - 4 Attention Symbols ................................................................................................................................................................................................................ D - 5 vi 046-003777-00 A5/A3™ Operating Instructions Foreword Introduction Foreword WARNING: Do not operate the A5/A3 Anesthesia System before reading these instructions. The operating instructions for the A5/A3 Anesthesia Delivery System (hereinafter referred to as A5/A3 Anesthesia System, A5/A3 System, A5/A3, or individual A5 and A3) are intended to provide information for proper installation, operation, and general maintenance of the A5/A3 System to the user. General knowledge and understanding of the features and functions of the A5/A3 System are prerequisites for its proper use. For servicing information or assistance, please contact an authorized representative in your area. CAUTION: U.S. Federal Law restricts this device to sale by or on the order of a physician or other practitioner licensed by state law to use or order the use of this device. NOTE: Figures in this manual are provided for reference purposes only. Screens may differ based on the system configuration and selected parameters. Indications For Use The A5/A3 Anesthesia System is a device used to administer to a patient, continuously or intermittently, a general inhalation anesthetic, and to maintain a patient's ventilation. The A5/A3 is intended for use by licensed clinicians, for patients requiring anesthesia within a health care facility, and can be used for adult and pediatric populations. WARNING: The A5/A3 is intended to be operated only by licensed clinicians and qualified anesthesia personnel who have received adequate training in its use. Anyone unauthorized or untrained must not perform any operation on the A5/A3. WARNING: The A5/A3 is not suitable for use in an MRI environment. Responsibilities of Operators The proper function of the A5/A3 System can only be guaranteed if it is operated and serviced in accordance with the information provided in this manual and by an authorized Mindray service representative. Non-compliance with this information voids all guarantee claims. The A5/A3 System must be operated by qualified and trained personnel only. All operators must fully observe these operating instructions and relevant additional documentation. They must also comply with the WARNINGS, CAUTIONS, and NOTES detailed in this manual. Warnings, Cautions, and Notes Please adhere to all warnings, cautions, and notes that are listed throughout this manual. They are summarized here for your reference. WARNING — Indicates a potential hazard or unsafe practice that, if not avoided, could result in death or serious injury to the patient or user. CAUTION — Indicates a potential hazard or unsafe practice that, if not avoided, could result in product/property damage or minor personal injury to the patient or user. NOTE — Provides application tips or other useful information. A5/A3™ Operating Instructions 046-003777-00 vii Introduction Warnings Warnings viii WARNING: Do not operate the A5/A3 Anesthesia System before reading these instructions. WARNING: All analog or digital products connected to this system must be certified passing the specified IEC standards (such as IEC 60950 for data processing equipment and IEC 60601-1 for medical electrical equipment). All configurations shall comply with the valid version of IEC 60601-1-1. The personnel who are responsible for connecting the optional equipment to the I/O signal port shall be responsible for medical system configuration and system compliance with IEC 60601-1-1. WARNING: This machine must only be operated by trained, skilled medical staff. WARNING: Before putting the system into operation, the operator must verify that the equipment, connecting cables, and accessories are in correct working order and operating condition. WARNING: The equipment must be connected to a properly installed power outlet with protective earth contacts only. If the installation does not provide for a protective earth conductor, disconnect it from the power line or operate from the equipment’s internal battery supply. WARNING: Multiple AC power outlets are provided on the rear of the A5/A3. These outlets are intended to supply power to additional equipment that form a part of the anesthesia system (i.e. vaporizers, gas analyzers, etc.). Do not connect other equipment to these outlets, as patient leakage current may be affected. Each outlet is rated 3 A; the total current that may be drawn through all outlets is 10 A on the A5 System and 9 A on the A3 System; do not attempt to exceed these load ratings. Do not connect additional MPSOs or extension cords to these outlets. WARNING: Do not put MPSO (Multiple Portable Socket Outlet (i.e., multiple outlet extension cords)) on the floor. WARNING: Connect the A5/A3 Anesthesia System to an AC power source before the internal battery power source is depleted. WARNING: Do not open the equipment housings. All servicing and future upgrades must be carried out only by trained and authorized Mindray personnel. WARNING: Do not rely exclusively on the audible alarm system for patient monitoring. WARNING: Adjustment of alarm volume to a low level may result in a hazard to the patient. WARNING: Alarm settings should be customized according to different patient situations. Constantly keeping the patient under close surveillance is the most reliable way for safe patient monitoring. WARNING: The physiological parameters and alarm messages displayed on the screen of the equipment are for the caregiver’s reference only and cannot be directly used as the basis for clinical treatment. WARNING: Dispose of the packaging material, observing the applicable waste control regulations and keeping it out of children’s reach. 046-003777-00 A5/A3™ Operating Instructions Warnings Introduction WARNING: To avoid the possibility of explosion, do not use the equipment in the presence of flammable anesthetic agents, vapors or liquids. Do not use flammable anesthetic agents such as ether and cyclopropane for this equipment. Use only non-flammable anesthetic agents that meet the requirements specified in IEC 60601-2-13 or ISO 8835. The A5/A3 Anesthesia System can be used with halothane, enflurane, isoflurane, sevoflurane, and desflurane. Only one anesthetic agent can be used at a time. WARNING: Fresh gas flow must never be switched off before the vaporizer is switched off. The vaporizer must never be left switched on without a fresh-gas flow. Anesthetic agent vapor at a high concentration can get into the machine lines and ambient air, causing harm to people and materials. WARNING: In order to prevent electric shock, the machine (protection class I) may only be connected to a correctly grounded mains connection (i.e., socket outlet with grounding contact). WARNING: The use of anti-static or electrically conductive breathing tubes, when utilizing high frequency electric surgery equipment, may cause burns, and is therefore not recommended in any application of this machine. WARNING: Possible electric shock hazard. The machine may only be opened by authorized service personnel. WARNING: The patient should be visually monitored by qualified personnel. In certain situations, life-threatening circumstances may occur that may not necessarily trigger an alarm. WARNING: Always set the alarm limits so that the alarm is triggered before a hazardous situation occurs. Incorrectly set alarm limits may result in operating personnel not being aware of drastic changes in the patient’s condition. WARNING: Connection of both medical and non-medical equipment to the auxiliary mains socket outlet(s) may increase the leakage currents to values exceeding the allowable limits. WARNING: Electric shock and fire hazard: Do not clean the machine while it is powered on and/or plugged into an outlet. WARNING: Disconnect the power plug from the mains supply before removing the rear panels or servicing the A5/A3 unit. WARNING: Malfunction of the central gas supply system may cause more than one or even all devices connected to it to stop their operation simultaneously. WARNING: The anesthesia system will cease to deliver gas at pressures below the minimum specified gas pipeline supply pressure. WARNING: Use a cleaning and disinfection schedule that conforms to your institution's disinfection and risk-management policies. WARNING: A5/A3™ Operating Instructions • Refer to the material safety data as applicable. • Refer to the operation and maintenance manuals of all disinfection equipment. • Do not inhale fumes that may result from any disinfection process. Use extreme care while handling the absorbent as it is a caustic irritant. 046-003777-00 ix Introduction x Warnings WARNING: Use care in lifting and manipulating vaporizers during the mounting process as their weight may be greater than expected, based on their size and shape. WARNING: Do not use talc, zinc stearate, calcium carbonate, corn starch, or similar material to prevent sticking of the bellows, as these materials may enter the patient's lungs or airway, causing irritation or injury. WARNING: All gas supplies should be of medical grade. WARNING: Single use respiratory hoses, face masks, sensors, sodalime, water traps, sampling lines, airway adapters, and other single use items may be considered potential biologically hazardous items and should not be reused. Dispose of these items in accordance with hospital policy and local regulations for contaminated and biologically hazardous items. WARNING: To avoid endangering a patient, do not perform testing or maintenance when the machine is in use. WARNING: Review the performance specifications of the disposal system that the transfer and receiving systems are intended to be used with, to ensure compatibility. WARNING: The A5/A3 should not be used adjacent to or stacked with other equipment. If adjacent or stacked use is necessary, the A5/A3 should be observed to verify normal operation in the configuration in which it will be used. WARNING: Ensure that the current alarm presets are appropriate before use on each patient. WARNING: A hazard can exist if different alarm presets are used for the same or similar equipment in any single area. WARNING: Due to the size and weight of the A5/A3, it should only be moved by qualified personnel. WARNING: Overloading machine may cause tipping. Equipment attached to the side of the machine should fall within the rated weights to prevent tipping of the machine. WARNING: Excess load may cause a tip hazard while moving the A5/A3. Before moving, remove all equipment from the top shelf and all monitoring equipment mounted to the side of the A5/A3. Use care when moving the A5/A3 up or down inclines, around corners, and across thresholds. Do not attempt to roll the A5/A3 over hoses, cords, or other obstacles. WARNING: Leaks or internal venting of sampled gas may affect accuracy. Perform the proper preoperative tests to ensure that the device is performing properly. Leaky circuits can not be used. WARNING: Connection of the A5/A3 exhaust port to the hospital’s waste gas scavenging system is strongly recommended to prevent exposure of hospital personnel to the A5/A3 exhaust gases. WARNING: Pins of connectors identified with the ESD warning symbol should not be touched. Connections should not be made to these connectors unless ESD precautionary procedures are used. WARNING: Operation of the A5/A3 below the minimum flow values may cause inaccurate results. 046-003777-00 A5/A3™ Operating Instructions Warnings Introduction WARNING: This equipment/system is intended for use by healthcare professionals only. This equipment/system may cause radio interference or may disrupt the operation of nearby equipment. It may be necessary to take mitigation measures, such as reorienting or relocating the device or shielding the location. WARNING: Ensure that an independent means of ventilation (e.g. a self-inflating manually powered resuscitator with mask) is available whenever the A5/A3 is in use. WARNING: Usage of accessories with package damage may cause biocontamination or failure. The operator should check accessory packaging for storage integrity before use. WARNING: Before using the A5/A3 System after cleaning or disinfecting, power up the system and follow the on-screen prompts to perform the Leak Test and the Compliance Test. See section 4.5 (pg. 4-9) "Leak and Compliance Tests". WARNING: Improperly cleaned materials may result in biocontamination. Use a cleaning and disinfection schedule that conforms to your institution's disinfection and risk-management policies. • Refer to the material safety data as applicable. • Refer to the operation and maintenance manuals of all disinfection equipment. The user should follow the recommended disinfection routine for this machine and any reusable accessories. WARNING: If the A5/A3 is damaged in any way that compromises the safety of the patient or user, discontinue use and attach a visible tag that marks the A5/A3 as unusable. Call Mindray Technical Support. WARNING: Oxygen, when present in high concentrations, can significantly increase the chance of fire or an explosion. Oil and grease may spontaneously ignite and should not be used where oxygen enrichment may occur. WARNING: Use of lubricants not recommended by Mindray may increase the danger of fire or explosion. Use lubricants approved by Mindray. WARNING: Low-pressure regulators and flow-meters are susceptible to high pressure, and may burst if improperly maintained or disassembled while under pressure. Changing connectors or disassembling should be performed only by qualified personnel. WARNING: Do not disassemble the low-pressure regulator, flow-metering device, or connector while under pressure. The release of sudden pressure may cause injury. WARNING: Review the specifications of the AGSS transfer and receiving systems and the specifications of the A5/A3 System to ensure compatibility and to prevent a mismatched receiving system. WARNING: Avoid connecting two or more hose assemblies in series as this may cause a loss of pressure and flow. WARNING: A hazard may exist due to the use of improper connectors. Ensure all assemblies use the proper connectors. WARNING: Avoid replacing a high-pressure flexible connection with one of lower nominal inlet pressure. A5/A3™ Operating Instructions 046-003777-00 xi Introduction Cautions WARNING: Reusing breathing circuits or reusable accessories that are not disinfected may cause cross-contamination. Disinfect the breathing circuits and reusable accessories before use. WARNING: Inspect all breathing system components carefully before each use. Ensure all components do not contain any obstructions or debris that can cause a potential hazard to the patient. WARNING: Use breathing circuits and manual bags in accordance with ASTM F1208 and compatible with standard 22mm male conical fittings per ASTM specifications F 1054. Cautions xii CAUTION: U.S. Federal Law restricts this device to sale by or on the order of a physician or other practitioner licensed by state law to use or order the use of this device. CAUTION: To ensure patient safety, use only parts and accessories specified in this manual. CAUTION: At the end of its service life, the equipment, as well as its accessories, must be disposed of in compliance with the guidelines regulating the disposal of such products, and in accordance with local regulations for contaminated and biologically hazardous items. CAUTION: Magnetic and electrical fields are capable of interfering with the proper performance of the equipment. Ensure that all external devices operating in the vicinity of the equipment comply with the relevant EMC requirements. Mobile phones, x-ray equipment, and MRI devices are possible sources of interference as they may emit higher levels of electromagnetic radiation. CAUTION: This system operates correctly at the electrical interference levels identified in this manual. Higher levels can cause nuisance alarms that may stop mechanical ventilation. Be aware of false alarms caused by high-intensity electrical fields. CAUTION: The A5/A3 Anesthesia System may become unstable if the unit is tilted beyond 10 degrees. Use extreme caution when moving or resting the unit on surfaces exceeding a 10 degree slope. Do not hang articles on the sides of the unit that would cause an excessive imbalance. CAUTION: Perform the daily checks specified on the checklist. In case of a system fault, do not operate the system until the fault has been corrected. CAUTION: Before starting the machine, users must be familiar with the information contained in these Operating Instructions and must have been trained by an authorized representative. CAUTION: If the machine does not function as described, it must be examined and repaired as necessary by qualified service personnel before being returned to use. CAUTION: Handle the machine with care to prevent damage or functional faults. CAUTION: Ensure that the gas supply of the machine always complies with the technical specifications. CAUTION: Before clinical use, the machine must be correctly calibrated and/or the respective tests must be performed, as described in these Operating Instructions. 046-003777-00 A5/A3™ Operating Instructions Cautions Introduction CAUTION: If system faults occur during the initial calibration or testing, the machine should not be operated until those faults have been corrected by a qualified service person. CAUTION: After servicing, functional, sensor, and system tests must be performed before clinical use. CAUTION: After changing the CO2 Pre-Pak or loose fill absorbent, perform a freshgas system leak test. CAUTION: Only vaporizers with Selectatec Interlock-Systems may be used with the A5/A3 unit. CAUTION: After each exchange of a vaporizer, perform a fresh-gas system leak test. CAUTION: Use cleaning agent sparingly. Excess fluid could enter the machine, causing damage. CAUTION: Do not autoclave any parts of the A5/A3 unless specifically identified as autoclaveable in this manual. Clean the A5/A3 only as specified in this manual. CAUTION: To prevent system damage: CAUTION: • Refer to the literature supplied by the manufacturer of the cleaning agent. • Never use organic, halogenated or petroleum-based solvents, anesthetics, glass cleaning agents, acetone or other irritant agents. • Never use abrasive agents (i.e. steel wool or silver polish) to clean components. • Keep all liquids away from electronic components. • Prevent liquid from entering the equipment. • All cleaning solutions used must have a pH between 7.0 and 10.5. Never immerse the oxygen sensor or its connector in any type of liquid. • Dispose of the oxygen sensor per the manufacturer’s specification. CAUTION: Do not use acetic hydroperoxide or formaldehyde steaming. CAUTION: The valve disc in each of the inhalation and exhalation valve assemblies on the breathing system is fragile and must be handled with care while removing the valve cage from the valve assembly. CAUTION: If moisture remains in the bellows after cleaning, the bellows surface folds may become tacky and prevent the bellows from properly expanding. Ensure all moisture is removed from the bellows after cleaning. CAUTION: Only connect Mindray approved equipment to the A5/A3 communication ports. Equipment connected to the A5/A3 ethernet ports must comply with IEC 60950. CAUTION: Do not connect any non-isolated devices to the DB9/RS232C interface of the A5/A3. A5/A3™ Operating Instructions 046-003777-00 xiii Introduction xiv Cautions CAUTION: Do not connect any devices to the SB ports other than Mindray approved USB storage devices and a supported USB mouse (see ‘‘Networking and USB Storage’’ on page A-5). CAUTION: Do not wash the inner surface of the oxygen sensor. CAUTION: Do not autoclave the following components: Paw gauge, oxygen sensor, flow sensor, and bellows. These components cannot withstand immersion or the heat and pressure of autoclaving. CAUTION: Users should monitor oxygen percentage (FiO2%) when using the Auxiliary O2/Air Flow Meters. Unknown oxygen concentrations may be delivered to the patient unless oxygen monitoring is used. CAUTION: The A5/A3 is NOT suitable for use in a magnetic resonance imaging (MRI) environment. CAUTION: To ensure measurement accuracy and to avoid possible damage to the A5/A3, use only Mindray-approved cables and accessories. CAUTION: Use the power cord provided with the product. If a substitute is necessary, use only hospital grade power cords. CAUTION: Do not use a damaged or broken unit or accessory. Periodically check all cables (e.g., AC line cord and patient connection cables) for damage that may occur through normal use. Replace cables if damaged in any way. CAUTION: Use of other oxygen transducers may cause improper oximeter performance. CAUTION: Unintended movement may occur if the casters are not locked. The operator should lock casters during use of the machine. CAUTION: Unsecured devices may slide off the top shelf. Devices should be securely attached to the top shelf. CAUTION: The voltage on the auxiliary outlets is the same voltage as the outlet into which the A5/A3 machine is plugged. Ensure that devices plugged into the auxiliary outlets are rated for the same supply voltage as the A5/A3. CAUTION: During the transport and storage of the vaporizer, block the gas inlet and outlet of the vaporizer with plugs to prevent foreign substances from entering the vaporizer. CAUTION: Do not use any flow outlets as handles for moving the A5/A3. The flow outlets may become damaged. Use the metal side bars on the main body when moving the A5/A3. CAUTION: Do not push down on the bag arm forcefully or hang heavy objects onto it. Excessive weight may bend and damage the bag arm. CAUTION: Use caution when disconnecting “quick connectors”, as the sudden release of pressure may cause injury. CAUTION: Avoid factors that can contribute to deterioration of the hose assemblies. Factors include excessive bending, crushing, abrasion, system pressures and temperatures that exceed hose ratings, and improper installation. 046-003777-00 A5/A3™ Operating Instructions Notes Introduction CAUTION: Use care in lifting and manipulating the breathing system block during removal from its mounting arm as handling may be awkward due to its weight and shape. CAUTION: Turn the flow controls slowly. To avoid damaging the control valves, do not turn further when the flowmeter reading is outside the range. When turning a flow control knob clockwise to decrease flow, the flowmeter should reach zero before the knob reaches its most clockwise mechanical stop (Off) position. Do not turn any further when the knob has reached the Off position. Similarly, when turning a flow control knob counterclockwise to increase flow from zero, the flowmeter reading should not indicate a change from zero until the flow control knob is turned approximately one (1) rotation counterclockwise from the Off position, and only if permitted according to the gas ratio control system. Notes NOTE: Figures in this manual are provided for reference purposes only. Screens may differ based on the system configuration and selected parameters. NOTE: Put the equipment in a location where you can easily see the screen and access the operating controls. NOTE: Keep this manual close to the equipment so that it can be obtained conveniently when needed. NOTE: The software was developed in compliance with IEC 60601-1-4. The possibility of hazards arising from software errors is minimized. NOTE: This manual describes all features and options. Your equipment may not have all of them. NOTE: The A5/A3 is intended to be operated with its integral Breathing Pressure monitoring in use. NOTE: The A5/A3 is intended to be operated with its integral Breathing Pressure limitation devices in use. NOTE: The A5/A3 is intended to be operated with its integral Exhaled Volume monitoring in use. NOTE: The A5/A3 is intended to be operated with its integral Breathing System integrity Alarm System in use. NOTE: The A5/A3 is intended to be operated with its integral Continuing Pressure Alarm in use. NOTE: The A5/A3 is intended to be operated with its integral O2 monitoring in use. NOTE: The A5/A3 is intended to be operated with an external CO2 monitor complying with ISO 21647. Connection to the CO2 monitor should be via a sample line from the patient circuit. NOTE: The Anesthesia Vapor Delivery Device is to be used with an Anesthetic Agent Monitor complying with ISO 21647. Connection to the Agent monitor should be via a sample line from the Patient Circuit. A5/A3™ Operating Instructions 046-003777-00 xv Introduction xvi Notes NOTE: Continuously monitor the anesthetic agent concentration when using the Anesthesia System to ensure accurate output of the anesthetic agent. NOTE: Check the liquid level of the anesthetic agent before and during all operations. When the liquid level is below the warning line, more anesthetic agent needs to be added. Refer to the vaporizer Instructions For Use for filling the vaporizer and other information. NOTE: The A5/A3 System is designed to be equipped with an anesthetic vapor delivery device that complies with ISO 11196. NOTE: The A5/A3 battery supply is not a user serviceable component. Only an authorized service representative can replace the battery supply. If the system is not used for an extended period, contact a service representative to have the battery supply disconnected. The batteries may be subject to local regulations regarding disposal. At the end of the battery life, dispose of the battery supply in accordance with local regulations. NOTE: Areas designated for the servicing of oxygen equipment shall be clean, free of oil and grease, and not used for the repair of other equipment. NOTE: Opening the cylinder valve quickly may cause unexpected pressure differentials and create a potential for fire or explosion arising from oxygen pressure shocks. Open and shut the cylinder valve slowly. NOTE: Accuracy of the flowrate may be affected by varying inlet pressure, varying outlet resistance, or varying ambient temperature. NOTE: The power device, terminal units and pipeline system can be supplied by one or several different manufacturers. NOTE: Regional or national regulations that apply to manufacturers of medical devices can exist. 046-003777-00 A5/A3™ Operating Instructions Warranty Statements Introduction Warranty Statements Mindray DS USA, Inc. warrants that components within the anesthesia system will be free from defects in workmanship and materials for the number of years shown on the invoice. Under this extended warranty, Mindray DS USA, Inc. will repair or replace any defective component at no charge for labor and/or materials. This extended warranty does not cover consumable items such as (but not limited to) batteries and external cables. Calibration may be performed without the need to disassemble the instrument. It is the responsibility of the purchaser to perform calibration as necessary, in accordance with the instructions provided in this manual. Recommended preventative maintenance, as prescribed in the Maintenance section of this manual, is the responsibility of the user, and is not covered by this warranty. Except as otherwise provided herein, the terms, conditions, and limitations of Mindray DS USA, Inc.’s standard warranty will remain in effect. Mindray DS USA, Inc. warrants that its products will be free from defects in workmanship and materials for a period of one (1) year from the date of purchase except that disposable or one-time use products are warranted to be free from defects in workmanship and materials up to a date one year from the date of purchase or the date of first use, whichever is sooner. This warranty does not cover consumable items such as, but not limited to, batteries, external cables, O2 sensors, CO2 absorbents, breathing circuits, hoses, or mounts. Mindray DS USA, Inc. will not be liable for any incidental, special, or consequential loss, damage, or expense directly or indirectly arising from the use of its products, liability under this warranty and the buyer’s exclusive remedy under this warranty is limited to servicing or replacing at Mindray DS USA, Inc.’s option at the factory or at an authorized distributor, any product which shall under normal use and service appear to the Company to have been defective in material or workmanship. No agent, employee, or representative of Mindray DS USA, Inc. has any authority to bind Mindray DS USA, Inc. to any affirmation, representation, or warranty concerning its products, and any affirmation, representation or warranty made by any agent, employee, or representative shall not be enforceable by buyer. This warranty is expressly in lieu of any other express or implied warranties, including any implied warranty or merchantability or fitness, and of any other obligation on the part of the seller. Damage to any product or parts through misuse, neglect, accident, or by affixing any non-standard accessory attachments or by any customer modification voids this warranty. Mindray DS USA, Inc. makes no warranty whatever in regard to trade accessories, such being subject to the warranty of their respective manufacturers. A condition of this warranty is that this equipment or any accessories which are claimed to be defective be returned when authorized, freight prepaid to Mindray DS USA, Inc., Mahwah, New Jersey 07430. Mindray DS USA, Inc. shall not have any responsibility in the event of loss or damage in transit. Disclaimers Product Improvements — Mindray DS USA, Inc. retains the right to modify the machine and/or operating instructions without prior notification. These operating instructions explain all features of the A5/A3 System and are correct at time of manufacture. Instructions and models produced at a later stage, may contain improvements or modifications that were not included in previous models. A5/A3™ Operating Instructions 046-003777-00 xvii Introduction Phone Numbers and How To Get Assistance Phone Numbers and How To Get Assistance A network of service representatives and factory-trained distributors is available. Prior to requesting service, perform a complete operational check of the instrument to verify proper control settings. If operational problems continue to exist, contact the Service Department at (800) 288-2121, ext: 8116 for Technical Support or (201) 995-7875 for assistance in determining the nearest field service location. Please include the instrument model number, the serial number (located on the back of the A5/A3), and a description of the problem with all requests for service. Warranty questions should be directed to a local representative. A list of offices, along with their phone numbers, is provided at the end of this manual. NOTE: Upon request, calibration instructions or other information will be provided to assist the user’s appropriately qualified technical personnel in repairing those parts of the A5/A3 which are designated as repairable. Manufacturer’s Responsibility The effects on safety, reliability, and performance of the equipment are the manufacturer’s responsibility only if: a. assembly operations, extensions, readjustments, modifications or repairs are carried out by authorized personnel; and b. the electrical installation of the relevant room complies with the appropriate requirements; and c. the equipment is used in accordance with the instructions for use Symbols The following table provides descriptions of symbols that are used on the device and/or within this manual. SYMBOL xviii DESCRIPTION SYMBOL DESCRIPTION Attention, Consult Accompanying Documents / Refer to Manual Environment: Temperature Range Defibrillator proof type BF equipment Environment: Humidity Range Electrical: Alternating Current (AC) Environment: Pressure Range Electrical: Equipotentiality Gas Cylinder Electrical: Fuse or circuit breaker Gas Inlet Electrical: Input Output Gas Outlet 046-003777-00 A5/A3™ Operating Instructions Symbols Introduction E 134°C A5/A3™ Operating Instructions Electrical: Internal Battery Gas Flow: Flow Control Electrical: Light Gas Flow: Maximum Electrical: Power On Gas Flow: Minimum Electrical: Power Standby Gas Flow Total Electrical: Protective Earth (Ground) Gas: O2 Flush Electrical: WEEE (Waste of Electrical and Electronic Equipment) Marking. Separate treatment from general waste at end of life. O2 Sensor Connector Identifier: Manufacturer Gas Pipeline Connection Identifier: Manufacturer’s Reference/ Catalog Number Material: Polyphenyl-sulfone Identifier: Serial Number Indicator Material: Polysulfone Lock/Unlock: Direction Touchpad Lock/Unlock: Lock Manual ventilation via Breathing Bag Lock/Unlock: Unlock Automatic Ventilation No Heavy Objects Do Not Crush Water Trap Autoclavable Do Not Oil 046-003777-00 xix Introduction Symbols 134°C Not Autoclavable Filter Access Caution: Hot Direction of flow Drawer weight limit Water Drain Conforms to UL std 60601-1, IEC 60601-2-13 Certified to CAN/CSA std C22.2 No 601.1, No 60601-2-13 xx Battery supply fully charged. AC power connected and powering system. Alarm Icon Battery supply partially charged. AC power connected, charging battery supply, and power system. Alarm Silence Icon Battery supply fully charged and powering system. AC power not connected. Low priority message Battery supply partially charged and powering system. AC power not connected. Medium priority message Battery supply low charged and powering system. Recharging recommended. AC power not connected. High priority message Battery supply not installed. Breathing System Warmer Off 046-003777-00 A5/A3™ Operating Instructions 1.0 Product Description General System Overview ...................................................................................................................................................................1-2 Physical Views .............................................................................................................................................................................................1-8 A5/A3™ Operating Instructions 046-003777-00 1-1 General System Overview Product Description 1.1 General System Overview 1.1.1 General Description The A5/A3 Anesthesia System is a device intended to administer, continuously or intermittently, a general inhalation anesthetic to a patient, and to maintain a patient's ventilation. The A5/A3 also provides for ventilatory monitoring of the patient. The A5/A3 Anesthesia System consists of a main unit (includes an anesthetic ventilator and flowmeter monitor assembly) and a detachable breathing system. The A5 Anesthesia System provides the following ventilation modes: • Volume Control Ventilation (VCV), which includes the Pressure Limit Ventilation (PLV) function • Pressure Control Ventilation (PCV) with/without Volume Guarantee (VG) ventilation mode • Synchronized Intermittent Mandatory Ventilation (SIMV) with VC mode (with/without PS option) • Synchronized Intermittent Mandatory Ventilation (SIMV) with PC mode (with/without PS option) • Pressure Support (PS) ventilation mode • Spontaneous ventilation in Manual mode with APL fully open • Manual Ventilation through the use of a breathing bag • Cardiac Bypass mode The A3 Anesthesia System provides the following ventilation modes: • Volume Control Ventilation (VCV), which includes the Pressure Limit Ventilation (PLV) function • Pressure Control Ventilation (PCV) • Synchronized Intermittent Mandatory Ventilation (SIMV) with VC mode (with/without PS option) • Pressure Support (PS) ventilation mode • Spontaneous ventilation in Manual mode with APL fully open • Manual Ventilation through the use of a breathing bag Electronic PEEP is available in all automatic ventilation modes. User control over inspiratory flow (Tslope) is possible in PCV, SIMV, and PS modes. Automatic fresh gas compensation limits the effect on the patient ventilation from changes in fresh gas flow rate by the operator. The traditional bellows system is driven by oxygen and makes patient disconnections clearly visible. The A5/A3 Anesthesia System provides the following common functions: 1-2 • • • • • • • • • • Automatic leak detection Circuit gas leakage compensation and automatic compliance compensation Cylinder and central pipeline gas supply connections available for gas input Electronically displayed flowmeter and electronically adjustable PEEP Electronic timer to display the duration between the start and end of an operation Work table light Mounting rails to connect an external patient monitor Network-ready Flow trigger mode available for PS and SIMV Auxiliary O2 and air supply • • Active AGSS N2O cutoff • • Vaporizer Total flow rotameter 046-003777-00 A5/A3™ Operating Instructions Product Description 1.1.2 General System Overview Key Features FEATURE 1.1.3 DESCRIPTION Display 15 inch color LCD with touchscreen Navigation Graphical user interface for easy navigation Ventilation Manual and automatic ventilation modes and monitoring: VCV, SIMV-VC, PCV, SIMV-PC (A5 only), PS, and Manual Fresh Gas Delivery Continuous and intermittent anesthesia flow, total flow rotameter, virtual dual flow tubes, electronically displayed on screen for ease of use 3 cylinder mount locations on rear Breathing System Heated, adjustable swivel, side hose ports, single turn APL valve Ergonomics Large stainless steel work surface Adjustable Breathing System block via swivel up to 50 degrees Electronic PEEP Positive End Expiratory Pressure (PEEP) is set and controlled electronically. Clear Data Display Two large waveforms for pressure and flow or Spirometry Loops (A5 only) USB Mouse Support The A5/A3 system supports a wired USB mouse, which can be plugged into one of the two SB ports at the rear of the unit. A cursor appears when the mouse is plugged. The cursor disappears if the user touches the screen or after 15 seconds of mouse inactivity. A3: The USB mouse can serve as a backup to the touchscreen. A5: The USB mouse can serve as a backup to both the touchscreen and touchpad. Fresh Gas Dosing The A5/A3 fresh gas dosing subsystem offers the following features: • Virtual On-Screen dual flow tube and numerical readouts to display the O2, N2O, and Air flows • A knob guard to prevent inadvertent movement of the flow control knobs • Gas supply gauges to indicate the gas pipeline supply pressures and gas cylinder pressures • Mechanical total flowmeter to display the combined flow of O2, Air, and N2O • An O2 flush button • A single combined output of auxiliary O2 and Air with flowmeters Safety systems within the A5/A3 work to prevent hypoxic mixtures from being delivered to the patient. Nitrous oxide will not be delivered unless oxygen flow is present. A pneumatic safety system assures that at least 21% O2 is present when setting mixtures of O2 and N2O. Additionally, if the A5/A3 is placed in Power Standby mode, O2 fresh gas flow is not available. WARNING: Ensure that both O2 and N2O flow controllers are turned OFF fully at the start and at the end of each case. All A5/A3 units are designed to maintain a safe O2:N2O ratio by allowing nitrous oxide to be set to a flow rate that is proportional to a previously adjusted flow of oxygen. The N2O flow is limited by the flow of O2 so that a safe ratio of no less than 21% oxygen can be maintained. The A5/A3 is designed to maintain oxygen flow at its previously set level when N2O is decreased. When adjusting N2O and O2 flow rates, always adjust the oxygen flow first to enable the nitrous oxide flow. To add N2O to the fresh gas flow, open the N2O flowmeter valve, but only after opening the O2 flowmeter valve. A5/A3™ Operating Instructions 046-003777-00 1-3 General System Overview 1.1.4 Product Description Flow Control Flow Control needle Valve and Knob: Three independent flow control knobs allow setting the input flow rates of N2O, Air, and O2 into the fresh gas flow. N2O Automatic Cutoff: An N2O automatic cutoff valve stops the flow of N2O if O2 flow is less than 200 mL/min. O2 Pressure Loss Alarm: An O2 pressure loss alarm annunciates when oxygen pressure is less than 220 kPa (32 psi). Oxygen Ratio Controller: An O2 ratio controller ensures that there is always at least 21% oxygen concentration in the fresh flow when N2O is fully open. 1.1.4.1 Flow/Pressure Sensing The Breathing System block contains patient flow and pressure sensors to measure inspiratory flow, expiratory flow, and inspiratory pressure. These sensors enable spirometry as well as standard pressure and flow monitoring. 1.1.5 Vaporizer Mounting The A5/A3 contains a 2-position Selectatec-type vaporizer mounting system to enable anesthetic agents to be introduced into the fresh gas flow. The mounting system adapts vaporizers with interlock, which permits only one agent at a time to be administered. Lighting above the vaporizers enables them to be seen in a darkened environment. A maximum of two vaporizers can be attached for use at any one time. Halothane, Enflurane, Isoflurane, Desflurane, and Sevoflurane vaporizers can be used. For the A5 model, a third, non-functional vaporizer parking spot on the side of the unit is provided as part of the standard configuration. 1.1.6 Anesthesia Ventilator The A5/A3 ventilator offers multiple ventilation modes: Volume Control Ventilation (VCV), Synchronized Intermittent Mandatory Ventilation-Volume Control (SIMV-VC), Pressure Control Ventilation (PCV), Pressure Support (PS) ventilation, and Manual ventilation. The A5 offers additional ventilation modes, which include Pressure Control Ventilation (PCV) with and without Volume Guarantee (VG), and Synchronized Intermittent Mandatory Ventilation-Pressure Control (SIMV-PC). 1.1.7 Breathing System A portion of the patient circuit is integrated into an assembly block called the Breathing System. The system contains a temperature controller, which warms the block to a temperature of 35ºC typical at 20ºC ambient temperature to limit the formation of water condensate. The Breathing System can be swiveled horizontally up to 50 degrees for user convenience. The breathing system provides access to the APL valve and breathing bag along with a view of the airway pressure gauge. The APL valve has a single turn knob that provides a clear view of the manual breathing pressure setting. The absorber assembly incorporates a cam-lock device that opens and closes to provide access to the absorber canister. Either a CO2 absorbent Pre-Pak or loose fill can be used. Two water traps that can be drained are located on the CO2 absorber assembly and on the breathing system block. NOTE: 1-4 Operating the A5/A3 with a full water trap in the breathing system block does not allow the water to condense appropriately. The trap should be removed and emptied when filled with water. 046-003777-00 A5/A3™ Operating Instructions Product Description General System Overview Two (2) flow sensors in the breathing system measure inspired and expired gases for control and monitoring. Inspired oxygen concentration is monitored via a fuel-cell type sensor. Breathing pressure is monitored with both a PAW gauge (mechanical) and electronic gauge. The breathing system can be swiveled for ease of positioning. A leak test port is provided to allow for leak testing during startup. The main pneumatic components of the Breathing System are as follows: • Inspiratory Valve (passive) • Expiratory Valve (passive) • Airway Pressure Limiting Valve (APL) • Connection for O2 Sensor • CO2 Absorber Assembly • Bellows Assembly • Auto/Manual bag switch • Bag arm • PAW Gauge The Breathing system connects to the A5/A3 main unit through the following ports: • Drive gas port, designed for use with oxygen as the drive gas • Fresh gas port • Exhaust gas port • Flow sensor pressure transmission pipeline port The Breathing System contains the following ports for end-user connections: 1.1.8 • Inspiratory port for Inspiratory hose of patient breathing circuit • Expiratory port for Expiratory hose of patient breathing circuit • Manual Breathing Bag Arm • Connection for the O2 cell • Water trap • Leak test port for sealing the breathing circuit during leak testing Anesthetic Gas Scavenging System (AGSS) The A5/A3 includes a waste gas scavenger that attaches to the side rail mount on the system. The A5/ A3 provides a port for the connection of the waste line from an anesthetic gas monitor. 1.1.9 Power Management / Battery Supply The advanced power management system of the A5/A3 provides AC power for main system functions while charging the system’s internal battery supply. During AC power failure, the A5/A3 will operate on battery power for a minimum of 75 minutes with one (1) new battery installed (A3) or 150 minutes with two (2) new batteries installed (A5). See ‘‘Battery Power Specifications’’ on page 8-6. A recessed main switch is provided to power the system ON and to put the system on power standby where the battery supply continues to charge as necessary when the A5/A3 is plugged into an external power source. The main switch also stops the O2 fresh gas supply when the A5/A3 is placed in Power Standby mode. A5/A3™ Operating Instructions 046-003777-00 1-5 General System Overview Product Description Auxiliary AC outlets on the rear of the machine operate independently of the main switch position. The A5 provides four (4) auxiliary AC outlets; the A3 provides three (3) auxiliary AC outlets. The auxiliary AC outlets are not powered when operating the A5/A3 on the internal battery supply. NOTE: Use the battery supply in the A5/A3 at least once every month to extend battery life. Charge the battery supply before its power capacity is depleted. NOTE: Inspect and replace the battery supply at regular service intervals. Long-term battery life depends on how frequent and how long the battery supply is used. For a properly maintained and stored lithiumion battery, its long-term life expectancy is approximately three (3) years. In more aggressive usage, life expectancy can be shortened. Replacing lithium-ion batteries every three (3) years is recommended. NOTE: The operating time of a battery depends on equipment configuration and operation. NOTE: In case of battery failure, contact Mindray service personnel for battery supply replacement. The A5/A3 Anesthesia System is designed to operate on battery power whenever AC power is interrupted. When the A5/A3 is connected to an AC power source, the battery supply is charged whether or not the A5/A3 is turned on. In case of power failure, the A5/A3 will automatically switch to run from the internal battery supply. When AC power source is restored within the specified time, the battery supply begins recharging, and power is switched from battery to AC automatically to ensure continuous system use. The on-screen battery symbol indicates the battery status. See FIGURE 1-1: PART(S) DESCRIPTION Battery supply is fully charged. AC power is connected. The A5/A3 is being powered by AC power. The solid portion represents the current charge level of the batteries in proportion to its maximum charge level. Battery supply is partially charged. AC power is connected and charging battery supply. The A5/A3 is being powered by AC power. Battery supply is fully charged. AC power is not connected. The A5/A3 is being powered by internal battery supply. Battery supply is partially charged. AC power is not connected. The A5/A3 is being powered by internal battery supply. 1-6 046-003777-00 A5/A3™ Operating Instructions Product Description General System Overview PART(S) DESCRIPTION Battery supply is low charged. Batteries need to be charged immediately to operate as a safe power backup. AC power is not connected. The A5/A3 is being powered by internal battery supply. Battery supply is not installed. FIGURE 1-1 Battery Status If the battery capacity is too low, power supply failure will result. A high-level alarm will be triggered and the message Low Battery Voltage! will be displayed in the technical alarm area. In this case, apply AC power to the A5/A3 Anesthesia System to resume operation and charge the battery supply. 1.1.10 Workplace Ergonomics The A5/A3 is a full-featured anesthesia delivery work station. The raised perimeter of its stainless steel work surface retains items that might otherwise roll or slide off its edge. The work surface light has high and low brightness settings. The wrap-around handle enables fine positioning of the machine. Three (3) large drawers are available for storage. All drawers can be locked with a key. Rail mounts on both sides of the machine enable mounting of patient monitors and most standard attachment arms for other devices. For the A5, a non-slip footrest and central brake are provided. For the A3, a non-slip footrest and individual caster brakes are provided. The top shelf can be used to mount additional equipment. The operator of the A5/A3 should be positioned in front of the monitor at a comfortable distance to view all displayed waveforms, text, and controls. A5/A3™ Operating Instructions 046-003777-00 1-7 Physical Views Product Description 1.2 Physical Views 1.2.1 Main Unit (Front View) A17 A1 A18 A2 A19 A20 A3 A21 A4 A22 A5 A23 A6 A24 A7 A25 A8 A26 A9 A10 A11 A27 A12 A28 A13 A14 A15 A16 FIGURE 1-2 Main Unit (Front View) PART(S) 1-8 DESCRIPTION A1 Alarm Light Illuminates red, yellow, or cyan during an alarm condition to indicate the alarm priority. Red = high priority, Yellow = medium priority, cyan = low priority, off = no alarm condition. A2 LCD Touchscreen Display / System Interface See section ‘‘System Interface’’ on page 3-1 A3 Auxiliary O2/Air Flowmeters Auxiliary O2/Air Flowmeters for auxiliary O2/Air output A4 Auxiliary O2/Air Gas Outlet Nozzle (barbed connector) for auxiliary O2/Air output. Combines the auxiliary O2/Air flowmeters into a single output of O2 only, Air only, or O2/Air blend, depending upon the O2 and Air flow adjustments. 046-003777-00 A5/A3™ Operating Instructions Product Description Physical Views PART(S) DESCRIPTION A5 Auxiliary O2 Gas Power Outlet (A5 only) High pressure O2 outlet (DISS connector) for connecting external devices such as a jet ventilator. A6 Flow Control Knobs N2O, Air, and O2 gas dosing. Turn each knob counterclockwise to increase flow. A7 Pressure Gauges (pipeline) Indicate the pressure at pipeline inlets for O2, Air, and N2O. A8 Pressure Gauges (cylinder) Indicate the pressure at cylinder inlets for O2, Air, and N2O. A9 Total Flow Meter Displays the combined flow rate of O2, Air, and N2O. A10 O2 Sensor Electrical Port Connects the O2 sensor cable on the breathing system to the main A5/A3 unit. A11 O2 Flush Button Provides high flow O2 to the inspiratory limb of the breathing system. A12 Touchpad (A5 only) Allows alternate control of the touch screen. Pull out to use. A13 AGSS Anesthetic Gas Scavenging System A14 Wheel Lock (A5 only) Locks or releases the brakes for all wheels when depressed. A wheel lock indicator displays red to indicate that the wheels are locked. Green indicates unlocked. A15 Wheel Lock Indicator (A5 only) Displays a lock symbol in red background to indicate the wheels are locked, or an unlock symbol in green background to indicate the wheels are unlocked. A16 Wheels Casters to enable the A5/A3 System to be moved. Casters on the A5 lock via a central brake. Casters on the A3 lock via individual locking levers on each caster. A17 Work Light Located under the top shelf to illuminate the work level shelf and allow the user to read the vaporizer dial setting in a darkened room. A18 Work Light Switch Turns on/off the work light. Three settings: Off, Low, and High. The user can turn on the work light only when the main power switch is turned on. A19 Vaporizer Mounting Manifold / Mounting Bar An interface for two Selectatec-type vaporizers to mount in this location. Bar holds two vaporizers. An interlock within the vaporizers provides for use of one vaporizer to deliver one agent at a time. A20 Vaporizer Mount Valve Cartridge Vaporizer index and outlet ports. A21 Vaporizer Parking Spot Holds a non-functional vaporizer for user convenience. (A5 standard, A3 optional) A22 Vaporizer Locking Device Vaporizer locking mechanism to secure against accidental disconnection A23 AC Status LED Illuminated when the system is connected to an AC power source. A24 Battery Charging LED Illuminated when the battery supply is charging. A25 Main Power Switch Switch to turn the system ON or switch to Power Standby. If the system is plugged into an external power source, the internal battery supply will continue charging in both ON and Power Standby switch positions. If the A5/A3 is in Power Standby mode, O2 fresh gas flow is not available. A26 Handle Metal bar used to assist moving the A5/A3 A27 Key lock Key and lock for securing the drawers A28 Storage Drawers Drawers (3) for storage (lockable) A5/A3™ Operating Instructions 046-003777-00 1-9 Physical Views 1.2.2 Product Description Main Unit (Rear View) B1 B2 B3 B4 B5 B6 B7 B9 B8 B10 B11 B13 B12 B14 FIGURE 1-3 Main Unit (Rear View) PART(S) 1 - 10 DESCRIPTION B1 Circuit Breakers Breakers for each auxiliary outlet A5: 3 A each (quantity 4), 10 A total (quantity 1) A3: 3 A each (quantity 3) B2 Mains Inlet Connects the mains power cord B3 Exhaust Fan Forces air to cool electronics and prevent buildup of O2 concentration. Do not block. 046-003777-00 A5/A3™ Operating Instructions Product Description Physical Views PART(S) B4 DESCRIPTION Communication Ports SP1, DP1, CS1, SB1, SB2 (See section 8.6.4 (pg. 8-7) "Communication Ports".) CAUTION: B5 Auxiliary AC Outlets Do not connect any devices to the SB ports other than Mindray approved USB storage devices and a supported USB mouse (see ‘‘Networking and USB Storage’’ on page A-5). A5: Additional devices up ‘to a total maximum power of 10 amps can be connected to four (4) outlets. A3: Additional devices up to a total maximum power of 9 amps can be connected to three (3) outlets. The A5 outlets are covered with two (2) metal plates, the A3 outlets are covered with one (1) metal plate, and require a tool to access. Only authorized personnel can access these outlets. B6 Equipotential stud / lug Provides a ground point B7 Hooks Allows user to hang or wrap cords B8 Cylinder Supply Connections Interface connectors to high pressure supply tanks (O2, Air, and N2O) B9 Gas Pipeline Supply Connections Connections for O2, Air, and N2O from a pipeline gas supply B10 Sample Line Exhaust Gas Inlet Inlet for waste gas from an optionally attached gas module. Merges with the AGSS connector that connects to the AGSS. B11 AGSS Connector Connects the AGSS or waste gas disposal system B12 AGSS Anesthetic Gas Scavenging System B13 Cylinders Supply tanks (E-size) containing high pressure O2, Air, and N2O to act as backup supply if the pipeline pressure is removed. Note: Tanks not supplied by Mindray. B14 AGSS Transfer Hose Routes exhaust gases from main unit to scavenger. A5/A3™ Operating Instructions 046-003777-00 1 - 11 Physical Views 1.2.3 Product Description Main Unit (Left View) C1 C2 C4 C3 FIGURE 1-4 Main Unit (Left View) PART(S) 1 - 12 DESCRIPTION C1 Auxiliary O2/Air Flowmeters Auxiliary O2/Air Flowmeters for auxiliary O2/Air output C2 Auxiliary O2/Air Gas Outlet Nozzle (barbed connector) for auxiliary O2/Air output. Combines the auxiliary O2/Air flowmeters into a single output. C3 Auxiliary O2 Gas Power Outlet (A5 only) High pressure O2 outlet (DISS connector) for connecting external devices such as a jet ventilator. C4 Rail Mount Enables mounting of patient monitors and most standard attachment arms for other devices. Rail mounts are on both left and right sides of the A5/A3. 046-003777-00 A5/A3™ Operating Instructions Product Description 1.2.4 Physical Views Main Unit (Right View) D1 D2 D3 D4 FIGURE 1-5 Main Unit (Right View) PART(S) DESCRIPTION D1 Vaporizer Mounting Manifold / Mounting Bar An interface for two Selectatec-type vaporizers to mount in this location. Bar holds two vaporizers. An interlock within the vaporizers provides for use of one vaporizer to deliver one agent at a time. D2 Key Lock Key and lock for securing the drawers D3 Storage Drawers Drawers (3) for storage (lockable) D4 Rail Mount Enables mounting of patient monitors and most standard attachment arms for other devices. Rail mounts are on both left and right sides of the A5/A3. A5/A3™ Operating Instructions 046-003777-00 1 - 13 Physical Views 1.2.5 Product Description Main Unit (Top View) E1 Rear E4 E3 E2 Front FIGURE 1-6 Main Unit (Top View) PART(S) 1 - 14 DESCRIPTION E1 Top Shelf Top level surface E2 Work Level Shelf Work Level surface (stainless steel) E3 Handle Wrap-around metal bar used to assist moving the A5/A3 device E4 Mounting Holes Allows mounting of optional equipment to the top shelf (e.g., DPM6 and DPM7 mounting plates and kits. See section A.9 (pg. A-4) "Mounting Accessories") 046-003777-00 A5/A3™ Operating Instructions Product Description 1.2.6 Physical Views Breathing System (Top View) F1 F10 F2 F3 F4 F9 F5 F6 F8 F7 FIGURE 1-7 Breathing System (Top View) PART(S) DESCRIPTION F1 Bellows (including bellows dome)1 Bellows that separates the breathing system gases from the oxygen drive gas F2 PAW Gauge2 Indicates the patient airway pressure F3 Expiratory Limb Exhaled breathing circuit connection F4 Inspiratory Limb Inhaled breathing circuit connection F5 Expiration Valve Allows flow of expiratory gas from the patient to the rebreathing system, and prevents reverse flow. F6 Inspiration Valve Allows flow of inspiratory gas to the patient, and prevents reverse flow. F7 Bag Arm Provides the interface to the manual ventilation bag F8 O2 Sensor Cable Assembly An electro-galvanic fuel cell device to measure the concentration of O2. The assembly is composed of the O2 cable, O2 cell cover, and O2 sensor. F9 APL (Airway Pressure Limiting) Valve2 Rotary regulator for setting the breathing system pressure limit during manual ventilation. Its scale shows approximate pressure. Set to SP during Spontaneous breathing. A5/A3™ Operating Instructions 046-003777-00 1 - 15 Physical Views Product Description PART(S) F10 1 2 1 - 16 DESCRIPTION Auto/Manual Bag Switch Enables switching between Automatic and Manual ventilation modes The bellows dome is a transparent cover with graduation marks from 300 to 1500 mL. These marks are for reference only. Tidal volume (Vt) should be read exclusively from the display of the user interface. Delivered Vt is a combination of bellows displacement and fresh gas flow. The APL valve and Paw gauge numerics are for reference only. Calibrated patient airway pressure is displayed on the user interface. 046-003777-00 A5/A3™ Operating Instructions Product Description 1.2.7 Physical Views Breathing System (Left View) G5 G4 G1 G3 G2 FIGURE 1-8 Breathing System (Left View) PART(S) DESCRIPTION G1 CO2 Absorber Canister Container for CO2 absorbent material loose fill or Pre-Paks) G2 Condensate Drain Valve Turn counter-clockwise (looking from bottom) to drain water collected in the absorber canister. G3 Absorber Canister Lock Lever-type locking mechanism to lock (horizontal position) or unlock (vertical position) the absorber canister from the canister assembly. G4 Water Trap Accumulates condensate from the breathing system. Must be removed and emptied periodically. To remove, turn clockwise (looking from top). G5 Absorber Bypass Assembly Maintains pressure in the breathing circuit when changing the sodalime contents in the CO2 absorber canister. A5/A3™ Operating Instructions 046-003777-00 1 - 17 Physical Views 1.2.8 Product Description Anesthetic Gas Scavenging System (AGSS) (Top, Front, and Right Views) Top View H1 H2 Rear View Right View H3 H5 Max Max Min Min H4 FIGURE 1-9 AGSS (Top, Front, and Right Views) PART(S) 1 - 18 DESCRIPTION H1 Mounting Rail Attachment Allows the AGSS to be mounted on the side rail. Contains a thumbscrew that must be tightened against the mounting rail. H2 Flow Adjust Knob Turn clockwise or counter-clockwise to adjust the flow in the AGSS until the float is between Min and Max marks. H3 Exhaust Port Exhaust port to the hospital’s waste gas scavenging system H4 Inlet Port Intake for exhaust gases from the breathing system. An AGSS transfer hose connects the Inlet and AGSS ports (see FIGURE 1-3) to transfer the exhaust gases. H5 Float Indicates exhaust flow. Adjusted by turning the Flow Adjust Knob (H2) until the float is between the Min and Max marks. 046-003777-00 A5/A3™ Operating Instructions 2.0 Installation Unpacking.....................................................................................................................................................................................................2-3 Initial Setup...................................................................................................................................................................................................2-4 Install the Vaporizer .................................................................................................................................................................................2-5 A5/A3™ Operating Instructions 046-003777-00 2-1 Installation 2-2 WARNING: This equipment must be installed by a factory authorized representative. WARNING: Continuous use of desiccated sodalime may endanger patient safety. Adequate precautions should be taken to ensure that the sodalime in the CO2 absorbent canister does not become desiccated. Turn off all gases when finished using the system. WARNING: When electrosurgical equipment is used, keep the electrosurgical leads away from the breathing system, the O2 sensor, and other parts of the A5/A3 Anesthesia System. Keep available backup manual ventilation and a respirator with mask in case the electrosurgical equipment prevents safe use of the ventilator. Ensure the correct operations of all life support and monitoring equipment. WARNING: Do not use masks or breathing tubes that are antistatic or conductive. They can cause burns if they are used near high frequency electrosurgical equipment. WARNING: This A5/A3 Anesthesia System has waste gas exhaust ports. The operator of the machine should pay attention to the disposal of the residual breathing gas scavenged. CAUTION: The operational environment and the power source of the equipment must comply with the requirements as specified in the A5/A3 ‘‘Product Specifications’’ on page 8-1 046-003777-00 A5/A3™ Operating Instructions Installation 2.1 Unpacking Unpacking When the A5/A3 Anesthesia System is delivered, IMMEDIATELY inspect the box for any damage. a. If there is NO damage and ALL tip indicators on the box exterior are intact, then sign and date the bill of lading or airway bill to indicate safe receipt of the A5/A3. b. If there is DAMAGE or ANY of the tip indicators on the box exterior have activated, then conditionally accept the delivery and clearly describe the damages on the bill of lading or airway bill. BOTH the carrier and recipient must sign and date the bill of lading or airway bill. Save all damaged factory packaging until further instructed by Mindray. The receiver should immediately contact Mindray Customer Service at (800) 288-2121 or (201) 995-8000. A5/A3™ Operating Instructions 046-003777-00 2-3 Initial Setup 2.2 Installation Initial Setup The initial setup of the A5/A3 Anesthesia System must be performed by an authorized Mindray service representative. Please contact Mindray Technical Support for any additional assistance. NOTE: 2-4 The A5/A3 is intended to be operated with an external CO2 monitor complying with ISO 21647. Connection to the CO2 monitor should be via a sample line from the patient circuit. 046-003777-00 A5/A3™ Operating Instructions Installation 2.3 Install the Vaporizer Install the Vaporizer CAUTION: Only vaporizers with Selectatec Interlock Systems may be used with the A5/A3 unit. WARNING: Use vaporizers compliant to ISO 8835-4. See section A.12 (pg. A-5) "Vaporizers". Refer to the vaporizer manufacturer’s Instructions For Use for mounting, filling, or draining the vaporizer and other information. WARNING: Use care in lifting and manipulating vaporizers during the mounting process as their weight may be greater than expected, based on their size and shape. NOTE: The barometric pressure may differ from the calibration pressure of the anesthetic vaporizer. This may cause an inaccurate output of the anesthetic agent. The operator should continuously monitor the concentration of anesthetic agent during system use to determine if the outputted concentration is accurate. FIGURE 2-1 shows the location of the vaporizer mounting system on the A5/A3 unit. Vaporizer mounts for two inline vaporizers A5 only: Additional vaporizer mount for one inactive vaporizer FIGURE 2-1 Location of Vaporizer Mounting System 1. If replacing and removing the vaporizer, lift each vaporizer straight up off the manifold. Do not pull the vaporizer forward. Do not rotate the vaporizer on the manifold. 2. Align the new vaporizer over the valve cartridges of the mounting bar, slightly tilting back the vaporizer. Hang the vaporizer on the mounting bar as shown in FIGURE 2-2. Ensure that the locking mechanism handle is in the unlocked position. Ensure that the dial is in the “T” (Transport) position or equivalent, depending upon the vaporizer manufacturer’s Instructions For Use. A5/A3™ Operating Instructions 046-003777-00 2-5 Install the Vaporizer Installation Locking Mechanism Handle in the Unlocked Position Vaporizer dial in the “T” position FIGURE 2-2 Vaporizer, Unlocked 3. Rotate the locking mechanism handle clockwise into the locked position as shown in FIGURE 2-3. NOTE: If installing a Desflurane vaporizer, refer to the manufacturer’s Instructions For Use on installation and use of the vaporizer. Locking Mechanism Handle in the Locked FIGURE 2-3 Vaporizer, Locked 4. Final check: 1. Ensure that the top of the vaporizer is horizontal. If not, remove and reinstall the vaporizer. 2. If a vaporizer lifts off the manifold, repeat steps 1 through 3 to reinstall the vaporizer. If the vaporizer lifts off a second time, do not use the system. WARNING: 2-6 For the A5/A3 Anesthesia System, using or turning on more than one vaporizer simultaneously is prohibited and prevented by a mechanical interlock. Do not attempt to override this safety mechanism. 046-003777-00 A5/A3™ Operating Instructions Installation 2.3.1 Install the Vaporizer Filling and Draining the Vaporizer Install only Mindray-approved vaporizers compliant to ISO 8835-4 on the A5/A3 unit. See section A.12 (pg. A-5) "Vaporizers". Refer to the manufacturer’s vaporizer Instructions For Use for filling or draining the vaporizer and other information. WARNING: Ensure that the correct anesthetic agent is used. The vaporizer is designed with the specific anesthetic agent named on it and further indicated by color coded labelling. The concentration of the anesthetic agent actually output will vary if the vaporizer is filled with the wrong agent. WARNING: Do not reuse the agent drained from the vaporizer. Treat as a hazardous chemical and follow local regulations for proper disposal. A5/A3™ Operating Instructions 046-003777-00 2-7 Install the Vaporizer Installation This page intentionally left blank. 2-8 046-003777-00 A5/A3™ Operating Instructions 3.0 System Interface Main Screen Components ..................................................................................................................................................................3-2 System Information Header ...............................................................................................................................................................3-5 Fresh Gas Flow Display ..........................................................................................................................................................................3-9 Waveforms Tab........................................................................................................................................................................................ 3-10 Spirometry Tab (A5 Only).................................................................................................................................................................. 3-12 Ventilation Mode Tabs ........................................................................................................................................................................ 3-18 Measured Values Area......................................................................................................................................................................... 3-20 System Softkeys...................................................................................................................................................................................... 3-21 Display Tab................................................................................................................................................................................................. 3-24 A5/A3™ Operating Instructions 046-003777-00 3-1 Main Screen Components 3.1 System Interface Main Screen Components The components of the Main screen are shown in FIGURE 3-1. 1 2 3 5 4 12 6 7 8 9 10 11 13 FIGURE 3-1 A5 Main Screen Components 3-2 046-003777-00 A5/A3™ Operating Instructions System Interface Main Screen Components 1 2 3 7 5 4 8 9 10 11 13 12 FIGURE 3-2 A3 Main Screen Components NUMBER MAIN SCREEN COMPONENT 1 Elapsed Timer Displays elapsed time. Select to start, stop, or reset the timer. 2 Fresh Gas Flow Area Displays real-time flowmeter levels for N2O, Air, and O2. 3 Patient Size Displays the currently selected patient size (Adult, Pediatric, or Infant). Select to change the patient size when the A5/A3 is in Standby mode or Manual mode. 4 Current Ventilation Mode Displays the current ventilation mode (VCV, SIMV-VC, PCV, SIMV-PC*, PS, Manual, or Bypass*. 5 Waveforms Tab See “Waveforms Tab” on page 3-10. 6 Spirometry Tab A5 only. See “Spirometry Tab (A5 Only)” on page 3-12. 7 Demographics Tab See “Demographics Tab” on page 3-16. DESCRIPTION * SIMV-PC and Bypass are only available on A5. A5/A3™ Operating Instructions 046-003777-00 3-3 Main Screen Components System Interface NUMBER MAIN SCREEN COMPONENT DESCRIPTION 8 Alarm / Prompt Message Area Displays physiological alarms, technical alarms, and prompt messages. The most recent highest priority alarm is displayed at the top. The remaining alarms are displayed in the lower area and grouped by priority. The most recent of these alarms is displayed first. Select this area to display a list of all active alarms. See ‘‘Alarms and Messages’’ on page 6-1 for tables that list the individual messages and their associated priority levels. High priority messages are red. Medium priority messages are yellow. Low priority messages are cyan. Prompt messages are black. 9 Alarm Silence Icon Displays the alarm silence icon and Alarm Silence countdown timer for 120 seconds when the Silence softkey is selected. 10 System Date and Time Displays the current system date and time. Select to adjust the date and time. See ‘‘Date and Time’’ on page 3-7. 11 Main Power Supply and Battery Status Icon Displays the main power supply and battery state. See “Power Management / Battery Supply” on page 1-5. 12 Ventilations Mode and Setting Parameters Area Displays tabs for all ventilation modes (VCV, SIMV-VC, PCV, SIMV-PC*, PS, and Manual/Bypass*). Each tab displays the ventilation mode and its parameters. Select a tab and the “Set Mode” softkey to change the ventilation mode. Select a parameter button to change the parameter setting. See ‘‘Ventilation Modes’’ on page 5-7. 13 System Softkeys Setup – Select to open the Setup menu. The Setup menu contains the General tab, Display tab, System tab, and Service tab. Alarms – Select to open the Alarms menu to set alarm limits, set alarm volume, view alarm log, and view all active alarms. Silence – Select to silence all currently sounding alarm tones for 120 seconds. The alarm silence icon and 120 second countdown time appear at the top of the screen. Select again to clear the alarm silence. Note, however, that a new alarm will sound if that alarm occurs while the system is in a silenced state. If this occurs, you can select the Silence softkey again to silence the new alarm and reset the silence countdown timer to 120 seconds. * SIMV-PC and Bypass are only available on A5. 3-4 046-003777-00 A5/A3™ Operating Instructions System Interface System Information Header 3.2 System Information Header 3.2.1 Elapsed Timer Displays the elapsed time. Located at the top left of the Main Screen. Select to start, stop, or reset the timer. (FIGURE 3-3) Elapsed Timer FIGURE 3-3 Elapsed Timer 3.2.2 Patient Size Displays the currently selected patient size (Adult, Pediatric, or Infant). Select to change the patient size when the A5/A3 is in Standby mode or Manual mode. (FIGURE 3-4) Patient Size FIGURE 3-4 Patient Size Menu 3.2.3 Alarm and Prompt Messages Displays physiological alarms, technical alarms, and prompt messages. The most recent highest priority alarm is displayed at the top. The remaining alarms are displayed in the lower area and grouped by priority. The most recent of these alarms is displayed first. Select this area to display a list of all active alarms. See ‘‘Alarms and Messages’’ on page 6-1 for tables that list the individual messages and their associated priority levels. High priority messages are red. Medium priority messages are yellow. Low priority messages are cyan. Prompt messages are black. (FIGURE 3-5) A5/A3™ Operating Instructions 046-003777-00 3-5 System Information Header System Interface FIGURE 3-5 Alarm and Prompt Messages 3.2.4 Alarm Silence Icon The Alarm Silence icon and Alarm Silence countdown timer are displayed when the Silence softkey is selected, which indicates that all currently sounding alarms are silenced for 120 seconds. (FIGURE 3-6) Alarm Silence Icon FIGURE 3-6 Alarm Silence Icon 3-6 046-003777-00 A5/A3™ Operating Instructions System Interface 3.2.5 System Information Header Date and Time Displays the current system date and time. (FIGURE 3-7) Date and Time FIGURE 3-7 Date and Time Icon To adjust the date and time: 1. Select the Date and Time icon. The Date/Time dialog is displayed (FIGURE 3-8). 2. Use the dialog keypad and softkeys to adjust the date, time, 12/24 hour format, date format, and daylight savings time. NOTE: If applicable, select Daylight Savings Time first before all other settings. NOTE: If the Daylight Savings Time On/Off button in the Date/Time dialog (see Figure 3-8) is inactive and cannot be selected, it is because the Daylight Savings setting has been set to Auto in the System settings (see Table 3-3, “System tab settings,” on page 27). 3. Select the “Accept” to finalize your changes. FIGURE 3-8 Date and Time Menu A5/A3™ Operating Instructions 046-003777-00 3-7 System Information Header 3.2.6 System Interface Battery Status Displays the main power supply and battery state (FIGURE 3-9). For more information on the advanced power management system of the A5/A3, see “Power Management / Battery Supply” on page 1-5. Battery Status Icon FIGURE 3-9 Battery Status Icon PART(S) DESCRIPTION Battery supply is fully charged. AC power is connected. The A5/A3 is being powered by AC power. The solid portion represents the current charge level of the batteries in proportion to its maximum charge level. Battery supply is partially charged. AC power is connected and charging batteries. The A5/A3 is being powered by AC power. Battery supply is fully charged. AC power is not connected. The A5/A3 is being powered by internal batteries. Battery supply is partially charged. AC power is not connected. The A5/A3 is being powered by internal batteries. Battery supply is low charged. Batteries need to be charged immediately to operate as a safe power backup. AC power is not connected. The A5/A3 is being powered by internal batteries. Battery supply is not installed. FIGURE 3-10 Battery Status 3-8 046-003777-00 A5/A3™ Operating Instructions System Interface 3.3 Fresh Gas Flow Display Fresh Gas Flow Display Displays real-time flowmeter levels for N2O, Air, and O2. (FIGURE 3-11) The flowmeter numerics display a precision to two decimal digits for flows < 1 L/min and one decimal digit for flows ≥ 1 L/min. Fresh Gas Flow Display FIGURE 3-11 Fresh Gas Flow Display A5/A3™ Operating Instructions 046-003777-00 3-9 Waveforms Tab 3.4 System Interface Waveforms Tab Displays PAW (cmH2O) and Flow (L/min) waveforms. (FIGURE 3-12) Waveforms Tab FIGURE 3-12 Main Screen Waveforms Tab 3.4.1 Waveform Color WAVEFORM COLOR DESCRIPTION Orange Indicates the color of the Paw waveform. Cyan Indicates the color of the Flow waveform. Purple During the inspiratory phase, Paw and Flow waveforms change to purple when spontaneous breath is detected in ventilation modes that contain pressure support. TABLE 3-1 Waveform color 3 - 10 046-003777-00 A5/A3™ Operating Instructions System Interface 3.4.2 Waveforms Tab Waveforms Autoscaling If the measured value of Paw or Flow is larger than the boundary at the end of breath cycle, the system will auto scale the Paw or Flow at the beginning of the next breath cycle. If the measured value of Paw or Flow is less than the boundary minus a margin at the end of two continuous breath cycles, the A5/A3 System will auto scale the Paw or Flow at the beginning of next breath cycle. Paw scale: The margin will be 10 cmH2O Flow scale: The margin will be 10 L/min if Flow ≤ 30 L/min The margin will be 15 L/min if Flow > 30 L/min A5/A3™ Operating Instructions 046-003777-00 3 - 11 Spirometry Tab (A5 Only) 3.5 System Interface Spirometry Tab (A5 Only) Displays separate looped graphs of Pressure-Volume (FIGURE 3-13) and Flow-Volume (FIGURE 3-14). Spirometry Tab FIGURE 3-13 Spirometry: Pressure-Volume Loop FIGURE 3-14 Spirometry: Flow-Volume Loop 3 - 12 046-003777-00 A5/A3™ Operating Instructions System Interface Spirometry Tab (A5 Only) Spirometry loops reflect patient lung function and ventilation. They also indicate other related parameters such as compliance, over-inflation, breathing system leak, and airway blockage. The system provides two spirometry loops: P-V (Paw-volume) loop and F-V (flow-volume) loop. Data of P-V and F-V loops come from pressure and flow data. Only one loop is displayed at a time. The spirometry tab displays four softkeys: Loop Type, Show Reference, Save Loop, and Review Loops. 3.5.1 Loop Type The Loop Type selection is used to select Pressure - Volume loop or Flow - Volume loop to display on the spirometry screen. Default Loop Type is Pressure - Volume loop. Show Reference Review Loops Loop Type Save Loop FIGURE 3-15 Spirometry Softkeys: Loop Type, Show Reference, Save Loop, and Review Loops 3.5.2 Show Reference The Show Reference softkey can be selected only after a baseline has been saved via the Save Loop softkey. The Show Reference softkey (FIGURE 3-15) is used to select and display a saved Baseline loop, Reference loop, or no loop (Off ) in the Spirometry Loop Window, overlapped with the currently plotting loop. Only the four most recently saved reference loops are listed chronologically. When a Reference loop or Baseline loop is selected to display in the Spirometry Loop Window, the time stamp will also be displayed. 3.5.3 Save Loop Select the Save Loop softkey (FIGURE 3-15) to save the currently plotting loop (including its numeric data) as either a baseline loop or reference loop. Only one baseline loop and up to four reference loops can be saved. Additional plotting loops can be saved to replace the baseline loop or reference loops. Only the four most recent reference loops are saved. The saved baseline or reference loop can be reviewed with its numeric data (via Review Loops softkey) or displayed with the currently plotting loop on the same graph for comparison (via Show Reference softkey). NOTE: A5/A3™ Operating Instructions A reference loop cannot be saved without first saving a baseline loop. The A5 system will always make the first saved loop as the baseline loop if no previous loops have been saved. Afterward, additional loops can be saved either as a baseline replacement or as a new reference loop. 046-003777-00 3 - 13 Spirometry Tab (A5 Only) System Interface To save a baseline loop: 1. From the main screen, select Spirometry tab > Save Loop softkey. If there is no baseline loop saved in memory, the currently plotting loop will be saved automatically as the baseline loop. 2. If a baseline loop is already saved in memory, a dialog box will appear with the choices of “Baseline“ and ”Reference“. Select ”Baseline”. A confirmation dialog will be displayed with the text “Selecting Yes will replace the currently saved Baseline loop. Do you want to proceed?” If “Yes” is selected, the currently saved baseline loop will be replaced. If “No” is chosen, the save will be aborted. To save a reference loop: 1. From the main screen, select Spirometry tab > Save Loop softkey. If a baseline loop is already saved in memory, a dialog box will appear with the choices of "Baseline" and "Reference". Select "Reference". A maximum of four (4) sets of Reference loops plus one (1) Baseline loop and corresponding numeric data can be saved. When the maximum of four (4) loops is reached, and the user attempts another save, a confirmation dialog will be displayed with the following text, “Selecting Yes will replace the oldest reference loop. Do you want to proceed?” If “Yes” is chosen, the oldest data will be removed as the new data is added. If "No" is chosen, the save will be aborted. 3.5.4 Review Loops Button Selecting the Review Loops softkey (FIGURE 3-15) displays the Review Loops screen (FIGURE 3-16). The following areas and selections are displayed: Small Loop Windows: These small graphic windows show the baseline and reference loops. The baseline loop (only one) is always located on the left and has a white border around its graph. The reference loops (up to four) are located to the right of the baseline loop. The reference loops are displayed from oldest (left) to newest (right). The baseline loop information is displayed below the small baseline loop window. The reference loop information is displayed in cyan highlight for the reference loop that is selected. Large Loop Window: This graphic window shows an enlarged view of the selected reference loop overlapped with the baseline loop. Loop Type: The Loop Type selection is used to choose the type of loop to review. The choices are: Pressure-Volume and Flow Volume. Default Loop Type is Pressure - Volume loop. Delete Loop: The Delete Loop selection is used to delete a selected Reference loop. When a reference loop is deleted, the newer reference loops will shift to the left. The Delete Loop button will be disabled (grayed out) if no reference loops have been saved. The baseline loop cannot be deleted. It can only be replaced by another baseline loop. 3 - 14 046-003777-00 A5/A3™ Operating Instructions System Interface Spirometry Tab (A5 Only) Non-selected Baseline Loop Non-selected Reference Loop Selected Reference Loop (small) Non-selected Reference Loop Selected Reference Loop (large) Numeric Data Area FIGURE 3-16 Review Loops window Numeric Data Area: Displays the numerical data associated with a saved Baseline loop and saved Reference loops. The parameters listed in column form include: Time, Expiratory Minute Volume (MVexp), Inspiratory Minute Volume (MVinsp), Expiratory Tidal Volume (VTexp), Inspiratory Tidal Volume (VTinsp), Ratio of Inspiratory time to Expiratory time (I:E), Positive End Expiratory Pressure (PEEP), Rate, Peak Inspiratory Pressure (PEAK), Plateau Pressure (PLAT), Mean Pressure (MEAN), Dynamic Airway Compliance (Compl), and Airway Resistance (Raw). A5/A3™ Operating Instructions 046-003777-00 3 - 15 Demographics Tab 3.6 System Interface Demographics Tab The Demographics tab is located on the main screen next to the Waveforms tab on the A3 system, and next to the Spirometry tab on the A5 system (FIGURE 3-17). The Demographics tab contains editable fields to enter patient and hospital data (TABLE 3-2). NOTE: Facility data should be entered when first setting up the machine. After entering facility data, the user should go to the System tab>Manage Defaults>Save as O.R. Defaults so that the data is not erased on power cycle or discharge. EDITABLE FIELD COMMENT Patient ID Enter up to 20 characters per field. These fields are cleared when the patient is discharged or if the A5/A3 is power cycled. First Name Last Name DOB (Date Of Birth) Weight (lbs/kg) Bed Room Enter the information from the virtual keypad. If the calculated age of the patient is outside the accepted range (0-150), a prompt message is displayed. These fields are cleared when the patient is discharged or if the A5/A3 is power cycled. Enter up to 20 characters per field. These fields are NOT cleared when the patient is discharged. These fields can be changed only by editing them directly. Point of Care Facility TABLE 3-2 Demographic Tab Fields for Patient and Hospital Data 3 - 16 046-003777-00 A5/A3™ Operating Instructions System Interface Demographics Tab Demographics Tab FIGURE 3-17 Demographics Tab A5/A3™ Operating Instructions 046-003777-00 3 - 17 Ventilation Mode Tabs 3.7 System Interface Ventilation Mode Tabs Displays tabs for all ventilation modes. Each tab displays the ventilation mode and its parameters. (FIGURE 3-18 to FIGURE 3-25) A5 ventilation modes: VCV, SIMV-VC, PCV, SIMV-PC, PS, and Manual A3 ventilation modes: VCV, SIMV-VC, PCV, PS, and Manual Ventilation Mode Tabs FIGURE 3-18 Ventilation Mode Tabs To change the ventilation mode: 1. Select a desired ventilation mode tab. The Set Mode softkey begins to blink green. 2. Optionally, select one or more parameter buttons to change the parameter settings of the desired ventilation mode. Select the “Accept” button to accept each parameter change. 3. Select the “Set Mode” softkey to finalize and change the ventilation mode. NOTE: If the Set Mode softkey is not selected after several seconds, an audible reminder is sounded, and then the desired ventilation mode is cancelled. FIGURE 3-19 Ventilation Mode: VCV FIGURE 3-20 Ventilation Mode: SIMV-VC 3 - 18 046-003777-00 A5/A3™ Operating Instructions System Interface Ventilation Mode Tabs FIGURE 3-21 Ventilation Mode: PCV (A5 unit) FIGURE 3-22 Ventilation Mode: PCV (A3 unit) FIGURE 3-23 Ventilation Mode: SIMV-PC (A5 only) FIGURE 3-24 Ventilation Mode: PS FIGURE 3-25 Ventilation Mode: Manual. (Note: Bypass function is available only on the A5.) A5/A3™ Operating Instructions 046-003777-00 3 - 19 Measured Values Area 3.8 System Interface Measured Values Area The Measured Values area is used to display the numerical data. The parameters include: Peak Inspiratory Pressure (PEAK), Plateau Pressure (PLAT) (user can configure this to display Mean Pressure (MEAN) or PLAT (see “Pressure Display” on page 3-25)), Positive End Expiratory Pressure (PEEP), I:E Ratio, Expiratory Tidal Volume (Vt), Expiratory Minute Volume (MV), Breath Rate (Rate), and Inspiratory O2% (FiO2). (FIGURE 3-26) Measured Values Area FIGURE 3-26 Measured Values Area 3 - 20 046-003777-00 A5/A3™ Operating Instructions System Interface 3.9 System Softkeys System Softkeys The A5/A3 System provides system softkeys at the bottom right of the main screen for direct access to the system setup, alarms menu, and for silencing alarms. (See Figure 3-27) FIGURE 3-27 System Softkeys 3.9.1 Setup Softkey Select the Setup softkey on the main screen to display the Setup menu. See Figure 3-27, “System Softkeys,” on page 21. The Setup menu contains the General tab, Display tab, System tab, and Service tab. See section 3.11 (pg. 3-24) "Display Tab". 3.9.2 Alarms Softkey Select the Alarms softkey on the main screen to open the Alarms menu to set alarm limits, set alarm volume, view alarm log, and view all active alarms. See “Alarms and Messages” on page 6-1. 3.9.3 Silence Softkey Select the Silence softkey on the main screen to silence all currently sounding alarm tones for 120 seconds. The alarm silence icon and 120 second countdown time appear at the top of the screen. Select again to clear the alarm silence. Note, however, that a new alarm will sound if that alarm occurs while the system is in a silenced state. If this occurs, you can select the Silence softkey again to silence the new alarm and reset the silence countdown timer to 120 seconds. A5/A3™ Operating Instructions 046-003777-00 3 - 21 Setup 3.10 System Interface Setup Select the Setup softkey (FIGURE 3-27) to open the Setup menu (FIGURE 3-28). The Setup menu contains the General tab, Display tab, System tab, and Service tab. See section 3.11 (pg. 3-24) "Display Tab". NOTE: The System tab is only available in Standby mode. NOTE: The Service tab is for use only by Mindray Technical Service. Please contact Mindray Technical Support for details. Many of these functions are only available if the A5/A3 is in Standby mode. 3.10.1 General Tab The General tab provides access to calibrate the O2 sensor and flow sensor, perform system leak and compliance tests, activate the breathing system warmer, and zero flow meters. The General tab also displays information for the most recent calibrations and leak test results, whether they were passed, failed, or skipped. (See Figure 3-28) FIGURE 3-28 General Tab Calibrate O2 Sensor To calibrate the O2 sensor, select the Calibrate O2 Sensor button. Follow the on-screen directions and prompts. See ‘‘O2 Sensor Calibration’’ on page 7-6 for more information. Note that information for the last O2 sensor calibration is displayed next to the button. Calibrate Flow Sensor To calibrate the flow sensor, select the Calibrate Flow Sensor button. Follow the on-screen directions and prompts. See ‘‘Flow Sensor Calibration’’ on page 7-5 for more information. Note that information for the last flow sensor calibration is displayed next to the button. 3 - 22 046-003777-00 A5/A3™ Operating Instructions System Interface Setup Leak Test / Compliance The Test Leak / Compliance button enables the A5/A3 system to perform a manual leak test and automatic leak test, and calculates the compliance for the A5/A3. To perform a leak test, select the Test Leak/Compliance button. Follow the on-screen directions and prompts. See ‘‘Leak and Compliance Tests’’ on page 4-9 for more information. Note that information for the last Leak Test / Compliance is displayed next to the button. Breathing System Warmer Select to set the breathing system Warmer On (default) or Warmer Off. If the Breathing System is selected Warmer Off or if AC power is not connected, the system displays an icon to indicate that the warmer is not active. After cycling power, the breathing system warmer will return to the default state. NOTE: The breathing system warmer is inactive when the A5/A3 is powered by the battery supply. Zero Flow Meters To zero the flow meters, select the Zero Flow Meters button. Follow the on-screen directions and prompts. Note that information for the last zeroing of the flow meters is displayed next to the button. NOTE: A5/A3™ Operating Instructions Before zeroing the flow meters, make sure to disconnect the gas supply (N2O, Air, O2). 046-003777-00 3 - 23 Display Tab 3.11 System Interface Display Tab Screen Brightness To adjust the screen brightness: 1. Select Setup softkey > Display tab (FIGURE 3-29). 2. In the Screen Brightness area, select +/- buttons to adjust the screen brightness. 3. Select the Accept button to confirm the change, or select Cancel to ignore the change. Select the +/- buttons to adjust screen brightness. FIGURE 3-29 A5/A3 Display Tab: Screen Brightness Area 3 - 24 046-003777-00 A5/A3™ Operating Instructions System Interface Display Tab Key Click Volume To adjust the key click volume: 1. Select Setup softkey > Display tab. 2. In the Key Click Volume area, select the +/- buttons to adjust the key click volume. 3. Select the Accept button to confirm the change. Select the +/- buttons to adjust the key click volume. FIGURE 3-30 A5/A3 Display Tab > Key Click Volume Area Clean Screen To clean the LCD touch screen: 1. Select Setup softkey > Display tab. 2. Select the Clean Screen button. The screen will lock for 10 seconds for cleaning. Calibrate Touch To calibrate the LCD touch screen: 1. Select Setup softkey > Display tab. 2. Select the Calibrate Touch button. 3. Follow the on-screen directions. Pressure Display To change the pressure display: 1. Select Setup softkey > Display tab. 2. Select the Pressure Display button. 3. Choose between Mean and Plat. 4. Select the Accept button to confirm the change. A5/A3™ Operating Instructions 046-003777-00 3 - 25 Display Tab System Interface Plimit Line The Plimit line function displays a dashed line in the Pressure waveform area to indicate the Plimit position. The Plimit line can be displayed in VCV, SIMV-VC, and PCV with VG on mode. The Plimit line function can be switched On or Off by the user. The default value for Plimit Line is On. Plimit Line FIGURE 3-31 Plimit Line NOTE: The Plimit line does not affect the auto-scaling algorithm. If the Plimit line is turned on but not visible, it may be because the line is positioned off the waveform scale. To set the Plimit line to ON or OFF 1. Select Setup softkey > Display tab. 2. Select the Plimit Line button to ON or OFF. 3 - 26 046-003777-00 A5/A3™ Operating Instructions System Interface 3.12 System Tab System Tab The System tab is accessible only by authorized administrative service personnel with password access. The system tab can only be accessed in Standby mode. NOTE: The default System tab password is: 1234. The authorized administrator should change the default password immediately after the system is installed to prevent unauthorized access to the System tab. The password can be up to 6 digits in length containing numerals 0 to 9. FIGURE 3-32 A5/A3 Setup menu > System tab SYSTEM TAB BUTTON CHOICES DESCRIPTION Calibration O2 Sensor Select to calibrate the O2 sensor. Follow the screen instructions. The date and time of the last calibration is displayed next to the O2 Sensor button. Language English (default) French Spanish Portuguese Russian Turkish Dutch Select to set the language of the user interface text. Default Patient Size Adult Pediatric Infant (default) Select to set the default patient size. TABLE 3-3 System tab settings A5/A3™ Operating Instructions 046-003777-00 3 - 27 System Tab System Interface SYSTEM TAB BUTTON Manage Defaults Time Settings CHOICES DESCRIPTION Save Defaults Save as O.R. Defaults Select “Save Defaults” or “Save as O.R. Defaults” to save the current configuration as the user default configuration. Load User Defaults Load O.R. Defaults Select “Load User Defaults” or “Load O.R. Defaults” to load the user default configuration. Restore Partial Defaults Select “Restore Partial Defaults” to overwrite the user defaults and system settings with the factory default settings. Note that network settings will not be restored. Import Defaults Select “Import Defaults” to import a copy of the defaults from the USB mass storage device if one has been inserted into an SB port at the rear of the A5/A3 unit. Export Defaults Select “Export Defaults” to export a copy of the defaults to the USB mass storage device if one has been inserted into an SB port at the rear of the A5/A3 unit. Time Zone (Default = UTC-05:00) Select to set the UTC time zone offset. Daylight Savings (Default =Manual, Auto) Select to set the Daylight Savings Time (DST) to be adjusted automatically by the A5 system, or manually by the authorized administrator. If the region or country of installation does not observe DST, change this setting to Manual. If Daylight Savings is set to Auto, the Daylight Savings Time On/Off button in the Date/Menu dialog becomes inactive and cannot be selected (see FIGURE 3-8) DST Start (Default =First Sunday in April at 2:00 AM) Select to set the START of Daylight Savings Time. This setting is not available if DST is set to Manual. DST End (Default =Last Sunday in October at 3:00 AM) Select to set the END of Daylight Savings Time. This setting is not available if DST is set to Manual. Network See section 3.12.1 (pg. 3-29) "Network Configuration". Change Password 1234 (default) Select to change the System tab password. The authorized administrator should change the default password immediately after the system is installed to prevent unauthorized access to the System tab. The password can be up to 6 digits in length containing numerals 0 to 9. Set Pressure Unit cmH2O(default) hPa mbar Select to set the Pressure Unit of measure. TABLE 3-3 System tab settings 3 - 28 046-003777-00 A5/A3™ Operating Instructions System Interface System Tab SYSTEM TAB BUTTON CHOICES DESCRIPTION Configuration Information — Select to display the machine ID and the status of system functions. Export Data — Select to export patient data via mass storage device. TABLE 3-3 System tab settings 3.12.1 Network Configuration Network configuration settings can be set via the Network button (see Figure 3-33): Select Main screen > Setup button > System tab > Network button. FIGURE 3-33 Network Configuration Screen Table 3-4 on page 30 lists the network settings and parameters. A5/A3™ Operating Instructions 046-003777-00 3 - 29 System Tab System Interface SETTINGS PARAMETERS This Machine Configure Ethernet Enter: • IP Address (default = 192.168.23.250) • Subnet (default = 255.255.255.0) • Default Gateway (default = [blank]) Configure Serial Select: • Protocol (None (default), MR-Link, MR-WATO) • Baud Rate (57600, 11520(default)) • Data Bits (8 (default)) • Stop Bits (1 (default), 2) • Parity (Odd, Even, None (default)) • Interval(10 Sec, 30 Sec, 1 Min (default), 5 Min, 30 Min, 1 Hour, 2 Hour, 6 Hour, 12 Hour, 24 Hour) Network Protocol HL7 Select: On, Off (default) Interval (enabled when HL7 = On) Select: 10 sec, 30 sec, 1 min (default), 5 min, 30 min, 1 hour, 2 hour, 6 hour, 12 hour, 24 hour Destination IP (enabled when HL7 = On) Enter: Destination IP (default = 192.168.23.200) Port (enabled when HL7 = On) Enter: Port (default = 1550) TABLE 3-4 Network Configuration Settings and Parameters 3 - 30 046-003777-00 A5/A3™ Operating Instructions System Interface System Tab SETTINGS PARAMETERS SNTP Protocol Interval Select: Off (default), 10 sec, 30 sec, 1 min, 5 min, 30 min, 1 hour, 2 hour, 6 hour, 12 hour, 24 hour Primary Server IP Enter: Primary Server IP (default = 132.163.4.103) Secondary Server IP Enter: Secondary Server IP (default = 210.72.145.44) TABLE 3-4 Network Configuration Settings and Parameters A5/A3™ Operating Instructions 046-003777-00 3 - 31 Service Tab 3.13 System Interface Service Tab Accessible only by Mindray-authorized service personnel. Please contact Mindray Technical Support for assistance. 3 - 32 046-003777-00 A5/A3™ Operating Instructions 4.0 Preoperative Tests Preoperative Test Schedules ..............................................................................................................................................................4-2 Inspect the System ..................................................................................................................................................................................4-3 Pre-operative Checkout List...............................................................................................................................................................4-4 System Self-Test .........................................................................................................................................................................................4-7 Leak and Compliance Tests ................................................................................................................................................................4-9 Power Failure Alarm Test ................................................................................................................................................................... 4-17 Pipeline Tests ............................................................................................................................................................................................ 4-18 Basic Ventilation Testing.................................................................................................................................................................... 4-20 Cylinder Tests............................................................................................................................................................................................ 4-21 Flow Control System Test.................................................................................................................................................................. 4-22 Vaporizer Tests ......................................................................................................................................................................................... 4-23 Breathing System Tests ...................................................................................................................................................................... 4-25 Alarm Tests................................................................................................................................................................................................. 4-27 Preoperative Preparations ................................................................................................................................................................ 4-30 Inspect the AGSS.................................................................................................................................................................................... 4-31 A5/A3™ Operating Instructions 046-003777-00 4-1 Preoperative Test Schedules 4.1 Preoperative Tests Preoperative Test Schedules Preoperative tests on the A5/A3 should be performed according to the test intervals listed below. Refer to special procedures or precautions in this manual. 4.1.1 NOTE: This is a guideline which can be modified to accommodate variations in local clinical practice. Such local modifications should have appropriate peer review. NOTE: It is recommended that the user check that N2O cutoff and O2/N2O ratio are normal before use. Use an O2 concentration tester to monitor the O2 concentration in the gas output. Test Intervals Perform the preoperative tests listed below at these events: • When required after a maintenance or service procedure • Every day before the first patient: • System Self-Test (Section 4.4) • Leak and Compliance Tests (Section 4.5) • Pipeline Tests (Section 4.7) • Cylinder Tests (Section 4.9) • Flow Control System Test (Section 4.10) • Vaporizer Tests (Section 4.11) • Before each patient: • Inspect the System (Section 4.2) • Pre-operative Checkout List (Section 4.3) • Perform the Leak/Compliance Test (Section 4.5) • Power Failure Alarm Test (Section 4.6) • Breathing System Tests (Section 4.12) • Alarm Tests (Section 4.13) • Inspect the AGSS (Section 4.15) 4-2 NOTE: Read and understand the operation and maintenance of each component before using the A5/A3 anesthesia machine. NOTE: Do not use the A5/A3 anesthesia machine if a test failure occurs. Contact Mindray Technical Support for assistance. NOTE: A checklist of the anesthetic system should be provided, including anesthetic gas delivery system, monitoring device, alarm system, and protective device, which are intended to be used for the anesthetic system, whether they are used alone or assembled together. 046-003777-00 A5/A3™ Operating Instructions Preoperative Tests 4.2 Inspect the System Inspect the System NOTE: Ensure that the breathing system is correctly connected and not damaged. Perform the following inspection checklist before operating the A5/A3 unit: 1. The A5/A3 anesthesia machine is correctly connected and undamaged. 2. Inspect the system for: a. Damage to flowmeters, vaporizers, gauges, supply hoses b. Complete breathing system with adequate CO2 absorbent Pre-Pak or loose fill c. Correct mounting of cylinders in yokes d. Presence of cylinder wrench e. Auxiliary O2 supply, available and functioning 3. Check that: a. Gas cylinders are turned off until needed to prevent the unintended use of gases b. Flow-control valves are off c. Vaporizers are off d. Vaporizers are filled (not overfilled) e. Filler caps are sealed tightly f. Two vaporizers cannot be turned on at the same time 4. All components are correctly attached. 5. The breathing system is correctly connected, the breathing tubes are undamaged, and the self-inflating manual ventilation device is available and functioning. 6. The gas supplies are connected and the pressures are correct. 7. Cylinder valves are closed on models with cylinder supplies (Verify that the cylinder wrench is attached.). 8. The necessary emergency equipment is available and in good condition. 9. Equipment for airway maintenance and tracheal intubation is available and in good condition. 10. Inspect the color of the sodalime in the canister. Replace the sodalime immediately if obvious color change is detected. The sodalime is white when new. If it is purple, it must be changed. 11. Applicable anesthetic and emergency drugs are available. 12. The casters are not damaged or loose, and the brake(s) is set and prevents movement. 13. Ensure the breathing system is in proper position. 14. The AC mains indicator and the battery indicator are displayed when the power cord is connected to the AC power source. If the indicators are not displayed, the system does not have electrical power. 15. The A5/A3 anesthesia machine is switched on or off normally. A5/A3™ Operating Instructions 046-003777-00 4-3 Pre-operative Checkout List Preoperative Tests 4.3 Pre-operative Checkout List 4.3.1 Introduction The purpose of the pre-operative checkout is to detect potential system problems before use. An effective method for detecting pneumatic circuit occlusions, leaks, and other system problems can be found in the A5/A3 pre-operative checkout procedures. In addition, it is recommended that the breathing circuit be tested for the ability to effectively deliver positive pressure ventilation before beginning each case. Testing the ability to properly ventilate a test lung can quickly identify an occluded circuit limb and other breathing circuit problems. Before starting each case, test the machine’s ability to ventilate the patient by removing the breathing bag from the bag arm and connecting it to the patient connection (elbow or Y-piece on the disposable circuit). Set the ventilator to deliver a specific tidal volume to the test lung and verify the exhaled tidal volume monitor. Observe that the test lung (breathing bag) inflates as the bellows descends, and that the test lung deflates during the exhalation phase Observe that the measured exhaled volume matches the tidal volume set on the ventilator. With the ventilator running, lower the fresh gas flow to zero and observe if the bellows rapidly falls with each exhalation. If this occurs, then a leak should be suspected, identified, and repaired. This test should be performed before starting each case. By verifying that a test lung (breathing bag) can be manually and mechanically ventilated, this indicates that the A5/A3 is capable of ventilating a patient with the attached breathing circuit. 4.3.2 Suggested Pre-operative Checkout List Below is a suggested checkout list that should be conducted before administering anesthesia. This is a guideline which users are encouraged to modify according to their local clinical practice. Such local modifications should have appropriate peer review. Users should refer to the A5/A3 Operating Instructions for special procedures, precautions, and step-by-step instructions. WARNING: To ensure proper machine operation, user safety, and patient safety, follow all checkout procedures established by the facility before administering anesthesia to the patient. Each day before administering anesthesia, the following should be done: 1. With the anesthesia machine connected to AC Power, turn the Mains switch to ON and verify that the unit is operating on AC. Follow the on-screen prompts to perform and complete the automatic machine start-up tests. 2. a. Check the O2 Supply fail-safe message and alarm. (See “O2 Pipeline Test” on page 4-18.) b. Test low O2 concentration alarm. (See “Test the O2 Concentration Monitoring and Alarms” on page 4-27. c. Test high and low airway pressure alarms. (See “Test the High Paw Alarm” on page 4-28.) (See “Test the Low Paw Alarm” on page 4-28.) d. Test low minute volume and apnea alarms. (See “Test the Low Minute Volume (MV) Alarm” on page 4-28. (See “Test the Apnea Alarm” on page 4-28.) 3. Verify that the O2 sensor displays approximately 21% in room air and above 94% after exposure to 100% O2. See “Test the O2 Concentration Monitoring and Alarms” on page 4-27. 4. Check that the vaporizers are properly installed and sufficiently filled and that filler ports are tightly closed. Verify that only one vaporizer turns ON at a time. (‘‘Install the Vaporizer’’ on page 2-5.) 4-4 046-003777-00 A5/A3™ Operating Instructions Preoperative Tests Pre-operative Checkout List 5. Perform a 40 cmH2O manual leak test. If present, set the left vaporizer to ON and perform a 40 cmH2O manual leak test. Set the vaporizer to OFF. Repeat for the right vaporizer if installed. (See “Manual Leak Test” on page 4-23.) 6. Perform a vaporizer leak test for each vaporizer installed on the A5/A3 system. (See “Manual Leak Test” on page 4-23.) 7. Check that AGSS float moves freely. Set the vacuum flow so that the float position is between the Min and Max lines. (‘‘Inspect the AGSS’’ on page 4-31.) 8. Drain any moisture from the breathing system water trap. Prior to each patient, before administering anesthesia, the following should be done: 1. Inspect the A5/A3 for damage or hazardous conditions; ensure all necessary equipment and supplies are present, e.g., drugs, CO2 absorbent (not exhausted), breathing circuits and tank wrench. 2. Check that central supply O2, N2O and Air pressures are each within the pipeline input range specifications (i.e., 40 to 87 psi). 3. Check that O2, N2O and Air flowmeters operate properly: Check that all flow levels on the monitor screen are at zero flow with flow-control valves closed. Adjust flow of all gases through their full ranges and check for erratic movements of the gas levels. 4. Check that a hypoxic mixture of less than 21% O2 may not be administered: Attempt to create an hypoxic O2/ N2O mixture by slowly opening the N2O flow control valve fully with the O2 flow valve fully closed (no N2O gas should be flowing). Then, slowly open the O2 flow valve and observe O2 and N2O rise in proportion to maintain a minimum concentration of 21% O2 in fresh gas. 5. Perform a vaporizer leak test for each vaporizer installed on the A5/A3 system. (See “Manual Leak Test” on page 4-23.) 6. Verify that Auxiliary O2 and Air are available and functioning. 7. Verify that a Self-inflating Manual Ventilation device is available and functioning. 8. Check that the O2, N2O, and Air cylinders (if present) are mounted on the A5/A3, have adequate pressure, and no high pressure leaks are present. (See “Cylinder Tests” on page 4-21.) 9. Check that valves on the O2, N2O, and Air cylinders (if present) are closed until needed to prevent unintentional use of gas. 10. With a breathing circuit and reservoir bag attached, check that the unidirectional valves operate by visual inspection. 11. Check ventilation capability in Standby, Manual, VCV and PCV ventilator modes. 12. Check that patient suction is adequate to clear the airway. 13. Verify ability of required monitors and check alarms. The following step is recommended to be performed when prompted by the machine: • Complete the 21% O2 Calibration. (See “O2 Sensor Calibration” on page 7-6.) The following step is recommended when replacing an O2 sensor: A5/A3™ Operating Instructions 046-003777-00 4-5 Pre-operative Checkout List • Preoperative Tests Complete the 21% and 100% O2 Calibration. (See “O2 Sensor Calibration” on page 7-6.) The following step is recommended to be performed weekly, whenever a new vaporizer is installed or when CO2 absorbent is replaced: • 4-6 Perform a vaporizer leak test. (See “Manual Leak Test” on page 4-23.) 046-003777-00 A5/A3™ Operating Instructions Preoperative Tests 4.4 System Self-Test System Self-Test When the A5/A3 is powered on, it performs a self-test to ensure its alarm system (alarm LED, speaker, and buzzer) and hardware (flowmeter board, ventilator board, assistant ventilator board, power board, and CPU board) are properly functioning. To perform a system self-test: 1. Turn the power switch on the front panel to the ON position. The A5/A3 powers up and begins its system self-test. See Table 4-1 for the system self-test sequence. After the system self-test is completed, the test results are displayed on the screen. Startup alarm messages also may be displayed. See Table 4-2 for a list of possible test result conditions. See Table 6.6.2.1 for a list of Startup Alarm Messages. 2. Proceed to operate or troubleshoot the A5/A3 based on the self-test results. SYSTEM SELF-TEST SEQUENCE COMMENTS 1. A high-pitched beep is sounded. Alarm self-test 2. The A5/A3 startup screen is displayed. 3. The LED above the touchscreen illuminates in sequence: red, yellow, and blue. Alarm self-test 4. A test low priority alarm is sounded. Alarm self-test 5. The System Self-Test progress bar is displayed. 6. The System Self-Test is automatically started. 7. The results of the System Self-Test are displayed. Hardware self-test TABLE 4-1 A5/A3 System Self-Test Sequence RESULT COMMENTS/OPTIONS Pass condition Example: The Pass condition indicates that the A5/A3 has passed the System Self-Test. No errors have been detected. Alarms and hardware are functioning properly. Select Continue to enter the Automatic Circuit Leak and Compliance Test screen. or Select Skip to enter the Standby with automatic ventilation enabled. TABLE 4-2 Types of System Self-Test Results A5/A3™ Operating Instructions 046-003777-00 4-7 System Self-Test Preoperative Tests RESULT COMMENTS/OPTIONS All-Functional error condition Example: The All-Functional error condition indicates that errors have been detected. However, all automatic ventilation, manual, and bypass modes are still enabled. Select Accept to enter the Automatic Circuit Leak and Compliance Test screen. or Select Skip to enter the main screen with automatic ventilation enabled, Manual Only error condition Example: The Manual Only error condition indicates that the A5/A3 can be used in manual mode only. Select Retry to repeat the System Self-Test. or Select Manual Only to place the device in manual ventilation mode only. The following low priority alarm will be displayed on the main screen: Automatic Ventilation Disabled. WARNING: Machine Non-Functional error condition Example: Selecting the “Manual Only” button will disable automatic ventilation. The Machine Non-Functional error condition indicates that the A5/A3 cannot be used. Select Retry to repeat the System Self-Test. or Contact service if this error condition persists. NOTE: “Service Access” button: The Service Access button is only available to Mindrayauthorized service personnel and requires a service password. TABLE 4-2 Types of System Self-Test Results Bundle Version – The Bundle Version is displayed in all System Self-Test results. This is the version number of the package of software that is installed in the A5/A3. If the Bundle Version displays a fail status, contact Mindray Technical Support. 4-8 046-003777-00 A5/A3™ Operating Instructions Preoperative Tests Leak and Compliance Tests 4.5 Leak and Compliance Tests 4.5.1 Automatic Circuit Leak and Compliance Test The Automatic Circuit Leak Test screen is displayed in FIGURE 4-1. FIGURE 4-1 Automatic Circuit Leak Test To Perform an Automatic Circuit Leak Test: NOTE: The A5/A3 system records the result of the last Automatic Circuit Leak Test in the General tab, including if the test had passed, failed, or was skipped. To access this information, from the main screen, select the Setup softkey > General tab. NOTE: If fresh gas is detected by the system before proceeding with the Automatic Circuit Leak & Compliance Test, a message is displayed on the screen to adjust all flowmeters to zero. 1. From power up: If the A5/A3 System is being powered on, the system automatically initiates a self-test and enters the “Automatic Circuit Leak Test” screen, followed by the “Manual Circuit Leak Test” screen. If the Skip button is selected, the system bypasses the “Automatic Circuit Leak Test” and the “Manual Circuit Leak Test” and enters the Standby screen. or From the main screen: Select the Setup softkey > General tab > Test Leak/Compliance button. A5/A3™ Operating Instructions 046-003777-00 4-9 Leak and Compliance Tests Preoperative Tests 2. Follow the directions on the screen: 1. Seal the Y-piece: 2. Ensure that the sample line port of the breathing circuit is occluded. 3. Install the manual bag. 4. Adjust all flowmeters to zero. 5. Set the Auto/Manual switch to the Auto position: 6. Press the O2 flush button to completely fill the bellows. 7. Select Continue to proceed with the Automatic Circuit Leak Test. NOTE: The “Continue” button can be selected only when the Auto/Manual switch is set to the Auto position and when no fresh gas is detected. 3. Compare the test results with the information in Table 4-3, “Automatic Circuit Leak and Compliance Test Results,” on page 4-11, and proceed accordingly. 4 - 10 046-003777-00 A5/A3™ Operating Instructions Preoperative Tests Leak and Compliance Tests RESULTS COMMENTS/OPTIONS Automatic Circuit Leakage: Pass Compliance Test: XX.X mL/cmH2O Example: Leak rate ≤200 mL/min Compliance test results are displayed in green. Select Continue to proceed to the Manual Circuit Leak Test screen. Automatic Circuit Leakage: Pass Compliance Test: Fail Example: Leak rate ≤200 mL/min Compliance test failed. The results screen displays the compliance values and time of the last compliance test that passed. If the compliance test has never been performed successfully, the compliance values and test time are displayed as ---. Select Accept to proceed to the Manual Circuit Leak Test screen and use the previous compliance values. or Select Retry to repeat the Automatic Circuit Leak Test & Compliance test. Automatic Circuit Leakage: XXX mL/min Compliance Test: Fail Example: Leak rate >200 mL/min and ≤1000 mL/min The results screen displays the compliance values and time of the last compliance test that passed. If the compliance test has never been performed successfully, the compliance values and test time are displayed as ---. Select Accept to proceed to the Manual Circuit Leak Test screen and use the previous compliance values. or Select Retry to repeat the Automatic Circuit Leak Test & Compliance test. TABLE 4-3 Automatic Circuit Leak and Compliance Test Results A5/A3™ Operating Instructions 046-003777-00 4 - 11 Leak and Compliance Tests Preoperative Tests RESULTS COMMENTS/OPTIONS Automatic Circuit Leakage: Fail: Fresh gas flow detected Compliance Test: Fail Example: Fresh gas is detected. Approximate threshold for fresh gas detection is 0.05 L/min of flow from any individual gas flow. Adjust all flowmeters to zero. Select Retry to repeat the test. Automatic Circuit Leakage: Fail Compliance Test: Fail Example: Leak rate >1000 mL/min. Fresh gas is not detected. Follow on-screen directions to troubleshoot the problem. or Select Manual Only to place the device in manual ventilation mode only. The following low priority alarm will be displayed on the main screen: Auto Ventilation Disabled – Leak Test Failed: WARNING: Selecting the “Manual Only” button will disable automatic ventilation. TABLE 4-3 Automatic Circuit Leak and Compliance Test Results 4 - 12 046-003777-00 A5/A3™ Operating Instructions Preoperative Tests Leak and Compliance Tests RESULTS COMMENTS/OPTIONS MACHINE NON-FUNCTIONAL Safety valve control test or pressure verification test failed. Automatic Circuit Leakage: Pass Compliance Test: XX.X mL/cmH2O Safety Valve Control: Fail Example: Select Retry to repeat the Automatic Circuit Leak Test & Compliance test. or Contact service if this error condition persists. NOTE: Time out Example: “Service Access” button: The Service Access button is only available to Mindrayauthorized service personnel and requires a service password. Test result cannot be shown due to an internal communication error. Select Retry to repeat the Automatic Circuit Leak Test & Compliance test. or Select Override to skip the test. TABLE 4-3 Automatic Circuit Leak and Compliance Test Results A5/A3™ Operating Instructions 046-003777-00 4 - 13 Leak and Compliance Tests 4.5.2 Preoperative Tests Manual Circuit Leak Test The Manual Circuit Leak Test screen is displayed in FIGURE 4-2: FIGURE 4-2 Manual Circuit Leak Test screen To Perform a Manual Circuit Leak Test: NOTE: If fresh gas is detected by the system before proceeding with the Manual Circuit Leak Test, a message is displayed on the screen to adjust all flowmeters to zero. 1. From power up: If the A5/A3 System is being powered on, the system automatically initiates a self-test followed by Automatic Circuit Leak and Compliance Test and the Manual Circuit Leak Test. If the Skip button is selected, the system bypasses these tests and enters the Standby screen. or From the main screen: Select the Setup softkey > General tab > Test Leak/Compliance button. 2. Follow the directions on the screen: 1. Adjust the APL to the 50 cmH2O position. 2. Adjust all flowmeters to zero. 3. Set the Auto/Manual switch to Manual. 4. Press the O2 flush button until the PAW gauge value is between 25 and 35 cmH2O. 5. Select “Continue” to proceed with the Manual Circuit Leak Test. or Select “Skip” to go directly to operational mode. NOTE: 4 - 14 The “Continue” button can be selected only when the Auto/Manual switch is set to the Manual position and when no fresh gas is detected. 046-003777-00 A5/A3™ Operating Instructions Preoperative Tests Leak and Compliance Tests 3. Compare the test results with the information in Table 4-4, “Manual Circuit Leak Test Results,” on page 4-15, and proceed accordingly. RESULTS COMMENTS/OPTIONS Pass Example: Manual Circuit Leak Test passed. Adjust the APL valve to SP position. Select Continue to proceed to the main screen. Fail: Fresh gas flow detected Example: Manual Circuit Leak Test failed. Fresh gas is detected. Adjust all flowmeters to zero. Select Retry to repeat the test. TABLE 4-4 Manual Circuit Leak Test Results A5/A3™ Operating Instructions 046-003777-00 4 - 15 Leak and Compliance Tests Preoperative Tests RESULTS COMMENTS/OPTIONS Fail Example: Manual Circuit Leak Test failed. Fresh gas is not detected. Follow on-screen directions to troubleshoot the problem. or Adjust APL valve to SP position and select Accept to proceed to the main screen. Time out Example: Test result cannot be shown due to an internal communication error. Select Retry to repeat the Automatic Circuit Leak Test & Compliance test. or Select Override to skip the test. TABLE 4-4 Manual Circuit Leak Test Results 4. 4 - 16 046-003777-00 A5/A3™ Operating Instructions Preoperative Tests 4.6 Power Failure Alarm Test Power Failure Alarm Test 1. Set the system switch to the On position. 2. Disconnect the AC mains. 3. Ensure that the AC mains indicator and battery charge indicator are extinguished. An audible alarm should sound and the prompt message "Battery in Use" should be displayed on the main screen. 4. Reconnect the AC mains. 5. Ensure that the AC mains indicator and battery charge indicator are illuminated. The prompt message "Battery in Use" should not be displayed on the main screen. 6. Set the system switch to the Off position. A5/A3™ Operating Instructions 046-003777-00 4 - 17 Pipeline Tests Preoperative Tests 4.7 Pipeline Tests 4.7.1 O2 Pipeline Test 1. Connect the O2 pipeline supply. 2. Close all cylinder valves if the A5/A3 anesthesia machine is equipped with cylinders. 3. Set the system switch to the On position. 4. Set the flow controls approximately to mid-range (approximately 6 L/min). 5. Ensure that all pipeline pressure gauges show 280 to 600 kPa. 6. Disconnect the O2 pipeline supply. 7. As O2 pressure decreases, alarms for “O2 Supply Failure” and “Drive Gas Pressure Low” should occur. 8. Ensure that the O2 gauge goes to zero. 4.7.2 N2O Pipeline Test NOTE: When doing the N2O pipeline test, connect the O2 supply first to enable N2O flow control. NOTE: Different from O2 pipeline supply, when N2O supply is disconnected, no alarms related to N2O pressure occur as N2O pressure decreases. 1. Connect the O2 and N2O pipeline supplies. 2. Close all cylinder valves if the A5/A3 anesthesia machine is equipped with cylinders. 3. Set the system switch to the On position. 4. Set the flow controls approximately to mid-range (approximately 6 L/min). 5. Check that all pipeline pressure gauges show 280 to 600 kPa. 6. Disconnect the N2O pipeline supply. 7. Ensure that the N2O gauge goes to zero. 4 - 18 046-003777-00 A5/A3™ Operating Instructions Preoperative Tests 4.7.3 Pipeline Tests Air Pipeline Test NOTE: Different from the O2 pipeline supply, when the Air pipeline supply is disconnected, no alarms related to Air pressure occur as Air pressure decreases. 1. Connect the Air pipeline supply. 2. Close all cylinder valves if the A5/A3 anesthesia machine is equipped with cylinders. 3. Set the system switch to the On position. 4. Set the flow controls approximately to mid-range (approximately 6 L/min). 5. Check that all pipeline pressure gauges show 280 to 600 kPa. 6. Disconnect the Air pipeline supply. 7. Ensure that the Air gauge goes to zero. A5/A3™ Operating Instructions 046-003777-00 4 - 19 Basic Ventilation Testing 4.8 Preoperative Tests Basic Ventilation Testing a. Attach a breathing circuit and breathing bag. b. Attach an adult test lung or breathing bag to the patient end of the Y-fitting of the breathing circuit. c. Set the O2 flow to 3 L/min and set the N2O and AIR flow rates to zero flow. d. Set the ventilator controls to: VENTILATOR CONTROLS VENTILATOR SETTINGS Patient Type Adult Ventilation Mode PCV Tidal Volume Guarantee - VtG Off Target Pressure - PINSP 20 Breath Rate - freq 8 I:E Ratio - I:E 1:2 PEEP - PEEP Off Inspiratory Slope - Tslope 0.5 e. Select PCV and begin ventilation. f. Verify that the breathing bag at the patient end of the Y-fitting of the breathing circuit inflates and deflates and that the PLAT on the display and the PAW gauge are consistent with the Ptarget setting. 4 - 20 046-003777-00 A5/A3™ Operating Instructions Preoperative Tests 4.9 Cylinder Tests Cylinder Tests NOTE: 4.9.1 You do not need to perform cylinder tests if the A5/A3 anesthesia machine is not equipped with cylinders. Check the Cylinder Pressure 1. Set the system switch to the Off position and connect the cylinders to be checked. 2. Open each cylinder valve using the supplied wrench. 3. Ensure that each cylinder has sufficient pressure. If not, close the applicable cylinder valve and install a full cylinder. O2 cylinder input range: 6.9 to15.5 MPa (1000 - 2250 psi) N2O cylinder input range: 4.2 to 6 MPa (600 - 870 psi) Air cylinder input range: 6.9 to15.5 MPa (1000 - 2250 psi) 4. Close all cylinder valves. 4.9.2 O2 Cylinder High Pressure Leak Test 1. Set the system switch to the Off position and disconnect the O2 pipeline supply. 2. Turn off the O2 flowmeter. 3. Open the O2 cylinder valve. 4. Record the current cylinder pressure. 5. Close the O2 cylinder valve. 6. Record the cylinder pressure after one minute. If the cylinder pressure decreases more than 5000 kPa (725 psi), install a new cylinder gasket. Repeat steps 1 through 6. If the leak continues, do not use the cylinder supply system. 4.9.3 N2O Cylinder High Pressure Leak Test 1. Set the system switch to the Off position and disconnect the N2O pipeline supply. 2. Turn off the N2O flowmeter. 3. Open the N2O cylinder valve. 4. Record the current cylinder pressure. 5. Close the N2O cylinder valve. 6. Record the cylinder pressure after one minute. If the cylinder pressure decreases more than 700 kPa (100 psi), install a new cylinder gasket. Repeat steps 1 through 6. If the leak continues, do not use the cylinder supply system. 4.9.4 Air Cylinder High Pressure Leak Test 1. Set the system switch to the Off position and disconnect the Air pipeline supply. 2. Turn off the Air flowmeter. 3. Open the Air cylinder valve. 4. Record the current cylinder pressure. 5. Close the Air cylinder valve. 6. Record the cylinder pressure after one minute. If the cylinder pressure decreases more than 5000 kPa (725 psi), install a new cylinder gasket. Repeat steps 1 through 6. If the leak continues, do not use the cylinder supply system. A5/A3™ Operating Instructions 046-003777-00 4 - 21 Flow Control System Test 4.10 Preoperative Tests Flow Control System Test WARNING: If N2O is available and flows through the system during this test, use a safe and approved procedure to collect and remove N2O gas. WARNING: Incorrect gas mixtures can cause patient injury. If the O2:N2O ratio system does not supply O2 and N2O in the correct proportions, do not use the system. CAUTION: Slowly open the cylinder valves to avoid damage. Do not use excessive force on the flow controls. After performing the cylinder tests, close all cylinder valves if cylinder supplies are not used. CAUTION: Turn the flow controls slowly. To avoid damaging the control valves, do not turn further when the flowmeter reading is outside the range. When turning a flow control knob clockwise to decrease flow, the flowmeter should reach zero before the knob reaches its most clockwise mechanical stop (Off) position. Do not turn any further when the knob has reached the Off position. Similarly, when turning a flow control knob counterclockwise to increase flow from zero, the flowmeter reading should not indicate a change from zero until the flow control knob is turned approximately one (1) rotation counterclockwise from the Off position, and only if permitted according to the gas ratio control system. To perform the flow control system tests: 1. Connect the pipeline supplies or slowly open the cylinder valves. 2. Turn all flow controls fully clockwise (flow OFF). 3. Set the system switch to the On position. 4. Do not use the system if the low battery alarm or other ventilator failure alarms occur. 5. Test the O2:N2O ratio system with change of O2 flow: Turn the O2 and N2O flow controls fully clockwise (flow OFF). Then, turn the N2O flow control fully counterclockwise (open position). There should be no N2O flow since there is no O2 flow yet. Turn the O2 control to the values shown in the table below. The N2O value should meet the criteria shown in the table. STEP O2 FLOW SETTING (L/MIN) N2O FLOW (L/MIN) 1 0 0 2 0.5 ≤ 1.88 3 0.8 ≥ 1.96 and ≤ 3.01 4 1.0 ≥ 2.45 and ≤ 3.76 5 2.0 ≥ 4.90 and ≤ 7.52 6 3.0 ≥ 7.34 and ≤ 11.29 7 0 0 6. Disconnect the O2 pipeline supply or close the O2 cylinder valve. NOTE: When O2 supply is disconnected, alarms for “O2 Supply Failure” and “Drive Gas Pressure Low” occur as O2 pressure decreases. 7. Set the system switch to the Off position. 4 - 22 046-003777-00 A5/A3™ Operating Instructions Preoperative Tests 4.11 Vaporizer Tests Vaporizer Tests WARNING: During the vaporizer tests, the anesthetic agent exits from the fresh gas outlet. Use a safe and approved procedure to remove and collect the agent. WARNING: To prevent damage, turn the flow controls fully clockwise (flow OFF) before using the system. Before the test, ensure that the vaporizers are correctly installed. For details about vaporizer installation, see ‘‘Install the Vaporizer’’ on page 2-5. 4.11.1 Vaporizer Back Pressure Test 1. Connect the O2 pipeline supply or open the O2 cylinder valve. 2. Set the O2 flow to 6 L/min. 3. Ensure that the O2 flow stays constant. 4. Adjust the vaporizer concentration from 0 to 1%. Ensure that the O2 flow must not decrease more than 1 L/min through the full range. Otherwise, install a different vaporizer and repeat this step. If the problem persists, the malfunction is in the anesthesia system. Do not use this system. 5. Test each vaporizer as per the steps above. NOTE: 4.11.2 Do not perform this test on the vaporizer when the concentration control is between “OFF” and the first graduation above “0” (zero) as the amount of anesthetic drug outputted is very small within this range. Manual Leak Test 1. Set the Auto/Manual ventilation switch to Manual. 2. Connect a breathing circuit to the inspiratory and expiratory ports. Connect a ventilation bag to the bag arm. 3. Set APL Valve to 75 cmH2O. 4. Close the breathing system at the patient connection by connecting the Y-piece on the breathing circuit to the leak test port. 5. Inflate the ventilation bag with O2 flush to 40 cmH2O. 6. Verify that circuit holds pressure for greater than 10 seconds. 7. Set the APL valve to SP. 4.11.3 Vaporizer Leak Test 1. Set the ventilation Auto/Manual ventilation switch to Manual. 2. Set the APL valve to the SP position. A5/A3™ Operating Instructions 046-003777-00 4 - 23 Vaporizer Tests Preoperative Tests 3. Connect one end of the breathing circuit to the bag arm, one end to the inspiratory port and the Y-piece to the test port: 4. Mount and lock the vaporizer onto the vaporizer mount. (Certain vaporizers need to be set to at least 1% for correct testing. See the vaporizer manufacturer’s manual for details.) 5. Set the fresh gas flow to 200 mL/min. 6. Set the APL valve to 75 and verify that the pressure on the airway pressure gauge increases above 30 cmH2O within 2 minutes. 7. Turn off the vaporizer. 8. Repeat Steps 4, 5, 6, and 7 for the other vaporizer. 4 - 24 046-003777-00 A5/A3™ Operating Instructions Preoperative Tests 4.12 Breathing System Tests Breathing System Tests WARNING: Objects in the breathing system can stop gas flow to the patient. This can cause injury or death. Ensure that there are no test plugs or other objects in the breathing system. WARNING: Do not use a test plug that is small enough to fall into the breathing system. 1. Ensure that the breathing system is correctly connected and not damaged. 2. Ensure that the check valves in the breathing system work correctly: 1. The inspiratory check valve opens during inspiration and closes at the start of expiration. 2. The expiratory check valve opens during expiration and closes at the start of inspiration. 4.12.1 Bellows Test 1. Select the Discharge button in the Manual tab. 2. Follow the screen prompts to discharge the patient and enter Standby mode. 3. Set the ventilation switch to the automatic ventilation position. 4. Set all flow controls to Off. 5. Close the breathing system at the patient connection by connecting the Y-piece on the breathing circuit to the leak test port. 6. Push the O2 flush button to expand the bellows to the top of the bellows enclosure. 7. Ensure that the pressure does not increase to more than 15 cmH2O on the airway pressure gauge. 8. The bellows should not fall faster than a rate of approximately 300 mL/min. If the leak rate is greater, troubleshoot the source of the leak. If the source of the leak is the bellows, then the bellows must be replaced. 4.12.2 Breathing System Leak Test in Manual Ventilation Status 1. Select the Discharge button in the Manual tab. 2. Follow the screen prompts to discharge the patient and enter Standby mode. 3. Set the Auto/Manual ventilation switch to Manual. 4. Connect the manual bag to the manual bag port. 5. Turn the APL valve control to fully close the APL valve (75 cmH2O). 6. Turn the O2 flow control to set the O2 flow to 0.15 L/min. 7. Connect the Y-piece on the breathing circuit to the leak test port. 8. Push the O2 flush button to let the pressure increase to approximately 30 cmH2O on the airway pressure gauge. 9. Release the flush button. A pressure decrease on the airway pressure gauge indicates a leak. Contact your service personnel. 4.12.3 APL Valve Test 1. Select the Discharge button in the Manual tab. 2. Follow the screen prompts to discharge the patient and enter Standby mode. 3. Set the Auto/Manual switch to Manual. A5/A3™ Operating Instructions 046-003777-00 4 - 25 Breathing System Tests Preoperative Tests 4. Connect the manual bag to the manual bag port. 5. Connect the Y-piece on the breathing circuit to the leak test port. 6. Turn the APL valve control to 30 cmH2O. 7. Push the O2 flush button to inflate the manual bag. 8. Ensure that the reading on the airway pressure gauge is with the range of 25 to 35 cmH2O. 9. Turn the APL valve control to the fully open position. 10. Set the O2 flow to 3 L/min. Turn any other gases off. 11. Ensure that the reading on the airway pressure gauge is less than 5 cmH2O. 12. Push the O2 flush button continuously. Ensure that the reading on the airway pressure gauge does not exceed 10 cmH2O. 13. Turn the O2 flow control to Off. Ensure that the reading on the airway pressure gauge does not decrease below 0 cmH2O. 4 - 26 046-003777-00 A5/A3™ Operating Instructions Preoperative Tests 4.13 Alarm Tests Alarm Tests Alarms also can be verified by creating an alarm condition on the A5/A3 and verifying the corresponding alarm indicators are present on the monitor. 4.13.1 Prepare for Alarm Tests 1. Connect a test lung or manual bag to the Y-piece of the breathing circuit. 2. Set the Auto/Manual switch to Auto. 3. Set the system switch to the On position. 4. Set the system to Standby mode. 5. Set the Patient Size to Adult. 6. Set the ventilator controls as follows: • Ventilation mode: select VCV • Vt: 500 mL • Rate: 12 bpm • I:E: 1:2 • Tpause: 10% • PEEP: OFF • Plimit: 30 cmH2O 7. Turn the O2 flow control to set the O2 flow to 0.5 to 1 L/min. 8. Push the O2 flush button to expand the bellows to the top of the bellow enclosure. 9. Touch the screen to exit Standby mode and begin ventilation. 10. Ensure that: • The main screen displays the correctly set data. The measured values should be within the tolerances specified in the specifications (see Table 8-24, “Control and Monitoring Accuracy,” on page 8-13 • The bellows inflates and deflates normally during mechanical ventilation. 4.13.2 Test the O2 Concentration Monitoring and Alarms 1. Set the Auto/Manual switch to Manual. 2. Remove the O2 sensor. After three minutes, ensure that the sensor measures approximately 21% O2 in room air by verifying the FiO2 value on the main screen. 3. Select the Alarms softkey and then the Limits tab. Set the FiO2 low alarm limit to 50%. 4. Ensure that a low O2 alarm (“Paw Too Low”) occurs. 5. Set the FiO2 low alarm limit back to a value less than the measured O2 value and ensure that the alarm cancels. 6. Put the O2 sensor back in the breathing system. 7. Select the Alarms softkey and then the Limits tab. Set the FiO2 high alarm limit to 50%. 8. Connect the manual bag to the manual bag port. Push the O2 flush button to fill the manual bag. Ensure that the sensor measures at least 90% O2. 9. Ensure that a high O2 alarm occurs. 10. Set the FiO2 high alarm limit to 100% and ensure that the alarm cancels. A5/A3™ Operating Instructions 046-003777-00 4 - 27 Alarm Tests 4.13.3 Preoperative Tests Test the Low Minute Volume (MV) Alarm 1. Set the ventilation switch to the automatic ventilation position. Set the ventilation mode to VCV. 2. Select the Alarms softkey and then the Limits tab. Set the MV low alarm limit to 8.0 L/min. 3. Ensure that a low MV alarm occurs after approximately 60 seconds. 4. Select the Alarms softkey and then the Limits tab. Set the MV low alarm limit back to a value less than the measured MV value and ensure that the alarm cancels. 4.13.4 Test the Apnea Alarm 1. Connect the manual bag to the manual bag port 2. Set the Auto/Manual ventilation switch to Manual. 3. Turn the APL valve control to set the APL valve to 10 cmH2O. 4. Inflate using the O2 pushbutton and squeeze the manual bag to ensure that a complete breathing cycle occurs on screen. 5. Stop inflating the manual bag and wait for more than 30 seconds to ensure that the apnea alarm occurs. 6. Inflate and squeeze the manual bag to ensure that the apnea alarm cancels. 4.13.5 Test the Continuous Airway Pressure Alarm 1. Connect the manual bag to the manual bag port. 2. Turn the O2 flow control clockwise to set the O2 flow to Off. 3. Turn the APL valve control to set the APL valve to 30 cmH2O position. 4. Set the Auto/Manual ventilation switch to Manual. 5. Push the O2 flush button for approximately 15 seconds. Ensure that the Continuous Airway Pressure alarm occurs. 6. Disconnect the breathing circuit and ensure that the alarm cancels. 7. Reconnect the breathing circuit. 4.13.6 Test the High Paw Alarm 1. Set the ventilation switch to the automatic ventilation position. 2. Select the Alarms softkey and then the Limits tab. 3. Set the PEAK low alarm limit to 0 cmH2O and PEAK high alarm limit to 10 cmH2O. 4. Ensure that a high Paw alarm (“Paw Too High”) occurs. 5. Set the PEAK high alarm limit to 40 cmH2O. 6. Ensure the high Paw alarm cancels. 4.13.7 Test the Low Paw Alarm 1. Set the ventilation switch to the automatic ventilation position. 2. Select the Alarms softkey and then Limits tab. 3. Set the Peak low alarm limit to 2 cmH2O. 4. Disconnect the test lung or manual bag from the Y-piece of the breathing circuit. 5. Wait for 20 seconds. View the alarm area and ensure that a low Paw alarm occurs. 4 - 28 046-003777-00 A5/A3™ Operating Instructions Preoperative Tests Alarm Tests 6. Connect the test lung or manual bag to the Y-piece of the breathing circuit. If using a manual bag, squeeze the bag to cancel the alarm. 7. Ensure the low Paw alarm cancels. A5/A3™ Operating Instructions 046-003777-00 4 - 29 Preoperative Preparations 4.14 Preoperative Tests Preoperative Preparations 1. Ensure that the ventilator parameters and alarm limits are set to applicable clinical levels. 2. Ensure that the system is in Standby. 3. Ensure that the equipment for airway maintenance, manual ventilation and tracheal intubation, and applicable anesthetic and emergency drugs are available. 4. Set the Auto/Manual ventilation switch to Manual. 5. Connect the manual bag to the manual bag port. 6. Turn off all vaporizers. 7. Turn the APL valve control to the SP position to fully open the APL valve. 8. Turn all flow controls to set all gas flows to Off. 9. Ensure that the breathing system is correctly connected and not damaged. WARNING: 4 - 30 Before connecting a patient, flush the A5/A3 anesthesia machine with 8 L/min of O2 for at least two minutes. This removes unwanted mixtures and by-products from the system. 046-003777-00 A5/A3™ Operating Instructions Preoperative Tests 4.15 Inspect the AGSS Inspect the AGSS 1. Connect the vacuum hose to the EVAC port or vacuum port of the healthcare facility and turn on the waste gas disposal system. Adjust the position of the float to be between the MIN and MAX lines by turning its flow adjustment knob (counterclockwise increases flow, clockwise decreases flow). 2. Check if the float can rise and exceed the “MIN” mark. If any blockage, tackiness, or damage occurs to the float, disassemble, clean the filter, and assemble the float again or replace the float. 3. Drain any moisture from the waste gas hose. Reconnect the waste gas hose to the AGSS waste gas port. NOTE: A5/A3™ Operating Instructions Do not block the AGSS pressure compensation openings during the inspection. If the float cannot rise, the possible reasons are: 1. The float surface is tacky. Turn over the AGSS and check if the float moves up and down freely. 2. The float is rising slowly. The filter may be blocked. Check if the filter is blocked. 3. The waste gas disposal system is not working or the pump rate is less than 50 L/min at which the AGSS works normally. Check the waste gas disposal system. 046-003777-00 4 - 31 Inspect the AGSS Preoperative Tests This page intentionally left blank. 4 - 32 046-003777-00 A5/A3™ Operating Instructions 5.0 Operations Powering On the A5/A3 Anesthesia System ...........................................................................................................................5-2 Patient Setup ...............................................................................................................................................................................................5-3 Oxygen Sensor Calibration .................................................................................................................................................................5-4 Input Fresh Gas ..........................................................................................................................................................................................5-5 Ventilation Modes ....................................................................................................................................................................................5-7 Start Mechanical Ventilation........................................................................................................................................................... 5-16 Stop Mechanical Ventilation........................................................................................................................................................... 5-16 Relationships of Ventilation Parameters .................................................................................................................................. 5-16 Parameter Monitoring (Waveforms) .......................................................................................................................................... 5-17 A5/A3™ Operating Instructions 046-003777-00 5-1 Powering On the A5/A3 Anesthesia System WARNING: 5.1 Operations Before using the A5/A3 Anesthesia System on the patient, ensure that the system is correctly assembled and in good condition, and that all the tests described in the Preoperative Test are already completed. In case of test failure, do not use the system. Have a qualified Mindray service representative repair the system. Powering On the A5/A3 Anesthesia System 1. Connect the gas supplies and gas cylinders to the A5/A3. 2. Connect the power cord to the AC power source. Ensure that the AC power LED is illuminated. 3. Set the system switch to ON. Ensure that both the operating state LED and battery LED are illuminated (the battery is being charged or fully charged). 4. The display shows the start-up screen. 5. The alarm LED flashes red, yellow, and cyan once in turn and then a beep is given. This verifies that audible and visual alarms are operational. 6. After several seconds, the system self-test screen is displayed and the A5/A3 runs its system self-test. 5.2 Powering Off the A5/A3 Anesthesia System The A5/A3 system provides a powering off function with the following features: • A prompt sound is given when user turns off the A5/A3. If the power switch is turned off in Standby mode, the A5/A3 will immediately power off. • If the power switch is turned off in Manual mode or in any of the Automatic ventilation modes, the A5/A3 will wait 12 seconds to power off completely. In the 12-second power off delay period, the screen will display a 10 second countdown timer. If the A5/A3 is performing Automatic ventilation, the ventilator will continue ventilating the patient in the current ventilation mode. • A beep is sounded for each second of the countdown from 10 to 1 second, after which a two-second shutdown sound is given when the timer reaches zero. • The volume of power off delay sound can be adjusted in the System Alerts setting in the Alarm Volume menu. • When the user turns on the machine during the power off delay period, the countdown timer will disappear, and the ventilator will resume its previous state. NOTE: The powering off function is not implemented during Standby, only when actively ventilating. FIGURE 5-1 Countdown timer screen 5-2 046-003777-00 A5/A3™ Operating Instructions Operations Patient Setup 5.3 Patient Setup 5.3.1 Discharge / Standby Mode The Discharge button is located in the Manual tab (FIGURE 5-2). The Discharge button can be selected only when the Auto/Manual ventilation switch is set to Manual, and when all gas flows are turned off. FIGURE 5-2 Discharge Button Discharging the patient changes the current patient size to the default patient size and loads the user defaults for the system; clears the patient demographics; clears the User Alarm Log and Spirometry Loops (including the currently plotting loop, reference loop, and baseline loop); and places the system into Standby mode (see Figure 5-3). In Standby, all system functions are idle. It is the default system startup mode and is used after discharging a patient. FIGURE 5-3 Standby Mode To discharge the patient and enter Standby: 1. Set the Auto/Manual ventilation switch to Manual. 2. Turn off all fresh gas flows by turning their knobs clockwise. Wait until all fresh gas flow levels are effectively at 0.0 L/min (i.e., flow < 0.05 L/min). NOTE: The A5/A3 system will not allow the Discharge button to be selected until the Auto/Manual ventilation switch is set to Manual, and system detects the individual fresh gas flows are effectively turned off (i.e., flow < 0.05 L/min). 3. Select the Discharge button in the Manual tab (see Figure 5-2). 4. Follow the screen prompts to discharge the patient and enter Standby mode. A5/A3™ Operating Instructions 046-003777-00 5-3 Oxygen Sensor Calibration Operations 5. To exit Standby, set the Auto/Manual ventilation switch to Manual, then touch the screen or turn on the fresh gas flow to more than 0.2 L/min of individual gas. 5.3.2 NOTE: To exit Standby by turning on the fresh gas flow, the flow must be increased to more than 0.2 L/min. NOTE: The Discharge button can be selected only when the system is not in Standby, all fresh gas flows are off, and the Auto/Manual switch is in the Manual position. NOTE: When the system is in Standby mode, the Bypass and Discharge buttons in the Manual tab are disabled. However, the Alarms button remains enabled and can be toggled to On or Off. WARNING: Selecting Discharge to enter Standby mode will stop automatic ventilation and parameter monitoring. Do not select Standby mode if the patient requires continuous automatic ventilation. Select the Patient Size (Adult, Pediatric, Infant) Patient size can only be changed when the current ventilation mode is Manual mode, or Standby mode. 1. Select Manual mode or the Discharge button (in the Manual tab) to enter Standby mode. 2. Select the Patient Size softkey at the top left of the main screen. The softkey displays “Adult”, “Pediatric”, or “Infant”. 3. Select the Patient Size: Adult, Pediatric, or Infant. 4. Select the Accept softkey to finalize your selection. NOTE: The A5/A3 saves the latest patient parameter settings (VCV, PCV, PCVVG (A5 only), PS, SIMV-VC, SIMV-PC (A5 only), and Alarms) for each patient type: Adult, Pediatric, and Infant. Changing to another patient type does not erase the parameter settings from the previous patient type. For example, changing from Adult to Pediatric and back to Adult will result in the Adult patient parameter settings still saved. FIGURE 5-4 Patient Size Setup Menu 5.4 Oxygen Sensor Calibration If oxygen sensor calibration is needed, please see ‘‘O2 Sensor Calibration’’ on page 7-6. 5-4 046-003777-00 A5/A3™ Operating Instructions Operations Input Fresh Gas 5.5 Input Fresh Gas 5.5.1 Set N2O, Air, and O2 Inputs 1. You can control the N2O, Air, and O2 flows in the fresh gas through the N2O, Air, and O2 flow controls. Readings of the gas flow can be seen on the respective electronic flowmeter on the screen. Below the electronic flowmeters and between the pressure gauges is the total flowmeter showing the total flow of the mixed gas. • • • • 5.5.2 Safety systems within the A5/A3 work to prevent hypoxic mixtures from being delivered to the patient. Nitrous oxide will not be delivered unless oxygen flow is present. A mechanical safety system assures that at least 21% O2 is present when setting mixtures of O2 and N2O. Ensure that both O2 and N2O flow controllers are turned OFF fully (clockwise) at the start and at the end of each case. All A5/A3 units are designed to maintain a safe O2:N2O ratio by allowing nitrous oxide to be set to a flow rate that is proportional to a previously adjusted flow of oxygen. The N2O flow is limited by the flow of O2 so that a safe ratio of no less than 21% oxygen can be maintained. When adjusting N2O and O2 flow rates, always adjust the oxygen flow first to enable the nitrous oxide flow. To add N2O to the fresh gas flow, the user must open the N2O flowmeter valve, but only after opening the O2 flowmeter valve. NOTE: The A5/A3 anesthesia system can be used alone as a ventilator. You can adjust O2 concentration in the breathing system through the O2 flow control. NOTE: The total flowmeter is calibrated based on 100% O2. The accuracy of the flowmeter may degrade with other gas or mixed gas. NOTE: When viewing the readings on the total flowmeter, keep your visual angle at the same level of the float. The reading of the scale may vary when viewed at a different angle. NOTE: If the readings shown on the electronic flowmeters differ from that on the total flowmeter, the electronic flowmeter will prevail and the total flowmeter is an approximate value. Set Anesthetic Agent NOTE: You do not need to perform this operation if inspiratory anesthetic agent is not used. NOTE: The A5/A3 anesthesia system can be mounted with vaporizers corresponding with halothane, enflurane, isoflurane, sevoflurane and desflurane. Only one of the vaporizers can be opened at a time because the vaporizers are featured with an interlock system. A5/A3™ Operating Instructions 046-003777-00 5-5 Input Fresh Gas 5.5.2.1 Operations Select the Desired Anesthetic Agent 1. Determine the anesthetic agent to be used and then fill the vaporizer. NOTE: The A5/A3 should use Mindray-approved vaporizers compliant to ISO 8835-4. Refer to the manufacturer’s vaporizer Instructions For Use for filling or draining the vaporizer and other information. WARNING: Ensure that the correct anesthetic agent is used. The vaporizer is designed with the specific anesthetic agent named on it and further indicated by color coded labelling. The concentration of the anesthetic agent actually output will vary if the vaporizer is filled with the wrong agent. 2. Mount the vaporizer filled with anesthetic agent onto the A5/A3 Anesthesia System. See “Install the Vaporizer” on page 2-5. 5.5.2.2 Adjust the Concentration of Anesthetic Agent Push and turn the concentration control on the vaporizer to set the appropriate concentration of anesthetic agent. For details about how to use the anesthetic agent, refer to the Vaporizer Instructions for Use. 5-6 046-003777-00 A5/A3™ Operating Instructions Operations 5.6 Ventilation Modes Ventilation Modes NOTE: 5.6.1 In all ventilation modes, when inspiration pressure reaches the high alarm limit of Paw, the system switches to expiration immediately and airway pressure is released. Monitored Parameters The A5/A3 monitors the following ventilation parameters: PARAMETER RANGE* COMMENTS PEAK -20 –120 cmH2O MEAN -20 – 120 cmH2O Vt 0 – 3000 mL MV 0 – 100 L PLAT -20 – 120 cmH2O Rate 0 – 120 bpm PEEP 0 – 70 cmH2O FiO2 18 – 100%** I:E — Displayed only in SIMV-VC, SIMV-PC, and PS modes * If the monitored parameter is out of range, it will be displayed as “- - -”. **FiO2 measurements between 100% and 110% inclusive will be displayed as 100%. Above this range, the system will display “- - -”. 5.6.2 Ventilation Modes The A5/A3 provides the following ventilation modes: 5.6.3 VENTILATION MODE PARAMETERS VCV Vt, Rate, I:E, Tpause, PEEP, Plimit SIMV-VC Vt, Rate, Tinsp, Tpause, PEEP, Plimit, PS(On/Off ), P, Trigger, Tslope, PCV A5: VtG, PlimVG, Pinsp, Rate, I:E, PEEP, Tslope A3: Pinsp, Rate, I:E, PEEP, Tslope SIMV-PC (A5 only) Pinsp, Rate, Tinsp, PS(On/Off ), P, Trigger, PEEP, Tslope PS Min Rate, P, Trigger, PEEP, Tslope, Apnea Ti Manual Bypass (A5 only), Alarms Change Ventilation Mode To change ventilation mode to Manual 1. Use the Auto/Manual Bag switch on the breathing system block to enter and exit Manual ventilation mode. To change ventilation mode to VCV, SIMV-VC, PCV, SIMV-PC (A5 only), or PS: 1. Select the tab of the desired ventilation mode. The “Set Mode” button (or “Preset Mode” button in manual) will flash. (FIGURE 5-5) A5/A3™ Operating Instructions 046-003777-00 5-7 Ventilation Modes Operations 2. Select the “Set Mode” button (or “Preset Mode” button in manual) to confirm. If the “Set Mode” button is not selected after several seconds, an audio reminder will sound for several seconds and then the system will return to the previous ventilation mode. 3. Optionally, select each available ventilation parameter to edit the parameter setting. 4. Move the Auto/Manual Bag switch to the Auto position. NOTE: When the Auto/Manual switch is in Auto position, all the buttons in Manual tab (Alarms, Bypass, and Discharge) are disabled; Alarms are set to On; and Bypass is set to Off. FIGURE 5-5 Ventilation Mode Tabs 5.6.4 Set Manual Ventilation Mode Manual ventilation mode is used for manually ventilating a patient or to let a patient breathe spontaneously. To use the manual mode, the user must first set the APL valve to the desired pressure value and then use the Auto/Manual switch on the breathing module to enter and exit Manual mode. Push the O2 flush button to inflate the bag if necessary. When the Auto/Manual switch is set to Manual, and the Alarms button in the Manual mode tab is set to Off, the alarm limit indicators on the main screen to the right of the measured values related to Pressure and Volume (such as PEAK and MV) will change to Off (see Figure 5-6). The Alarms button setting (On/Off ) in the Manual mode tab is saved and restored when toggling from Manual to Auto and back to Manual mode. For example, if the Alarms button is set to Off, this setting will be saved and restored to Off after switching to Auto and back to Manual mode. FIGURE 5-6 Alarm Limit Indicators 5-8 046-003777-00 A5/A3™ Operating Instructions Operations Ventilation Modes Setting the APL Valve for Manual Ventilation Rotate the APL valve adjustment knob to the desired pressure. The number on the rotating portion that lines up with the index mark on the bottom section of the valve indicates the approximate pressure setting. NOTE: Clockwise rotation increases the pressure, and counterclockwise rotation decreases the pressure. The patient can be ventilated by hand using the breathing bag. The pressure will be limited to the value set on the APL valve. Setting the APL Valve for Spontaneous Breathing Rotate the APL valve adjustment knob fully counterclockwise until the SP marking on the knob lines up with the index mark on the bottom section of the valve. The valve will then be open for spontaneous patient breathing. NOTE: In the manual ventilation mode, you can use the APL valve to adjust the breathing system pressure limit and gas volume in the manual bag. When the pressure in the breathing system reaches the pressure limit set for the APL valve, the valve opens to release excess gas. NOTE: The APL valve adjusts the breathing system pressure limit during manual ventilation. Its scale shows approximate pressure. Cardiac Bypass Mode (A5 Only) Cardiac Bypass mode is only available in Manual ventilation mode. This mode turns off pressure volume and apnea alarms when they are not appropriate (e.g., during heart/lung bypass). NOTE: When Bypass mode is On, the Alarms button is disabled and set to Off. A confirmation dialogue appears when turning Bypass mode On. Enter Cardiac Bypass mode by setting the Bypass softkey in Manual mode to On. When the Bypass softkey is set to On, the Alarm softkey is disabled and set to Off automatically. When Bypass is set to Off, the Alarm button returns to its setting before entering Bypass. When exiting Manual mode or discharging a patient, Bypass will be set to Off. FIGURE 5-7 Bypass Mode Softkey Setting Alarms In Manual ventilation mode, when Bypass is set to Off, the pressure, volume and apnea alarms can be turned off by setting the Alarms softkey to Off. The related alarm limits are then displayed as Off. Pressure, volume and apnea alarms can be turned on by setting the Alarms softkey to On, which returns the related alarm limits to their original settings. A5/A3™ Operating Instructions 046-003777-00 5-9 Ventilation Modes Operations FIGURE 5-8 Set Alarms to Off 5.6.5 Make Settings before Starting Mechanical Ventilation Mode 1. Set the Auto/Manual ventilation switch to Manual. If discharging a patient, select the Discharge button in the Manual tab to enter Standby mode. 2. Select the desired ventilation mode tab. 3. Set the desired ventilation parameters. 4. Select the Preset button (flashing green) on the right of the ventilation tabs to confirm the ventilation mode. 5. If necessary, push the O2 flush button to inflate the bellows. 6. If in Standby, exit Standby by touching the main screen or by turning on the fresh gas flow to more than 0.2 L/min. 7. To begin mechanical ventilation, set the Auto/Manual ventilation switch to Auto. 5.6.6 Set Volume Control Ventilation (VCV) Volume Control Ventilation (VCV) mode is a fully-mechanical ventilation mode. In the VCV mode, each time mechanical ventilation starts, gas is delivered to the patient at a constant flow, which reaches the preset Vt within the gas delivery time. To ensure a certain amount of Vt, the resulted airway pressure (Paw) changes based on patient pulmonary compliance and airway resistance. In VCV mode, you need to set Plimit to prevent high airway pressure from injuring the patient. In this mode, you can select to set Tpause to improve patient pulmonary gas distribution and PEEP to improve expiration of end-tidal carbon dioxide and to increase oxygenation of breathing process. 5 - 10 046-003777-00 A5/A3™ Operating Instructions Operations Ventilation Modes To ensure the set tidal volume gas delivery, the ventilator adjusts gas flow based on the measured inspiratory volume, dynamically compensates for the loss of tidal volume arising from breathing system compliance and system leakage and eliminates the effect of fresh gas as well. This is called tidal volume compensation. In the VCV mode, if tidal volume compensation has failed, the A5/A3 Anesthesia System can continue delivering gas stably but cannot compensate for the effects of fresh gas flow and breathing system compliance losses. In VCV and SIMV-VC modes, when inspiration pressure reaches Plimit, respectively, the inspiration pressure is held. FIGURE 5-9 Volume Control Ventilation (VCV) Tab 5.6.6.1 To Set VCV Mode 1. Select the VCV tab on the Main Screen. 2. Check that all VCV parameters are set appropriately. If necessary, select the parameter softkey to edit the parameters settings. (FIGURE 5-9) 3. Select the Set Mode softkey to confirm. VCV parameters: • Vt: Tidal volume (mL) • Rate: Breath rate (bpm) • I:E: Ratio of inspiratory time to expiratory time • Tpause: Percentage of inspiratory plateau time in inspiratory time (%) • PEEP: Positive end-expiratory pressure (cmH2O) • Plimit: Pressure limit level (cmH2O) NOTE: 5.6.7 Before activating a new mechanical ventilation mode, ensure that all related parameters are set appropriately. Set Pressure Control Ventilation (PCV) Pressure control ventilation (PCV) mode is a basic fully-mechanical ventilation mode. In the PCV mode, each time mechanical ventilation starts, PAW rises rapidly to the preset Pinsp. Then gas flow slows down through the feedback system to keep PAW constant until expiration starts at the end of inspiration. The tidal volume delivered in the PCV mode changes based on patient pulmonary compliance and airway resistance. In the PCV mode, you can set PEEP to improve expiration of end-tidal carbon dioxide and to increase oxygenation of breathing process. A5/A3™ Operating Instructions 046-003777-00 5 - 11 Ventilation Modes Operations For the A5, in PCV mode, Tidal Volume Guarantee (VtG) can be enabled with the VtG setting. When VtG is a value, then Pinsp is disabled. The ventilator attempts to deliver the set VtG while maintaining the PAW at or below PlimVG. When VtG is Off, PlimVG is disabled and Pinsp is enabled. Changing the value of Pinsp will automatically set PlimVG to the same value, but PlimVG can be adjusted without affecting the value of Pinsp. FIGURE 5-10 Pressure Control Ventilation Tab 5.6.7.1 To Set PCV Mode 1. Select the PCV tab on the Main Screen. 2. Check that all PCV parameters are set appropriately. If necessary, select the parameter softkey to edit the parameters settings. (FIGURE 5-10) 3. Select the Set Mode softkey to confirm. PCV parameters: • VtG (A5 only): Tidal volume guarantee (mL) • PlimVG (A5 only): pressure limit level of volume guarantee (cmH2O) • Pinsp: Peak inspiratory airway pressure (cmH2O) • Rate: Breath rate (bpm) • I:E: Ratio of inspiratory time to expiratory time • PEEP: Positive end-expiratory pressure (cmH2O) • Tslope: Rise time (sec) NOTE: 5.6.8 Before activating a new mechanical ventilation mode, ensure that all related parameters are set appropriately. Synchronized Intermittent Mandatory Ventilation (SIMV) The A5 supports two modes of SIMV: SIMV-volume control (SIMV-VC) and SIMV–pressure control (SIMV-PC). The A3 supports SIMV-VC only. 5.6.8.1 Pressure Support in Synchronized Intermittent Mandatory Ventilation (SIMV) In SIMV-VC and SIMV-PC (A5 only) Ventilation modes, PS Ventilation can be turned on and off by changing the PS setting to On and Off, respectively. When PS Ventilation is Off, the ΔP and Tslope settings are disabled in SIMV-VC mode, and the ΔP setting is disabled in SIMV-PC mode. 5 - 12 046-003777-00 A5/A3™ Operating Instructions Operations 5.6.8.2 Ventilation Modes Synchronized Intermittent Mandatory Ventilation–Volume Control (SIMV-VC) FIGURE 5-11 Synchronized Intermittent Mandatory Ventilation–Volume Control (SIMV-VC) Tab SIMV-VC means to deliver synchronized intermittent mandatory volume controlled ventilation to the patient. In the SIMV-VC mode, the ventilator waits for patient’s next inspiration based on the specified time interval. The sensitivity depends on Trigger. If Trigger is reached within the trigger waiting time (called synchronous trigger window), the ventilator delivers volume controlled ventilation synchronously with the preset tidal volume and inspiratory time. If the patient does not inspire within the trigger window, the ventilator delivers volume controlled ventilation to the patient at the end of trigger window. Spontaneous breathing outside trigger window can acquire pressure support. In VCV and SIMV-VC modes, when inspiration pressure reaches Plimit, the inspiration pressure is held. 5.6.8.3 Synchronized Intermittent Mandatory Ventilation–Pressure Control (SIMV-PC) - A5 Only FIGURE 5-12 Synchronized Intermittent Mandatory Ventilation–Pressure Control (SIMV-PC) Tab SIMV-PC is available on the A5 only. SIMV-PC means to deliver synchronized intermittent mandatory pressure controlled ventilation to the patient. In the SIMV-PC mode, the ventilator waits for patient’s next inspiration based on the specified time interval. The sensitivity depends on Trigger. If Trigger is reached within the trigger waiting time (called synchronous trigger window), the ventilator delivers pressure controlled ventilation synchronously with the preset tidal volume and inspiratory time. If the patient does not inspire within the trigger window, the ventilator delivers pressure controlled ventilation to the patient at the end of trigger window.Spontaneous breathing outside trigger window can acquire pressure support. 5.6.8.4 To Set SIMV-VC or SIMV-PC Mode 1. Select the SIMV-VC tab or SIMV-PC tab on the Main Screen. 2. Check that all SIMV-VC or SIMV-PC parameters are set appropriately. If necessary, select the parameter softkey to edit the parameters settings. (FIGURE 5-12) A5/A3™ Operating Instructions 046-003777-00 5 - 13 Ventilation Modes Operations 3. Select the Set Mode softkey to confirm. SIMV-VC parameters: • Vt: Tidal volume (mL) • Rate: Breath rate (bpm) • Tinsp: Time of inspiration (sec) • Tpause: Inspiratory pause (%) • PEEP: Positive end-expiratory pressure (cmH2O) • Plimit: Pressure limit level • Trigger: Flow trigger level (L/min) • PS: Pressure support (On/Off ) • ΔP: Change in pressure (cmH2O) • Tslope: Rise time (sec) SIMV-PC (A5 only) parameters: • Pinsp: Peak inspiratory airway pressure (cmH2O) • Rate: Breath rate (bpm) • Tinsp: Time of inspiration (sec) • Trigger: Flow trigger level (L/min) • PEEP: Positive end-expiratory pressure (cmH2O) • Tslope: Rise time (sec) • PS: Pressure support (On/Off ) • ΔP: Change in pressure (cmH2O) NOTE: 5.6.9 Before activating a new mechanical ventilation mode, ensure that all related parameters are set appropriately. Set Pressure Support Ventilation (PS) In Pressure Support (PS) mode, the patient’s effort is supported by the A5/A3 at a preset level of inspiratory pressure. Inspiration is triggered and cycled by patient effort. The user can set the Trigger flow, ΔP, PEEP, minimum allowed breathing frequency, and Slope Time. If the Min Rate (bpm) is violated, the A5/A3 will give an Apnea Ventilation breath to assure ventilation is occurring. 5.6.9.1 To Set PS Mode FIGURE 5-13 Pressure Support Tab 1. Select the PS tab on the Main Screen. 2. Check that all PS parameters are set appropriately. If necessary, select the parameter softkey to edit the parameters settings. (FIGURE 5-13) 5 - 14 046-003777-00 A5/A3™ Operating Instructions Operations Ventilation Modes 3. Select the Set Mode softkey to confirm. PS parameters: • Min Rate: Minimum rate (bpm), applies to apnea backup breaths only • ΔP: Change in pressure (cmH2O) • Trigger: Flow trigger level (L/min) • PEEP: Positive end-expiratory pressure (cmH2O) • Tslope: Rise time (sec) • Apnea Ti: Apnea Inspiratory Time NOTE: Apnea Ti permits the user to vary the inspiratory time of the apnea backup breaths. Apnea backup breaths are only triggered when the patient does not achieve the Min Rate that is set by the user. If the patient’s spontaneous breaths meet or exceed the Min Rate, the apnea backup is not used. NOTE: Before activating a new mechanical ventilation mode, ensure that all related parameters are set appropriately. A5/A3™ Operating Instructions 046-003777-00 5 - 15 Start Mechanical Ventilation 5.7 Operations Start Mechanical Ventilation NOTE: Before starting a new mechanical ventilation mode, ensure that all related ventilation parameters are set appropriately. To start mechanical ventilation from Standby mode: 1. Set the Auto/Manual ventilation switch to Manual. 2. Exit Standby by touching the main screen or by turning on the fresh gas flow to more than 0.2 L/min. 3. Set the Auto/Manual ventilation switch to Auto. The A5/A3 system will begin mechanical ventilation. 5.8 Stop Mechanical Ventilation To stop mechanical ventilation: 1. Ensure that the breathing system is set up and the APL valve is set properly before stopping mechanical ventilation. 2. Set the Auto/Manual Bag switch to the Manual Bag position. This selects manual ventilation and stops mechanical ventilation. 5.9 Relationships of Ventilation Parameters Ventilation modes may share the same ventilation parameters and values. For example, SIMV-VC and VCV both include Vt, Plimit, Rate, Tpause, and PEEP. Therefore, these parameter values that are linked may be passed from the previous ventilation mode to the current mode. Section B.8 ‘‘Linked Ventilation Parameter Relationships’’ on page B-12 includes a table that lists how the linked parameter values are set when changing ventilation modes. Ventilation parameter values that are non-linked are set according to relationship equations. Section B.9 ‘‘Non-Linked Ventilation Parameter Relationships’’ on page B-14 includes a table of equations to show how non-linked parameter values are set when changing ventilation modes. 5 - 16 046-003777-00 A5/A3™ Operating Instructions Operations 5.10 Parameter Monitoring (Waveforms) Parameter Monitoring (Waveforms) The system displays waveforms and Spirometry loops in the Waveform Area and digital data in the Parameter Area. The digital data is separated into three parameter groups: Pressure, Volume, and Fraction of Inspired O2 (FiO2). 5.10.1 Pressure The Pressure parameter group consists of 3 parameters: • Airway Peak Pressure (PEAK) • Plateau Pressure (PLAT) or Mean Pressure (MEAN) • Positive End Expiratory Pressure (PEEP) The unit of measure for these parameters is cmH2O. If the parameter data is out of range, it is displayed as “– – –”. NOTE: The high alarm limit for Airway Peak Pressure (PEAK) is displayed to the top right of the reading. The low alarm limit for Airway Peak Pressure (PEAK) is displayed to the bottom right of the reading. NOTE: The display of either Plateau Pressure (PLAT) or Mean Pressure (MEAN) is configured from the System menu tab. The associated Pressure vs. Time and Flow vs. Time waveforms are displayed together in the Waveform Area. FIGURE 5-14 Example Simulated Pressure vs. Time and Flow vs. Time Waveforms A5/A3™ Operating Instructions 046-003777-00 5 - 17 Parameter Monitoring (Waveforms) Operations Pressure vs. Time The Y-axis of the Pressure vs. Time waveform is labeled Paw (which represents Airway Pressure). The unit of measure is cmH2O and, depending on the size of the pressure signal, the Y-axis will automatically adjust to one of the following 3 scales: • 0 to 10, in increments of 5 • 0 to 30, in increments of 10 • 0 to 80, in increments of 20 Though the X-axis is not labeled, it represents a time scale of 0 to 15 seconds. Flow vs. Time The Y-axis of the Flow vs. Time waveform represents Flow. The unit of measure is L/min and its scale is -90 to +90, in increments of 45. Though the X-axis is not labeled, it represents a time scale of 0 to 15 seconds. 5.10.1.1 Auto-zeroing the Pressure Sensors The A5/A3 auto-zeros the pressure sensors at regular intervals to compensate for changes in temperature and/or barometric pressure that could affect both pressure and flow measurements. This may affect the waveforms on the screen, but does not affect the volume/pressure delivered to the patient. The auto-zeroing intervals are: startup, 5 mins, 15 mins, 30 mins, 60 mins, and every 60 mins thereafter. NOTE: 5.10.2 The A5/A3 will display the message “Auto-zeroing in process” during the auto-zeroing intervals. Volume The Volume parameter group consists of 3 parameters: • Tidal Volume (VT ) - The unit of measure is mL (milliliter). • Minute Volume (MV) - The unit of measure is (L/min (liters per minute). • Respiratory Rate (Rate) - The unit of measure is bpm (breaths per minute). If the parameter data is out of range, it is displayed as “– – –”. NOTE: 5.10.3 The high alarm limit for Minute Volume (MV) is displayed to the top right of the reading. The low alarm limit for Minute Volume (MV) is displayed to the bottom right of the reading. Inspired O2 (FiO2) The unit of measure is % (volume %). If the parameter data is out of range, it is displayed as “– – –”. FiO2 measurements between 100% and 110% inclusive will be displayed as 100%. Above this range, the system will display “- - -”. 5 - 18 NOTE: FiO2 values above 100%, although not realistic, are possible due to errors in calibration. NOTE: The high alarm limit is displayed to the top right of the reading. The low alarm limit is displayed to the bottom right of the reading. 046-003777-00 A5/A3™ Operating Instructions Operations 5.10.4 Parameter Monitoring (Waveforms) Spirometry (A5 Only) Spirometry is a respiratory monitoring technology that provides continuous (breath-by-breath) measurement of patient lung mechanics. The resultant pressure, volume, flow, compliance, and resistance data enables quick assessment of the patient’s pulmonary status. Open the Spirometry Loop Window by selecting the SPIROMETRY tab. 5.10.4.1 Spirometry Loops Currently plotting loop, reference loop, and baseline loop can be displayed in Manual and Mechanical Ventilation modes. Discharge Patient will clear Spirometry Loops (baseline and reference loops). Restart the machine will clear Spirometry Loops (baseline and reference loops). Spirometry is disabled in Bypass mode. If Bypass mode is entered when the Spirometry tab is open, then the system will switch to the Waveforms tab. Pressure-Volume Spirometry Loop FIGURE 5-15 is an example of the Pressure-Volume loop. FIGURE 5-15 Pressure-Volume Loop The Y-axis of the Pressure-Volume Spirometry loop represents Volume. The unit of measure is mL and its scale is 0 to 1500, in increments of 250. The X-axis is labeled Paw (which represents Airway Pressure). The unit of measure is cmH2O and its scale is -20 to 80, in increments of 20. A5/A3™ Operating Instructions 046-003777-00 5 - 19 Parameter Monitoring (Waveforms) Operations Flow-Volume Spirometry Loop FIGURE 5-16 is an example of the Flow-Volume loop. FIGURE 5-16 Flow-Volume Loop The Y-axis of the Flow-Volume Spirometry loop represents Flow. The unit of measure is L/min and its scale is -90 to +90, in increments of 45, but only absolute numbers are displayed. The X-axis represents Volume. The unit of measure is mL and its scale is 0 to 1400, in increments of 750. 5.10.4.2 Waveform Autoscaling If the measured values of Paw, Flow, or Volume are larger than the boundary at the end of breath cycle, the system will autoscale the Paw, Flow, or Volume at the beginning of next breath cycle. If the measured values of Paw, Flow, or Volume are less than the boundary minus a margin (see Table 5-1) at the end of two continuous breath cycles, the system will autoscale the Paw, Flow, or Volume at the beginning of the next breath cycle. SCALE MARGIN Paw 10 cmH2O. Flow 10 L/min if Flow ≤ 30 L/min 15 L/min if Flow > 30 L/min Volume 25 mL if volume ≤ 100 mL 100 mL if volume > 100 mL TABLE 5-1 Autoscaling Margins of Paw, Flow, and Volume 5 - 20 046-003777-00 A5/A3™ Operating Instructions 6.0 Alarms and Messages Introduction .................................................................................................................................................................................................6-2 Displaying Alarms.....................................................................................................................................................................................6-5 Setting Alarm Volume............................................................................................................................................................................6-8 Silencing Alarms........................................................................................................................................................................................6-9 Setting Alarm Limits............................................................................................................................................................................. 6-10 Alarm and Prompt Messages ......................................................................................................................................................... 6-13 A5/A3™ Operating Instructions 046-003777-00 6-1 Introduction 6.1 Alarms and Messages Introduction The A5/A3 System provides alarms and messages that are indicated to the user by visual and audible alerts. Alarms and messages appear at the top of the Main Screen and in the Alarms window. (See Figure 6-1.) Users can adjust alarm properties, which include setting alarm limits to trigger alarm conditions, adjusting alarm volume, and silencing alarms. Alarm Messages Area Alarms Window Alarms Window Softkey Silence Alarms Softkey FIGURE 6-1 Alarms and messages on the main screen and in the Alarms window 6.1.1 Alarm System Self-Test The A5/A3 System performs a self-test of its alarm system when powered on. The self-test includes the alarm LED and speaker as follows: 6-2 • During the self-test, the alarm LED will illuminate in sequence the colors red, yellow, and cyan for approximately 1 second each color. • The system speaker will produce one tone after the alarm light is in self-test. 046-003777-00 A5/A3™ Operating Instructions Alarms and Messages 6.1.2 Introduction Types of Alarms and Messages The A5/A3 provides the following types of alarms and messages below. See section 6.6 (pg. 6-13) "Alarm and Prompt Messages" for the list of alarms and messages, see: • Physiological Alarm: This is an alarm caused by a patient-related variable. It requires a response from the user. It can have the following priority: high, medium, or low. • Technical Alarm: This is an alarm caused by a machine-related variable. It requires a response from the user. It can have the following priority: high, medium, or low. • Prompt Message: This is a message to the user. It does not require a response from the user. It always has the lowest priority, below Physiological and Technical alarms. It is displayed in black. A5/A3™ Operating Instructions 046-003777-00 6-3 Introduction 6.1.3 Alarms and Messages Alarm Indicators The A5/A3 provides the following alarm indicators: • An alarm LED located on top of the LCD monitor. The LED can illuminate red, yellow, cyan, or OFF depending on the alarm condition. Table 6-1 describes the alarm behavior of different alarm types and different alarm priority labels. If multiple alarms occur simultaneously, the audio and LED behavior will follow the highest priority active alarm. • Colored alarm messages displayed on the Main Screen. High priority messages are red. Medium priority messages are yellow. Low priority messages are cyan. Prompt messages are black. Messages are displayed according to priority and time. (See ‘‘Displayed Order of Alarm Messages’’ on page 6-7.) • Alarm audio through the system alarm speaker. Table 6-1 lists the audio behavior for each type of alarm. ALARM TYPE Physiological Alarm Technical Alarm Prompt Message ALARM PRIORITY ALARM LED COLOR AUDIO BEHAVIOR MESSAGE BEHAVIOR High Play high priority alarm sound file, the interval between each play is 5 ± 1 sec. white text red background, high priority icon. Red Medium Play medium priority alarm sound file, the interval between each play is 5 ± 1 sec. black text yellow background, medium priority icon. Yellow Low Play low priority alarm sound file, the interval between each play is 17 ± 1 sec. white text cyan background, low priority icon. Cyan High Play high priority alarm sound file, the interval between each play is 5 ± 1 sec. white text red background, high priority icon. Red Medium Play medium priority alarm sound file, the interval between each play is 5 ± 1 sec. black text yellow background, medium priority icon. Yellow Low Play low priority alarm sound file, the interval between each play is 17 ± 1 sec. white text cyan background, low priority icon. Cyan None None white text black background Off TABLE 6-1 Alarm indicators (audio and on-screen messages) 6-4 046-003777-00 A5/A3™ Operating Instructions Alarms and Messages 6.2 Displaying Alarms Displaying Alarms On the LCD monitor screen, alarm messages are automatically displayed at the top area of the Main Screen when alarm conditions occur (see FIGURE 6-4). Additionally, a list of all active alarms and an alarm log can be found in the Alarms window. (See FIGURE 6-2 and FIGURE 6-3.) Each message is displayed with an associated priority symbol as follows: • High priority • Medium priority • Low priority To display a list of all active alarms: 1. On the Main Screen, select the Alarms softkey or touch the Alarm Message area at the top of the screen. The Alarms windows is displayed. 2. Select the Active tab. A list of all active alarm messages is displayed (FIGURE 6-2). Up to 15 current alarms can be displayed on screen, after which a scroll bar is used to display the remaining alarms. Alarms are displayed in order of priority and time. See section 6.2.1 (pg. 6-7) "Displayed Order of Alarm Messages" for more information. FIGURE 6-2 Active Alarms list in the Alarms window A5/A3™ Operating Instructions 046-003777-00 6-5 Displaying Alarms Alarms and Messages To display, filter, or clear the Alarm Log: 1. On the Main Screen, select the Alarms softkey. The Alarms windows is displayed. 2. Select the Log tab. A list of all previous alarm messages is displayed. 3. Select the arrow keys on the right side to move through the list of alarms. 4. Optionally, select the Filter button to display All alarms, or only High, Medium, or Low priority alarms. 5. Optionally, select the Clear Log button to remove all alarms from the log. FIGURE 6-3 Alarms Window. Log tab is displayed. 6-6 046-003777-00 A5/A3™ Operating Instructions Alarms and Messages 6.2.1 Displaying Alarms Displayed Order of Alarm Messages Alarm messages are displayed in order of priority and time of occurrence. FIGURE 6-4 shows the alarm messages list divided into two areas (Area A and Area B). Area A (Highest priority AND most recent alarm) Area B (Less priority or less recent alarms) FIGURE 6-4 Displayed order of alarm messages Alarm messages are displayed in Area A and Area B according to the following rules: • To be in Area A, an alarm must be both the highest priority AND the most recent (Area A does not cycle). The remaining active alarms and prompt messages cycle in Area B. • New Alarms with less priority than alarms in Area A are displayed immediately in Area B, and the cycle proceeds from that position in the list. • Alarms cycling in Area B are grouped and displayed in the following order: highest priority, medium priority, low priority, and prompt messages. In each group, the most recent alarm is displayed first. • If the alarm in Area A is removed, then the most recent and highest priority alarm from Area B is moved to Area A. A5/A3™ Operating Instructions 046-003777-00 6-7 Setting Alarm Volume 6.3 Alarms and Messages Setting Alarm Volume Users can set the audio level of alarms and system alerts by selecting the Alarms softkey on the Main Screen to display the Alarms window. (FIGURE 6-5) The Alarms volume settings adjust the audio level of all High, Medium, and Low Priority sounding alarms. The System Alerts volume settings adjust the audio level of all sounding pop-up prompts and non-confirmed ventilation mode alerts. To set the Alarm Volume: 1. On the Main Screen, select the Alarms softkey. The Alarms window is displayed. 2. Select the Audio tab. Volume controls for Alarms and System Alerts are displayed. 3. Adjust the volume by selecting the + (increase) or – (decrease) buttons. The Alarms volume has 10 levels of adjustment. Default level is 5. The System Alerts volume has 10 levels of adjustment. Default level is 2. 4. Select Accept to activate your changes and exit the Alarms window. (Selecting Cancel will discard your changes and exit the Alarms window.) FIGURE 6-5 Audio Tab WARNING: 6-8 Do not rely exclusively on the audible alarm system when using the A5/ A3 Anesthesia System. Adjustment of alarm volume to a low level may result in a hazard to the patient. Always keep the patient under close surveillance. 046-003777-00 A5/A3™ Operating Instructions Alarms and Messages 6.4 Silencing Alarms Silencing Alarms When an alarm condition occurs and the alarm audio is sounded, the user can select the Silence softkey at the bottom of screen to silence the alarm audio. In silenced status, all the alarm indicators work normally except audible alarm tones. When the Silence softkey is selected, all active alarms are silenced and the icon on the left side of the alarm message changes to indicate that the alarm is silenced. When the 120 second silence icon appears, the audio alarms are silenced for 120 seconds, after which the audio alarms resume. If you select the Silence softkey while all alarms are silenced, then the audio alarms will resume immediately. NOTE: A new alarm will sound if that alarm occurs while the system is in a silenced state. If this occurs, you can select the Silence softkey again to silence the new alarm and reset the silence countdown timer to 120 seconds. Alarm Silenced Icon FIGURE 6-6 Alarm silenced icon A5/A3™ Operating Instructions 046-003777-00 6-9 Alarm Limits Alarms and Messages 6.5 Alarm Limits 6.5.1 Setting Alarm Limits Users can set the high and low alarm limits of Paw, MV, and FiO2 to create alarm conditions consistent with patient needs. The alarm is then triggered when the parameter value is greater than the High Limit or lesser than the Low Limit. NOTE: When using the A5/A3 Anesthesia System, ensure that the alarm limits of each parameter are set to the appropriate values for the patient. To set the Alarm Limits: 1. On the Main Screen, select the Alarms softkey. The Alarms windows is displayed. 2. Select the Limits tab. (See FIGURE 6-7.) 3. Select a parameter softkey. The softkey is highlighted when selected. 4. Use the on-screen keypad to enter the desired parameter value. For each parameter, the range of values is displayed above the keypad. The section ‘‘Alarm Limits’’ on page B-3 also lists the range of values for Paw, MV, and FiO2. 5. Select Accept to save the change (or select Cancel to not save). 6. Repeat Steps 3 to 6 for each parameter value. FIGURE 6-7 Limits tab in the Alarms window 6 - 10 046-003777-00 A5/A3™ Operating Instructions Alarms and Messages 6.5.2 Alarm Limits Loading Alarm Defaults Users can load the user alarm limit defaults of all modules from the Alarms window. To load alarm limit defaults: 1. On the Main Screen, select the Alarms softkey. The Alarms windows is displayed. 2. Select the Load Alarm Defaults button at the bottom of the Alarms window. The alarm limits defaults are loaded for FiO2, MV, and PEAK. 3. Select the Accept button to save these settings and close the Alarms window. Load Alarm Defaults button FIGURE 6-8 Load Alarm Defaults button in the Alarms window A5/A3™ Operating Instructions 046-003777-00 6 - 11 Alarm Limits 6.5.3 Alarms and Messages Auto Alarm Limits The Auto Alarm Limits function uses an algorithm based on measured values. The relationship is shown in the table below. The Auto Alarm Limits button is disabled when the A5/A3 is in Standby mode or Manual mode. The Auto Alarm Limits button is also disabled when the current mode is PS, SIMV-VC, or SIMV-PC. ALARM LIMIT ADJUST FORMULA Paw High PEAK+5 or PLAT+10, whichever is greater minimum 35 cmH2O Paw Low (PLAT-PEEP) x 0.6 + PEEP - 1 minimum 3 cmH2O maximum Paw High - 1 MV High MV x 1.4 minimum 2.0 L/min MV Low MV x 0.6 minimum 0.3 L/min maximum MV High - 0.1 TABLE 6-2 Auto Alarm Limits The parameters in the formula are all measured parameters. The new alarm limits for Paw are calculated on the basis of average values for PEAK, PLAT, and PEEP. The value used for average uses the value of the last four ventilation cycles or the value in one minute, whichever is smaller. Spontaneous breaths by the patient are not taken into account. If there is not a valid measured MV, the corresponding MV alarm limits will not be adjusted. If the average value for PEAK, PLAT, and PEEP cannot be calculated, the corresponding alarm limits will not be adjusted. If the calculated alarm limit is more than the high threshold of setting range or less than the low threshold, the corresponding threshold is used as the auto alarm limit. 6 - 12 046-003777-00 A5/A3™ Operating Instructions Alarms and Messages 6.6 Alarm and Prompt Messages Alarm and Prompt Messages This section lists the following alarms and messages: • Physiological Alarm Messages • Technical Alarm Messages • Prompt Messages. For each alarm message, corresponding actions are given instructing you to troubleshoot problems. If the problem persists, contact your service personnel. NOTE: The Disable in Manual and Cardiac Bypass mode column indicates how this alarm is controlled by the alarm on/off button and the cardiac bypass mode button in manual mode. NOTE: The Disable in Standby mode column indicates which physiological alarms will be disabled automatically in Standby mode. A5/A3™ Operating Instructions 046-003777-00 6 - 13 Alarm and Prompt Messages 6.6.1 Alarms and Messages Physiological Alarm Messages ALARM PRIORITY DISABLED WHEN ALARM IS OFF DISABLED IN STANDBY MODE MESSAGE CAUSE Apnea Two triggering conditions occur simultaneously: 1. Paw < (PEEP+3) cmH2O for more than 30 seconds 2. Vt < 10 mL for more than 30 seconds Medium Yes N/A * Apnea >2 min No breath has been detected within the last 120 seconds. High Yes N/A * Paw Too High Ppeak ≥ Paw high alarm limit setting High Yes N/A * Paw Too Low Ppeak ≤ Paw low alarm limit setting for 20 seconds High Yes N/A * Pressure Limiting Paw ≥ Plimit Low N/A * N/A * FiO2 Too High FiO2 > high alarm limit setting Medium No N/A * FiO2 Too Low FiO2 < low alarm limit setting High No N/A * MV Too High MV > high alarm limit setting Medium Yes N/A * MV Too Low MV < low alarm limit setting Medium Yes N/A * Continuous Airway Pressure Paw in the breathing circuit > sustained airway pressure alarm limit for 15 seconds High No N/A * Negative Pressure Paw < -10 cmH2O for 1 second High No N/A * * N/A - Not Applicable. This alarm message does not exist within this mode and therefore cannot be disabled or enabled. TABLE 6-3 Physiological Alarm Messages 6 - 14 046-003777-00 A5/A3™ Operating Instructions Alarms and Messages Alarm and Prompt Messages 6.6.2 Technical Alarm Messages 6.6.2.1 Startup Alarm Messages NOTE: Startup alarms will not trigger the alarm sound and alarm light. NOTE: Startup alarms priority is only used to display in the alarm logbook. NOTE: Startup Result if Fail column indicates the result when this startup phase alarm is triggered, which may be ALL, only manual, and NonFunctional. NOTE: “All” indicates that all Automatic Ventilation, Manual Ventilation, and Cardiac Bypass modes are enabled. “Only Manual” indicates that only Manual Ventilation and Cardiac Bypass modes are enabled. “Non-Functional” indicates that the A5/A3 Anesthesia System cannot be used. ALARM PRIORITY MACHINE MODE WHEN CHECKED STARTUP RESULT IF FAIL MESSAGE CAUSE Bundle Version Error / Incompatible version found Incompatible firmware version is installed. N/A Startup NonFunctional CPU Board Bundle Version: Time out Self-test result cannot be obtained due to an internal communication error. N/A Startup NonFunctional CPU Board Flowmeter Voltage Error / Flowmeter Voltage: Fail DVCC, AVDD or VC voltage error High Startup Only Manual Electronic Flowmeter Board Flowmeter Self Test Error / Flowmeter Self Test Fail 1. CPU, Flash or WTD error 2. Table blank or error High Startup NonFunctional Electronic Flowmeter Board Flowmeter Self Test: Time out Self-test result cannot be obtained due to an internal communication error. High Startup NonFunctional Electronic Flowmeter Board Aux Control Module Self Test Error / Aux Control Module Self Test: Fail 1. CPU, Flash or WTD error 2. After power on, CPU board can't communicate with the Aux Control board. High Startup NonFunctional Aux Vent Control Board Aux Control Module Self Test: Time out Self-test result cannot be obtained due to an internal communication error. High Startup NonFunctional Aux Vent Control Board A5/A3™ Operating Instructions 046-003777-00 REMARK 6 - 15 Alarm and Prompt Messages 6 - 16 Alarms and Messages ALARM PRIORITY MACHINE MODE WHEN CHECKED STARTUP RESULT IF FAIL MESSAGE CAUSE Ventilator Self Test Error / Ventilator Self Test: Fail 1. CPU, TIMER, RAM, WTD, EEPROM or AD error 2. After power on, CPU board cannot communicate with the ventilator board. High Startup NonFunctional Ventilator Control Board Ventilator Self Test: Time out Self-test result cannot be obtained due to an internal communication error. High Startup NonFunctional Ventilator Control Board Ventilator Voltage Error / Ventilator Voltage: Fail 5V or 12V voltage error High Startup Only Manual Ventilator Control Board PEEP Valve Failure / PEEP Valve: Fail 1. PEEP valve voltage error. 2. PEEP valve pressure error. Medium Startup Only Manual Ventilator Control Board Insp Valve Failure / Insp Valve: Fail 1. Inspiratory valve voltage error. 2. Inspiratory valve flow error. Medium Startup Only Manual Ventilator Control Board Safety Valve Failure / Safety Valve: Fail PEEP safety valve voltage error. Medium Startup Only Manual Ventilator Control Board Flow Sensor Failure / Flow Sensor: Fail Ventilator flow is out of range. Low Startup Only Manual Ventilator Control Board Calibrate Flow Sensor and Insp Valve 1. Calibration table isn't found in EEPROM. 2. Checksum of Calibration table does not match. Low Startup Only Manual Ventilator Control Board Calibrate Pressure Sensor and PEEP Valve 1. Calibration table isn't found in EEPROM. 2. Checksum of Calibration table does not match. Low Startup Only Manual Ventilator Control Board Calibrate O2 Sensor 1. Calibration table isn't found in EEPROM. 2. Checksum of Calibration table does not match. Low Startup All Ventilator Control Board Ventilator Initialization Error / Ventilator Initialization: Fail After power on, CPU board cannot send the parameter settings to the ventilator board. High Startup NonFunctional CPU Board 046-003777-00 REMARK A5/A3™ Operating Instructions Alarms and Messages Alarm and Prompt Messages ALARM PRIORITY MACHINE MODE WHEN CHECKED STARTUP RESULT IF FAIL REMARK MESSAGE CAUSE Ventilator Initialization: Time out Self-test result cannot be obtained due to an internal communication error. High Startup NonFunctional CPU Board Drive Gas Pressure Low Drive Gas Pressure is low High Startup All Ventilator Control Board O2 Supply Failure / O2 Supply: Fail O2 Supply Failure High Startup All Ventilator Control Board Power Supply Voltage Error / Power Supply Voltage: Fail 3.3V, 5V, 12V voltage error High Startup Only Manual Power Board RT Clock Needs Battery There is no button battery cell available in the system, or the button battery cell power is depleted. High Startup only All CPU Board RT Clock Failure / RT Clock: Fail RT chip malfunction High Startup only All CPU Board TABLE 6-4 Startup Alarm Messages 6.6.2.2 CPU Board Runtime Alarm ALARM PRIORITY MACHINE MODE WHEN CHECKED DISABLE IN STANDBY MODE MESSAGE CAUSE IP Address Conflict The IP address of the machine is the same as the IP address of another device in the local network. Medium Runtime No Fan Failure Speed of the fan ≤ 20% of normal speed Medium Runtime No ALARM PRIORITY MACHINE MODE WHEN CHECKED DISABLE IN STANDBY MODE TABLE 6-5 CPU Board Runtime Alarm Messages 6.6.2.3 Power Board Runtime Alarm MESSAGE CAUSE Power System Comm Stop Lost communication with CPU board for 10 seconds. High Runtime No Power Supply Voltage Error 3.3V, 5V, 12V voltage error High Runtime No A5/A3™ Operating Instructions 046-003777-00 6 - 17 Alarm and Prompt Messages Alarms and Messages ALARM PRIORITY MACHINE MODE WHEN CHECKED DISABLE IN STANDBY MODE MESSAGE CAUSE Low Battery Voltage! Battery voltage is less than 10.6V for 5 seconds. High Runtime No System going DOWN, Battery depleted! Battery voltage is less than 10.2V. High Runtime No Battery Undetected Battery undetected Medium Runtime No Battery in Use AC power fail Low Runtime No Power Board High Temp Power board temperature is greater than 95° C High Runtime No Heating Module Failure 1. Both resistance temperatures are greater than 105° C or less than 0° C for 20 seconds. 2. One of the resistance temperatures is greater than 110° C for 15 seconds. Low Runtime No Breathing Circuit Not Mounted Breathing Circuit is not mounted. High Runtime No TABLE 6-6 Power Board Runtime Alarm Messages NOTE: 6.6.2.4 6 - 18 If the power board loses communication with the CPU board for 10 seconds, the alarm buzzer will be turned on. Electronic Flowmeter Board Runtime Alarm ALARM PRIORITY MACHINE MODE WHEN CHECKED DISABLE IN STANDBY MODE MESSAGE CAUSE Flowmeter Voltage Error DVCC, AVDD, or VC voltage error High Runtime No N2O Flow Too High N2O flow is greater than 15 L/min for 1 second. Low Runtime No O2 Flow Too High O2 flow is greater than 25 L/ min for 1 second. Low Runtime No Air Flow Too High Air flow is greater than 20 L/ min for 1 second. Low Runtime No O2-N2O Ratio Error N2O flow is greater than 0.5 L/ min and greater than 4 times O2 flow for 1.6 seconds. High Runtime No Flowmeter Comm Stop Lost communication with CPU board for 10 seconds. When this alarm is triggered, the fresh gas flow value will be displayed as '---'. High Runtime No NO Fresh Gas Fresh gas flow is less than 50 mL/min for 5 seconds when the machine is not in Standby mode. Medium Runtime Yes 046-003777-00 A5/A3™ Operating Instructions Alarms and Messages Alarm and Prompt Messages ALARM PRIORITY MACHINE MODE WHEN CHECKED DISABLE IN STANDBY MODE MESSAGE CAUSE Internal N2O Flow Failure The I2C communication between the CPU and N2O flow sensor has failed. Low Runtime No Internal O2 Flow Failure The I2C communication between the CPU and O2 flow sensor has failed. Low Runtime No Internal Air Flow Failure The I2C communication between the CPU and Air flow sensor has failed. Low Runtime No TABLE 6-7 Electronic Flowmeter Board Runtime Alarm Messages 6.6.2.5 Ventilator Control Board Runtime Alarm ALARM PRIORITY MACHINE MODE WHEN CHECKED DISABLE IN STANDBY MODE MESSAGE CAUSE Aux Control Module Comm Stop Lost communication with CPU board for 10 seconds. High Runtime No Ventilator Voltage Error 5V or 12V voltage error High Runtime No PEEP Valve Failure 1. PEEP valve voltage error 2. PEEP valve pressure error Medium Runtime No Insp Valve Failure 1. Inspiratory valve voltage error 2. Inspiratory valve flow error Medium Runtime No Safety Valve Failure PEEP safety valve voltage error Medium Runtime No Flow Sensor Failure 1. Inspiratory flow is out of range. 2. Expiratory flow is out of range. Low Runtime No Check Flow Sensors 1. Inspiratory reverse flow 2. Expiratory reverse flow High Runtime N/A * Pinsp Not Achieved Pinsp does not reach the Pinsp setting in pressure mode. Low Runtime N/A * Vt Not Achieved Vt does not reach the Vt setting in volume mode. Low Runtime N/A * Automatic Ventilation Disabled The machine is in the automatic ventilation disabled state. Low Runtime No Auto Ventilation Disabled-Leak Test Failed Automatic Circuit Leak Test failed, and the result is "Manual Only". Low Runtime No * A5/A3™ Operating Instructions N/A - Not Applicable. This alarm message does not exist within this mode and therefore cannot be disabled or enabled. 046-003777-00 6 - 19 Alarm and Prompt Messages Alarms and Messages TABLE 6-8 Ventilator Control Board Runtime Alarm Messages ALARM PRIORITY MACHINE MODE WHEN CHECKED DISABLE IN STANDBY MODE MESSAGE CAUSE Patient Circuit Leak 1. Vte is less than Vti to the maximum of 200 mL and 50% for 30 seconds 2. Vti is less than Vt delivery in volume mode. 3. Patient is not connected. Medium Runtime N/A CO2 Absorber Canister Not Locked CO2 Canister is not mounted. High Runtime No O2 Sensor Disconnected O2 Sensor is not connected. Low Runtime No Replace O2 sensor The O2 value is less than 5%. Medium Runtime No Calibrate O2 Sensor O2 value is greater than 110% or between 5% and 15% for 3 seconds. Low Runtime No Ventilator Comm Stop Lost communication with the CPU board for 10 seconds. High Runtime No Drive Gas Pressure Low Drive Gas Pressure is low. High Runtime No O2 Supply Failure O2 Supply Failure High Runtime No Fresh Gas Flow Too High In VCV and SIMV-VC modes, the fresh gas flow is greater than or equal to the desired flow. Low Runtime N/A TABLE 6-9 Ventilator Control Board Runtime Alarm Messages (cont’d) 6 - 20 046-003777-00 A5/A3™ Operating Instructions Alarms and Messages Alarm and Prompt Messages 6.6.3 Prompt Messages 6.6.3.1 Prompt Messages Displayed in Alarm Area MESSAGE TIMEOUT REMARK Correspond status does not exist. This Alarms Off icon and message appear on a white background when the Alarms button in the Manual mode tab is set to OFF. Load Configuration Failure 10 sec This message appears when load user or latest configuration failed. DEMO Mode - Not for Clinical Use Never This message appears when the system is set to Demo mode from the Service tab. Service Mode - Not for Clinical Use Never This message appears when the machine is worked in Service mode. Apnea Ventilation Correspond status does not exist. This message appears when the Min Rate triggers a breath in PS ventilation mode. Calibrate O2 sensor for 21% • When the machine is powered on, if more than 72 hours have elapsed since the last successful calibration, the prompt message "Calibrate O2 sensor for 21%" is displayed. The message disappears after successful calibration. • If the machine is kept powered on, the prompt message “Calibrate O2 sensor for 21%” is displayed at the next Standby mode after 5am after 72 hours have elapsed since the last successful calibration. • If the alarm message "RT Clock Needs Battery" or "RT Clock Failure" is displayed, the prompt message "Calibrate O2 sensor for 21%" is disabled. • If the calibrate time is empty, the prompt message "Calibrate O2 sensor for 21%" is displayed. Auto-zero in process Correspond status does not exist. This message appears when auto-zeroing of the pressure sensors is in process. Fresh Gas Is On Correspond status does not exist. This message is displayed if the fresh gas flow value is flashing in Standby mode. New functions activated, please restart! After the machine restart This message appears when activation complete successfully. Pressure, Volume and Apnea Alarms are OFF TABLE 6-10 Prompt Messages Displayed in Alarm Area 6.6.3.2 Prompt Messages Displayed in Pop-up Area MESSAGE TIMEOUT REMARK Can only Discharge in Manual Mode! 5 sec This message appears if the Discharge button is selected when the Manual switch is set to Auto and the machine is in non-standby. Invalid Age! Please check DOB or current system time. 5 sec This message appears after entering the patient’s date of birth if the calculated age of the patient is outside the accepted range (0-150). Patient Size can only be changed in Manual Mode or in Standby 5 sec This message appears when the Patient Size selection is pressed while the system is in Automatic Ventilation mode. A5/A3™ Operating Instructions 046-003777-00 6 - 21 Alarm and Prompt Messages Alarms and Messages MESSAGE TIMEOUT REMARK Vent modes can only be changed using "Set Mode" button below 5 sec This message appears when the Current Mode area is pressed. Out of Range 5 sec This message appears when the entered value is outside the allowable range. Invalid Password 5 sec This message appears when the entered password is wrong. Saving User Configuration has failed. 5 sec This message appears when the Saving User Configuration process has failed. New password input is inconsistent. 5 sec This message appears when the new password and the confirmed new password do not match. Automatic ventilation disabled. Check lever on breathing system. 15 sec This message appears when exiting Standby mode while the Auto/Manual switch is in Auto position and system is in the Automatic Ventilation disabled state. Fresh gas flow detected! Adjust all flowmeters to zero After fresh gas flow is turned off or after exiting "Manual Circuit Leak Test" or "Automatic Circuit Leak Test & Compliance Test" screen. This message appears in the first "Manual Circuit Leak Test" or "Automatic Circuit Leak Test & Compliance Test" screen when fresh gas flow is detected. Access to System settings only available in Standby 5 sec This message appears when the current mode is in non-standby and the user tries to enter the Setup > System menu. Can not discharge while fresh gas flow is detected! 5 sec This message appears when user tries to discharge by pressing the disabled Discharge button while fresh gas is on, Auto/Manual switch is set to Manual, and the system is in non-standby. Set Auto/Manual switch to Manual position before starting case 1. When triggered by turning on fresh gas, it will disappear after fresh gas flow is turned off or Auto/Manual switch is set to Manual; 2. When triggered by touching the Waveforms/ Spirometry screen, it will disappear after 5 seconds or Auto/Manual switch is set Manual. When Auto/Manual switch is in Auto position and system is in Standby mode, this message will appear in the following cases: 1. Turning on fresh gas 2. Touching the Waveforms/Spirometry screen Set Auto/Manual switch to Manual position and adjust all flowmeters to zero. 5 sec This message appears in the first "Automatic Circuit Leak Test & Compliance Test" screen when pressing the disabled Continue button. Set Auto/Manual switch to Auto position and adjust all flowmeters to zero. 5 sec This message appears in the first "Manual Circuit Leak Test" screen when pressing the disabled Continue button. TABLE 6-11 Prompt Messages Displayed in Pop-up Area 6 - 22 046-003777-00 A5/A3™ Operating Instructions 7.0 Maintenance Theory of Operation ...............................................................................................................................................................................7-3 Block Diagram.............................................................................................................................................................................................7-3 Maintenance Schedule .........................................................................................................................................................................7-4 Breathing System Maintenance.......................................................................................................................................................7-4 Flow Sensor Calibration ........................................................................................................................................................................7-5 O2 Sensor Calibration.............................................................................................................................................................................7-6 Water Build-up in the Flow Sensor ................................................................................................................................................7-9 AGSS Transfer Tube Maintenance...................................................................................................................................................7-9 Cleaning and Disinfection................................................................................................................................................................ 7-10 Regular Maintenance .......................................................................................................................................................................... 7-26 A5/A3™ Operating Instructions 046-003777-00 7-1 Maintenance 7-2 WARNING: Do not use a malfunctioning A5/A3 Anesthesia System. Have all repairs and service done by an authorized service representative. WARNING: Use a cleaning and disinfection schedule that conforms to your institution's disinfection and risk-management policies. • Refer to the material safety data as applicable. • Refer to the operation and maintenance manuals of all disinfection equipment. • Do not inhale fumes that may result from any disinfection process. WARNING: Do not use talc, zinc stearate, calcium carbonate, corn starch, or similar material to prevent sticking of the bellows, as these materials may enter the patient's lungs or airway, causing irritation or injury. WARNING: Only use lubricants approved for anesthesia or O2 equipment. WARNING: Do not use lubricants that contain oil or grease. They can burn or explode in the presence of high O2 concentrations. WARNING: Obey infection control and safety procedures. Used equipment may contain blood and body fluids. WARNING: Movable parts and removable components may present a pinch or a crush hazard. Use care when moving or replacing system parts and components. WARNING: Before using the A5/A3 System after cleaning or disinfecting, power up the system and follow the on-screen prompts to perform the Leak Test and the Compliance Test. See section 4.5 (pg. 4-9) "Leak and Compliance Tests". CAUTION: To prevent system damage: • Refer to the literature supplied by the manufacturer of the cleaning agent. • Never use organic, halogenated or petroleum-based solvents, anesthetics, glass cleaning agents, acetone or other irritant agents. • Never use abrasive agents (i.e. steel wool or silver polish) to clean components. • Keep all liquids away from electronic components. • Prevent liquid from entering the equipment. • All cleaning solutions used must have a pH between 7.0 and 10.5. CAUTION: Never immerse the oxygen sensor or its connector in any type of liquid. Dispose of the oxygen sensor per the manufacturer’s specification. CAUTION: Do not wash the inner surface of the oxygen sensor. CAUTION: Do not autoclave the following components: Paw gauge, oxygen sensor, flow sensor, and bellows. These components cannot withstand immersion or the heat and pressure of autoclaving. NOTE: No repair should ever be attempted by anyone not having experience in the repair of devices of this nature. Replace damaged parts with components manufactured or sold by Mindray. Then test the unit to ensure that it complies with the manufacturer’s published specifications. 046-003777-00 A5/A3™ Operating Instructions Maintenance 7.1 Theory of Operation Theory of Operation The A5/A3 System is a pneumatically-driven and electronically-controlled anesthesia machine. Three types of supply gases are available: N2O, O2, and Air. The user adjusts supply gas flows through the flowmeters. The mixed gas outputted from the flowmeters is further mixed with the anesthetic agent inside the anesthetic vaporizer to form fresh gas. During the inspiratory phase, the microprocessor-controlled inspiratory valve produces the preset drive gas inspiratory flow and the expiratory valve closes. The drive gas enters the bellows dome in the patient circuit and depresses the bellows inside the dome to move downward. This forces the gas inside the bellows to enter the patient's lungs until the end of the inspiratory phase. During the expiratory phase, the inspiratory valve closes and the expiratory valve opens. The patient can expire freely. The patient's expired gas, mixed with the fresh gas, enters and lifts the bellows inside the dome. The drive gas outside the bellows is scavenged to the Anesthetic Gas Scavenging System (AGSS) until the end of the expiratory phase. During ventilation, the ventilator performs real-time monitoring over airway pressure and flow. If the airway pressure or minute volume is outside the user-preset alarm limits, an audible and visible alarm occurs. When the airway pressure is higher than the limit value determined by the PEAK high alarm limit, the ventilator enters the expiratory phase automatically to avoid causing injury to the patient. Additionally, the ventilator has a built-in pressure safety valve that opens at an approximate pressure of 110 cmH2O (11kPa). 7.2 Block Diagram Anesthetic Ventilator Anesthetic Gas Delivery Device (Vaporizer) Anesthetic Gas Delivery System Anesthetic Gas Scavenging System (AGSS) Hospital’s Disposal System Breathing System Patient FIGURE 7-1 Block Diagram of A5/A3 System A5/A3™ Operating Instructions 046-003777-00 7-3 Maintenance Schedule 7.3 Maintenance Maintenance Schedule The schedules listed below are the minimum frequency based on 2000 hours of usage per year. The equipment should be serviced more frequently if used more than this yearly usage. Maintenance should be performed by a trained technician. NOTE: During cleaning and setup, inspect the parts and seals for damage. Replace or repair as necessary. MINIMUM FREQUENCY MAINTENANCE Daily Clean the external surfaces. Every 72 hours Perform 21% O2 calibration (O2 sensor in breathing system). The A5/A3 will prompt the user for 21% O2 calibration. Annually Periodic maintenance due, to be performed by a trained technician. Contact Mindray Technical Support for details. Every three years Periodic maintenance due, to be performed by a trained technician. Contact Mindray Technical Support for details. As necessary • Perform 100% O2 calibration after replacing the O2 sensor. • Replace the O2 sensor if it cannot be calibrated. • Before installing the cylinder, use a new cylinder gasket on the cylinder yoke. • Empty the water trap if there is water buildup. • Replace the sodalime in the canister if sodalime color change is detected. Follow the manufacturer’s instructions. • Replace the flow sensor if the seal for the flow sensor is damaged, the membrane inside the flow sensor is cracked or distorted, or the flow sensor is cracked or distorted. • Replace the transfer tube if it is damaged. TABLE 7-1 Maintenance Schedule 7.4 Breathing System Maintenance When cleaning the breathing system, replace any parts that are visibly cracked, chipped, distorted or worn. For details, refer to ‘‘Inspect the System’’ on page 4-3 and ‘‘Cleaning and Disinfection’’ on page 7-10. 7-4 046-003777-00 A5/A3™ Operating Instructions Maintenance 7.5 Flow Sensor Calibration Flow Sensor Calibration WARNING: Do not perform calibration while the unit is connected to a patient. NOTE: During calibration, do not operate the pneumatic parts. Do not move or press the breathing tubes. The flow sensor must be calibrated whenever the flow volume is out of specification or after changing the flow sensor. To calibrate the flow sensor: 1. Ensure that the supply gas pressure is normal. 2. Turn off all fresh gas inputs. 3. Set the ventilation switch to the automatic ventilation position. 4. Remove the bellows and reinstall the bellows housing. 5. Plug the Y-piece of the breathing circuit into the leak test port to close the breathing system. 6. Remove the water trap. 7. Ensure that the system is Standby mode. If not, select the Discharge button in the Manual tab and follow the screen prompts to discharge the patient and enter Standby mode. 8. Select the Setup softkey, then the Calibrate Flow Sensor button. 9. Follow the on-screen prompts and select the Begin button to start to calibrate the flow sensor. The calibration process takes several minutes. The system will display the results of the calibration status when the process is completed. 10. Reinstall the bellows and water trap. 11. Select Done to close the Calibration window. 12. Select Accept to close the Setup window. NOTE: In case of repeated calibration failure, contact Mindray Technical Support. FIGURE 7-2 Flow Sensor Calibration Begin A5/A3™ Operating Instructions 046-003777-00 FIGURE 7-3 Flow Sensor Calibration Successful 7-5 O2 Sensor Calibration 7.6 Maintenance O2 Sensor Calibration Perform O2 calibration when the measured value of O2 concentration has a large deviation from other reference sources or when the O2 sensor is replaced. If the O2 sensor is replaced, 100% O2 sensor calibration is required. For continued O2 sensor accuracy, the A5/A3 checks for 21% O2 calibration approximately every 72 hours. The A5/A3 prompts the user for 21% O2 calibration as follows: • When the machine is powered on, if more than 72 hours have elapsed since the last successful calibration, the prompt message "Calibrate O2 sensor for 21%" is displayed. The message disappears after successful calibration. • If the machine is kept powered on, the prompt message “Calibrate O2 sensor for 21%” is displayed at the next Standby mode after 5am after 72 hours have elapsed since the last successful calibration. NOTE: If the alarm message "RT Clock Needs Battery" or "RT Clock Failure" is displayed, the prompt message "Calibrate O2 sensor for 21%” is disabled. The O2 sensor must be removed from the breathing system before calibrating it at 21%. The O2 sensor can be reinstalled after verifying that there is no water build-up in the O2 sensor and its installation part. 7-6 046-003777-00 A5/A3™ Operating Instructions Maintenance 7.6.1 O2 Sensor Calibration Calibrate the O2 Sensor 21% O2 sensor calibration can be performed in all ventilation modes when calibrating from the Setup > General tab. When calibrating from the Setup > System tab, the A5/A3 must be placed in Standby mode and a system password is required. See ‘‘System Tab’’ on page 3-27 for password information. NOTE: The breathing system automatically seals off the O2 sensor port when the O2 sensor is removed. 1. Set the A5/A3 to Standby mode: a. Set the Auto/Manual ventilation switch to Manual. b. Turn off all fresh gas flows by turning their knobs clockwise. Wait until all fresh gas flow levels are effectively at 0.0 L/min (i.e., flow < 0.05 L/min). c. Select the Discharge button in the Manual tab. NOTE: The A5/A3 system will not allow the Discharge button to be selected until the Auto/Manual ventilation switch is set to Manual, and system detects the individual fresh gas flows are effectively turned off (i.e., flow < 0.05 L/min). d. Follow the screen prompts to discharge the patient and enter Standby mode. 2. Select Setup > General > Calibrate O2 Sensor. Only 21% O2 sensor calibration is available in the General tab, or Select Setup > System (system password needed) > Calibration > O2 Sensor. Both 21% and 100% O2 sensor calibrations are available in the System tab. The 21% button is highlighted by default. NOTE: In the System tab, 21% oxygen sensor calibration must be completed before performing 100% calibration. The 100% button is disabled if a 21% oxygen sensor calibration has not been successfully completed within 72 hours. 3. Remove the O2 sensor from the O2 sensor port on the breathing system. Allow three (3) minutes for the sensor to acclimate to the environment. 4. Carefully follow the on-screen prompts to prepare for calibration. 5. Select the Begin button to start 21% O2 sensor calibration. The system will indicate the calibration status when the process is completed. 6. When 21% O2 sensor calibration is successfully completed, reinstall the O2sensor into the O2 sensor port on the breathing system. If an error code in red (e.g., 00 00 00 10) is displayed, see Table 7-2, “O2 Sensor Calibration Error Codes,” on page 7-8 for troubleshooting information. 7. If you are in the Setup > General, select Done when 21% O2 sensor calibration is completed. Skip the remaining steps below. or If you are in the Setup > System and wish to skip 100% O2 sensor calibration, select Done to close the calibration window. Skip the remaining steps below. 8. Select the 100% button to perform 100% O2 sensor calibration. 9. Carefully follow the on-screen prompts to prepare for calibration. A5/A3™ Operating Instructions 046-003777-00 7-7 O2 Sensor Calibration Maintenance 10. Select the Begin button to start 100% O2 sensor calibration. The system will indicate the calibration status when the process is completed. If an error code in red (e.g., 00 00 00 10) is displayed, see Table 7-2, “O2 Sensor Calibration Error Codes,” on page 7-8 for troubleshooting information. 11. After calibration, select Done to close the calibration window. NOTE: In case of repeated calibration failures, replace the O2 sensor and repeat the calibration. If calibration still fails, contact Mindray Technical Support. ERROR CODE DESCRIPTION RECOMMENDED ACTION 00 00 00 01 O2 sensor calibration is canceled. . Perform O2 sensor calibration again. 00 00 00 02 O2 supply pressure is low. During 100% calibration process, O2 supply pressure was not sufficient. . Check that the O2 sensor is connected to the cable correctly. . Check the O2 supply pressure. . Check that the O2 sensor output voltage in the calibration menu is steady. . Replace the O2 sensor. 00 00 00 04 O2 sensor is disconnected. Sampled data is greater than 2900 (AD value). . Check that the O2 sensor is connected to the cable correctly. . Check that the O2 sensor output voltage in the calibration menu is steady. . Replace the O2 sensor. 00 00 00 08 21% calibration value is outside of the expected range (150~500) (AD value). . Check that the O2 sensor is connected to the cable correctly. . Check that the O2 sensor is in 21% O2. . Check that the O2 sensor output voltage in the calibration menu is steady. . Replace the O2 sensor. 00 00 00 10 100% calibration value is outside of the expected range (800~2028) (AD value). . Check that the O2 sensor is connected to the cable correctly. . Check that the O2 sensor is in 100% O2. . Check that the O2 sensor output voltage in the calibration menu is steady. . Replace the O2 sensor. 00 00 00 20 Error writing to EEPROM. . Repeat the calibration. . Replace the O2 sensor. . Replace the CPU board. TABLE 7-2 O2 Sensor Calibration Error Codes 7-8 046-003777-00 A5/A3™ Operating Instructions Maintenance Water Build-up in the Flow Sensor 7.7 Water Build-up in the Flow Sensor 7.7.1 Prevent Water Build-up Water comes from the condensation of exhaled gas and a chemical reaction between CO2 and the sodalime in the CO2 absorbent canister. At lower fresh gas flows more water builds up because of the following: • More CO2 stays in the CO2 absorbent canister to react and produce water. • More moist, exhaled gas stays in the breathing system and CO2 absorbent canister to produce condensed water. Check the inspiratory and expiratory flow sensors when abnormal flow waveform or unstable tidal volume fluctuation is detected. Check the sensor for water. If there is water build-up, clear it immediately before use. To prevent water build-up: 7.7.2 • Use a filter between the flow sensor and the patient to limit water condensation in the flow sensor. • Check the water trap for water before using the A5/A3 Anesthesia System. If there is water build-up, clear it immediately. Clear Water Build-up The water build-up inside the flow sensor will result in inaccurate measured value of tidal volume. If there is water built up inside the flow sensor, remove the sensor and clear the water. Then reinstall the sensor for use. 7.8 WARNING: Check water build-up inside the flow sensor before every system use. Pooled water in the flow sensor causes erroneous readings. WARNING: Ensure that all breathing system parts are completely dried after the breathing system is cleaned and disinfected. AGSS Transfer Tube Maintenance Check the tube of the AGSS transfer system. Replace it if it is damaged. A5/A3™ Operating Instructions 046-003777-00 7-9 Cleaning and Disinfection 7.9 Maintenance Cleaning and Disinfection CAUTION: 7.9.1 Before using the A5/A3 System after cleaning or disinfecting, power up the system and follow the on-screen prompts to perform the Leak Test and the Compliance Test. See section 4.5 (pg. 4-9) "Leak and Compliance Tests". General Guidelines Follow all WARNINGS and CAUTIONS listed at the beginning of this chapter. Prior to use, refer to the facility’s infection control policy to determine the frequency and level at which cleaning and disinfection should be performed. If disinfection is required, all components must first be cleaned and dried as described in the following sub-sections. For additional information about infection control practices, refer to the APIC Guidelines for Selection and Use of Disinfectants, published in the American Journal of Infection Control, Vol. 24, No. 4, August 1996. For additional information about infection control, refer to the ASA’s Recommendations for Infection Control for the Practice of Anesthesiology, second edition. For additional information on reprocessing medical devices, refer to AAMI TIR 30:2003, A compendium of process, materials, test methods, and acceptance criteria for cleaning reusable medical devices. 7.9.2 Cleaning and Disinfecting Agents / Autoclaving The A5/A3 should be cleaned and disinfected before its first use, then daily and as often as needed. Table 7-1, “Maintenance Schedule,” on page 7-4. Table 7-3 lists the cleaning and disinfecting agents and autoclaving process that may be used on the A5/A3 Anesthesia System. * AGENT CLASSIFICATION Water detergent Soapy water (pH value of detergent at 7.0 to 10.5) detergent Sodium hypochloride (bleach) solution in water (10%) intermediate level disinfectant Isopropyl alcohol (70%) intermediate level disinfectant Super Sani-Cloth (0.5% Quaternary ammonium chloride and 55% Isopropyl alcohol) intermediate level disinfectant Virkon intermediate level disinfectant Autoclaving process * high level disinfectant All breathing system components are autoclavable except the Paw gauge, flow sensor, O2 sensor, and bellows. The components can be autoclaved up to a maximum temperature of 134 ºC (273 ºF). TABLE 7-3 Cleaning and Disinfecting Agents 7.9.3 External Surfaces Use a soft cloth with an approved cleaning agent (See section 7.9.2 (pg. 7-10) "Cleaning and Disinfecting Agents / Autoclaving") to clean all outer surfaces, hoses, and cables. 7 - 10 046-003777-00 A5/A3™ Operating Instructions Maintenance 7.9.4 Cleaning and Disinfection Bellows Assembly FIGURE 7-4 Bellows Assembly Read all content in this section before disassembling, cleaning, disinfecting, and re-assembling the bellows to avoid equipment malfunction and patient injury. 1. The bellows dome is a transparent cover with graduation marks from 300 to 1500 mL. Remove the bellows dome by turning it counterclockwise and lifting it away from the breathing system. See FIGURE 7-5. FIGURE 7-5 Removing the Bellows Dome 2. Detach the bellows from the base plate as shown in FIGURE 7-6. A5/A3™ Operating Instructions 046-003777-00 7 - 11 Cleaning and Disinfection Maintenance FIGURE 7-6 Detaching the Bellows 3. Detach the top plate from the bellows as shown in FIGURE 7-7. FIGURE 7-7 Detaching the Bellows Top Plate 4. Remove the bellows adapter ring from inside the bellows as shown in FIGURE 7-8. Note the orientation of the bellows adapter ring as it is being removed to ensure that it is properly inserted during reassembly. (If the ring contains grooves, the ring should be oriented so that the grooves are facing downward in the final reassembly.) Grooves on adapter ring face downward. FIGURE 7-8 Removing the Bellows Adapter Ring 7 - 12 046-003777-00 A5/A3™ Operating Instructions Maintenance Cleaning and Disinfection 5. Remove the bellows dome O-ring as shown in FIGURE 7-9. FIGURE 7-9 Removing the Bellows Dome O-ring 6. Cleaning a. To prevent damage, wash each component gently using a recommended cleaning agent (See section 7.9.2 (pg. 7-10) "Cleaning and Disinfecting Agents / Autoclaving"). Ensure that all bellows surfaces are cleaned. Do not autoclave the bellows. b. Rinse with clean, hot water, and allow to dry. NOTE: Dry the bellows by allowing it to hang so that it is fully expanded. This will facilitate thorough drying and prevent it from sticking to itself. CAUTION: Do not autoclave the following components: Paw gauge, oxygen sensor, flow sensor, and bellows. These components cannot withstand immersion or the heat and pressure of autoclaving. CAUTION: If moisture remains in the bellows after cleaning, the bellows surface folds may become tacky and prevent the bellows from properly expanding. Ensure all moisture is removed from the bellows after cleaning. c. After all bellows components are completely dry, inspect them for damage before disinfection or re-assembly and functional testing. d. If disinfecting the bellows components, continue with step 7, otherwise skip to step 8. 7. Disinfection NOTE: Ensure that all bellows components have been cleaned as described in step 6 before disinfecting. See section 7.9.2 (pg. 7-10) "Cleaning and Disinfecting Agents / Autoclaving" and use an approved disinfecting agent for all bellows components while adhering to facility policies and procedures. 8. Connect the bellows to the breathing system by reassembling all components in the reverse order. Prior to use after cleaning or disinfecting, power up the system and follow the onscreen prompts to perform the Leak Test and the Compliance Test. See section 4.5 (pg. 4-9) "Leak and Compliance Tests". A5/A3™ Operating Instructions 046-003777-00 7 - 13 Cleaning and Disinfection 7.9.5 Maintenance Inspiration and Expiration Valves The following procedure is written generically for a single, unspecified valve. It should be performed on both the inspiration and expiration valves. Expiration Valve Inspiration Valve FIGURE 7-10 Location of Expiration and Inspiration Valves 1. Remove the valve dome as shown in FIGURE 7-11, turning it counterclockwise. FIGURE 7-11 Valve Dome Removal CAUTION: The valve disc in each of the inhalation and exhalation valve assemblies on the breathing system is fragile and must be handled with care while removing the valve cage from the valve assembly. 2. The valve cage will be removed in this step (refer to FIGURE 7-12). The six prongs of the valve cage have tabs that secure it in the valve assembly. While noting the previous CAUTION, use two hands to remove the valve cage by gently manipulating the prongs to release the tabs. As the valve cage is lifted away from the assembly, ensure that the valve disc does not fall out. 7 - 14 046-003777-00 A5/A3™ Operating Instructions Maintenance Cleaning and Disinfection 3. Remove the valve disc from the valve cage as shown in FIGURE 7-12. 4. Remove the O-ring from the bottom of the valve assembly as shown in FIGURE 7-12. Valve Cage Valve Disc O-ring FIGURE 7-12 Valve Cage Removal CAUTION: The valve disc in each of the inhalation and exhalation valve assemblies on the breathing system is fragile and must be handled with care while removing the valve cage from the valve assembly. 5. Cleaning a. Wash each component using a recommended cleaning agent (See section 7.9.2 (pg. 710) "Cleaning and Disinfecting Agents / Autoclaving"). b. Rinse with clean, hot water, and allow to dry. c. After all components are completely dry, verify that the valve disc and the prongs of the valve cage are undamaged before disinfection or re-assembly and functional testing. d. If disinfecting the valve components, continue with step 6, otherwise skip to step . 6. Disinfection NOTE: Ensure that all valve components have been cleaned as described in step 5 before disinfecting. See section 7.9.2 (pg. 7-10) "Cleaning and Disinfecting Agents / Autoclaving" and use an approved disinfecting agent for all valve components while adhering to facility policies and procedures. 7. Reassembly Reassemble the valve components in the reverse order, noting any previously stated CAUTION. Prior to use after cleaning or disinfecting, power up the system and follow the onscreen prompts to perform the Leak Test and the Compliance Test. See section 4.5 (pg. 4-9) "Leak and Compliance Tests". A5/A3™ Operating Instructions 046-003777-00 7 - 15 Cleaning and Disinfection 7.9.6 Maintenance Oxygen Sensor 1. The oxygen sensor is a component that is pressed into position for use. It is not necessary to remove this component to clean it. However, if removal is desired, first disconnect the oxygen sensor cable from the main unit as shown in FIGURE 7-13. Then hold the oxygen sensor and pull straight out firmly from the breathing system block Oxygen Sensor Cable Connection to Main Unit Oxygen Sensor FIGURE 7-13 Oxygen Sensor and Cable CAUTION: Never immerse the oxygen sensor or its connector in any type of liquid. • Dispose of the oxygen sensor per the manufacturer’s specification. CAUTION: Do not wash the inner surface of the oxygen sensor. CAUTION: Do not autoclave the following components: Paw gauge, oxygen sensor, flow sensor, and bellows. These components cannot withstand immersion or the heat and pressure of autoclaving. 2. Clean the oxygen sensor exterior with a soft, lint-free cloth, and a recommended cleaning agent (See section 7.9.2 (pg. 7-10) "Cleaning and Disinfecting Agents / Autoclaving"). Allow to dry thoroughly. 3. Inspect the oxygen sensor for damage and replace as necessary. 4. Re-insert the oxygen sensor if it had been removed. 7 - 16 046-003777-00 A5/A3™ Operating Instructions Maintenance 7.9.7 Cleaning and Disinfection APL Valve 1. The APL valve is a component that is plugged into position and secured by a threaded base collar. Loosen the base collar of the APL valve by turning the collar (not the valve knob) counterclockwise until it is no longer threaded as shown in FIGURE 7-14. Then, firmly pull the APL valve upward to remove. APL Valve Knob APL Valve Base Collar (threaded) FIGURE 7-14 APL Valve Removal 2. Cleaning a. Clean the APL valve with a soft, lint-free cloth and a recommended cleaning agent (See section 7.9.2 (pg. 7-10) "Cleaning and Disinfecting Agents / Autoclaving"). Allow it to dry thoroughly. b. If disinfecting the APL valve, continue with step 3, otherwise skip to step 4. 3. Disinfection NOTE: Ensure that the APL valve has been cleaned as described in step 2 before disinfecting. See section 7.9.2 (pg. 7-10) "Cleaning and Disinfecting Agents / Autoclaving" and use an approved disinfecting agent for the APL valve while adhering to facility policies and procedures. 4. Reassemble the APL valve by turning its base collar clockwise until it is securely tightened. Prior to use after cleaning or disinfecting, power up the system and follow the on-screen prompts to perform the Leak Test and the Compliance Test. See section 4.5 (pg. 4-9) "Leak and Compliance Tests". A5/A3™ Operating Instructions 046-003777-00 7 - 17 Cleaning and Disinfection 7.9.8 Maintenance PAW Gauge 1. The PAW gauge is a component that is pressed into position for use. It is not necessary to remove this component to clean it. However, if removal is desired, simply hold it and lift it straight up from the absorber block as shown in FIGURE 7-15. FIGURE 7-15 PAW Gauge Removal CAUTION: Do not autoclave the following components: Paw gauge, oxygen sensor, flow sensor, and bellows. These components cannot withstand immersion or the heat and pressure of autoclaving. 2. Clean the PAW gauge with a soft, lint-free cloth and a recommended cleaning agent (See section 7.9.2 (pg. 7-10) "Cleaning and Disinfecting Agents / Autoclaving"). Allow it to dry thoroughly. 3. Re-insert the PAW gauge if it was removed. Prior to use after cleaning or disinfecting, power up the system and follow the on-screen prompts to perform the Leak Test and the Compliance Test. See section 4.5 (pg. 4-9) "Leak and Compliance Tests". 7 - 18 046-003777-00 A5/A3™ Operating Instructions Maintenance 7.9.9 Cleaning and Disinfection Bag Arm 1. At the base of the bag arm, locate the retaining ring. Turn the ring counterclockwise until it is no longer threaded. Lift the bag arm from the breathing system block (see FIGURE 7-16). Bag Arm Retaining Ring FIGURE 7-16 Bag Arm Removal 2. Cleaning a. Clean the bag arm with a soft, lint-free cloth and a recommended cleaning agent (See section 7.9.2 (pg. 7-10) "Cleaning and Disinfecting Agents / Autoclaving"). Allow it to dry thoroughly. b. If disinfecting the bag arm, continue with step 3, otherwise skip to step 4. 3. Disinfection NOTE: Ensure that the bag arm has been cleaned as described in step 2 before disinfecting. See section 7.9.2 (pg. 7-10) "Cleaning and Disinfecting Agents / Autoclaving" and use an approved disinfecting agent for the bag arm while adhering to facility policies and procedures. 4. Reassemble the bag arm to the breathing system. Prior to use after cleaning or disinfecting, power up the system and follow the on-screen prompts to perform the Leak Test and the Compliance Test. See section 4.5 (pg. 4-9) "Leak and Compliance Tests". A5/A3™ Operating Instructions 046-003777-00 7 - 19 Cleaning and Disinfection 7.9.10 Maintenance Absorber Canister 1. Locate the condensate drain valve at the bottom of the absorber canister assembly. Absorber Canister Condensate Drain FIGURE 7-17 Condensate Drain Valve Location Turn the condensate drain valve to open and close FIGURE 7-18 Condensate Drain Valve (Close Up View) 2. While holding a small cup below the drain, turn the condensate drain valve clockwise to open the drain and collect any water that may have gathered. Turn the drain valve counterclockwise to close the drain. Discard any water collected. WARNING: Use extreme care while handling the absorbent as it is a caustic irritant. 3. Rotate the locking mechanism handle clockwise into the unlocked position as shown in FIGURE 7-19. This separates the absorber canister from the top of the assembly. While noting the previous WARNING, remove the absorber canister. Then remove the Pre-Pak or loose fill absorbent from the canisters. Dispose of the absorbent per the manufacturer’s specification. 7 - 20 046-003777-00 A5/A3™ Operating Instructions Maintenance Cleaning and Disinfection Locked Position Unlocked Position FIGURE 7-19 Absorber Canister, Unlocked FIGURE 7-20 Absorber Canister, Locked 4. Cleaning a. Clean the absorber canister with a soft, lint-free cloth and a recommended cleaning agent (See section 7.9.2 (pg. 7-10) "Cleaning and Disinfecting Agents / Autoclaving"). Allow them to dry thoroughly. b. If disinfecting the Absorber Canister, continue with step 5, otherwise skip to step 6. 5. Disinfection NOTE: Ensure that the Absorber Canister has been cleaned as described in step 4 before disinfecting. See section 7.9.2 (pg. 7-10) "Cleaning and Disinfecting Agents / Autoclaving" and use an approved disinfecting agent for the Absorber Canister while adhering to facility policies and procedures. WARNING: Use extreme care while handling the absorbent as it is a caustic irritant. NOTE: Ensure that the absorber canister is completely dry before adding absorbent. 6. While noting the previous WARNING, add new Pre-Pak or loose fill absorbent to the absorber canister. Re-install the absorber canister into the assembly. Rotate the locking mechanism handle clockwise into the locked position as shown in FIGURE 7-20. 7.9.11 Breathing System Block 1. Remove all of the following components from the breathing system block: • Bellows Assembly • Oxygen Sensor • Inspiratory and Expiratory Valves (all components) • APL Valve • PAW Gauge • Bag Arm • Absorber Canister A5/A3™ Operating Instructions 046-003777-00 7 - 21 Cleaning and Disinfection Maintenance • Inspiratory and Expiratory Flow Sensors 2. Remove the absorber canister and canister mount (mandatory). CAUTION: Use care in lifting and manipulating the breathing system block during removal from its mounting arm as handling may be awkward due to its weight and shape. CAUTION: The breathing system block is calibrated and matched with the anesthesia machine at the factory. A label in the back of the machine indicates the serial number of the matching breathing system block. When reassembling, ensure that the breathing system block and anesthesia machine are properly matched. Otherwise, the breathing system must be recalibrated. 3. While holding the sides of the breathing system block, firmly separate and slide it away from its mounting arm. FIGURE 7-21 Breathing System Block Removal, Top View FIGURE 7-22 Breathing System Block Removal, Bottom View 7 - 22 046-003777-00 A5/A3™ Operating Instructions Maintenance Cleaning and Disinfection 4. Cleaning a. Clean the breathing system block exterior with a soft, lint-free cloth and a recommended cleaning agent (See section 7.9.2 (pg. 7-10) "Cleaning and Disinfecting Agents / Autoclaving"). Allow to dry thoroughly. b. If disinfecting the breathing system block, continue with step 5, otherwise skip to step 6. 5. Disinfection NOTE: Ensure that the breathing system block has been cleaned as described in step 4 before disinfecting. High level disinfection of the breathing system block can be performed through steam autoclaving up to a maximum temperature of 134 ºC (273 ºF). Using an autoclave, follow the manufacturer’s instructions for high level disinfection of the breathing system block while adhering to facility policies and procedures. 6. Reassemble the breathing system components in reverse order. Prior to use after cleaning or disinfecting, power up the system and follow the on-screen prompts to perform the Leak Test and the Compliance Test. See section 4.5 (pg. 4-9) "Leak and Compliance Tests". CAUTION: To ensure patient safety, use only parts and accessories specified in this manual. CAUTION: To ensure measurement accuracy and to avoid possible damage to the A5/A3, use only Mindray-approved cables and accessories. A5/A3™ Operating Instructions 046-003777-00 7 - 23 Cleaning and Disinfection 7.9.12 Maintenance AGSS (Anesthetic Gas Scavenging System) and AGSS Transfer Hose 1. Disconnect the EVAC hose from the AGSS. (See FIGURE 7-23.) 2. Remove the AGSS and Transfer Hose from the A5/A3. Transfer Hose EVAC Hose Port FIGURE 7-23 AGSS and Transfer Hose Removal 3. Clean the outer surface of the AGSS and Transfer Hose with a soft, lint-free cloth and a recommended cleaning agent (See section 7.9.2 (pg. 7-10) "Cleaning and Disinfecting Agents / Autoclaving"). Allow to dry thoroughly. 4. Refer to FIGURE 7-24. Remove the top of the AGSS. Inspect the AGSS filter and shake it over a waste container to clean it as necessary. If the filter must be replaced, dispose of the old filter per local disposal regulations. 7 - 24 046-003777-00 A5/A3™ Operating Instructions Maintenance Cleaning and Disinfection AGSS Filter FIGURE 7-24 Removal of AGSS Top / AGSS Filter Inspection 5. Reassemble the AGSS and Transfer Hose and reconnect them to the A5/A3 in the reverse order. A5/A3™ Operating Instructions 046-003777-00 7 - 25 Regular Maintenance 7.10 Maintenance Regular Maintenance WARNING: To avoid endangering a patient, do not perform testing or maintenance when the machine is in use. Visual inspection should be performed every 30 days to ensure timely replacement of worn or damaged parts. 1. Power off the system. 2. Perform an overall visual inspection of the system. 3. Power up the system and follow the on-screen prompts to perform the Leak Test and the Compliance Test. See section 4.5 (pg. 4-9) "Leak and Compliance Tests". 7 - 26 046-003777-00 A5/A3™ Operating Instructions 8.0 Product Specifications Standards Compliance ..........................................................................................................................................................................8-2 Safety Designations.................................................................................................................................................................................8-3 Physical Specifications...........................................................................................................................................................................8-4 Stability Configurations and Conditions ....................................................................................................................................8-4 Environmental Specifications............................................................................................................................................................8-5 Electrical Specifications.........................................................................................................................................................................8-6 Pneumatic Specifications.....................................................................................................................................................................8-8 Breathing System Specifications .....................................................................................................................................................8-9 Anesthetic Gas Scavenging System (AGSS) .......................................................................................................................... 8-11 Ventilator Specifications .................................................................................................................................................................... 8-12 Displays and Controls Specifications......................................................................................................................................... 8-15 Alarms ........................................................................................................................................................................................................... 8-17 Safety Specifications ............................................................................................................................................................................ 8-18 ASTM F 1208 – 89 (2005) Disclosures........................................................................................................................................ 8-20 Data Storage (Non-Volatile) and Recording.......................................................................................................................... 8-21 Electromagnetic Capability ............................................................................................................................................................. 8-22 A5/A3™ Operating Instructions 046-003777-00 8-1 Standards Compliance 8.1 Product Specifications Standards Compliance The A5/A3 Anesthesia System is in compliance with the following industry standards. AAMI ISO 10993-1: 2003 / ISO 10993-1: 2009 Biological Evaluation of Medical Devices - Part 1: Evaluation and Testing AAMI/ISO 15223-1: 2012 Medical Devices - Symbols to be used with Medical Device labels, labelling and information to be supplied ASTM F1101-90 (2003) Standard Specification for Ventilators Intended for Use During Anesthesia CGA V-1: 2005 Standard for Compressed Gas Cylinder Valves Outlet and Inlet Connections CGA V-5: 2008 Diameter-Index Safety System (Noninterchangeable Low Pressure Connections for Medical Gas Applications IEC 60068-2-27: 2008/EN 60068-2-27: 2009 Basic Environmental Testing Procedures. Part 2 Tests - Tes Ea and Guidance: Shock IEC 60068-2-64: 2008/EN 60068-2-64: 2008 Environmental Testing: Part 2: Test Methods, Test Fh: Vibration, Broad-band Random (Digital Control) and Guidance IEC 60601-1:1988+A1:1991+A2:1995 Medical Electrical Equipment - Part 1: General Requirements for Safety IEC 60601-1-2: 2007 Medical Electrical Equipment - Part 1-2: General Requirements for Safety - Collateral Standard: Electromagnetic Compatibility - Requirements and Tests IEC 60601-1-4: 2000 Collateral Standard: Programmable Electrical Medical Systems IEC 60601-1-8: 2006 Collateral Standard: General Requirements, Tests and Guidance for Alarm Systems in Medical Electrical Equipment and Medical Electrical Systems IEC 60601-2-13: 2003 Medical Electrical Equipment - Part 2-13: Particular Requirements for the Safety and Essential Performance of Anaesthetic Systems IEC 62304: 2006 Medical Device Software - Software Life Cycle Processes IEC 62366: 2007 Medical Devices - Application of Usability Engineering to Medical Devices ISO 13485: 2003 Medical Devices - Quality Management Systems Requirements for Regulatory Purposes ISO 14971: 2007 Medical Devices - Application of Risk Management to Medical Devices ISO 21647: 2004 Medical Electrical Equipment - Particular Requirements for the Basic Safety and Essential Performance of Respiratory Gas Monitors ISO 5356-1: 2004 Anaesthetic and Respiratory Equipment - Conical Connectors - Part 1: Cones and Sockets TABLE 8-1 Standards Compliance 8-2 046-003777-00 A5/A3™ Operating Instructions Product Specifications 8.2 Safety Designations Safety Designations Type of Protection against Electric Shock: Class I equipment with internal electric power supply. Where the integrity of the external protective earth (ground) in the installation or its conductors is in doubt, the equipment shall be operated from its internal electric power supply (i.e., battery supply). Degree of Protection against Electric Shock: BF, defibrillation-proof Power Supply Connection: External electric power supply: 100 to 120 VAC, 60 Hz, 12 A Internal battery supply: Lithium-ion, 11.1V, 4.5 Ah (1 or 2 batteries installed) Mode of Operation: Continuous Degree of Protection against Hazards of Explosion: Ordinary equipment, without protection against explosion; not for use with flammable anesthetics. Degree of Protection against Ingress of Liquids: Ordinary equipment, without protection against ingress of liquids – IPX0 (IEC 60529) Electrical Connection between Equipment and Patient: Equipment designed for non-electrical connection to the patient Degree of Mobility: Mobile: including the base and casters of the anesthesia machine Disinfection: Steam autoclavable or disinfectable (breathing system only) TABLE 8-2 Safety Designations 8.2.1 Oxygen Enriched Environments The A5/A3 complies with the standards for oxygen-enriched environments by staying below the required power threshold or by providing forced ventilation and ventilation failure monitoring and alarm. 8.2.2 Wiring and PC Board Materials The A5/A3 complies with NRTL standards for wiring and PC board materials. Primary wiring is double insulated (jacketed). All wires are UL recognized. A5/A3™ Operating Instructions 046-003777-00 8-3 Physical Specifications 8.3 Product Specifications Physical Specifications Dimensions: Height: 1400 mm ± 25 mm Width: 1050 mm ± 25 mm (including breathing system) Depth: 805 mm ± 25 mm Weight (no vaporizers or gas cylinders): A3: 150 kg (331 lbs) ± 5 kg A5: 160 kg (353 lbs) ± 5 kg Work Surface (stainless steel): Width: 616 mm (24.3 in) ± 25 mm Depth: 380 mm (15.0 in) ± 25 mm Height: 850 mm (33.5 in) ± 25 mm Top Shelf: Weight Capacity: 40 kg (88.2 lbs) Width: 616 mm (24.3 in) ± 25 mm Depth: 362 mm (14.3 in) ± 25 mm Side Mounting Rails: Supporting weight: 25 kg at a maximum distance of 0.41 m Bag Arm: Length: 312 mm ± 10 mm Height: 1150 mm ± 10 mm Swiveling angle: 150 ± 10 degrees Drawers (internal dimensions): Drawers are of equal size: • Height: 135 mm ± 10 mm • Width: 440 mm ± 10 mm • Depth: 385 mm ± 10 mm Casters: Diameter: 15 cm (6 in) Brake: • A5 model: central brake with lock/unlock indicator • A3 model: individual caster brakes TABLE 8-3 Physical Specifications 8.4 Stability Configurations and Conditions Maintains stability when tilted 10 degrees, as required by IEC60601-1, clause 24. 8-4 WARNING: Due to the size and weight of the A5/A3, it should only be moved by qualified personnel. WARNING: To avoid tip hazards, use care when moving the A5/A3 up or down inclines, around corners and across thresholds. Remove all equipment from the top shelf and mounted to the side of the A5/A3 before moving. Do not attempt to roll the A5/A3 over hoses, cords or other obstacles. 046-003777-00 A5/A3™ Operating Instructions Product Specifications 8.5 Environmental Specifications Environmental Specifications Operating Temperature: +10 to +40°C +50 to 104°F Storage Temperature: -20 to +60°C -4 to 140°F oxygen sensor: -20 to +50°C Humidity (Operating and Storage): 15 to 90% RH, non-condensing Atmospheric Pressure (Operating): 70 kPa to 106.7 kPa Atmospheric Pressure (Storage): 50 kPa to 106.7 kPa Resistance to Ingress of Fluids: Complies with the requirements of clause 44.3 in IEC 60601-1 and also the requirements in IEC 60529 for non-protective equipment (IPX0) TABLE 8-4 Environmental Specifications A5/A3™ Operating Instructions 046-003777-00 8-5 Electrical Specifications Product Specifications 8.6 Electrical Specifications 8.6.1 Main Electrical Power Specifications The A5/A3 complies with UL 60601-1 for its main power supply. Power Supply Input Voltage: 100 to 120 VAC @ 60 Hz Power Supply Input Current: 12 A maximum for A5 unit 10 A maximum for A5 auxiliary outlets 12 A maximum for A3 unit 9 A maximum for A3 auxiliary outlets 5 ±0.05 m (length), hospital grade Power Cord: TABLE 8-5 Main Electrical Power Specifications 8.6.2 Battery Power Specifications Battery Type: Sealed Lithium-ion, 11.1 V, 4.5 Ah A5: two (2) batteries A3: one (1) battery Battery Run-time: One (1) new battery installed: >75 minutes Two (2) new batteries installed: >150 minutes Run-time criteria: VCV mode (Tv = 500 mL, Rate = 10 bpm, I:E = 1:2, Plimit = 30 cmH2O, PEEP = OFF) Time to Shutdown from Lower Battery Alarm: >5 minutes (new fully-charged battery supply) Battery Charge Time: New Battery: <8 hours from an initial charge of 10% Charging occurs whenever AC is applied to the A5/A3 System. TABLE 8-6 Battery Power Specifications 8.6.3 Auxiliary Electrical Outlets Number of Outlets: A5: 4 A3: 3 Output Voltage: 100 to 120 VAC @ 60 Hz (corresponds to power supply input voltage) Output Current of Each Auxiliary Outlet: 3A Output Current Total: A5: 10 A A3: 9 A Breaker Rating per Auxiliary Outlet: 3A Breaker Rating Total: A5: 10 A A3: No total current breaker TABLE 8-7 Auxiliary Electrical Outlets 8-6 046-003777-00 A5/A3™ Operating Instructions Product Specifications 8.6.4 Electrical Specifications Communication Ports One DB9 male connector on the rear of the A5/A3. Provides a non-isolated output serial RS232C interface. Communication Port (SP1): CAUTION: Do not connect any nonisolated devices to the DB9/RS232C interface of the A5/A3. Network Port (CS1): One RJ-45 network port SB Ports (SP1, SP2): Two SB ports CAUTION: Data Port (DP1): Do not connect any devices to the SB ports other than Mindray approved USB storage devices and a supported USB mouse (see ‘‘Networking and USB Storage’’ on page A-5). One test port for connection of calibration equipment by a Mindray-authorized service representative TABLE 8-8 Communication Ports A5/A3™ Operating Instructions 046-003777-00 8-7 Pneumatic Specifications Product Specifications 8.7 Pneumatic Specifications 8.7.1 Pipeline Supply (N2O, Air, O2) Pipeline Input Range: N2O: 280 to 600 kPa (40 to 87 psi) Air: 280 to 600 kPa (40 to 87 psi) O2: 280 to 600 kPa (40 to 87 psi) Pipeline Connections: DISS threaded body as per CGA V-5 Gas Configuration: N2O, Air, O2 TABLE 8-9 Pipeline Supply 8.7.2 Cylinder Supply (N2O, Air, O2) Cylinder Supply: E-cylinder (American style) and pin indexed per CGA V-1 O2 Cylinder Input Range: 6.9 to 15.5 MPa (1000 to 2250 psi) N2O Cylinder Input Range: 4.2 to 6 MPa (600 to 870 psi) Air Cylinder Input Range: 6.9 to 15.5 MP (1000 to 2250 psi) Cylinder Connections: Pin-Index Safety System (PISS) Yoke Configuration: N2O, Air, O2 TABLE 8-10 Cylinder Supply 8.7.3 Drive Gas O2 8.7.4 N2O Automatic Cutoff An N2O automatic cutoff stops the flow of N2O when O2 flow is less than 200 mL/min. 8.7.5 O2 Controls O2 supply failure alarm: ≤ 220 kPa (32 psi) 8.7.6 Oxygen Ratio Controller Provides 25% ± 4% O2 when N2O valve is fully open and O2 flow range is 0.8L/min to 3L/min 8-8 046-003777-00 A5/A3™ Operating Instructions Product Specifications Breathing System Specifications 8.8 Breathing System Specifications 8.8.1 Breathing System Volume Automatic Ventilation: Total volume: 4350 mL +/-100 mL (including bellows) Bellows: 1500 mL +/-100 mL Manual Ventilation: 3300 mL +/-100 mL (not including breathing bag) TABLE 8-11 Breathing System Volume 8.8.2 CO2 Absorber Assembly Absorber Capacity: 1 Pre-Pak (1500 ±100 mL) Absorber Canister Contents: 1 Pre-Pak canister or Loose Fill absorbent TABLE 8-12 CO2 Absorber Assembly 8.8.3 Water Trap Mode: detachable separately Capacity: 6 ±1 mL TABLE 8-13 Water Trap 8.8.4 Vaporizer Connections Vaporizer Positions: A5: 3 (2 active, 1 inactive) A3: 2 (active) Mounting Mode: Selectatec, with interlocking function TABLE 8-14 Vaporizer Connections 8.8.5 Breathing System Connections Exhalation Connection: 22 mm OD ISO 15 mm ID ISO Taper Inhalation Connection: 22 mm OD ISO 15 mm ID ISO Taper Connections from Breathing System to a Gas Scavenger: 30 mm OD ISO TABLE 8-15 Breathing System Connections 8.8.6 APL Valve Range: SP, Approximately 0 to 75 cmH2O Adjustable Range of Motion: 330 ±10 degrees Tactile Knob Indication: 30 cmH2O and above TABLE 8-16 APL Valve A5/A3™ Operating Instructions 046-003777-00 8-9 Breathing System Specifications Product Specifications Minimum pressure to open the APL valve: Dry: 0.1 kPa Wet: 0.1 kPa Expiratory resistance: Pressure drop(kPa) Flow(L/min) TABLE 8-16 APL Valve 8.8.7 Breathing System Temperature Controller Breathing System Temperature Maintained to: 35ºC typical at 20ºC ambient temperature Note: The block heater does not operate while the system is being powered by the internal battery supply. TABLE 8-17 Breathing System Temperature Controller 8.8.8 Breathing Circuit Parameters System Compliance: Volume of gas lost due to internal compliance (manual ventilation mode only): ≤ 2mL/cm H2O Impedance in Manual Mode: ≤ 6 cmH2O (the gas under test is a bi-directional sine wave at a frequency of 20 with tidal volume of 1 L) Impedance in Automatic Ventilation Mode: ≤ 6 cmH2O (the gas under test is a semi-sine wave at a frequency of 20 with tidal volume of 1 L) Leakage: ≤ 150 mL @ 3kPa System Safety Pressure on Patient Circuit: 110 ±10 cmH2O @ 10-110 L/min TABLE 8-18 Breathing Circuit Parameters 8.8.9 Materials All materials in contact with the patient’s exhaled gas are autoclavable, except the flow sensors, pressure gauge, bellows, and O2 cell. All materials in contact with the patient's gas are latex-free. 8 - 10 046-003777-00 A5/A3™ Operating Instructions Product Specifications 8.9 Anesthetic Gas Scavenging System (AGSS) Anesthetic Gas Scavenging System (AGSS) Type of the Applicable Disposable System: Low flow Size: 430mm x 132mm x 114mm Tolerance: +/- 5mm Extract Flow: 25 to 50 L/min Resistance: ≤ 0.35 kPa @ 75 L/min TABLE 8-19 Anesthetic Gas Scavenging System (AGSS) A5/A3™ Operating Instructions 046-003777-00 8 - 11 Ventilator Specifications 8.10 Product Specifications Ventilator Specifications General Ventilator Specifications Ventilation Modes: • Manual ventilation mode with breathing bag • Spontaneous ventilation in manual mode with APL fully open • Volume Control Ventilation (VCV) mode with PLV function • A3: Pressure Control Ventilation (PCV) mode • A5: Pressure Control Ventilation (PCV) mode with/without VG ventilation mode • Pressure Support (PS) ventilation mode • Synchronous Intermittent Mandatory Ventilation (SIMV) mode with VCV ventilation mode • A5: Synchronous Intermittent Mandatory Ventilation (SIMV) mode with PCV ventilation mode Patient Size: Adult, Pediatric, Infant Fresh Gas Flow Compensation: Volume-compensated ventilation Inspiratory Flow (Min/Max): The A5/A3 does not allow combinations of ventilation parameters (e.g., I: E, Vt and Freq.) to be set if the resultant inspiratory flow is greater than 110 L/m maximum or less than 2.4 L/min minimum. Inspiratory Flow Range: 2.4 to 110 L/min Low Flow Anesthesia: Tidal volume delivery at 1 L/min total fresh gas flow. Trigger Window: PS and SIMV are adjustable flow triggers. Inspiratory Trigger Level: 1 to 15 L/min Plateau (End Insp.): Plateau pressure in VCV and SIMV-VC mode. Adjustable from Off, 5 to 60% of inspiratory period. TABLE 8-20 General Ventilator Specifications Ventilator Parameter Settings Range Apnea Ti: 0.2 to 5.0 sec (PS), Step: 0.1 sec Tidal Volume: 20 to 1500 mL (VCV, SIMV-VC, PCV), Step: 1 mL Respiration Rate: 4 to 100 bpm (VCV, SIMV-VC, PCV, SIMV-PC*), Step: 1 bpm Minimum Rate: 2 to 60 bpm (PS), Step: 1 bpm I:E 4:1 to 1:8 (VCV, PCV), Step: 0.5 Tinsp: 0.2 to 5 sec (SIMV-PC*, SIMV-VC), Step: 0.1 sec Pinsp: 5 to 70 cmH2O (PCV, SIMV-PC*), Step: 1 cmH2O Tpause: OFF, 5 to 60% (VCV, SIMV-VC), Step: 1% Plimit: 10 to 100 cmH2O (VCV, SIMV-VC), Step: 1 cmH2O PEEP: OFF, 3 to 30 cmH2O (VCV, SIMV-VC, PCV, SIMV-PC*, PS), Step: 1 cmH2O ΔP: 3 to 50 cmH2O (SIMV-VC, SIMV-PC*, PS), Step: 1 cmH2O Trigger: 1 to 15 L/min (SIMV-VC, SIMV-PC*, PS), Step: 1 L/min Tslope: 0.0 to 2.0 sec (SIMV-VC, SIMV-PC*, PCV, PS), Step: 0.1 sec NOTE: The Tslope setting is an approximation. The exact waveform shape may not be realized under certain clinical scenarios. TABLE 8-21 Ventilator Parameter Settings Range 8 - 12 046-003777-00 A5/A3™ Operating Instructions Product Specifications Ventilator Specifications VtG* Off, 20 to 1500 mL (PCV), Step: 1 PlimVG* 5 to 100 cmH2O (PCV), Step: 1 cmH2O * SIMV-PC, VtG, and PlimVG available on A5 only TABLE 8-21 Ventilator Parameter Settings Range Ventilator Performance Drive Pressure: 280 to 600 kPa Inspiratory flow range: 2.4 to 110 L/min Flow Valve Range: 1 to 110 L/min TABLE 8-22 Ventilator Performance Ventilator Monitored Parameters Oxygen Monitor: Type: Galvanic fuel cell FiO2 displayed: 18 to 100 vol% O2 Accuracy of measurements: ± (volume fraction of 2.5%+2.5% gas level) Response Time of O2 Sensor: ≤ 20 seconds Pressure Monitor: PEEP range: 0 to 70 cmH2O Pmean range: -20 to 120 cmH2O Ppeak range: -20 to 120 cmH2O Pplateau range: -20 to 120 cmH2O Ventilator Monitor: Tidal Volume Range: 0 to 3000 mL Minute Volume Range: 0 to 100 L Respiration Monitor: Rate range: 0 to 120 bpm TABLE 8-23 Ventilator Monitored Parameters Control and Monitoring Accuracy * Volume Control (O2 driving): <60 mL ±10 mL ≥60 mL and ≤210 mL ±15 mL >210 mL ±7% of the set value Volume Control: <75 mL ±15 mL ≥75 mL ±20 mL or ±10% of the set value, whichever is greater Pressure Control: Pinsp: ±2.5 cmH2O or ±7% of the set value, whichever is greater Plimit: ±10% of the set value PEEP Control: 3 to 30 cmH2O: ± 2.0 cmH2O, or ±10% of the displayed value, whichever is greater OFF: not defined Volume Monitoring (O2 driving): <60 mL ±10 mL ≥60 mL and ≤210 mL ±18 mL >210 mL ±9% of the set value Volume Monitoring: <75 mL ±15 mL ≥75 mL and ≤1500 mL: ±20mL or ±10% of the measured value, whichever is greater >1500 mL: not defined TABLE 8-24 Control and Monitoring Accuracy A5/A3™ Operating Instructions 046-003777-00 8 - 13 Ventilator Specifications Product Specifications Airway Pressure Monitoring: ±2.0cmH2O or ±5% of the set value, whichever is greater PEEP Monitoring Accuracy 0 to 30 cmH2O: ±2.0 cmH2O, or ±10% of the displayed value, whichever is greater > 30 cmH2O: not defined Respiration Monitoring Accuracy: ±1 bpm or ±10% of the set value, whichever is smaller Minute Volume Monitoring Accuracy: 0 to 30 L/min ±15% of the displayed value, repeatable to ±5% over a 1-hour period * Specifications are applicable after warm-up time of the Breathing System (Section 8.8.7). TABLE 8-24 Control and Monitoring Accuracy 8 - 14 046-003777-00 A5/A3™ Operating Instructions Product Specifications Displays and Controls Specifications 8.11 Displays and Controls Specifications 8.11.1 Electronic Controls Display Size: Color LCD, 15 inch diagonal, 4:3 ratio, 1024 X 768 resolution TFT technology with touch screen Graphic Waveforms: Airway Pressure and Flow Graphic Virtual Flow Meters: Displayed range (N2O, Air, O2): 0 to 15 L/min Control range (Air, O2): 0 to 15 L/min Control range (N2O): 0 to 10 L/min Accuracy: ±10% or 0.12 L/min, whichever is greater Resolution: 50 mL/min @ 0 to 1 L/min 100 mL/min @ 1 to 15 L/min Numeric Data: Tidal Volume, Minute Volume, Peak airway pressure, PEEP, Mean or Plateau pressure, Breath Rate, FiO2 AC Power Indicator LED: Green illuminated = plugged active AC power line Not illuminated = unplugged or inactive AC power line Battery State Indicator LED: Solid green illuminated = battery supply is charging or fully charged Not illuminated = battery supply is discharging or not charging Work Light: Settings: Off, Low, High Main Power Switch: ON position = power applied to unit, O2 fresh gas flow available Power Standby position = power applied only to charge battery supply, O2 fresh gas flow not available Note: Flow of Air is independent of the main power switch position and is regulated by the flow control knobs. Touchpad (A5 only): Allows alternate control of the touch screen Mouse: SB port on rear of A5/A3 allows connection of a mouse for alternate control of the touch screen. TABLE 8-25 Electronic Controls 8.11.2 Pneumatic Controls Line Pressure Gauges: Gauges: N2O, Air, O2 Range: 0 to 145 psi (0 to 1000 kPa) Accuracy: ±(4% of full scale reading + 8% of actual reading) Units of measure: kPa, psi Cylinder Pressure Gauges: Gauges: N2O, Air, O2 N2O: 0 to 1400 psi (0 to 10 MPa) Air: 0 to 3500 psi (0 to 25 MPa) O2: 0 to 3500 psi (0 to 25 MPa) Accuracy: ±(4% of full scale reading + 8% of actual reading) Units of measure: kPa, psi TABLE 8-26 Pneumatic Controls A5/A3™ Operating Instructions 046-003777-00 8 - 15 Displays and Controls Specifications Product Specifications Individual Flow Meter, Control Needle Valve and Knob: Configuration: N2O, Air, O2 Displayed Range: N2O, Air, O2: 0 to 15 L/min Control Range (N2O): 0 to 10 L/min Control Range (Air): 0 to 15 L/min Control Range (O2): 0 to 15 L/min Accuracy: ±10% or 0.12 L/min, whichever is greater Resolution: 50 mL/min @ 0 to 1 L/min 100 mL/min @ 1 to 15 L/min Rotations: 5 (from 0 flow to maximum flow) Total Flow Meter Range: 0 to 10 L/min ±10% of the indicated value for flows (between 10% and 100% of full scale with oxygen) Auxiliary O2 and Air Flow Meter: Flow range for each meter: 0 to 15 L/min Auxiliary O2 Gas Power Outlet (A5 Only): Pressure range: 280 to 600 kPa Maximum flow: ≥90 L/min O2 Flush Pushbutton (green): Flow rate: 35 to 50 L/min Inspiratory Airway Pressure Gauge: -20 to 100 cmH2O ±(4% of full scale reading + 4% of actual reading) TABLE 8-26 Pneumatic Controls 8 - 16 046-003777-00 A5/A3™ Operating Instructions Product Specifications 8.12 Alarms Alarms Self-test: Self-testing of alarm system functions (alarm light, speaker, and buzzer) is performed when A5/A3 System is powered on. Alarm Indicators: Audible: speaker / buzzer Visual: alarm light and on-screen alarm messages (Audible and visual alarms comply with the requirements of IEC 60601-1-8.) Alarm Categories: Physiological alarms: three levels (high, medium, low) Technical alarms: three levels (high, medium, low) Sound Levels: 10 alarm sound levels, adjustable (levels 1 to 10) Alarm Status: Normal Status: all alarms are functioning properly Silence Status: silenced alarms do not produce alarm audio; only new alarms produce alarm audio Sound Pressure levels (normal operation without alarm): ≤ 60 dBA Measured from the patient's head location at 1 meter height, 1 meter from the front of the unit, and 1 meter to the left of the unit. TABLE 8-27 Alarms A5/A3™ Operating Instructions 046-003777-00 8 - 17 Safety Specifications 8.13 Product Specifications Safety Specifications Vibration Test: Frequency range: 10 to 2000 Hz ASD10 to 100Hz: 1.0 (m/s2)2/Hz ASD 100 to 200Hz: -3 dB/Octave ASD200 to 2000Hz: 0.5 (m/s2)2/Hz Duration: 10 min/axis per each perpendicular axis (3 total) Shock Test: Peak acceleration: 150 m/s2 (15.3 g) Duration: 11 ms Pulse shape: half-sine Number of shocks: 3 shocks per direction per axis (18 total) Drop: Complies with the requirements of clause 21.6 (rough handling) in IEC 60601-1. Spillage and Ingress of Liquids: Complies with the requirements of clause 44.3 in IEC 60601-1 and also the requirements in IEC 60529 for non-protective equipment (IPX0). Surface Temperature: Complies with the requirements of clauses 42.1, 42.2, and 42.3 in IEC 60601-1. Mechanical Stability: Complies with the requirements of clause 24.1 in IEC 60601-1. Incompatibility with External Connectors: Complies with the requirements of clause 56.3 in IEC 60601-1. Enclosure Rigidity and Strength: Complies with the requirements of clauses 16a, 21a, and 21b in IEC 60601-1. Complies with the requirements of clause 55 in UL 60601-1. Impairment of Cooling: Complies with the requirements of clause 52.5.5 in IEC 60601-1/ EN 60601-1/UL 60601-1. Leakage Current: Complies with the requirements of clause 19 in IEC 60601-1/UL 60601-1. Earth leakage current: • Normal condition ≤ 300 uA • Single fault condition ≤ 1000 uA Enclosure leakage current: • Normal condition ≤ 100 uA • Single fault condition ≤ 300 uA Patient leakage current: • Normal condition ≤ 100 uA • Single fault condition ≤ 500 uA Patient auxiliary current d.c.: • Normal condition ≤ 10 uA • Single fault condition ≤ 50 uA Patient auxiliary current a.c.: • Normal condition ≤ 100 uA • Single fault condition ≤ 500 uA Patient leakage current (applied part plus mains voltage): • Single fault condition ≤ 5000 uA Dielectric Strength: Complies with the requirements of clause 20 in IEC 60601-1/EN 60601-1. Mains supply to earth (A-a1): 1500 VRMS, 1 min Mains supply to applied part (B-a): 4000 VRMS, 1 min Applied part to earth (B-d): 1500 VRMS, 1 min Isolation at network port: 1500 VRMS, 1 min TABLE 8-28 Safety Specifications 8 - 18 046-003777-00 A5/A3™ Operating Instructions Product Specifications Safety Specifications Grounding Impedance: Complies with the requirements of clause 18 in IEC 60601-1. The impedance between the protective earth terminal and any accessible metal part (e.g., screw and equipotential stud) that is protectively earthed does not exceed 0.1 ohm. Protective Grounding: Complies with the requirements of clause 58 in IEC 60601-1. The protective earth terminal is not used for the mechanical connection between different parts of the equipment or the fixing of any component not related to protective earthing or functional earthing. TABLE 8-28 Safety Specifications A5/A3™ Operating Instructions 046-003777-00 8 - 19 ASTM F 1208 – 89 (2005) Disclosures 8.14 Product Specifications ASTM F 1208 – 89 (2005) Disclosures Based on the following disclosures, the A5/A3 meets ASTM Standard Specification F1208 for Anesthesia Breathing Systems. 8.14.1 Leakage of Breathing System Mode Resistance Pressure Leakage (Manual mode, Bypass Off ) 10.19 mL/min @3kPa Leakage (Manual mode, Bypass On) 15.10 mL/min @3kPa Leakage (Mechanical Ventilation mode, Bypass Off ) 8.15 mL/min @3kPa Leakage (Mechanical Ventilation mode, Bypass On) 14.77 mL/min @3kPa TABLE 8-29 Leakage of Breathing System 8.14.2 Resistance of Breathing Systems The typical pressure drops due to inspiratory and expiratory gas flow in the breathing system at reference flows of 0.5 and 1.0 L/sec are: 8.14.3 • Manual, Inspiratory flow: flow rate = 0.5 L/s @ 0.59 kPa resistance • Manual, Inspiratory flow: flow rate = 1.0 L/s @ 0.24 kPa resistance • Manual, Expiratory flow: flow rate = 0.5 L/s @ 0.21 kPa resistance • Manual, Expiratory flow: flow rate = 1.0 L/s @ 0.43 kPa resistance • Auto, Inspiratory flow: flow rate = 0.5 L/s @ 0.23 kPa resistance • Auto, Inspiratory flow: flow rate = 1.0 L/s @ 0.58 kPa resistance • Auto, Expiratory flow: flow rate = 0.5 L/s @ 0.44 kPa resistance • Auto, Expiratory flow: flow rate = 1.0 L/s @ 0.20 kPa resistance CO2 Absorber Resistance For a filled CO2 absorber, resistance at 1 L/sec flow = 0.14 kPa 8.14.4 CO2 Absorber Capacity CO2 absorber capacity is 1 Pre-Pak or 1500 mL. 8.14.5 Unidirectional Valve Opening Pressure Dry: 0.03 kPa opening pressure Wet: 0.05 kPa opening pressure. 8 - 20 046-003777-00 A5/A3™ Operating Instructions Product Specifications 8.15 Data Storage (Non-Volatile) and Recording Data Storage (Non-Volatile) and Recording Configuration Storage: A5/A3 anesthesia system supports one factory configuration group and one user configuration group. Each configuration has three patient size types: Adult, Pediatric, and Infant. Log Storage: 500 entries of alarm log 500 entries of activity log 500 entries of error log 500 entries of service log TABLE 8-30 Data Storage (Non-Volatile) and Recording A5/A3™ Operating Instructions 046-003777-00 8 - 21 Electromagnetic Capability 8.16 Product Specifications Electromagnetic Capability The A5/A3 meets the requirements of IEC 60601-1-2/EN 60601-1-2. NOTE: The A5/A3 needs special precautions regarding EMC and needs to be installed and put into service according to the EMC information provided below. NOTE: Portable and mobile RF communications equipment can affect the A5/ A3. See Table 8-31 on page 22 through Table 8-33 on page 23 that follow. GUIDANCE AND DECLARATION - ELECTROMAGNETIC EMISSION The A5/A3 is intended for use in the electromagnetic environment specified below. The customer or the user of the A5/A3 should assure that it is used in such an environment. EMISSIONS TEST COMPLIANCE ELECTROMAGNETIC ENVIRONMENT - GUIDANCE RF emissions CISPR 11 Group 1 The A5/A3 uses RF energy only for its internal function. Therefore, its RF emissions are very low and are not likely to cause any interference in nearby electronic equipment. RF emissions CISPR 11 Class B Conducted emissions CISPR 11 Class B The A5/A3 is suitable for use in all establishments other than domestic establishments and those directly connected to the public low-voltage power supply network that supplies buildings used for domestic purposes. Harmonic emissions IEC 61000-3-2 Class A Voltage fluctuations/ Flicker emissions IEC 61000-3-3 Complies TABLE 8-31 Guidance and Declaration - Electromagnetic Emission GUIDANCE AND DECLARATION - ELECTROMAGNETIC IMMUNITY The A5/A3 is intended for use in the electromagnetic environment specified below. The customer or the user of the A5/A3 should assure that it is used in such an environment. IMMUNITY TEST IEC 60601 TEST LEVEL COMPLIANCE LEVEL ELECTROMAGNETIC ENVIRONMENT - GUIDANCE Electrostatic discharge (ESD) IEC 61000-4-2 ±6 kV contact ±8 kV air ±6 kV contact ±8 kV air Floors should be wood, concrete or ceramic tile. If floors are covered with synthetic material, the relative humidity should be at least 30%. Electrical fast transient/burst IEC 61000-4-4 ±2 kV for power supply lines ±1 kV for input/ output lines ±2 kV for power supply lines ±1 kV for input/ output lines Mains power quality should be that of a typical commercial or hospital environment. TABLE 8-32 Guidance and Declaration - Electromagnetic Immunity 8 - 22 046-003777-00 A5/A3™ Operating Instructions Product Specifications Electromagnetic Capability GUIDANCE AND DECLARATION - ELECTROMAGNETIC IMMUNITY The A5/A3 is intended for use in the electromagnetic environment specified below. The customer or the user of the A5/A3 should assure that it is used in such an environment. IEC 60601 TEST LEVEL COMPLIANCE LEVEL ELECTROMAGNETIC ENVIRONMENT - GUIDANCE Surge IEC 61000-4-5 ±1 kV differential mode ±2 kV common mode ±1 kV differential mode ±2 kV common mode Mains power quality should be that of a typical commercial or hospital environment. Voltage dips, short interruptions and voltage variations on power supply input lines IEC 61000-4-11 <5% UT (>95% dip in UT ) for 0.5 cycle 40% UT (60% dip in <5% UT (>95% dip in UT ) for 0.5 cycle 40% UT (60% dip in UT ) for 5 cycles 70% UT (30% dip in UT ) for 5 cycles 70% UT (30% dip in Mains power quality should be that of a typical commercial or hospital environment. The A5/A3 requires continued operation during power mains interruptions and is therefore provided with batteries that supply uninterruptible power. UT ) for 25 cycles UT ) for 25 cycles <5% UT (>95% dip in UT ) for 5 sec <5% UT (>95% dip in UT ) for 5 sec 3 A/m 3 A/m IMMUNITY TEST Power frequency (50/60 Hz) magnetic field IEC 61000-4-8 Power frequency magnetic fields should be at levels characteristic of a typical location in a typical commercial or hospital environment. UT is the A.C. mains voltage prior to application of the test level. TABLE 8-32 (Continued) Guidance and Declaration - Electromagnetic Immunity GUIDANCE AND DECLARATION - ELECTROMAGNETIC IMMUNITY The A5/A3 is intended for use in the electromagnetic environment specified below. The customer or the user of the A5/A3 should assure that it is used in such an environment. IMMUNITY TEST IEC 60601 TEST LEVEL COMPLIANCE LEVEL ELECTROMAGNETIC ENVIRONMENT GUIDANCE Portable and mobile RF communications equipment should be used no closer to any part of the A5/A3 than the separation distance derived from the following calculations: Recommended separation distance Conducted RF IEC 61000-4-6 3 Vrms 150 kHz to 80 MHz outside ISM bands 10 Vrms 150 kHz to 80 MHz in ISM bands 3 Vrms d = 1.2 x P 10 Vrms TABLE 8-33 Guidance and Declaration - Electromagnetic Immunity A5/A3™ Operating Instructions 046-003777-00 8 - 23 Electromagnetic Capability Product Specifications GUIDANCE AND DECLARATION - ELECTROMAGNETIC IMMUNITY The A5/A3 is intended for use in the electromagnetic environment specified below. The customer or the user of the A5/A3 should assure that it is used in such an environment. IMMUNITY TEST IEC 60601 TEST LEVEL COMPLIANCE LEVEL Radiated RF IEC 61000-4-3 10 V/m 80 MHz to 2.5 GHz 2 Hz sine wave 80% AM modulation 10 V/m ELECTROMAGNETIC ENVIRONMENT GUIDANCE d = 1.2 x P 80 MHz to 800 MHz d = 2.3 x P 800 MHz to 2.5 GHz where P is the maximum output power rating of the transmitter in watts (W) according to the transmitter manufacturer and d is the recommended separation distance in meters (m). Field strengths from fixed RF transmitters, as determined by an electromagnetic site survey,a should be less than the compliance level in each frequency range.b Interference may occur in the vicinity of equipment marked with the following symbol: NOTE: At 80 MHz and 800 MHz, the higher frequency range applies. NOTE: These guidelines may not apply in all situations. Electromagnetic propagation is affected by absorption and reflection from structures, objects, and people. a b Field strengths from fixed transmitters, such as base stations for radio (cellular/cordless) telephones and land mobile radios, amateur radio, AM and FM radio broadcast, and Vt broadcast cannot be predicted theoretically with accuracy. To assess the electromagnetic environment due to fixed RF transmitters, an electromagnetic site survey should be considered. If the measured field strength in the location in which the A5/ A3 is used exceeds the applicable RF compliance level above, the A5/A3 should be observed to verify normal operation. If abnormal performance is observed, additional measures may be necessary, such as reorienting or relocating the A5/A3. Over the frequency range 150 kHz to 80 MHz, field strengths should be less than 3 V/m. TABLE 8-33 (Continued) Guidance and Declaration - Electromagnetic Immunity 8 - 24 046-003777-00 A5/A3™ Operating Instructions A.0 Accessories Accessory Kits............................................................................................................................................................................................. A-2 AGSS................................................................................................................................................................................................................. A-2 Breathing System..................................................................................................................................................................................... A-2 Breathing System..................................................................................................................................................................................... A-2 CO2 Absorbent Canister ...................................................................................................................................................................... A-3 Flow Sensor ................................................................................................................................................................................................. A-3 Gas Cylinder Accessories..................................................................................................................................................................... A-3 Gas Supply Hoses .................................................................................................................................................................................... A-3 Manuals and Reference Cards.......................................................................................................................................................... A-4 Mounting Accessories .......................................................................................................................................................................... A-4 Networking and USB Storage .......................................................................................................................................................... A-5 O2 Sensor ...................................................................................................................................................................................................... A-5 Vaporizers ..................................................................................................................................................................................................... A-5 A5/A3™ Operating Instructions 046-003777-00 A-1 Accessory Kits Accessories WARNING: Use only accessories specified in this chapter. Using other accessories may cause incorrect measured values or equipment damage. WARNING: Disposable accessories can not be reused. Reuse may degrade performance or cause cross-contamination. WARNING: Check the accessories and their packages for damage. Do not use them if any sign of damage is detected. WARNING: At the end of its service life, the equipment, as well as its accessories, must be disposed of in compliance with the guidelines regulating the disposal of such products, and in accordance with local regulations for contaminated and biologically hazardous items. The following accessories are designed for the A5/A3 Anesthesia System. The use of other accessories is not recommended. To place an order for these or other accessories, contact Customer Service at 1 (800)288-2121 or order accessories online at www.mindray.com. A.1 A.2 A.3 A-2 Accessory Kits PART NUMBER DESCRIPTION 0060-00-1912 A5 Anesthesia System Sales BOM 0060-00-1936 A3 Anesthesia System Sales BOM 115-009546-00 Kit, User Resource Kit AGSS PART NUMBER DESCRIPTION 801-0631-00098-00 Waste Gas Scavenger Assembly 801-0631-00074-00 AGSS Transfer Tube 801-0631-00078-00 Waste Gas Hose for Gas module to Quick Release Fitting Breathing System PART NUMBER DESCRIPTION 801-0631-00054-00 Bellows Dome, A Series 801-0631-00055-00 Bellows Assembly, A Series 801-0631-00057-00 Insp/Exp Connector, A Series 801-0631-00059-00 Insp/Exp Connector Rotary Cap, A Series 801-0631-00058-00 Water Trap, A Series 801-0631-00061-00 Check valve dome, A Series 801-0631-00104-00 Check valve, A Series 801-0631-00063-00 Bag Arm - Fixed Height, A Series 801-0631-00064-00 Airway pressure gauge, A Series 046-003777-00 A5/A3™ Operating Instructions Accessories A.4 A.5 A.6 A.7 CO2 Absorbent Canister CO2 Absorbent Canister PART NUMBER DESCRIPTION 801-0631-00066-00 CO2 Absorbent Canister, A Series 801-0631-00099-00 CO2 Bypass Assembly, A Series 801-0631-00092-00 CO2 Absorber Hose, A Series 801-0631-00100-00 CO2 Absorber Base with Drain Valve, A Series 0683-00-0325-01 CO2 Absorbent, Loose Fill (1) 0683-00-0325-12 CO2 Absorbent, Loose Fill (12) 0683-00-0326-01 CO2 Absorbent, Pre-Pak (1) 0683-00-0326-12 CO2 Absorbent, Pre-Pak (12) Flow Sensor PART NUMBER DESCRIPTION 801-0631-00056-00 Expiratory Flow Sensor Assembly, A Series 801-0631-00060-00 Inspiratory Flow Sensor Assembly, A Series Gas Cylinder Accessories PART NUMBER DESCRIPTION 0348-00-0185 Washer, Seal for Cylinder 801-0631-00079-00 Gas Cylinder Wrench (6700-0020-300) Gas Supply Hoses PART NUMBER DESCRIPTION (15 FOOT LENGTH) 0004-00-0077-11 O2 Gas Supply Hose, 15 ft, Ohmeda 0004-00-0077-12 O2 Gas Supply Hose, 15 ft, Chemetron 0004-00-0077-13 O2 Gas Supply Hose, 15 ft, Puritan Bennett 0004-00-0077-14 O2 Gas Supply Hose, 15 ft, DISS Female 0004-00-0078-11 N2O Gas Supply Hose, 15 ft, Ohmeda 0004-00-0078-12 N2O Gas Supply Hose, 15 ft, Chemetron 0004-00-0078-13 N2O Gas Supply Hose, 15 ft, Puritan Bennett 0004-00-0078-14 N2O Gas Supply Hose, 15 ft, DISS Female 0004-00-0079-11 Air Gas Supply Hose, 15 ft, Ohmeda 0004-00-0079-12 Air Gas Supply Hose, 15 ft, Chemetron 0004-00-0079-13 Air Gas Supply Hose, 15 ft, Puritan Bennett 0004-00-0079-14 Air Gas Supply Hose, 15 ft, DISS Female 0004-00-0080-13 VAC Gas Supply Hose, 15 ft, Ohmeda 0004-00-0080-14 VAC Gas Supply Hose, 15 ft, Chemetron A5/A3™ Operating Instructions 046-003777-00 A-3 Manuals and Reference Cards A.8 A.9 A-4 Accessories PART NUMBER DESCRIPTION (15 FOOT LENGTH) 0004-00-0080-15 VAC Gas Supply Hose, 15 ft, Puritan Bennett 0004-00-0080-16 VAC Gas Supply Hose, 15 ft, DISS Female 0004-00-0081-11 EVAC Gas Supply Hose, 15 ft, Ohmeda 0004-00-0081-12 EVAC Gas Supply Hose, 15 ft, Chemetron 0004-00-0081-13 EVAC Gas Supply Hose, 15 ft, Puritan Bennett 0004-00-0081-14 EVAC Gas Supply Hose, 15 ft, DISS Female 0004-00-0081-31 EVAC DISS to VAC Ohmeda Gas Supply Hose, 15 ft 0004-00-0081-32 EVAC DISS to VAC Chemetron Gas Supply Hose, 15 ft 0004-00-0081-33 EVAC DISS to VAC Puritan Bennett Gas Supply Hose, 15 ft 0004-00-0081-34 EVAC DISS to VAC DISS Female Gas Supply Hose, 15 ft Manuals and Reference Cards PART NUMBER DESCRIPTION 046-003777-02 A5/A3 Operations Manual (Hardcopy, English) 046-003777-01 A5/A3 Operations Manual (CD) 046-001764-05 A5/A3 Anomalies List 801-0631-00081-00 A5/A3 Pre-Operation Checklist (English) 801-0631-00082-00 A5/A3 Auxiliary O2/Air Reference Card Mounting Accessories PART NUMBER DESCRIPTION 0436-00-0169 Monitor Mounting Arm, Pivot, 12" 0386-00-0344 Mounting Kit, GM3 to GCX mount adapter plate 0040-00-0452 Mounting Kit, DPM6/7, T5 & T8 to GCX Mount Adapter Plate 115-009637-00 Kit for SMR to A5/A3 without Hooks 0436-00-0198 Monitor Mounting Arm, Pivot, 16" 0436-00-0258 Utility Tray, Two Pivot, 24" 045-000250-00 Writing Surface Insert (for Utility Tray) 0436-00-0259 Mount, Suction Canister 0992-00-0256 Regulator, Patient Suction 0436-00-0207 Mounting Arm, Suction Regulator 050-000702-00 Mounting Adapter Plate with Cable Hooks 115-011304-00 Cable Management Kit 115-004003-00 Mounting Kit for DPM7 Monitor 115-004004-00 Mounting Kit for DPM6 Monitor 046-003777-00 A5/A3™ Operating Instructions Accessories A.10 A.11 A.12 Networking and USB Storage Networking and USB Storage PART NUMBER DESCRIPTION 0012-00-1274-01 CAT 5 Ethernet Cable, Patch, STP, 6' (1.83m) 0012-00-1274-02 CAT 5 Ethernet Cable, Patch, STP, 25' (7.62m) 0012-00-1274-03 CAT 5 Ethernet Cable, Patch, STP, 50' (15.24m) 0012-00-1392-05 CAT 5 Ethernet Cable, Crossover, STP, 3’ (0.91 m) 0012-00-1392-06 CAT 5 Ethernet Cable, Crossover, STP, 6’ (1.83 m) 0012-00-1392-07 CAT 5 Ethernet Cable, Crossover, STP, 10’ (3.05 m) 0012-00-1392-08 CAT 5 Ethernet Cable, Crossover, STP, 20’ (6.10 m) 0992-00-0297-01 USB Storage Device, 2GB 0000-10-10751 USB Wired Mouse O2 Sensor PART NUMBER DESCRIPTION 040-001270-00 O2 Sensor, A Series 801-0631-00102-00 O2 Sensor Cable and Housing, A Series 801-0631-00091-00 O2 Sensor Cable, A Series Vaporizers PART NUMBER DESCRIPTION 0992-00-0148 Sevoflurane Vaporizer with Quick Fill Adapter 0004-00-0100 Sevoflurane Quick Fill Bottle Adapter 0992-00-0149 Isoflurane Vaporizer with Fill Adapter 0004-00-0101 Isoflurane Fill Bottle Adapter A5/A3™ Operating Instructions 046-003777-00 A-5 Vaporizers Accessories This page intentionally left blank. A-6 046-003777-00 A5/A3™ Operating Instructions B.0 Parameters and Factory Defaults Waveform/Spirometry Tabs (A5 Only) .........................................................................................................................................B-2 Alarm Limits .................................................................................................................................................................................................B-3 Setup Menu..................................................................................................................................................................................................B-4 Alarm Volume and Log .........................................................................................................................................................................B-6 Date and Time ............................................................................................................................................................................................B-6 Ventilation Modes ....................................................................................................................................................................................B-7 Linked Ventilation Parameter Relationships..........................................................................................................................B-12 Non-Linked Ventilation Parameter Relationships..............................................................................................................B-14 A5/A3™ Operating Instructions 046-003777-00 B-1 Waveform/Spirometry Tabs (A5 Only) B.1 B-2 Parameters and Factory Defaults Waveform/Spirometry Tabs (A5 Only) OBJECT RANGE DEFAULT Current selection saved when powered off Waveform/Spirometry Tab Waveform tab, Spirometry tab Waveform tab No Spirometry Tab: Loop Type Pressure, Flow Pressure No Spirometry Tab: Save Loop Reference, Baseline Reference No Spirometry Tab: Show Reference Off, Baseline, [time] Off No Spirometry Tab: Review Loops: Loop Type Pressure, Flow Pressure No 046-003777-00 A5/A3™ Operating Instructions Parameters and Factory Defaults B.2 Alarm Limits Alarm Limits PARAMETER RANGE DEFAULT UNIT Current selection saved when powered off Peak High The greater of 10 and (Paw Low+1) to 100 Step: 1 Adult: 50 Pediatric: 40 Infant: 40 cmH2O Yes Peak Low 0 to the lesser of 70 and (Paw High–1) Step: 1 Adult: 10 Pediatric: 8 Infant: 8 cmH2O Yes MV High The greater of 0.2 and (MV Low+0.1) to 25 Step: 0.1 Adult: 12 Pediatric: 6 Infant: 6 L/min Yes MV Low 0 to the lesser of 20 and (MV High–1) Step: 0.1 Adult: 1 Pediatric: 1 Infant: 0.2 L/min Yes FiO2 High The greater of 21 and (FiO2 Low+1) to 100, Off Step: 1 Off % Yes FiO2 Low 18 to the lesser of 98 and (FiO2 High–1) Step: 1 18 % Yes A5/A3™ Operating Instructions 046-003777-00 B-3 Setup Menu B.3 B-4 Parameters and Factory Defaults Setup Menu PARAMETER RANGE DEFAULT Current selection saved when powered off General Tab: Breathing System Warmer On, Warmer Off Warmer On No Display Tab: Pressure Display Mean, PLAT PLAT Yes Display Tab: Plimit Line On/Off On Yes Display Tab: Screen Brightness level 1-10 5 Yes Display Tab: Key Click Volume level 1-10 2 Yes System Tab: Language English, French, Spanish, Portuguese, Russian, Turkish, Dutch English Yes System Tab: Default Patient Size Adult, Pediatric, Infant Infant Yes System Tab: Network: This Machine: Configure Ethernet: IP Address 0 - 255 192.168.23.250 Yes System Tab: Network: This Machine: Configure Ethernet: Subnet 0 - 255 255.255.255.0 Yes System Tab: Network: This Machine: Configure Ethernet: Default Gateway 0 - 255 — Yes System Tab: Network: This Machine: Configure Serial: Baud Rate 4800, 9600, 57600, 115200 9600 Yes System Tab: Network: This Machine: Configure Serial: Flow Control Off, On Off Yes System Tab: Network: This Machine: Configure Serial: Parity Odd, Even, None None Yes System Tab: Network: This Machine: Configure Serial: Data Bits 8, 7, 6, 5 8 Yes System Tab: Network: This Machine: Configure Serial: Stop Bits 2, 1.5, 1 1 Yes System Tab: Network: Network Protocol: HL7 On, Off Off Yes 046-003777-00 A5/A3™ Operating Instructions Parameters and Factory Defaults Setup Menu PARAMETER RANGE DEFAULT Current selection saved when powered off System Tab: Network: Network Protocol: Interval 10 sec, 30 sec, 1 min, 5 min, 30 min, 1 hr, 2 hr, 6 hr, 12 hr, 24 hr 1 min Yes System Tab: Network: Network Protocol: Destination IP — 192.168.23.200 Yes System Tab: Network: Network Protocol: Port Configuration 0 - 65535 1550 Yes System Tab: Network: SNTP Protocol: Interval 10 sec, 30 sec, 1 min, 5 min, 30 min, 1 hr, 2 hr, 6 hr, 12 hr, 24 hr Off Yes System Tab: Network: SNTP Protocol: Primary Server IP 0 - 255 132.163.4.103 Yes System Tab: Network: SNTP Protocol: Secondary Server IP 0 - 255 210.72.145.44 Yes A5/A3™ Operating Instructions 046-003777-00 B-5 Alarm Volume and Log B.4 B.5 B.6 B-6 Parameters and Factory Defaults Alarm Volume and Log PARAMETER RANGE DEFAULT Current selection saved when powered off Alarm Volume level 1-10 5 Yes System Alerts Volume level 1-10 2 Yes Alarm Log Filter High, Medium, Low, All All Yes Date and Time PARAMETER RANGE DEFAULT Current selection saved when powered off Day 1-31 1 Yes Month 1-12 1 Yes Year 2009-2099 2009 Yes Hour — 00 (24 hr) 12 am (12 hr) Yes Minute 00-60 00 Yes AM/PM AM/PM AM Yes 12/24 hour 12, 24 12 Yes Date format — YYYY-MM-DD Yes Demographics PARAMETER RANGE DEFAULT Current selection saved when powered off Day (DOB) 1-31 — Yes Month (DOB) 1-12 — Yes Year (DOB) 1900-2099 — Yes Weight Units lbs, kg lbs Yes Weight Range 0-660 lbs 0-300 kg — Yes 046-003777-00 A5/A3™ Operating Instructions Parameters and Factory Defaults B.7 Ventilation Modes Ventilation Modes OBJECT RANGE DEFAULT Current selection saved when powered off Ventilation Mode Tab VCV, SIMV-VC, PCV, SIMV-PC*, PS VCV Yes * SIMV-PC available only on A5. VENTILATION MODE PARAMETERS Manual Bypass**, Alarms VCV Vt, Rate, I:E, Tpause, PEEP, Plimit SIMV-VC Vt, Rate, Tinsp, Tpause, PEEP, Plimit, PS(On/Off ), P, Trigger, Tslope, PCV VtG**, PlimVG**, Pinsp, Rate, I:E, PEEP, Tslope SIMV-PC** Pinsp, Rate, Tinsp, PS(On/Off ), P, Trigger, PEEP, Tslope PS Min Rate, P, Trigger, PEEP, Tslope, Apnea Ti ** SIMV-PC, VtG, PlimVG, and Bypass are available only on A5. A5/A3™ Operating Instructions 046-003777-00 B-7 VCV SIMV-VC PCV SIMV-PC PS MANUAL Vt Range: 20 to 1500 mL Step: 1 Range: 20 to 1500 mL Step: 1 — — — — Defaults: Adult: 600 mL Pediatric: 120 mL Infant: 20 mL Defaults: Adult: 600 mL Pediatric: 120 mL Infant: 20 mL — — Range: 20 to 1500 mL Step: 1 — — — VtG (A5 only) Ventilation Modes B-8 PARAMETER Default: Off 046-003777-00 VG (A5 only) — — Default: Off — — — Rate Range: 4 to 100 bpm Step: 1 bpm Range: 4 to 100 bpm Step: 1 bpm Range: 4 to 100 bpm Step: 1 bpm Range: 4 to 100 bpm Step: 1 bpm — — Defaults: Adult: 8 bpm Pediatric: 15 bpm Infant: 20 bpm Defaults: Adult: 8 bpm Pediatric: 15 bpm Infant 20 bpm Defaults: Adult: 8 bpm Pediatric: 15 bpm Infant: 20 bpm Defaults: Adult: 8 bpm Pediatric: 15 bpm Infant: 20 bpm — — — — Range: 2 to 60 bpm Step: 1 bpm — Min. Rate I:E Range: 1:8 to 4:1 Step: 0.5 Default: 1:2 — Range: 1:8 to 4:1 Step: 0.5 Default: 1:2 — — — Parameters and Factory Defaults A5/A3™ Operating Instructions Defaults: Adult: 4 bpm Pediatric: 6 bpm Infant: 12 bpm VCV SIMV-VC PCV SIMV-PC PS MANUAL Tinsp — Range: 0.2 to 5 sec Step: 0.1 sec — Range: 0.2 to 5 sec Step: 0.1 sec — — — — Defaults: Adult: 2.0 sec Pediatric: 1.0 sec Infant: 1.0 sec Pinsp Tpause 046-003777-00 Plimit PlimVG(A5 only) — — Range: Off, 5% to 60% Step: 1% Range: Off, 5% to 60% Step: 1% Default: 10% Default: 10% Range: 10 to 100 cmH2O Step: 1 cmH2O Range: 10 to 100 cmH2O Step: 1 cmH2O Defaults: Adult: 50 cmH2O Pediatric: 40 cmH2O Infant: 20 cmH2O Defaults: Adult: 50 cmH2O Pediatric: 40 cmH2O Infant: 20 cmH2O — — Defaults: Adult: 2.0 sec Pediatric: 1.0 sec Infant: 1.0 sec Range: PEEP+5 to 70 cmH2O Step: 1 cmH2O Range: PEEP+5 to 70 cmH2O Step: 1 cmH2O Defaults: Adult: 15 cmH2O Pediatric: 10 cmH2O Infant: 10 cmH2O Defaults: Adult: 15 cmH2O Pediatric: 10 cmH2O Infant: 10 cmH2O — — — — — — — — Range: 5 - 100 cmH2O Step: 1 cmH2O — — — — Parameters and Factory Defaults A5/A3™ Operating Instructions PARAMETER Default: Pinsp PEEP Range: Off, 3 to 30 cmH2O Step: 1 cmH2O Range: Off, 3 to 30 cmH2O Step: 1 cmH2O Range: Off, 3 to 30 cmH2O Step: 1 cmH2O Range: Off, 3 to 30 cmH2O Step: 1 cmH2O Default: Off Default: Off Default: Off Default: Off Default: Off B-9 Ventilation Modes Range: Off, 3 to 30 cmH2O Step: 1 cmH2O VCV SIMV-VC PCV SIMV-PC PS MANUAL ΔP — Range: 3 to 50 cmH2O Step: 1 — Range: 3 to 50 cmH2O Step: 1 Range: 3 to 50 cmH2O Step: 1 — Defaults: Adult: 8 cmH2O Pediatric: 5 cmH2O Infant: 5 cmH2O Defaults: Adult: 8 cmH2O Pediatric: 5 cmH2O Infant: 5 cmH2O Range: 1 to 15 L/min Step: 1 Range: 1 to 15 L/min Step: 1 Defaults: Adult: 3 L/min Pediatric: 2 L/min Infant: 2 L/min Defaults: Adult: 3 L/min Pediatric: 2 L/min Infant: 2 L/min Defaults: Adult: 8 cmH2O Pediatric: 5 cmH2O Infant: 5 cmH2O Trigger — Range: 1 to 15 L/min Step: 1 — Defaults: Adult: 3 L/min Pediatric: 2 L/min Infant: 2 L/min Tslope * 046-003777-00 PS — — Bypass (A5 only) — — Range: 0.0 to 2.0 sec Step: 0.1 sec Range: 0.0 to 2.0 sec Step: 0.1 sec Range: 0.0 to 2.0 sec Step: 0.1 sec Range: 0.0 to 2.0 sec Step: 0.1 sec Default: 0.2 sec Default: 0.2 sec Default: 0.2 sec Default: 0.2 sec Range: On, Off Step: — — Range: On, Off Step: — — — — Range: On, Off Step: — Default: Off — Ventilation Modes B - 10 PARAMETER — Default: Off — — Default: Off Alarm — — — — — Range: On, Off Step: — Apnea Ti — — — — Range: 0.2 to 5.0 sec Step: 0.1 sec Default: 5.0 sec (adult) 3.0 sec (Pediatric) 2.0 sec (Infant) * The Tslope setting is an approximation. The exact waveform shape may not be realized under certain clinical scenarios. — Parameters and Factory Defaults A5/A3™ Operating Instructions Default: On Parameters and Factory Defaults B.8 Linked Ventilation Parameter Relationships Linked Ventilation Parameter Relationships The table below lists how parameter values are affected when changing ventilation modes. For example, ventilation modes that share the same parameters may also share the same parameter values when changing from one ventilation mode to the other. Other parameters may have their values set differently when changing ventilation modes. CURRENT VENTILATION MODE & PARAMETERS AFFECTED VCV SIMV-VC PCV * *** PREVIOUS VENTILATION MODE VCV SIMV-VC PCV SIMV-PC PS Vt — * Measured Vt or last value * * Rate — * * * * I:E — * * * * Tpause — * * * * PEEP — * * * * Plimit — * * * * Vt * — Measured Vt or last value * * Rate * — * * * Tinsp * — * * * Tpause * — * * * PEEP * — * * * Plimit * — * * * PS * — * * PS = On ΔP * — * * * Trigger * — * * * Tslope * — * * * VtG*** * * — * * Pinsp PLAT or 80% PEAK or last value * — * * Rate * * — * * I:E * * — * * PEEP * * — * * PlimVG*** If VtG=OFF, then Pinsp. If VtG is a value, then last value of PlimVG. If VtG=OFF, then Pinsp. If VtG is a value, then last value of PlimVG. — If VtG=OFF, then Pinsp. If VtG is a value, then last value of PlimVG. If VtG=OFF, then Pinsp. If VtG is a value, then last value of PlimVG. Tslope * * — * * The parameter value is shared between the previous and current ventilation modes. Available on A5 only. A5/A3™ Operating Instructions 046-003777-00 B - 11 Linked Ventilation Parameter Relationships CURRENT VENTILATION MODE & PARAMETERS AFFECTED SIMVPC*** PS * *** B - 12 Parameters and Factory Defaults PREVIOUS VENTILATION MODE VCV SIMV-VC PCV SIMV-PC PS Pinsp PLAT or 80% PEAK or last value * * — * Rate * * * — * Tinsp * * * — * PS * * * — PS = On ΔP * * * — * Trigger * * * — * PEEP * * * — * Tslope * * * — * Min Rate * * * * — ΔP * * * * — Trigger * * * * — Peep * * * * — Tslope * * * * — Apnea Ti * * * * — The parameter value is shared between the previous and current ventilation modes. Available on A5 only. 046-003777-00 A5/A3™ Operating Instructions Parameters and Factory Defaults B.9 Non-Linked Ventilation Parameter Relationships Non-Linked Ventilation Parameter Relationships VENTILATION MODE Parameter VCV Rate Parameter Relationship Equation(s) 4 ≤ Rate ≤ 100 Vt 20 ≤ Vt ≤ 1500 Plimit SIMV-VC Plimit ≥ PEEP+5 10 ≤ Plimit ≤ 100 Rate 4 ≤ Rate ≤ 100 Vt 20 ≤ Vt ≤ 1500 A5/A3™ Operating Instructions ΔP ΔP ≤ Plimit-PEEP 3 ≤ ΔP ≤ 50 Plimit Plimit ≥ PEEP+5 Plimit ≥ ΔP+PEEP 10 ≤ Plimit ≤ 100 046-003777-00 B - 13 Non-Linked Ventilation Parameter Relationships Parameters and Factory Defaults VENTILATION MODE Parameter PCV Rate Parameter Relationship Equation(s) 4 ≤ Rate ≤ 100 VtG If VtG is not Off. 20 ≤ Vt ≤ 1500 SIMV-PC (A5 ONLY) Pinsp (A5 only) Pinsp ≥ PEEP+5 5 ≤ Pinsp ≤ 70 PlimVG (A5 only) PlimVG ≥ PEEP+5 5 ≤ PlimVG ≤ 100 Rate 4 ≤ Rate ≤ 100 Pinsp B - 14 Pinsp ≥ PEEP+5 5 ≤ Pinsp ≤ 70 046-003777-00 A5/A3™ Operating Instructions C.0 Pneumatic Diagram Pneumatic Diagram of the A5/A3 System ................................................................................................................................C-2 A5/A3™ Operating Instructions 046-003777-00 C-1 Pneumatic Diagram of the A5/A3 System 35 36 34 33 32 28 29 Vaporizer 26 25 Flow 50 Flow 57 23 6 4 2 1 3 5 51 30 44 7 7 8 8 7 8 22 23 23 9 24 10 20 56 11 15 ORC 16 17 Flow 12 Flow P 55 49 13 52 27 19 14 18 21 46 45 41 NO NC 42 33 31 40 43 39 O2 P 53 Flow 47 38 Flow 48 AGSS 37 Pneumatic Diagram of the A5/A3 System 54 C.1 Pneumatic Diagram FIGURE C-1 Pneumatic Diagram of the A5/A3 System C-2 046-003777-00 A5/A3™ Operating Instructions Pneumatic Diagram Pneumatic Diagram of the A5/A3 System NO. DESCRIPTION NO. DESCRIPTION 1. O2 Gas Pipeline Connection 30. Auxiliary Air Flowmeter 2. O2 Gas Cylinder Connection 31. Inspiratory Check Valve 3. N2O Gas Pipeline Connection 32. Sodalime Absorber Canister 4. N2O Gas Cylinder Connection 33. Bypass Valve 5. Air Gas Pipeline Connection 34. O2 Sensor 6. Air Gas Cylinder Connection 35. Airway Pressure Gauge 7. Gas Cylinder Pressure Regulator (400kPa) 36. Inspiratory Flow Sensor 8. Pressure Relief Valve (758kPa) 37. Patient Connector 9. Drive Gas Inlet Filter 38. Expiratory Flow Sensor 10. Pressure Regulator (200kPa) 39. Water Trap 11. Inspiratory Flow Control Valve 40. Expiratory Check Valve 12. Inspiratory Flow Sensor 41. Auto/Manual Bag Switch 13. Safety Valve (110 cmH2O) 42. Breathing Bag 14. Pop-off Valve 43. APL Valve 15. PEEP Safety Valve 44. Auxiliary O2 Gas Power Outlet (A5 only) 16. Drive Gas Pressure Switch (140kPa) 45. Bellows 17. PEEP Proportional Valve 46. Pressure Relief Valve (1kPa, 10 cmH2O) 18. Exhaust Valve 47. Negative Pressure Check Valve (1 cmH2O) 19. Flow Restrictor 48. Gas Container 20. O2 Flush Valve 49. Pressure Sensor 21. Flow Restrictor 50. Total Flowmeter 22. O2 Pressure Switch (220kPa) 51. Auxiliary Oxygen Flowmeter 23. Pressure Regulating Valve (220kPa) 52. Free Breathing Check Valve 24. System Switch 53. Pressure Sensor 25. Oxygen Ratio Controller (ORC) 54. AGSS 26. Flow Control and Electronic Display Module 55. Check Valve 27. Dual Vaporizer Block 56. Back pressure valve 28. Check Valve 57. Flow compensation valve 29. Pressure Relief Valve (37.9kPa) A5/A3™ Operating Instructions 046-003777-00 C-3 Pneumatic Diagram of the A5/A3 System Pneumatic Diagram This page intentionally left blank. C-4 046-003777-00 A5/A3™ Operating Instructions D.0 Abbreviations, Symbols, and Units of Measure Abbreviations, Symbols, and Units of Measure Abbreviations .............................................................................................................................................................................................D-2 Symbols .........................................................................................................................................................................................................D-3 Units of Measure ......................................................................................................................................................................................D-4 Attention Symbols ..................................................................................................................................................................................D-5 A5/A3™ Operating Instructions 046-003777-00 D-1 Abbreviations D.1 D-2 Abbreviations, Symbols, and Units of Measure Abbreviations ABBREVIATION DESCRIPTION AA anesthetic agent AG anesthetic gas AGSS anesthetic gas scavenging system APL airway pressure limit Apnea Ti inspiratory time for apnea backup breaths BTPS body temperature and pressure, saturated C compliance (Cdyn) CO2 carbon dioxide FiO2 fractional concentration of oxygen in inspired gas Flow flow I:E ratio of inspiration time to expiration time MEAN mean pressure Min Rate minimum breath rate MV minute volume N2O nitrous oxide O2 oxygen Pinsp pressure control level of inspiration Plimit pressure limit level PlimVG pressure limit level of volume guarantee PAW airway pressure PCV pressure control ventilation PEAK peak pressure PEEP positive end-expiratory pressure PLAT plateau pressure PS pressure support ΔP pressure support level added to PEEP R resistance Rate breath rate SIMV-PC synchronized intermittent mandatory ventilation - pressure control SIMV-VC synchronized intermittent mandatory ventilation - volume control SP Spontaneous breathing Tinsp time of inspiration Tpause percentage of inspiratory plateau time in inspiratory time Tslope time for the pressure to rise to target pressure Trigger trigger sensitivity Vt tidal volume VtG tidal volume guarantee VCV volume control ventilation VG volume guarantee control 046-003777-00 A5/A3™ Operating Instructions Abbreviations, Symbols, and Units of Measure D.2 Symbols Symbols SYMBOL DESCRIPTION SYMBOL DESCRIPTION - minus > greater than % percent ≤ less than or equal to / per, divide, or ≥ greater than or equal to ≈ approximately ± plus or minus ^ power × multiply + plus © copyright = equal to ™ trademark < less than ® registered trademark A5/A3™ Operating Instructions 046-003777-00 D-3 Units of Measure D.3 D-4 Abbreviations, Symbols, and Units of Measure Units of Measure UNIT OF MEASURE DESCRIPTION UNIT OF MEASURE DESCRIPTION A Ampere, Amp m meter Ah Amp hour mAh microAmp hour bpm breath per minute mbar mbar °C degree Celsius mg milligram cc cubic centimeter min minute cm centimeter ml, mL milliliter cmH2O centimeter of water mm millimeter dB decibel mmHg millimeter of mercury °F Fahrenheit ms millisecond g gram mV milliVolt hr hour mW milliWatt Hz Hertz ppm part per million hPa hectoPascal s, sec second inch inch V Volt k kilo VA Volt Amp kg kilogram VAC Volts alternating current kPa kiloPascal Ω Ohm psi pound-force per square inch μA microAmp L, l liter μV microVolt lb pound W Watt nm nanometer 046-003777-00 A5/A3™ Operating Instructions Abbreviations, Symbols, and Units of Measure D.4 Attention Symbols Attention Symbols The following figures provide descriptions of symbols of Attention that are used on the device and/or within this manual. 02. 01. FIGURE D-1 Main Unit (Front View) A5/A3™ Operating Instructions 046-003777-00 D-5 Attention Symbols Abbreviations, Symbols, and Units of Measure ATTENTION! NUMBER DESCRIPTION 01 Total Flowmeter: The total flowmeter is calibrated based on 100% O2. The accuracy of the flowmeter may degrade with other gas or mixed gas. When viewing the readings on the total flowmeter, keep your visual angle at the same level of the float. The reading of the scale may vary when viewed at a different angle. If the readings shown on the electronic flowmeters differ from that on the total flowmeter, the electronic flowmeter will prevail and the total flowmeter is an approximate value. 02 Only vaporizers with Selectatec Interlock-Systems may be used with the A5/A3 unit. Use vaporizers compliant to ISO 8835-4. See section A.12 (pg. A-5) "Vaporizers". Refer to the manufacturer’s vaporizer Instructions For Use for filling or draining the vaporizer and other information. Use care in lifting and manipulating vaporizers during the mounting process as their weight may be greater than expected, based on their size and shape. D-6 046-003777-00 A5/A3™ Operating Instructions Abbreviations, Symbols, and Units of Measure Attention Symbols 04. 03. 05. FIGURE D-2 Main Unit (Rear View) ATTENTION! NUMBER DESCRIPTION 03 Each auxiliary outlet is rated at 100 to 120 VAC @ 60 Hz. 04 Individual outlet current is limited to 3 A. Total mains output current is limited to 10 A. 05 Sample Line Exhaust Gas Inlet: Inlet for waste gas from an optionally attached gas module. Merges with the AGSS connector that connects to the AGSS. A5/A3™ Operating Instructions 046-003777-00 D-7 Attention Symbols Abbreviations, Symbols, and Units of Measure 06. 08. 07. FIGURE D-3 Main Unit (Left View) ATTENTION! NUMBER D-8 DESCRIPTION 06 Auxiliary O2/Air Gas Outlet: Nozzle (barbed connector) for auxiliary O2/Air output. Combines the auxiliary O2/Air flowmeters into a single output. 07 Maximum supporting weight: 25 kg at a maximum distance of 0.31 m 08 Warning: Hot 046-003777-00 A5/A3™ Operating Instructions Abbreviations, Symbols, and Units of Measure Attention Symbols 09. 11. 10. FIGURE D-4 Main Unit (Right View) ATTENTION! NUMBER DESCRIPTION 09 Maximum supporting weight: 25 kg at a maximum distance of 0.31 m 10 Maximum supporting weight: 25 kg at a maximum distance of 0.31 m 11 Maximum supporting weight: 25 kg at a maximum distance of 0.31 m A5/A3™ Operating Instructions 046-003777-00 D-9 Attention Symbols Abbreviations, Symbols, and Units of Measure Rear 12. Front FIGURE D-5 Main Unit (Top View) D - 10 ATTENTION! NUMBER DESCRIPTION 12 Top Shelf: 40 kg MAX. 88 lbs MAX. 046-003777-00 A5/A3™ Operating Instructions Abbreviations, Symbols, and Units of Measure Attention Symbols 14. 15. 13. FIGURE D-6 Breathing System (Top View) ATTENTION! NUMBER DESCRIPTION 13 Do not push down on the bag arm forcefully or hang heavy objects onto it. Excessive weight may bend and damage the bag arm. 14 Autoclavable up to 134°C. Polyphenylsulfone (PPSU). 15 APL Valve: The APL valve and PAW gauge numerics are for reference only. Calibrated patient airway pressure is displayed on the user interface. A5/A3™ Operating Instructions 046-003777-00 D - 11 Attention Symbols Abbreviations, Symbols, and Units of Measure 17. 16. FIGURE D-7 Breathing System (Left View) ATTENTION! NUMBER DESCRIPTION 16 134°C >PPSU<. Autoclavable up to 134°C. Operating the A5/A3 with a full water trap in the breathing system block does not allow the water to condense appropriately. The trap should be removed and emptied when filled with water. Operating without a water trap will cause the Leak Test to fail. 17 D - 12 Bellows Dome: The bellows dome is a transparent cover with graduation marks from 300 to 1500. These marks are for qualitative purposes only. Tidal volume (VT) should be read exclusively from the display of the user interface. Delivered tidal volume (VT) is a combination of bellows displacement and fresh gas flow. 046-003777-00 A5/A3™ Operating Instructions Abbreviations, Symbols, and Units of Measure Attention Symbols This page intentionally left blank. A5/A3™ Operating Instructions 046-003777-00 D - 13 046-003777-00 Rev B October 4, 2012 Mindray DS USA, Inc. • 800 MacArthur Boulevard • Mahwah, NJ 07430 • USA • Dom. Customer Service: 1.800.288.2121 • Intl. Customer Service: +1.201.995.8000 • Dom. Fax: 1.800.926.4275 • Intl. Fax: +1.201.995.8680 • www.mindray.com Mindray Medical Netherlands B.V.• Drs. W. van Royenstraat 8 • P.O. Box 26 • 3870 CA Hoevelaken • The Netherlands • Tel: +31 33 25 44 911 • Fax: +31 33 25 37 621 Mindray (UK) Limited • 3 Percy Road • St. John’s Park • Huntingdon • Cambridgeshire PE29 6SZ • United Kingdom • Tel: 01480 416840 • Fax: 01480 436588 Mindray Medical France SARL • Europarc Créteil •123, Chemin des Bassins • 94035 Créteil Cedex • France • Tel: (0)1.45.13.91.50 • Fax: (0)1.45.13.91.51 Mindray Medical Germany GmbH • Zwischen den Bächen 4 • 64625 Bensheim • Deutschland • Tel: +49.6251.17524-0 • Fax: +49.6251.17524-20 Mindray Medical International Ltd. • 2813 Office Tower, Convention Plaza • No 1 Harbour Road • Wanchai • Hong Kong • Tel: +852 2793 5596 • Fax: +852 2344 8824 Medstar Importação e Exportação Ltda • Av. Vereador José Diniz, 3300 • São Paulo, SP • CEP 04804-000 • Brazil • Tel: 55 11 2872-3385 • Fax: 55 11 2872-3385 0002-08-8918